

- To link StoreCRM and LINE, please do the following
- When linked to LINE, LINE messages can be delivered to customers at the appropriate time.
- When to deliver the LINE message,ScenarioThis can be set in the
- Functions available after linking with LINE
- Watch the video to set up
- See the manual and set it up.
- Configure guidance for LINE login errors
- Configure LINE integration tracking (classic customer accounts only)
- Set up the LINE and profile membership cards
Functions available after linking with LINE
StoreCRM(Shopify App Store)
StoreCRM for LINE | The definitive Shopify and LINE integration app
How to install an icon for LINE ID linkage on your Shopify store
How to enable Shopify membership registration and login with LINE Login
Necessary for attracting customers! Comparing 4 Shopify LINE ID linked apps with many benefits
How to manage customers on LINE | 10 recommended CRM tools
Watch the video to set up
See the manual and set it up.
|
Create a LINE Official Account
If you already have a LINE Official Account, you can skip this item. If you do not have a LINE Official Account yet, register for a LINE Business ID and then create one.
If you do this from the Messaging API settings,LINE Official Account ManagerPlease open the corresponding LINE Official Account.
Register a LINE Business ID
In this article, we will explain how to register your LINE Business ID.
If you have already registered your LINE Business ID, you can skip this step.
1. Official LINE AccountAccess → Click [Start a LINE Official Account].
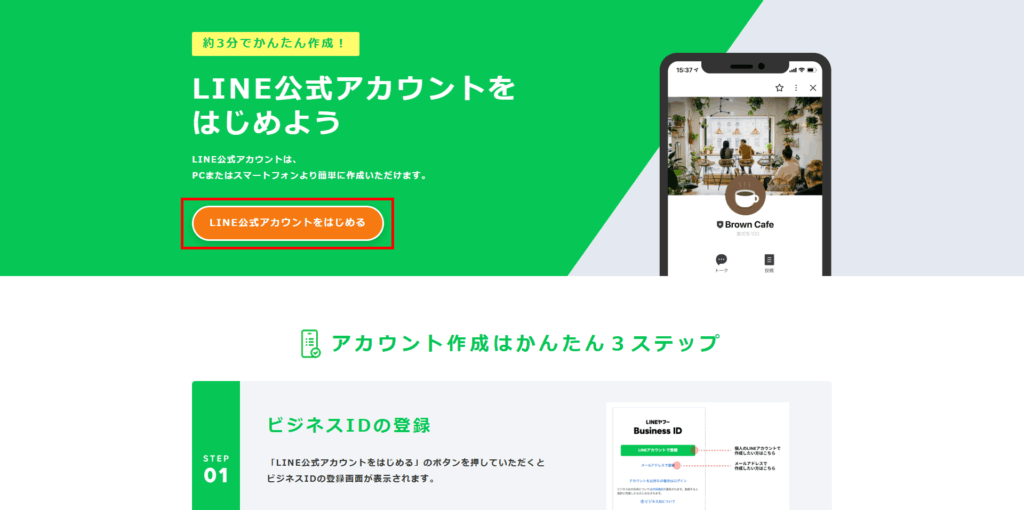
2. Click [Register with email address].
- Here we will explain how to register using your email address. If you want to register with a LINE account, click [Register with a LINE account].
- If you already have an account, please see step 4.
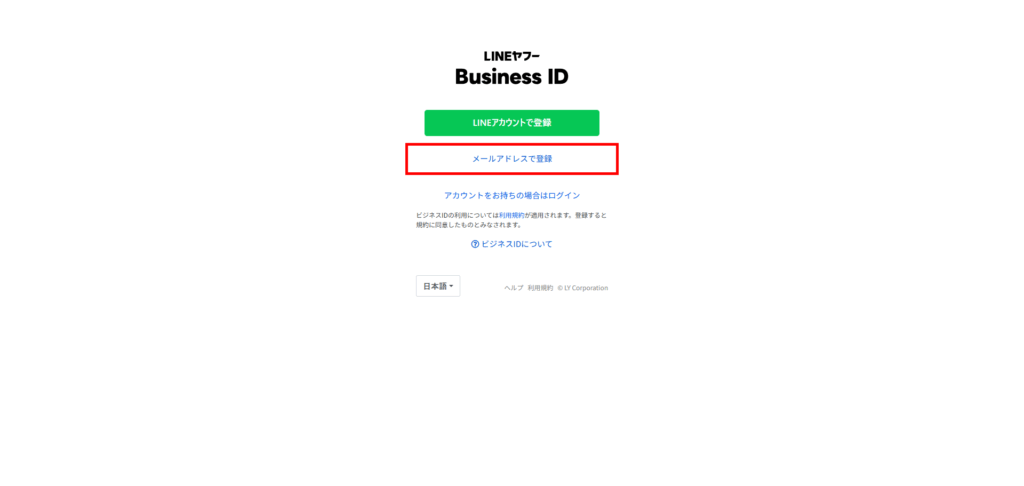
3. Enter your email address → click [Send registration link].
A registration link will be sent to your email address; click on it to complete your registration.
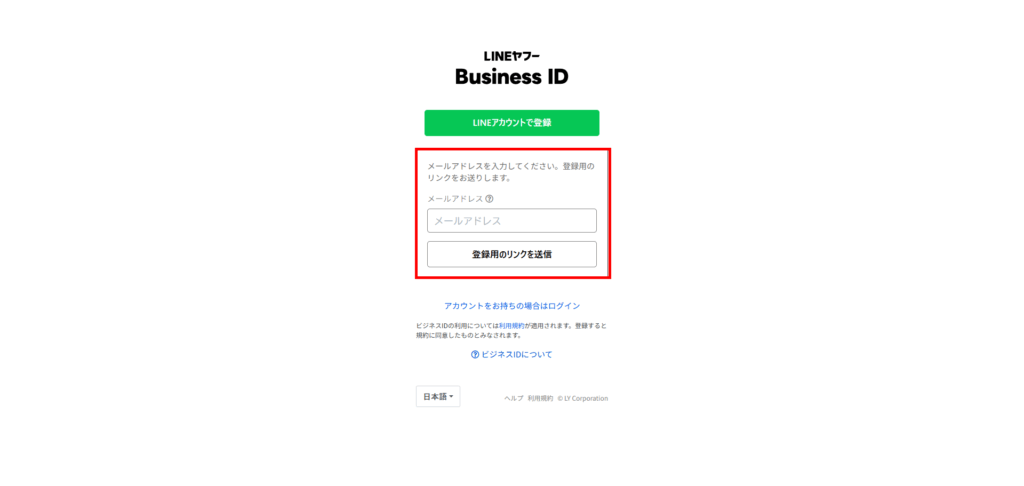
4. Click [If you already have an account, log in].
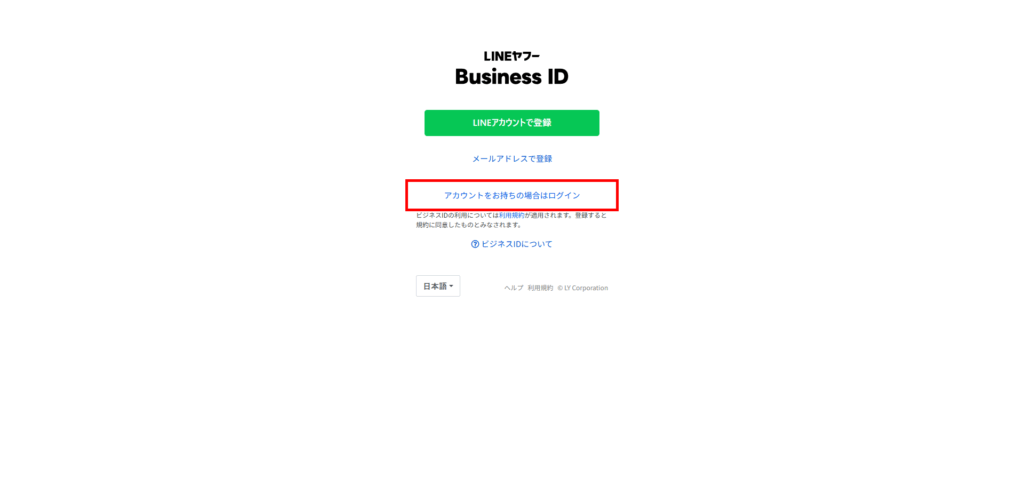
Create a LINE Official Account
This article explains how to create a LINE Official Account and move to the LINE Official Account Manager home screen.
If you already have a LINE Official Account, you can safely skip this step.
1. Please enter your store's official account.
As an example, enter "StoreCRM Official Account" as the account name.
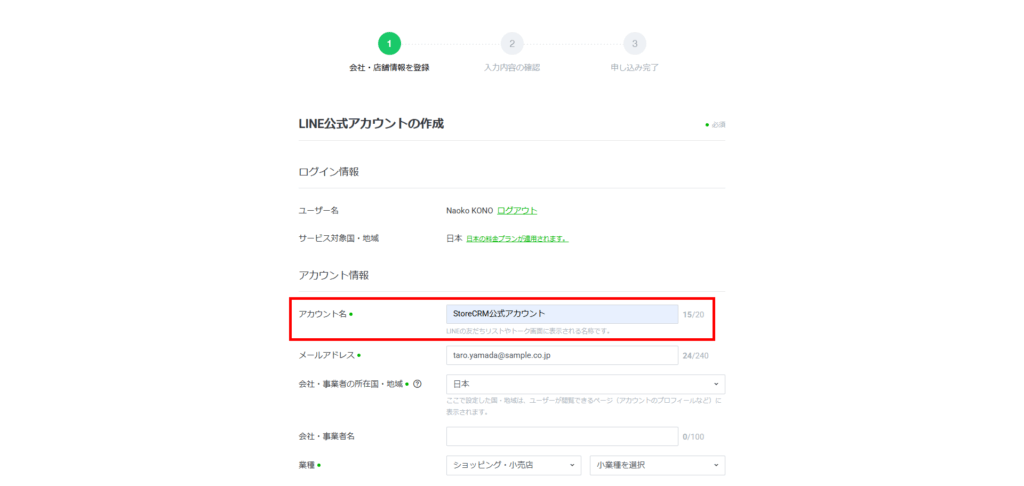
2. Select your store's industry type.
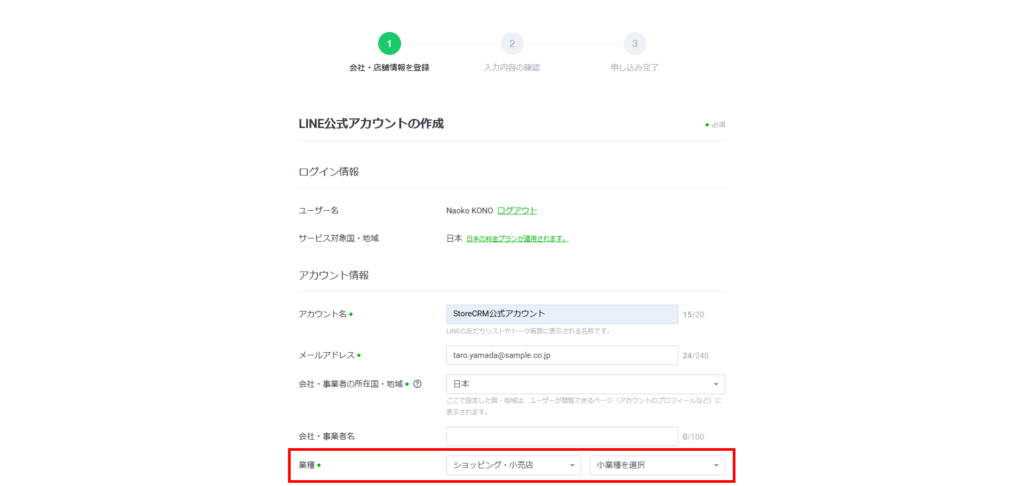
3. Please select the purpose of your account.

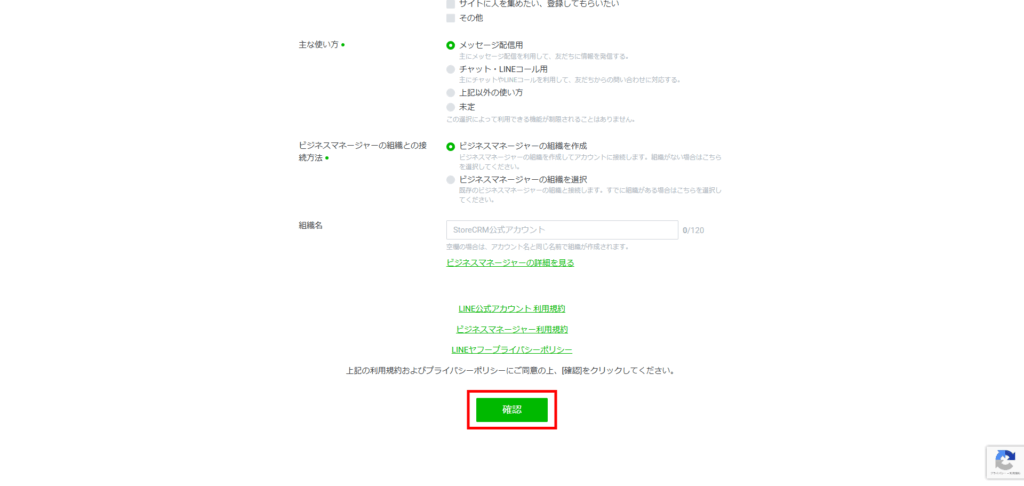
4. Please select the primary use of your account.
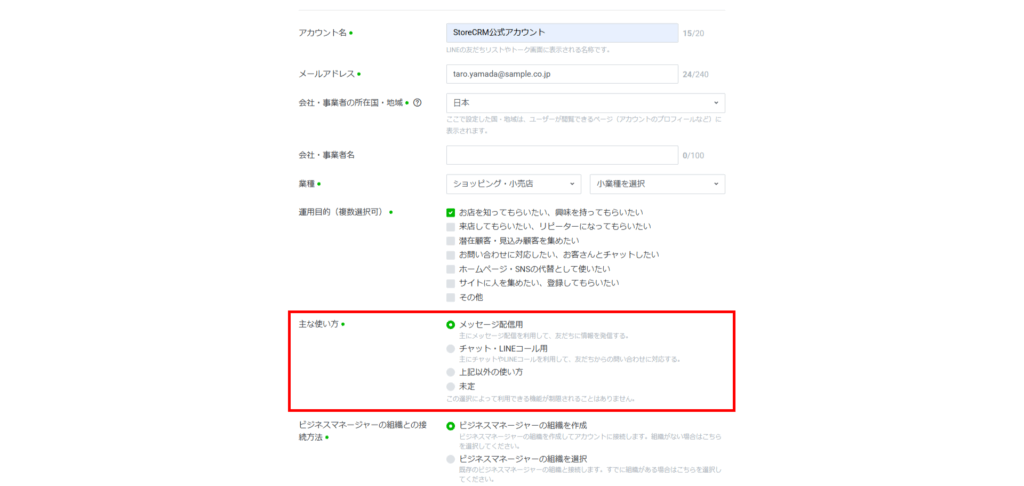
5. Choose how your Business Manager will connect with your organization.
For business managers,here for more information.
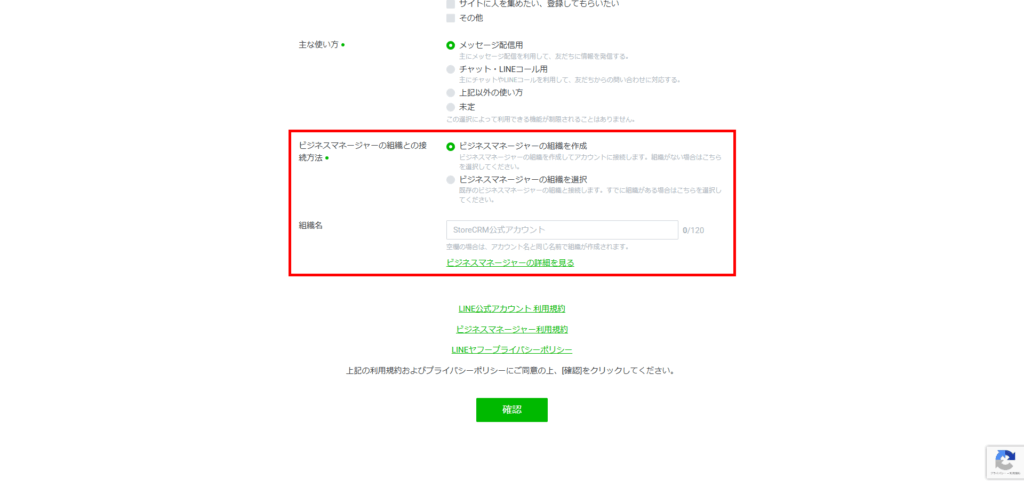
6. Click Confirm.
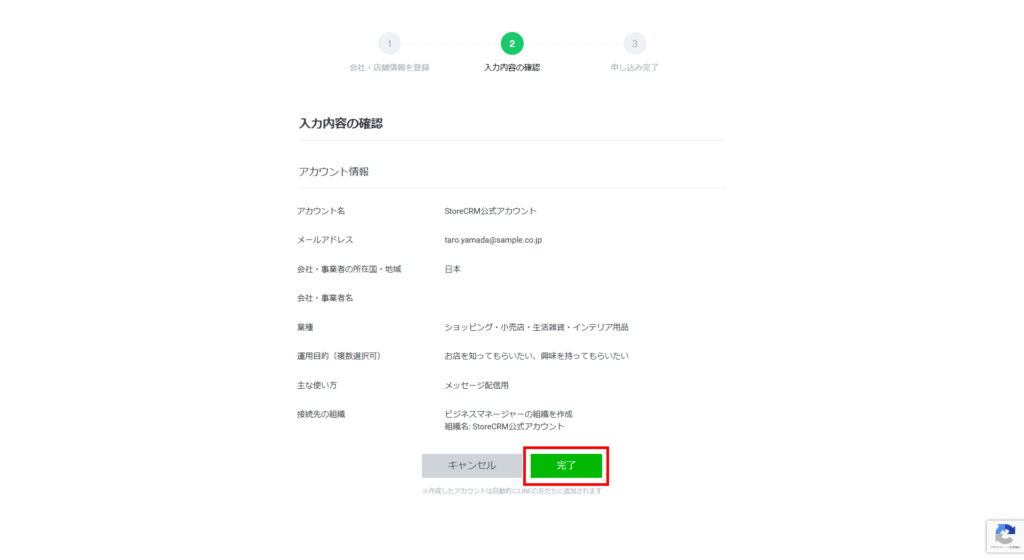
7. Click Finish.
8. Click [Authenticate later].
Account verificationIf you would like to do so, please click Request Account Verification.

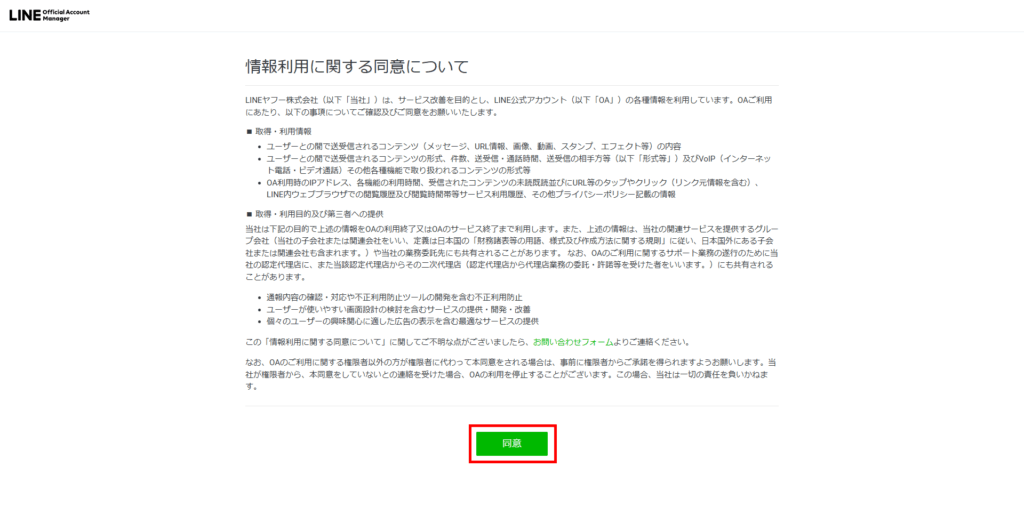
9. Click Agree.
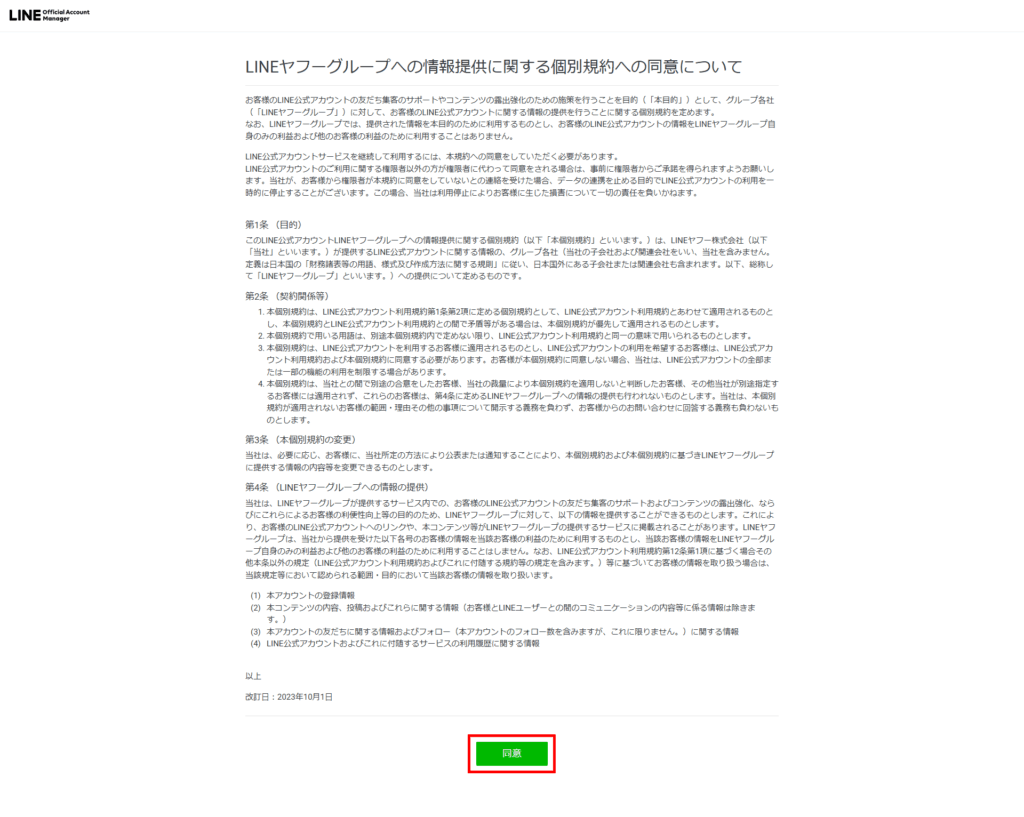
10. Click Agree.
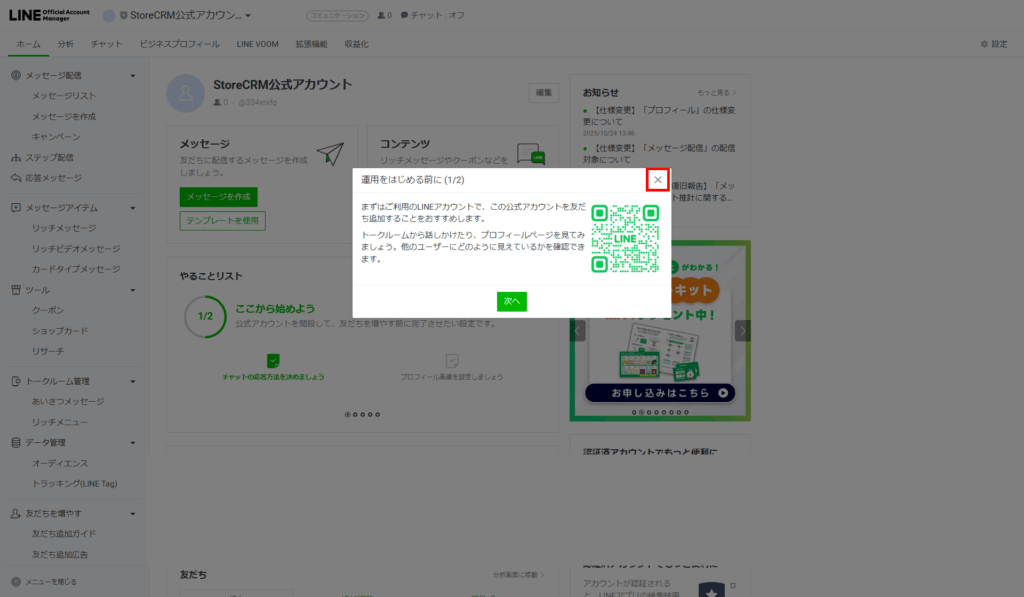
11. Click [×].
You have now moved to the LINE Official Account Manager home screen.
Generate and configure the Messaging API
Generate a Messaging API from LINE Official Account Manager (if you have never set up a Messaging API before)
This item explains how to generate the Messaging API from LINE Official Account Manager.
Skip this item if you have already generated one to use the Messaging API.
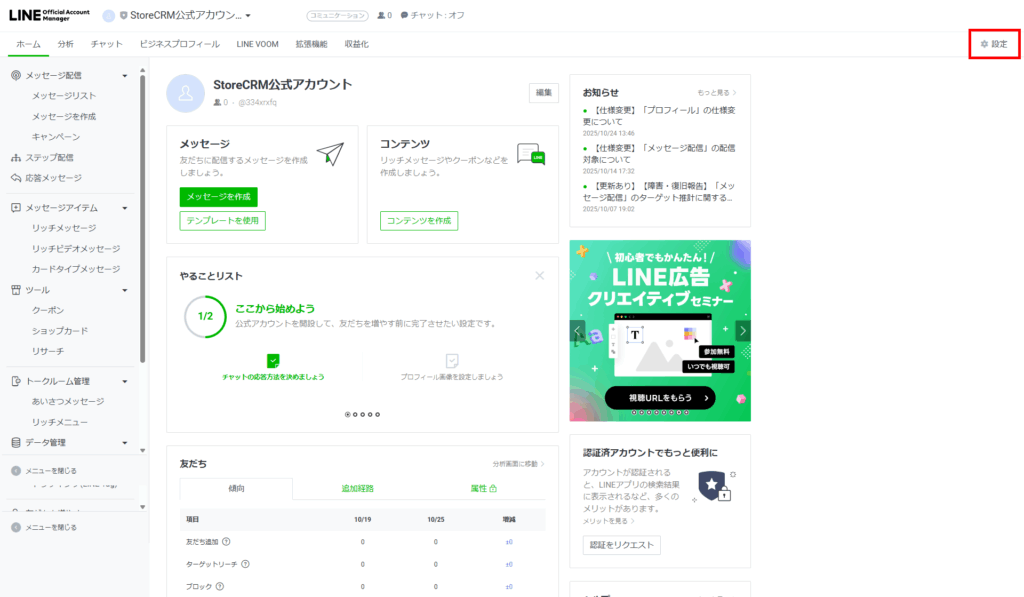
1. From the LINE Official Account Manager home screen, click [Settings].
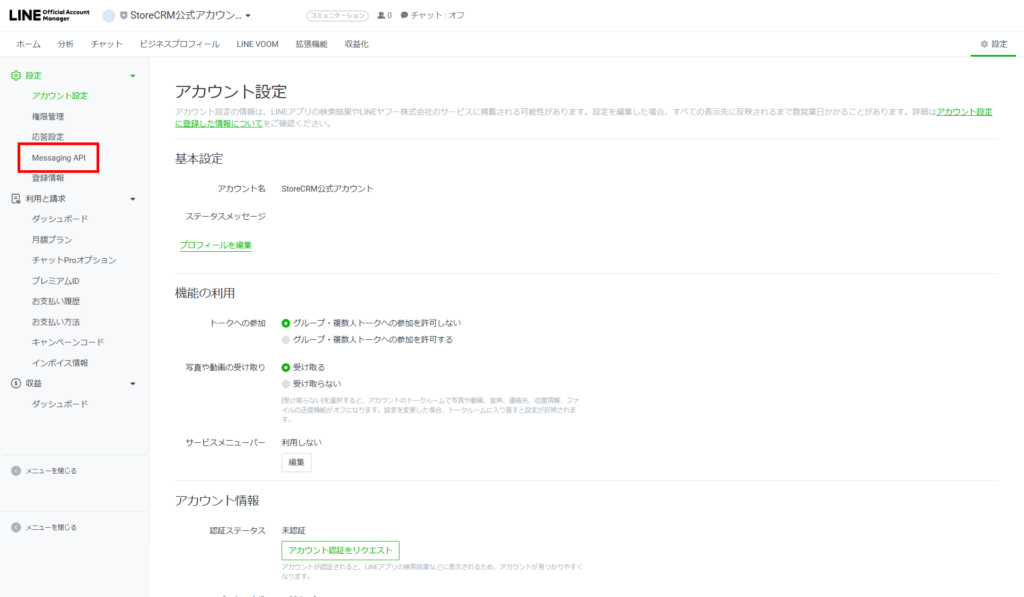
Click on "Messaging API.
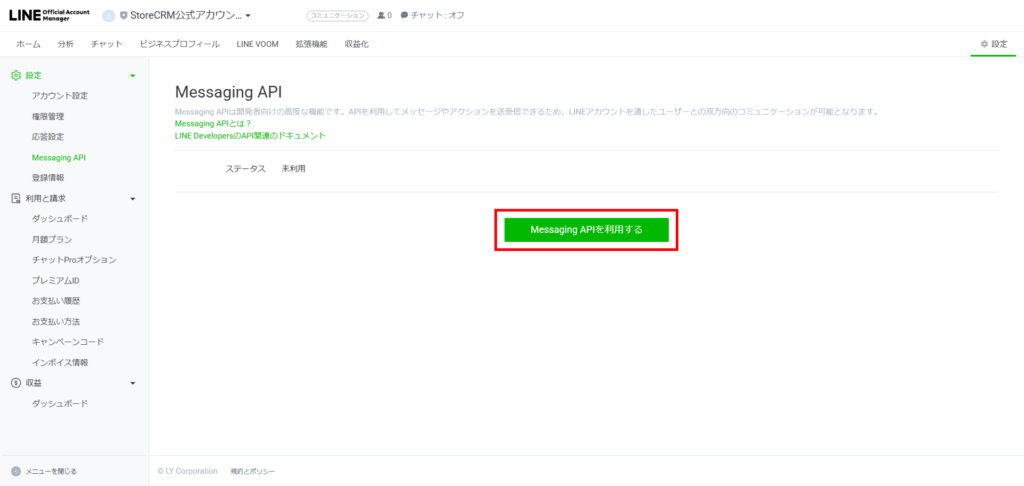
3. Click [Use Messaging API].
4. Choose your provider.
As an example, we will create a new provider called "StoreCRM Official Account".
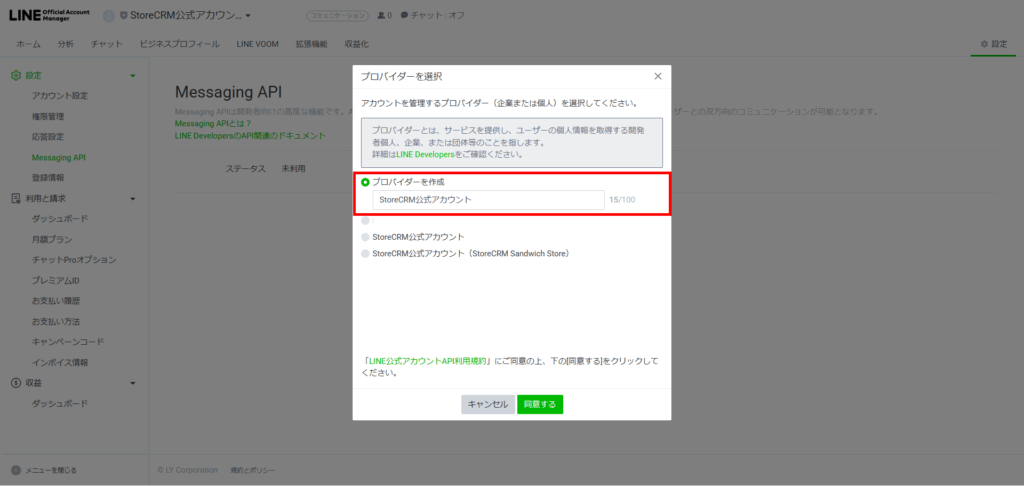
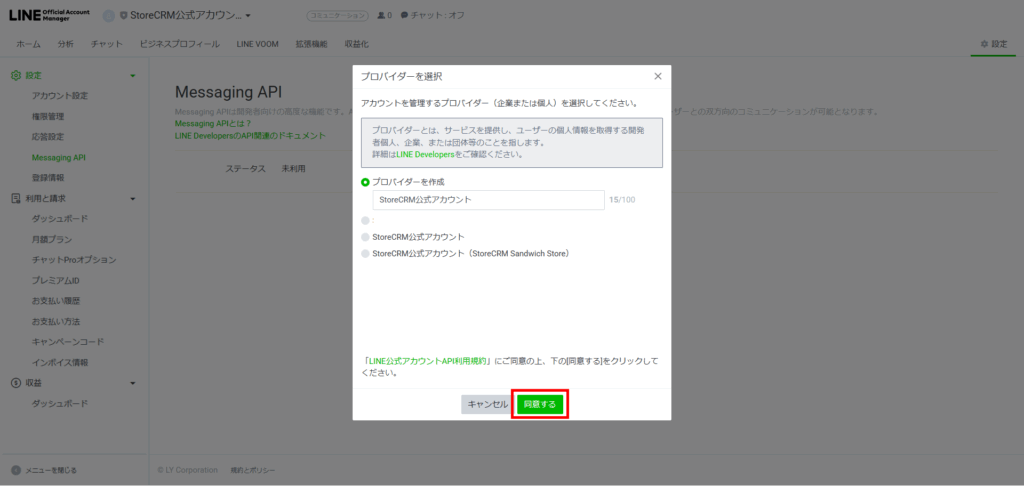
Click "I agree.
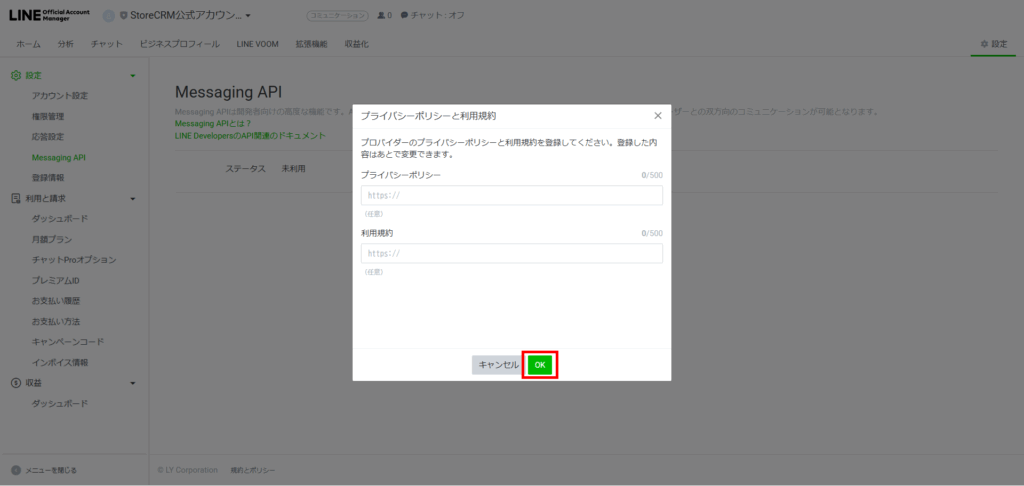
6. Click OK.
This is an optional input. You can proceed to the next step even if you do not enter any information.
7. Click OK.
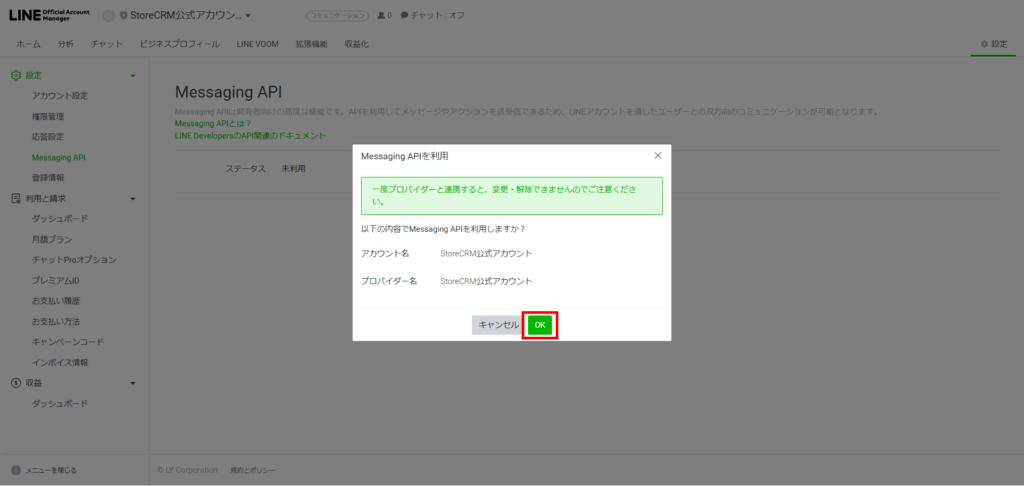
8. Verify that the Messaging API has been generated
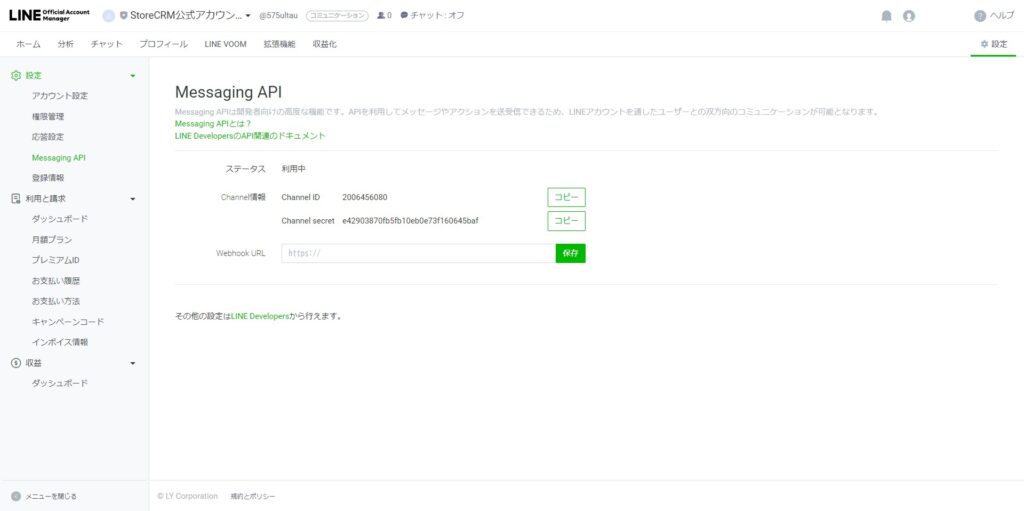
Configuring the Messaging API
Here, we will explain how to set up the generated Messaging API to StoreCRM.
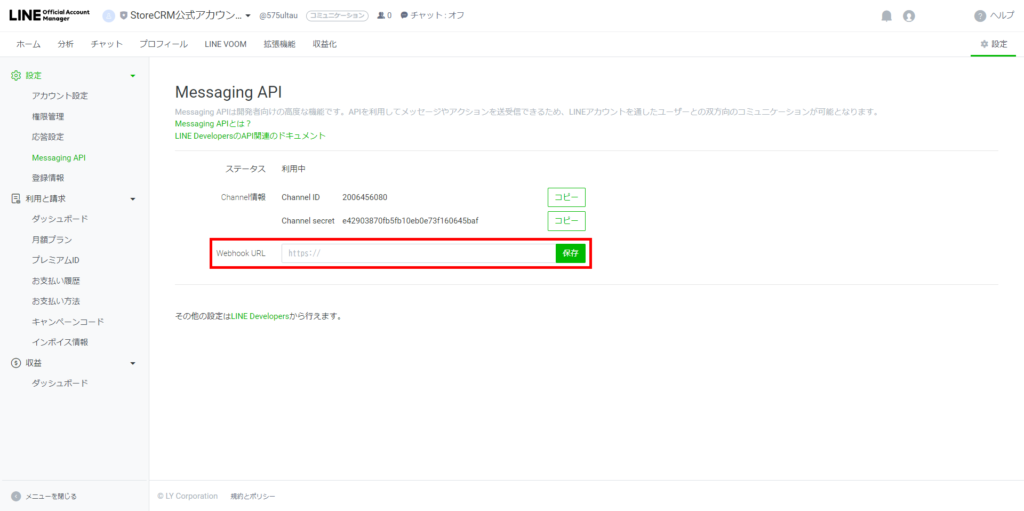
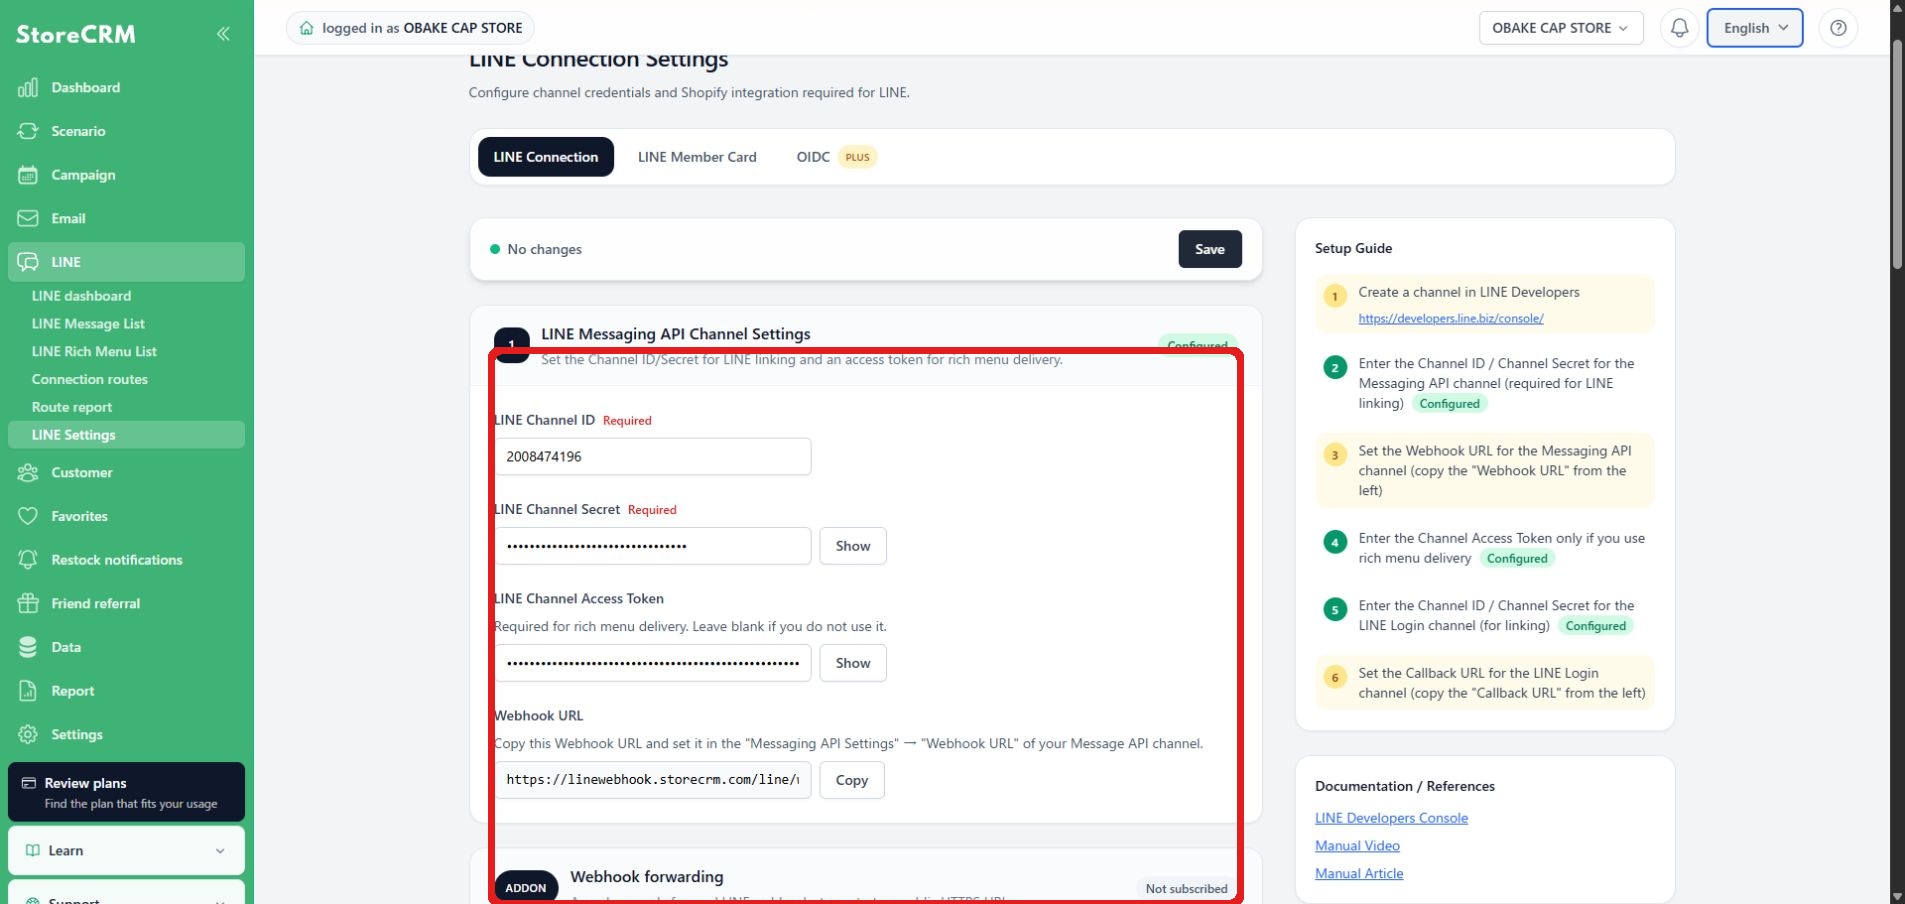
1. From LINE Official Account Manager, copy the Messaging API Channel ID from [Settings > Messaging API] of the LINE Official Account you want to set up.
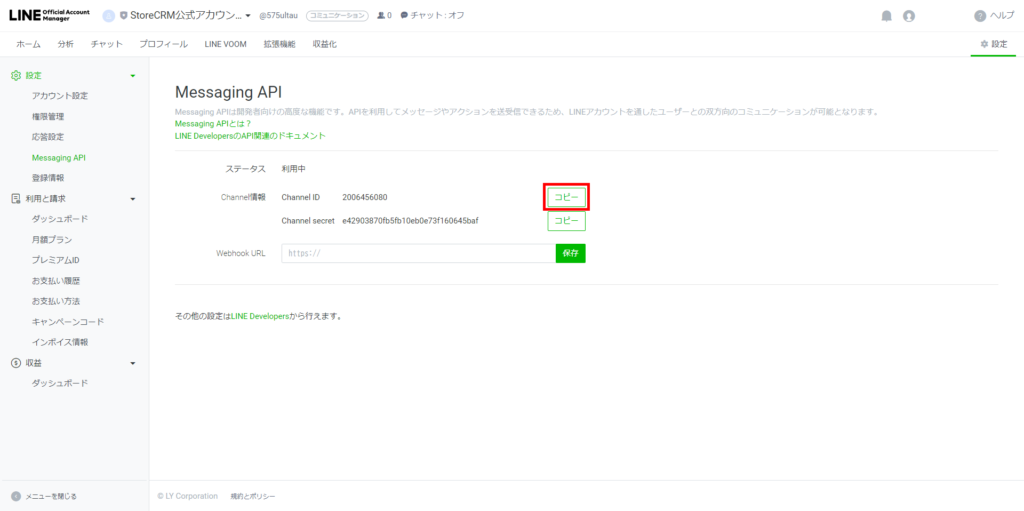
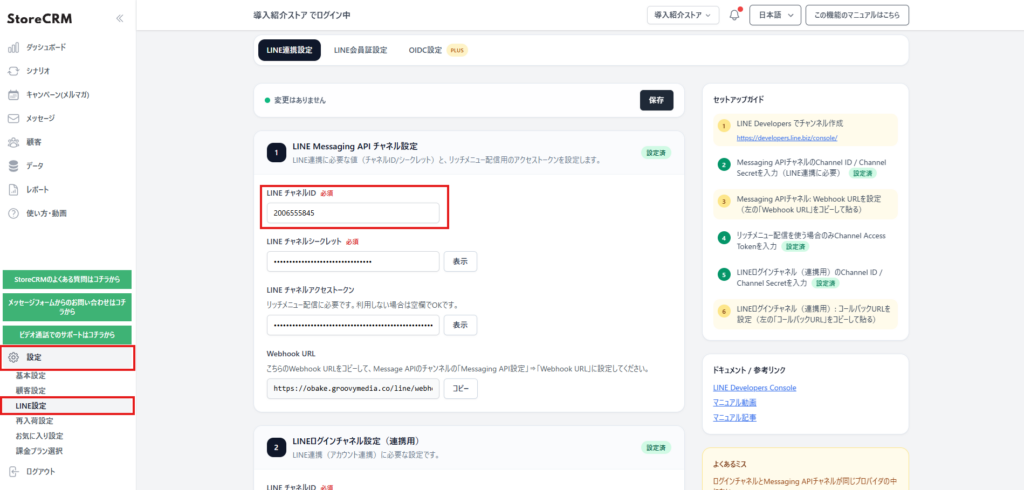
2. Paste it into [LINE channel ID] of StoreCRM's LINE Messaging API.
3. Copy the Messaging API Channel secret.
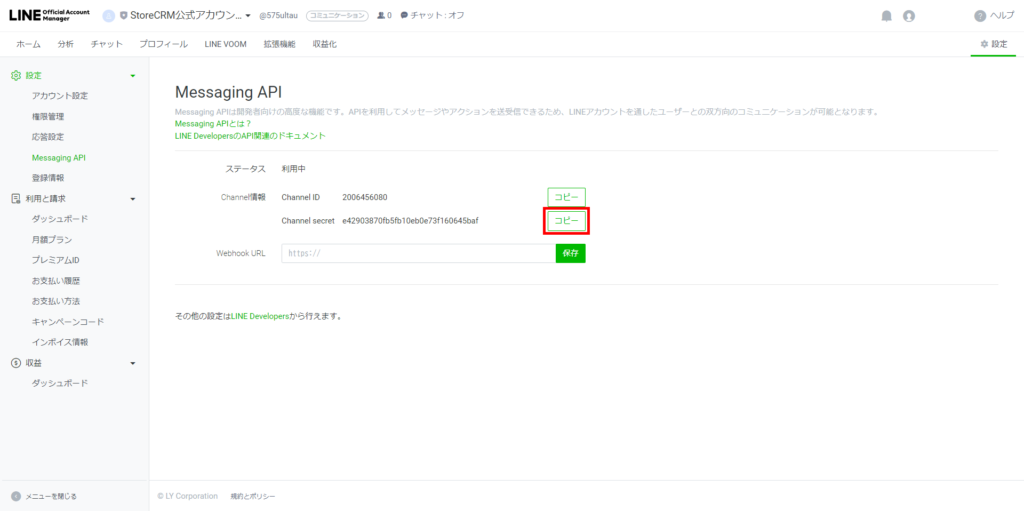
4. Paste it into [LINE Channel Secret] of StoreCRM's LINE Messaging API.
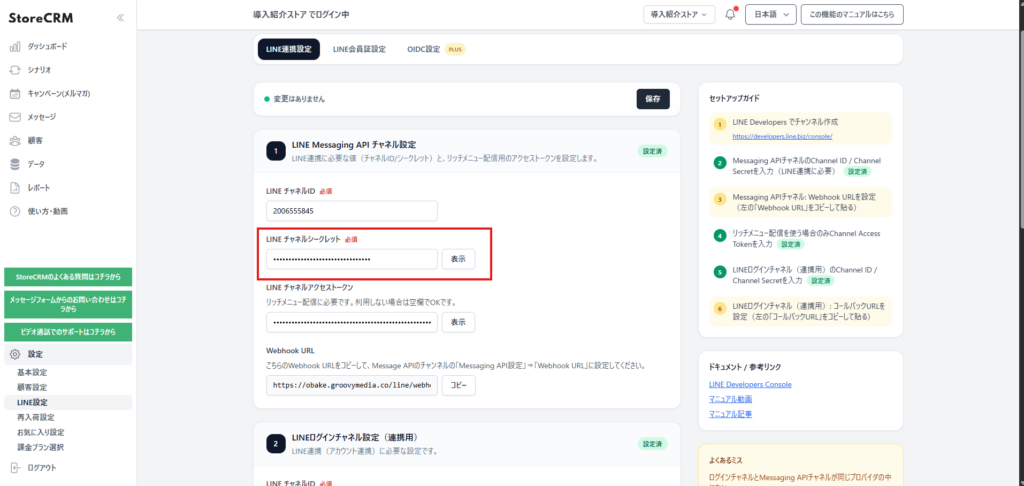
LINE channel ID and LINE channel secret are used in combination. Please enter both values for the same Messaging API channel, as you cannot save just one. If an error appears in the input field, check for missing values or spaces before and after.
5. Copy the StoreCRM webhook URL.
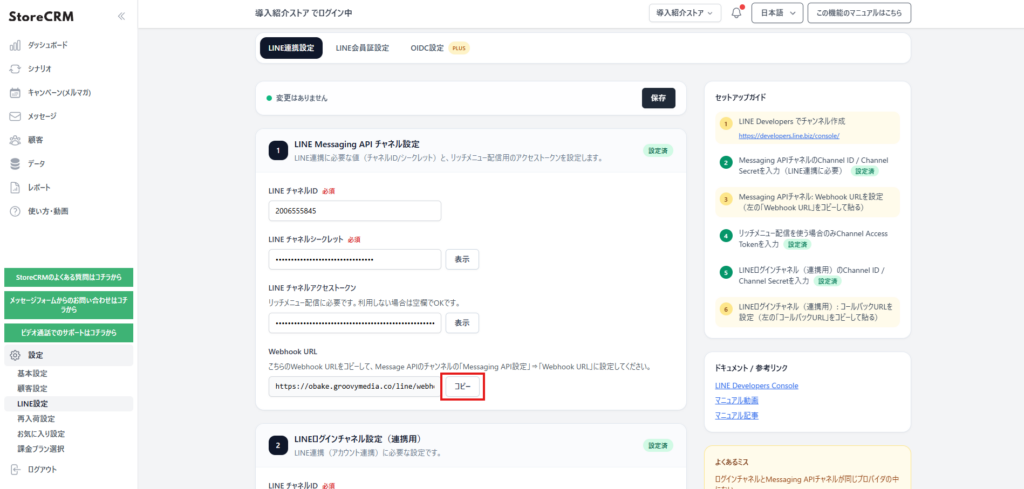
6. Paste it into your LINE webhook URL and click Save.
StoreCRM and LINE integration has been completed.
Create and configure a LINE Login channel
Create a LINE Login channel from LINE Developers (if you have never created a LINE Login channel before)
※The LINE Login channel must be created within the same provider as the Messaging API.
If you have already created a LINE Login channel, you can skip this item.
1. Click LINE Developers Console to go to the LINE Developers Console. (When moving from LINE Official Account Manager)
In the LINE Developers console,hereIt can also be accessed from.
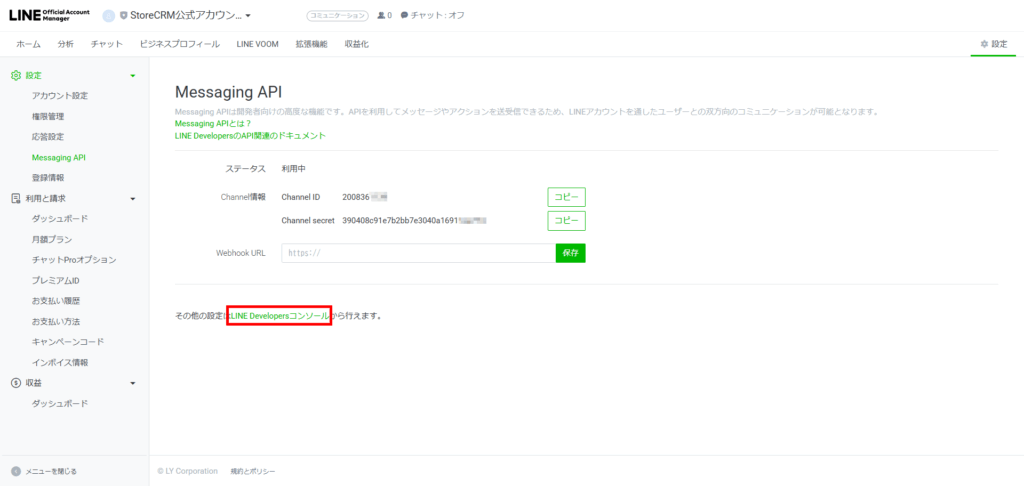
2. In the LINE Developers console, click the provider name under Admin. (If you created the Messaging API earlier, select the same name as when you created it)
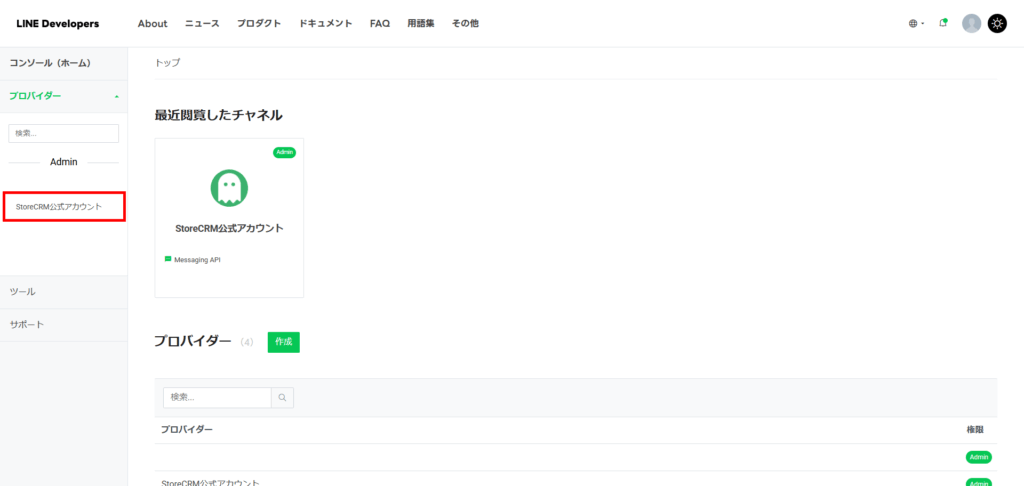
3. Click Create New Channel.
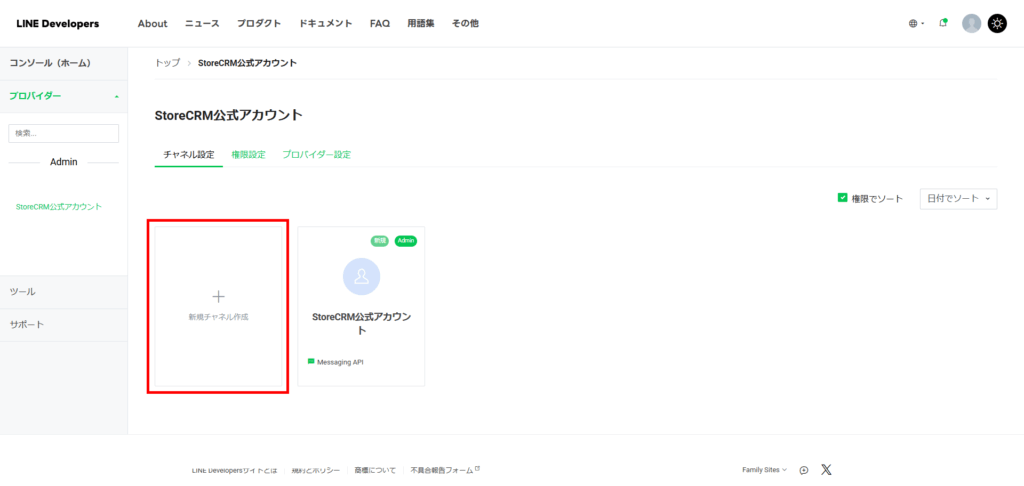
4. Click [LINE Login].
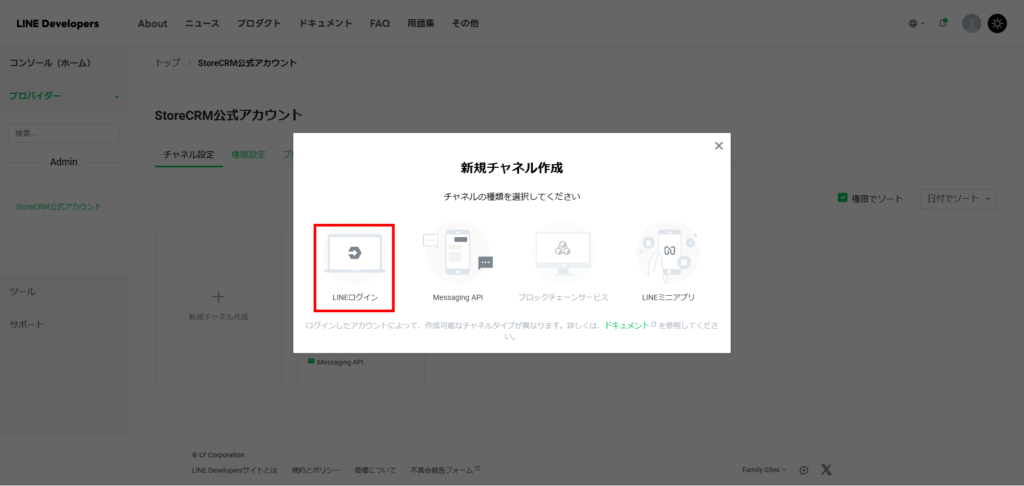
5. Select the appropriate country/region where your company/operator is located.

6. We recommend using the same channel name you set earlier.
As an example, we set "StoreCRM Official Account".
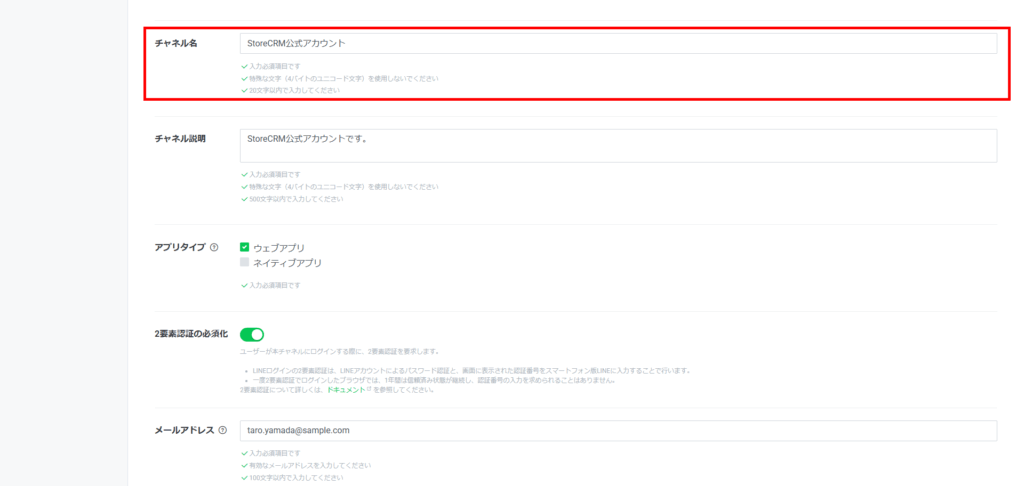
7. Set the channel description.
As an example, "This is an official StoreCRM account." and set up.
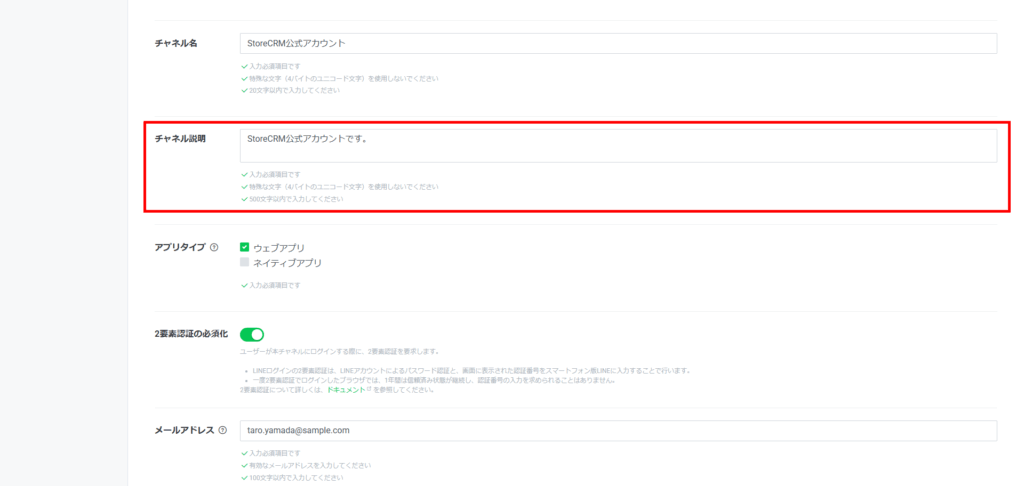
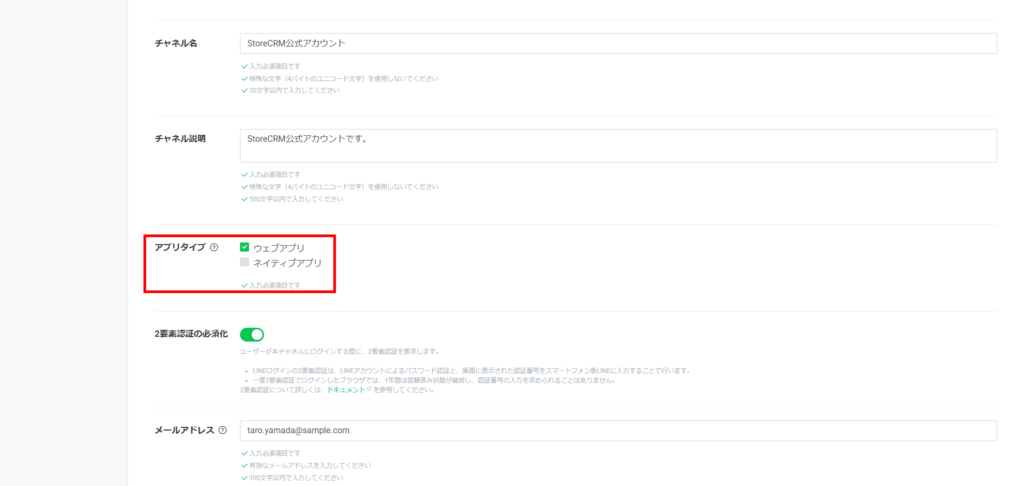
8. Check [Web application] under App type.
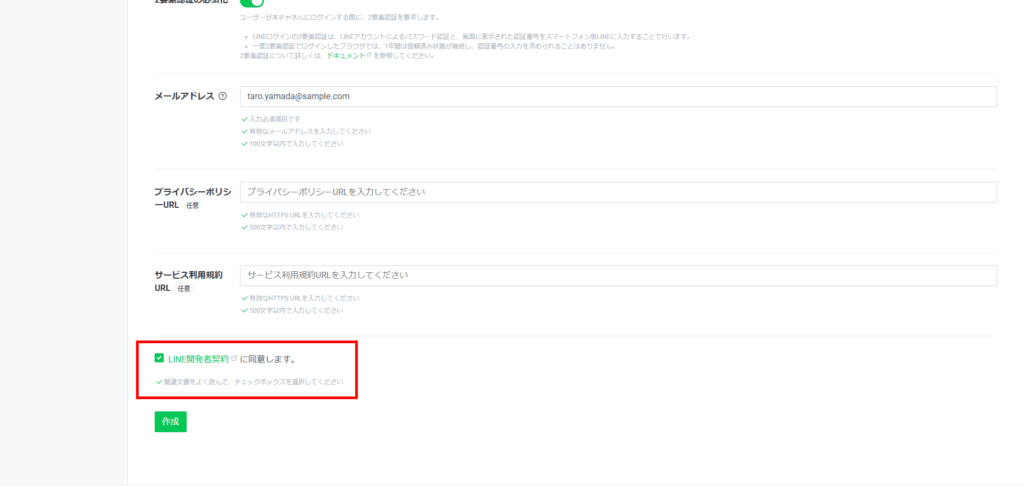
9. Check [I agree to the terms of the LINE Developer Agreement].
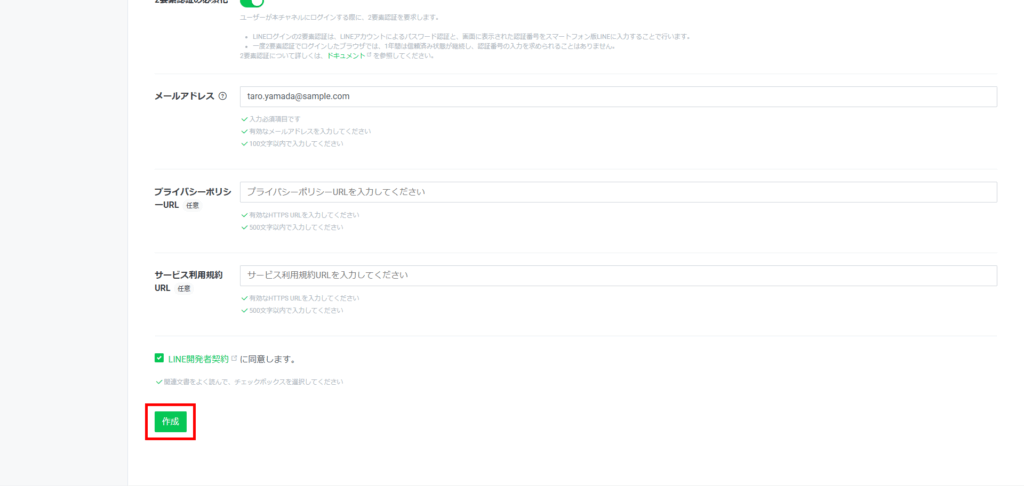
10. Click Create.
A LINE login has been created.
Configure the LINE Login channel
1. Copy the channel ID by clicking the copy button on the right.
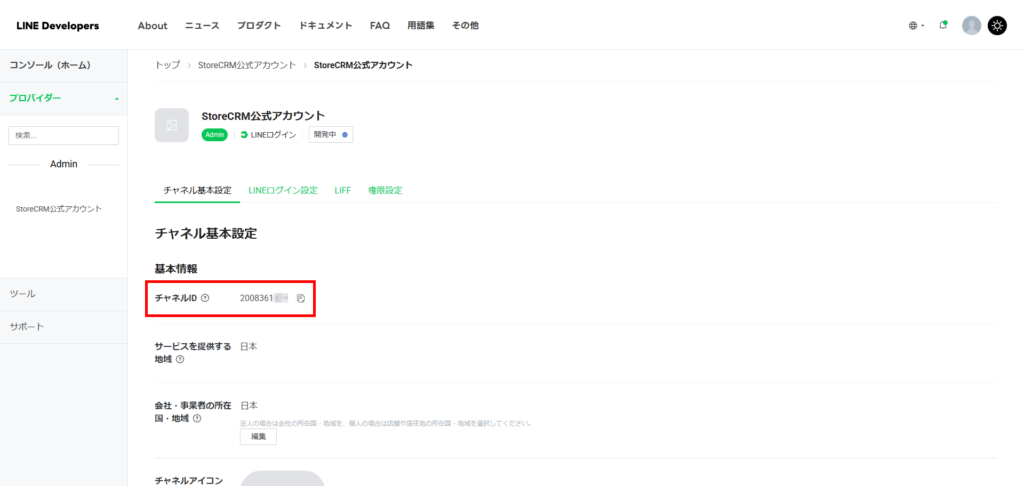
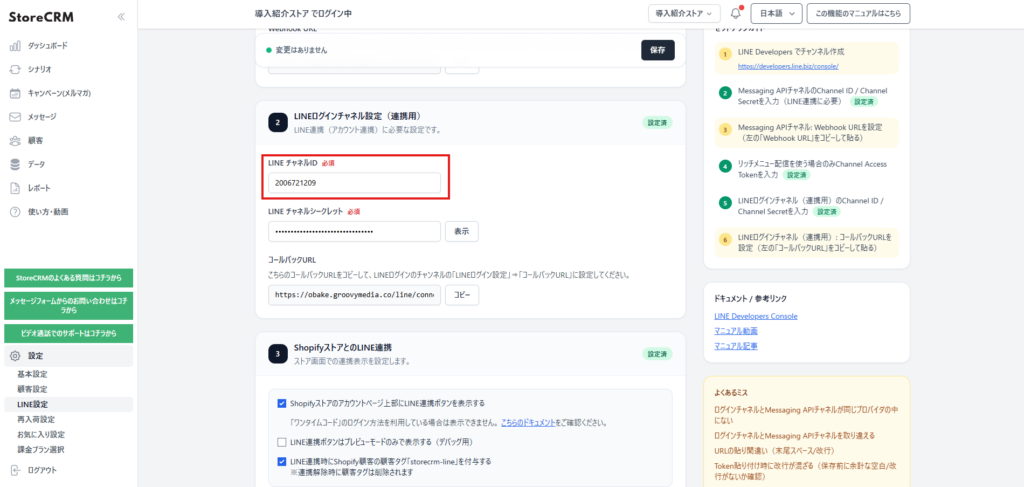
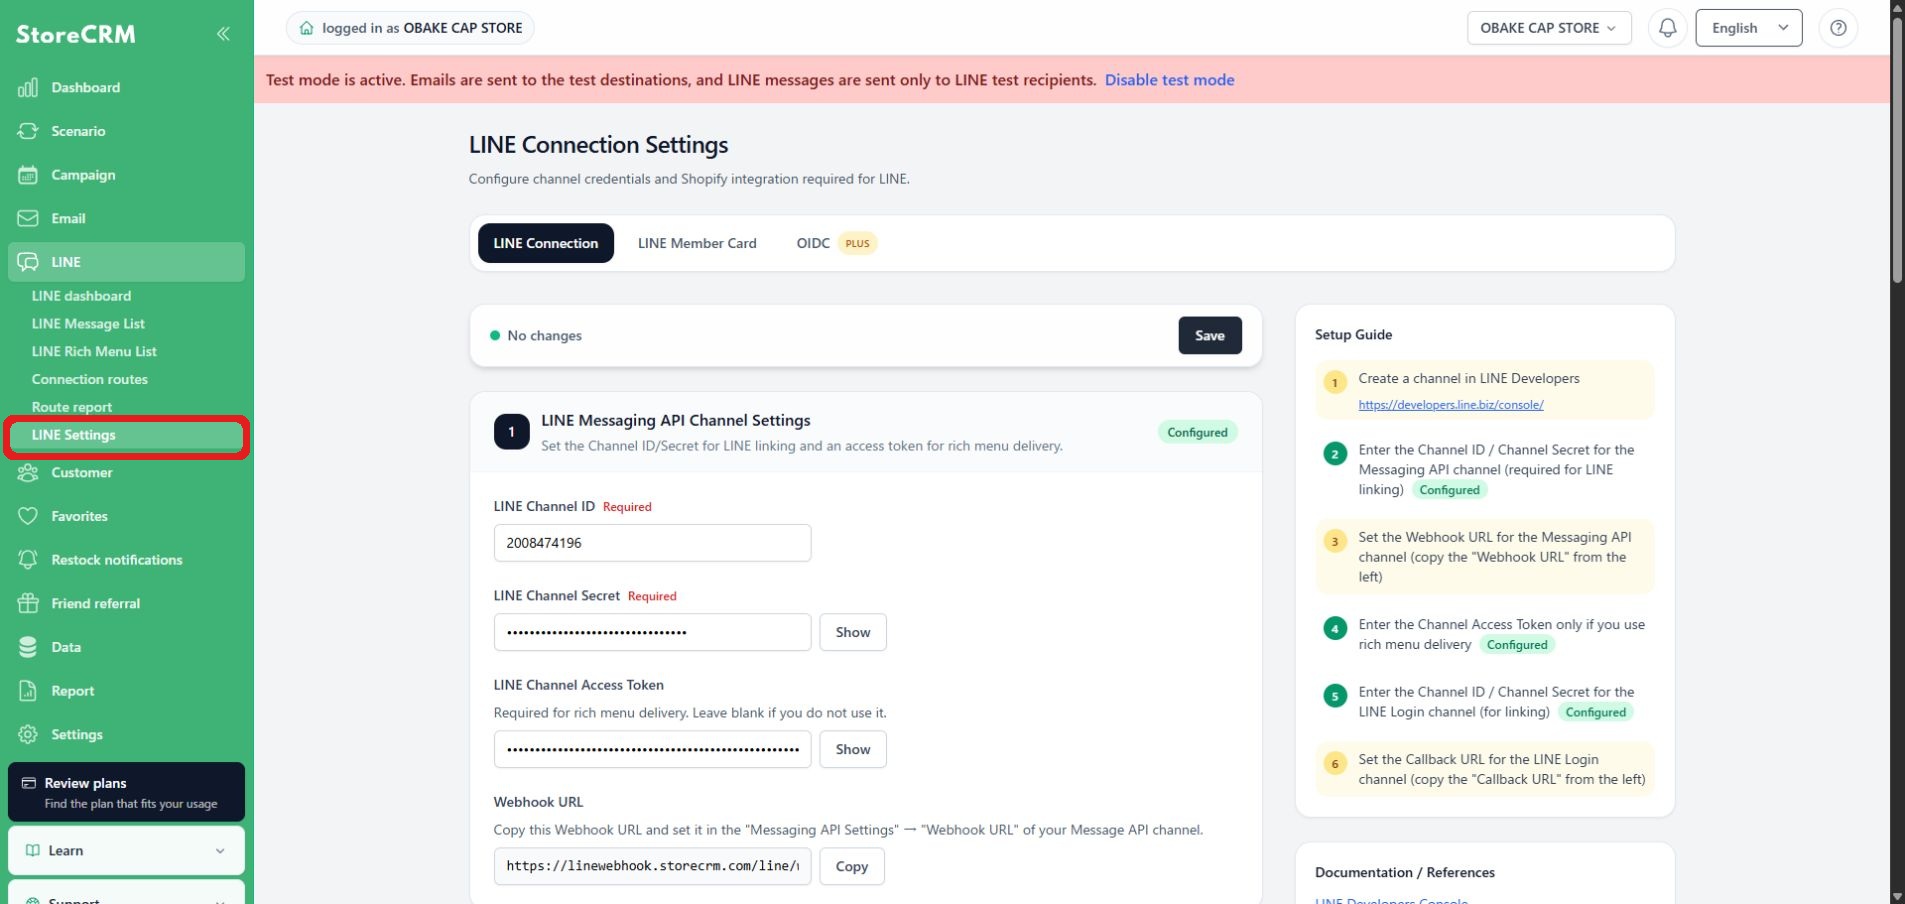
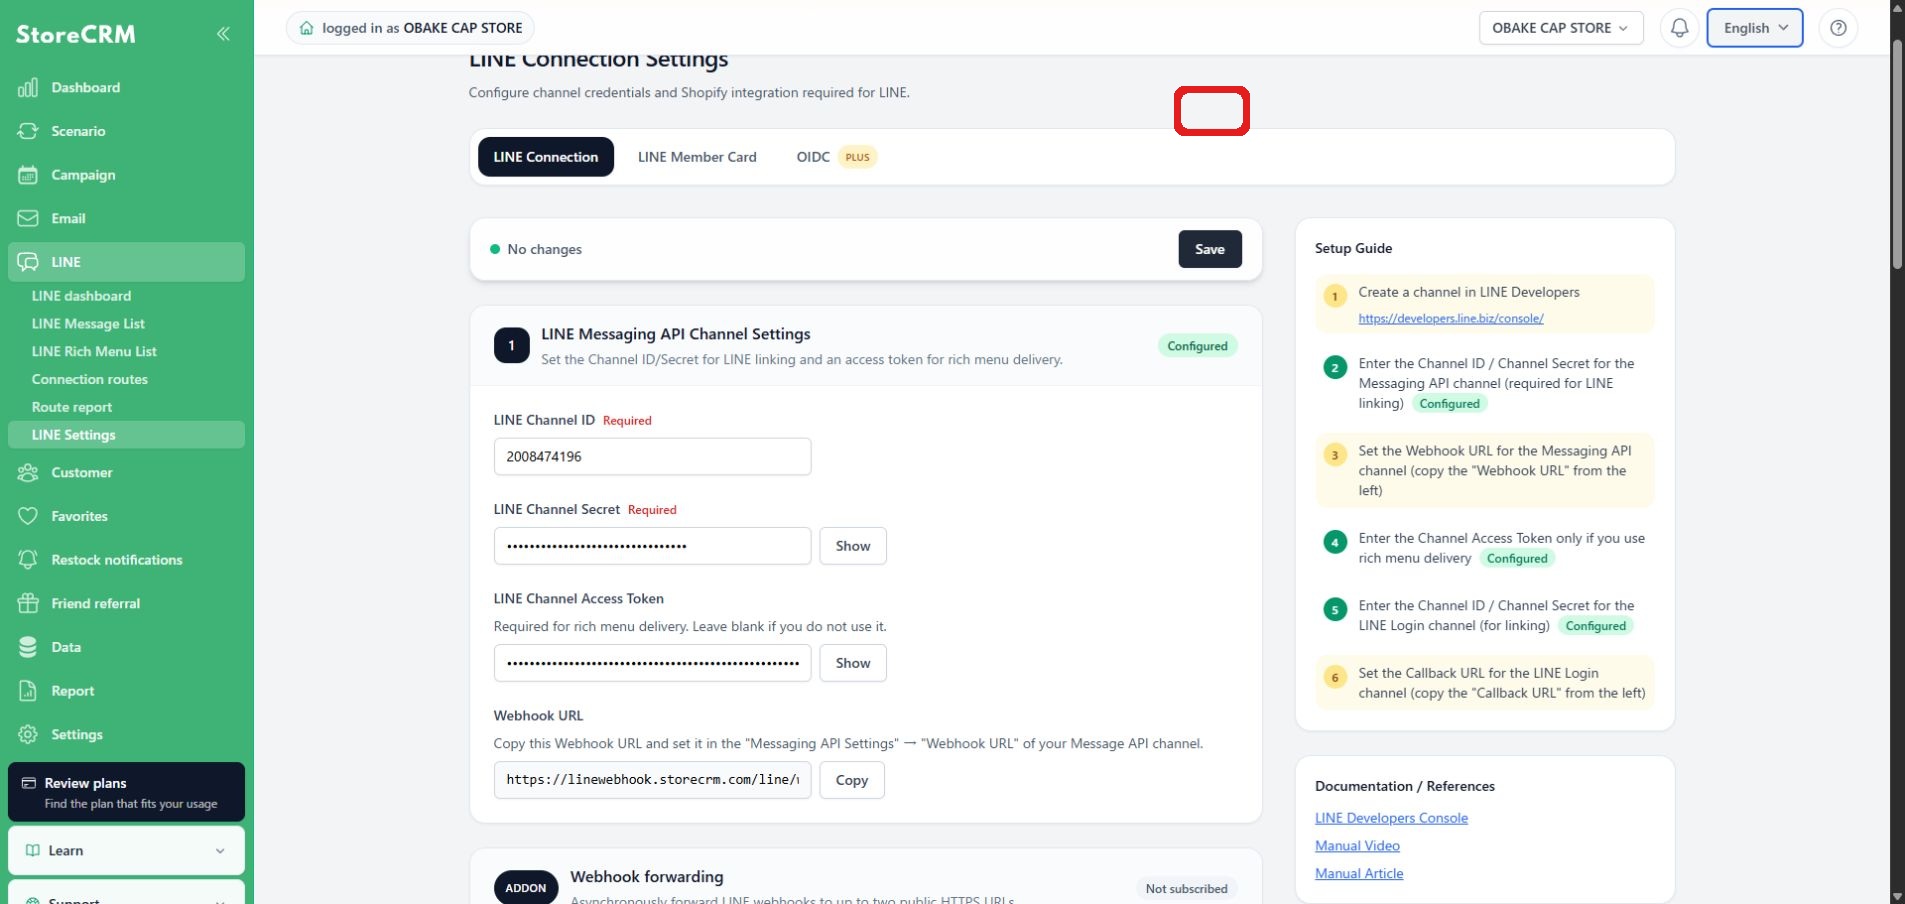
2. In StoreCRM, click LINE → LINE settings, then paste the ID you copied into LINE Channel ID.
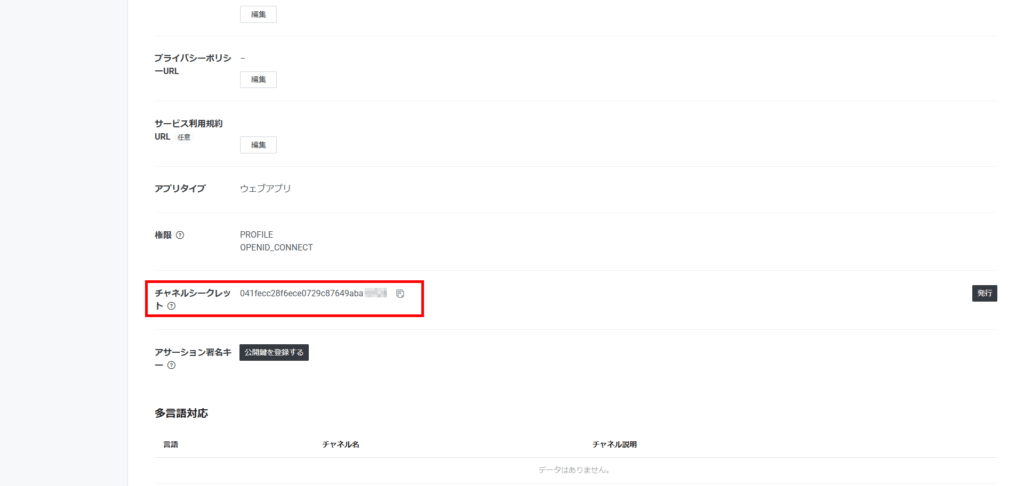
3. Scroll the LINE Login screen. Click the copy button to the right of the channel secret to copy the string.
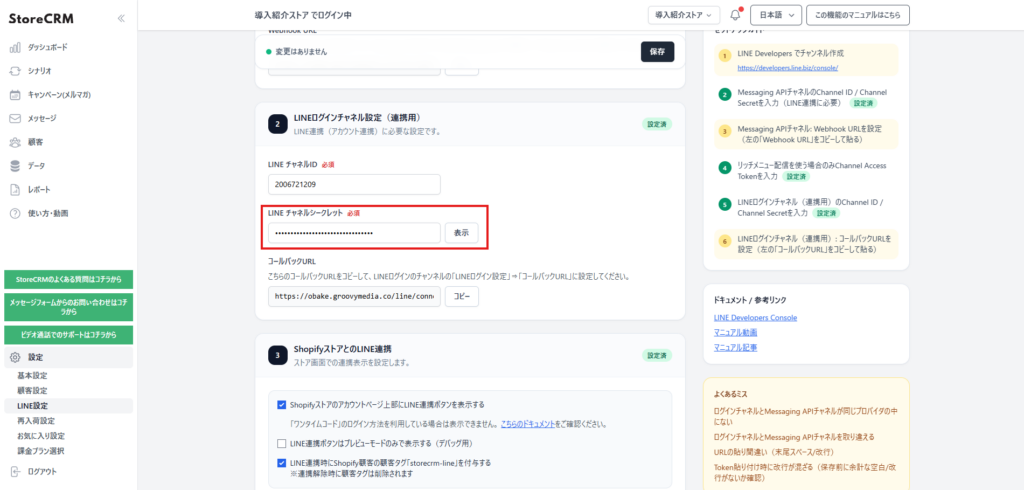
4. Paste the string you copied earlier into [LINE Channel Secret] in StoreCRM.
5. Copy the [Callback URL].
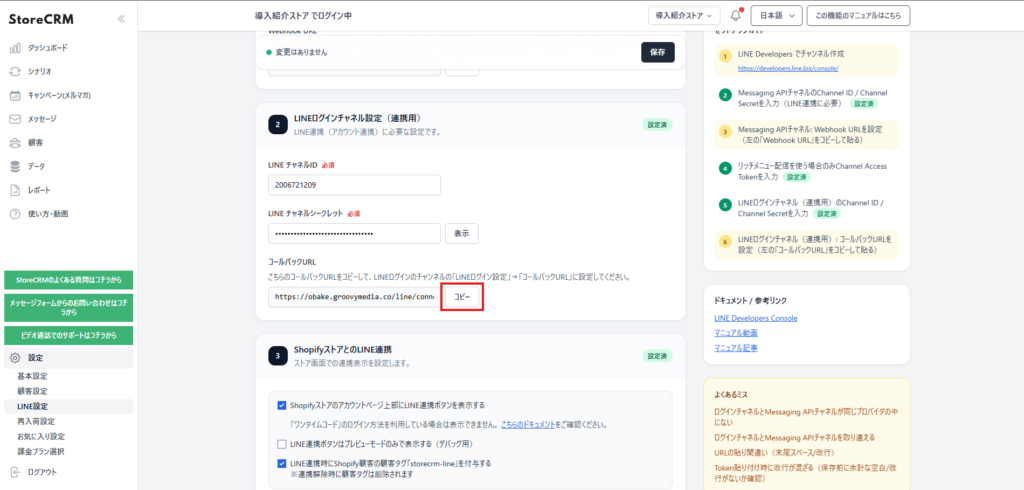
6. Click [LINE Login Settings] under LINE Login.
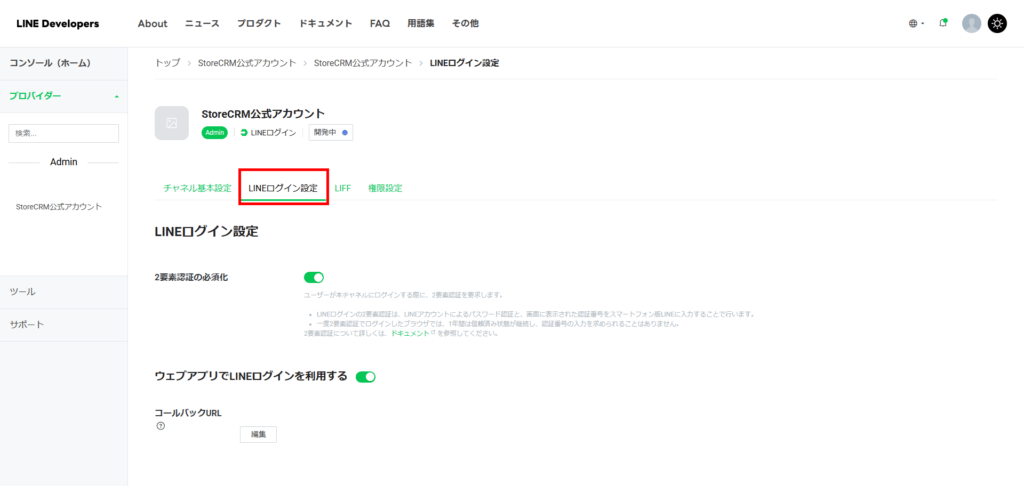
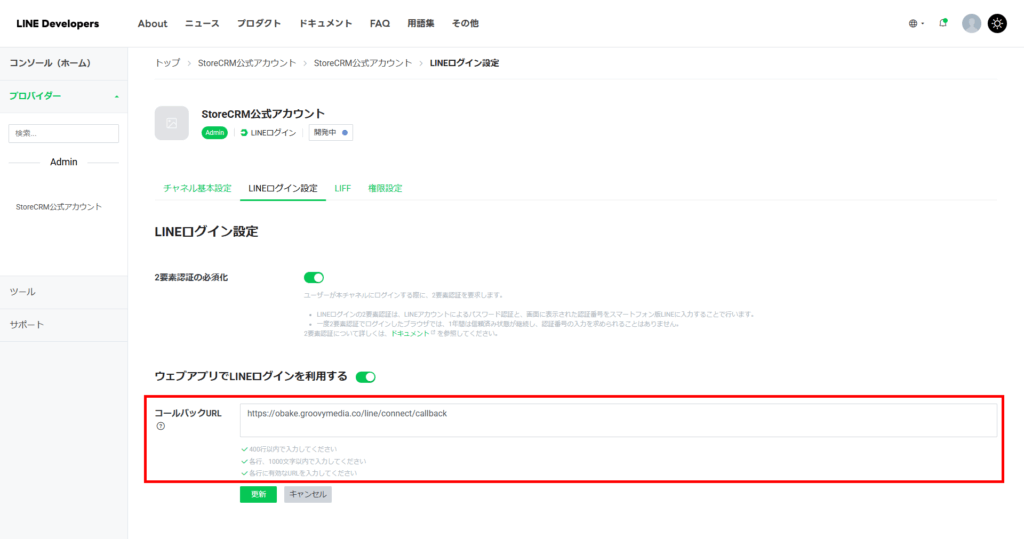
7. Click Edit Callback URL, paste the one you copied earlier, and click Update.
8. Click [Channel Basic Settings].
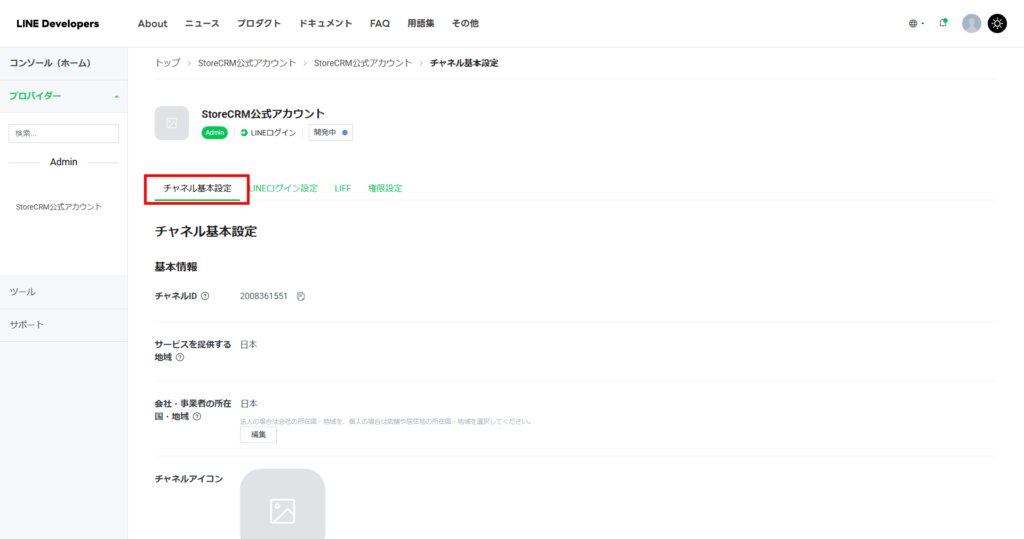
9. From [Friend addition options] → [Linked LINE Official Account], select the account name you just created and click [Update].
By enabling this setting, you can encourage people to add friends to your official LINE account at the same time they make a LINE connection.

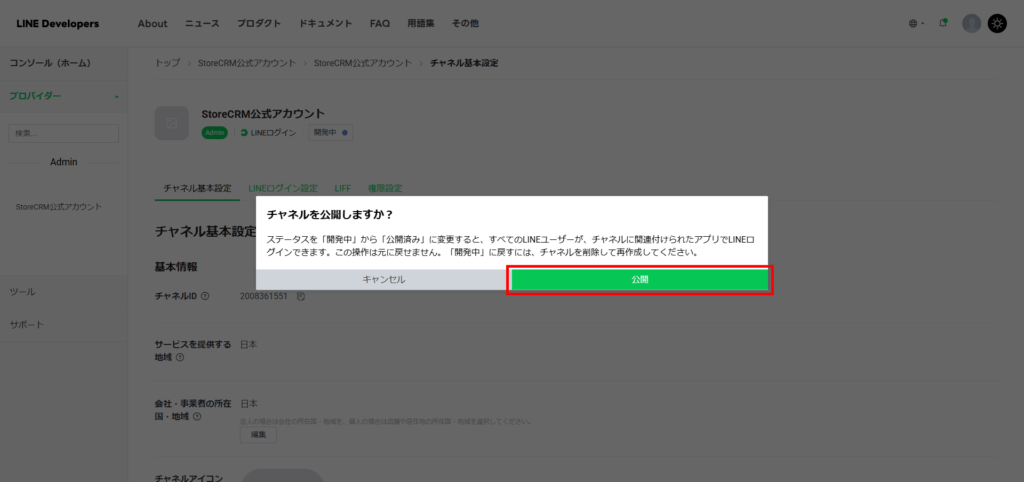
10. Click Under Development.

11. Click Publish.
Place a LINE registration button on your Shopify store account page
You can place a LINE registration button on your Shopify store account page.
Add the button from the StoreCRM settings screen
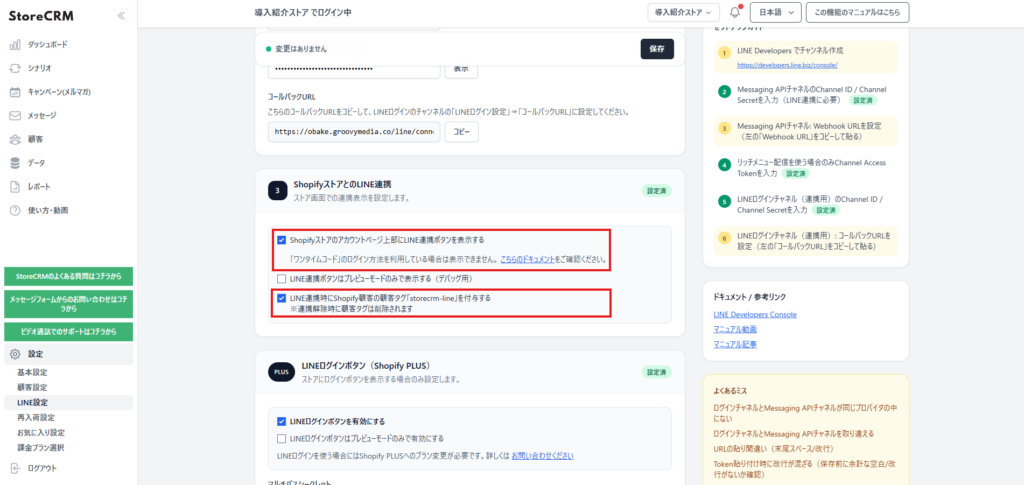
1. Check [Display LINE integration button at the top of Shopify store account page] and click [Save]. If you want to add a customer tag when linking with LINE, check [Add customer tag "storecrm-line" for Shopify customers when linking with LINE] and save.
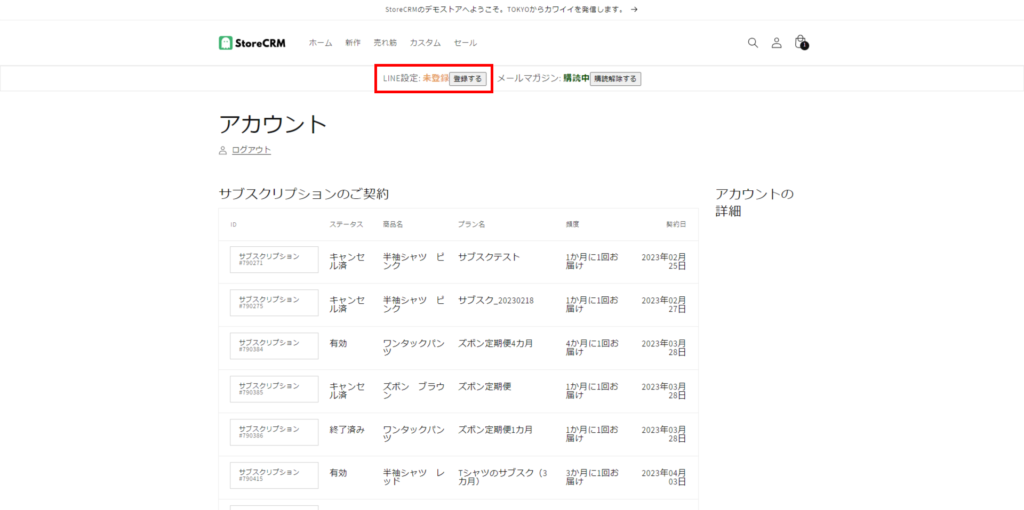
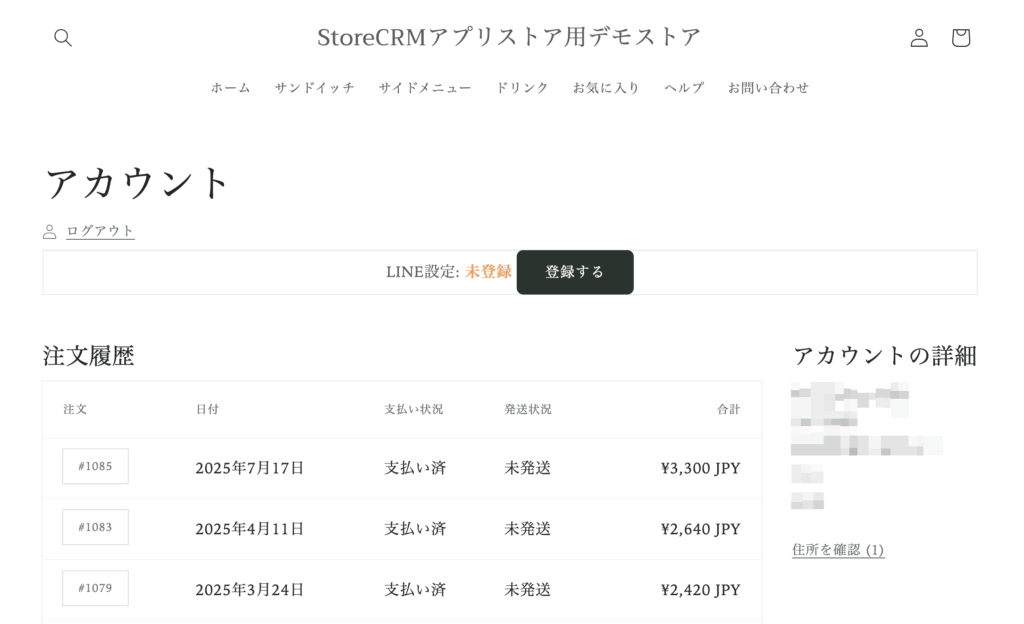
2. a LINE registration button has been installed on the store's account page.
- [We recommend that you click "Register" to test if you can actually register.
- If an error occurs, the LINE login channel is [.under developmentPlease set it to [Published] and try again. Please change it to [Published] and try again.
Edit the theme to add the button
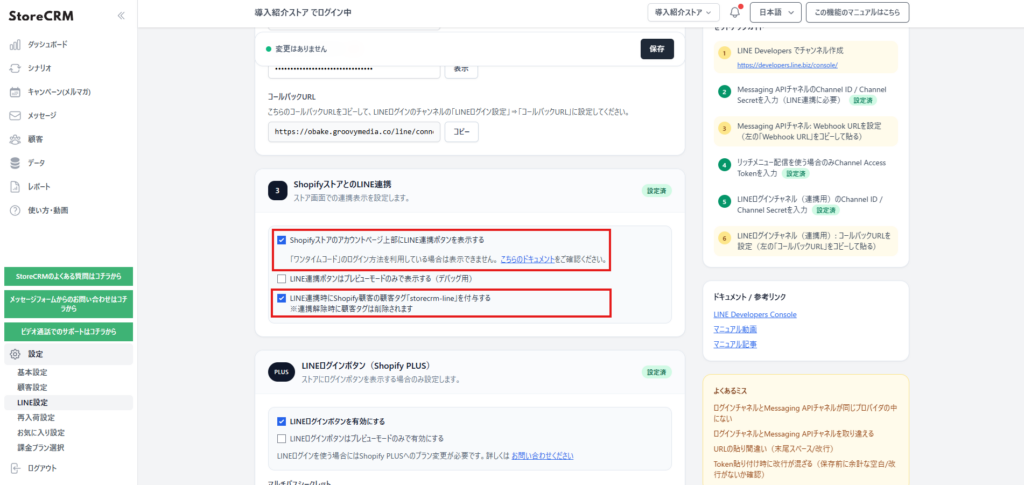
1. Check [Display LINE integration button at the top of Shopify store account page] and click [Save].
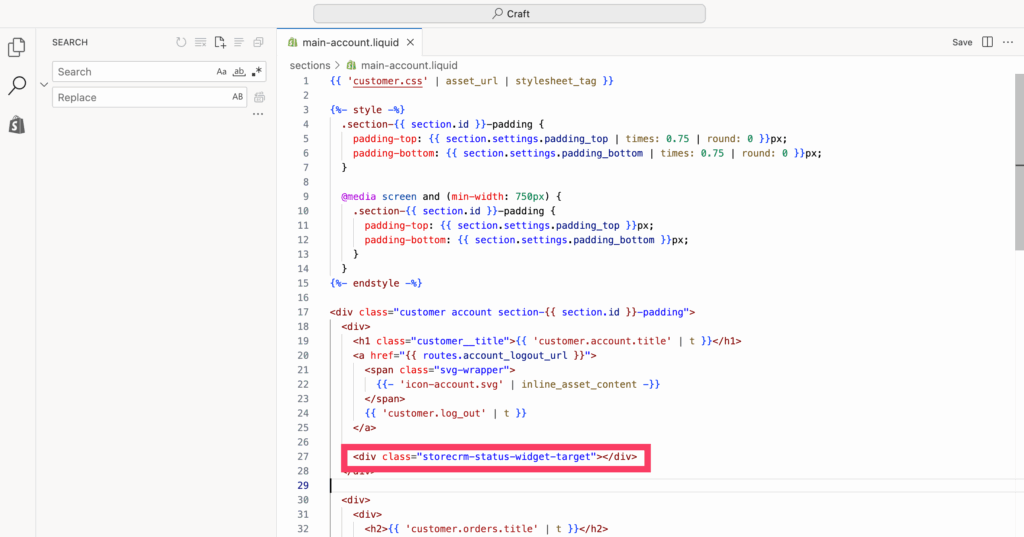
2. Edit the theme code.
Add a div element with the class name “storecrm-status-widget-target” anywhere in the Liquid file that renders the account page to place the button at any location.
3. Make sure the button is installed.
Configure guidance for LINE login errors
In [LINE] → [LINE Settings], you can set a guide to display to customers who failed LINE Login.
Enter a /pages/… path in the store or an HTTPS URL on the same store to send customers to that page. If left blank, StoreCRM displays its standard error screen. You can edit the heading, description, and back button for the standard screen in Japanese and English.
Configure LINE integration tracking (classic customer accounts only)
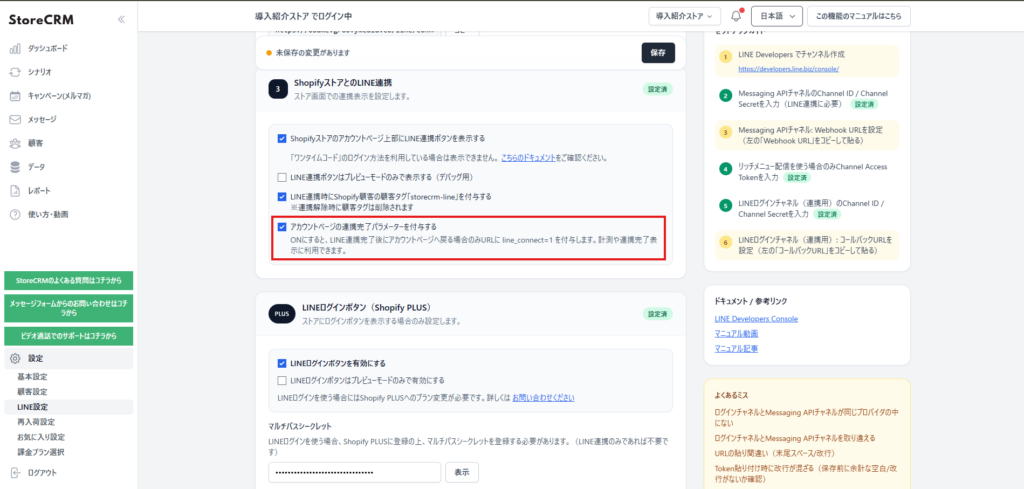
To track completion of LINE integration, select [Add an integration completion parameter to the account page] and save. When this setting is on, the following parameter is added to the URL when the customer returns to the account page after completing LINE integration: line_connect=1 Use this parameter to track completed integrations in Google Tag Manager or to display an integration-complete message in your storefront.
Note: This setting applies only when returning to the account page (/account)./account/profile On pages under the account path, such as line_connect=1 the parameter is not added.
Note: If this setting is off, as before, line_connect=1 the parameter is not added.
Configure the LINE Channel Access Token settings.
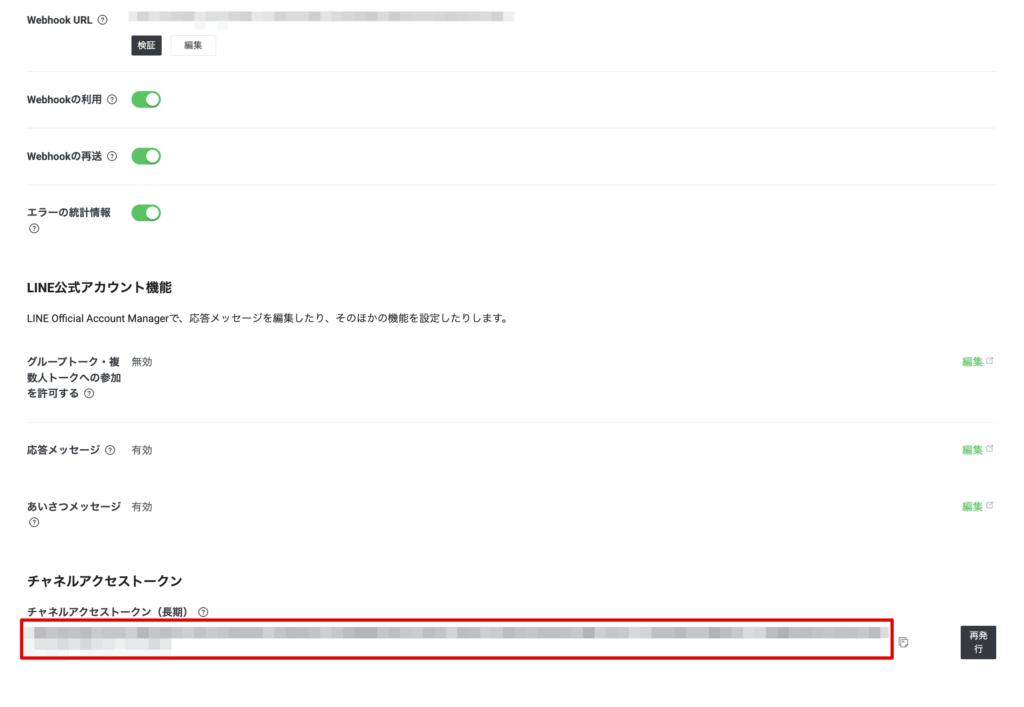
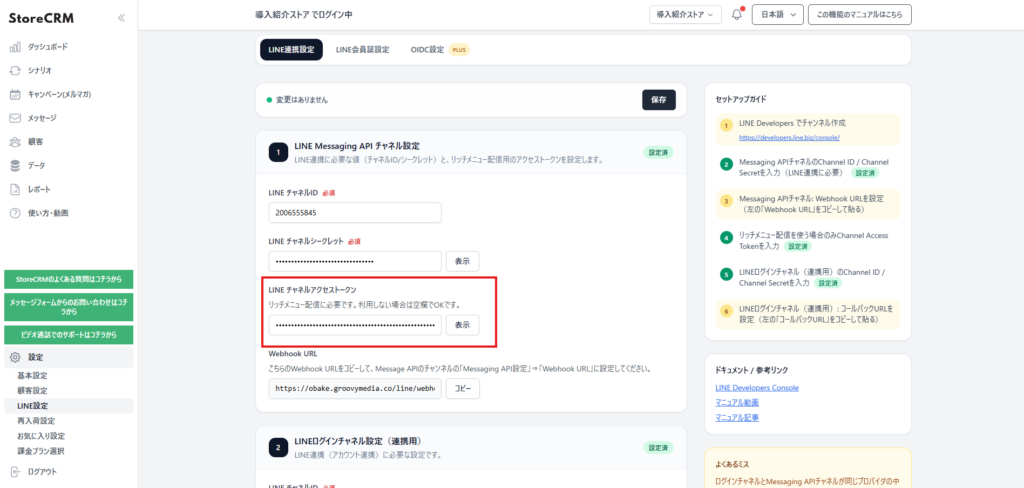
It is not necessary to enter a LINE Channel Access Token in order to send LINE messages from StoreCRM, but it is also necessary to have a LINE Channel Access Token set up in order to deliver rich menus.
1. Generate a channel access token from Store Official Account in the left navigation → [Channel Settings] → [Messaging API] → [Channel Access Token] in [Messaging API Settings].
2) Paste the generated channel access token into the LINE Channel Access Token in the StoreCRM LINE Settings and click [Save].
Enable LINE Login with Shopify Plus
This is an OIDC collaboration that allows you to log in to a new Shopify customer account with your LINE account. Can be set up by stores using Shopify Plus.
Setup flow
- In StoreCRM, open LINE → LINE settings → OIDC and click Enable OIDC integration. StoreCRM generates the Discovery URL, Client ID, Client Secret, and other values to enter in Shopify.
- In the Shopify admin screen, open Settings → Customer Account → Authentication Management → Manage Providers → Connect to Provider.
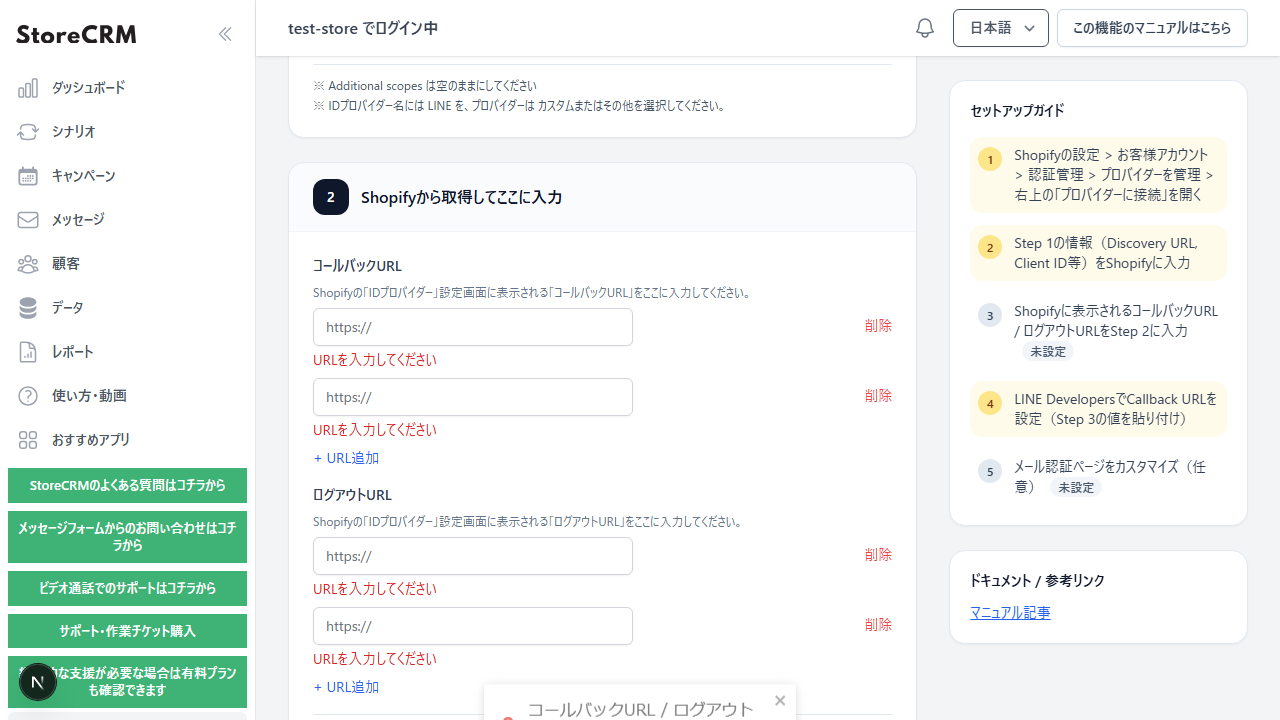
- Select LINE for the ID provider name, select Custom or Other for the provider, and enter the information displayed in STEP 1 of StoreCRM. Leave Additional scopes blank.
- Enter the callback URL and logout URL displayed in Shopify into STEP 2 of StoreCRM. If there is more than one, click [+ Add URL] to add more input fields.
- Register the LINE Login Callback URL displayed in STEP 3 of StoreCRM to the LINE Developers LINE Login channel.
- If necessary, set the logo, favicon, button color, terms and conditions URL, and notes for the email authentication page, then click [Save].
Validation when saving
This check is performed when saving the callback URL and logout URL obtained from Shopify to StoreCRM in the OIDC integration settings for Shopify Plus.
- Paste the callback URL and logout URL displayed on Shopify's [Identity Provider] settings screen into the corresponding fields in StoreCRM.
- If multiple URLs are displayed, click [+ Add URL] to increase the input field and register all the URLs given by Shopify.
- At least one callback URL and one or more logout URL each are required when saving. If there is a blank field, [Enter URL] will be displayed below the input field and the file will not be saved.
- Spaces before and after the URL are removed, but values with spaces in the middle of the URL or values that are not in URL format cannot be saved.
- If the URL on the Shopify side changes due to the addition of your own domain, etc., copy the content displayed on Shopify again and update the StoreCRM side as well.
After making changes, click Save and confirm the save completion message. Reload the page and if all the URLs you added remain, the setup is complete.
Click here for detailed explanation of LINE Login settings
Related pages
Set up the LINE and profile membership cards
If you would like to display the membership card barcode to customers who have already linked LINE, or if you would like to display the membership card on the profile screen of a new customer account,Set up the LINE and profile membership cardsfor detailed instructions.
 English
  Japanese