The flow editor is,supplemental planThe above is available.
See the manual and set it up.
1. Introduction
This article describes how to use the Flow Editor*, one of StoreCRM's features.
StoreCRM allows you to execute a variety of measures, including step emails for checkout abandonment and member registration, with simple settings.
When implementing measures, it is important to deliver personalized information that is of interest and concern to each customer.
StoreCRM's flow editor allows you to intuitively set up detailed conditions for sending out different emails and branching processing based on customer and order information.
Personalized email newsletters using the flow editor can increase LTV and decrease the decoding rate of email newsletters, so be sure to implement it.
Explanation of Flow Editor
How to open the Flow Editor screen
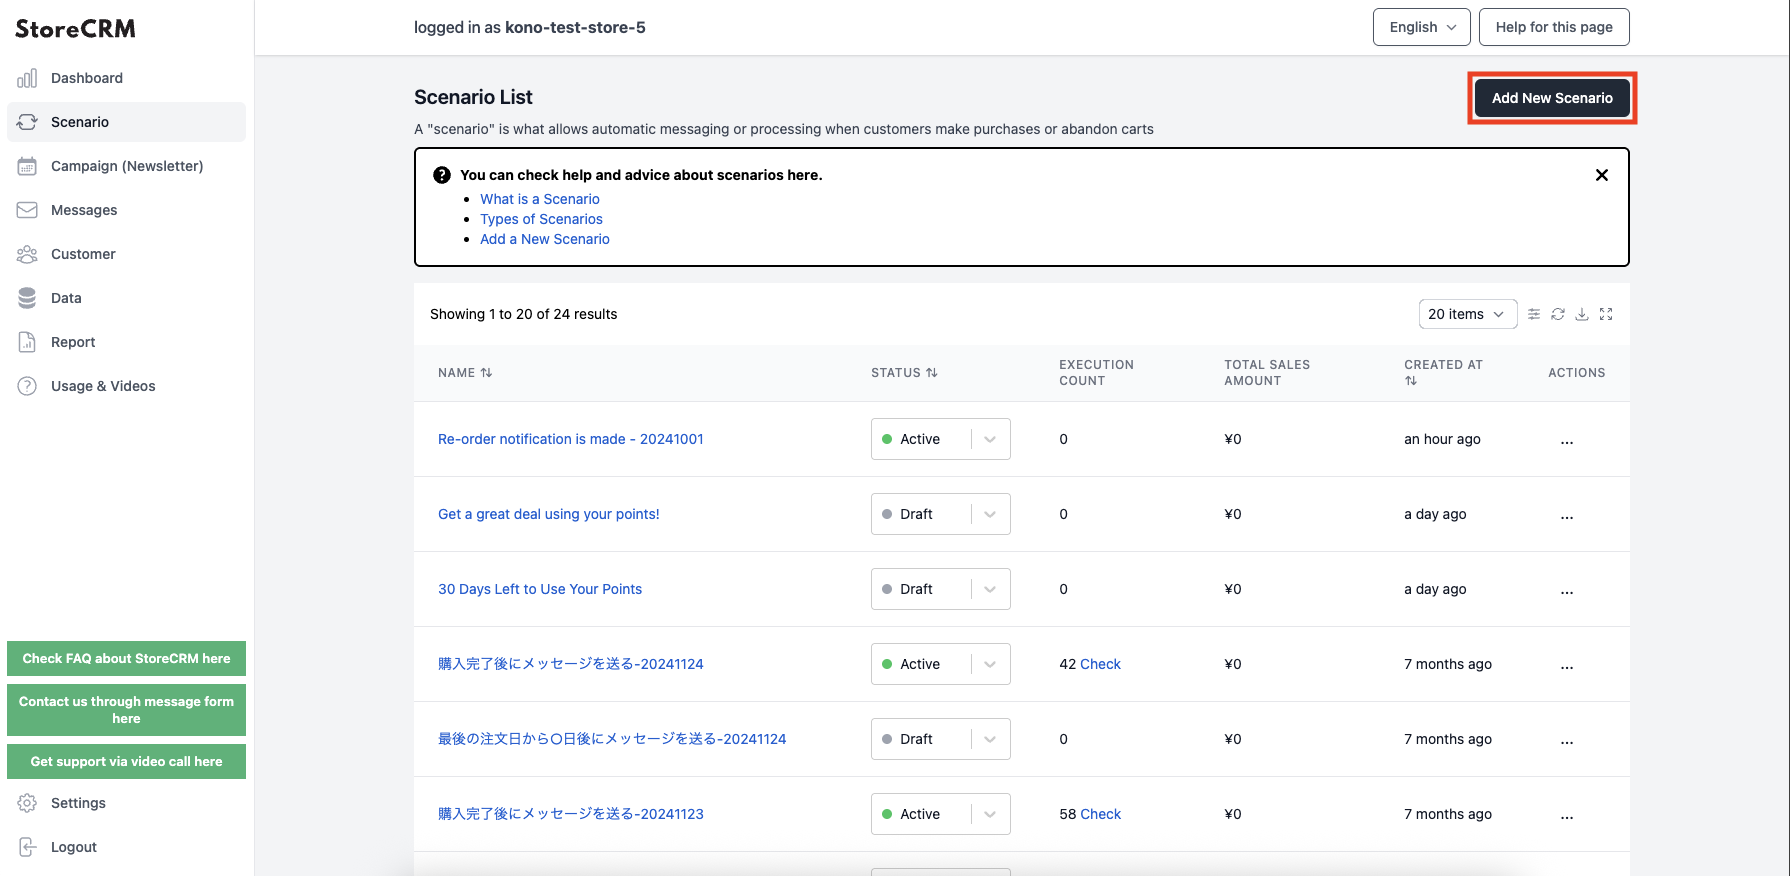
➀Click [StoreCRM App Screen] > [Scenarios] to open the Scenarios List page.
Click on "Add new scenario" in the upper right corner of the screen.
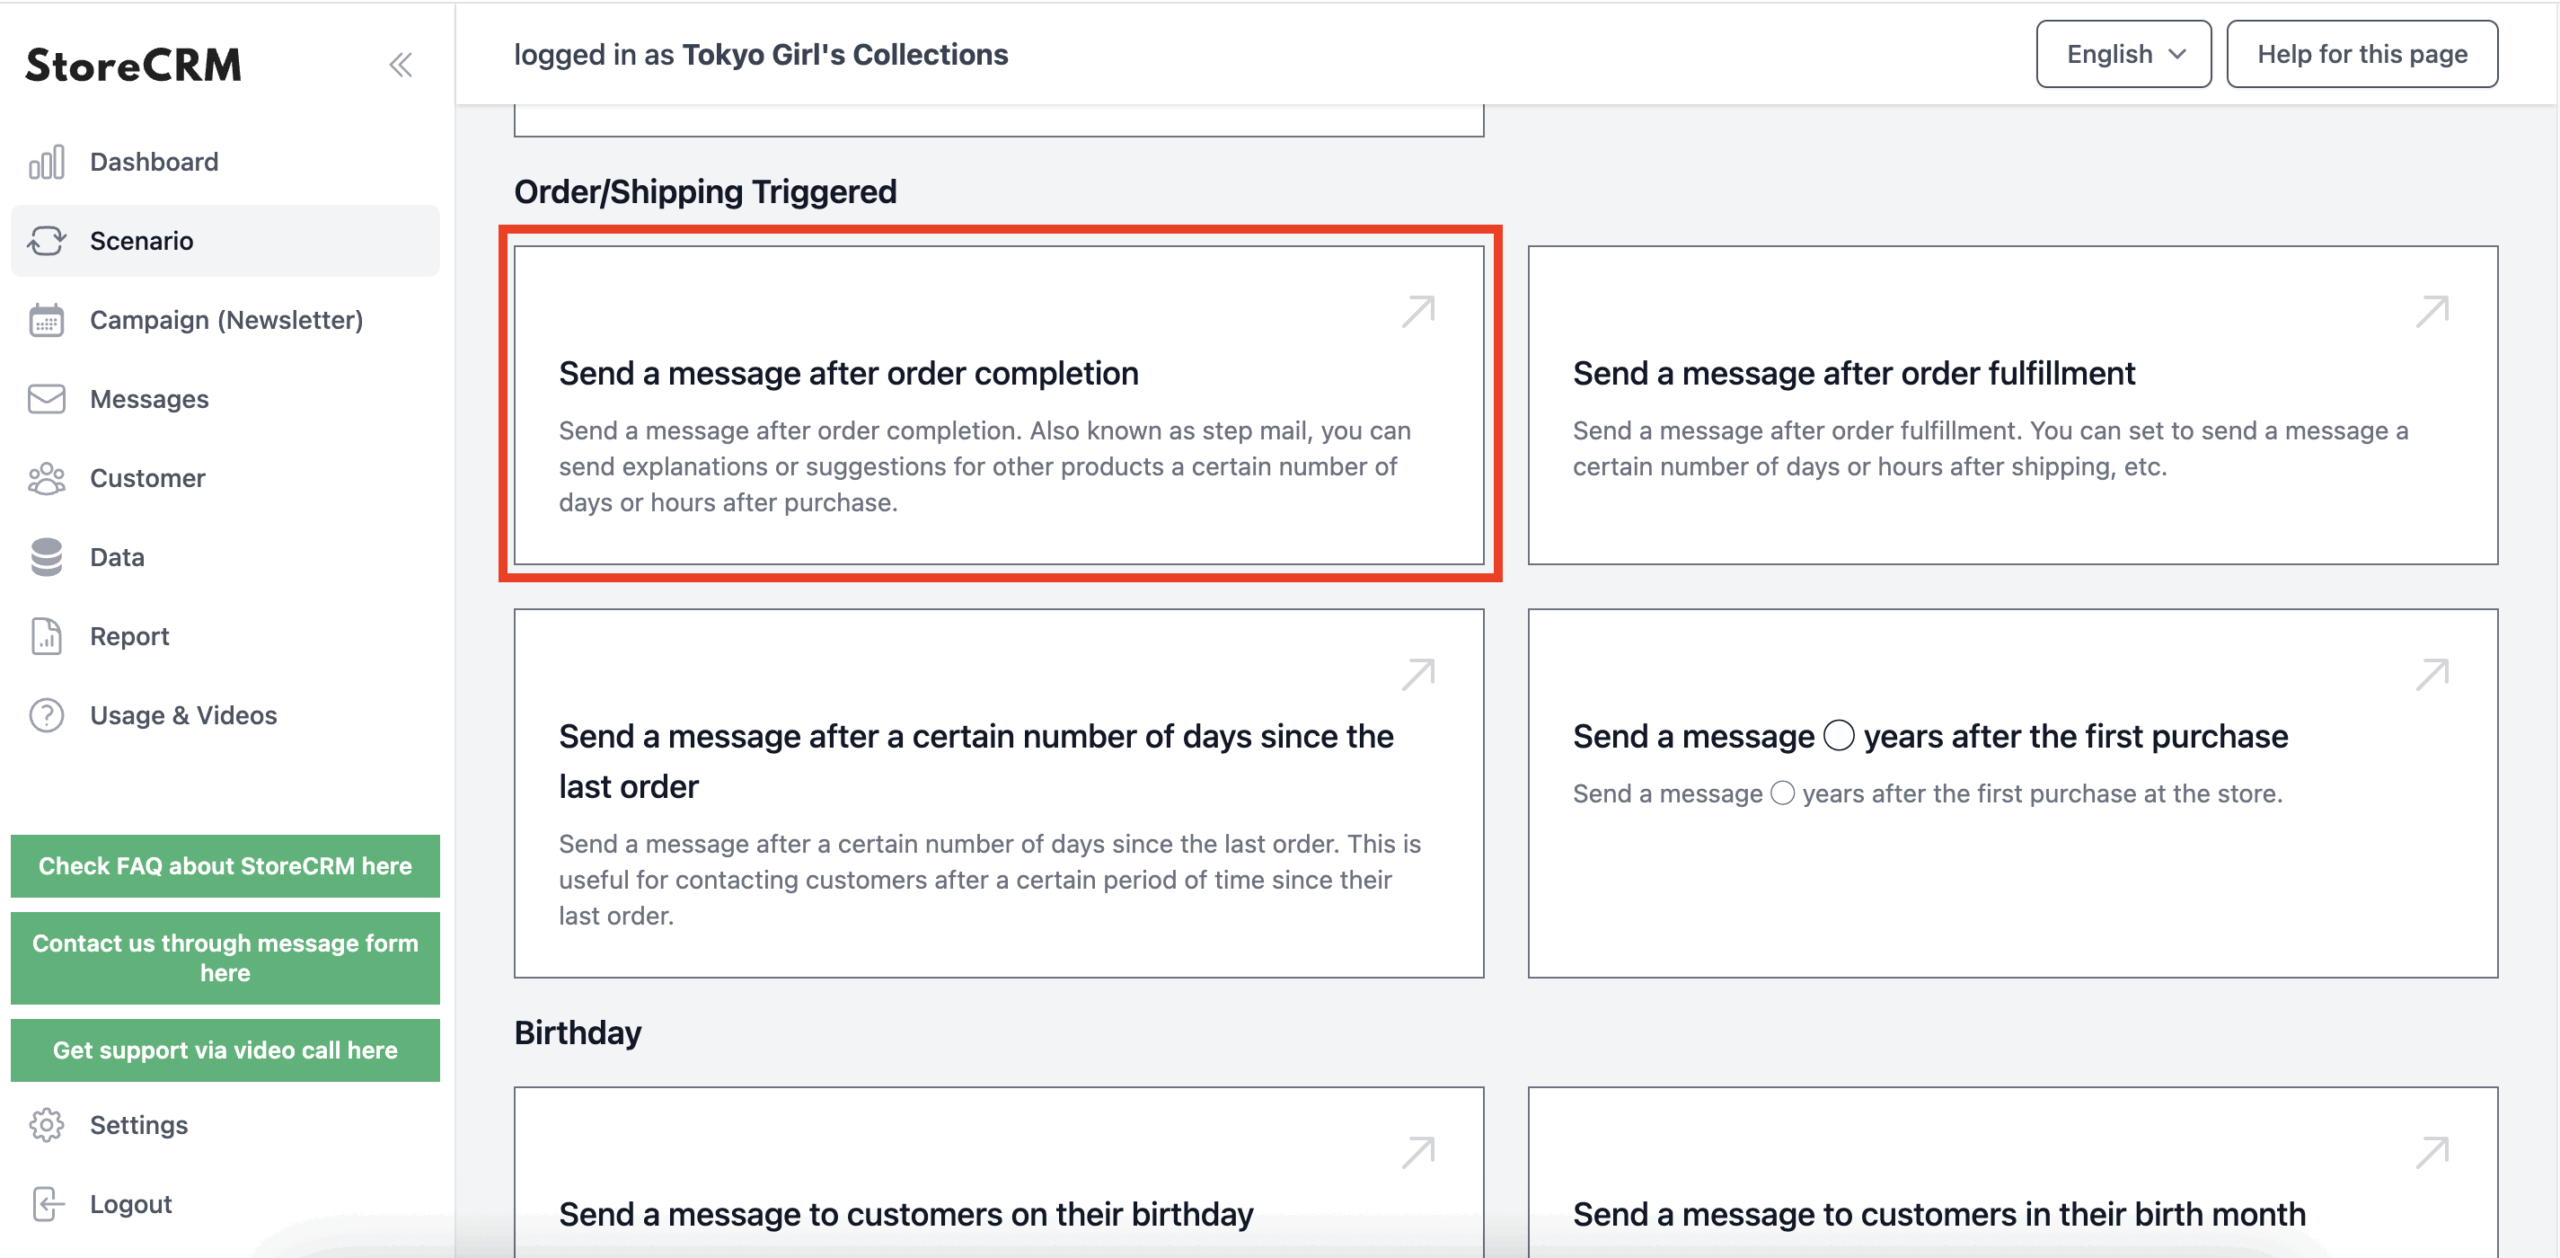
(2)Click on the scenario you wish to createThe following is a list of the most common problems with the
This time, select [Email after purchase is complete].
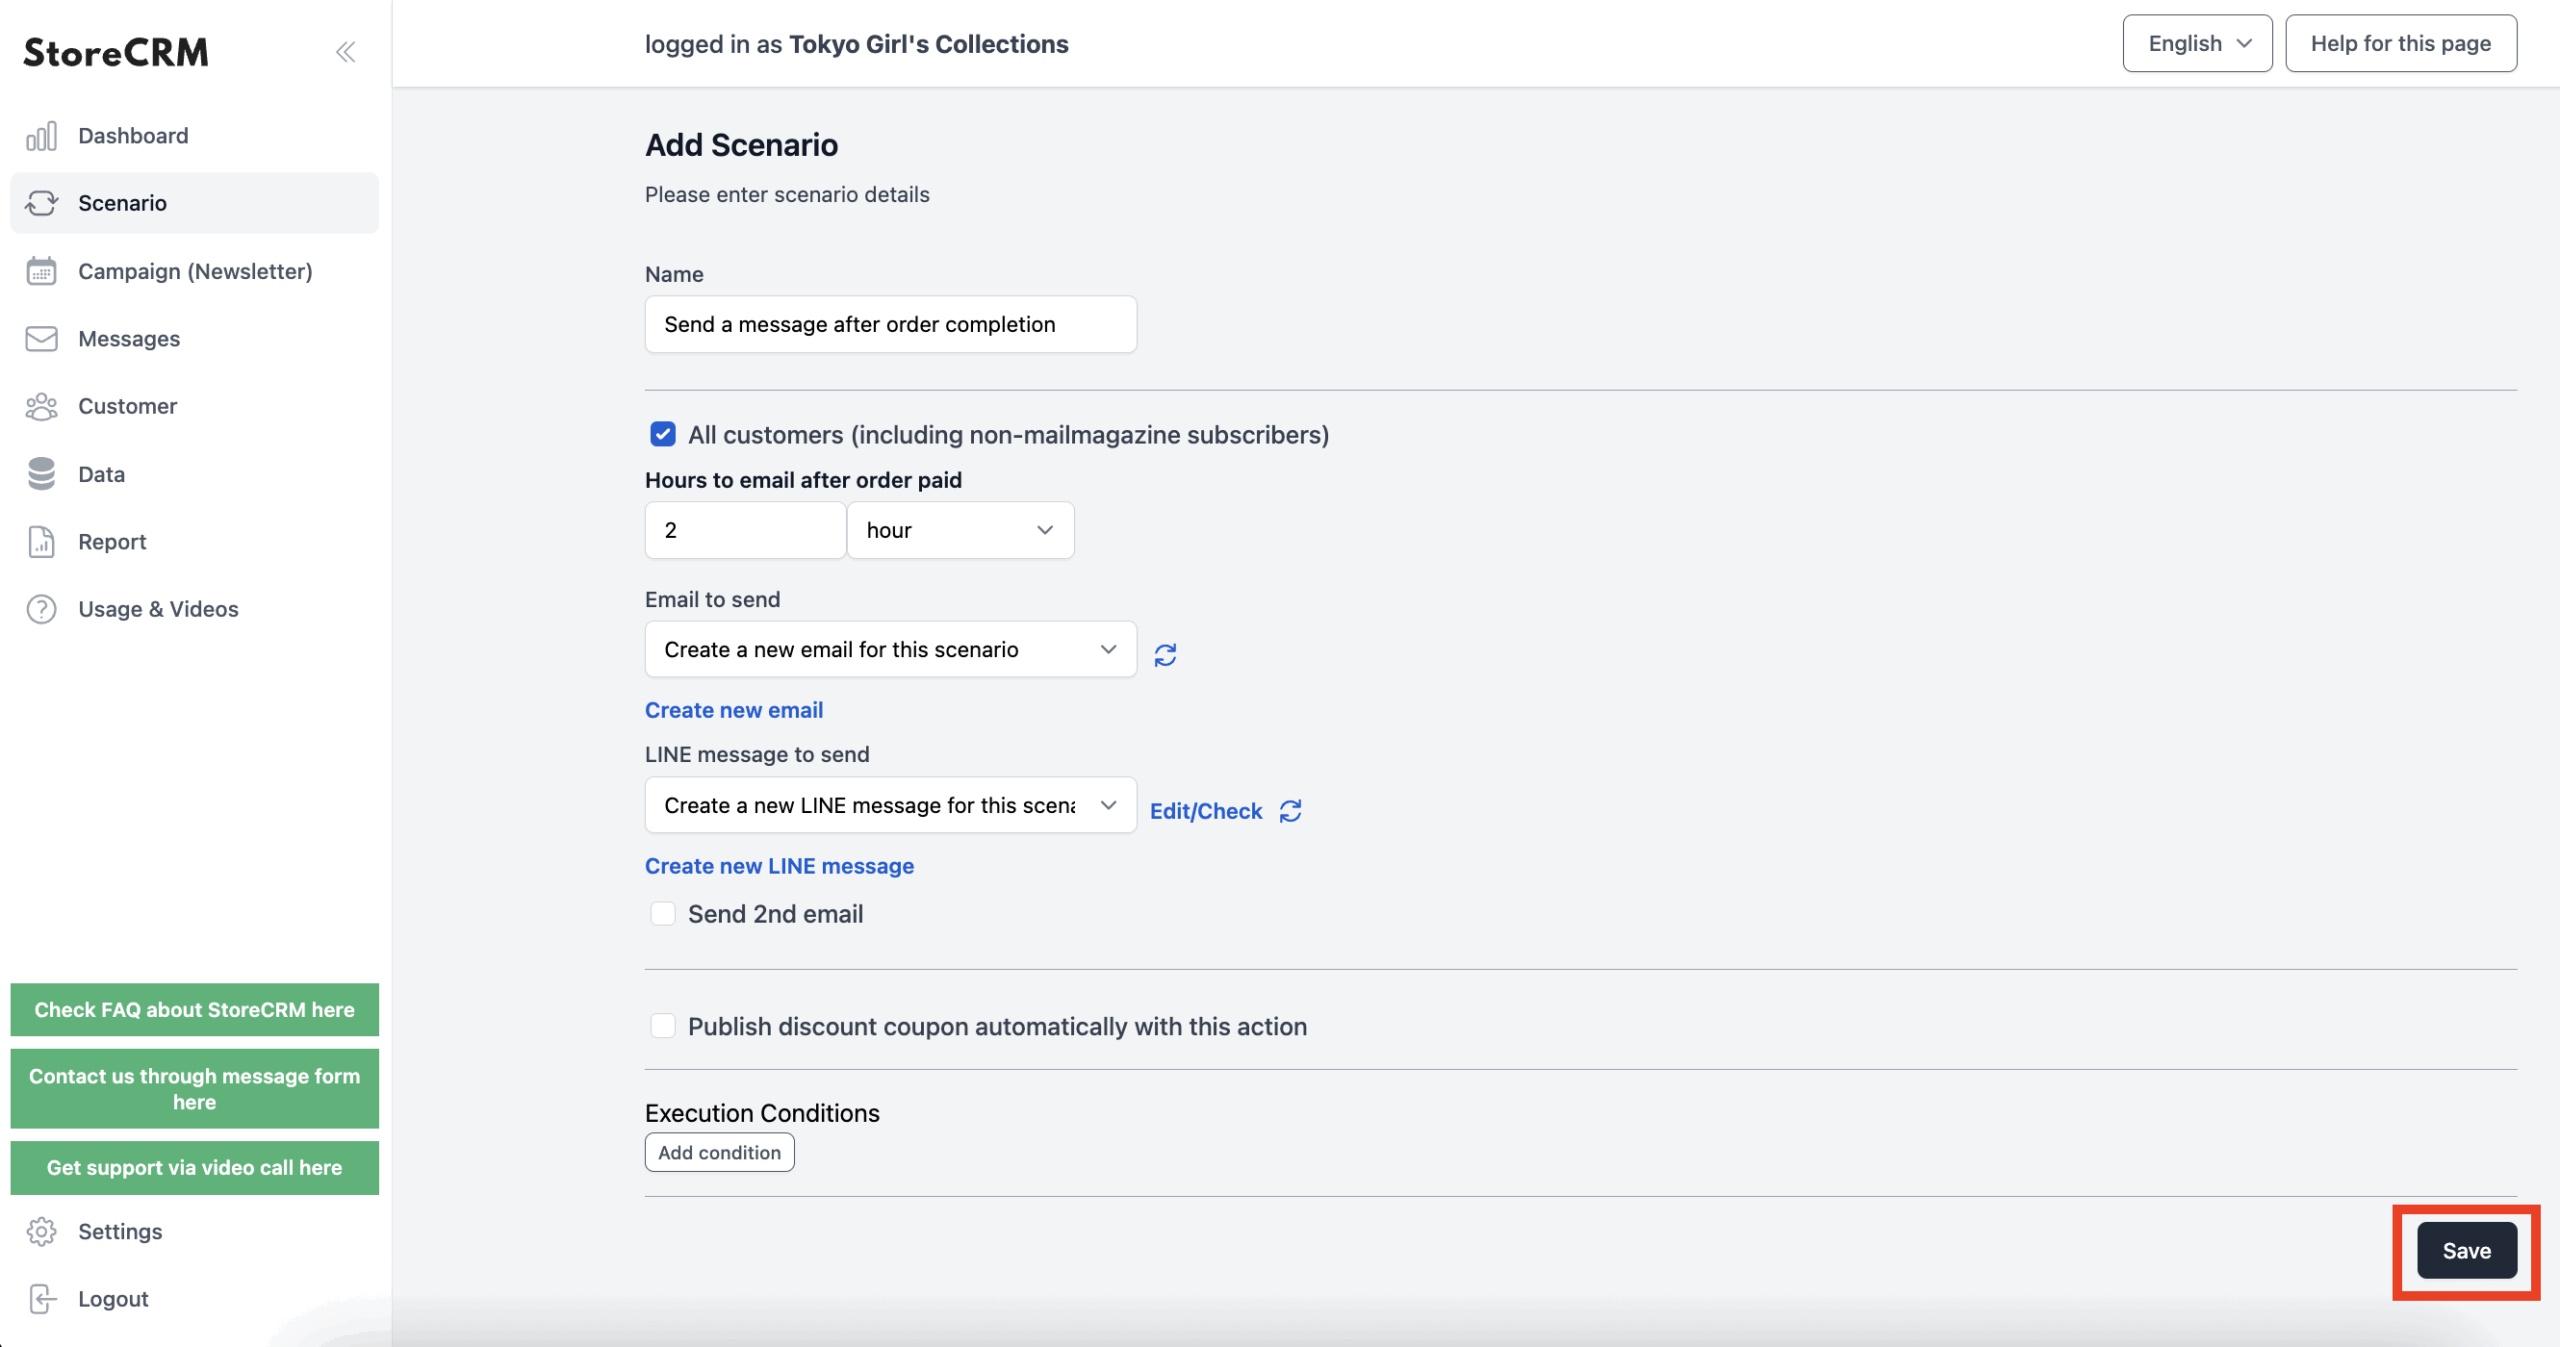
(3) The scenario setup screen will open, but save the settings as they are made in the flow editor.
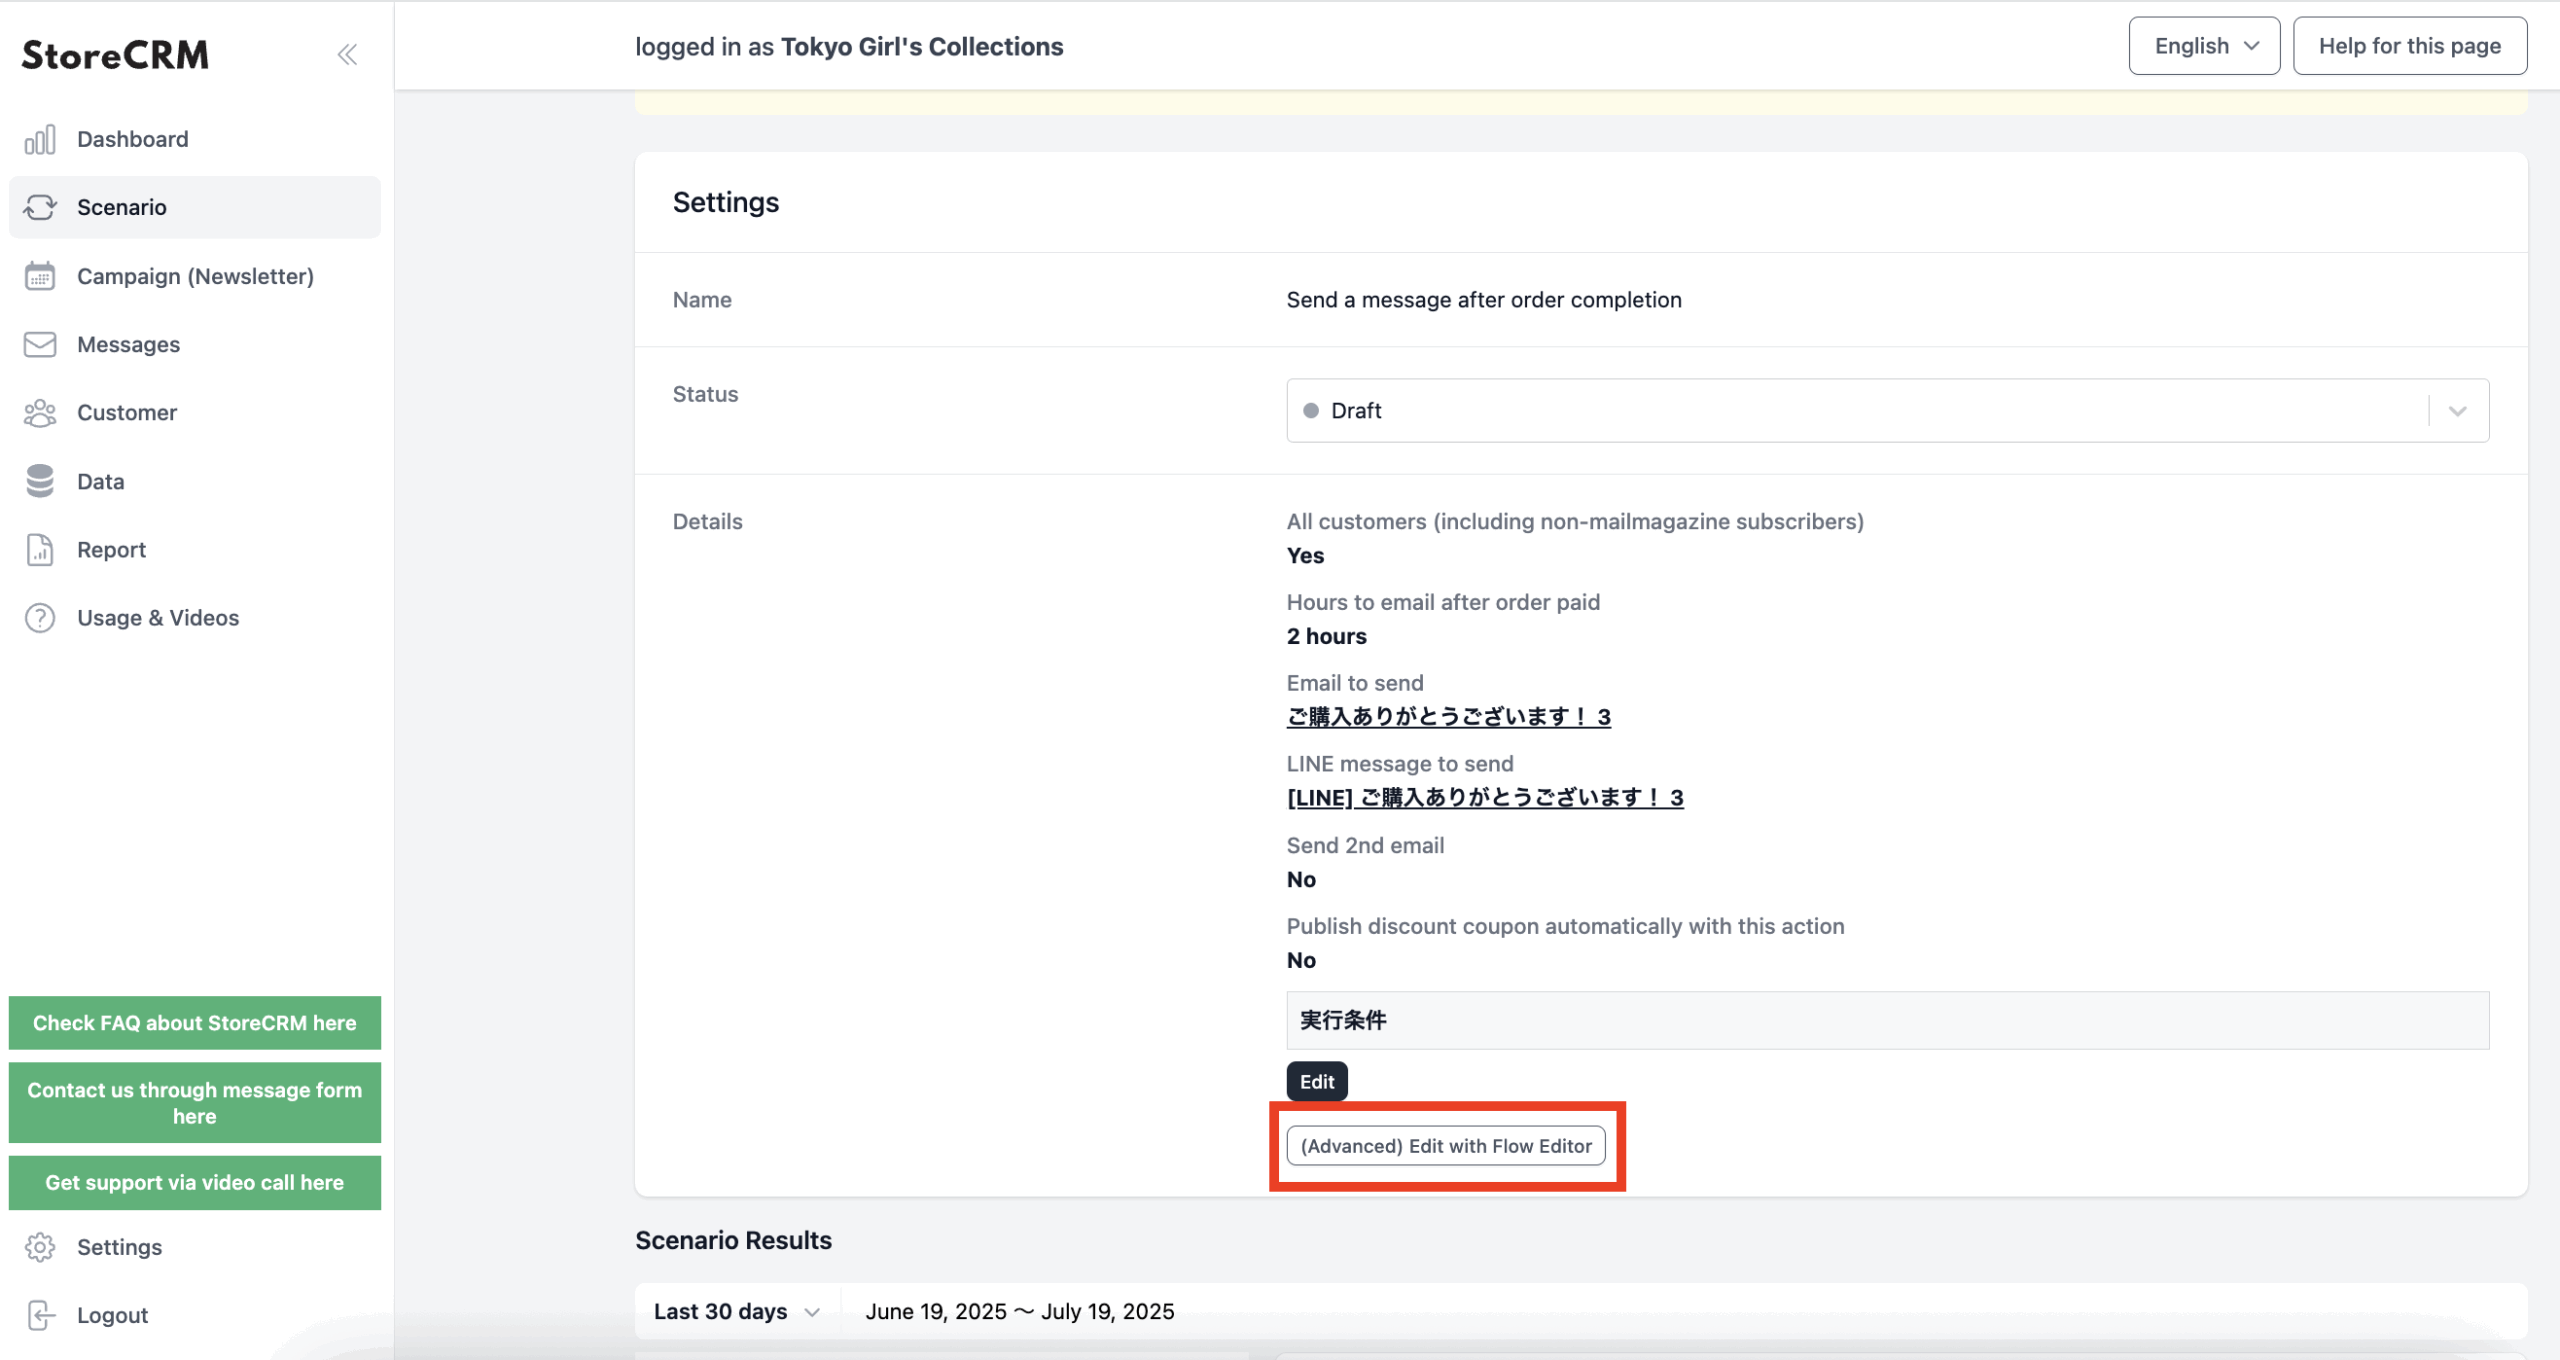
(4) When the Scenario Details screen opens, click [Settings] > [Details] > [(Advanced) Edit with Flow Editor].

(5) The flow editor screen will open and this section is now complete.
The Flow Editor screen can also be opened for scenarios that have already been created by following steps (4) through (5).
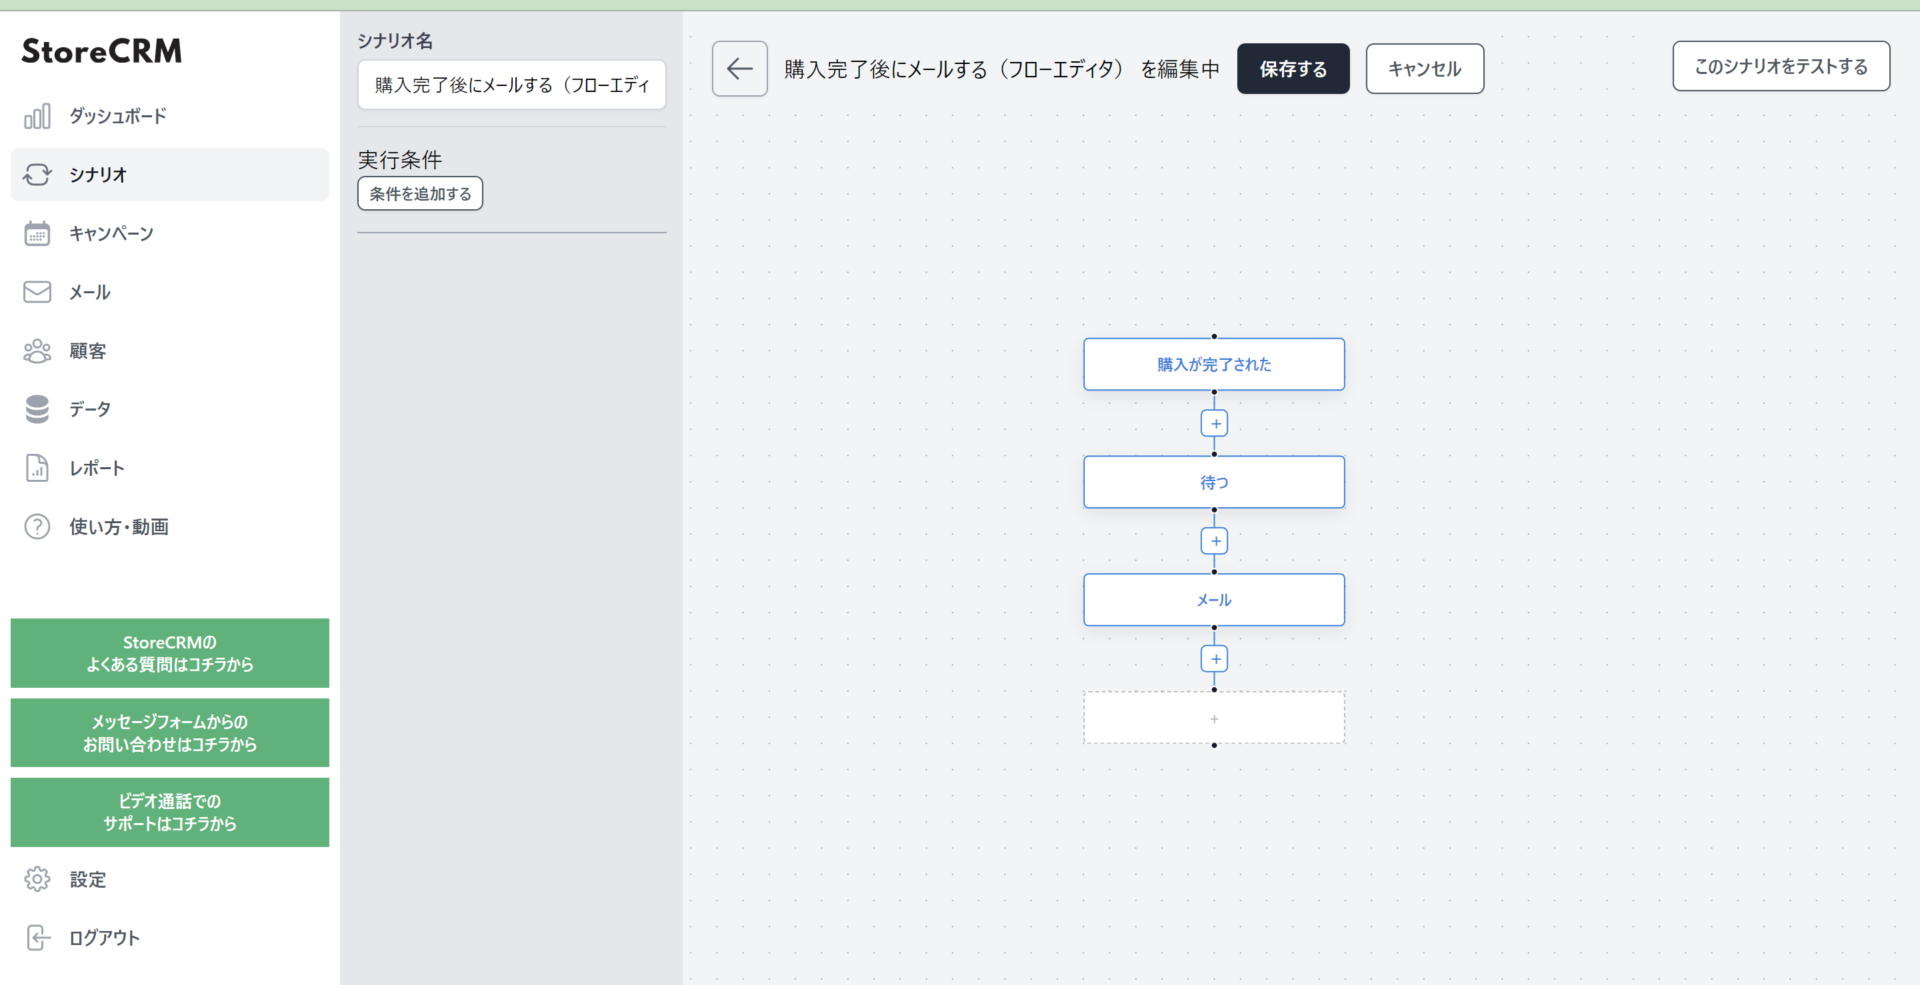
Explanation of various Flow Editor setting items
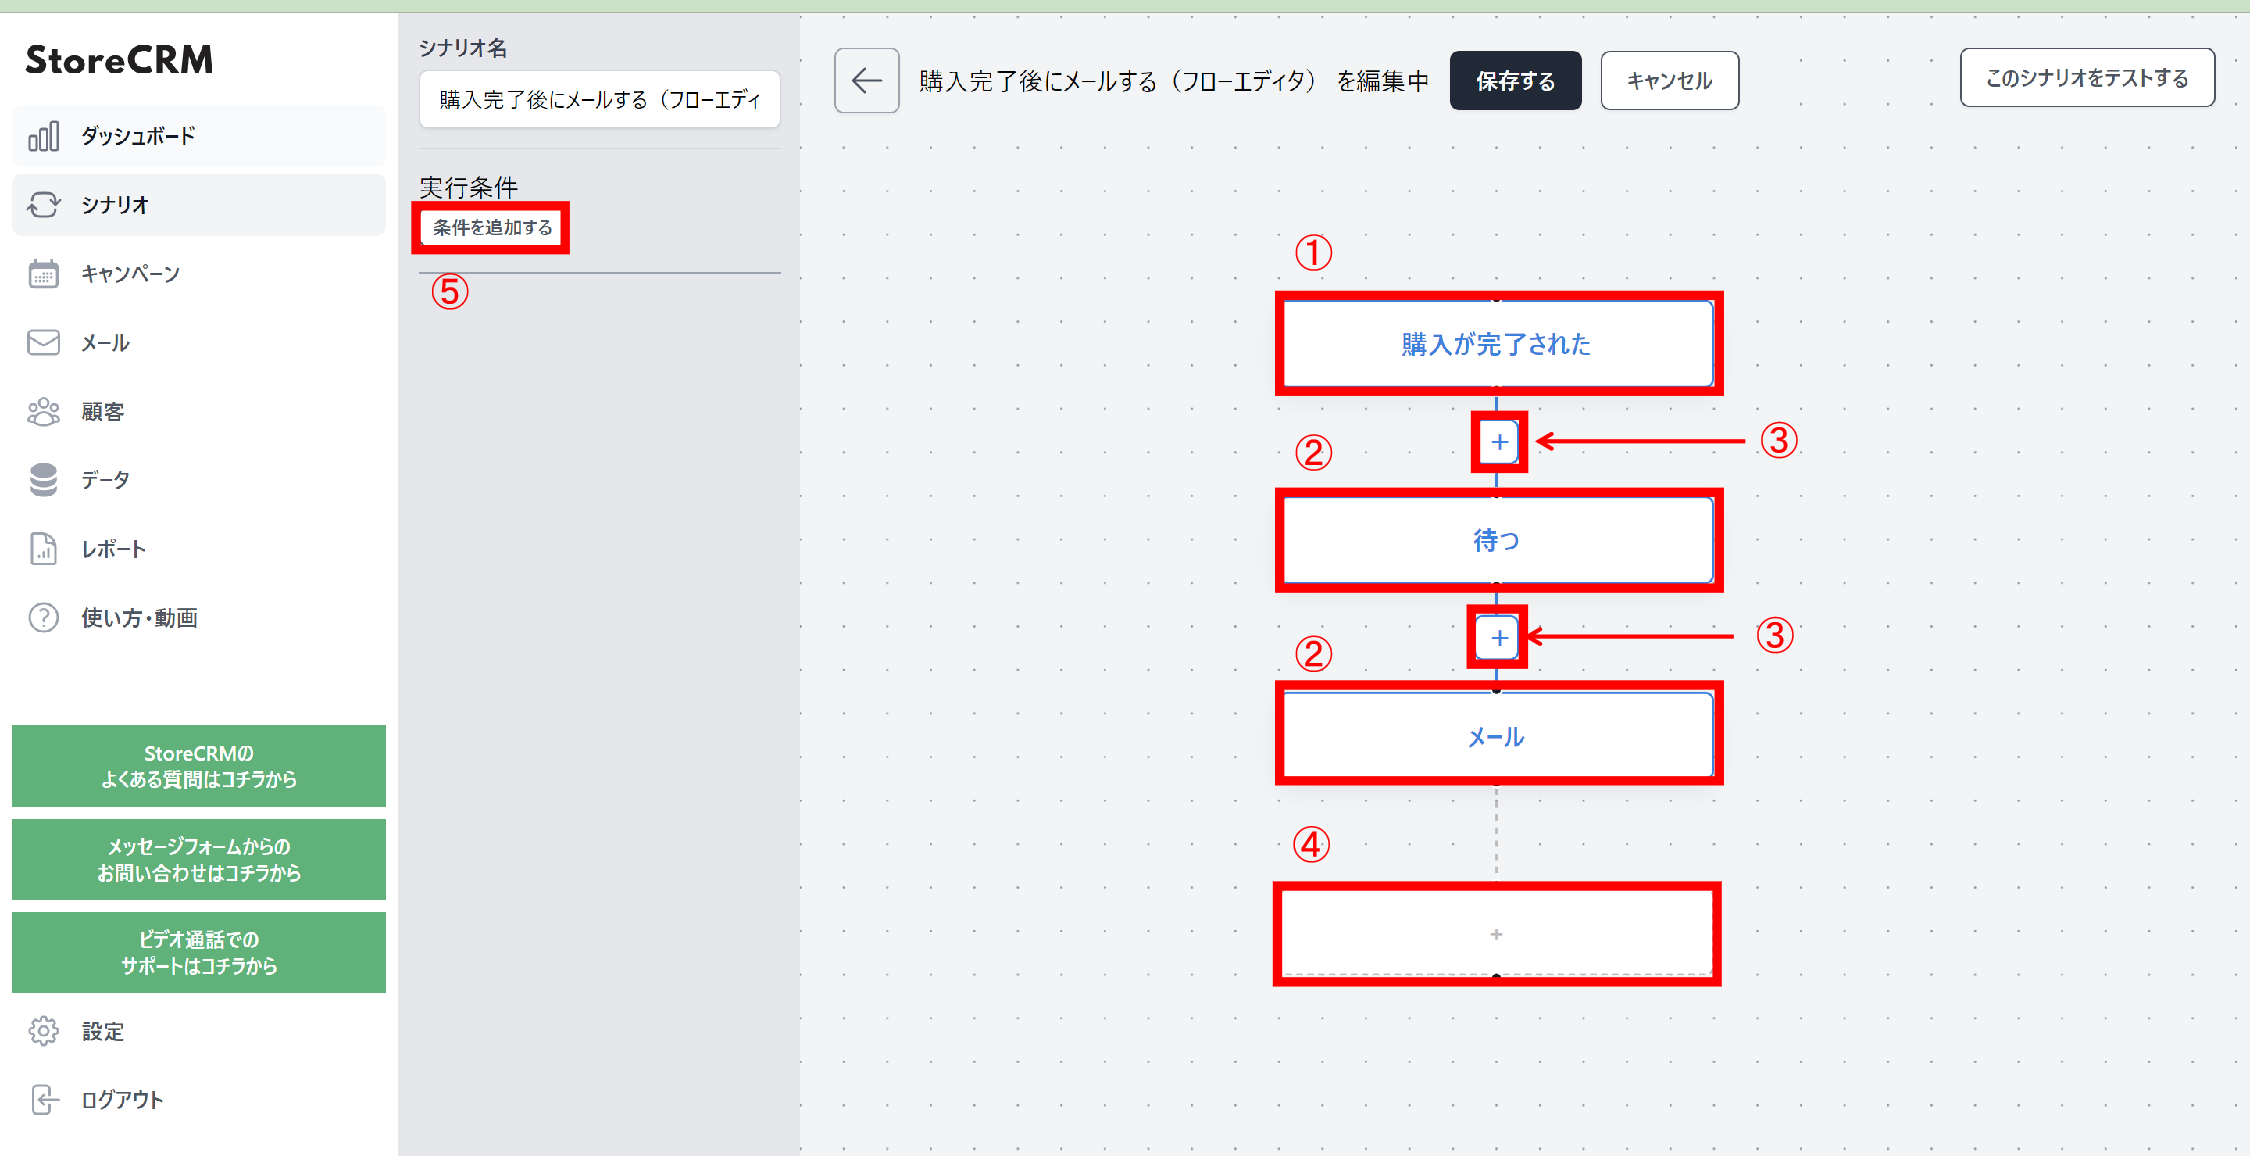
The following is an explanation of each item on the Flow Editor screen. In a scenario, processing is started by the execution trigger in (1) and the processing blocks in (2) are processed in order from the top to the bottom.
(1) Scenario execution trigger
This is the event that triggers the execution of the scenario. In this case, we have selected the scenario [Email after purchase], so the process will start when the customer purchases the product. The trigger for the scenario varies depending on the scenario selected, so select the scenario according to the trigger you wish to use. Note that you cannot change or delete the execution trigger of a scenario.
(2) Processing block (node)
The processing group that is actually executed when triggered by (1) is executed from the top to the bottom. There are processes such as waiting for xx days or xx hours, actually sending a specified e-mail, or branching on a specified condition.
(3) Add processing block button
Adds a new processing block between specified processes. There are several types of processing blocks that can be added, which are described below.
(4) Add processing block button (add to the end of the current processing)
Adds a new processing block to the end of the current processing.
(5) Scenario execution conditions
You can set conditions for whether this scenario is actually executed. Conditions can be set based on order details and customer information.
You can perform processing only for customers who have been assigned a specific tag, or only for orders of a given amount or higher.
If a processing block is selected, the processing setup items will appear in this location.
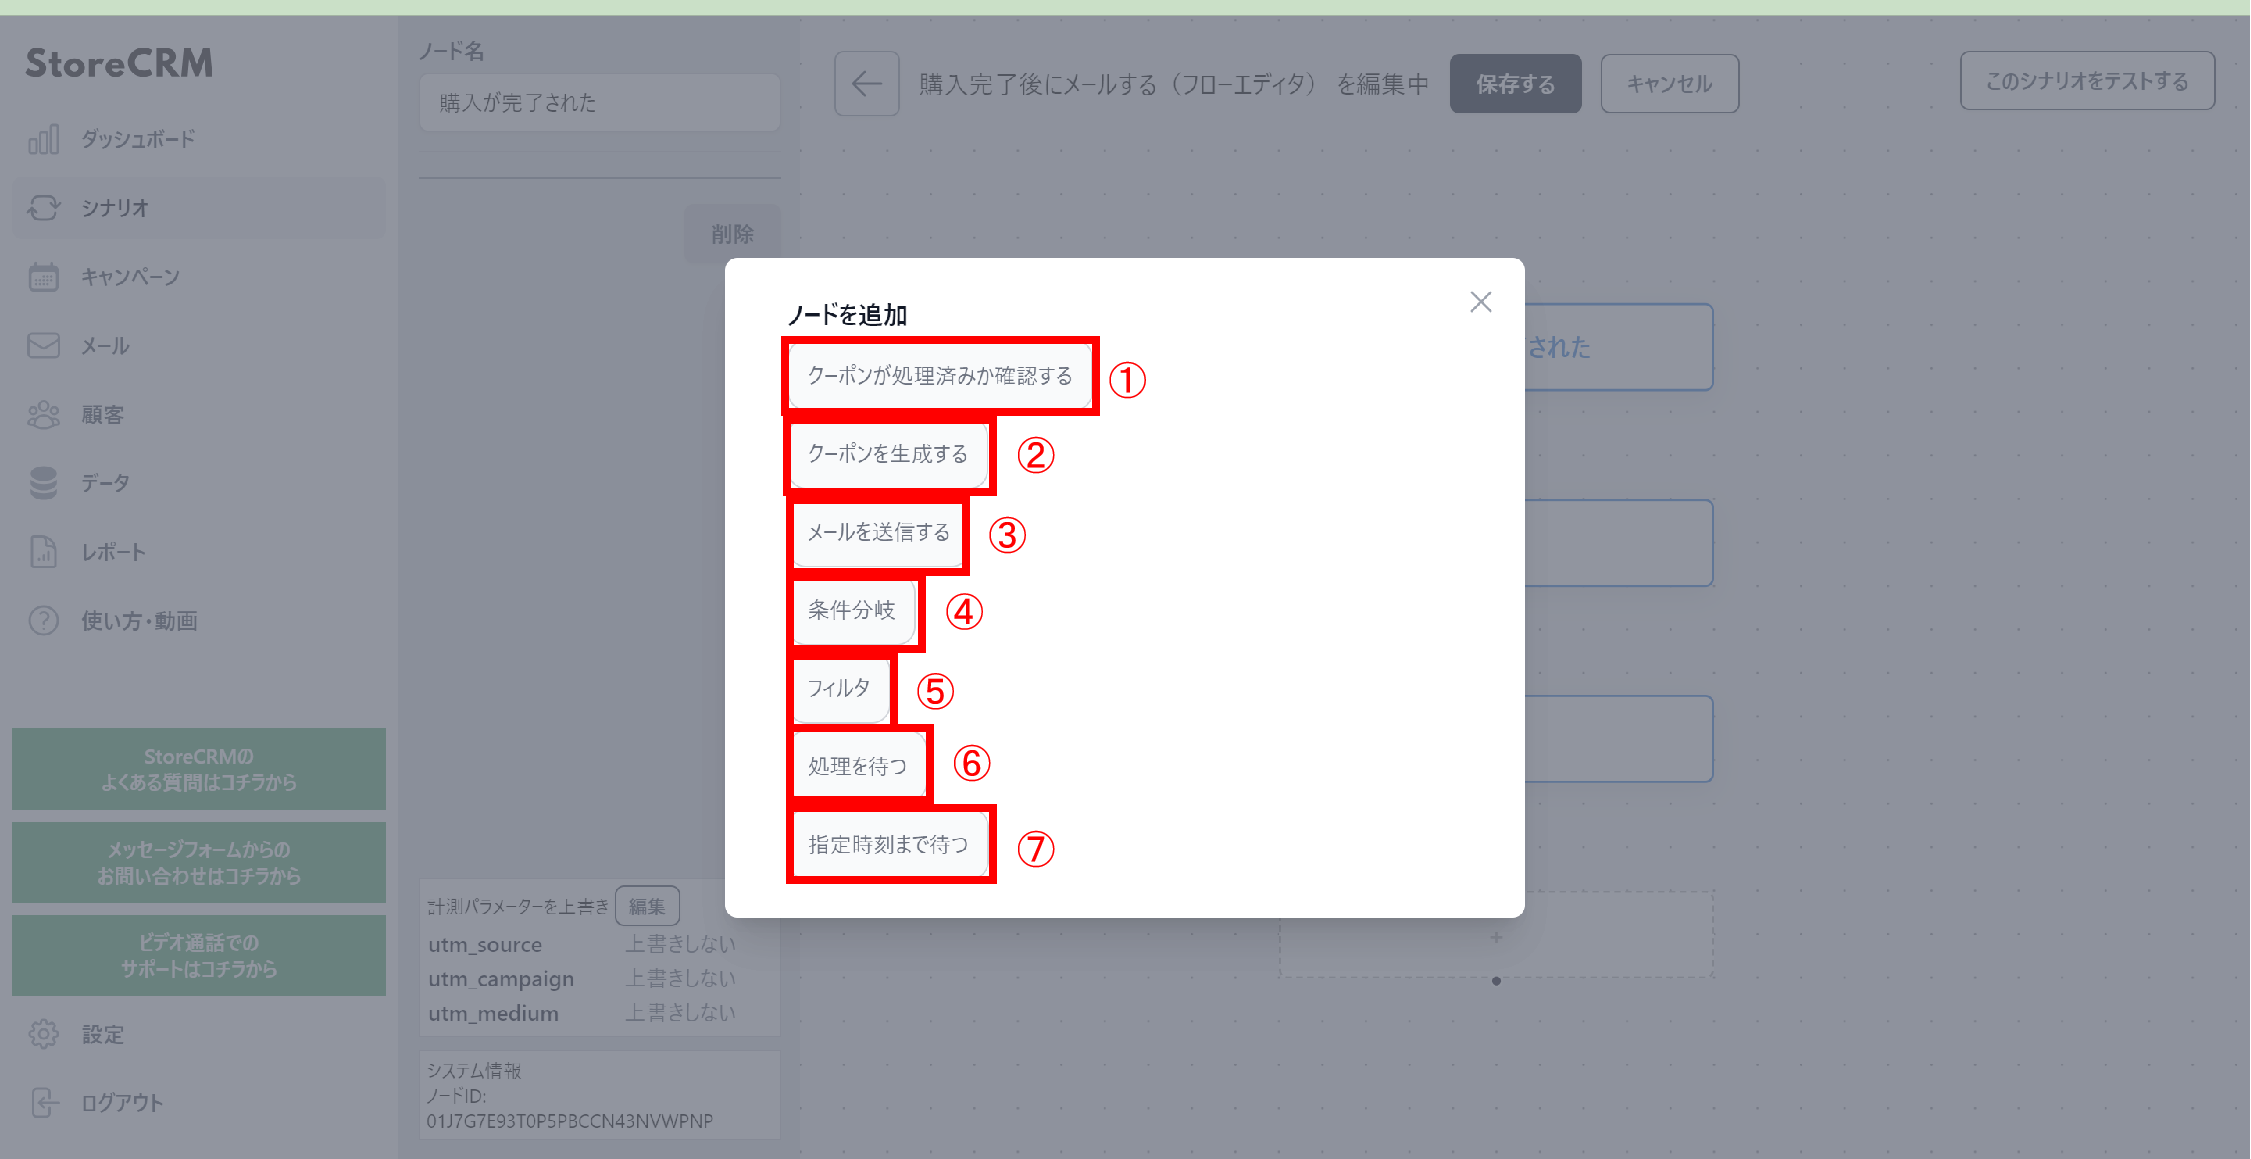
Clicking the Add Processing Block button in (3) and (4) above will take you to a screen where you can select the type of processing block.
This section provides an overview of each processing block and its use.
(1) Check if the coupon has been processed.
If the generated coupon is used, no further processing is performed.
Use this when sending multiple emails in a scenario and not sending any more emails once the coupon has been used.
(2) Generate coupons
If you want to send an email with a coupon, you must add this processing block before the processing block that sends the email.
Selecting this processing block allows you to set the coupon discount rate, expiration date, and coupon usage conditions.
You can also specify any leading string if you wish to manage coupon codes.
(3) Send an e-mail
Sends the specified e-mail.
(4) Conditional branching
Order information and customer information can be referenced as well as scenario execution conditions, and subsequent processing can be divided according to whether or not the set conditions are met. *Multiple conditions can be set.
The basic usage is to send out arbitrary mail to each of the branches.
(5) Filter
As with scenario execution conditions and conditional branching, order information and customer information are referenced, and if the set conditions are met, subsequent processing is performed. If not, no further processing is performed.
*Multiple conditions can be set.
This is used when it is not necessary to branch processing by conditions, but only for specific customers or orders, and only for subsequent processing.
(6) Wait for processing
Use this function when you want to allow time between the previous process and the next process. Set the waiting time in days, hours, or minutes.
(7) Wait until the designated time
Use this function when you want to leave time between the previous process and the next process on a time basis.
You can set it in the form of "wait until 00:00 in 00 days" or something similar.
3. advanced scenario customization
About customized specifications
In this section, we will actually use the flow editor to create advanced scenarios.
From this section, we will explain how to add nodes and node names are explained in the previous section, so if you are unsure, please refer to the previous section while setting up. The original template will be customized using the [Email after purchase is complete] template used up to the previous section.
The specifications are as follows
memo
- Send F2 conversion emails to first-time customers based on the products they purchased.
- Seven days after the purchase is completed, mailings will be sent out to customers who have not returned or refunded their purchases under the following conditions.
(1) If [coffee] is included in the product tags purchased, a coffee goods recommendation ranking e-mail will be sent.
(2) If [Baer] is included in the purchased product tag, a rental beer server introduction e-mail is sent.
(3) If (1) and (2) do not apply, send an email introducing the recommended collection.
(4) If the order exceeds 10000 yen, an e-mail with a coupon for 20%OFF will be sent.
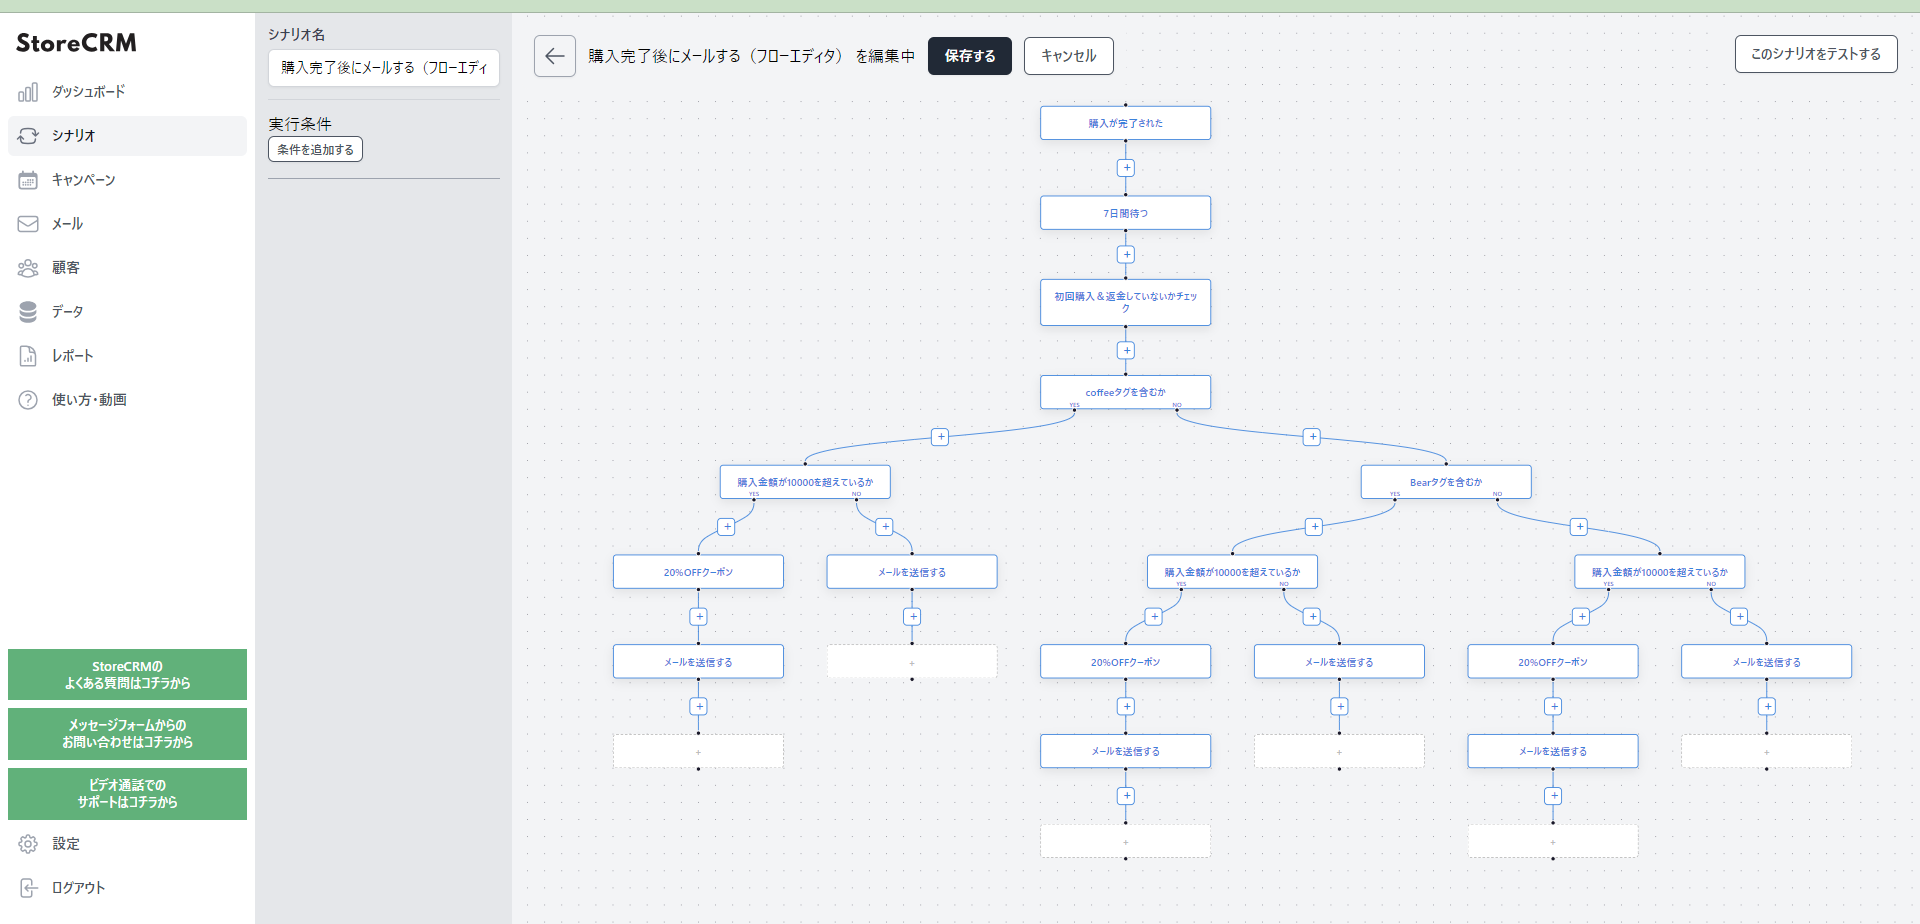
This is a complete diagram of the flow editor we will be creating.
Although it looks complicated, it is easy to set up by following the steps one by one.
Compose an email
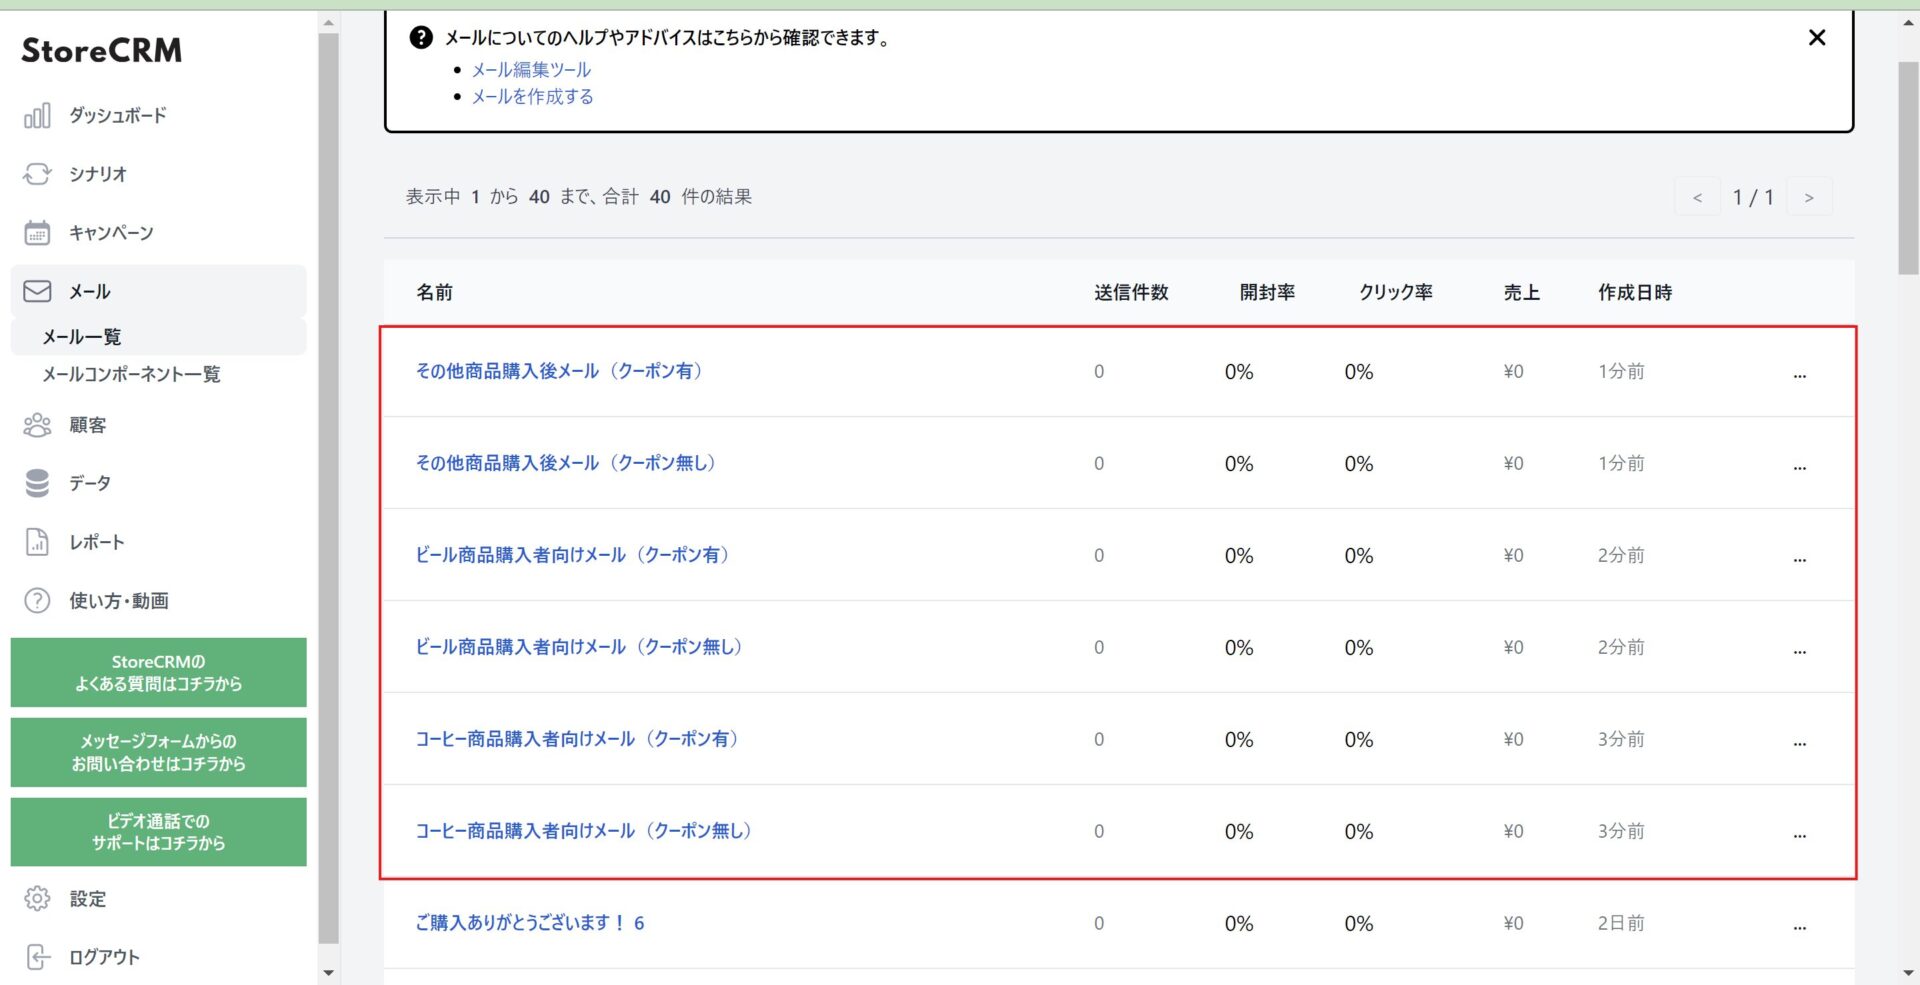
Before editing the flow editor, create an email. In this case, we will create the following email since we will be sending 6 different email patterns.
1) Emails for coffee product purchasers (with coupons)
(2) Emails for coffee product purchasers (without coupons)
(3) Emails for beer product purchasers (with coupons)
(4) Email for purchasers of beer products (without coupons)
5) Email after purchase of other products (with coupons)
(6) Email after purchase of other products (without coupon)
If you do not know how to compose an email, please watch this video.
Customize Flow Editor
We will actually edit the flow editor to create a scenario. If you have some sense of the flow editor from the previous section,
Please try to create a scenario using the specifications without reading the explanations that follow.
(1) Open the edit screen of the flow editor created in section 2.
memo
Once you save in the flow editor, you will not be able to return to the mode where you can modify it with easy settings. Be sure to duplicate the scenario and customize it if you want to try it on a scenario that is in production.
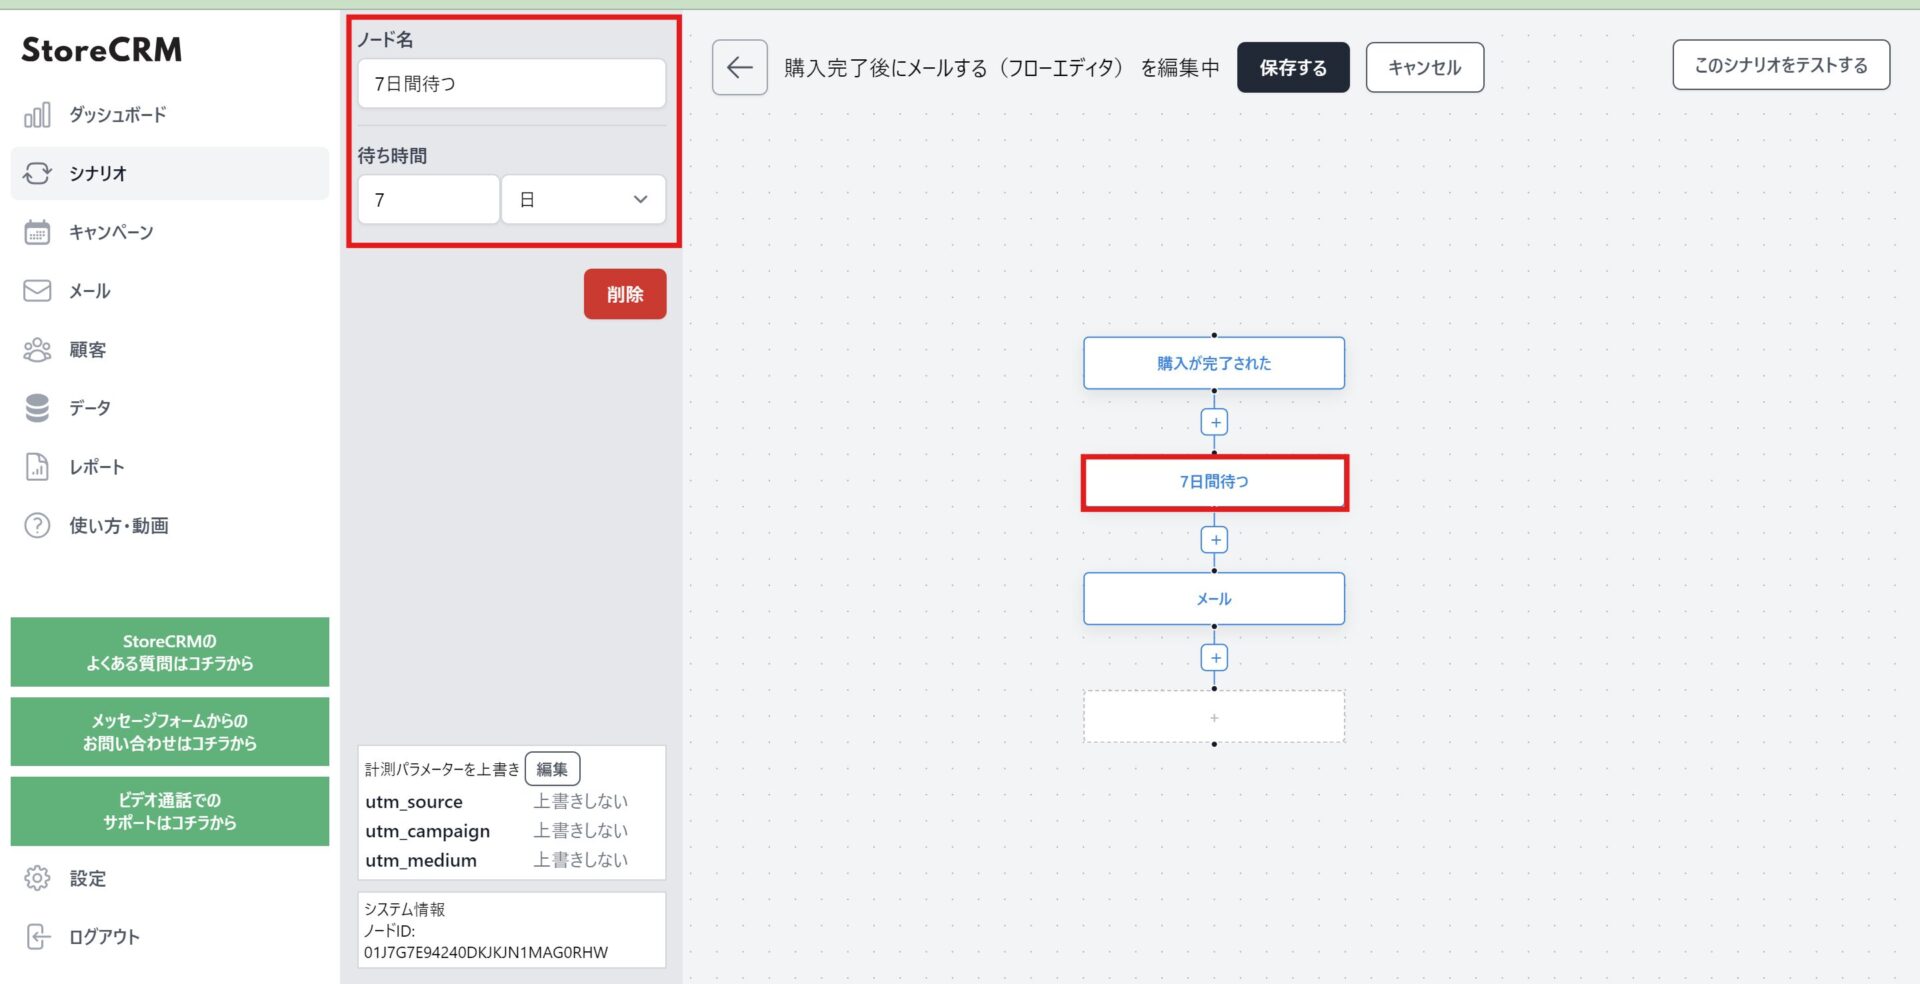
Select the node ➁[Wait] and set the waiting time to 7 days. Give the node an arbitrary name that you recognize.
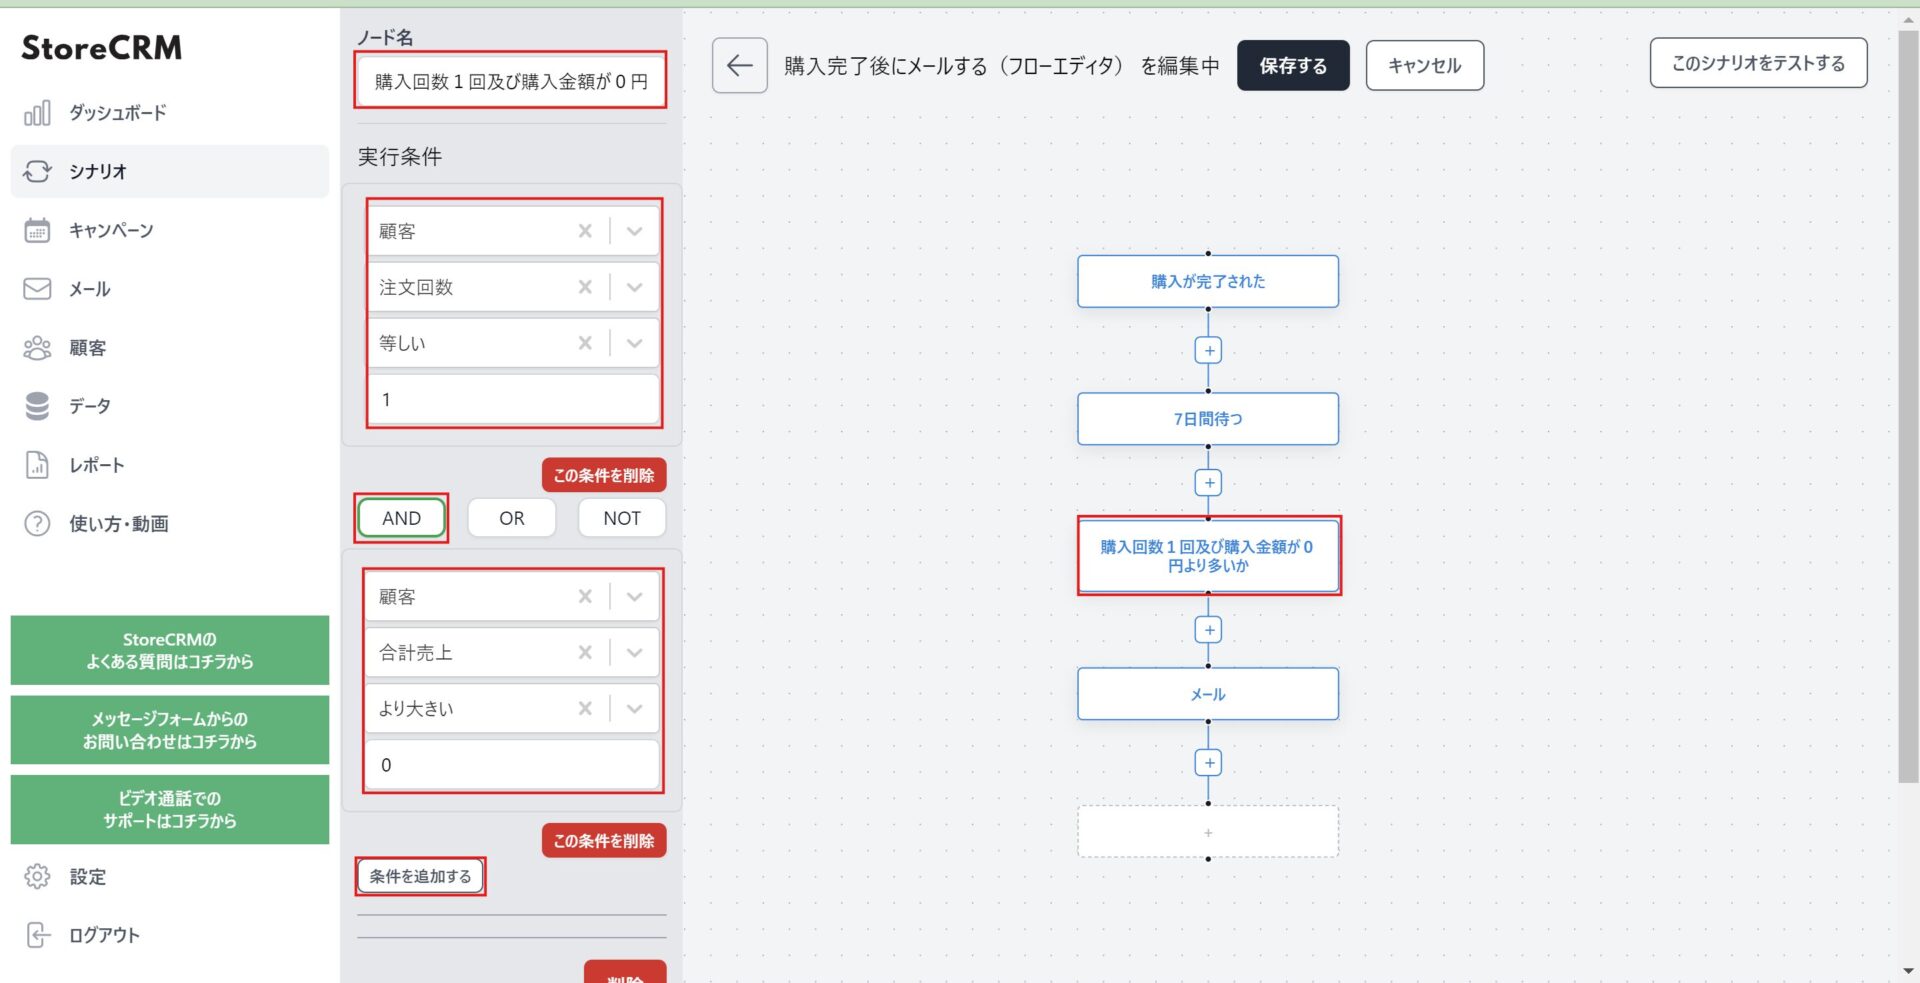
Add a [Filter] node between the [Wait] node and the [Mail] node.
thisThe first time you want to send an e-mail to a customer who is a first-time buyer (one-time purchase) and has not paid for the product (refund/return), you set the conditions and narrow down the list of customers to whom you will send the e-mail for further processing.
Multiple conditions can also be set by clicking the "Add Condition" button and connecting them with "AND", "OR", and "NOT".
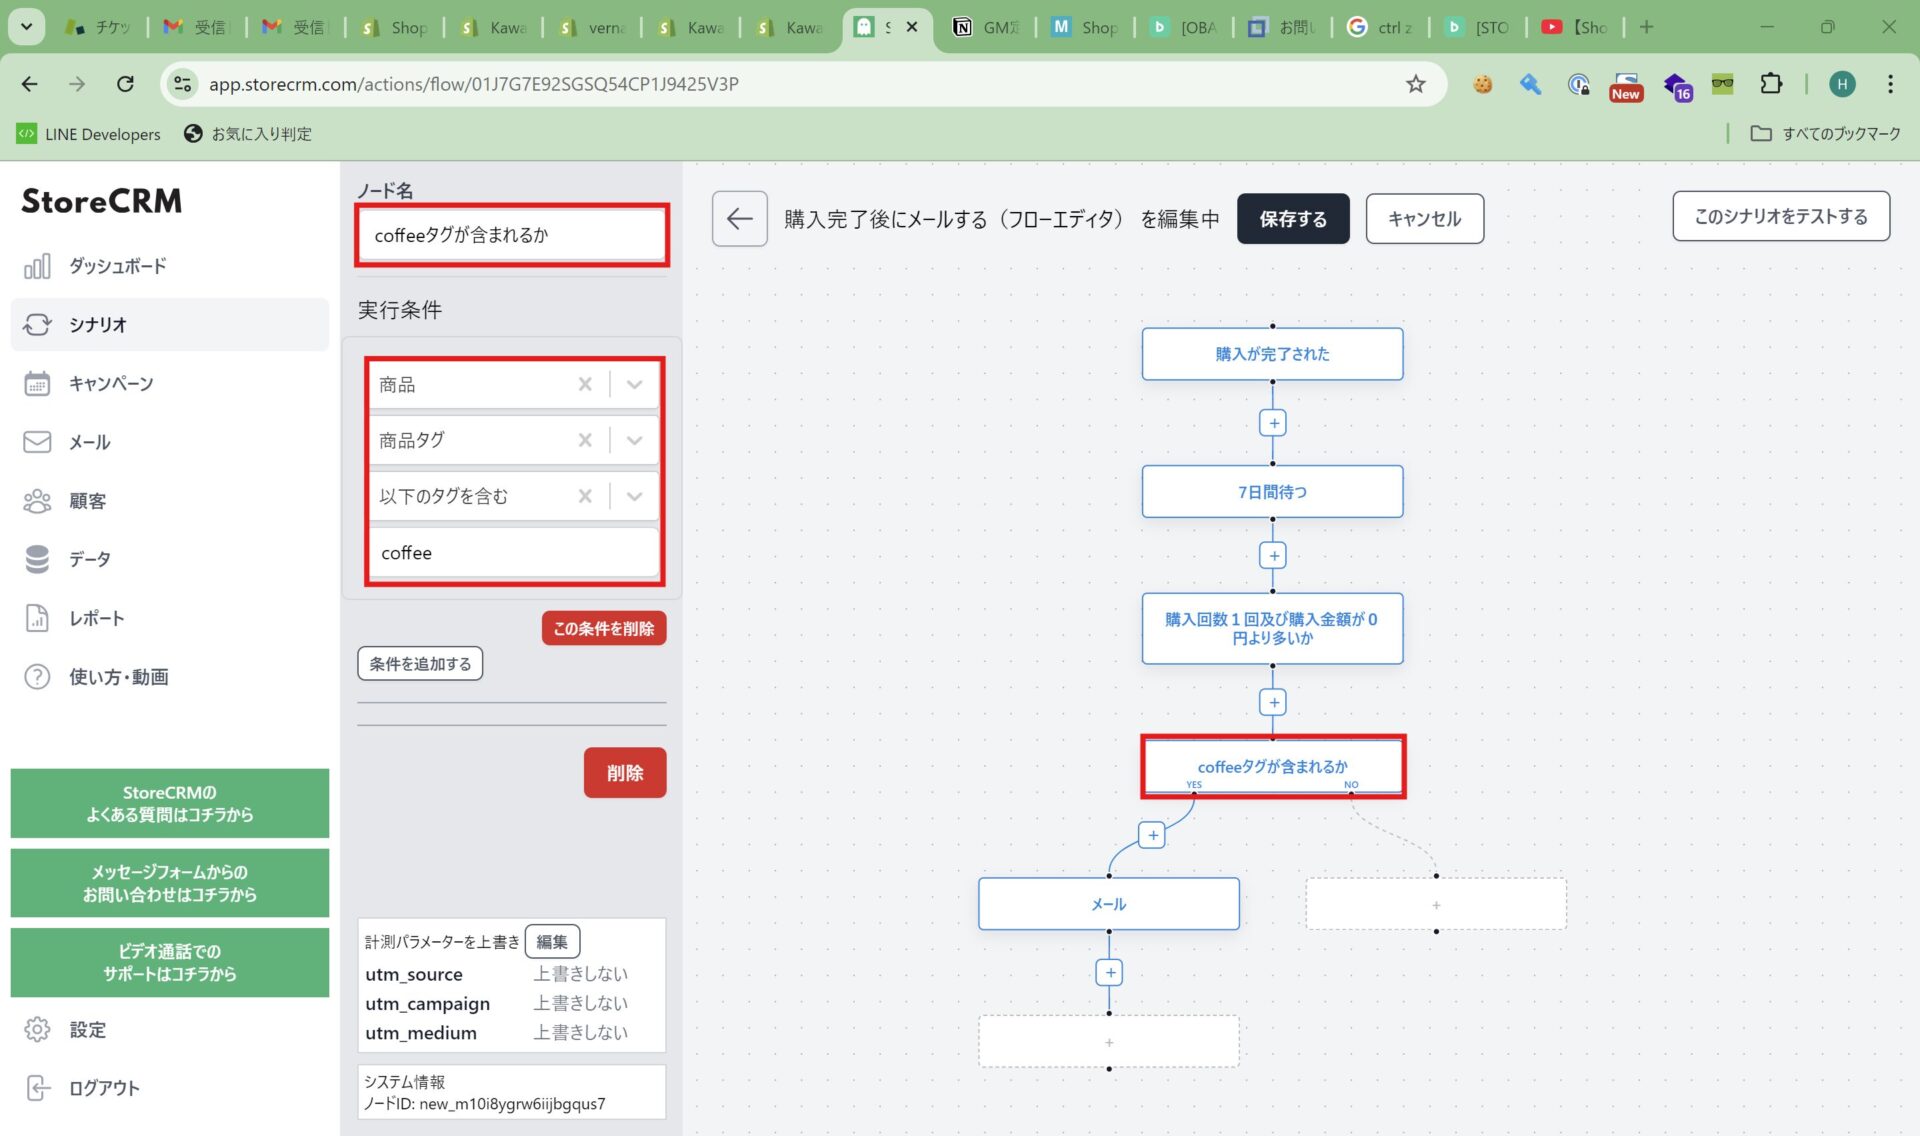
(4) [One purchase and purchase amount greater than 0 yen] node and [EmailAdd a [Conditional Branch] node between the [Conditional Branch] nodes.
This section determines whether the [COFFEE] tag is included in the purchased items.
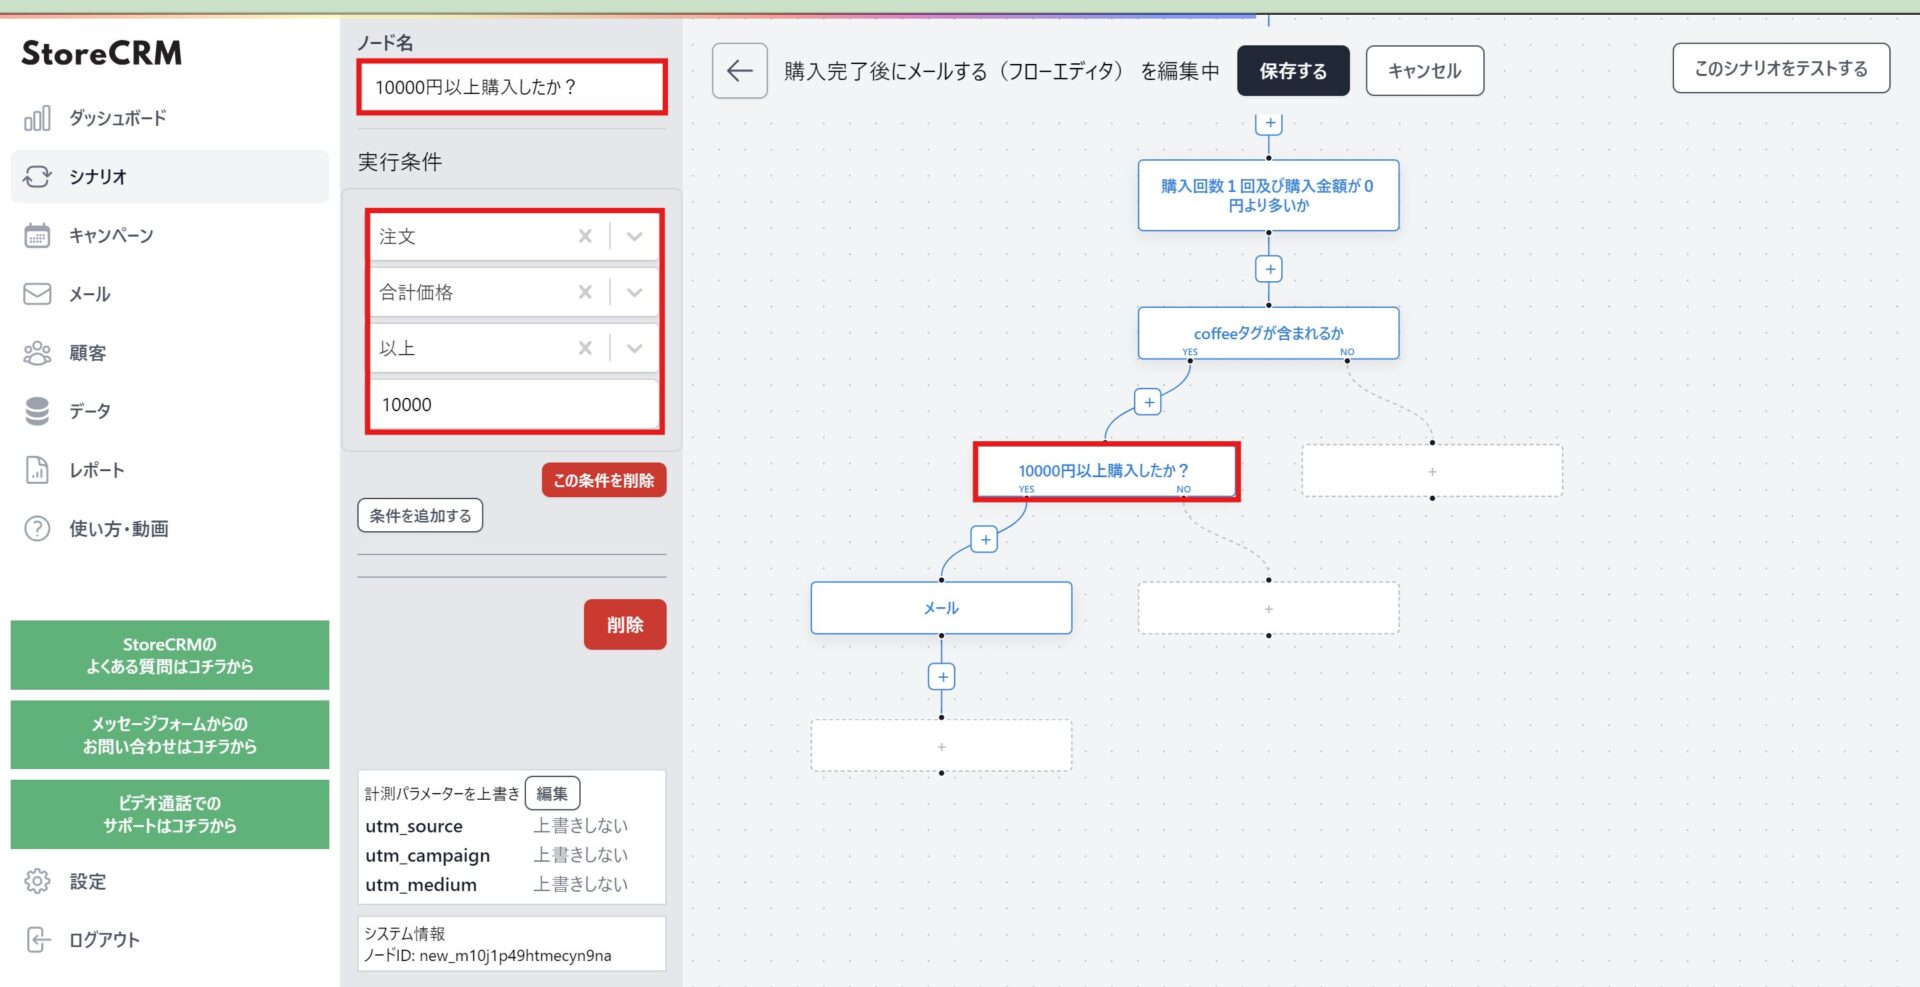
(5) [ (5) [ (5) [ (5) [ (5) [ (5)between the [contains COFFEE tags] node and the [email] node.Add a [conditional branch] node.
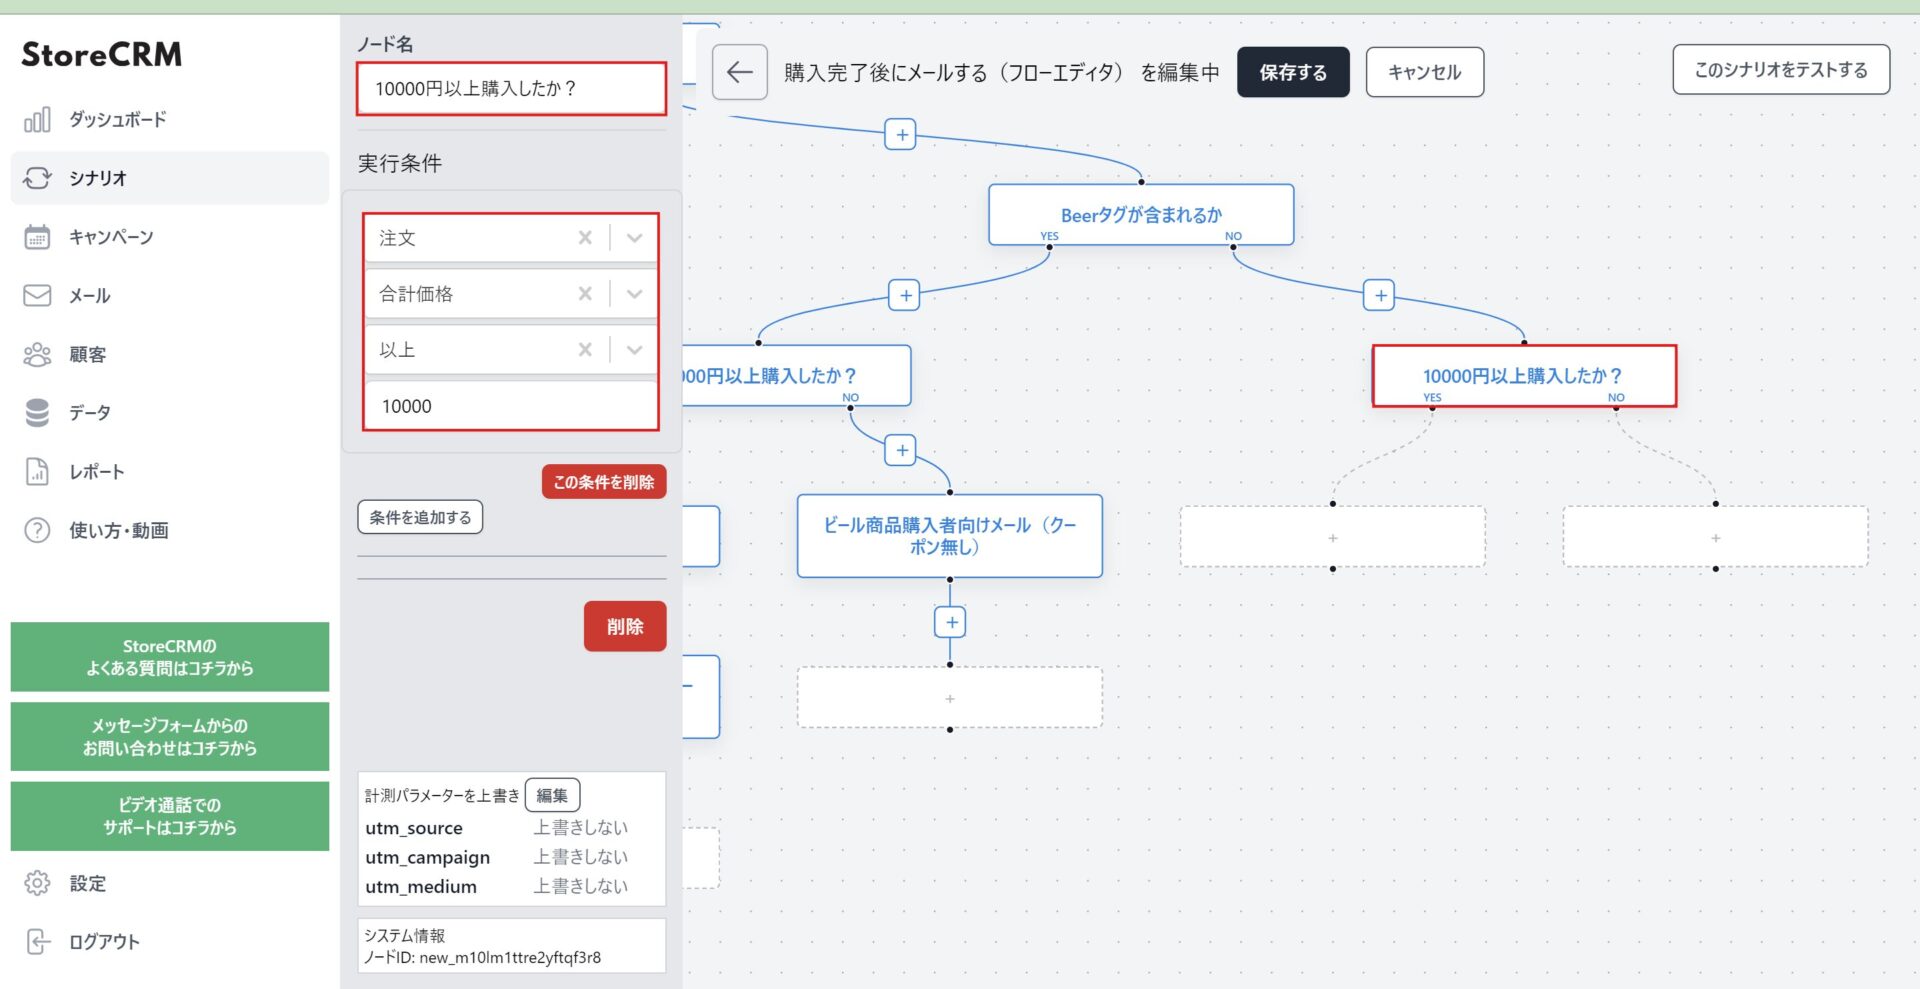
This section determines if the total amount of the order is 10,000 yen or more.
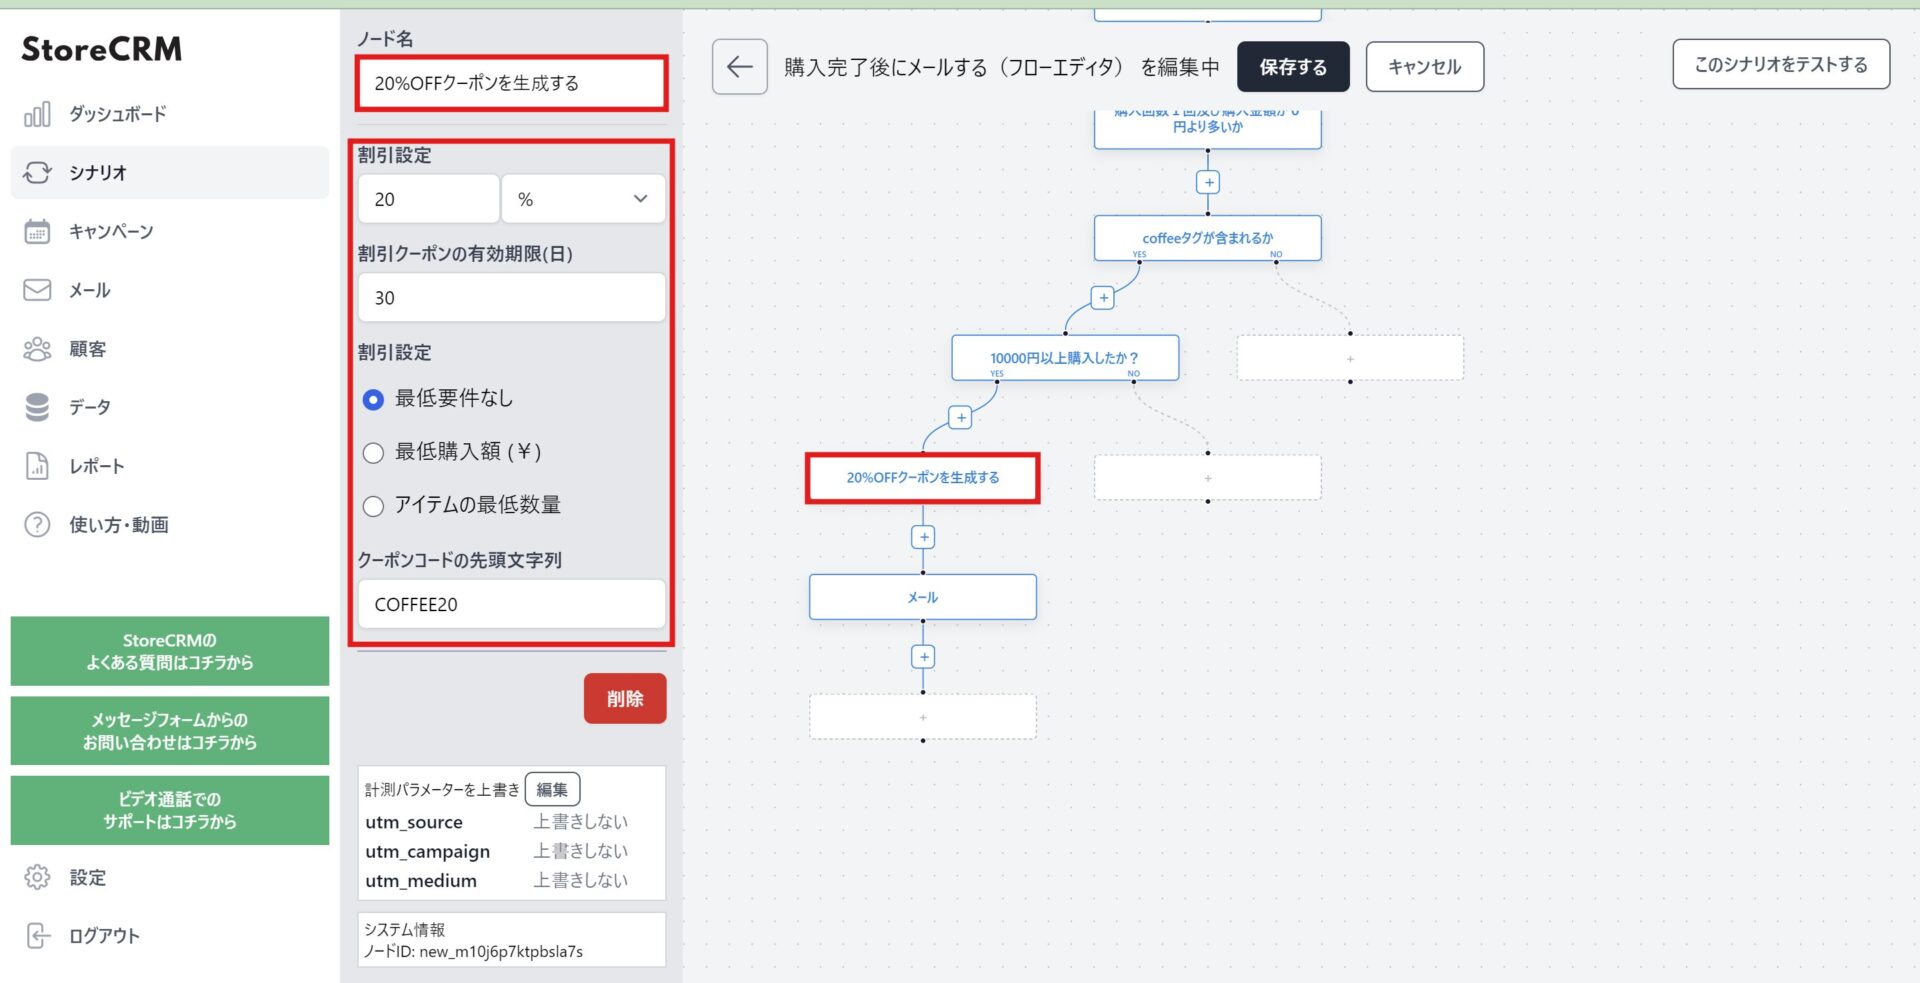
6)[Purchased more than 10,000 yen?between the [mail] node and the [mail] node.[Add a "Generate Coupon" node.
This is the process of generating coupons for customers who have made purchases of 10,000 yen or more, as coupons are given in the emails sent to them.
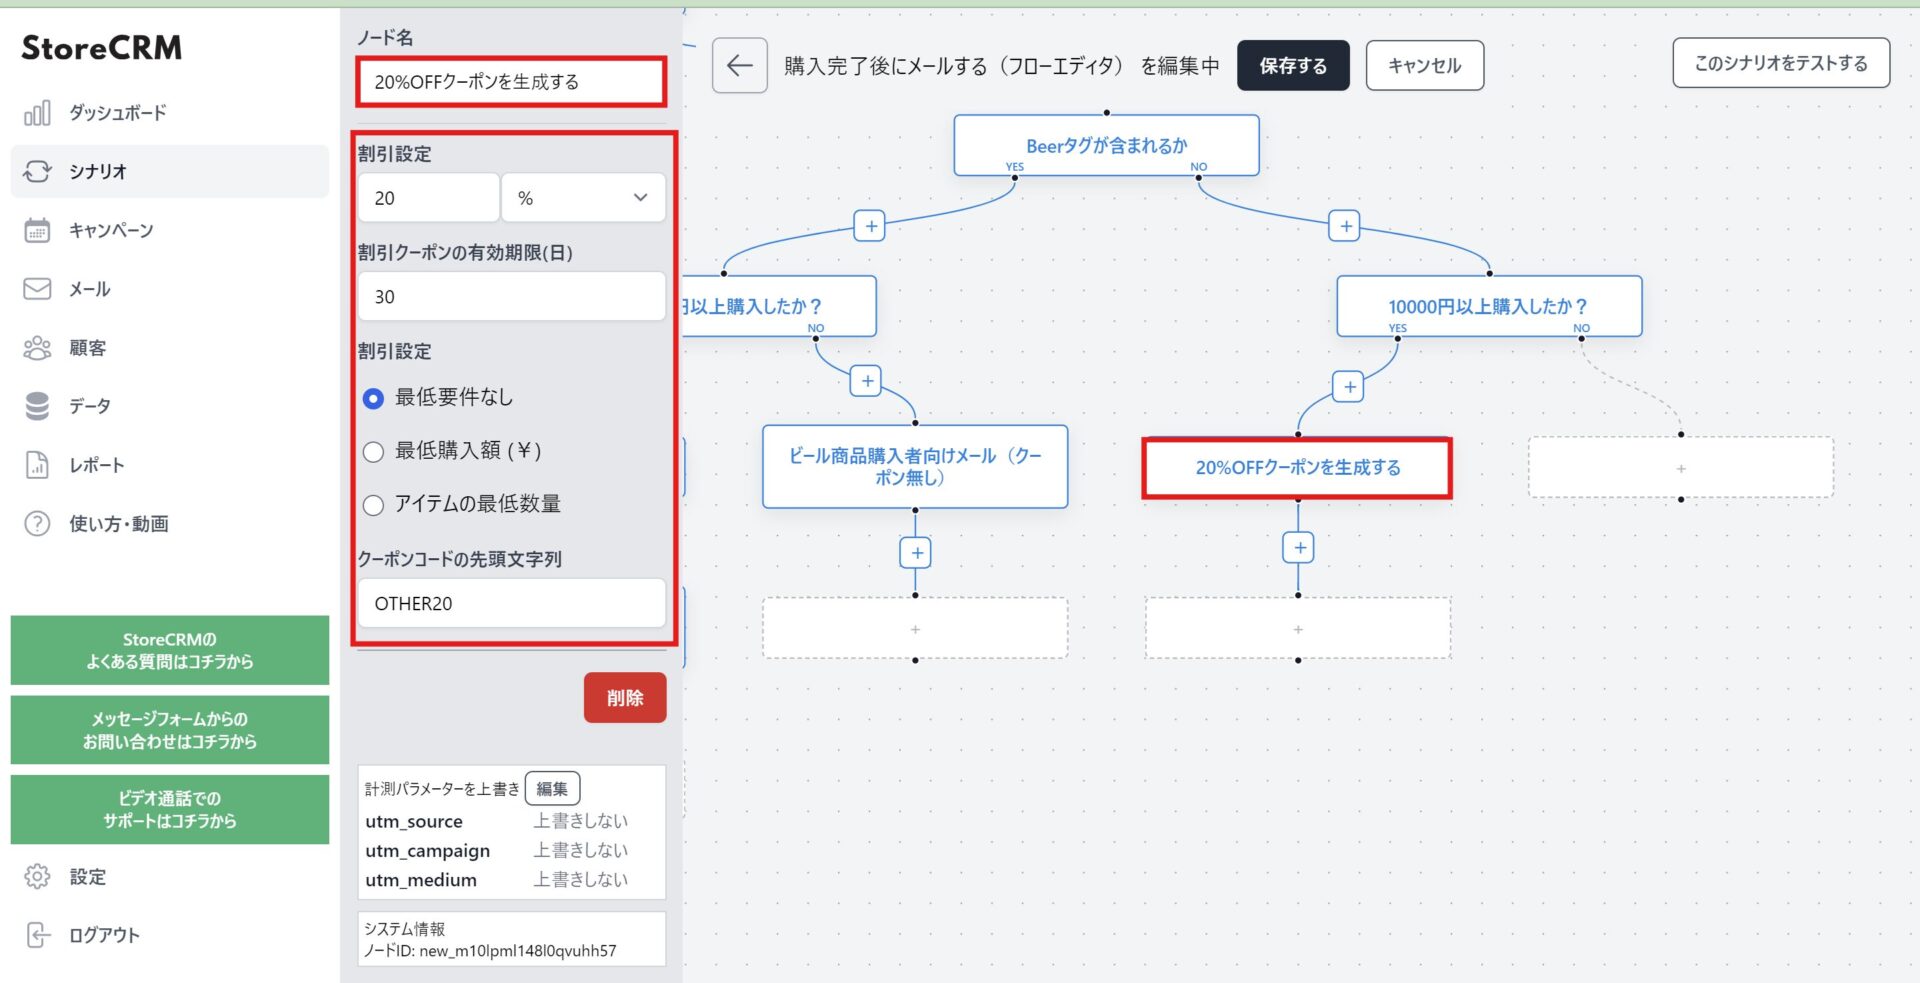
Register any discount settings, expiration dates, and conditions of use. Since this scenario will issue more than one coupon, specify a leading string and name the coupon so that we know which attribute of the customer it is intended for.
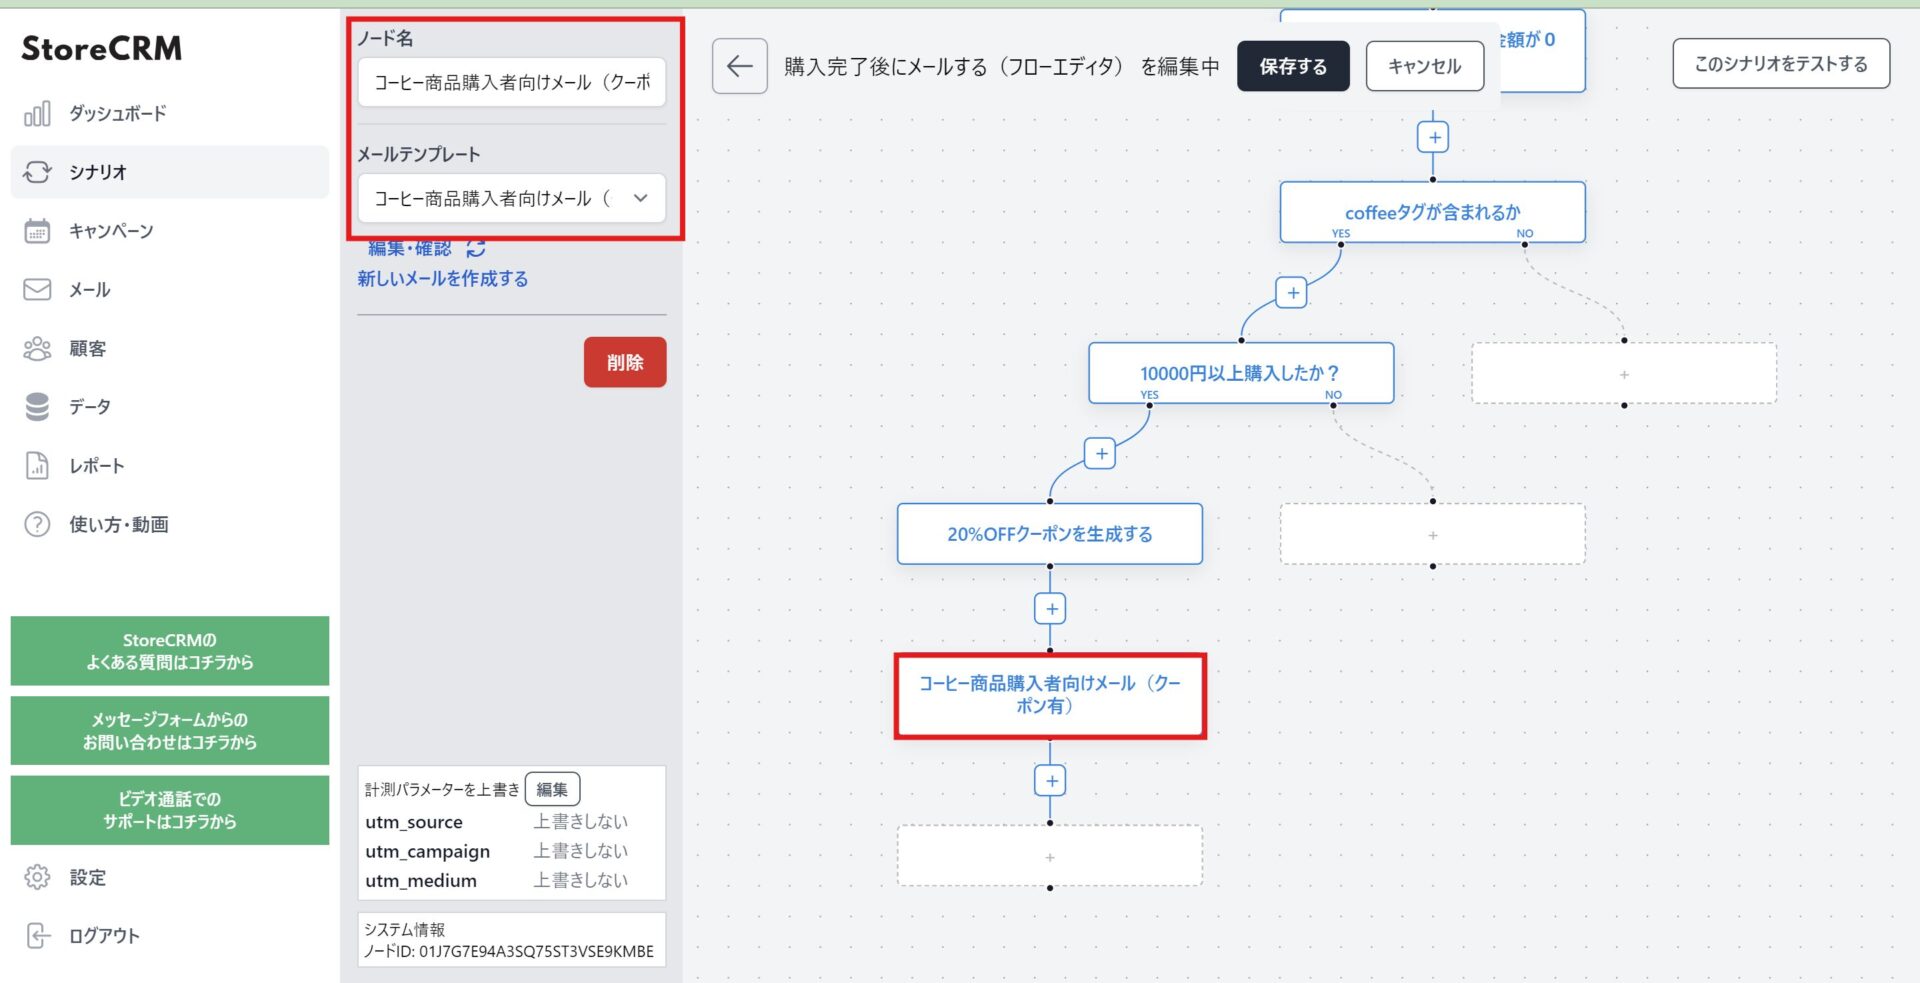
(vii) Under the [Generate 20%OFF coupon] node, click on the [Email] node and select an email template.
In this case, select [Email for Coffee Buyers (with coupon)]. Modify the node name to match.
Emails that give a coupon will be converted into a coupon code generated at the time of delivery and delivered by including the [coupon] string in the text.
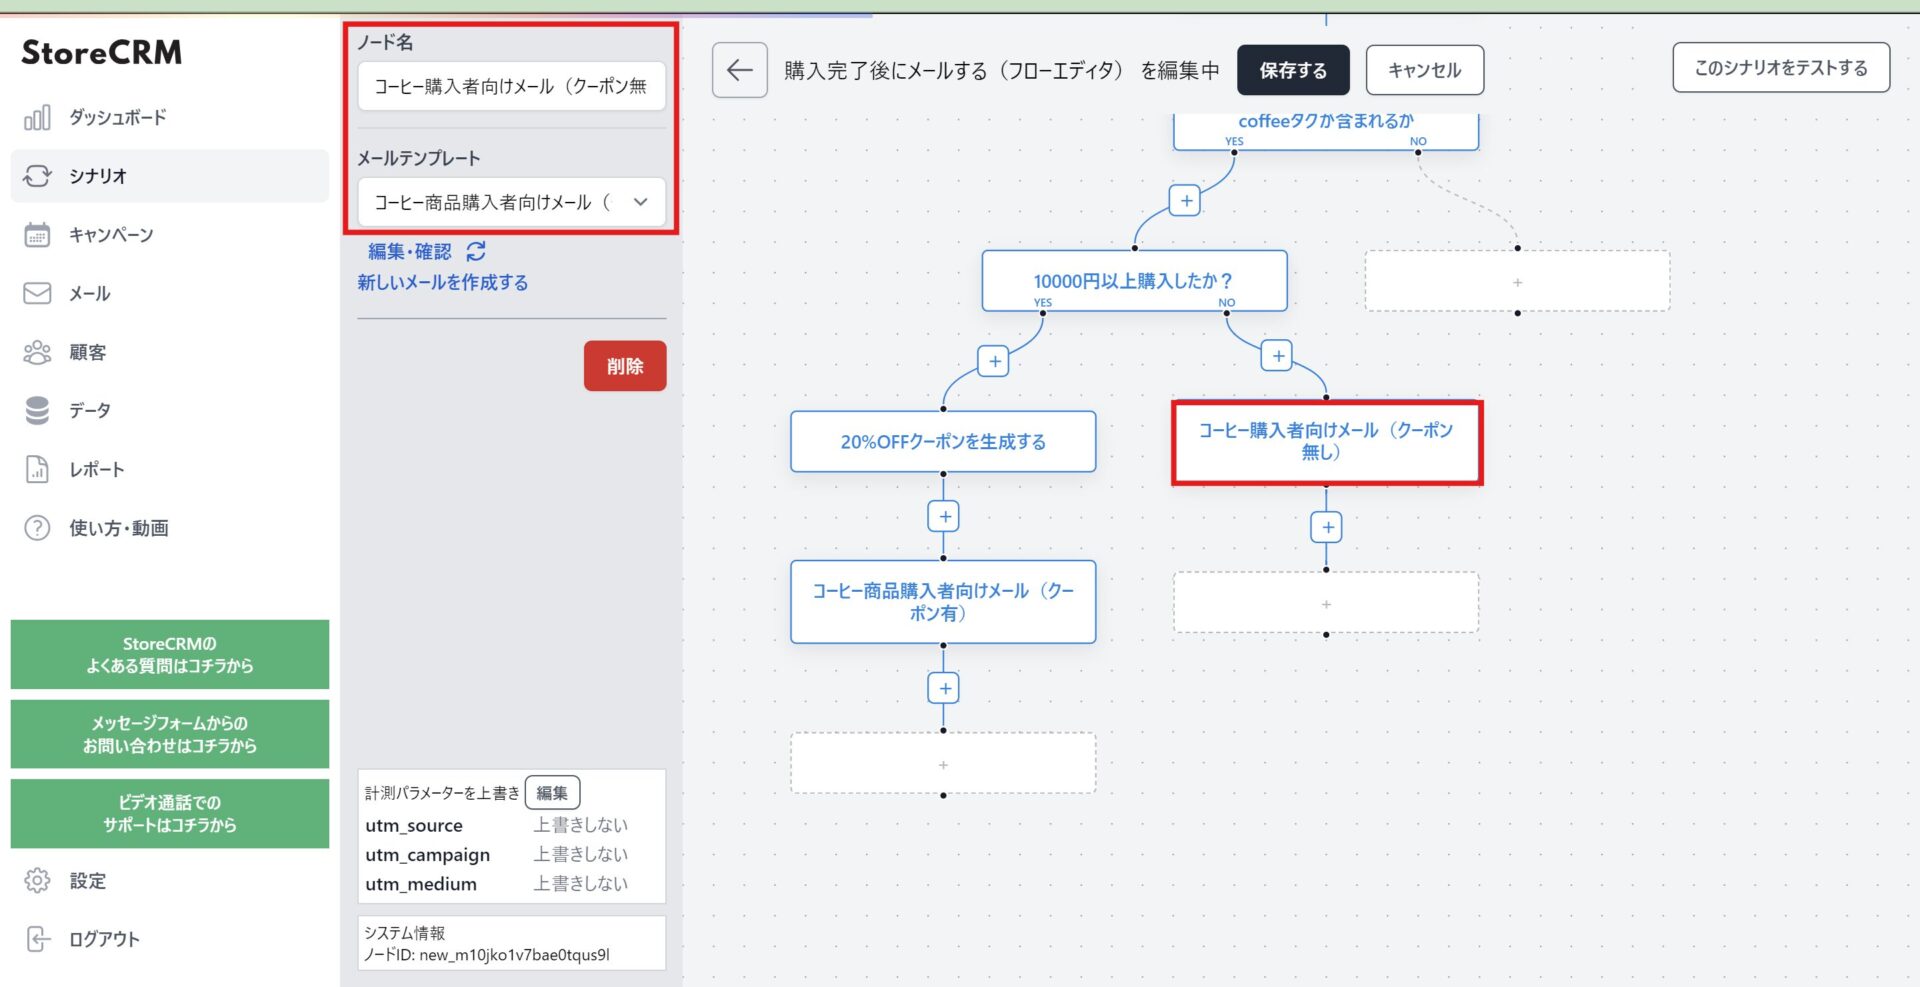
viii)[Purchased more than 10,000 yen?Add a [send email] node under the NO of the [send email] node.
In this case, select [Email for Coffee Buyers (no coupon)]. We will name the node with the name of the node.
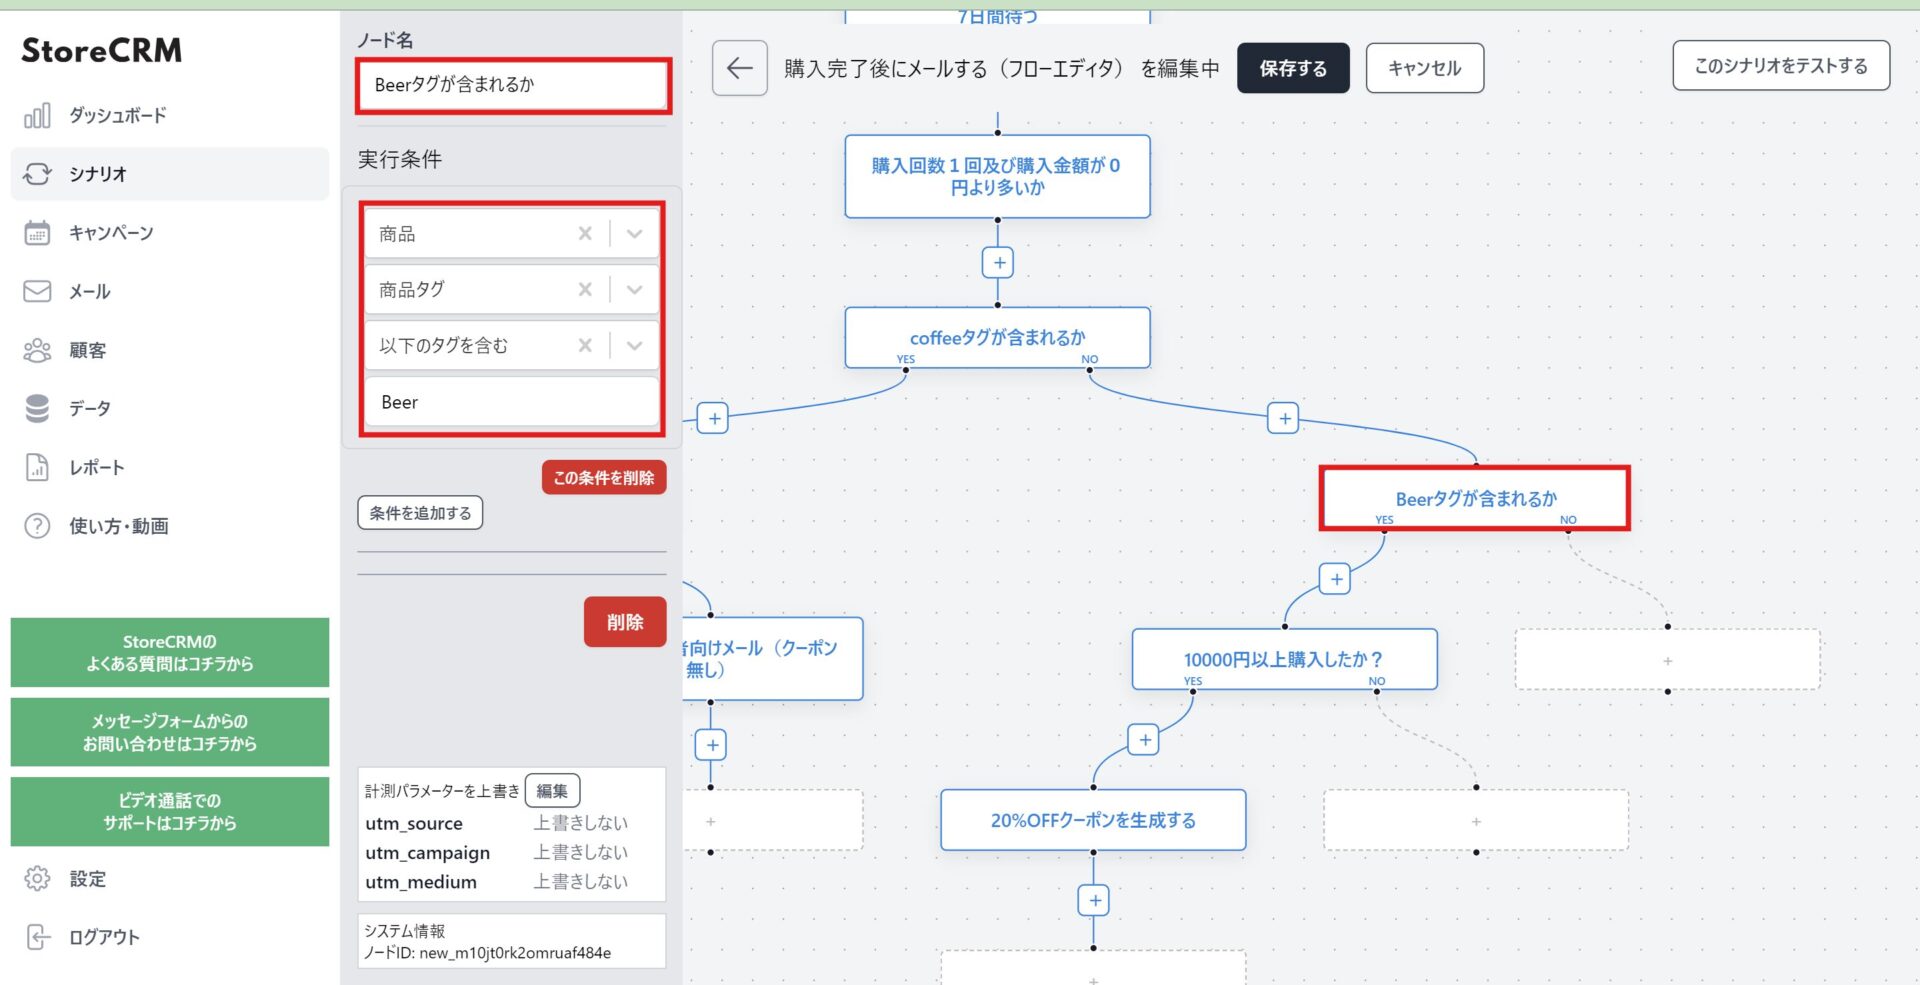
nine[Whether coffee tags are included or notAdd a [conditional branch] node under the [NO] node.
This section determines whether the purchased product contains the [Beer] tag.
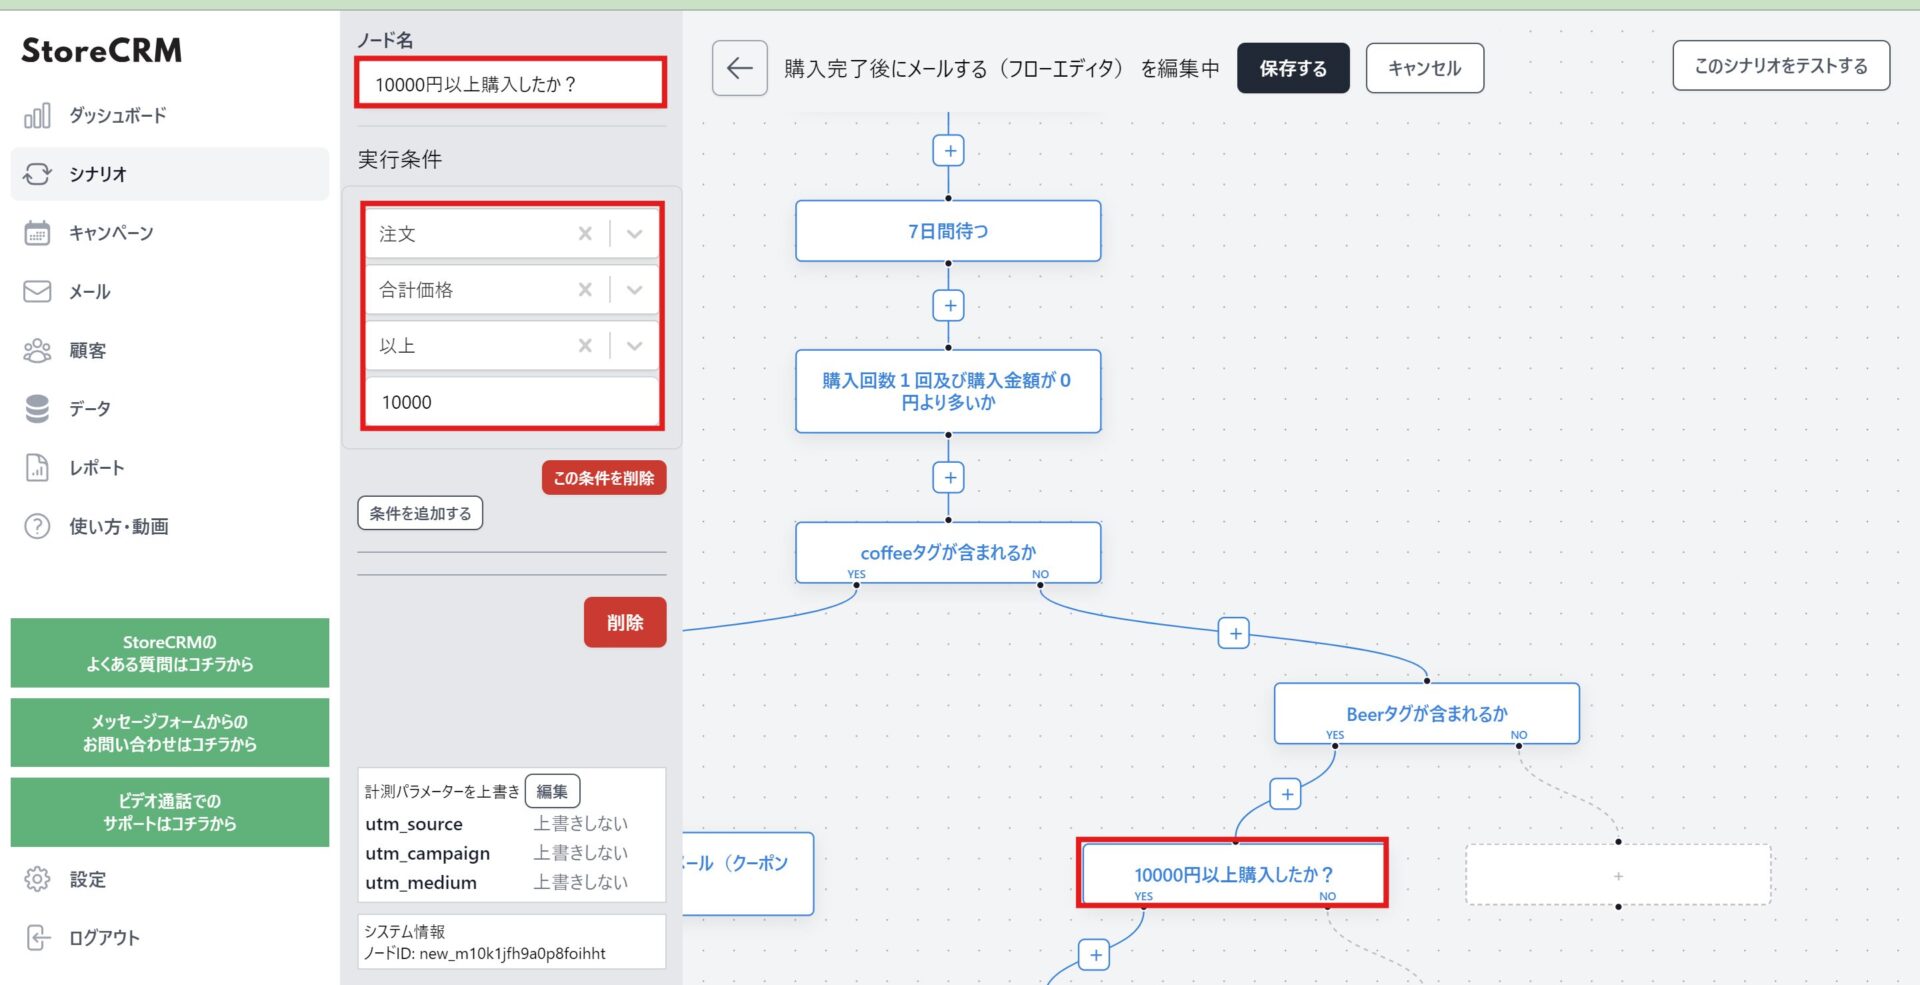
10[BeerTagged or not tagged?Add a [conditional branch] node under the YES node.
This section determines if the total amount of the order is 10,000 yen or more.
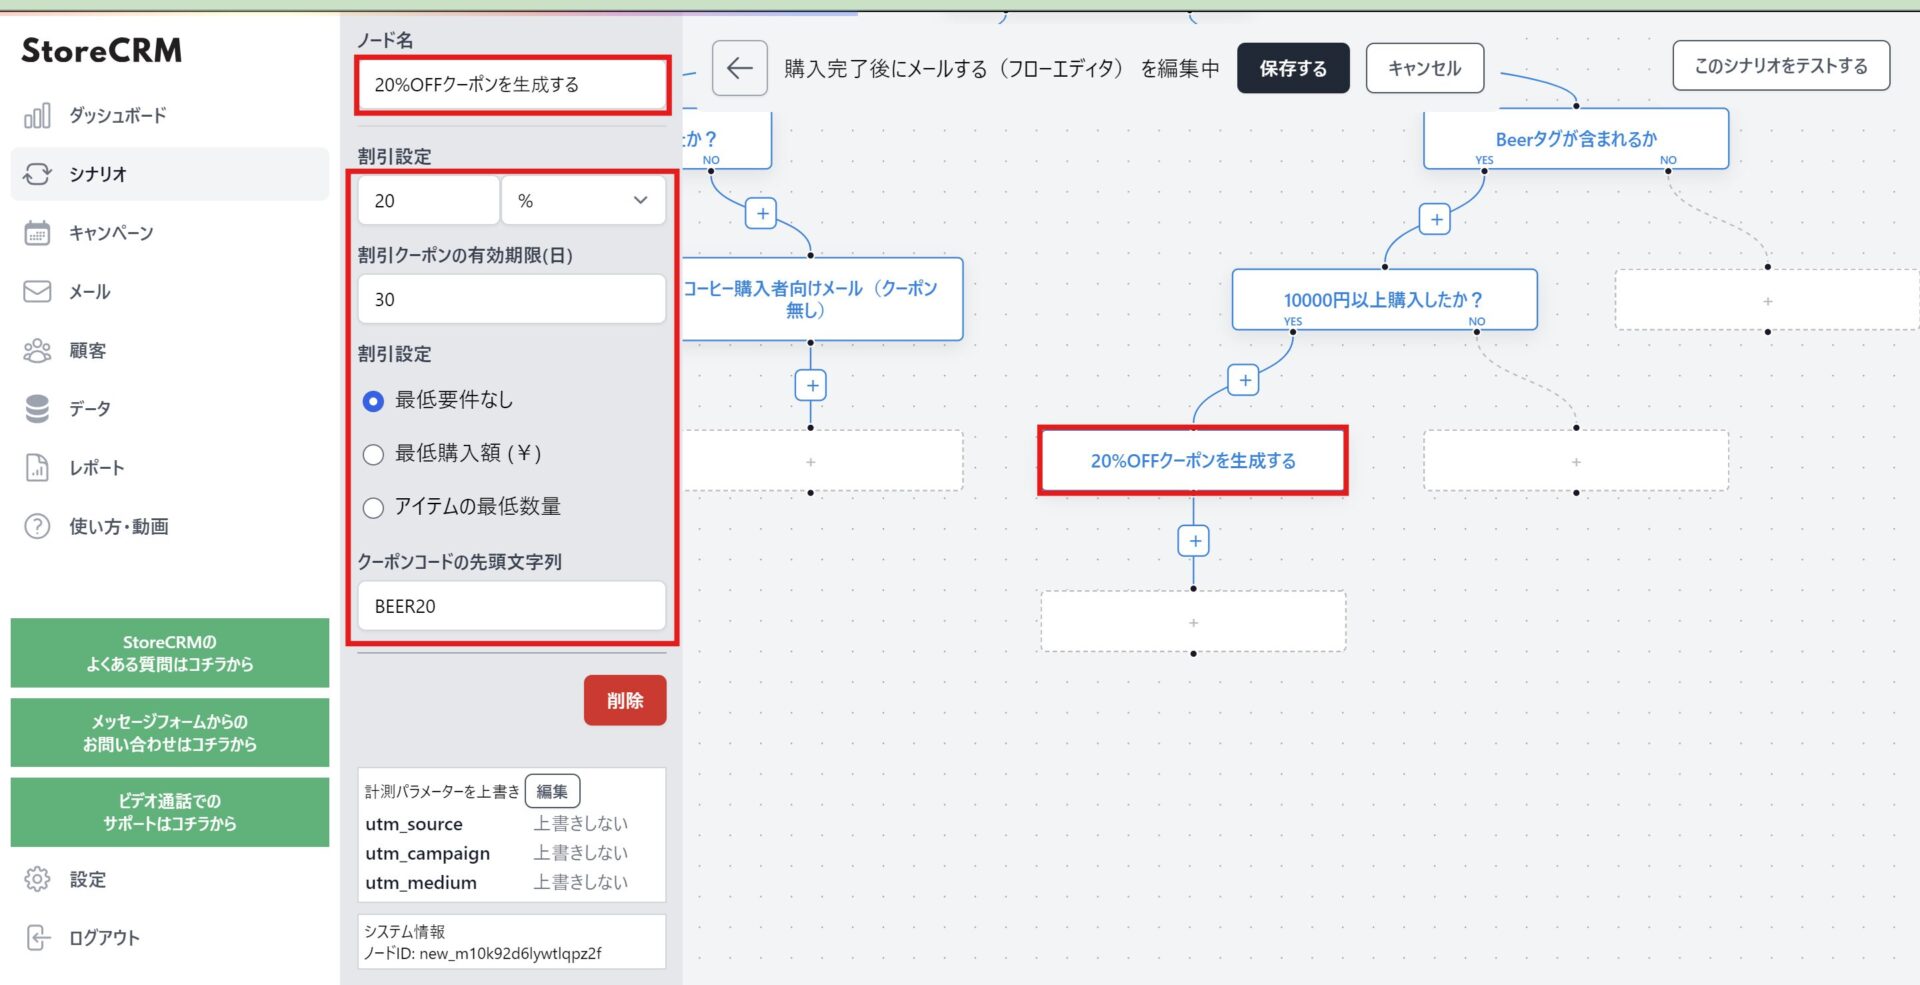
(11) [ (11)Purchased more than 10,000 yen?under the YES node of the [node[Add a "Generate Coupon" node.
This is the process of generating coupons for customers who have made purchases of 10,000 yen or more, as coupons are given in the emails sent to them.
Register any discount settings, expiration dates, and conditions of use. Since this scenario will issue more than one coupon, specify a leading string and name the coupon so that we know which attribute of the customer it is intended for.
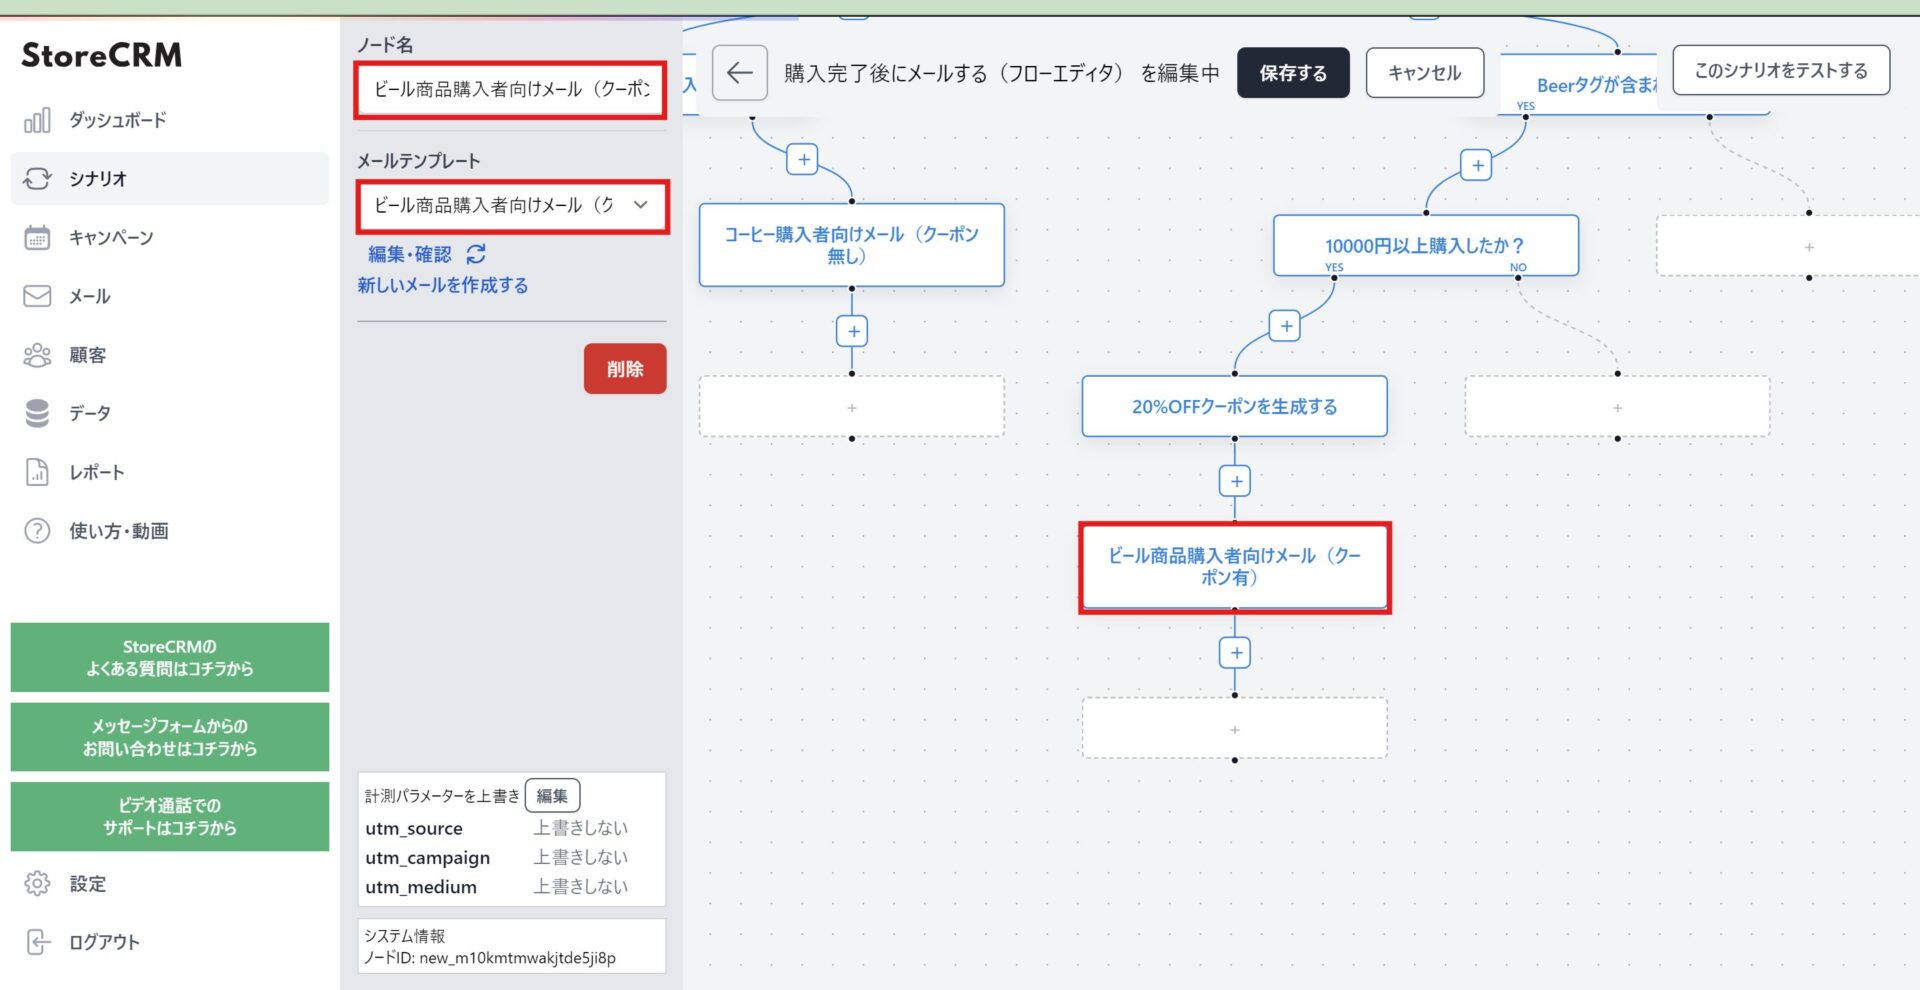
⑫Add a [Mail] node under the [Generate 20%OFF coupon] node and select an email template.
In this case, select [Email for Beer Buyers (with coupon)]. Modify the node name to match.
Emails that give a coupon will be converted into a coupon code generated at the time of delivery and delivered by including the [coupon] string in the text.

⑬[Purchased more than 10,000 yen?Add a [send email] node under the NO of the [send email] node.
In this case, select [Email for Beer Buyers (no coupon)]. We will name the nodes accordingly.
⑭[Beer tags are included or notAdd a [conditional branch] node under the [NO] node.
This section determines if the total amount of the order is 10,000 yen or more.
15 (used in legal documents)[Purchased more than 10,000 yen?under the YES node of the [node[Add a "Generate Coupon" node.
This is the process of generating coupons for customers who have made purchases of 10,000 yen or more, as coupons are given in the emails sent to them.
Register any discount settings, expiration dates, and conditions of use.
Since this scenario will issue more than one coupon, specify a leading string and name the coupon to indicate which attribute of the customer it is intended for.
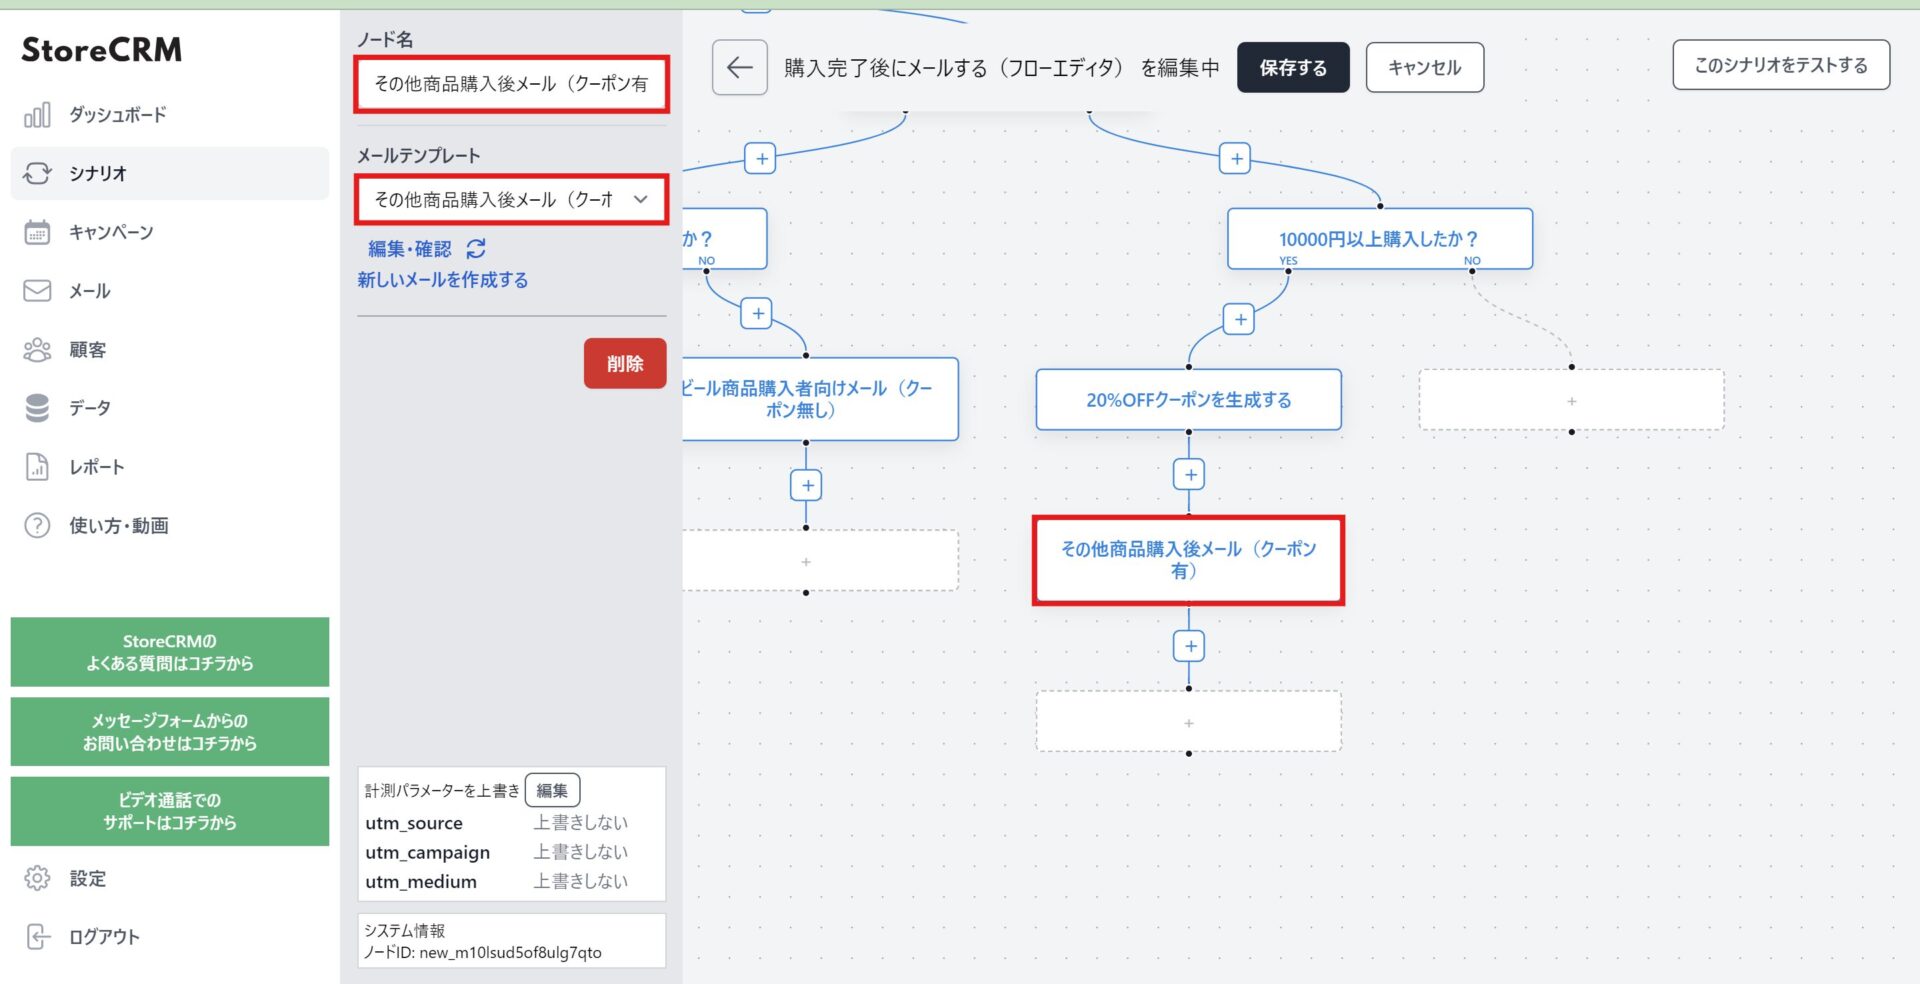
⑯Add a [Email] node under the [Generate 20%OFF coupon] node and select an email template.
In this case, select [Email for other product purchasers (with coupon)]. Modify the node name to match.
Emails that give a coupon will be converted into a coupon code generated at the time of delivery and delivered by including the [coupon] string in the text.
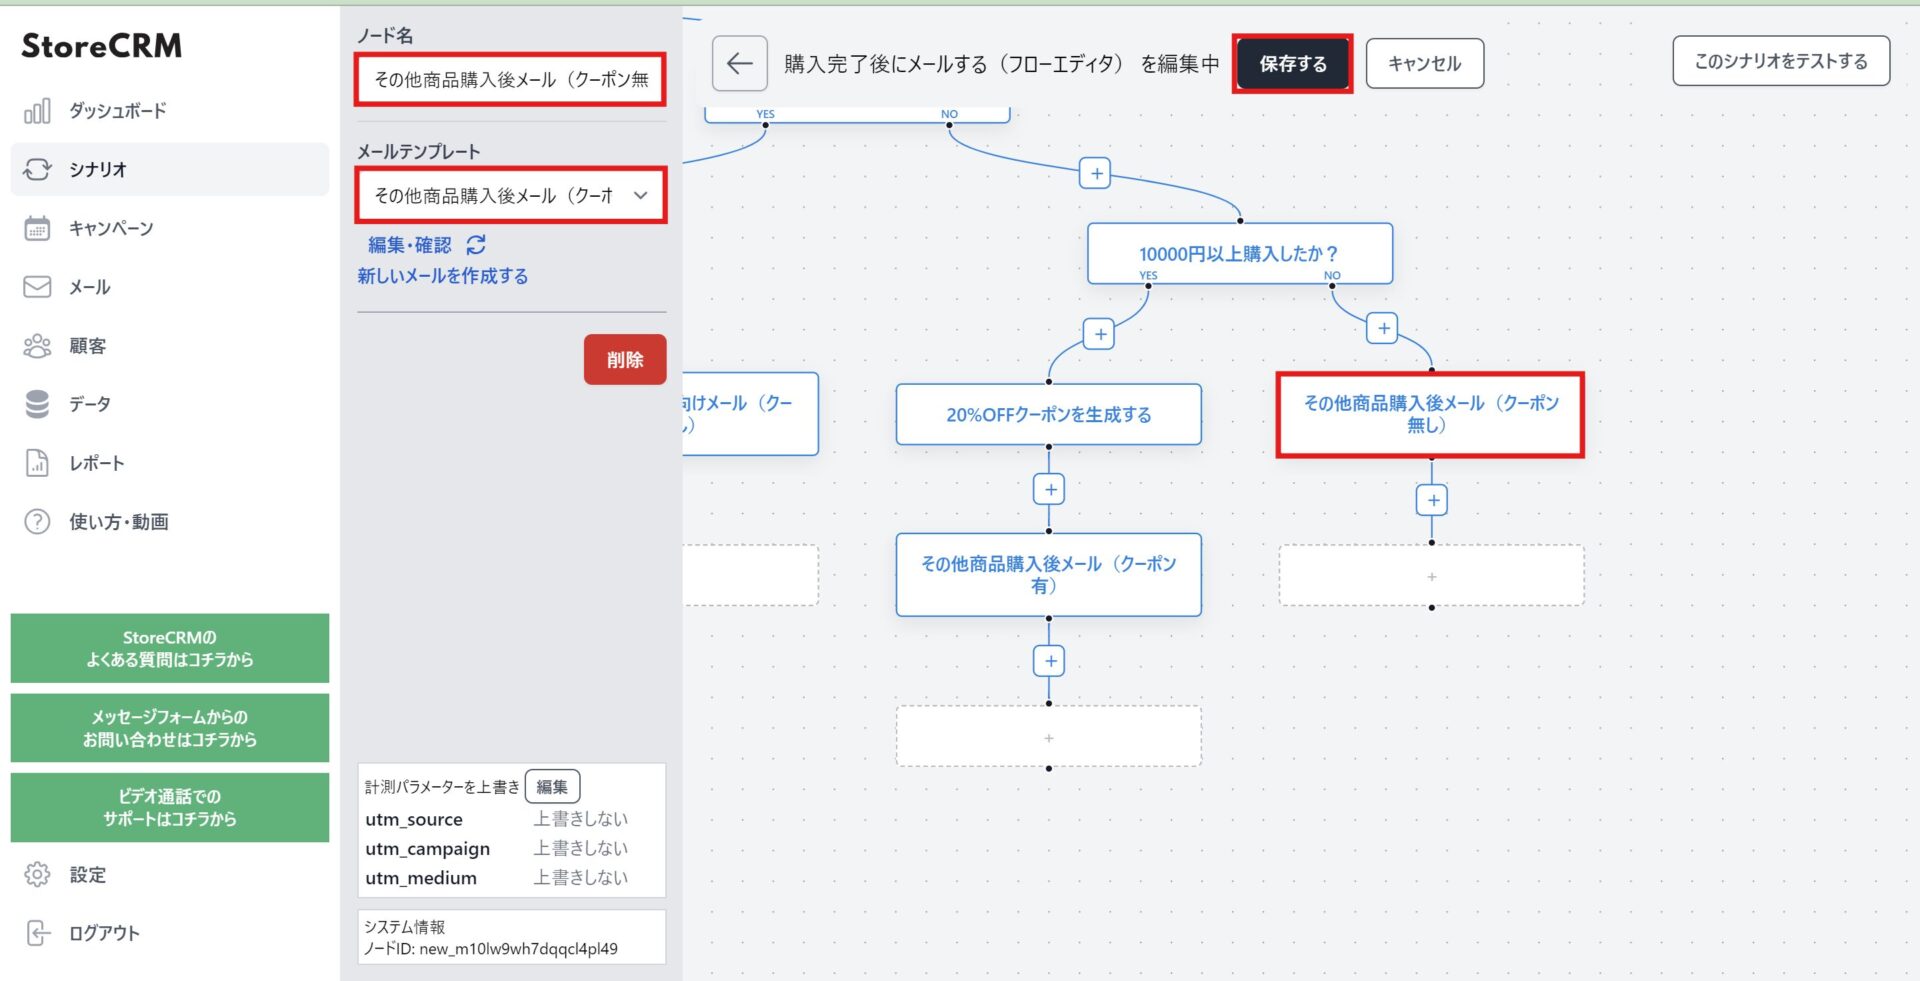
⑰[Purchased more than 10,000 yen?Add a [send email] node under the NO of the [send email] node.
In this case, select [Email after purchase of other products (without coupon)]. We will name the node with the name of the node.
Remember to click "Save" at the top of the screen to finish editing the flow editor.
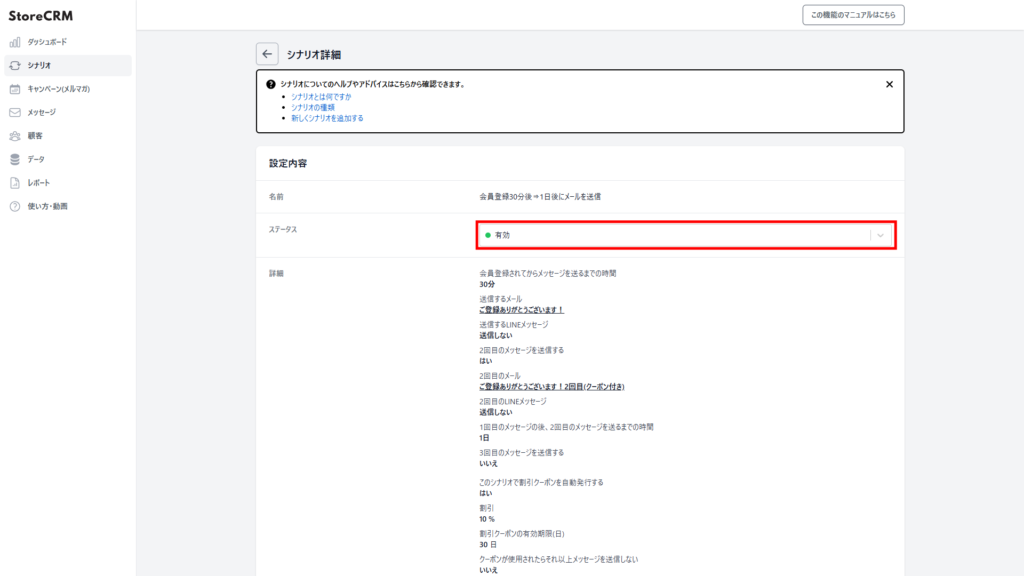
After saving the ⑱Flow Editor, click on the [Settings]>[Status] pull-down on the Scenario Details screen and set to [Enable] to send the email according to the conditions you set.
This section will be complete once the scenario is activated.
memo
When activating a scenario, make sure there are no other scenarios activated with the same trigger. If you are working on a completely different scenario, this is not a problem. Especially when activating a duplicated scenario, make sure that the scenario from which you are duplicating is valid,
Conclusion
By using the flow editor in StoreCRM, it is possible to deliver personalized email newsletters to each customer based on their interests. Personalized mail magazine delivery can be highly effective in increasing LTV and decreasing unsubscription rates.
By reading this article, you do not need to be an engineer to distribute advanced segments, so please put it into practice.
StoreCRM also provides support for application-related settings and consulting services to help customers increase sales.
Inquiry FormPlease feel free to contact us from
Related Pages