

Setup steps
To send email from StoreCRM using an address on your own domain, add the DNS records issued by StoreCRM to your domain provider and complete authentication.
DNS values differ by domain and store. Do not copy values from this page's image or examples; always use the values shown in your own StoreCRM screen.
1. Save the sender email address
Open [Settings] → [Basic settings] → [Email delivery settings], enter a sender email address on your own domain, and save it. Addresses from common email services such as Gmail cannot be used.
2. Issue DNS records
After saving the email address, [StoreCRM sending domain authentication] appears. Select [Issue DNS records] to display five DNS records in most cases, or up to six when DMARC is not configured.
3. Add every displayed DNS record
Add each row's host, type, and value to your domain provider exactly as shown. If the screen displays a priority, enter it as well.
The screen shows the required record types, such as CNAME and TXT. Do not omit or change records or values based on the example.
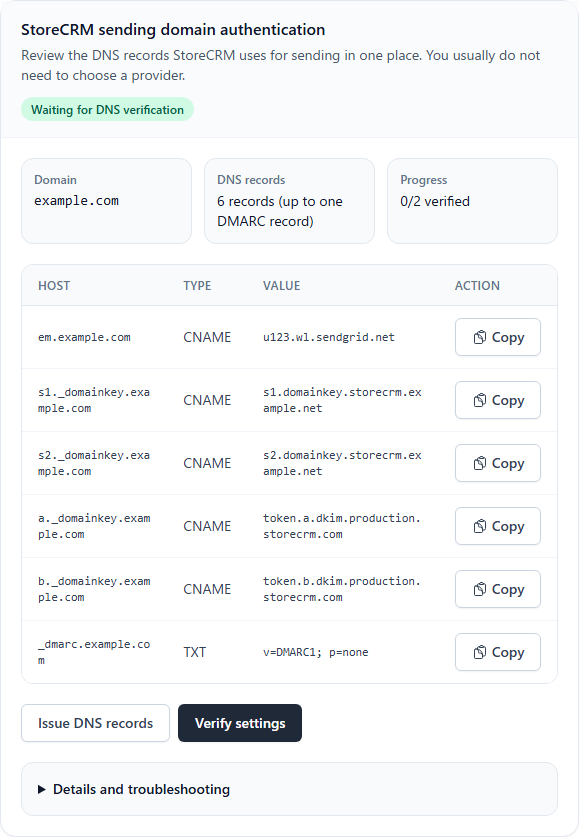
- Some DNS providers automatically append the domain to the host. Before saving, check the preview to make sure the domain is not duplicated.
- If your provider offers proxying, such as Cloudflare, configure email-authentication CNAME records as DNS-only.
- Do not delete or modify existing MX records used to receive email.
- Do not create multiple SPF or DMARC TXT records for the same host. If a record already exists, preserve it and consult your domain administrator.
4. Verify the settings in StoreCRM
After adding the records to DNS, wait for propagation and select [Verify settings]. Propagation may take some time.
If authentication does not complete, check for extra spaces, a duplicated domain, the record type, and proxy settings, then try again.
Checks before sending
- The authentication status is [Ready to send]
- The sender email address uses the authenticated domain
- A test email is received without issues in spam filtering or the displayed sender
 English
  Japanese