

- With StoreCRM,Shopify Flowby using Shopify Flow, when points change in the Shopify app “VIP ‑ Membership Program”, you can send customers a LINE message or email.
- In this article, we will explain how to send LINE (Flex Message) and email (HTML email) using the same trigger.
- To use this feature, in addition to StoreCRM, you must also install the VIP - membership program and Shopify Flow.
- Shopify and LINEintegrationmust be configured in advance.
- Confirm the app installation and LINE integration
- VIP – Send a LINE message from StoreCRM when points change in the membership program
Confirm the app installation and LINE integration
Before configuring this workflow, install the required apps and complete the LINE integration.
Install the VIP ‑ membership program
The VIP ‑ membership program isherePlease install from.
Install Shopify Flow
Shopify Flow isherePlease install from.
Link Shopify and LINE
To link Shopify and LINE,here for more information.
VIP – Send a LINE message from StoreCRM when points change in the membership program
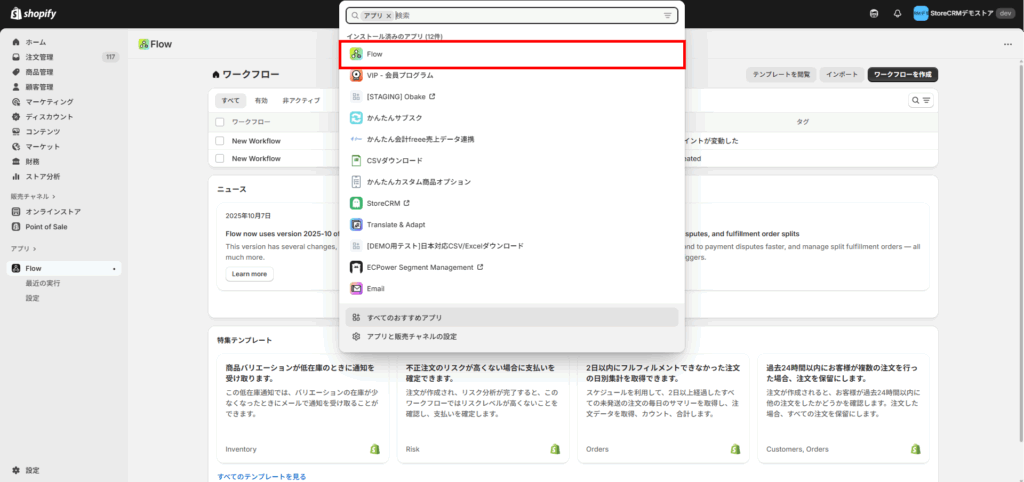
1. Click Shopify → Apps and enter "Flow".
Shopify Flow will appear.
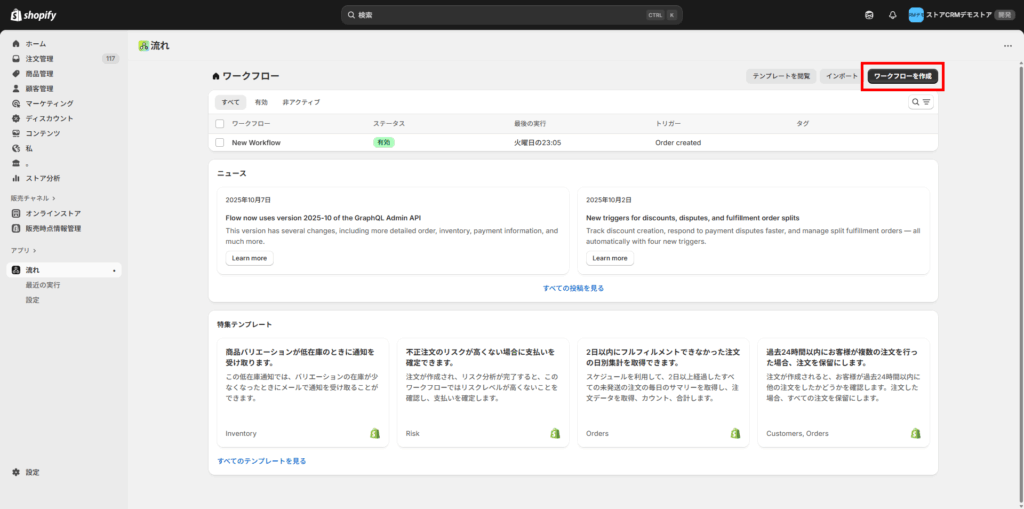
2. Click Create Workflow.
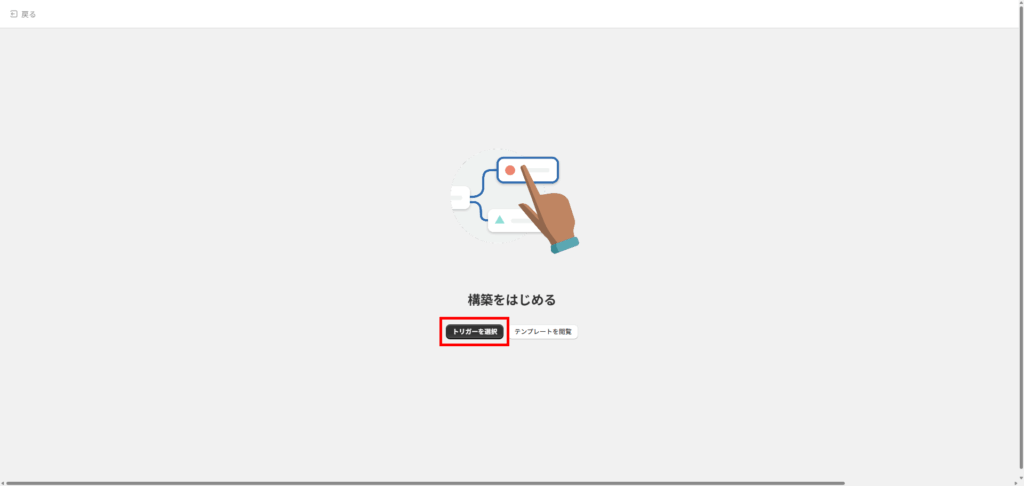
3. Click Select Trigger.
4. Name your workflow.
As an example, we have set it to ``Send LINE from StoreCRM when points change in the VIP - membership program''.
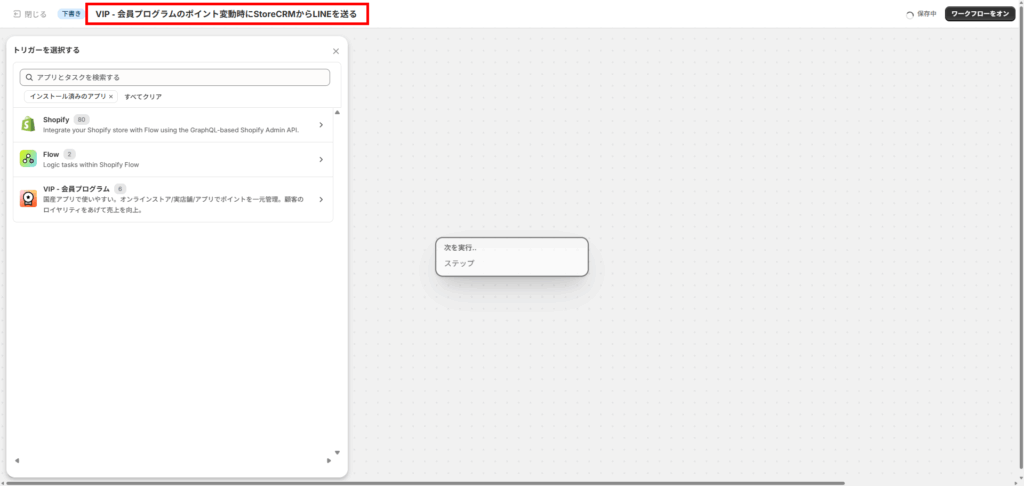
5. Click VIP – Membership Program.
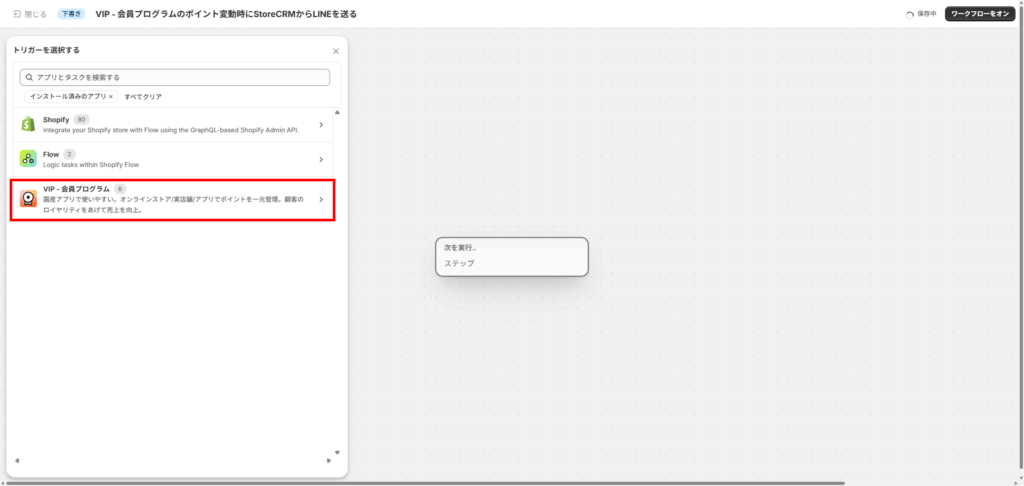
6. Click [Customer's points changed].
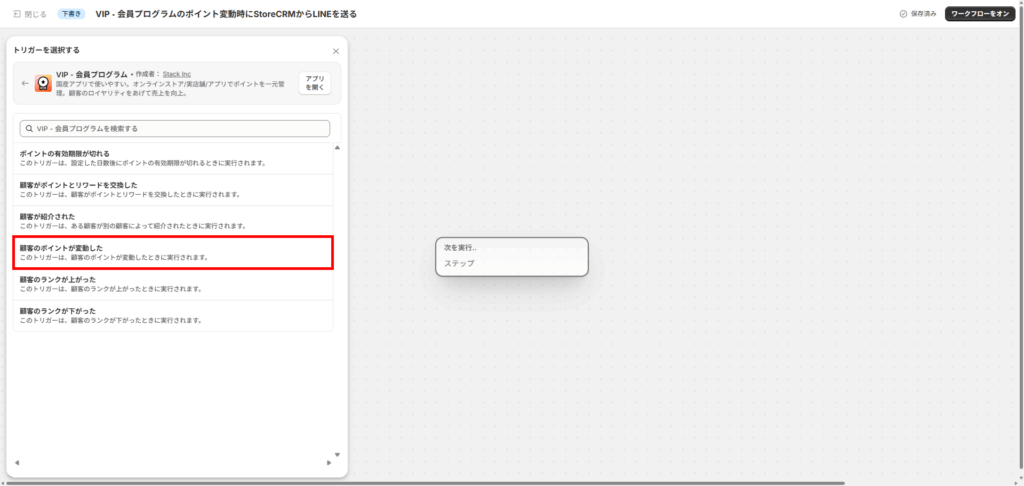
7. Click [+] → [Action].
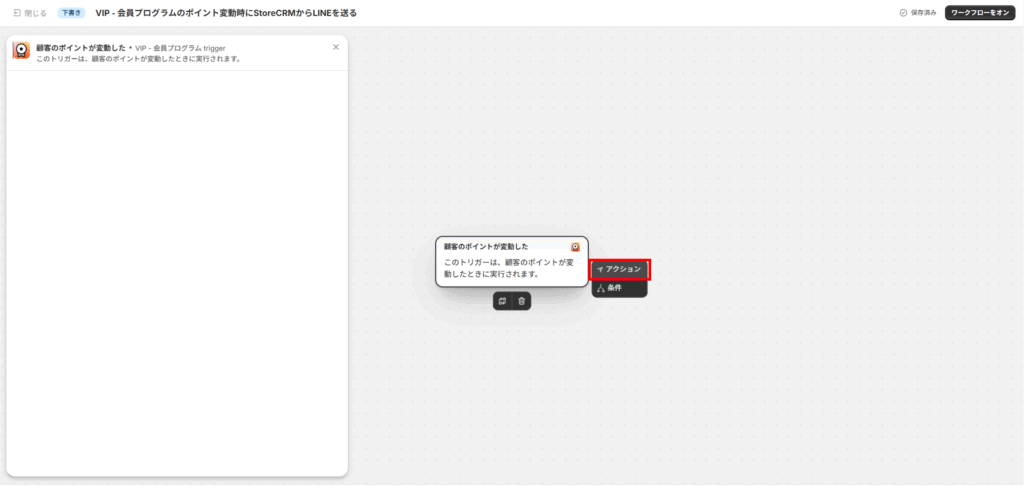
8. Click StoreCRM.
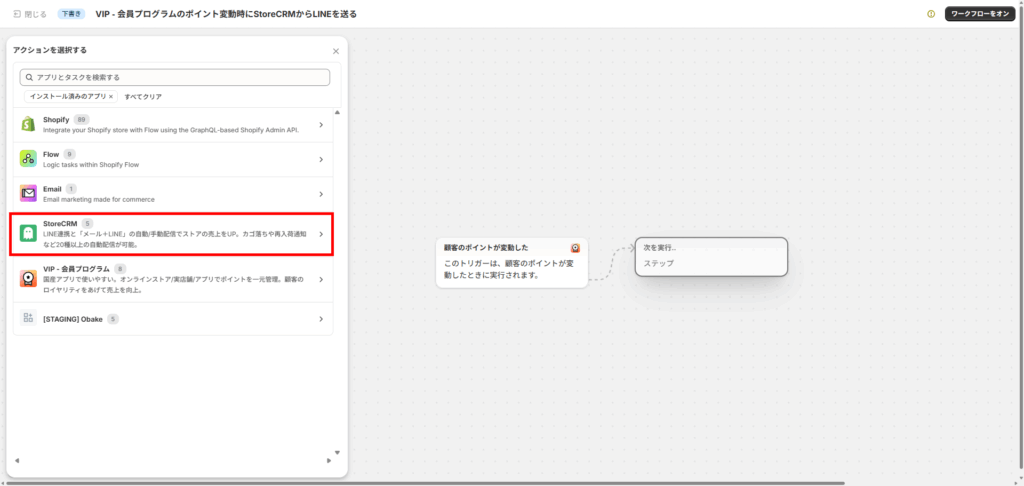
9. Click LINE: Send Flex Message.
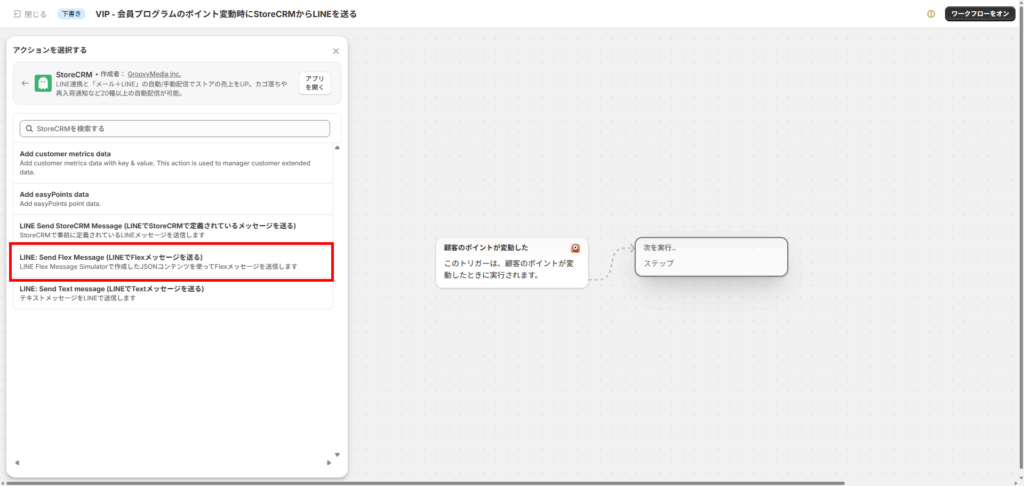
10. In Alternate Text, enter what you want to be displayed when the Flex Message is not displayed.
- Here, as an exampleCurrent points {{approvedPoint}}I entered
- [Show variables] at the bottom right of the text field→Click the variable name you want to enter, and it will appear in the text field.Variablewill be inserted automatically. You can insert multiple variables.
- A variable is {{ }} A string surrounded by , with different values displayed depending on the recipient of the message.
- You can create messages that are displayed by combining variables and text.
Variable types and meanings
Instead of entering variables manually, be sure to click the variable name on the Shopify Flow screen and insert it into the text field.
| variable name | Variable | meaning | Provided by |
|---|---|---|---|
| customer | Select from 2nd layer | Customer information (ID, name, email, etc.), detailshere | Shopify |
| pointsDiff | {{pointsDiff}} | Number of points increased or decreased this time | VIP ‑ Membership Program |
| topic | {{topic}} | Reason for variation (add/sub etc.) | VIP ‑ Membership Program |
| approvedPoint | {{approvedPoint}} | Current points after change | VIP ‑ Membership Program |
| pointCreatedAt | {{pointCreatedAt}} | Time when the change occurred | VIP ‑ Membership Program |
| shop | Select from 2nd layer | Shop information and detailshere | Shopify |
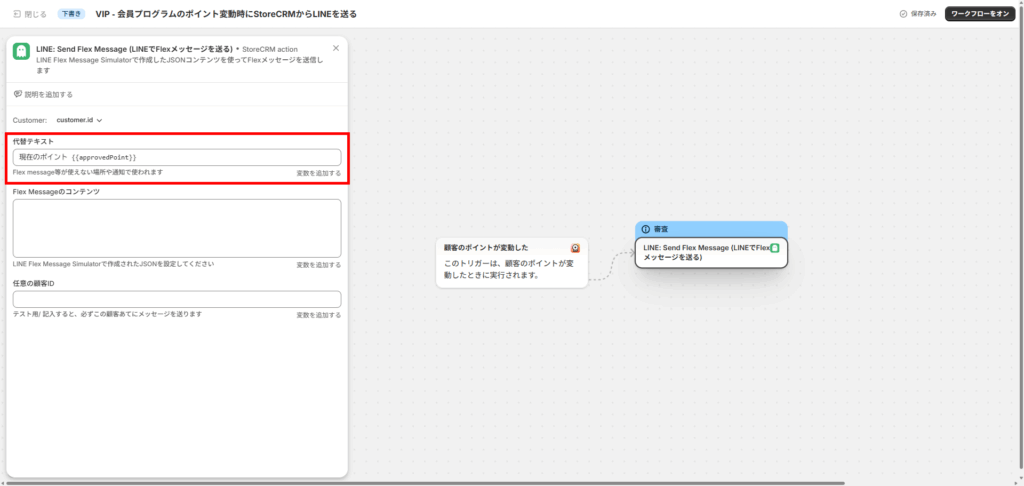
11. Create the Flex Message content.
Click [Show variables] at the bottom right of the text field → the variable name you want to enter, and the variable will be automatically inserted into the text field. You can insert multiple variables.
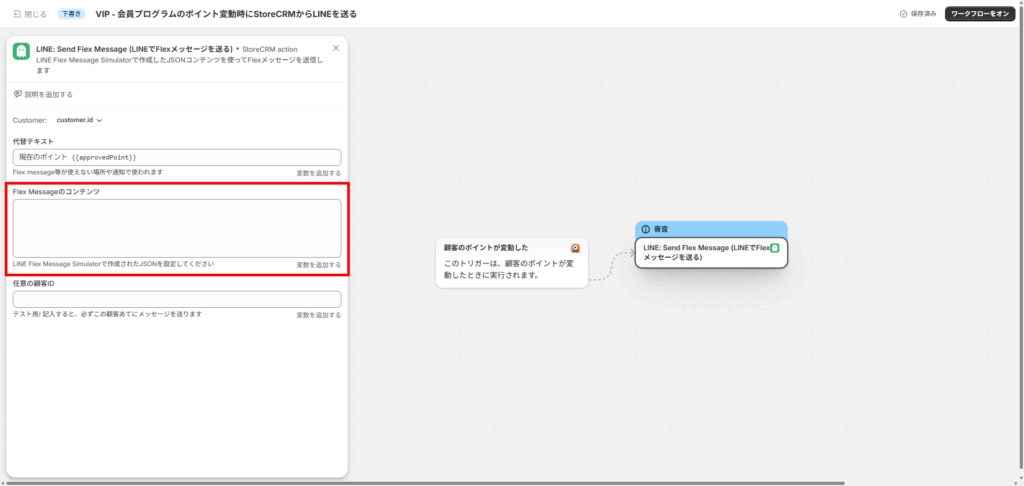
12. LINE Flex Message Simulatoraccess.
- LINE Flex Message Simulator isLINE Developers ConsoleIf you are not logged in, you will be prompted to log in. If you have a developer account on the LINE Developers console, please log in. If you do not have an account, clickCreate an account] and follow the steps to create an account.
- For information on how to create a LINE Flex Message, seehere for more information.
- For information on how to send LINE Flex Messages, seehere for more information.
- Watch this video to learn how to use LINE Flex Message.
How to edit a LINE Flex Message and send it to customers on your Shopify store
13. Click View as JSON in the top right.
You can also edit from a template by clicking Showcase.
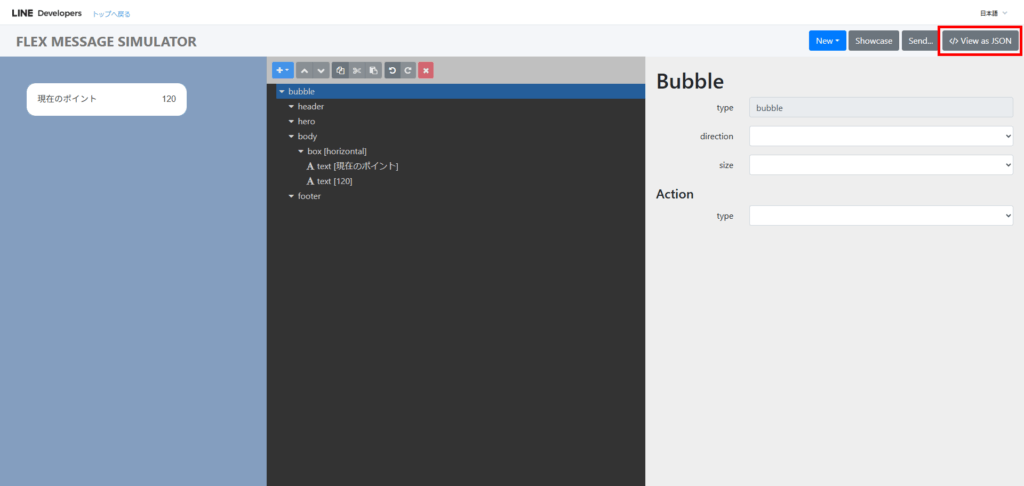
14. Default JSONDelete all, paste all of the following code, and click Apply in the bottom right corner.
This is for checking the operation of the simulator only. Variables cannot be used.
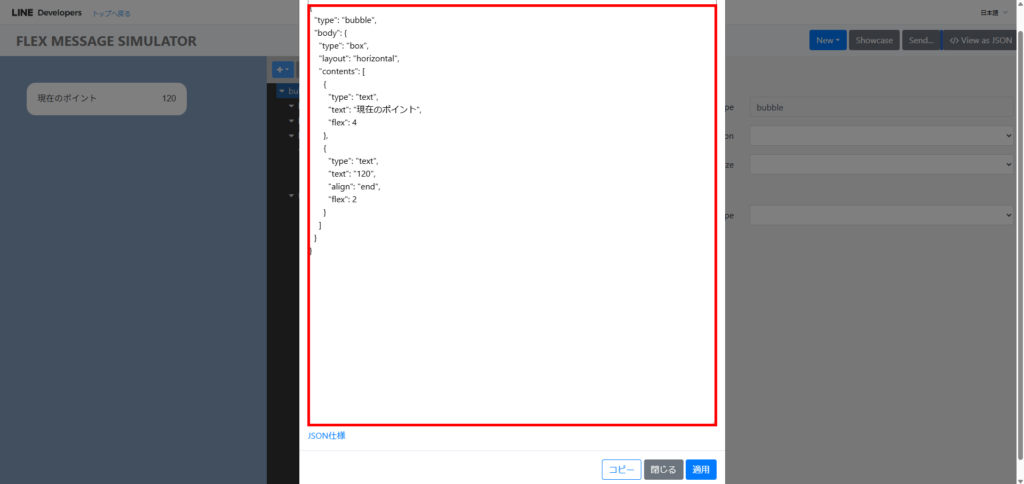
{
  "type": "bubble",
  "body": {
    "type": "box",
    "layout": "horizontal",
    "contents": [
      {
        "type": "text",
        "text": "現在のポイント",
        "flex": 4
      },
      {
        "type": "text",
        "text": "120",
        "align": "end",
        "flex": 2
      }
    ]
  }
}
15. If "Current Points 120" is displayed on the left side, it is complete.
You can also create from a template by clicking [Showcase] in the upper right.
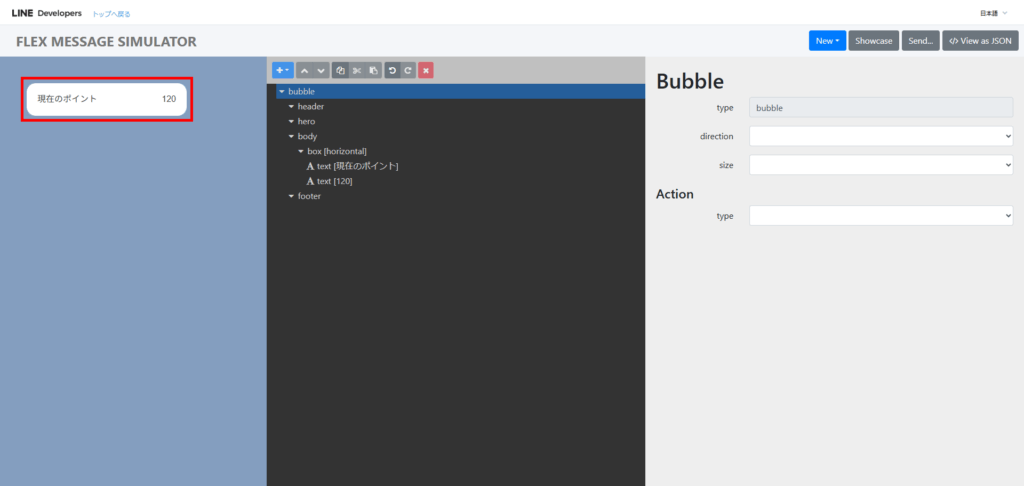
16. Adjust the layout to your liking by manipulating the tree view in the center.
There is no need to make any adjustments.
17. Copy and paste the adjusted code into Shopify Flow.
Be sure to change "120" in the operation confirmation code to {{approvedPoint}}.
18. Enter any customer ID if required.
- If you enter a customer ID, the message will always be sent to the customer with that ID.
- Customer ID is the number displayed at the end of Shopify → [Customer Management] → Click on any customer → URL.
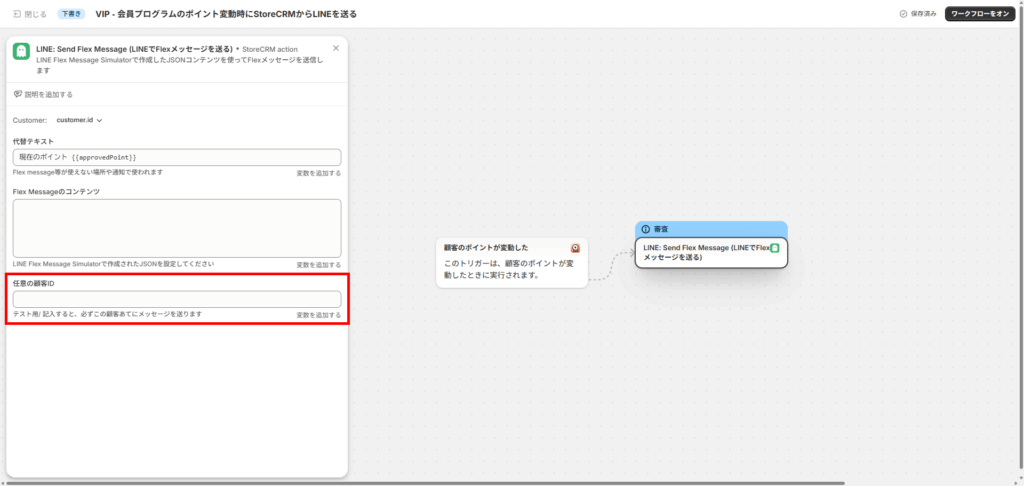
19. Click Turn on Workflow in the top right corner to enable the settings.
Settings are complete. A message is delivered to the customer when the number of points changes.
VIP – Send an email from StoreCRM when points change in the membership program
1. Click Shopify → Apps and enter "Flow".
Shopify Flow will appear.
2. Click Create Workflow.
3. Click Select Trigger.
4. Name your workflow.
As an example, we have set it to ``Send an email from StoreCRM when points change in the VIP - membership program''.
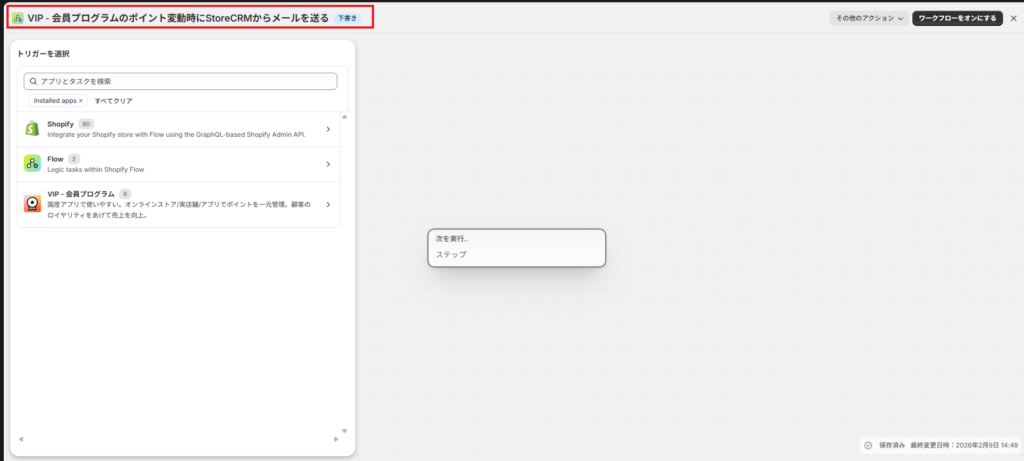
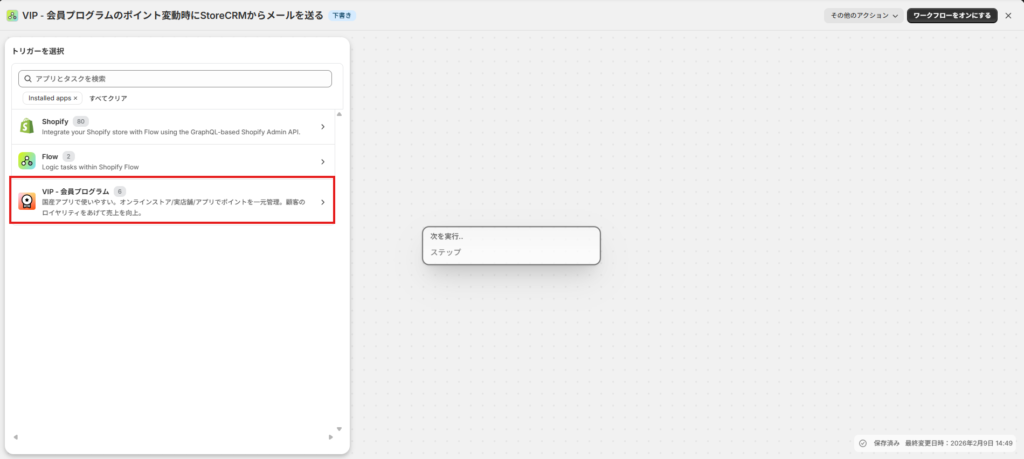
5. Click VIP – Membership Program.
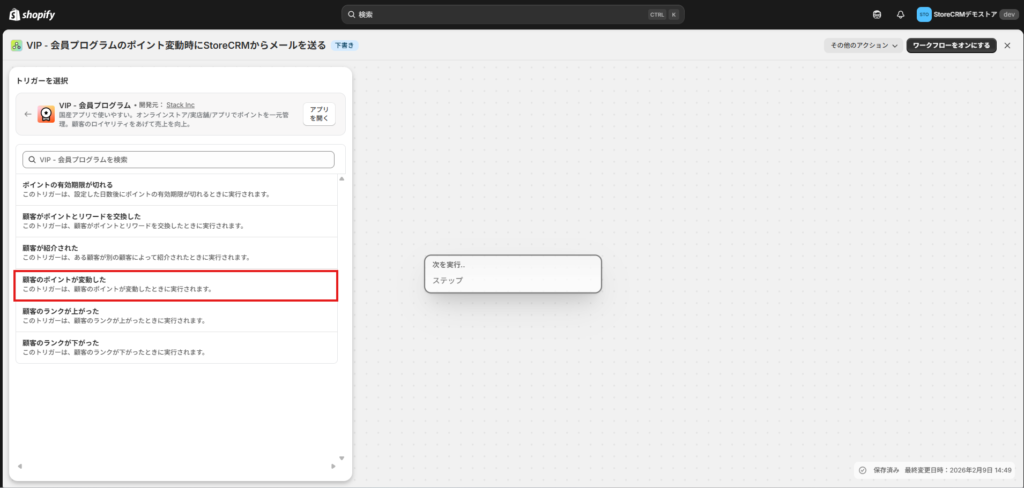
6. Click [Customer's points changed].
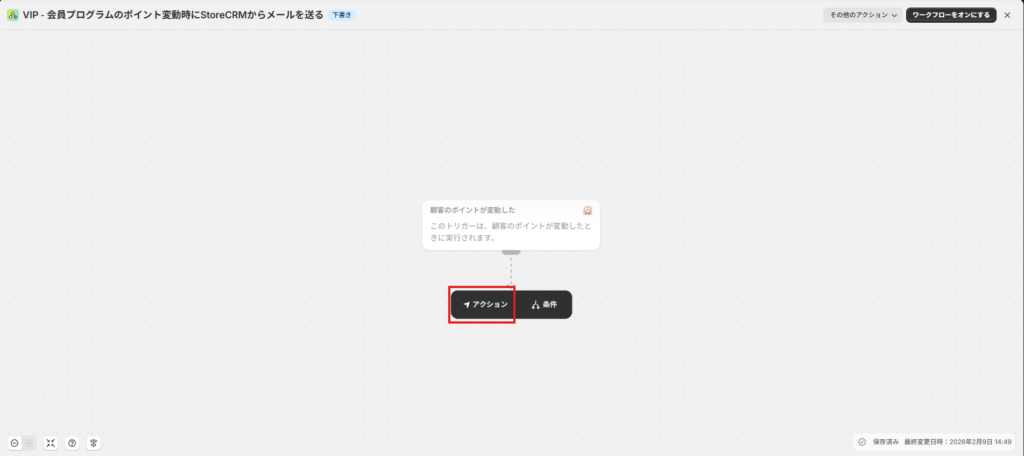
7. Click [+] → [Action].
8. Click StoreCRM.
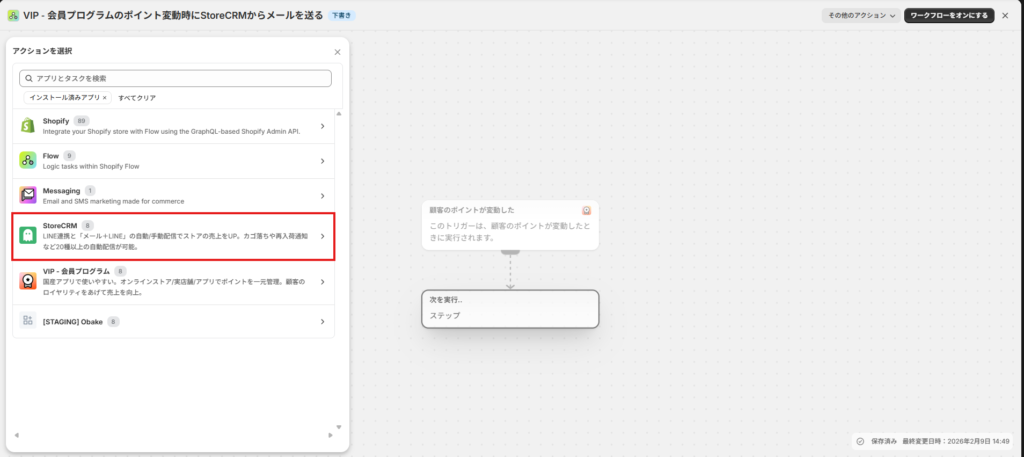
9. Click Email HTML: Send Email.
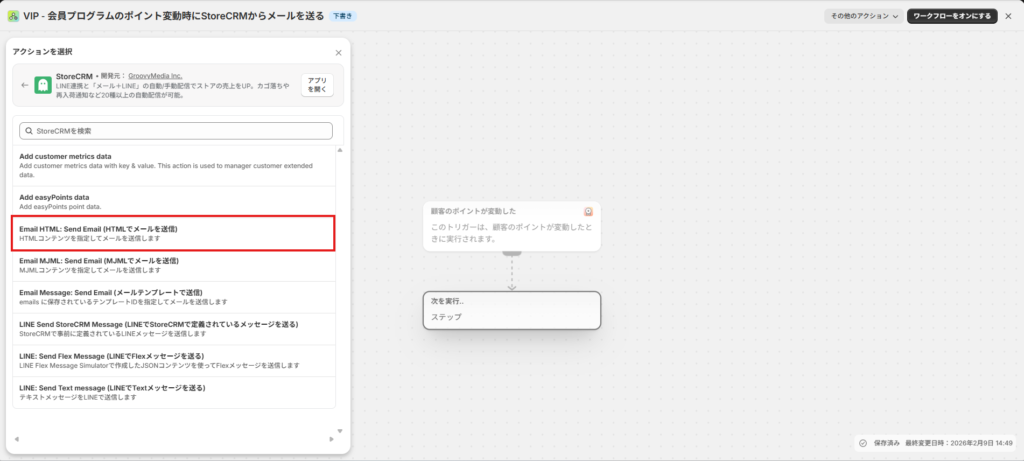
There are three actions available for sending StoreCRM emails:
- Email Message: Send Email (send predefined email in StoreCRM)
- Email HTML: Send Email (Send HTML email)
- Email MJML: Send Email (Send MJML email)
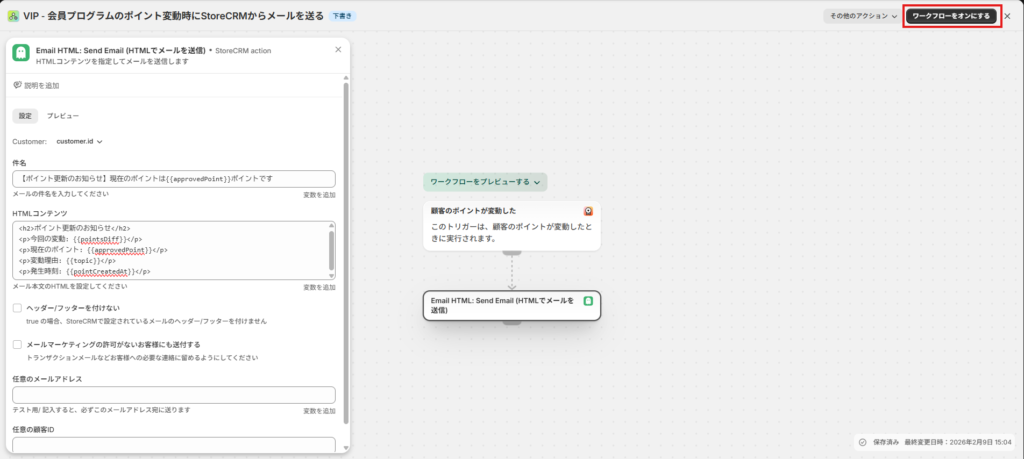
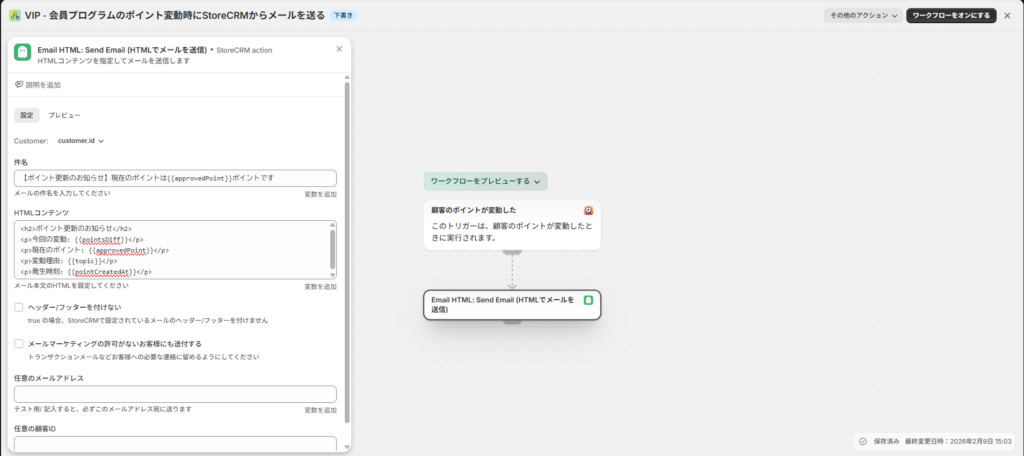
10. Email HTML: Send Email (Send HTML email)settings
This time, we want to utilize variables given by the VIP's "Customer's points changed" trigger in the message, so we will use "Email HTML: Send Email (Send HTML email)” to proceed with the explanation.
Email HTML: Send Email requires the following fields:
- Subject
- HTML body
By embedding trigger variables in the HTML body, variable information can be displayed in the same way as LINE.
<h2>ポイント更新のお知らせ</h2>
<p>今回の変動: {{pointsDiff}}</p>
<p>現在のポイント: {{approvedPoint}}</p>
<p>変動理由: {{topic}}</p>
<p>発生時刻: {{pointCreatedAt}}</p>
Optional setting items include the following.
- No header/footer...Setting item for sending with header/footer set on StoreCRM side
- Also send to customers without email marketing consent...If turned ON, email marketing will be sent to customers who have not received permission from Shopify. Please do not use it for promotional purposes, and only use it for non-promotional communications such as important announcements.
- Any email address...This is for testing purposes. If you enter your email address, all notifications will be sent to the email address you entered. Please enter it when confirming operation.
- Any customer ID...This is for testing purposes. If you enter an email address, all notifications will be sent to the email address associated with the customer you entered. Please enter it when confirming operation.
Variable types and meanings
Instead of entering variables manually, be sure to click the variable name on the Shopify Flow screen and insert it into the text field.
| variable name | Variable | meaning | Provided by |
|---|---|---|---|
| customer | Select from 2nd layer | Customer information (ID, name, email, etc.), detailshere | Shopify |
| pointsDiff | {{pointsDiff}} | Number of points increased or decreased this time | VIP ‑ Membership Program |
| topic | {{topic}} | Reason for variation (add/sub etc.) | VIP ‑ Membership Program |
| approvedPoint | {{approvedPoint}} | Current points after change | VIP ‑ Membership Program |
| pointCreatedAt | {{pointCreatedAt}} | Time when the change occurred | VIP ‑ Membership Program |
| shop | Select from 2nd layer | Shop information and detailshere | Shopify |
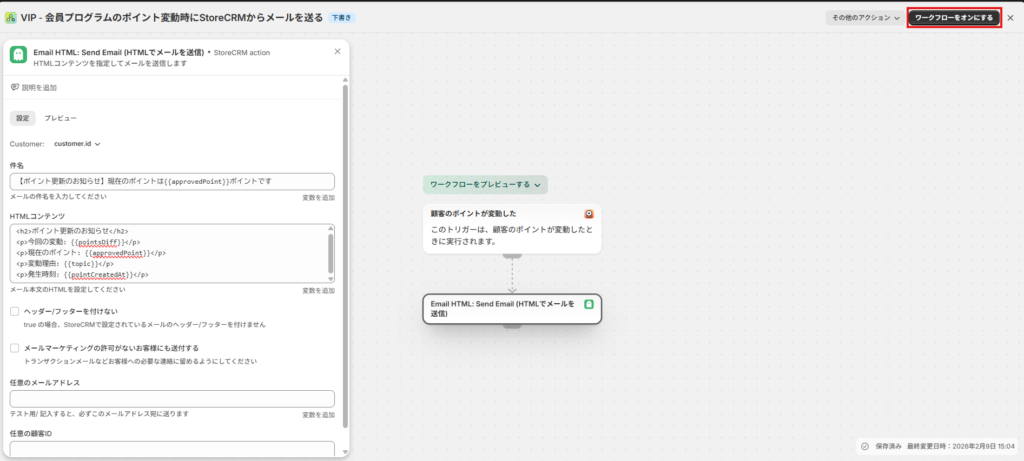
19. Click Turn on Workflow in the top right corner to enable the settings.
Settings are complete. A message is delivered to the customer when the number of points changes.
Related pages
 English
  Japanese