

In the customer information collection settings for registration, you can collect additional information during or immediately after registration through Shopify's new customer accounts and OIDC registration flows. Configure fields such as first name, last name, phone number, birthday, customer metafields, email marketing consent, and Terms of Service consent for each flow you use.
This page explains how to select a collection flow, configure fields and form text, use the preview, apply the settings to your store, and verify everything before publishing.
- What you can do
- 1. Open the settings page
- 2. Select a collection flow
- 3. Configure the basic flow settings
- 4. Add fields to collect
- 5. Configure the text and appearance in the preview
- 6. Save and apply the settings to your store
- 7. Verify the behavior before publishing
- If the form does not display correctly
What you can do
- Configure the customer information to collect for each of the four flows during or immediately after registration
- Set each field as required, allow it to overwrite an existing value, or select checkboxes by default
- Drag fields to change their display order
- Edit the text, logo, and colors for the email screen and additional details form while checking the preview
- Configure form text for each language published in Shopify
- Hide fields that already have values or limit the form to new customers
1. Open the settings page
- Open [Settings] in StoreCRM.
- Click [Collect customer information during registration] in the settings menu.
2. Select a collection flow
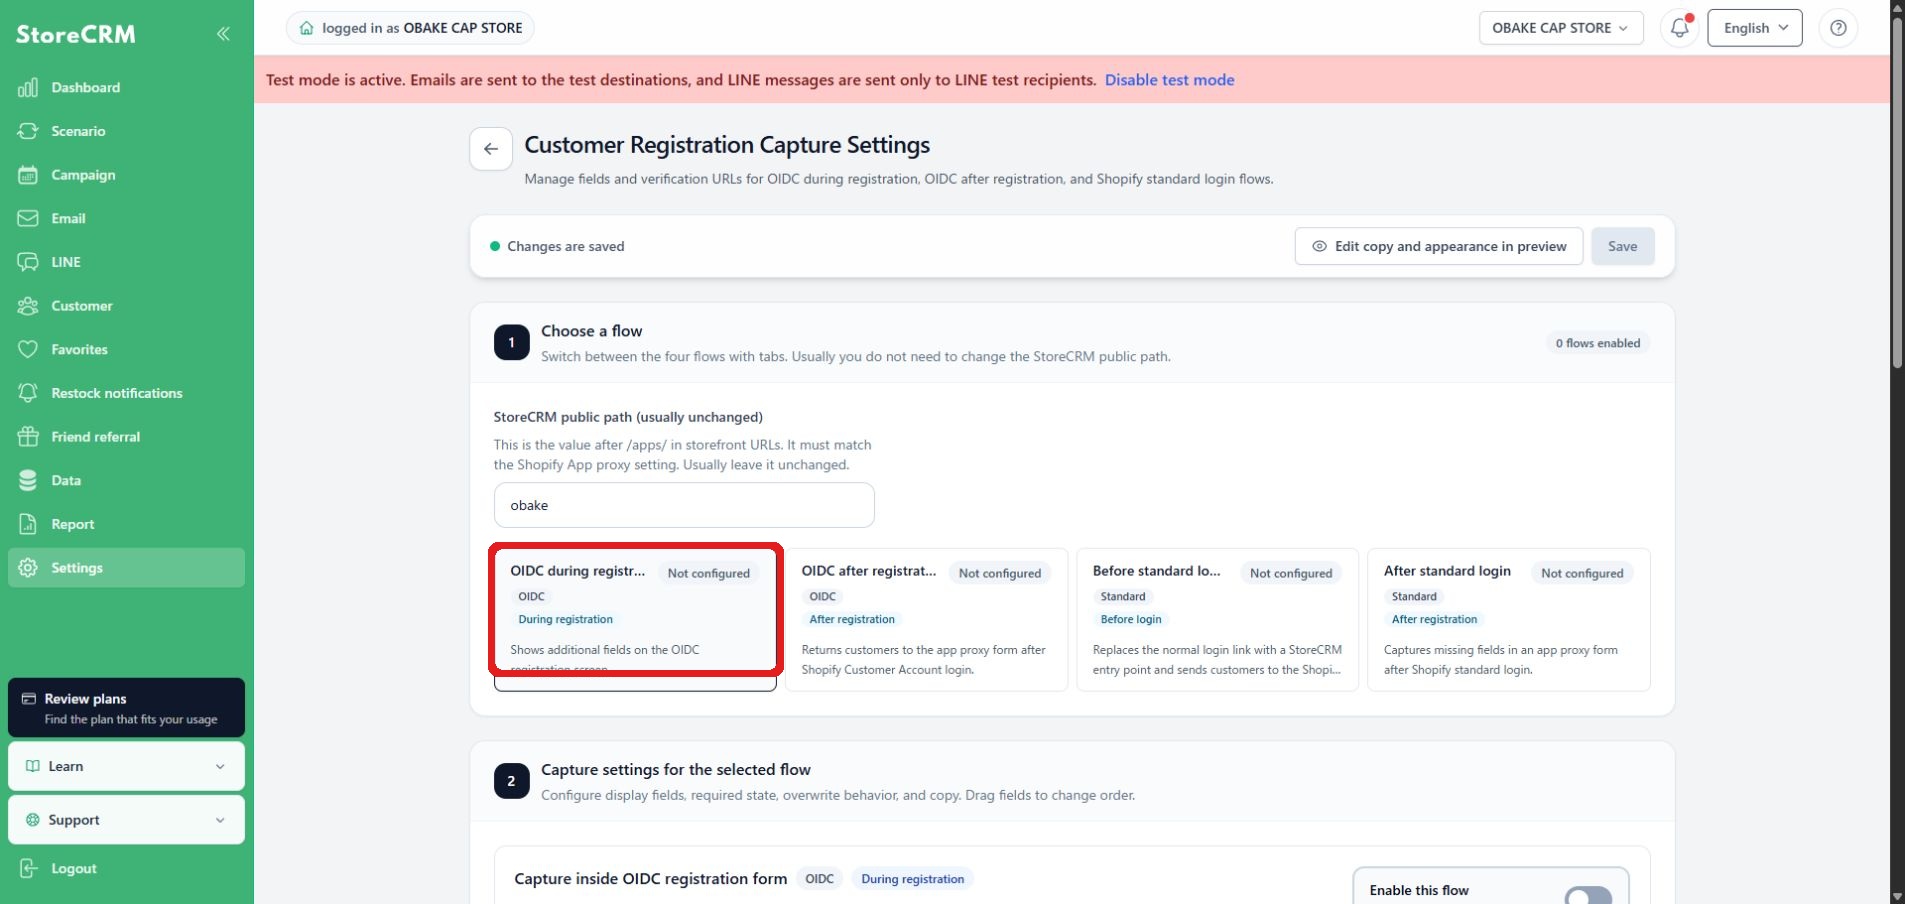
Under [Select a flow], choose the flow that matches your store's registration process. You can save whether each flow is enabled, which fields it collects, its text, and its display conditions.
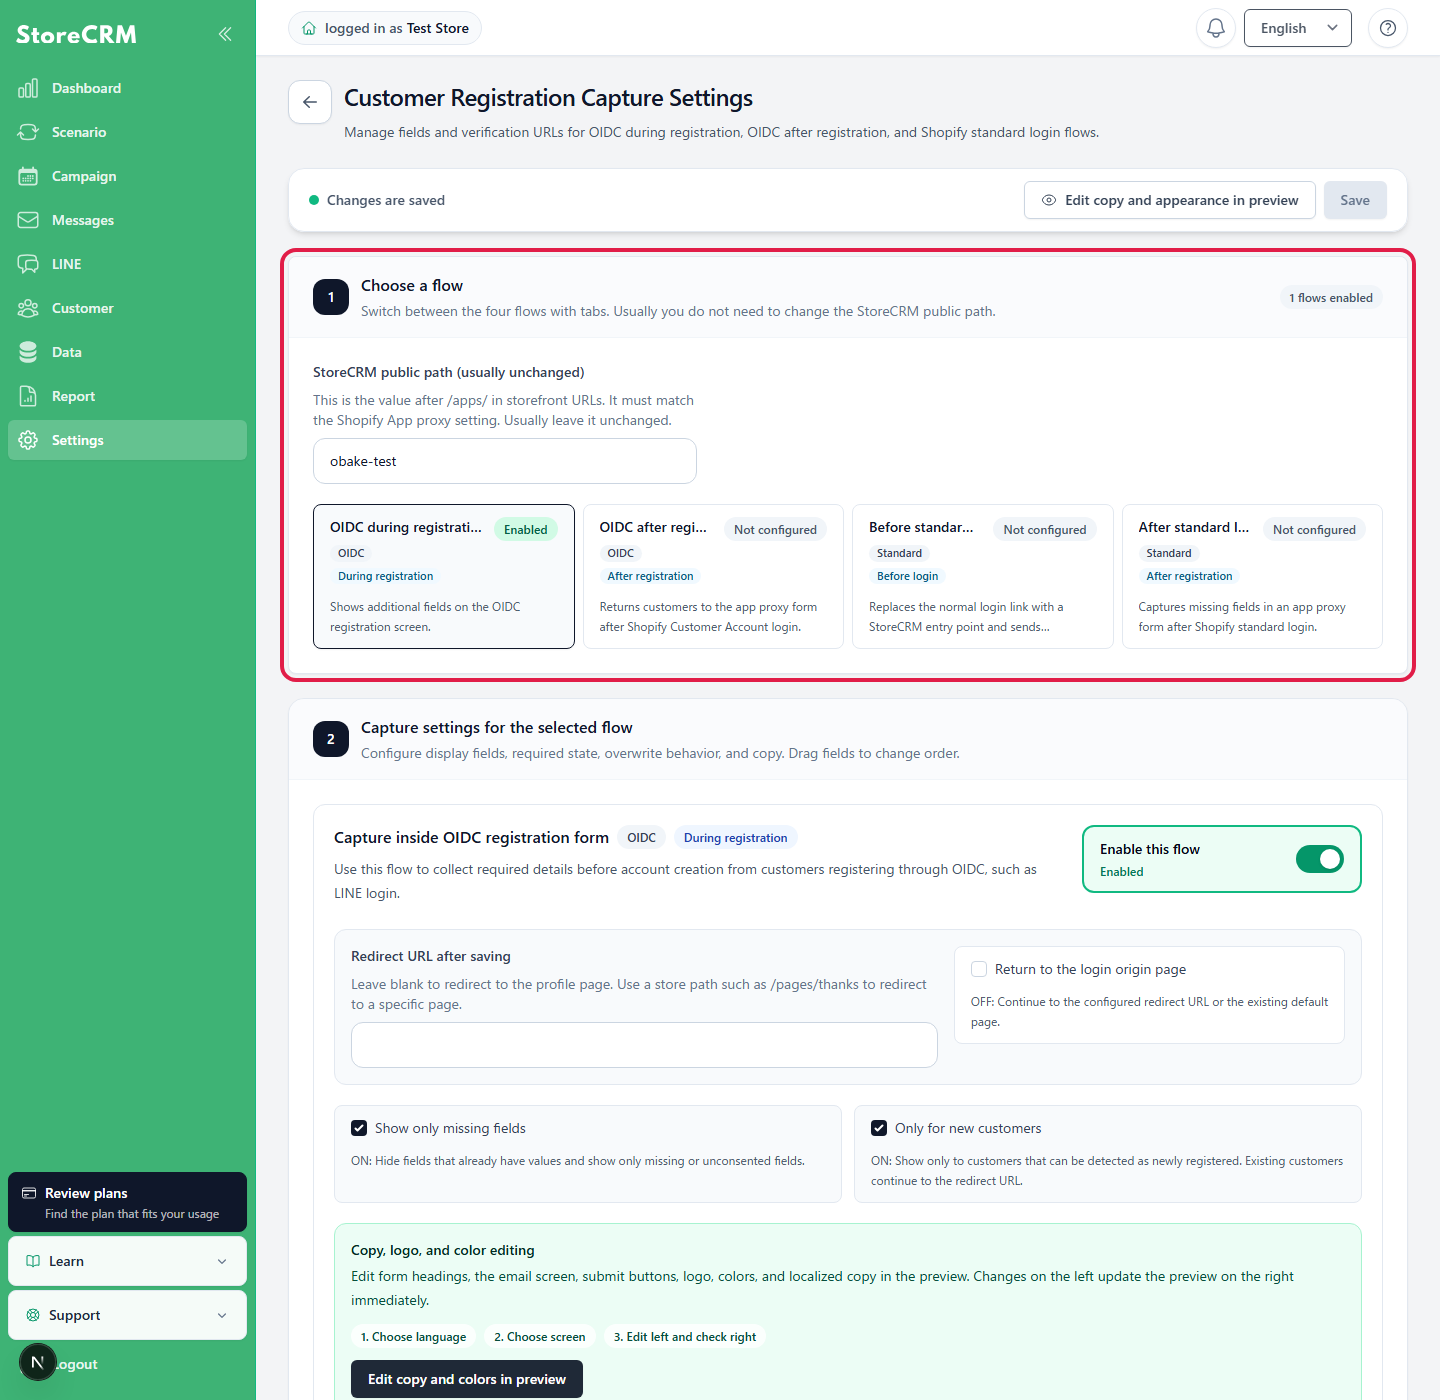
| Flow | When it appears | Purpose |
|---|---|---|
| OIDC during registration | Before an account is created through OIDC | Collect required information before registration from customers signing up through OIDC, such as LINE Login. |
| OIDC after registration | After OIDC registration and signing in to Shopify customer accounts | Collect missing information from signed-in customers. |
| Before standard login | Before Shopify's standard login | First verifies the email address, then directs existing customers to six-digit code entry and new customers to the additional details form. |
| After standard login | After Shopify's standard login | Collect missing information immediately after registration from signed-in customers. |
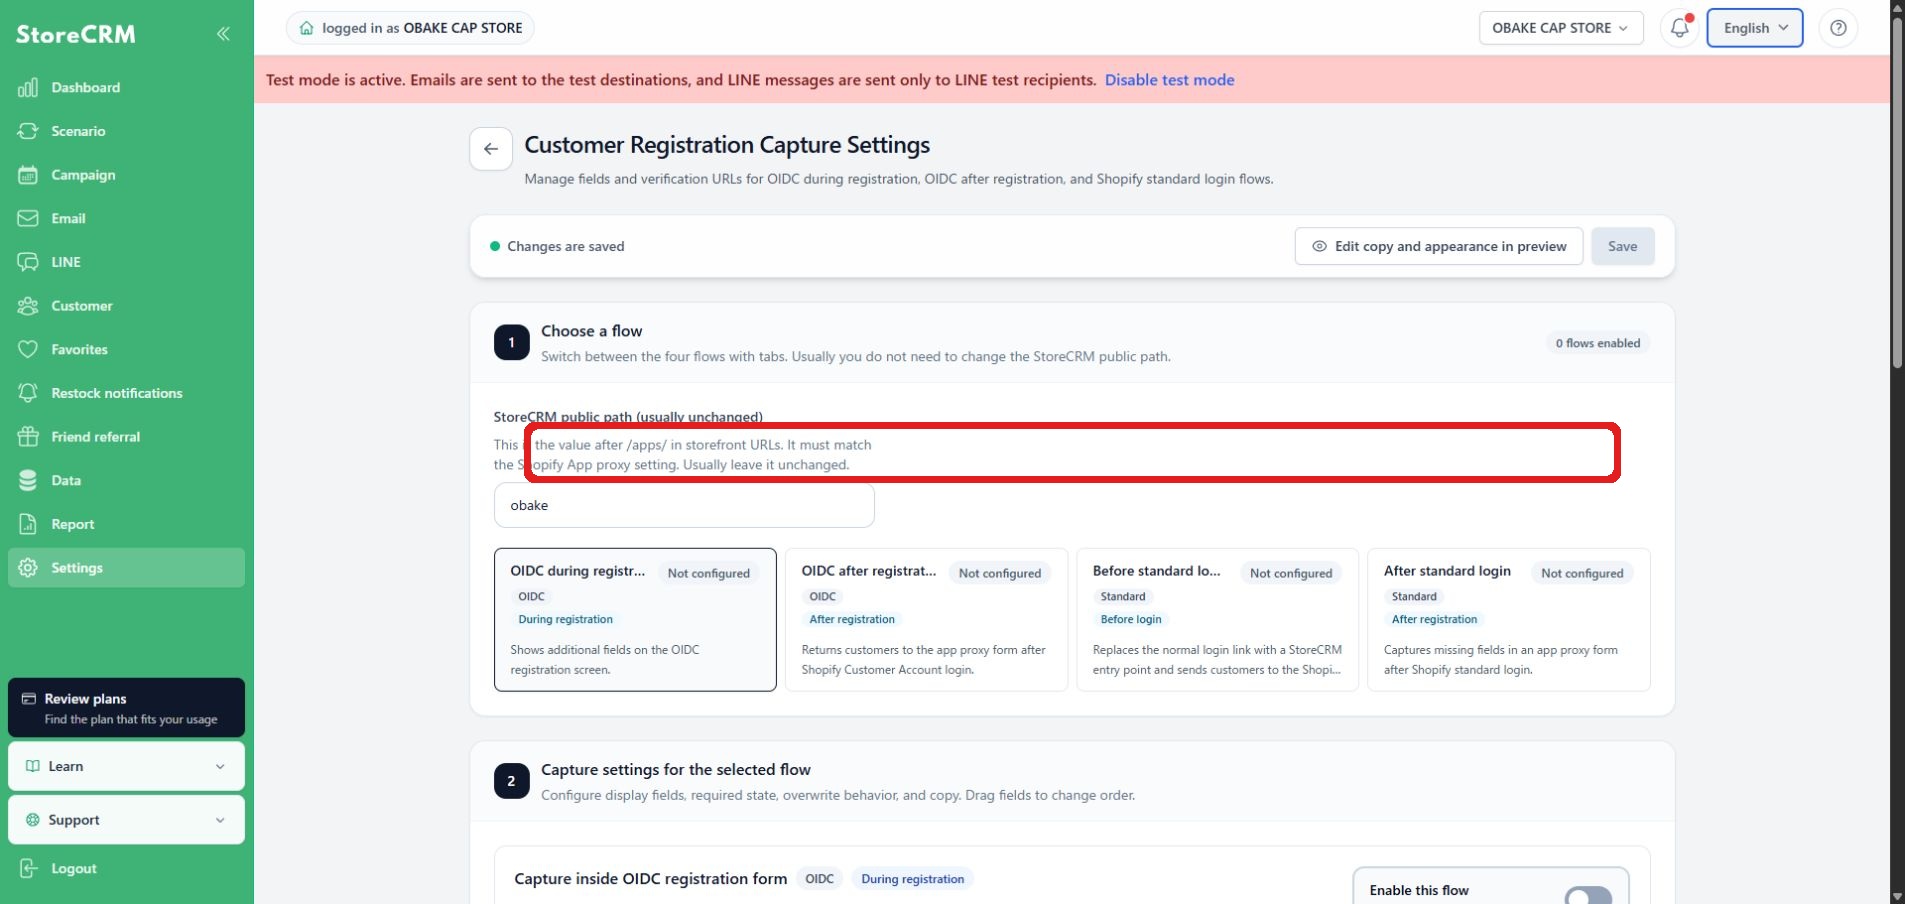
StoreCRM public path This is the value that comes immediately after /apps/ in the store URL. It must match the App proxy setting in the Shopify app, but you normally do not need to change it.
3. Configure the basic flow settings
- Open the tab for the flow you want to configure.
- Turn on [Enable this flow].
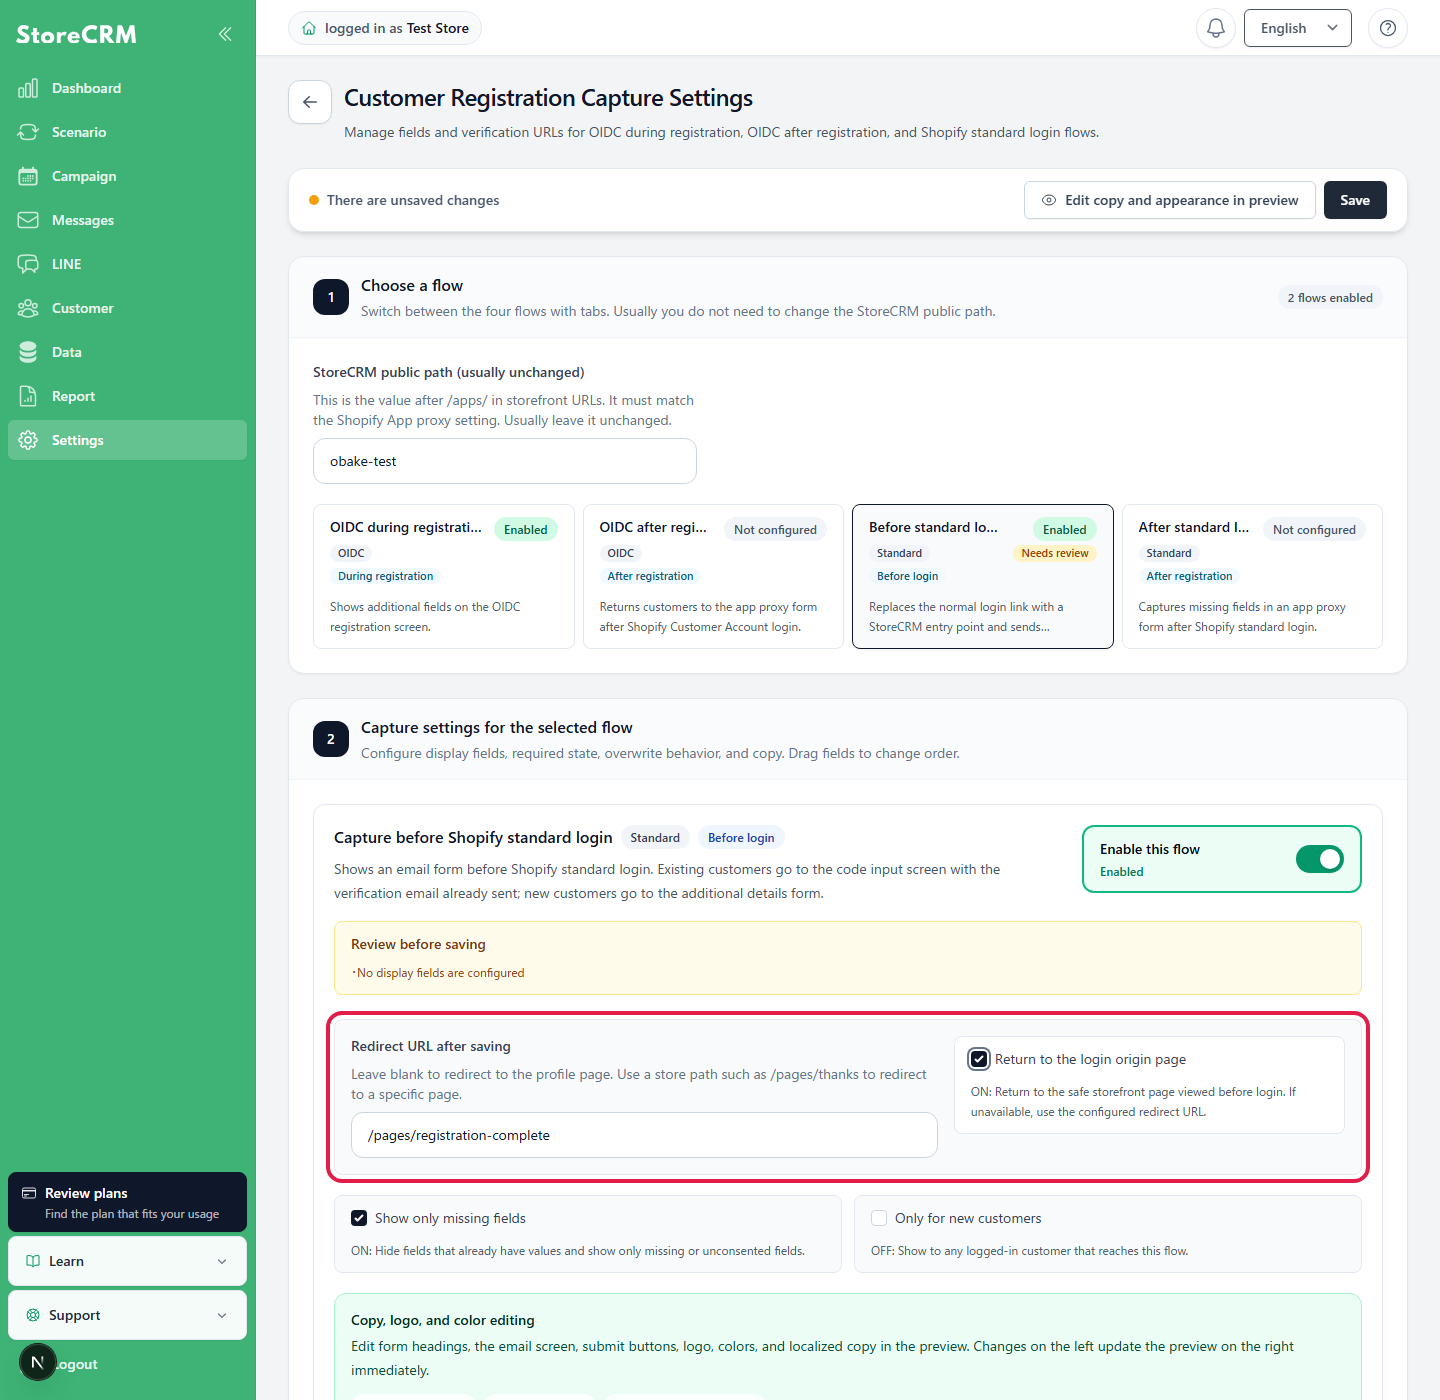
- Enter a [Redirect URL after saving] if needed. If left blank, customers are redirected to the profile page. To redirect to a page within your store, enter a path such as
/pages/registration-complete. - Configure the conditions under which the form is shown to customers.
| Settings | When ON | When OFF |
|---|---|---|
| Show only missing fields | Hides fields that already have values and consent items that have already been accepted, showing only incomplete fields and unaccepted consent items. | Shows all fields added to this flow, regardless of whether the customer already has values for them. |
| Only for new customers | Shows the form only to customers identified as having just registered. Existing customers skip the form and proceed to the redirect destination. | Shows the form to any signed-in customer who reaches this flow, whether new or existing. |
Return customers to the page where they started signing in after registration
[Return to the page where login started] When enabled, customers return to the product page, cart, or other page where they started signing in after completing registration or entering additional information. When disabled, they are redirected to the page specified under [Redirect URL after saving].
The same setting applies to new registration, existing-customer login, registration that requires additional information, and registration that does not. Before publishing, start login from each flow and confirm that customers return to the expected page.
4. Add fields to collect
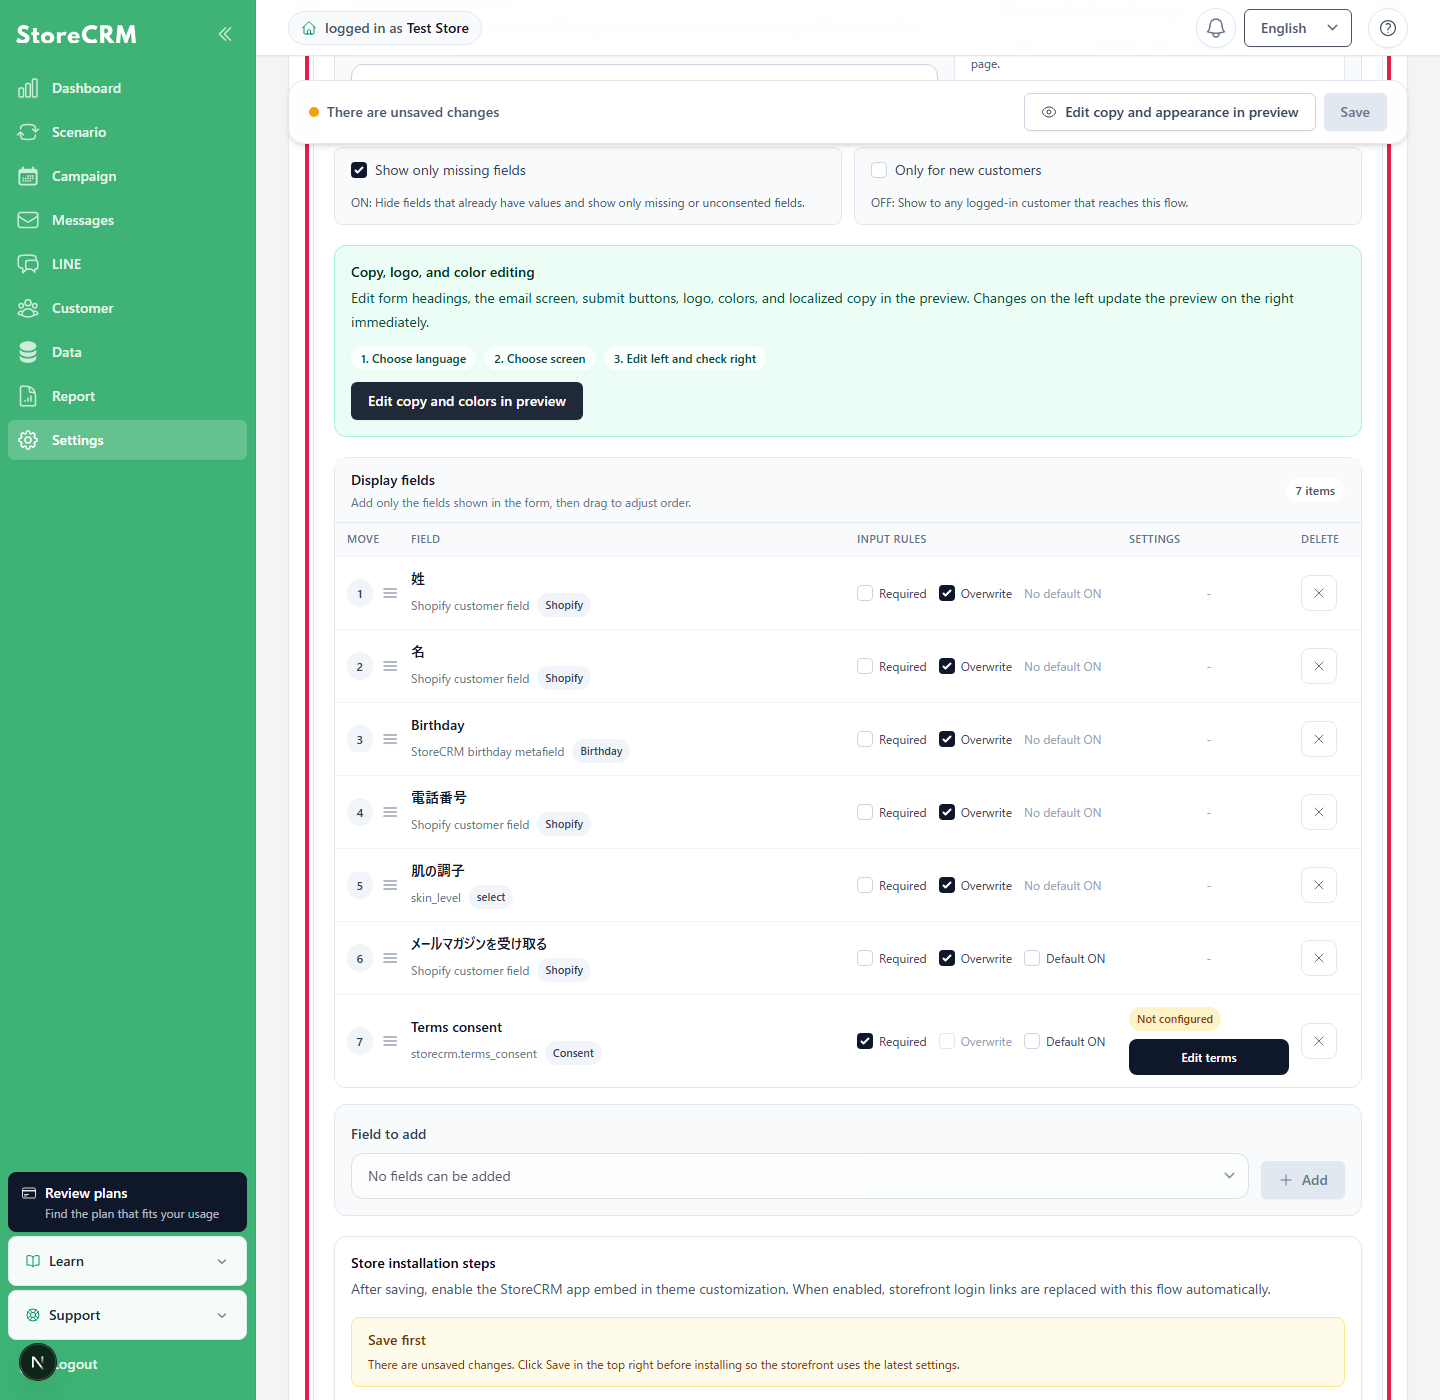
Under [Display fields], configure the fields shown on the form and their input rules.
- Select the fields you want to collect under [Fields to add].
- Click [Add].
- Configure [Required], [Overwrite], and [Default ON] for each added field.
- Drag the move icon on the left to change the display order.
- To remove a field from the form, click the delete button on the right.
Fields you can add
| type | Example | Saved to |
|---|---|---|
| Standard Shopify customer information | Last name, first name, and phone number | Shopify customer information |
| Birthday | Birthday | The birthday metafield configured in StoreCRM |
| Customer metafields | Membership rank, categories of interest, and similar information | The Shopify customer metafield shown for the field |
| Email marketing consent | Receive email newsletters | Shopify email marketing subscription status |
| Terms consent | Consent to the Terms of Service and Privacy Policy | storecrm.terms_consent |
To add a customer metafield, first register the metafield you want to use in StoreCRM's customer property settings. Registered fields appear under [Fields to add].
Input rules
| Settings | Behavior |
|---|---|
| Required | The form cannot be saved unless the field is completed or the checkbox is selected. |
| Overwrite | Saves the value entered in the form even when the customer information already has a value. This setting cannot be changed for Terms consent. |
| Default ON | Displays checkbox fields such as email marketing consent and Terms consent as selected by default. |
Configure terms consent
Configure multiple terms and privacy policies
You can include multiple links in Markdown format in the consent text. The display name and URL are extracted automatically for each link, and you can manage the terms version.
I agree to the [Terms of Service](https://example.com/terms) and [Privacy Policy](https://example.com/privacy)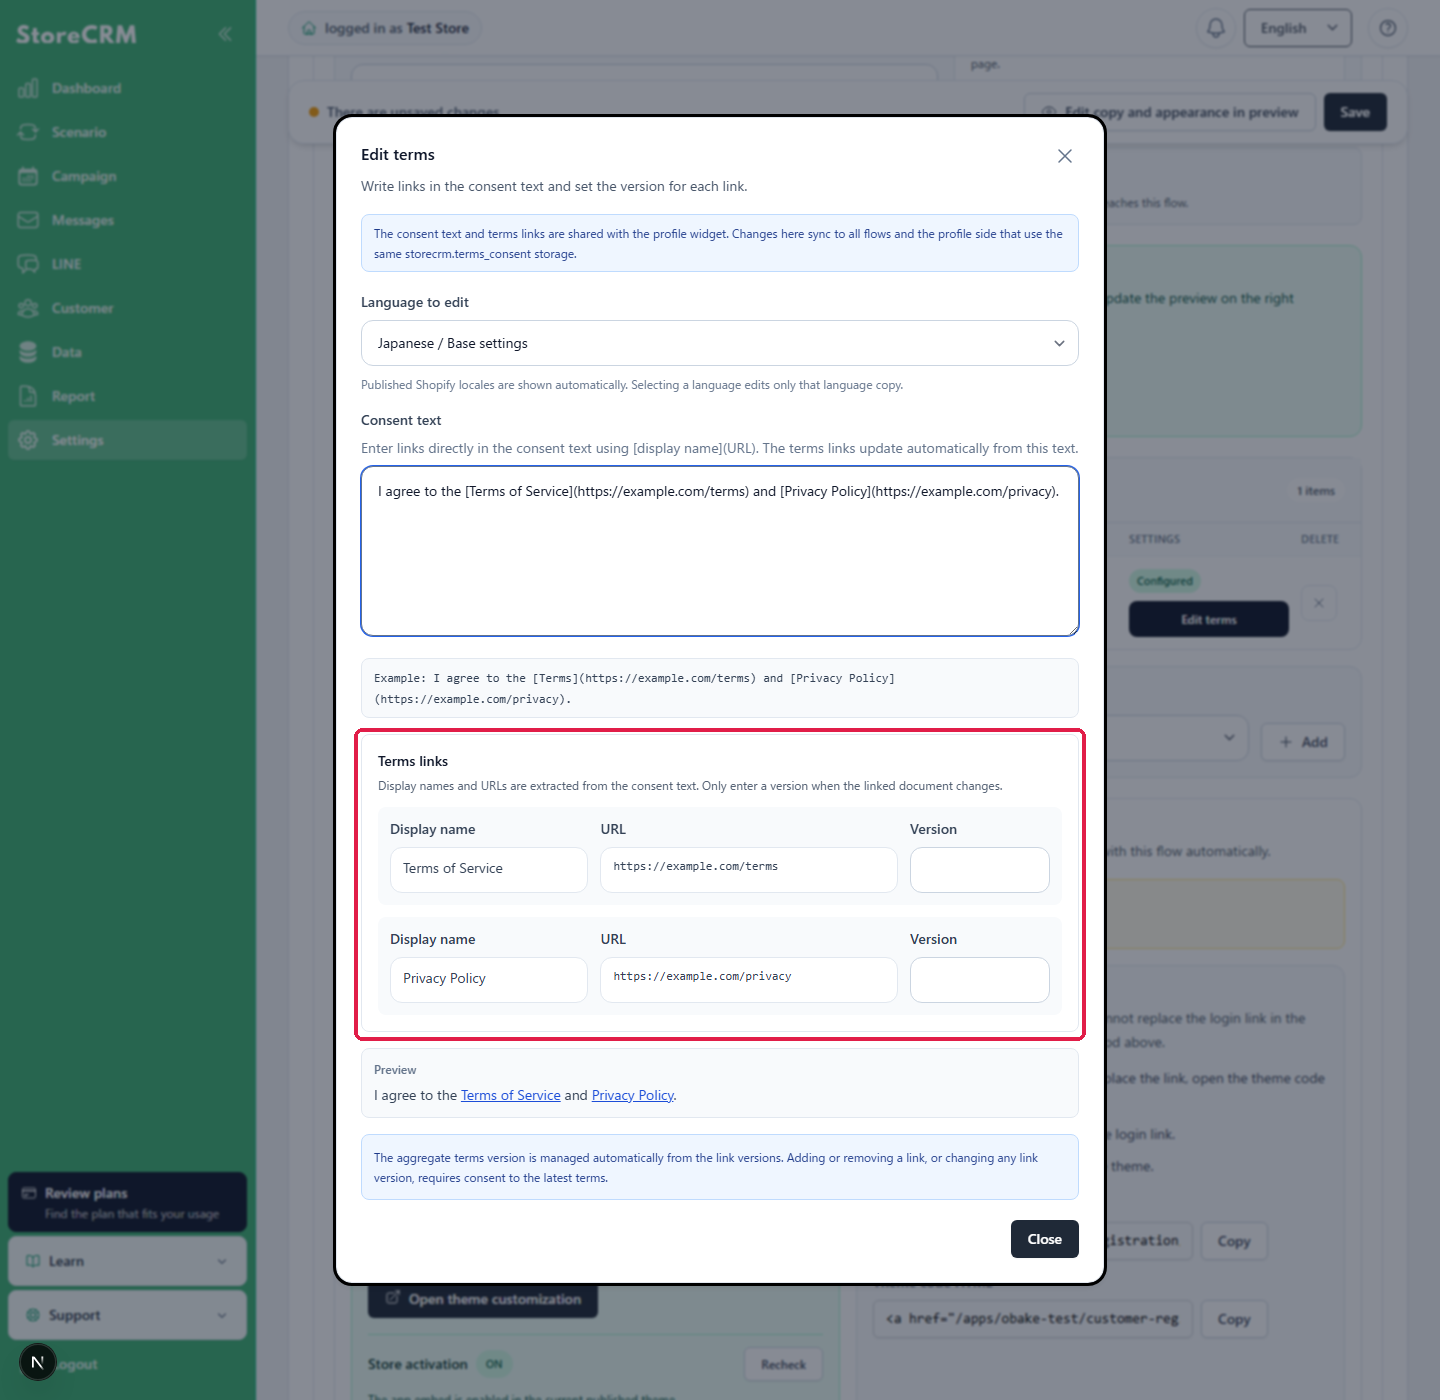
- Configure the consent text and links for each language. Switch between the published locales synced from Shopify to edit them.
- Changing a link URL or terms version allows you to treat customers as needing to consent to the latest version again.
- Specify a published
https://page for the URL. Relative URLs, unsafe schemes, and invalid URLs cannot be saved. - Before saving, use the preview to confirm that every link opens and that its display name and destination are correct.
When you save the Terms of Service, the current latest version is also synced automatically to the Shopify shop metafield. You do not need to configure it manually in Shopify admin. If synchronization fails, check the save result, wait a while, and save again.
The same terms settings are synced to all flows and the profile page that use the same destinationstorecrm.terms_consent. Check the impact on published flows before saving.
- Add [Terms consent] under [Fields to add].
- Click [Edit Terms of Service].
- Configure the consent text, link text, Terms of Service URL, and terms version.
The Terms of Service URL and terms version are shared by the customer properties widget and all collection flows. When the terms are revised, changing the terms version lets you request consent to the new version again even when [Show only missing fields] is ON.
When adding birthday items
The birthday field uses separate year, month, and day selectors. The same input format is used in all four capture flows, including before or after registration and before or after email confirmation.
Under Add field, select Birthday, click Add, and save the settings. After saving, go through each flow, select the year, month, and day, and save. Confirm that the same date appears in the StoreCRM customer details and the Shopify customer metafield.
5. Configure the text and appearance in the preview
- Click [Edit text and colors in preview] for the applicable flow.
- Select the language and screen to edit on the left.
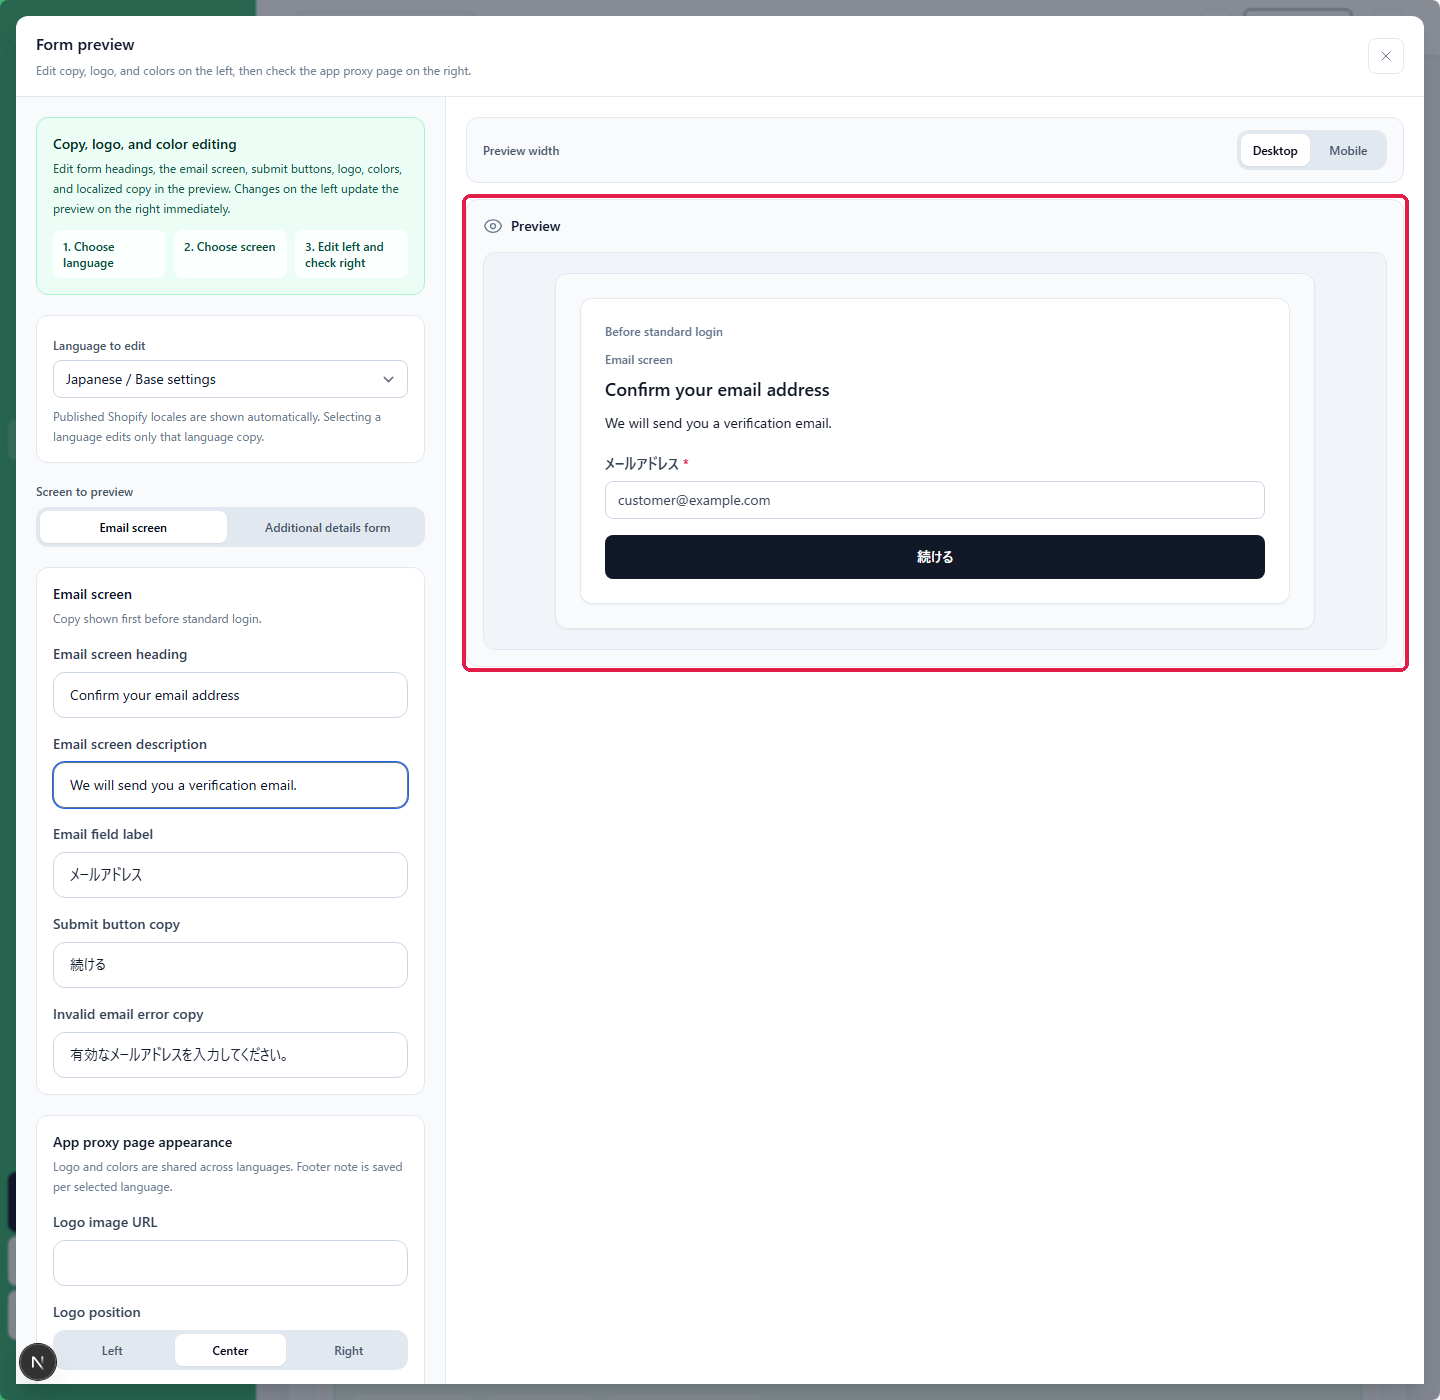
- Change the text and appearance in the fields on the left and check the result in the preview on the right. Changes appear in the preview as you type.
- Switch between [Desktop] and [Mobile] to check both display widths.
Language to edit
- Under [Japanese / Basic settings], edit the form's default text.
- When you select a published locale synced from Shopify, you can edit only the text for that language.
- After copying the basic settings with [Copy from Japanese], you can adjust the translated text.
- You can also use [Create translation draft] to generate a draft. Review the content before publishing.
- The logo and colors are shared across all languages. Form text and the footer note are saved separately for each language.
Editable text
| Screen | Editable content |
|---|---|
| Email screen | Heading, description, email address field label, submit button, and the error message shown when an invalid email address is entered |
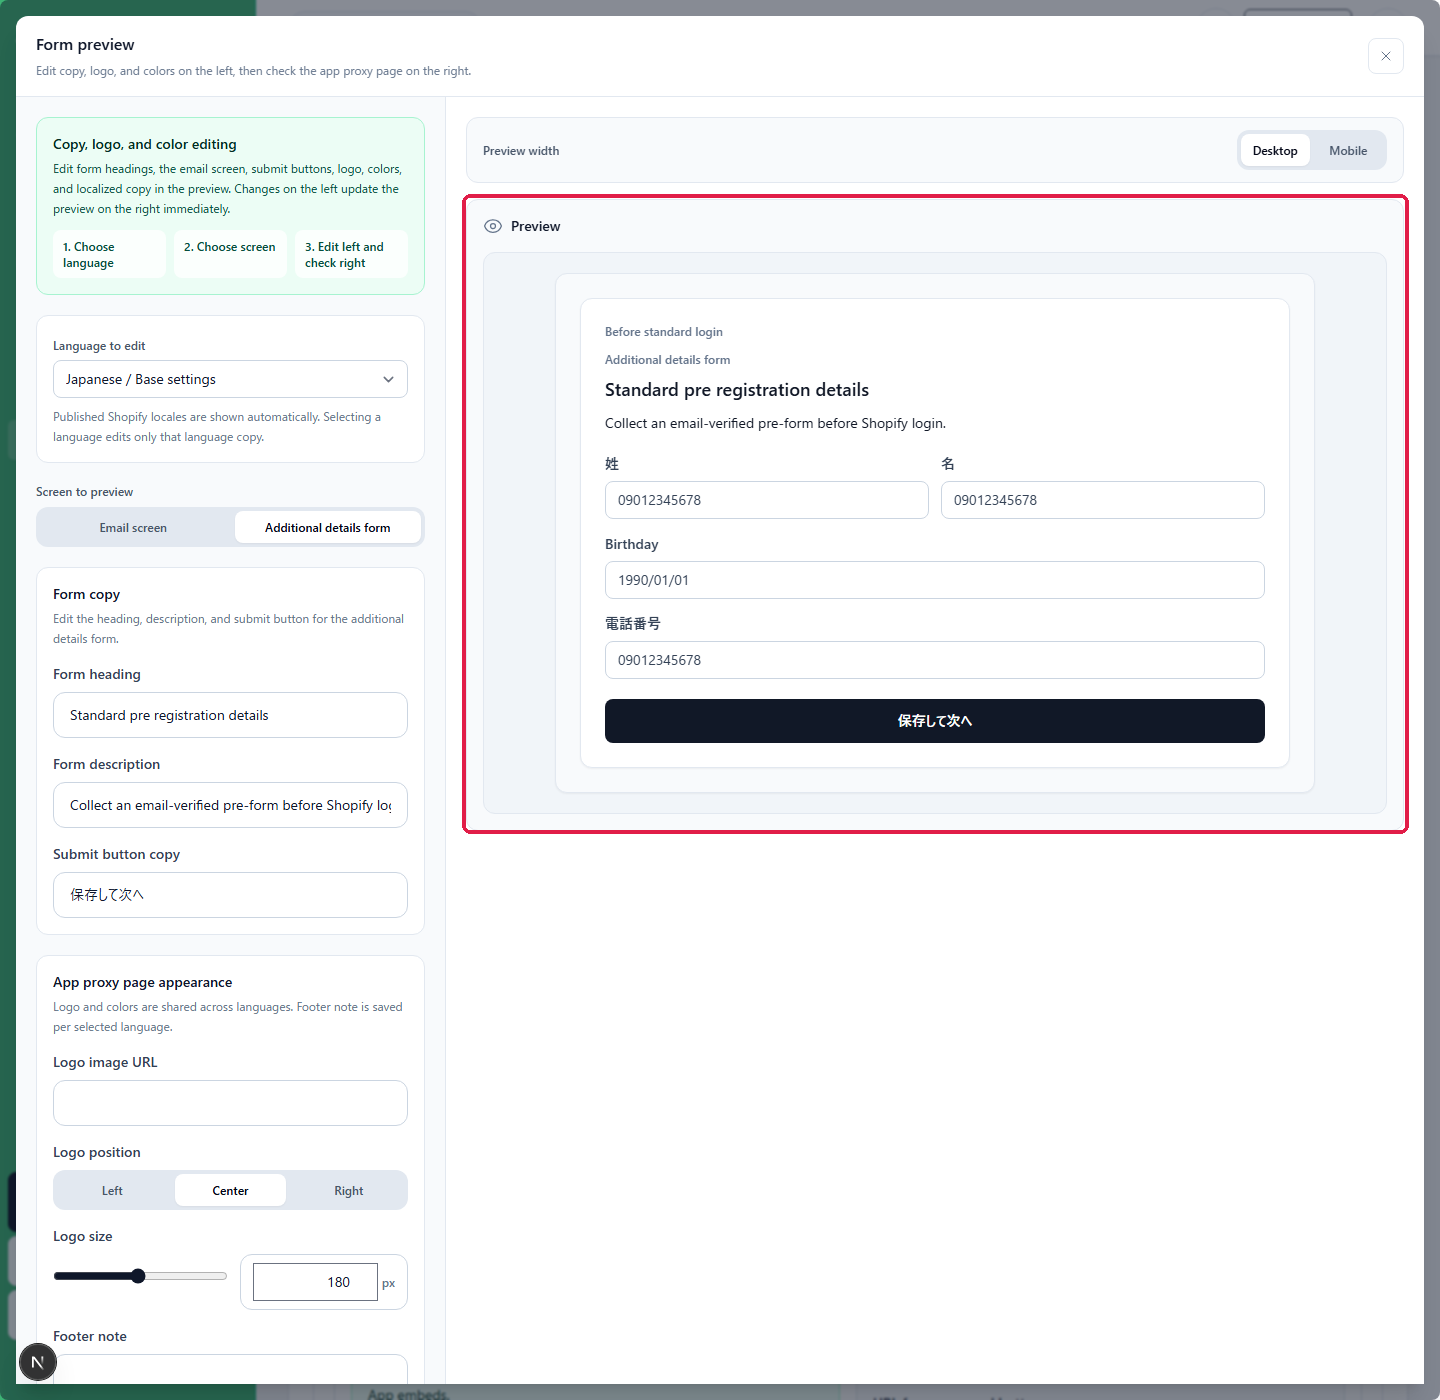
| Additional details form | Form heading, form description, submit button, and footer note |
| Terms of Service | Consent text and link text. Change the URL and terms version from [Edit Terms of Service]. |
The [Email screen] appears in the [Before standard login] flow. For the other flows, you will mainly check the [Additional details form].
Logo and colors
- Logo image URL
- Logo position (left, center, or right)
- Logo size
- Background color, card color, text color, button color, and button text color
For the OIDC during-registration and after-registration flows, the logo from the OIDC settings may be used when the logo image URL is blank. Set a logo image URL if you want to use a different logo for each collection flow.
6. Save and apply the settings to your store
- Click [Save] in the upper-right corner of the settings page.
- Click [Open theme customization] under [Installation steps for your store].
- In the Shopify theme editor, open [App embeds] and turn on the StoreCRM app embed for the applicable flow.
- Save the Shopify theme.
- Return to the StoreCRM settings page and make sure [Enable on storefront] is [ON]. Click [Check again] if necessary.
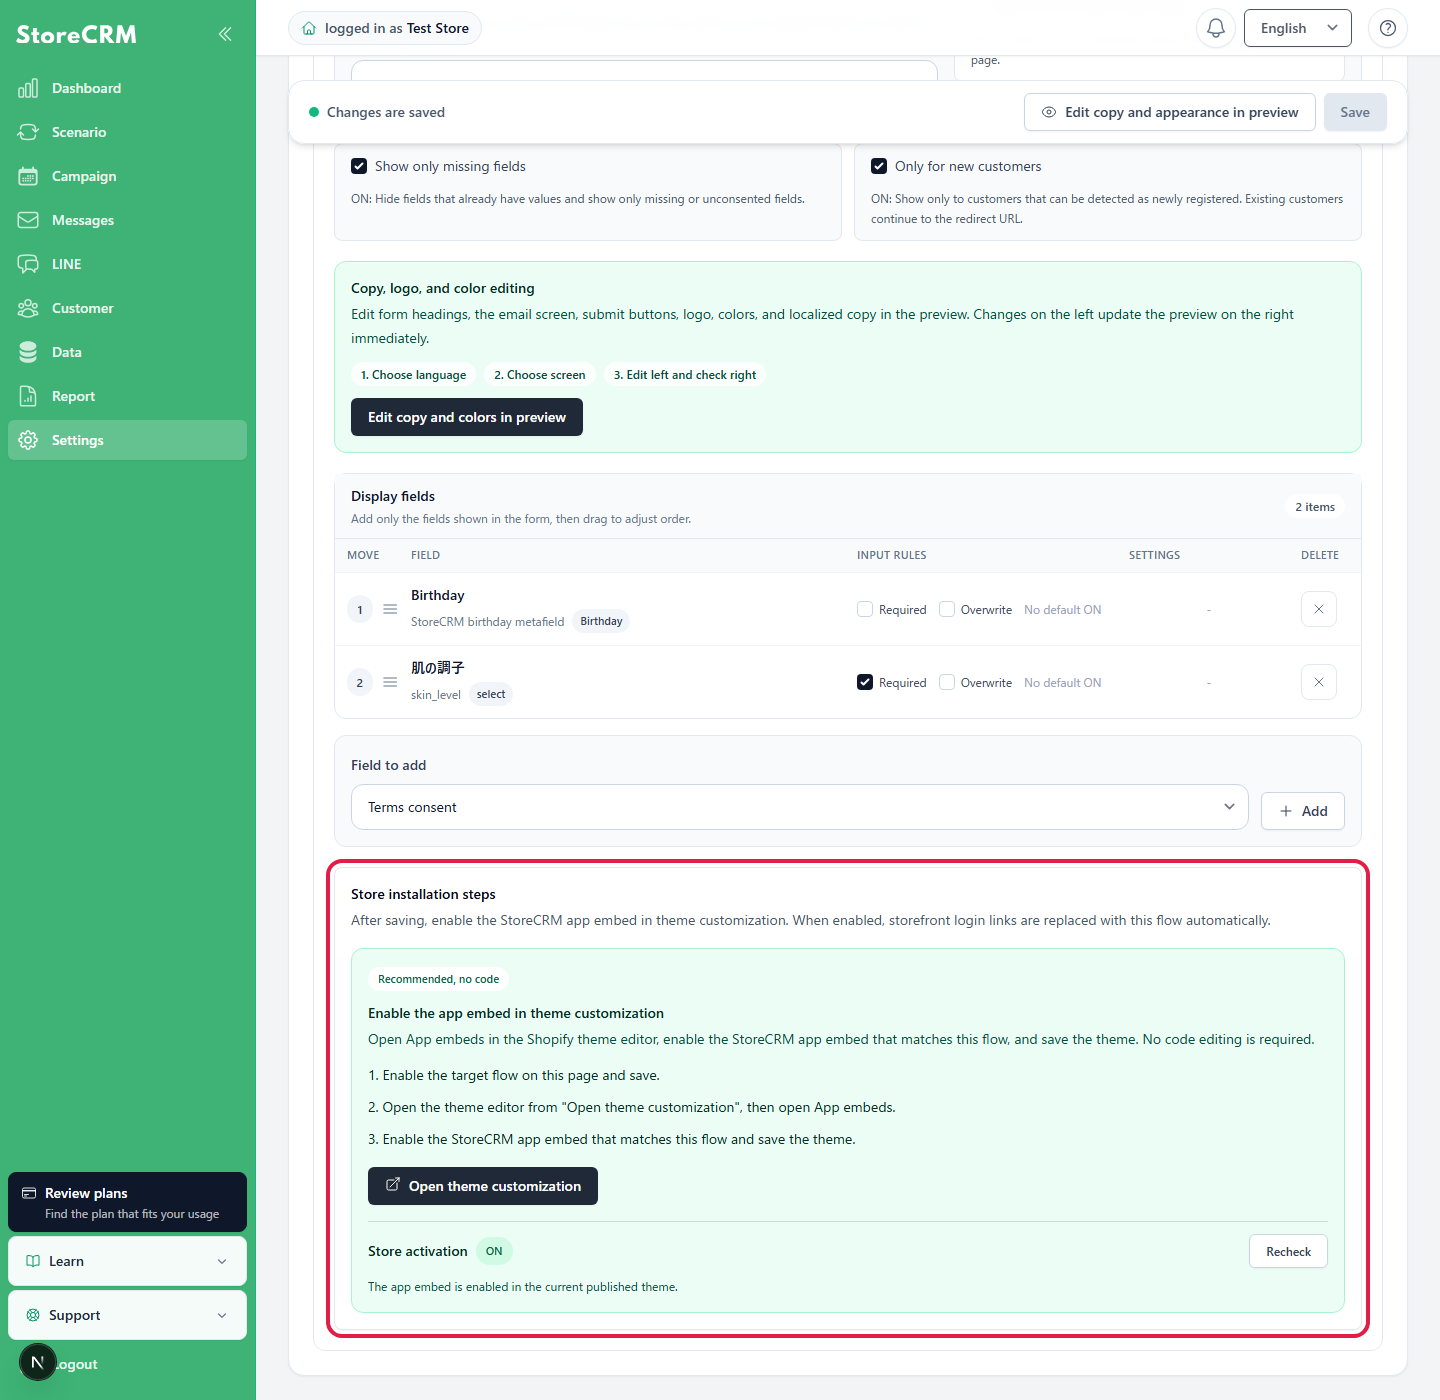
If your theme does not replace the login link through an app embed for the before- or after-standard-login flow, use the [URL for menus and buttons] or [HTML for theme code] shown on the page. Normally, use the no-code app embed.
To use an OIDC flow, complete StoreCRM's OIDC integration settings first. For [OIDC during registration], also turn on the app embed for [OIDC during-registration link] in theme customization.
7. Verify the behavior before publishing
| Flow | How to verify |
|---|---|
| OIDC during registration | While logged out, open the new-registration flow for OIDC and confirm that the additional details form appears before the account is created. |
| OIDC after registration | Register through OIDC and sign in to Shopify customer accounts, then confirm that the form for missing fields appears. |
| Before standard login | While logged out, open the login link in your store. Confirm that a new email address proceeds to the additional details form and a registered email address proceeds to six-digit code entry. |
| After standard login | Register and sign in through Shopify's standard login, then confirm that the form for missing fields appears immediately after registration. |
- The form cannot be saved when a required field is blank
- The entered values are saved to Shopify customer information or the applicable customer metafields
- [Show only missing fields] and [Only for new customers] work as expected
- The Terms of Service links and redirect URL after saving are correct
- The text and layout are correct in Japanese and every published language, on both desktop and mobile
If the form does not display correctly
| Issue | What to check |
|---|---|
| The form does not appear | Check that the applicable flow is enabled, at least one display field has been added, the settings have been saved, and the app embed is ON in the published theme. |
| The form does not appear for existing customers | Check whether [Only for new customers] is ON or [Show only missing fields] has determined that all fields are already complete. |
| The login link does not change | Check the app embed for the applicable flow, the published theme, and the StoreCRM public path. If the login link is specific to your theme, install it manually. |
| Updated text is not reflected | Check that you are editing the correct language and screen and that you clicked [Save] after closing the preview. |
| The Terms of Service URL changed unexpectedly | The Terms of Service URL and terms version are shared by the profile widget and all collection flows. Make sure the values are correct as shared settings. |
 English
  Japanese