- To send a coupon in your birthday e-mail, do the following
- This feature is only available when Shopify -> [Settings] -> [Customer Account] is set to [Conventional].When [Customer Account] is selected, the one-time password cannot be used because the customer information is not transferred.
See the manual and set it up.
1. Introduction
Sending coupons in birthday e-mails is a very effective measure to improve retention rates on e-commerce sites. Also, informing customers that they will receive a coupon on their birthday may encourage them to register as members of the e-commerce site.
This article explains how to add Shopify's "Birthday Registration Feature" using StoreCRM and specific settings and notes about "sending coupons using birthdays".
Click here to install StoreCRM.
2. what you can do with StoreCRM
StoreCRM can send birthday/birthday month emails without Shopify Flow. In addition, with the theme modification, it will be possible to acquire birthdays at the same time as member registration.
By adding a birthday registration form to a customer's account page, you can collect birthdays of new members as well as existing members. Collecting birthdays will help you understand your store's customer base as well as send out coupons.
memo
In the scenario created in StoreCRM, in addition to the email to send the coupon, an email can also be sent to inform the customer that the coupon is about to expire. It has been confirmed that sales via the scenario are 401 TP3T higher when the coupon expiration notice is sent in the second email than in the one-time email that only sends the coupon.
3. store settings
memo
This article uses the Dawn theme, which is a free theme. Paid themes and themes with customization may have different file structure.
If you contact StoreCRM customer support, we can modify the theme free of charge. (We may provide a separate quote for requests to implement a special design.Contact UsPlease.
Creating Customer Meta Fields
To implement the birthday registration field, you need to create a field in the customer meta field to register the birthday.
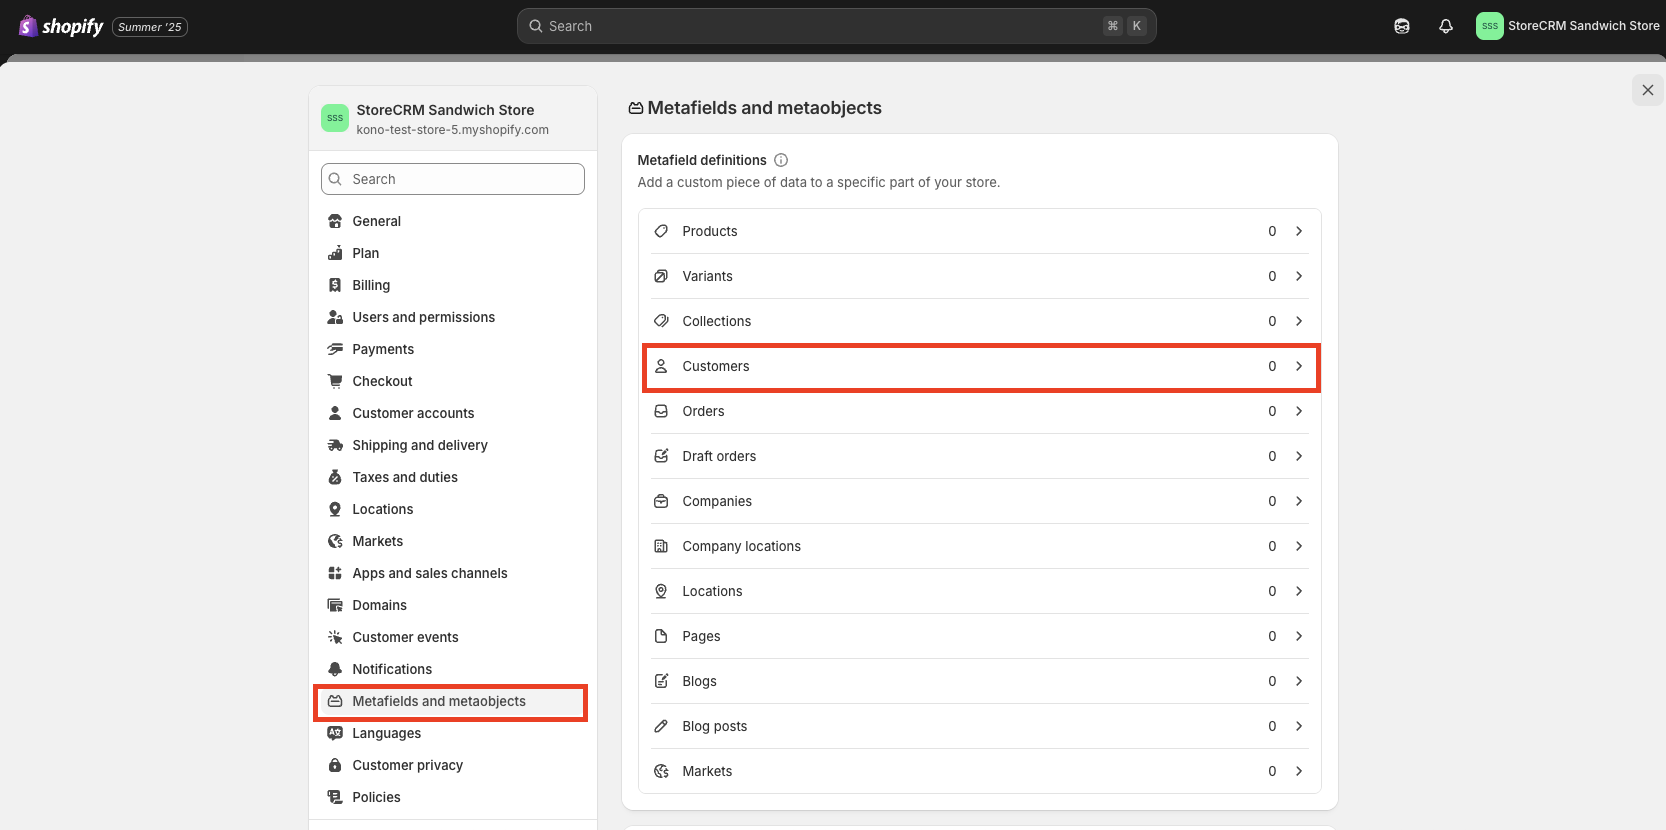
Click on ➀shopify Administration > Settings > Custom Data > Customers.
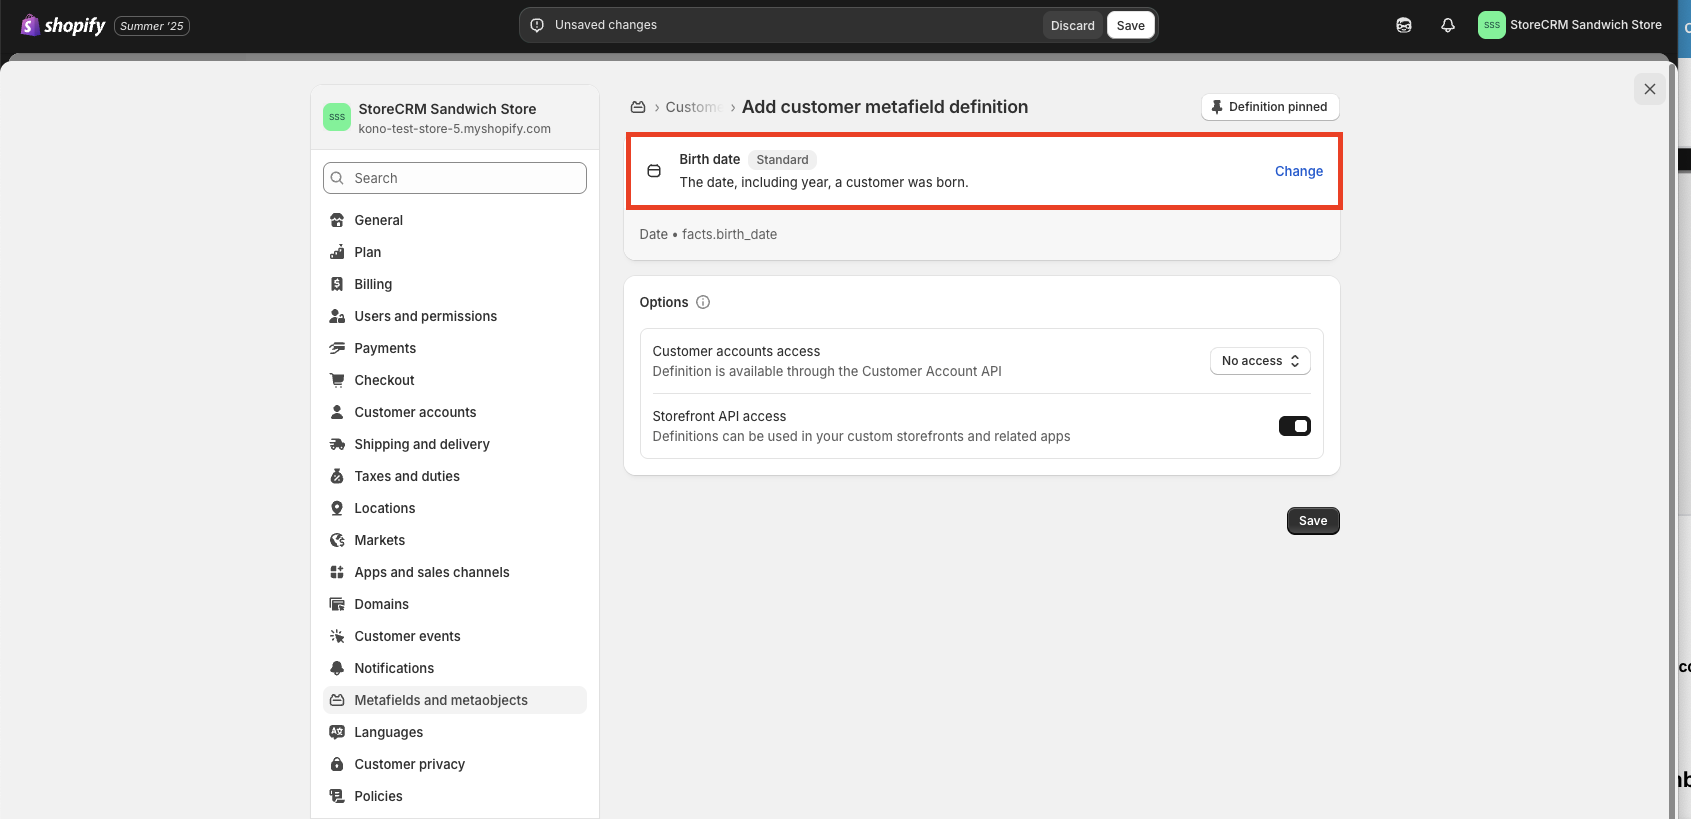
Click on ➁Date of birth.
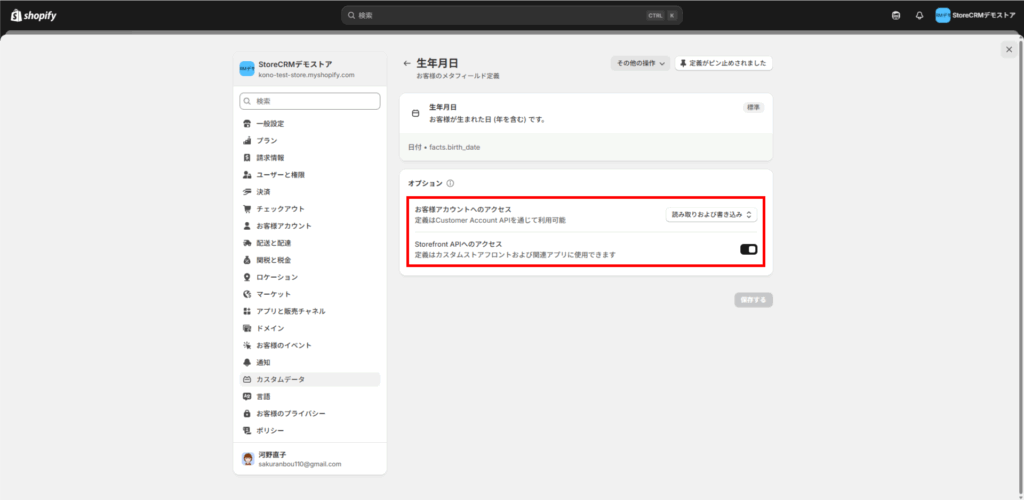
Under ③Options>Access to Customer Account, select "Read and Write", turn on access to Storefront API, and click "Save".
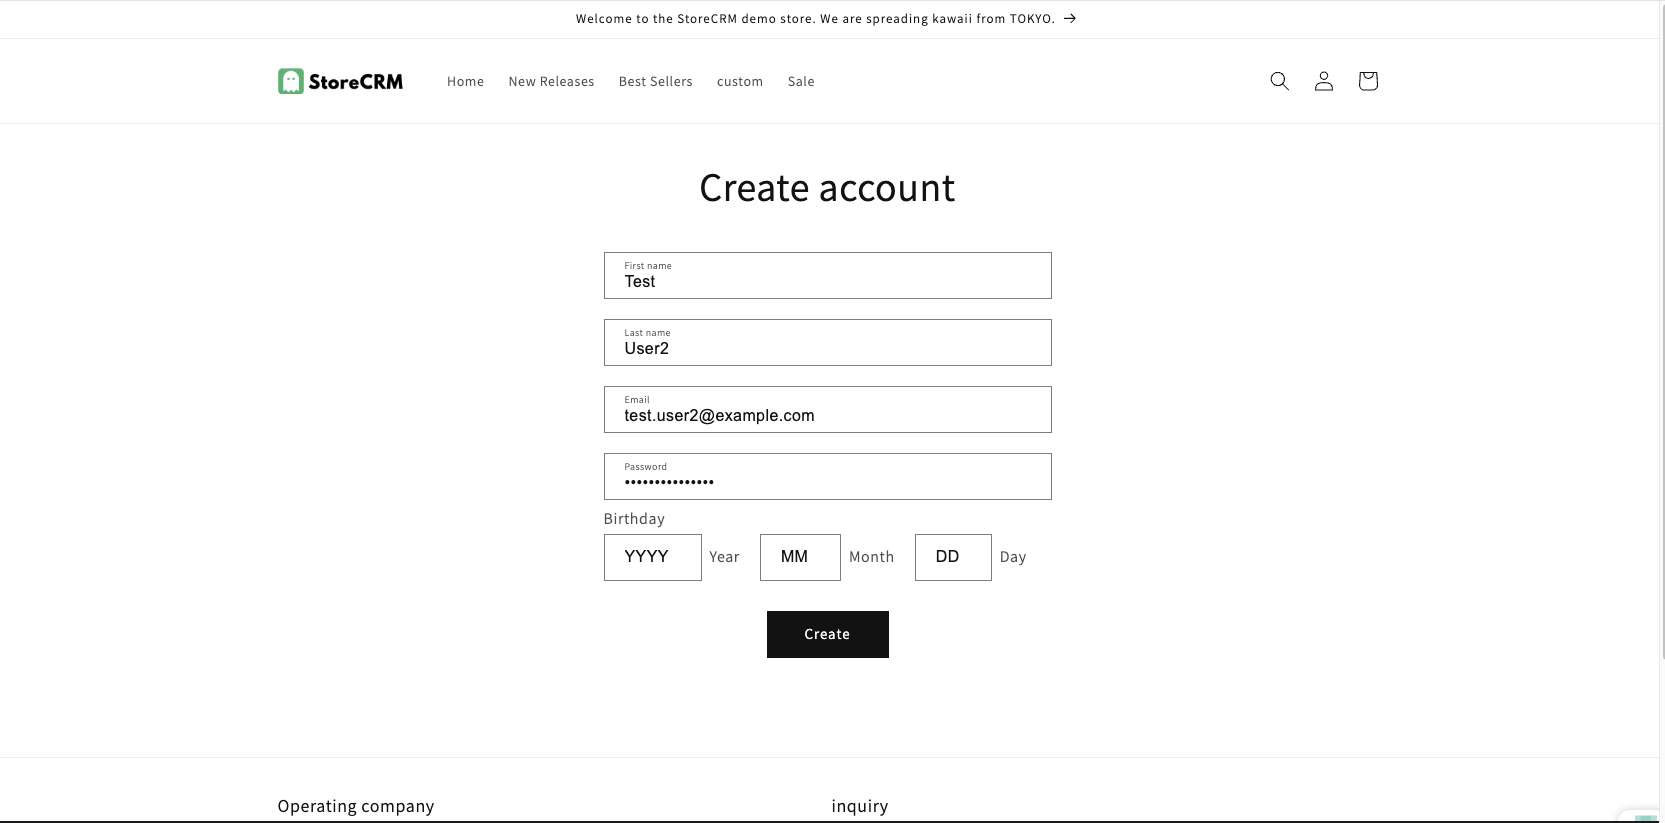
4. implementation of birthday registration form for new member registration
Goal of this item
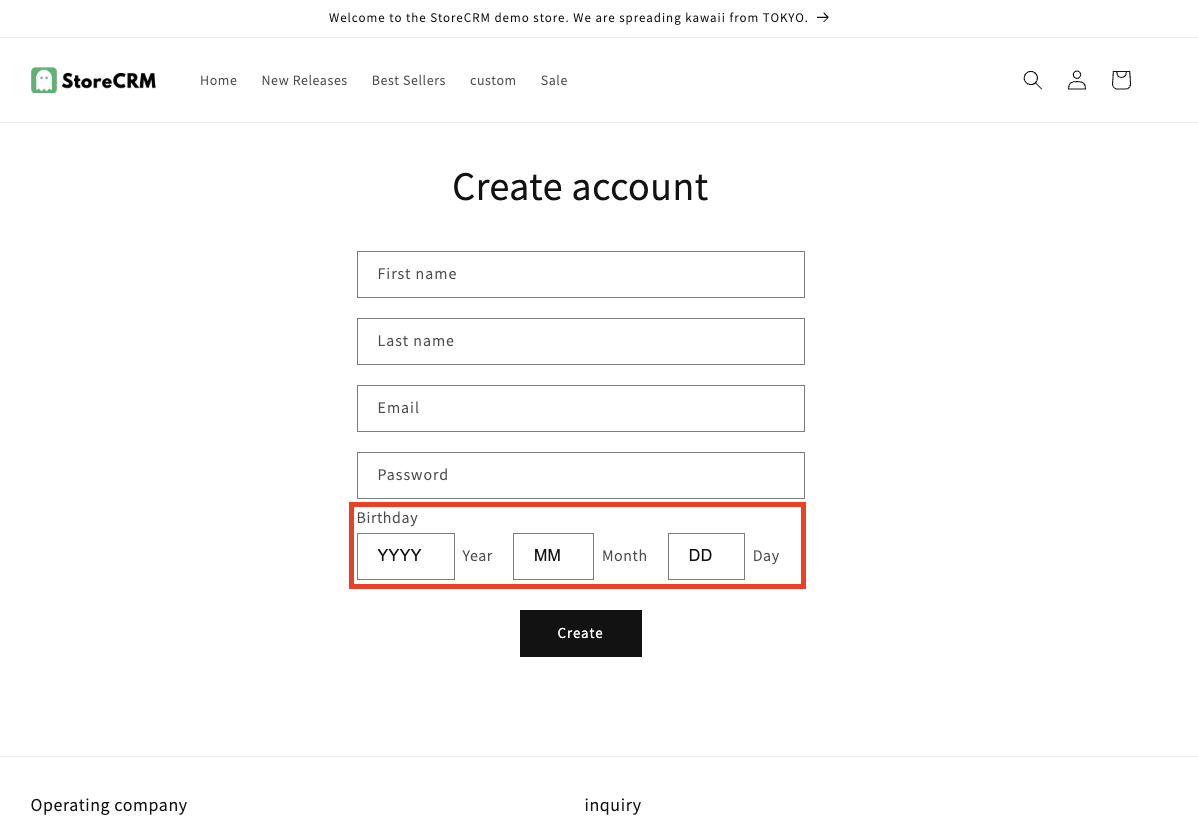
First, let's check the completed screen of the birthday registration form that we will implement this time.
The red frame is the birthday registration field.
Open the code for the implementation location
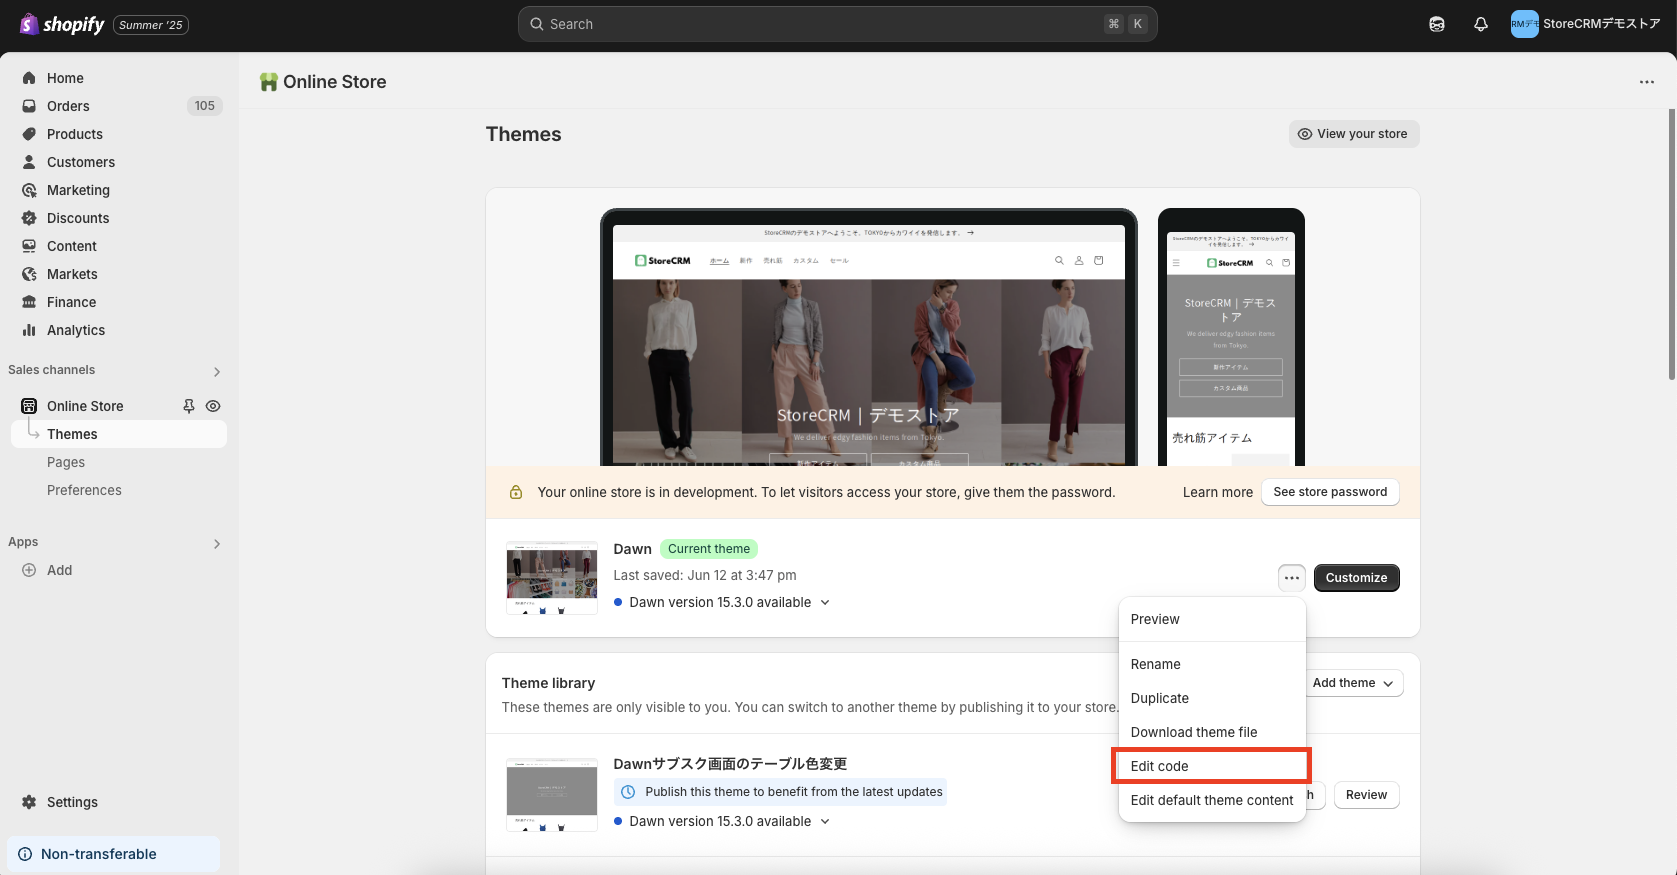
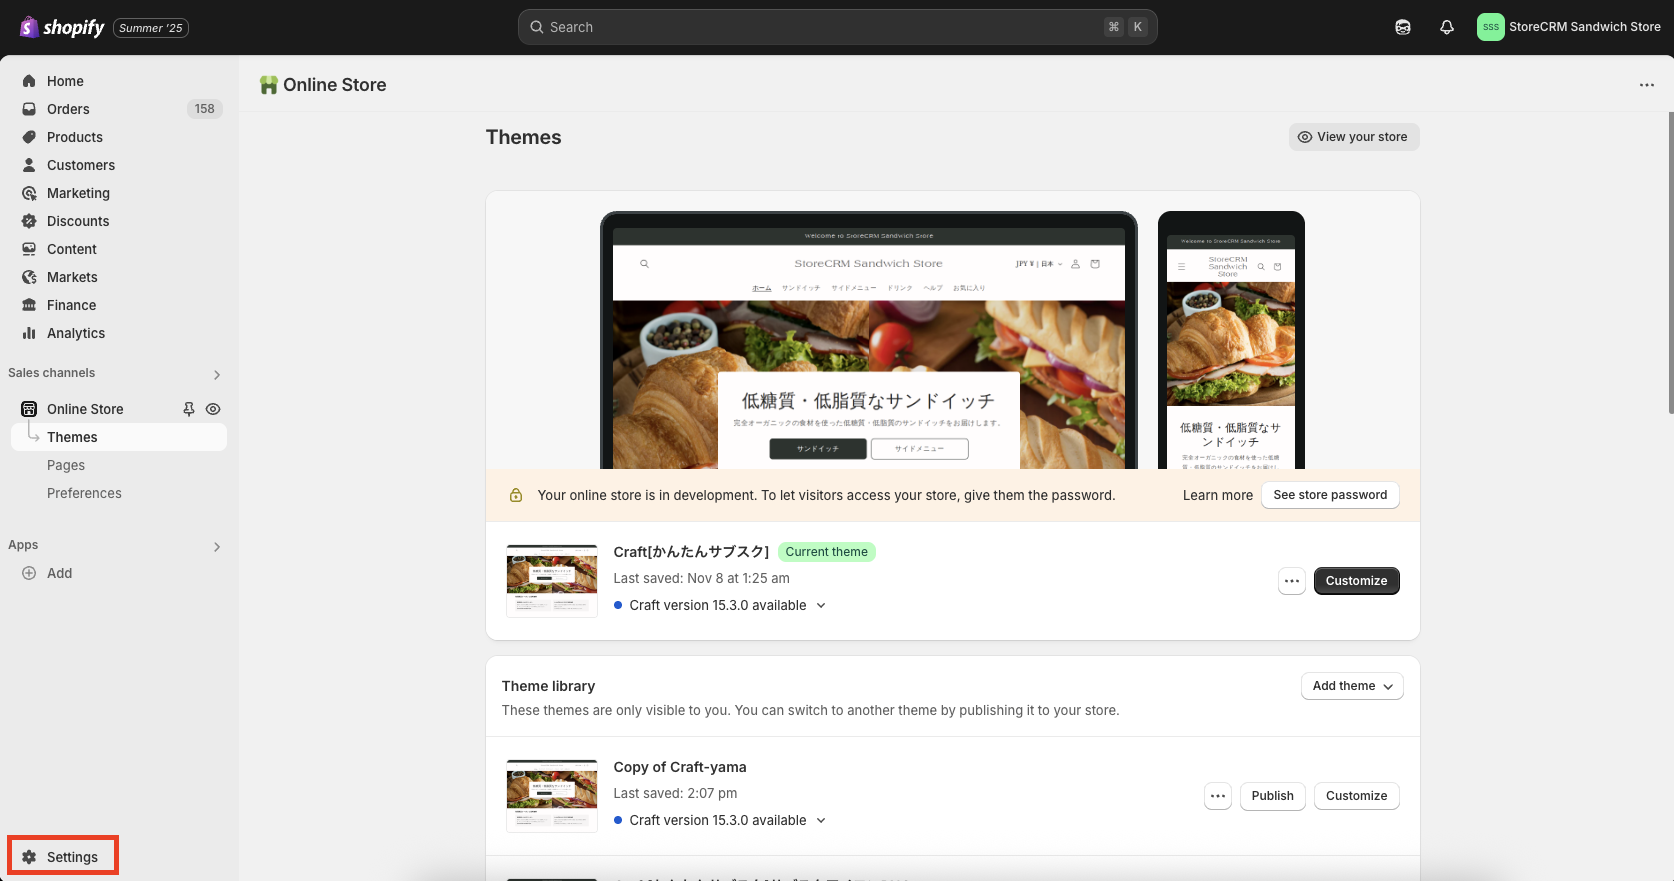
Open the list of themes from ➀[shopify admin] >[Sales Channels] >[Online Store] >[Themes].
[Click on "..." and then "Edit Code".
attention (heed)
Since we will be editing the theme code in the steps ahead, we recommend that you "duplicate" the theme and edit the duplicated theme if you are unsure.
As an ➁ example, we will discuss the Dawn theme.
memo
The relevant files will vary depending on the theme,Liquid/JSON support table for customer-related templatesfor more information.
This feature is only available when Shopify -> [Settings] -> [Customer Account] is set to [Conventional].When [Customer Account] is used, customer information is not transferred because of the one-time password and there is no liquid file, so it cannot be used.
Click [Edit Code] to go to the file list screen. In this case, since we will be editing the member registration screen
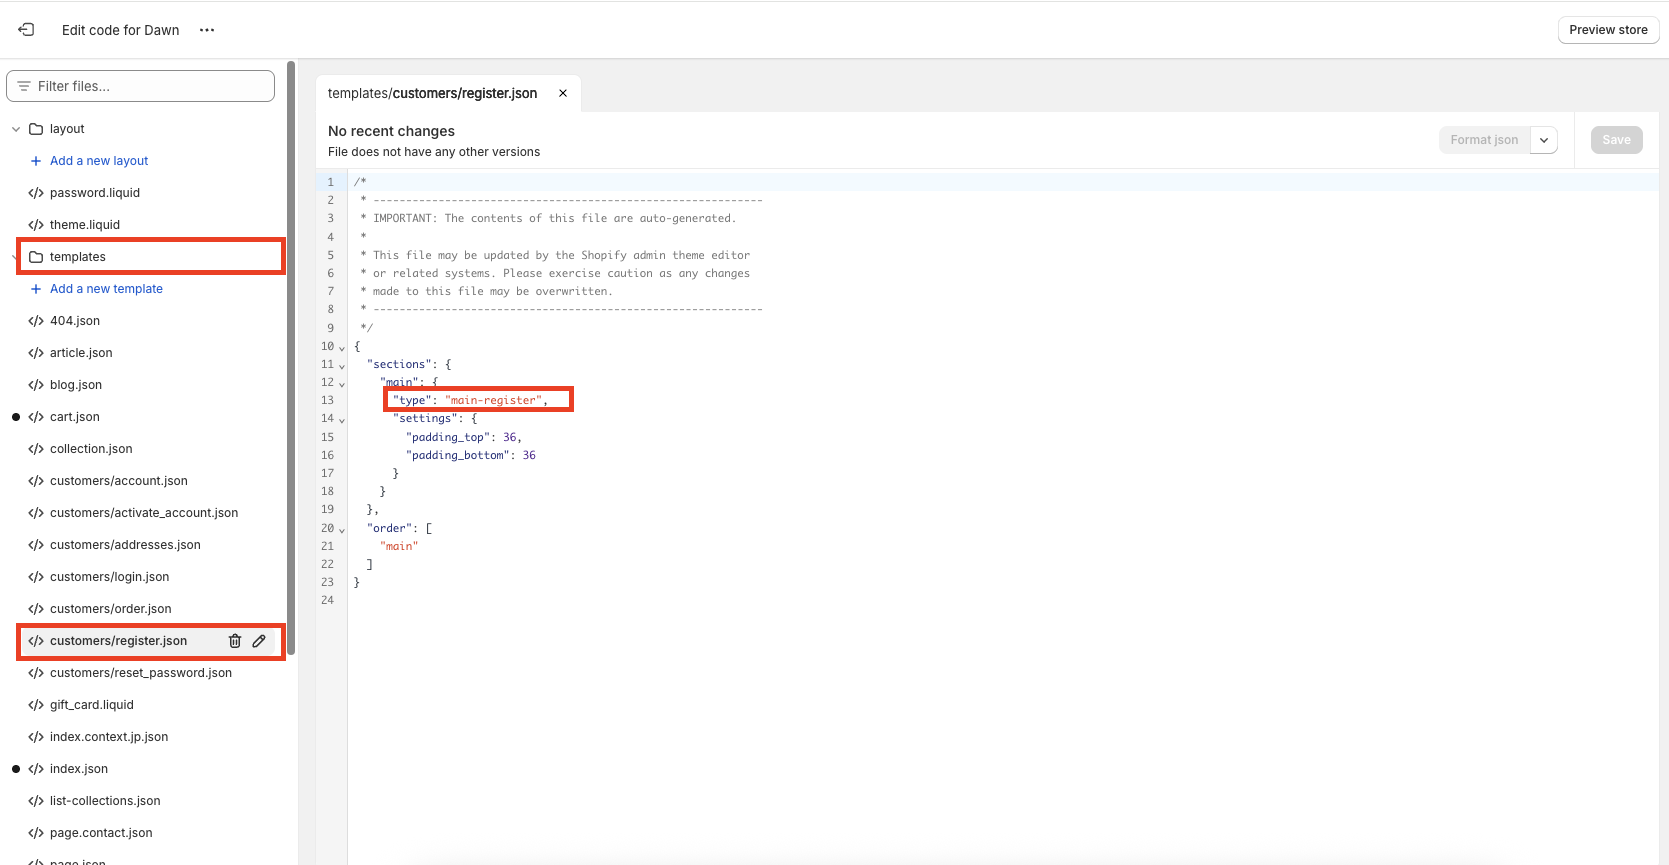
Open [Template]->[customer/register.json].
Open the file and check the code written in sections>main>type.
For the Dawn theme, it was listed as [main-register].
This indicates the location of the code on the member registration page, and in this case the code corresponds to [section]>[main-register.liquid].
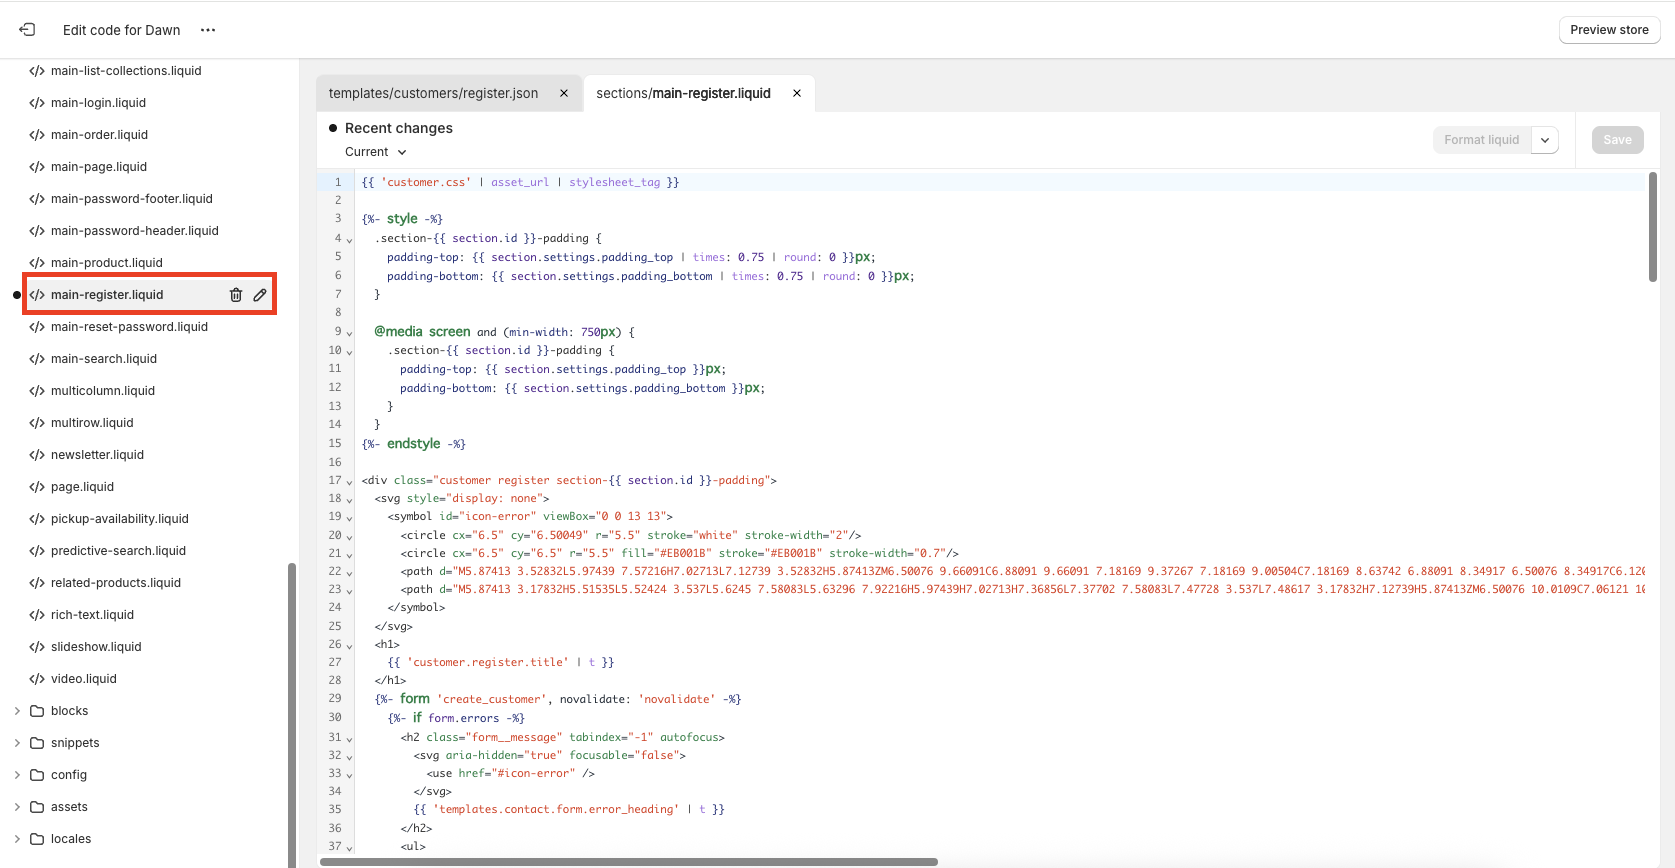
3) Actually click [section]>[main-register.liquid] to open the file.
Open the code for the implementation location

In this case, the code is to be implemented below the password input field and above the "Create" button, so the code is implemented between lines 137 and 138.
➀Copy and paste the HTML code below.
<div class="customer-birthday">
    <div class="birthdaylabel">Date of Birth</div>
	<ul class="birthdayinput" style="padding-left: 0;margin-bottom: -10px;margin-top: 0px;">
		<li class="dayform">
	    <select class="form-control yearselect" id="year" name="customer_year" >
	      <option value="0">Year</option>
      </select>
      <input type="text" class="birthdayyear" aria-required="true" style="width:0px;height:0px;opacity: 0;" name="customer[note][birthday-year]" value="">
      <span class="daychar">counter for years (following a number in the hito-futa-mi counting system)</span>
    </li>
    <li class="dayform">
	    <select class="form-control monthselect" id="month" name="customer_month" >
	      <option value="0">Month</option>
      </select>
      <input type="text" class="birthdaymonth" aria-required="true" style="width:0px;height:0px;opacity: 0;" name="customer[note][birthday-month]" value="">
      <span class="daychar">month</span>
		</li>
    <li class="dayform">
	    <select class="form-control dayselect" id="day" name="customer_day" >
	      <option value="0">Day</option>
      </select>
      <input type="text" class="birthdayday" aria-required="true" style="width:0px;height:0px;opacity: 0;" name="customer[note][birthday-day]" value="">
      <span class="daychar">day (of the month)</span>
    </li>
   </ul>
  </div>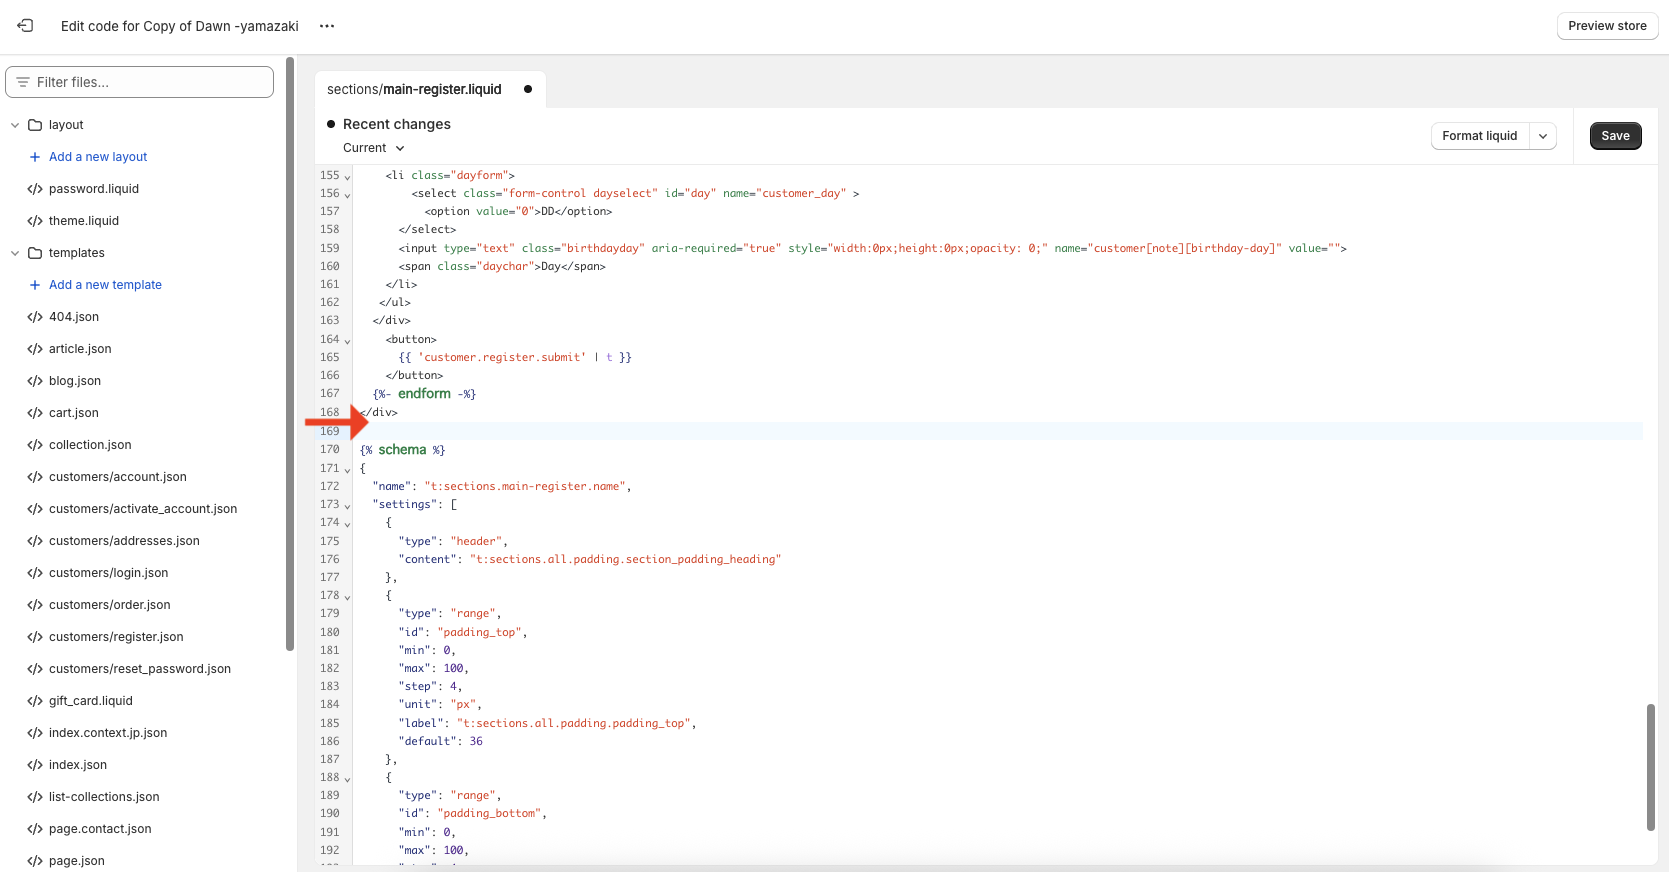
➁Continue by adding css and javascript. css is the minimum code, so if you want to change the design, you can customize it to your own taste.
As for the javascript, it is a script that generates the selector date, so paste it in as is. Paste the code and click "Save" to finish adding the code.
.dayform {
    display: flex;
    align-items: center;
    margin-right:2rem;
  }
  .birthdayinput {
    display:flex; align-items: center; margin-right:2rem; }
  }
  .form-control {
    box-shadow:0 0 var(--inputs-border-width) rgba(var(--color-foreground),var(--inputs-border-opacity))
  }
  .birthdaylabel {
    text-align: left;
    margin-top: 5px; }
  }
check the operation
After adding the code, check the operation.
➀Open the Create Account page and you should see a birthday registration form. To verify that it works, select your account information and birthday, then click Create.
➁Once the account has been created, we will check to see if the birthday information has actually been obtained.
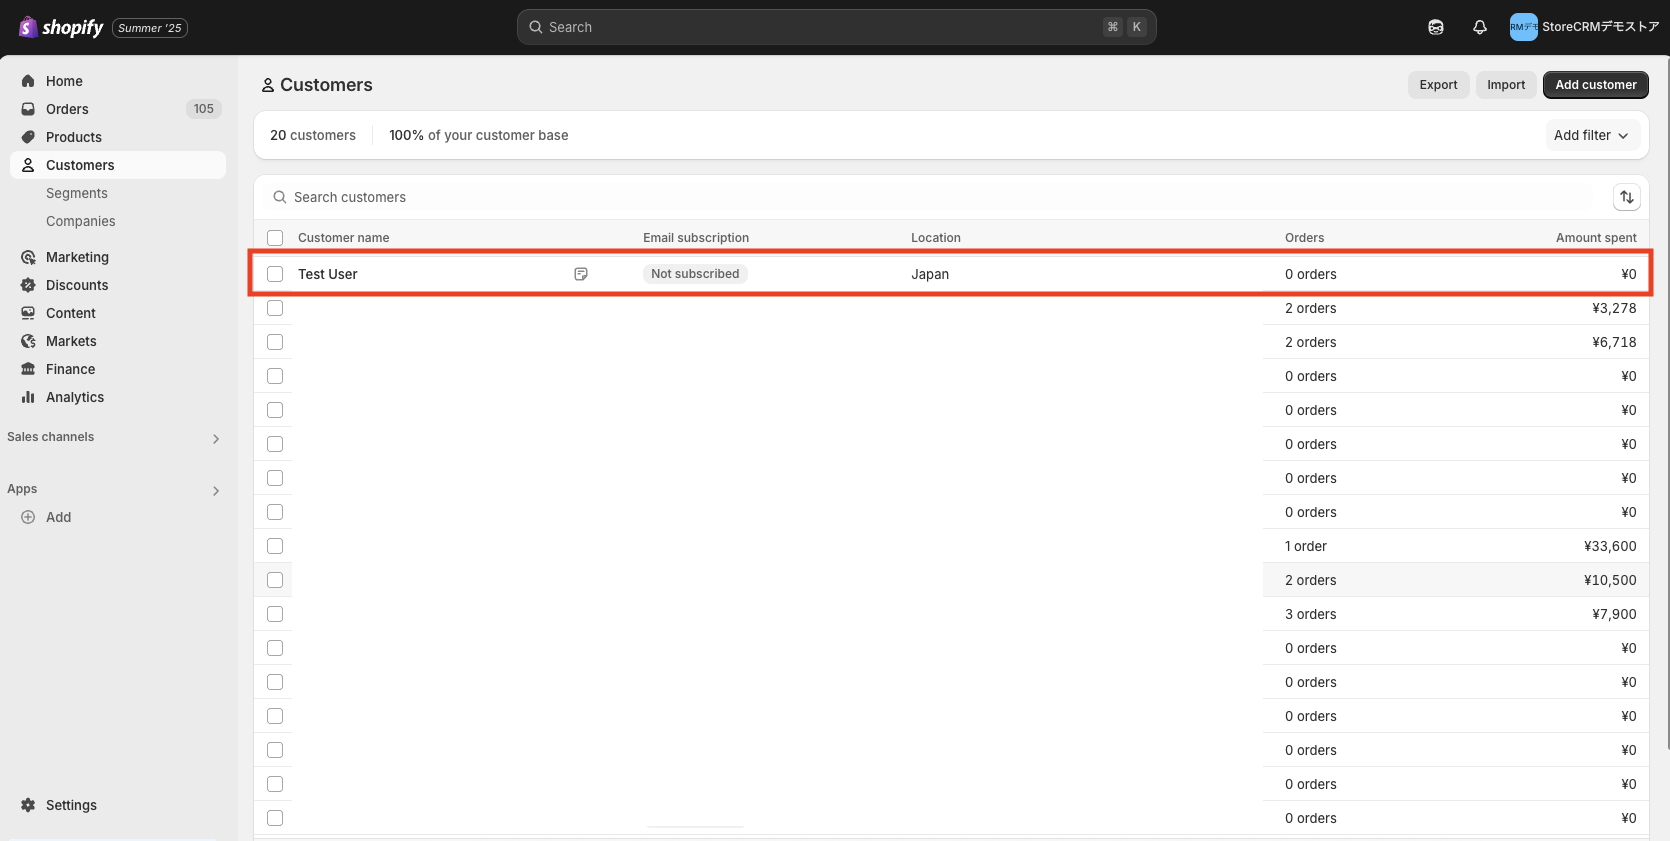
Open the StoreCRM application page and click on Customers > Customer List.
At the top of the list is the account you just created, so click on the name to see the customer detail page.
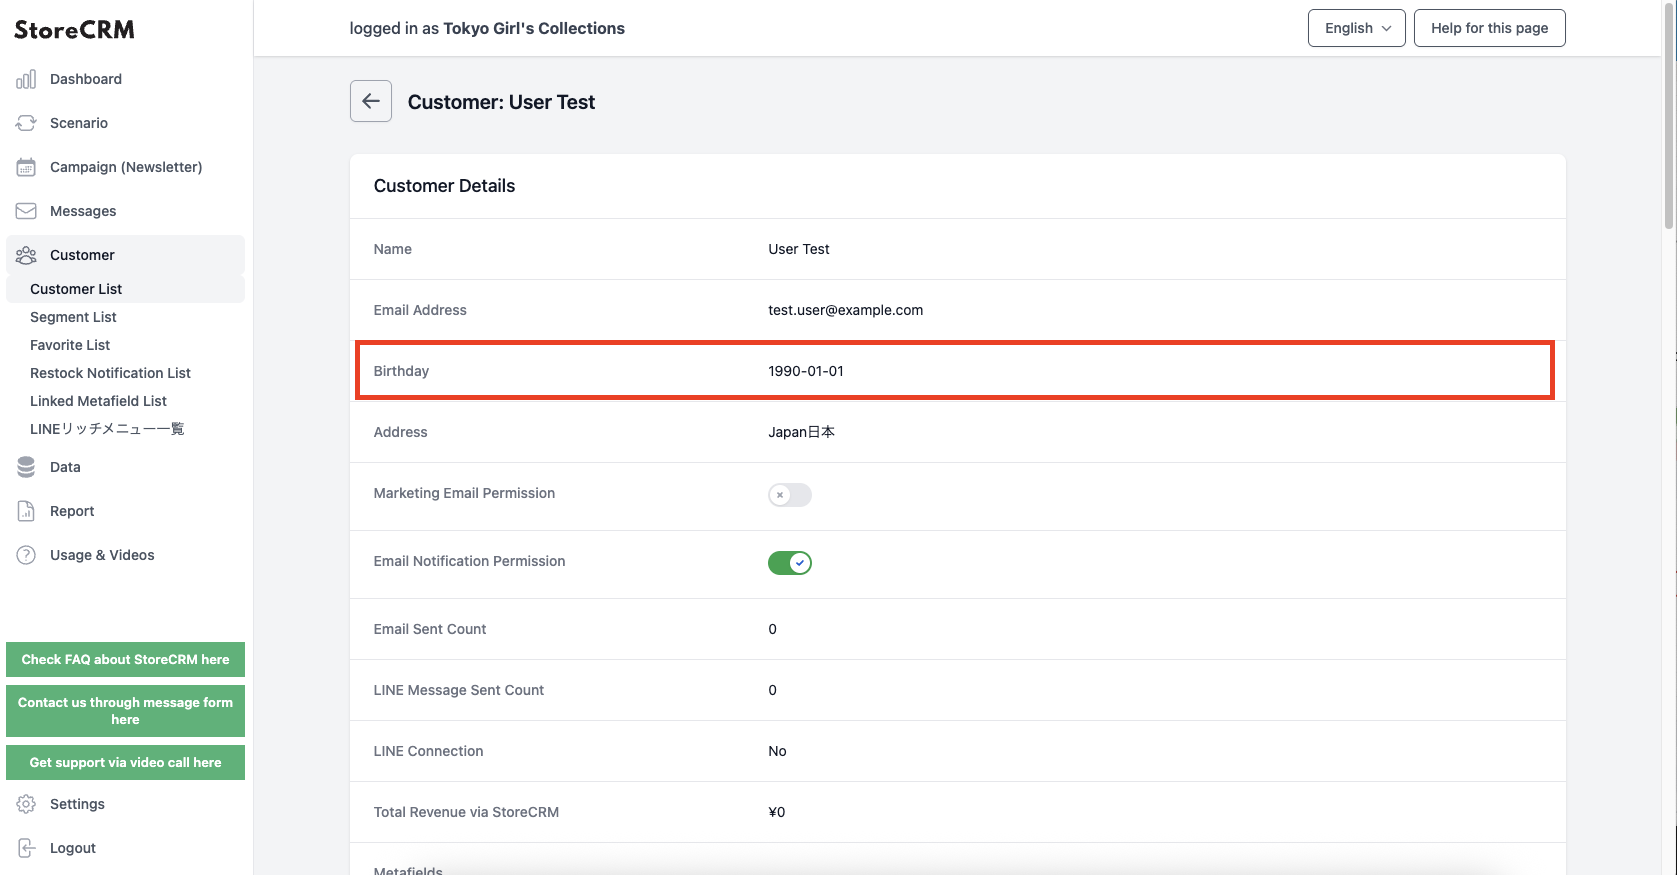
(3) Check the birthday item in the customer details, and if the birthday information you have just registered is registered, you have succeeded.
If the operation check does not work, compare the code in the [Add code] field with the code you actually added.
Make sure there are no differences.
5. add birthday registration form on account page
Goal of this item
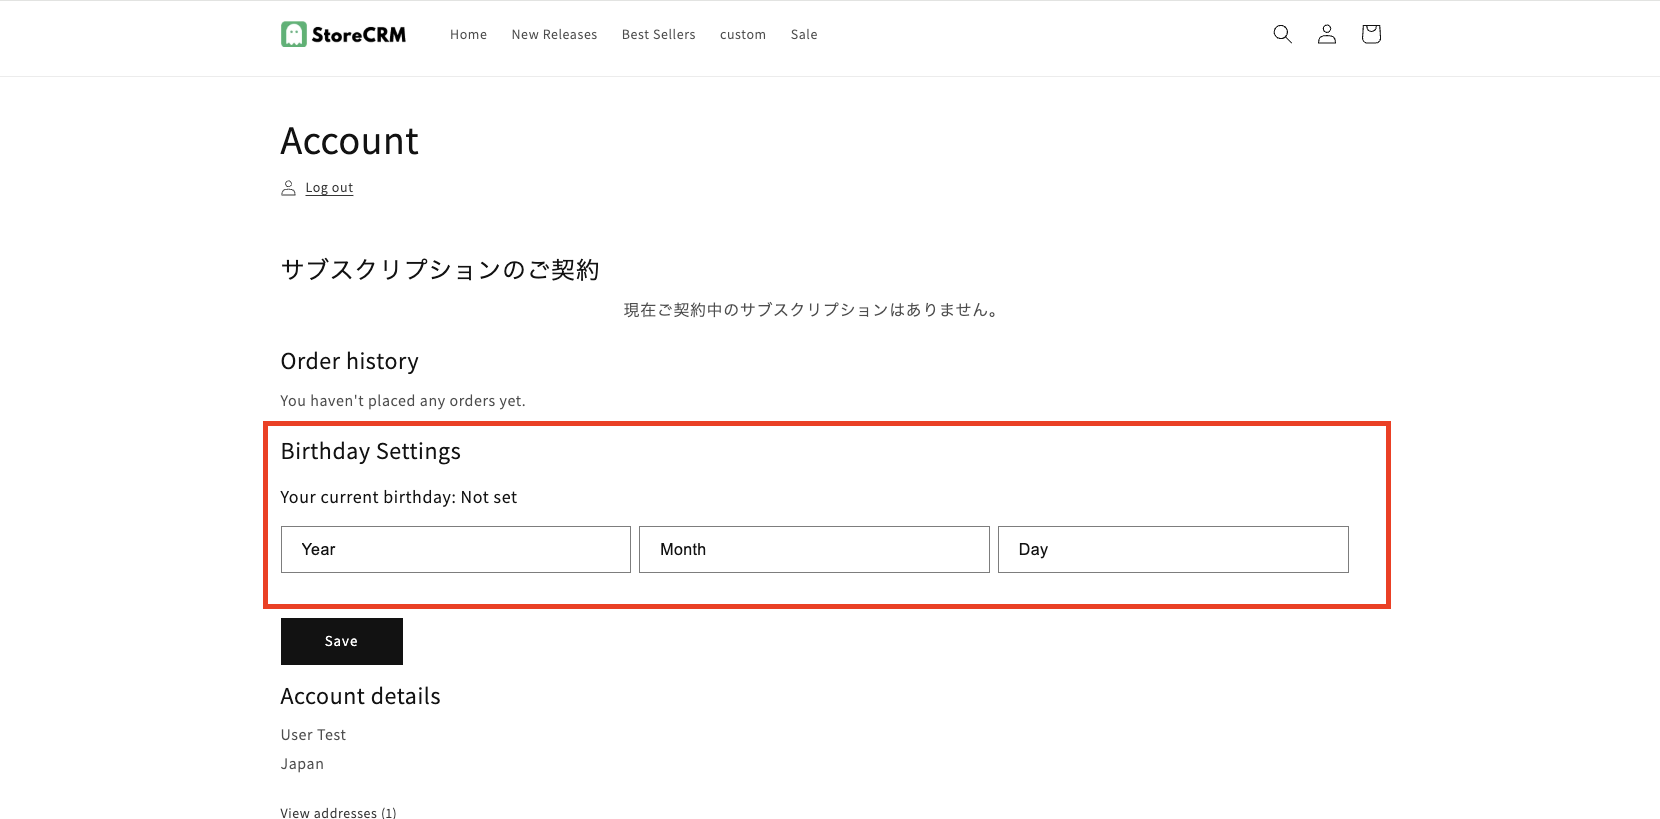
First, let's check the completed screen of the birthday registration form that we will implement this time.
The implementation of the birthday registration form on the account page should be such that once the birthday is registered, it cannot be changed, because unlike when a new member registers, it can be accessed any number of times.

In this implementation, the birthday is determined based on whether it is registered or not, and the display content is divided accordingly.
Goal of the implementation location

Go to [shopify admin] > [Sales Channels] > [Online Store] > [Themes] to open the list of themes.
[Click on "..." and then "Edit Code".
attention (heed)
Since we will be editing the theme code in the steps ahead, we recommend that you "duplicate" the theme and edit the duplicated theme if you are unsure.
➀Click [Edit Code] to go to the file listing screen.
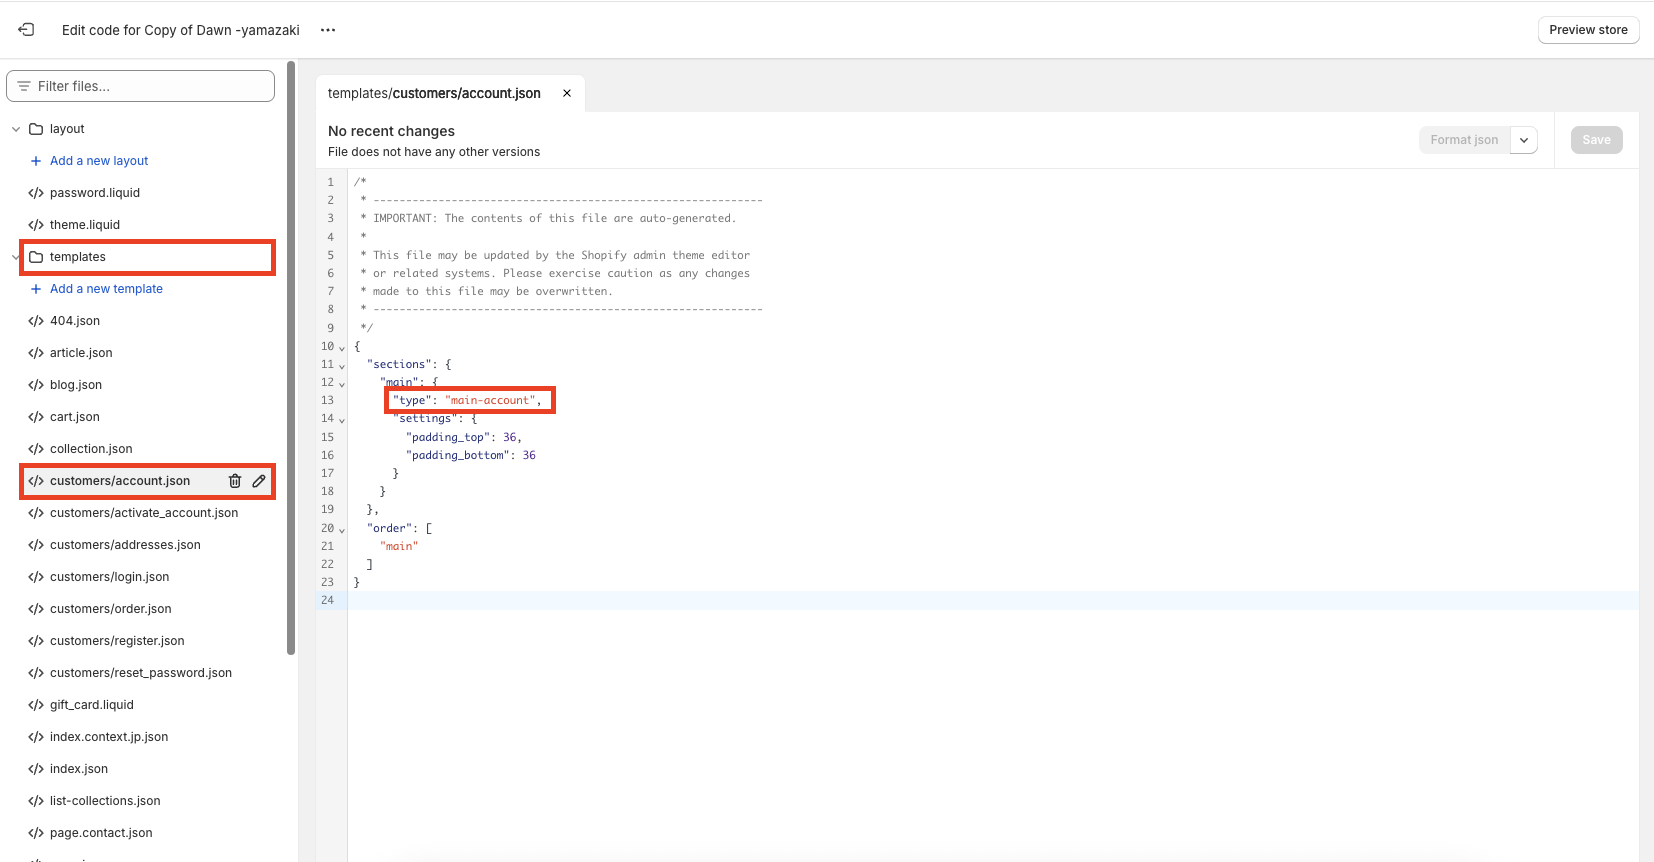
In this case, open [Template]->[customer/account.json] since we will edit the member registration screen.
Open the file and check the code written in sections>main>type.
For the Dawn theme, it was listed as [main-account].
This indicates the location of the code on the membership registration page, and in this case the code corresponds to [section]>[main-account.liquid].
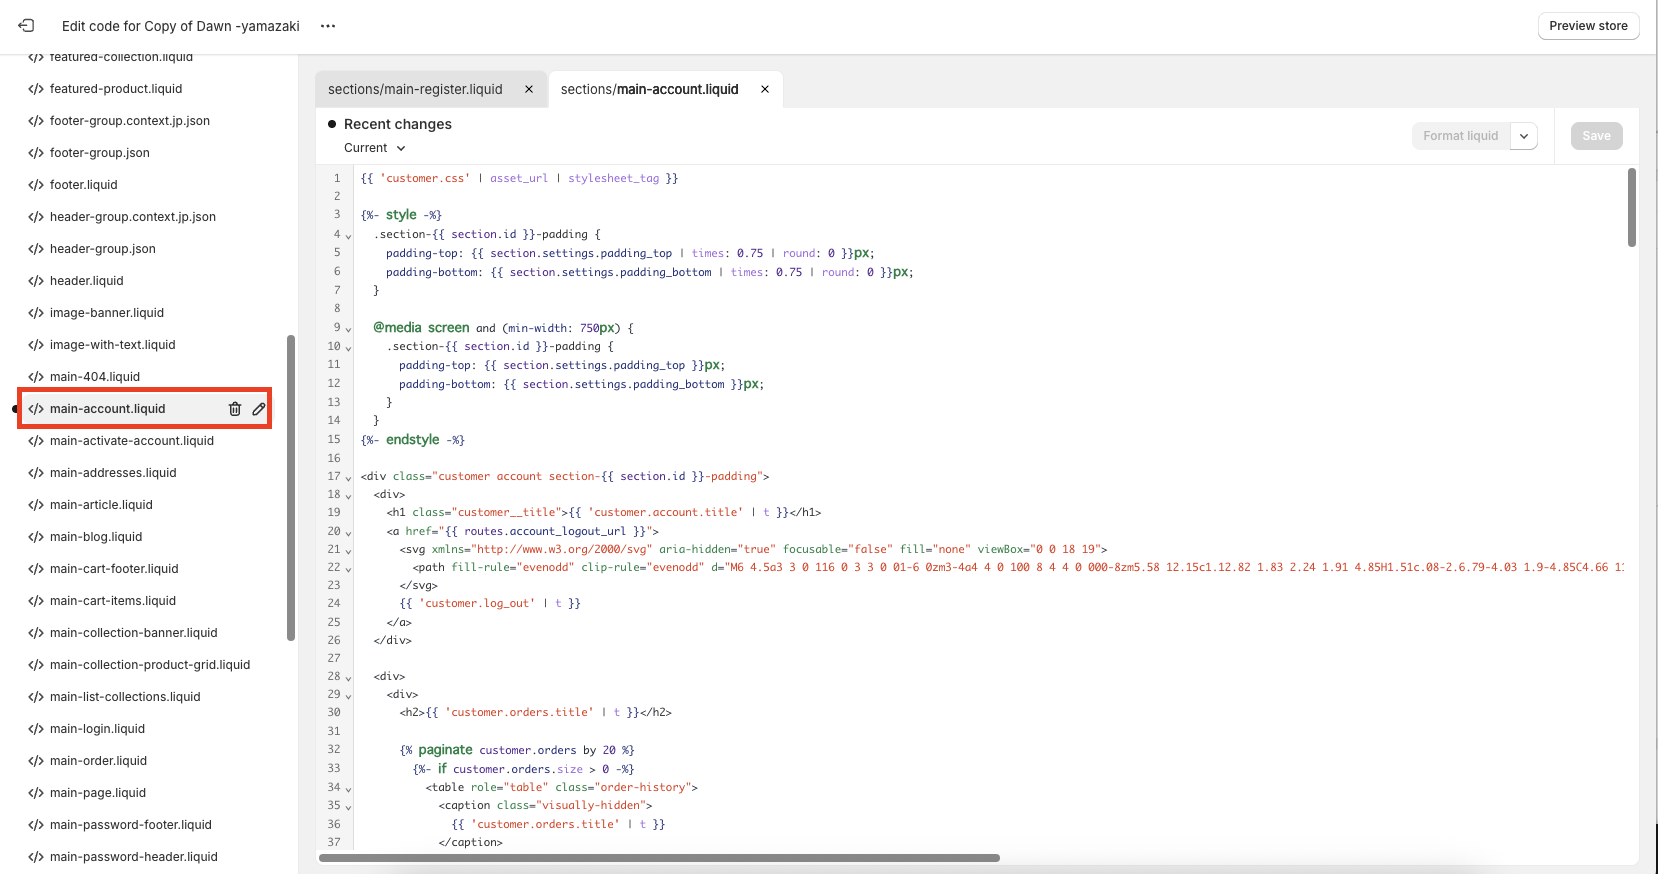
➁Actually click on [section]>[main-account.liquid] to open the file.
Append the code
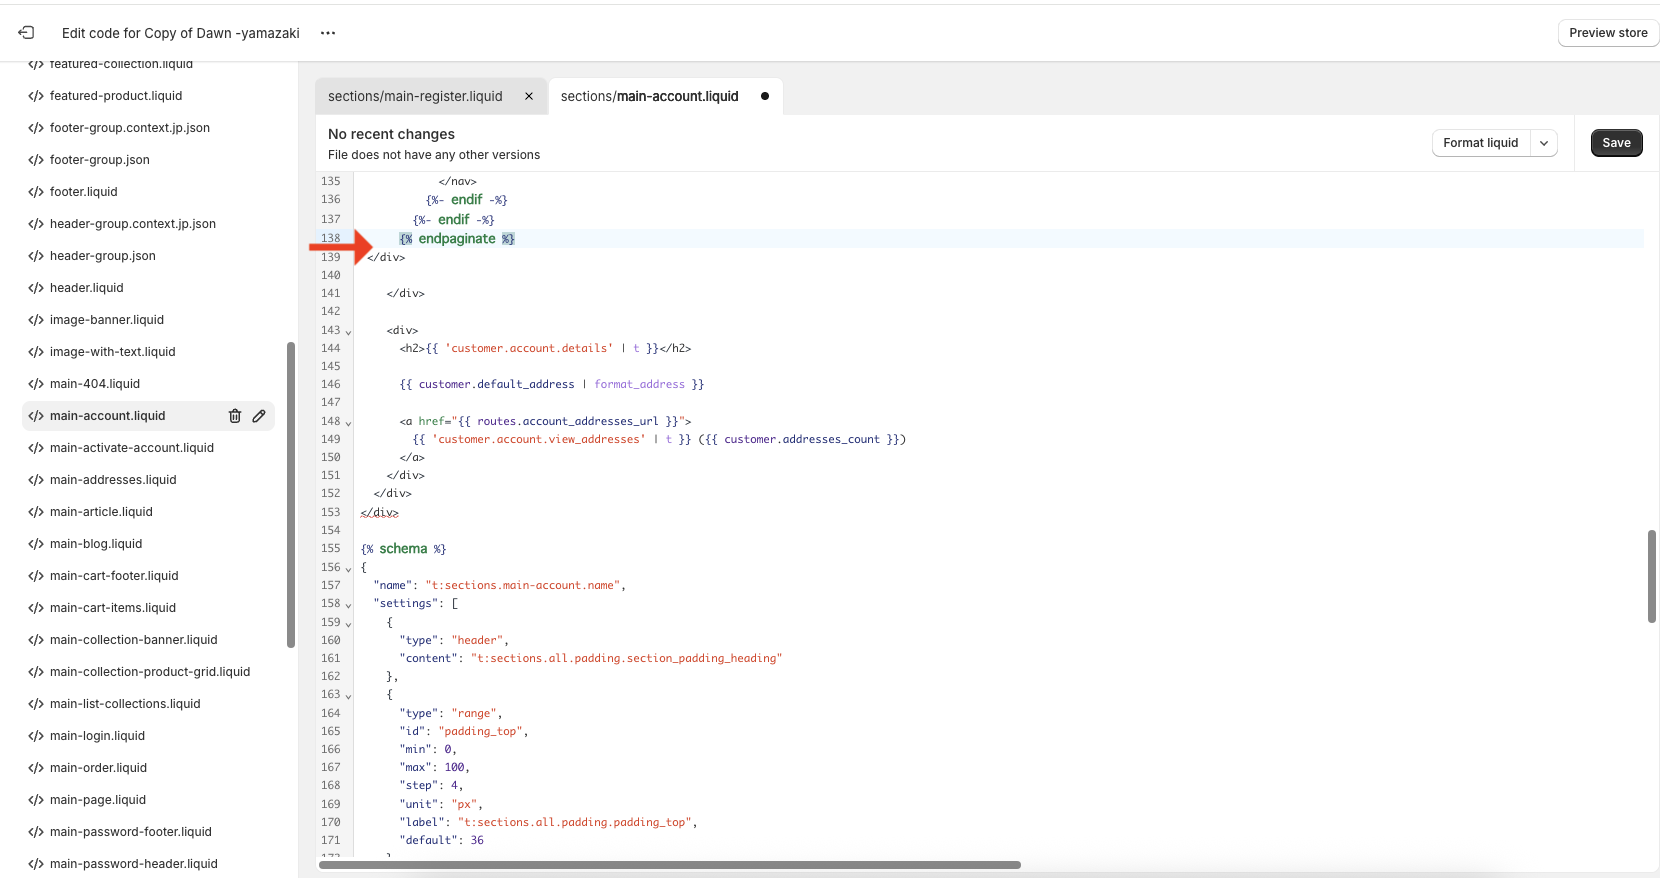
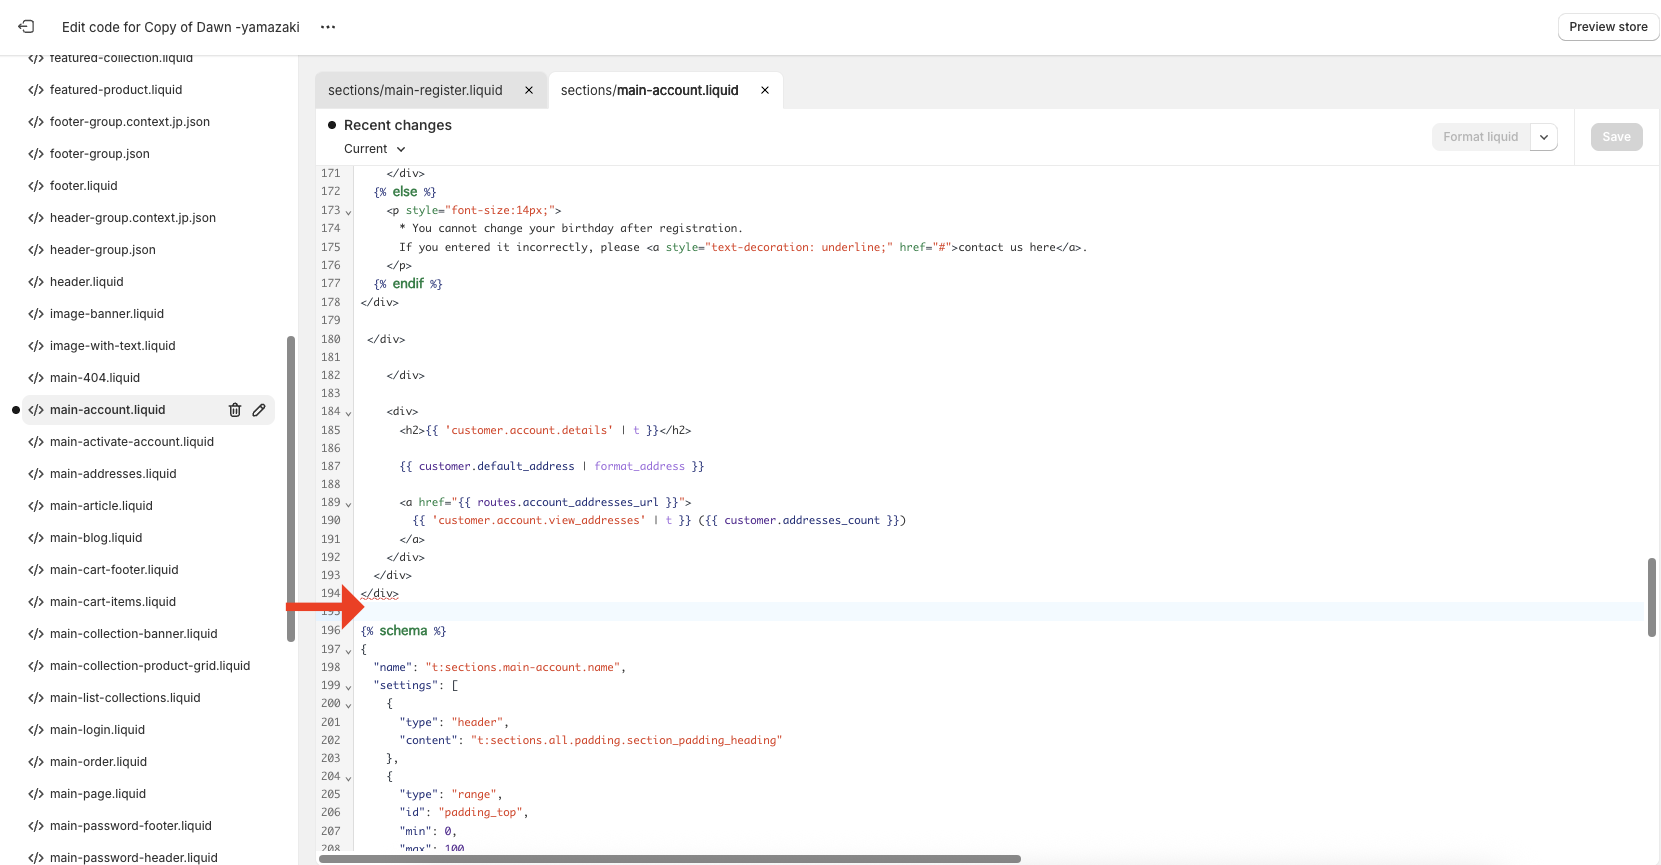
In this case, the code is implemented between lines 137 and 138 to be implemented under the order history.
➀Copy and paste the following HTML code
[Notes.
Please replace the href="#" on line 24 with a link to the "Contact Form" in your own store.
<div id="accountBirthday" class="acountInfoSp sp" style="margin-top:20px;">
	<h2>Birthday setting</h2>
  <h3 class="setbirthday">
	  Currently set birthday:
    {% if customer.metafields.facts.birth_date == null %}
Unregistered.
    {% else %}
      {{ customer.metafields.facts.birth_date | date: "%Y year %m month %d day" }}
    {{ % endif %}
   </h3>
   {% if customer.metafields.facts.birth_date == null %}
      <!-- Birthday Widget By OBAKE -->
      <div>
	      <ul class="grid grid--3-col birthdayinput" style="padding-left: 0;margin-bottom: 5px;">
	        <li class="grid__item dayform"><select class="form-control" id="year" name="customer_year" ><option value="0">Year</option></select><span class="daychar">counter for years (following a number in the hito-futa-mi counting system)</span></li>
          <li class="grid__item dayform"><select class="form-control" id="month" name="customer_month" ><option value="0">Month</option></select><span class="daychar">month</span></li>
          <li class="grid__item dayform"><select class="form-control" id="day" name="customer_day" ><option value="0">Day</option></select><span class="daychar">day (of the month)</span></li>
        </ul>
        <button id="birthdaySave" class="btn btn-primary" onclick="window.obakeStoreBirthday(obakeGetBirthday());">Save</button>
        <div class="saveok">Birthdays have been added</div>
       </div>
    {% else %}
	     <p style="font-size:14px;">Birthdays cannot be changed after registration. If you have registered the wrong date and time at the time of registration,
       <a style="text-decoration: underline;" href="#">Please contact us.</a></p>
    {% endif %}
 </div>
➁Continue by adding css and JavaScript.
As for css, the code is minimal, so if you want to change the design, please customize it to your own taste.
(3) Paste the code and click "Save" to complete the code addition.
.dayform {
    display: flex;
    align-items: center;
    position: relative;
    margin-bottom: 0; }
}

.birthdayinput {
    display: flex;
    margin-left: 0; }
}

.yearselect, .monthselect, .dayselect {
    min-width: 100px; }
}

.birthdayyear, .birthdaymonth, .birthdayday {
    padding: 0;
    left: 10px;
    position: absolute; }
}

.daychar {
    margin: 0 10px; }
}

.form-control {
    box-shadow: 0 0 var(--inputs-border-width) rgba(var(--color-foreground), var(--inputs-border-opacity));
}

.saveok {
    color: red;
    font-size: 16px;
    display: none;
    margin-top: 15px; }
}

@media (max-width: 500px) {
    .daychar {
        font-size: 14px;
        margin: 0 -20px 0 5px;
    }

    .birthdayinput {
        display: flex;
        justify-content: space-between; }
    }

    .customer-birthday {
        padding-right: 25px; }
    }

    .dayform {
        max-width: 100px !important; }
        min-width: 0 !important; }
    }

    #year {
        min-width: 90px; }
    }

    #month {
        min-width: 70px; }
    }

    #day {
        min-width: 70px; }
    }
}
check the operation
After adding the code, check the operation.
➀Register on the Create Account page without registering your birthday.
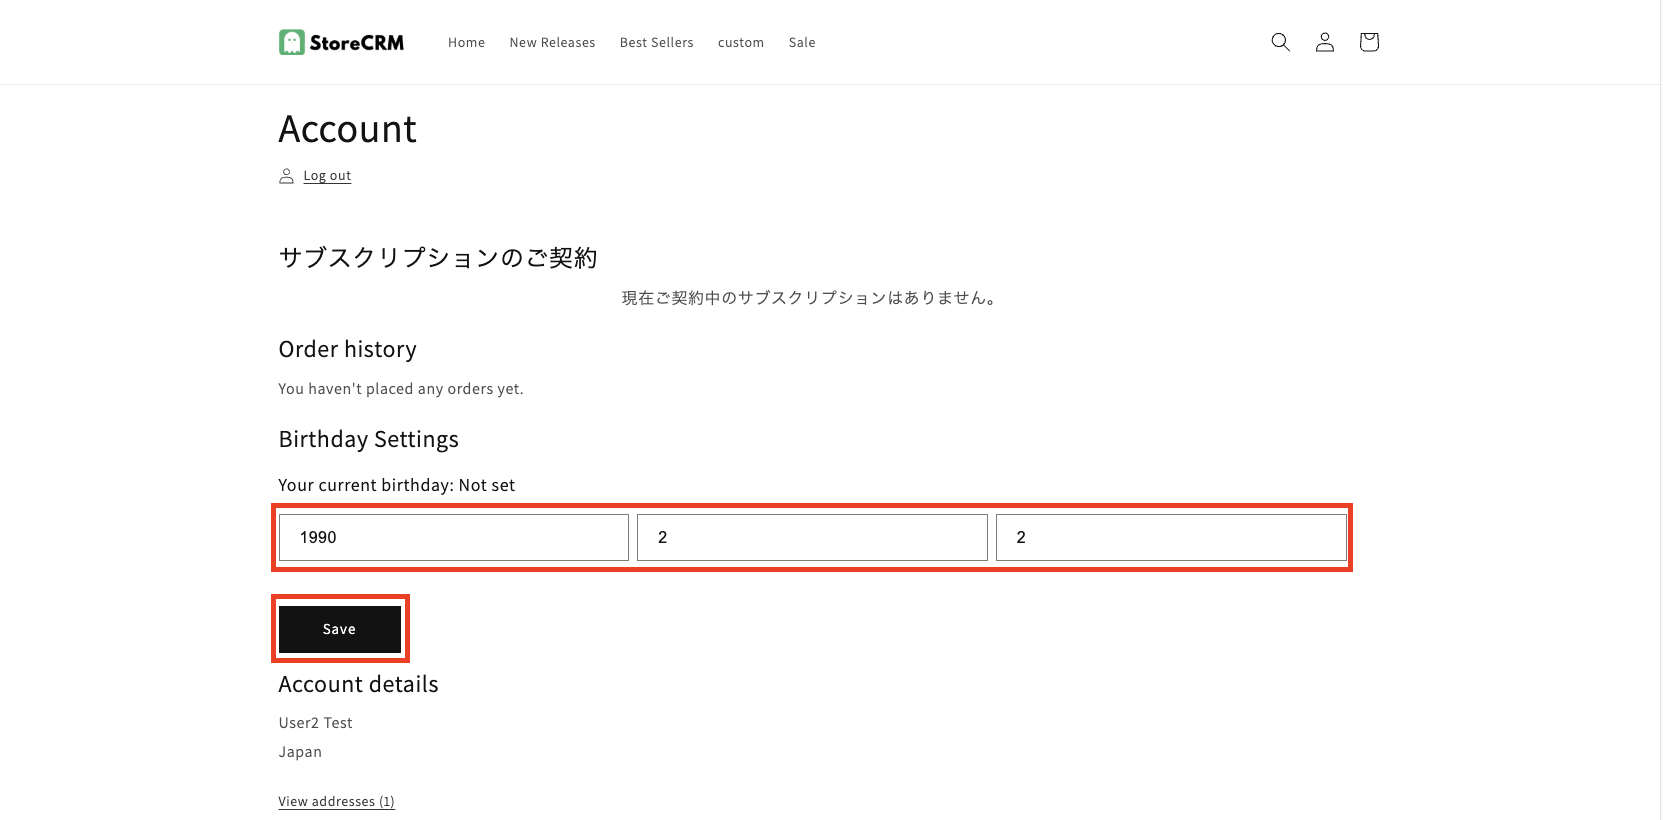
➁After creating an account, check My Page and you will see the Birthday Registration field, select your birthday and click the Save button.

At that time, please confirm the following actions
- When the saving is completed, the text "Birthday has been added" should appear under the [Save] button.
- Birthday selection select box, [Save] button should no longer be able to be pressed.
- When reloading the page or accessing My Page again, the display changes and the birthday cannot be changed.
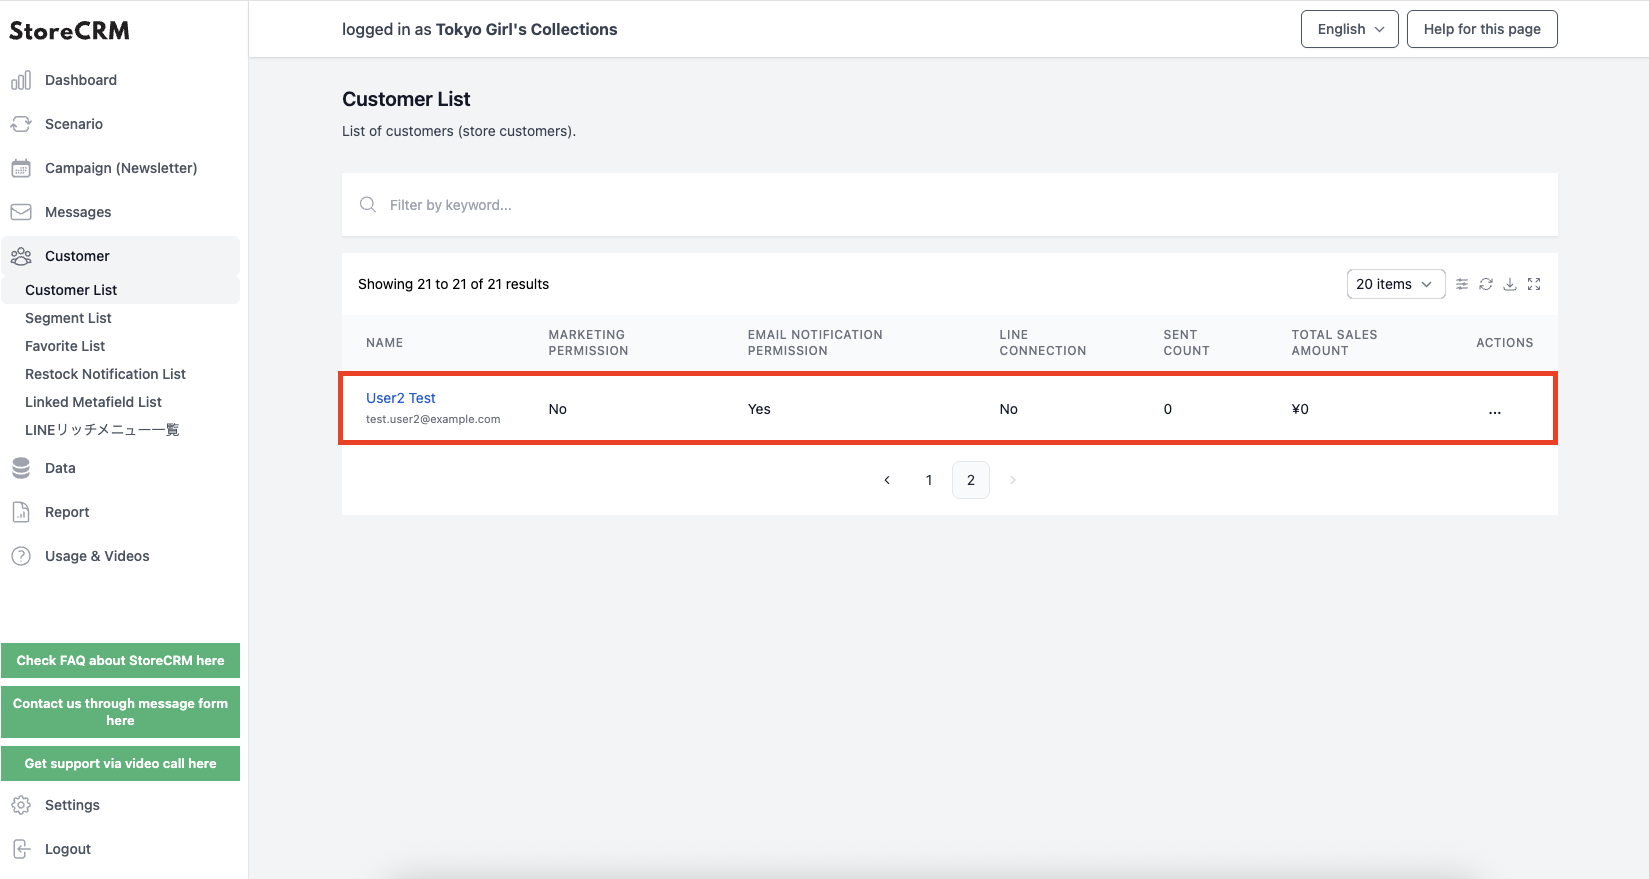
Open the ③StoreCRM application page and click [Customers]>[Customer List].
At the top of the list is the account you just created, so click on the name to see the customer detail page.

(4) Check the birthday item in the customer details, and if the birthday information you have just registered is registered, you have succeeded.
If the operation check does not work, compare the code in the [Add code] field with the code you actually added.
Make sure there are no differences.
6. create scenario emails using birthday information
In this section, we will use the birthday and birthday month information collected in sections 2 and 3 to create a scenario for automatically sending an e-mail to customers whose birthdays and birthday months fall on a monthly basis.
By adding birthday and birthday month coupons to emails, you can stimulate customer purchasing and increase sales.
Create a scenario
StoreCRM provides scenario templates such as "Email the birthday person" and "Email the birthday month person," allowing you to send emails automatically by simply setting simple conditions.
This time, we will actually create a scenario for [email the birthday person
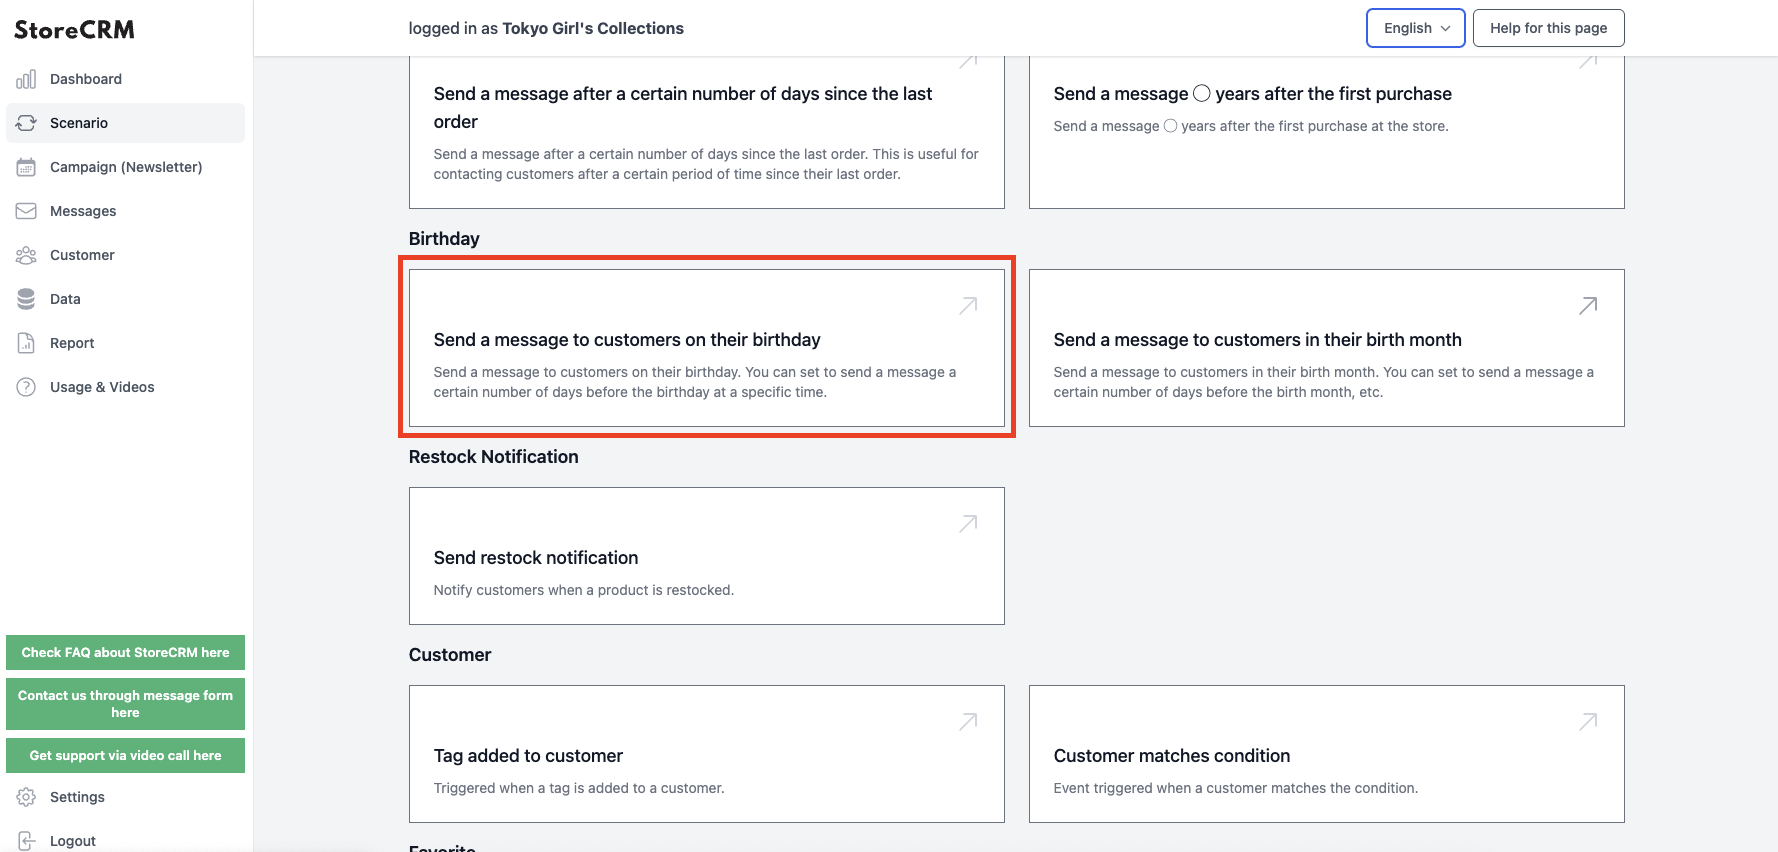
Open the ➀StoreCRM application page and click on Scenario > Email Birthday Person.
*If you wish to create a scenario in which you email the person with the birthday month, click on "Email the person with the birthday month".
Subsequent steps are the same.
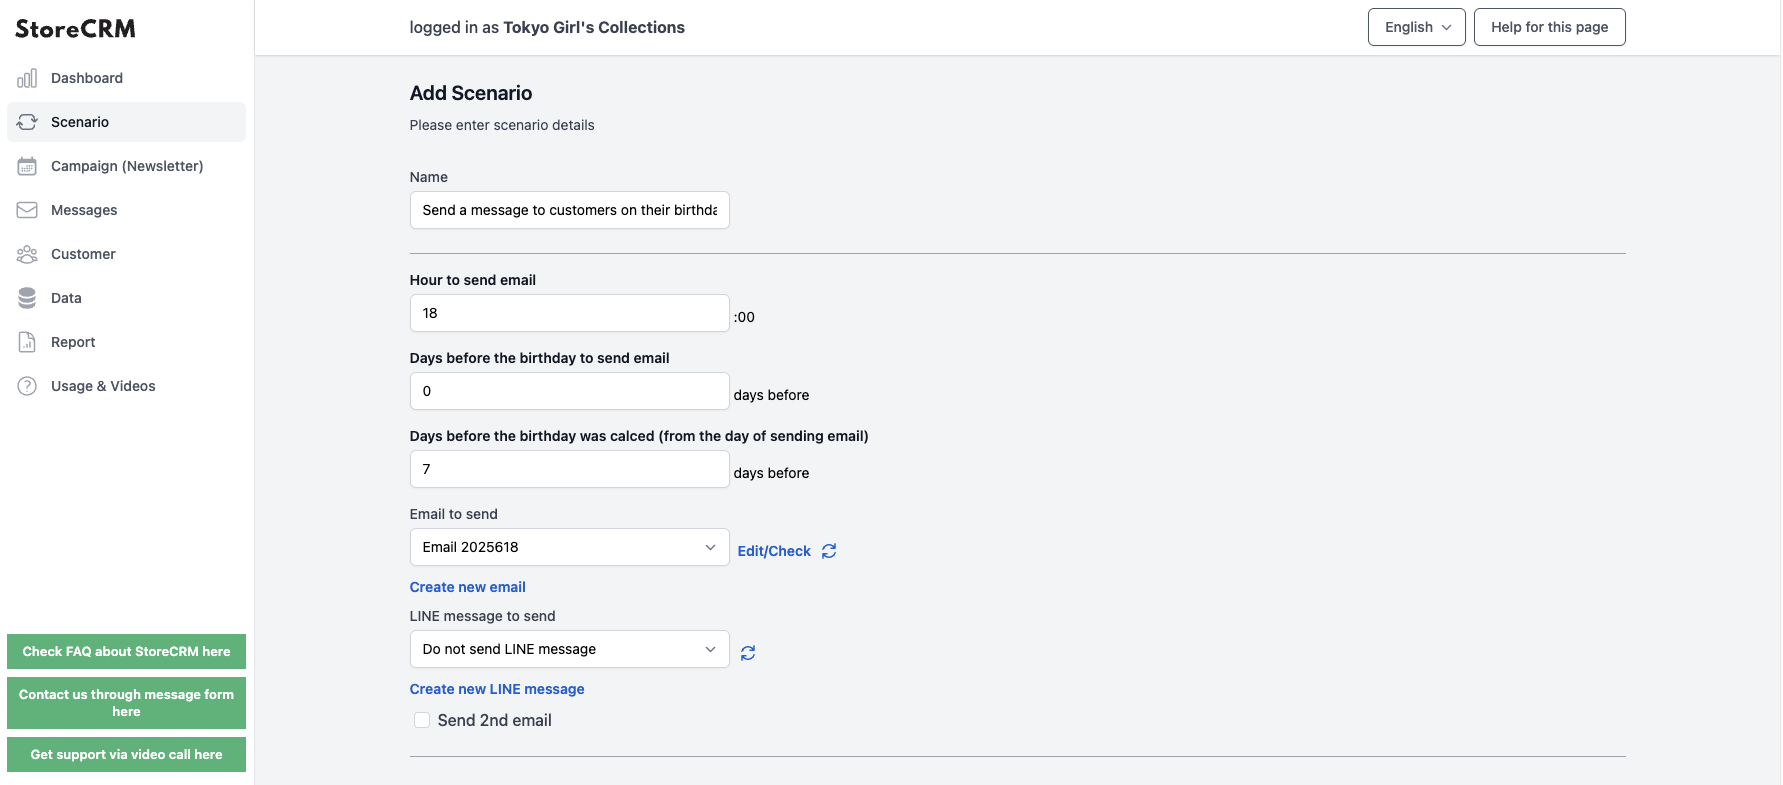
The "Scenario Settings" screen will appear, and you will need to set the date and time to send the email. In this case, the following settings were made
important
- Birthday registration closes 7 days before the email is sent.
- Send birthday email at midnight on the day of the birthday
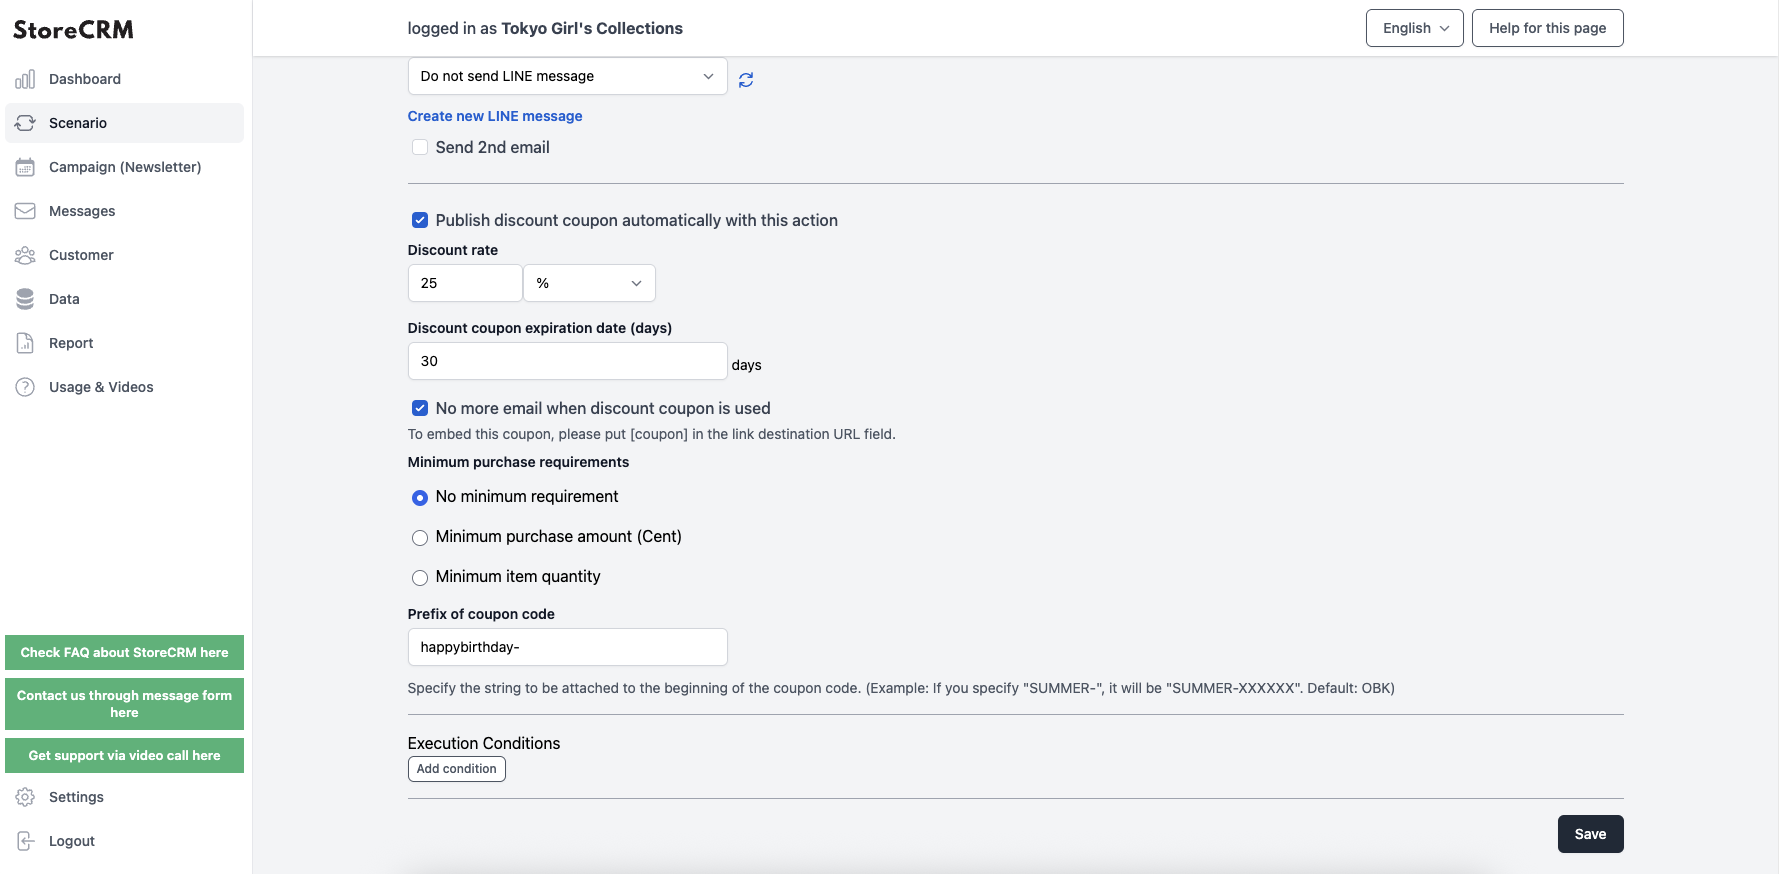
Next, we want to add a birthday coupon to the email, so we check the "Automatically issue a discount coupon with this action" checkbox and configure the coupon settings to be created.
In this case, the following specifications were used
important
- 25% discount on your bill for purchases over 1000 yen
- Specify the beginning of the coupon code as [happybirthday-].
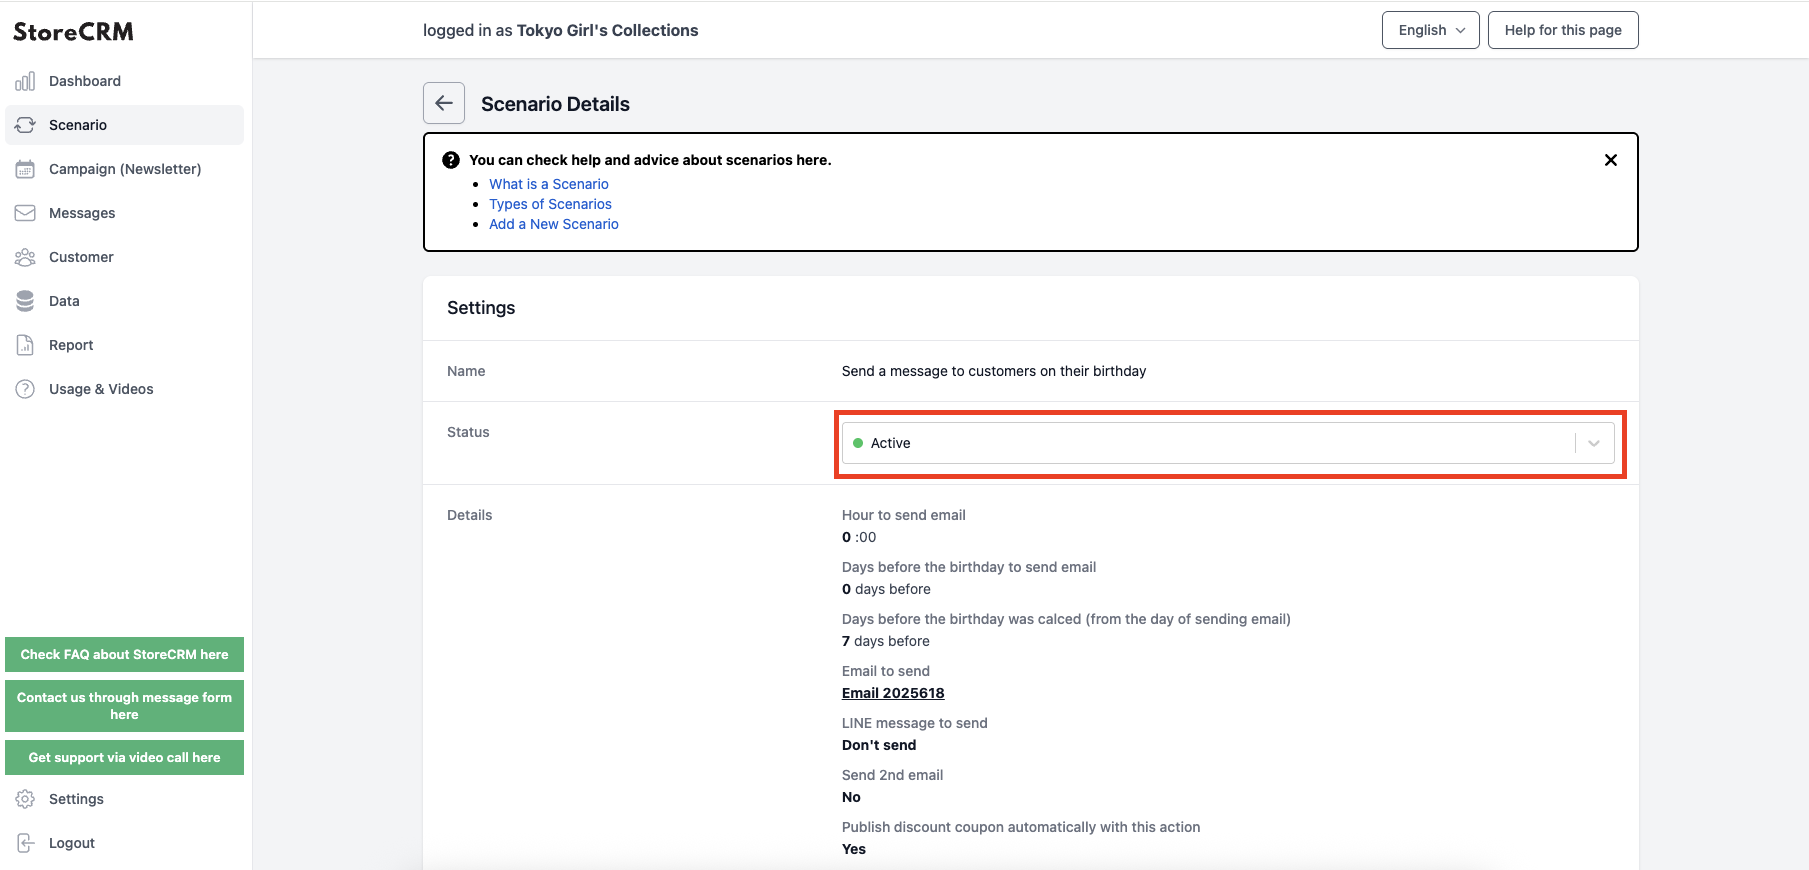
When the settings are complete, click the "Save" button to create the scenario and display the scenario details.
Click on the pull-down under [Settings]>[Status] and set to [Enable] to send the email according to the conditions you have set.
*At the point of creating a scenario, an email that fits the scenario is automatically generated.
If you wish to customize your email, please refer to the next section for editing.
This completes the creation of the scenario.
Edit Email
StoreCRM comes with pre-defined birthday-related email templates, which can be used as-is to run scenarios. If you would like to design an e-mail that matches the atmosphere of your store or deliver a message to your customers in your own words, you can edit it in the e-mail editor.

Open the ➀StoreCRM application page and click on [Mail] > [Mail List].
Click on the name of the e-mail you wish to edit in the list of e-mails.
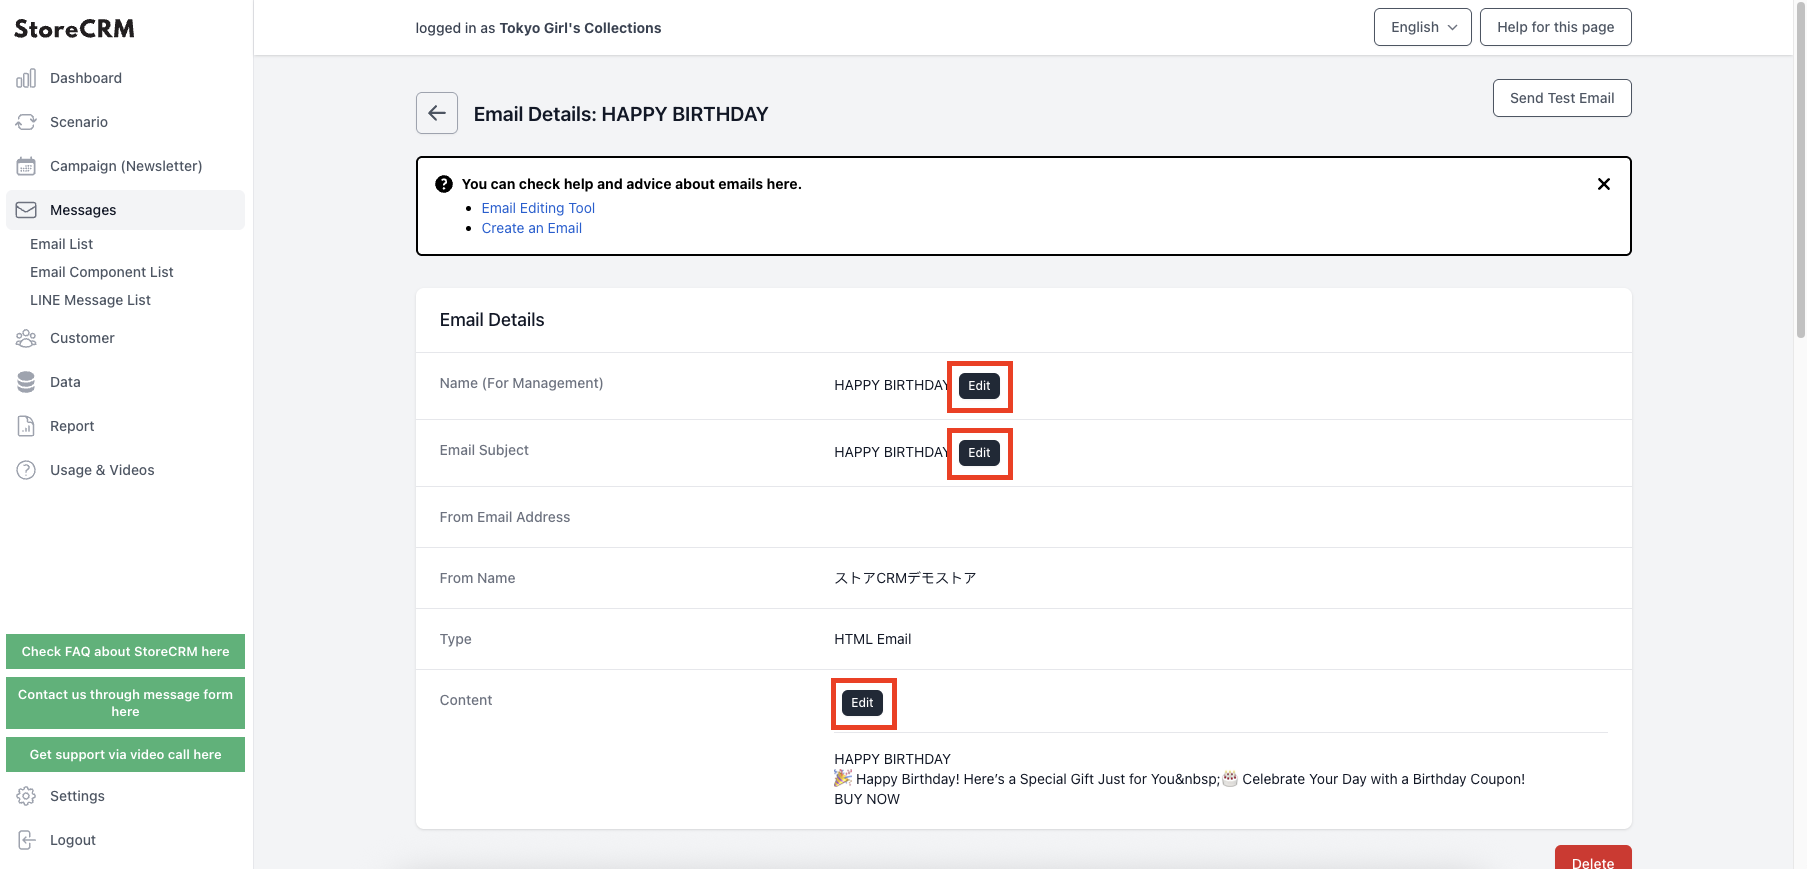
You can customize [Mail Name (for management)], [Mail Title], and [Body] from [Edit] on the ➁Mail Detail page.
Create emails that match the atmosphere of your store to increase open rates and CVR*.
CVR stands for "Conversion Rate" and is also called "CV rate." It is an indicator that expresses the percentage of visitors who have achieved a conversion (purchase or application for a product) on a website.
7. summary
By utilizing StoreCRM, we have been able to implement code and other measures, such as the birthday email policy introduced here, but now we are able to use StoreCRM to implement the same code,
Various measures that could not be realized without combining ShopifyFlow and the Shopify application and performing difficult settings can now be realized with this single application.
StoreCRM also provides free support for app-related settings (setting up on behalf of the customer) and offers suggestions for increasing sales to customers who have introduced the app.
Inquiry FormPlease feel free to contact us from
Related Pages