To send a restocking notification e-mail, do the following
Watch the video to set up
See the manual and set it up.
1. Introduction
It is very important to introduce a "restocking notification function" to e-commerce sites as a measure to prevent lost purchase opportunities due to product stock-outs.
This article explains how to add a "restocking notification feature" for Shopify using StoreCRM and specific settings and notes about "creating restocking notification scenarios".
StoreCRM does not require the introduction of other restocking notification applications, and everything from restocking notification functions to measures using restocking notifications can be realized with this application alone.
Implementing a restocking notification function will not only prevent lost purchase opportunities, but will also collect customer information, so be sure to implement this function.
memo
This article will use the Dawn theme, a free theme.
Paid themes and customized themes may have different file structures. We look forward to working with you!Contact UsPlease.
2. introduction of restocking notification function
Goal of this item
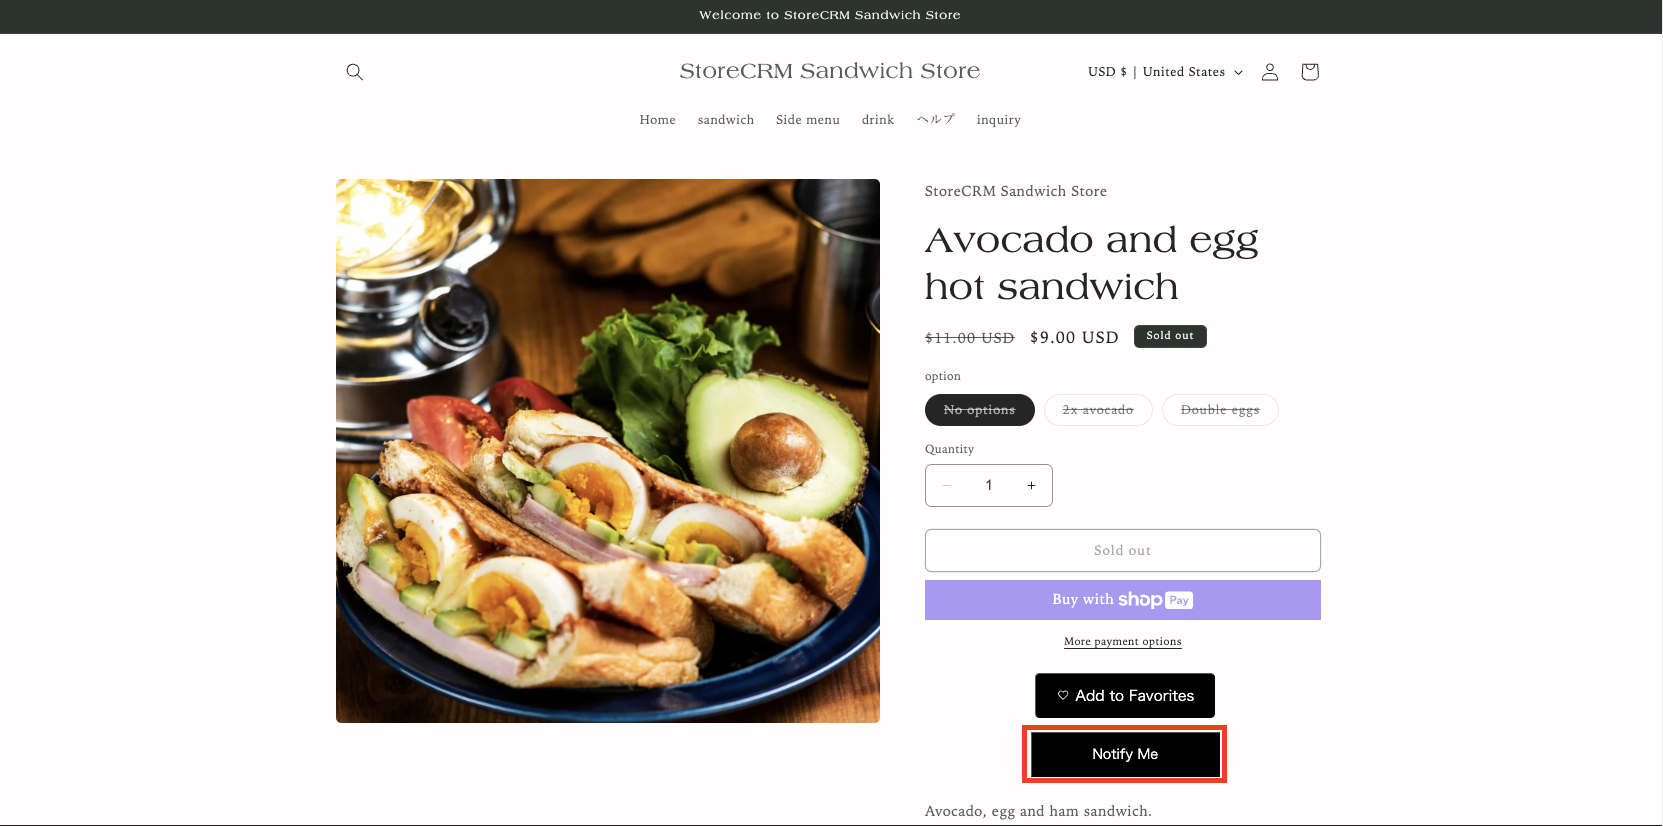
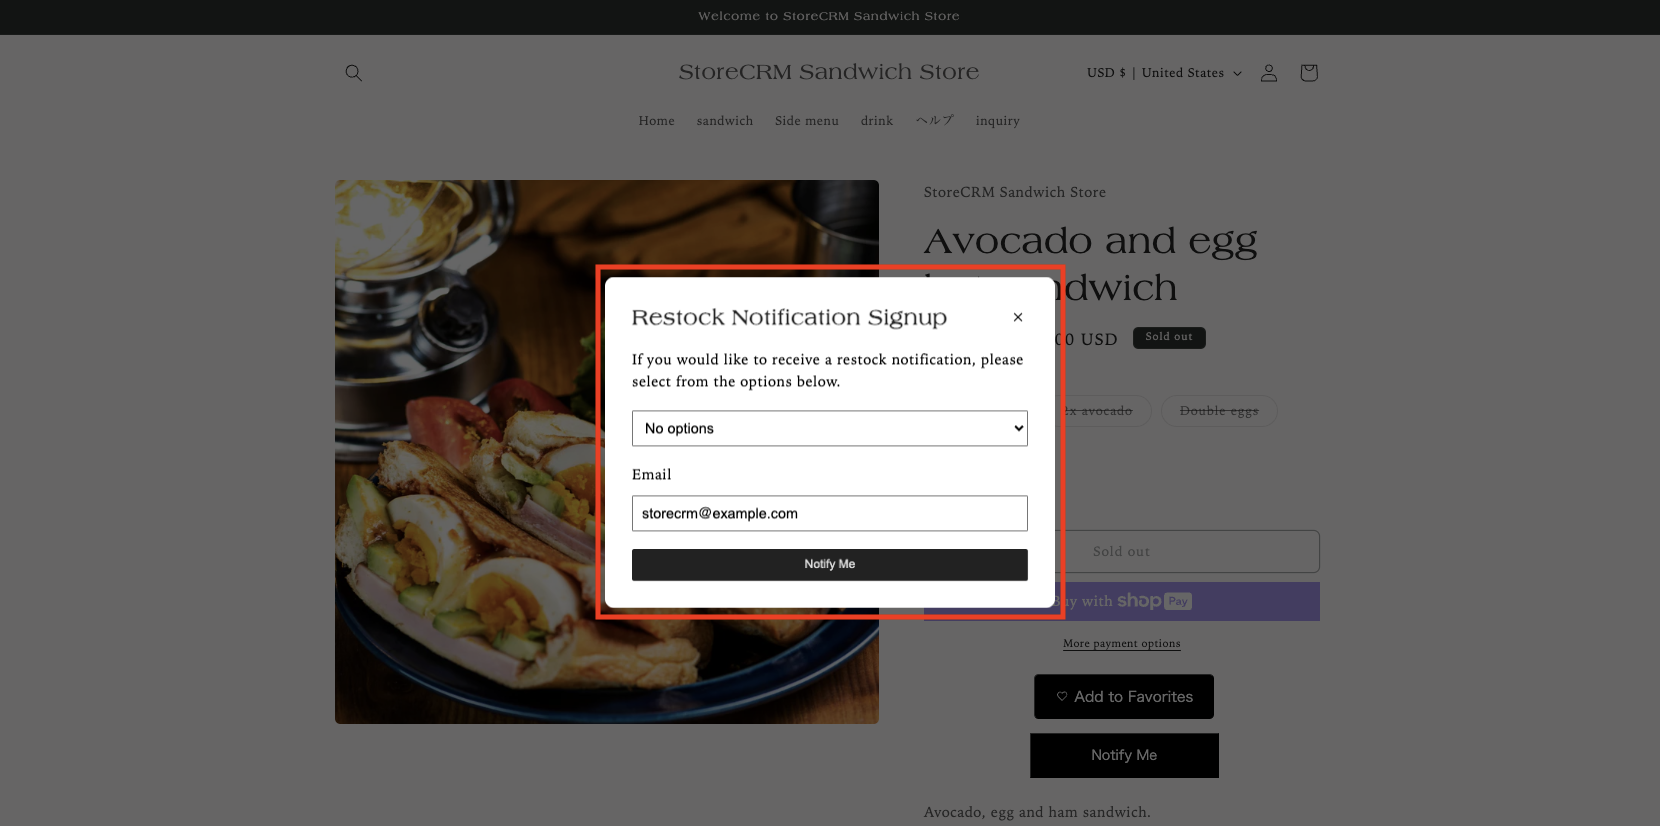
First, let's check the completed screen of the restocking notification function to be implemented this time.
The red frame indicates the restock notification button and the restock notification form.
Open the theme customization screen for the implementation location.
attention (heed)
Since you will be editing the theme in the steps ahead, we recommend that you select "Duplicate" to copy the theme and edit the copied theme if you are unsure.
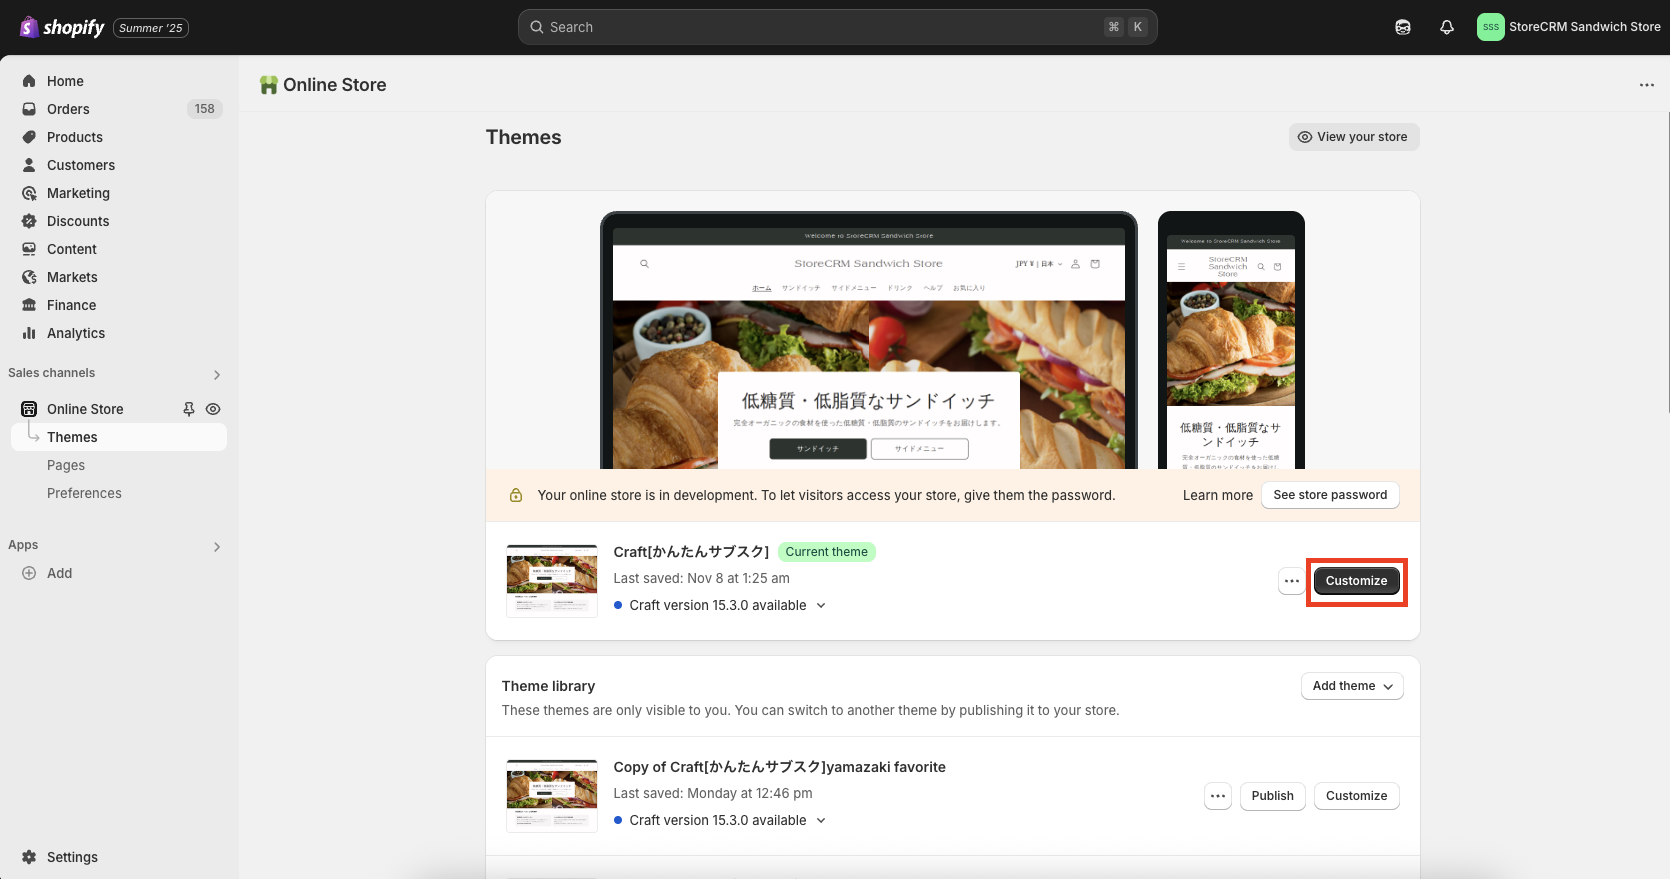
➀Go to [shopify admin] > [Sales Channels] > [Online Store] > [Themes] to open the list of themes.
Click Customize to the right of the theme you wish to edit.
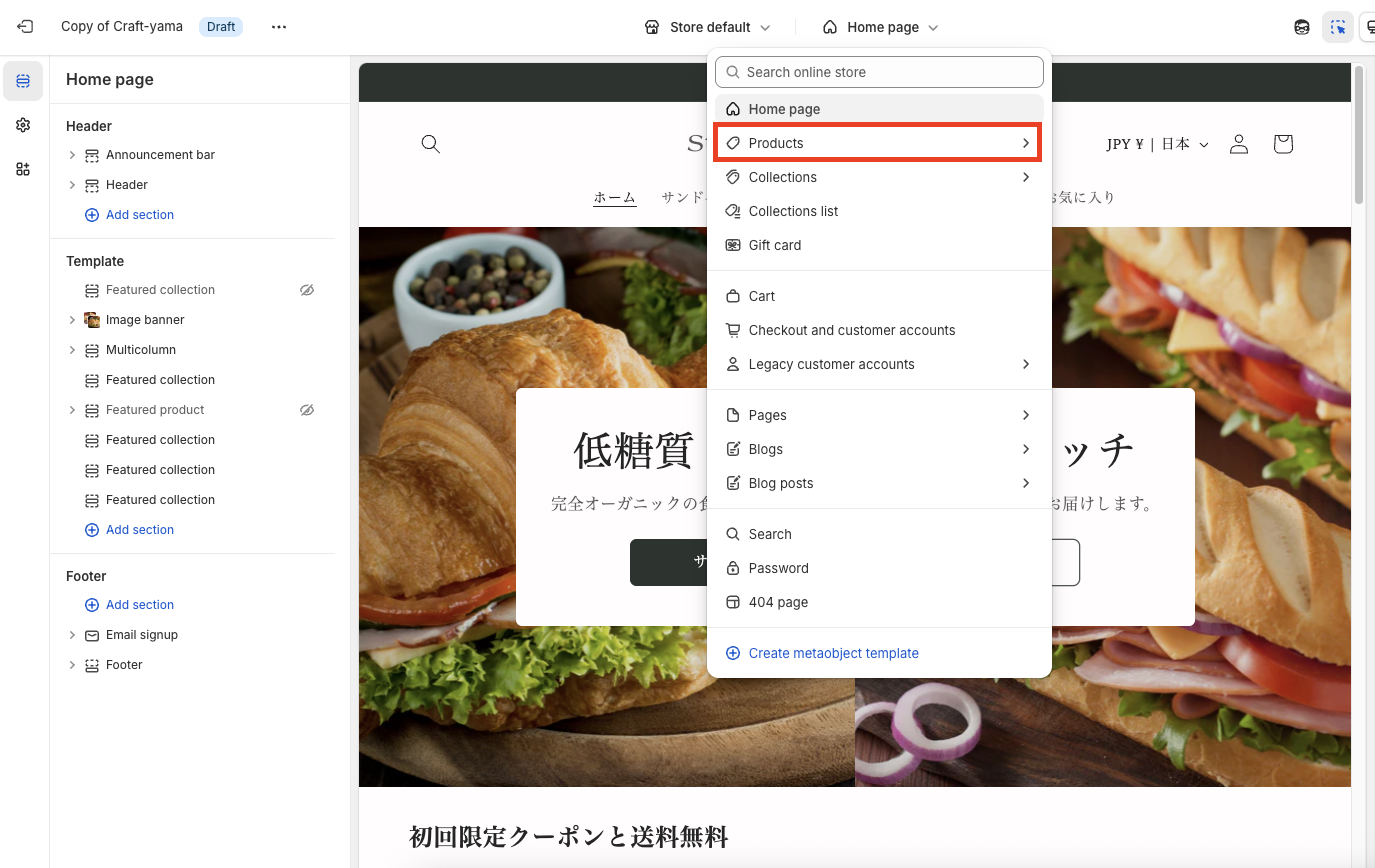
➁Click [Customize] to go to the theme customization screen. In this case, we will edit the product details screen, so click [Home Page] > [Products] at the top of the page.
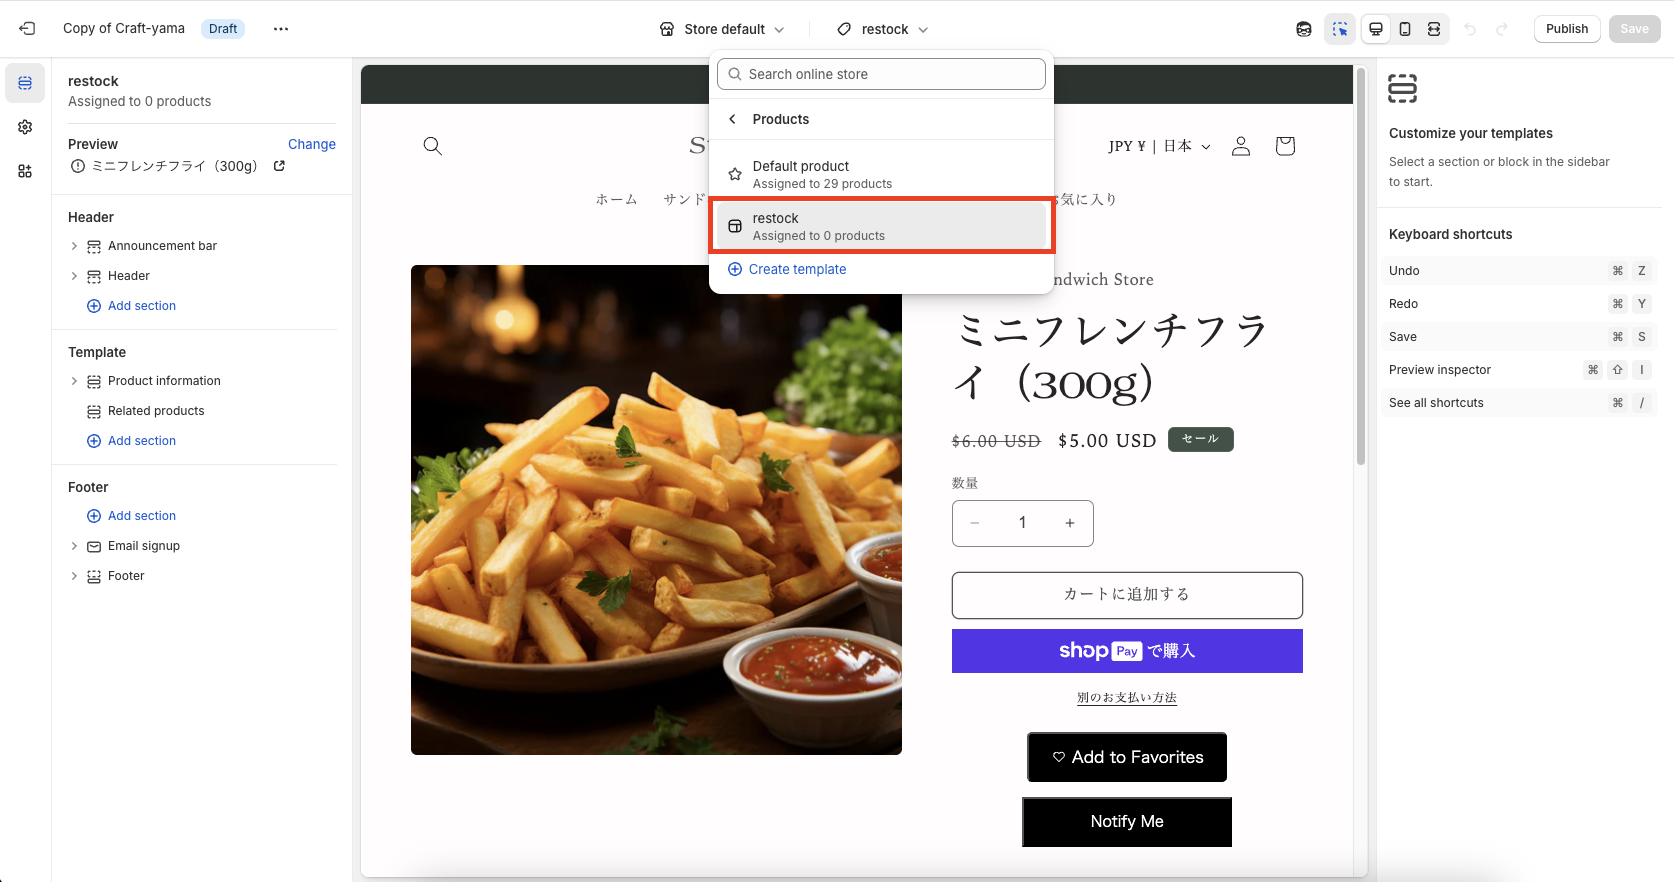
Click [Products] to see the list of templates for product detail pages, and select the template for which you wish to implement the restocking notification function.
If you want to apply the restocking notification feature only to specific products, create a new template by copying an existing template from [Create Template] and click on [Create Template].
You can also introduce it into a template that you have created. In this case, we will create a template named [restock] and install it.
Add an app block for restock notifications
- No code implementation is required to implement the restocking notification feature if you are using Theme 2.0 or later.
- This can be implemented by adding a theme block for the application, which will be explained in this section.
- If you are using Theme 1.0, you will find the following information on the product detail pageAdd codeThe following is a list of the most important factors that need to be taken into account when making a purchase.
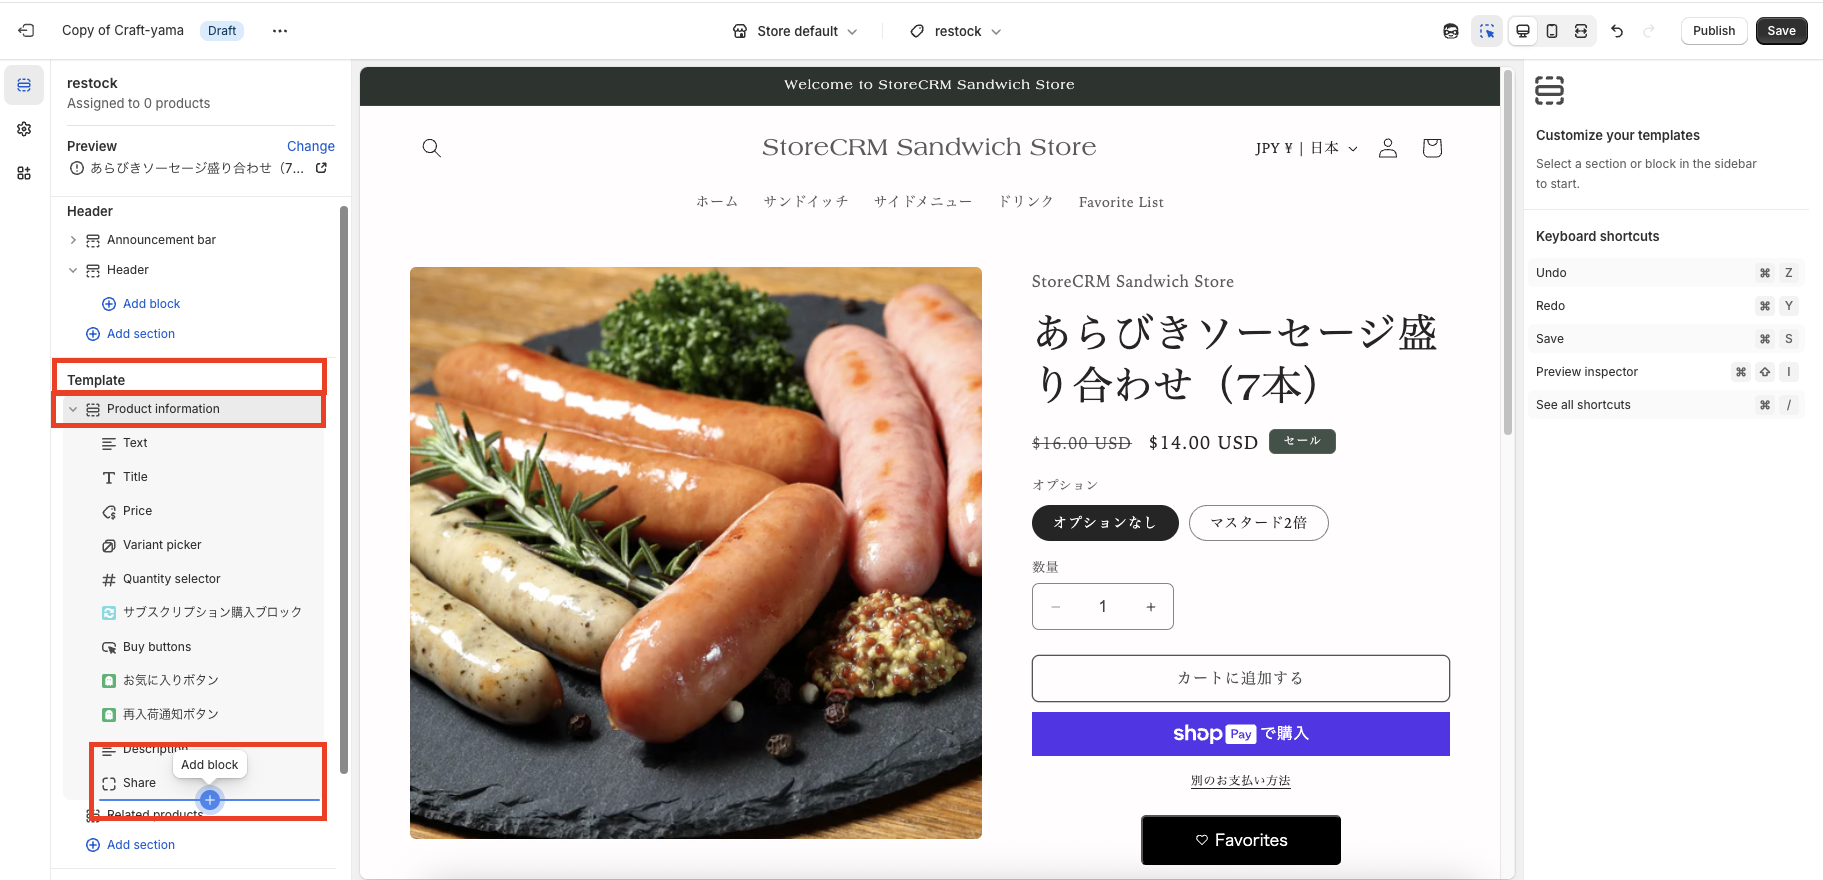
➀First, decide where you want to place the restocking notification button.
In this case, we want to place it at the bottom of the [Buy Now Button], so click [Product Information] > [Add Block] in the menu on the left side.
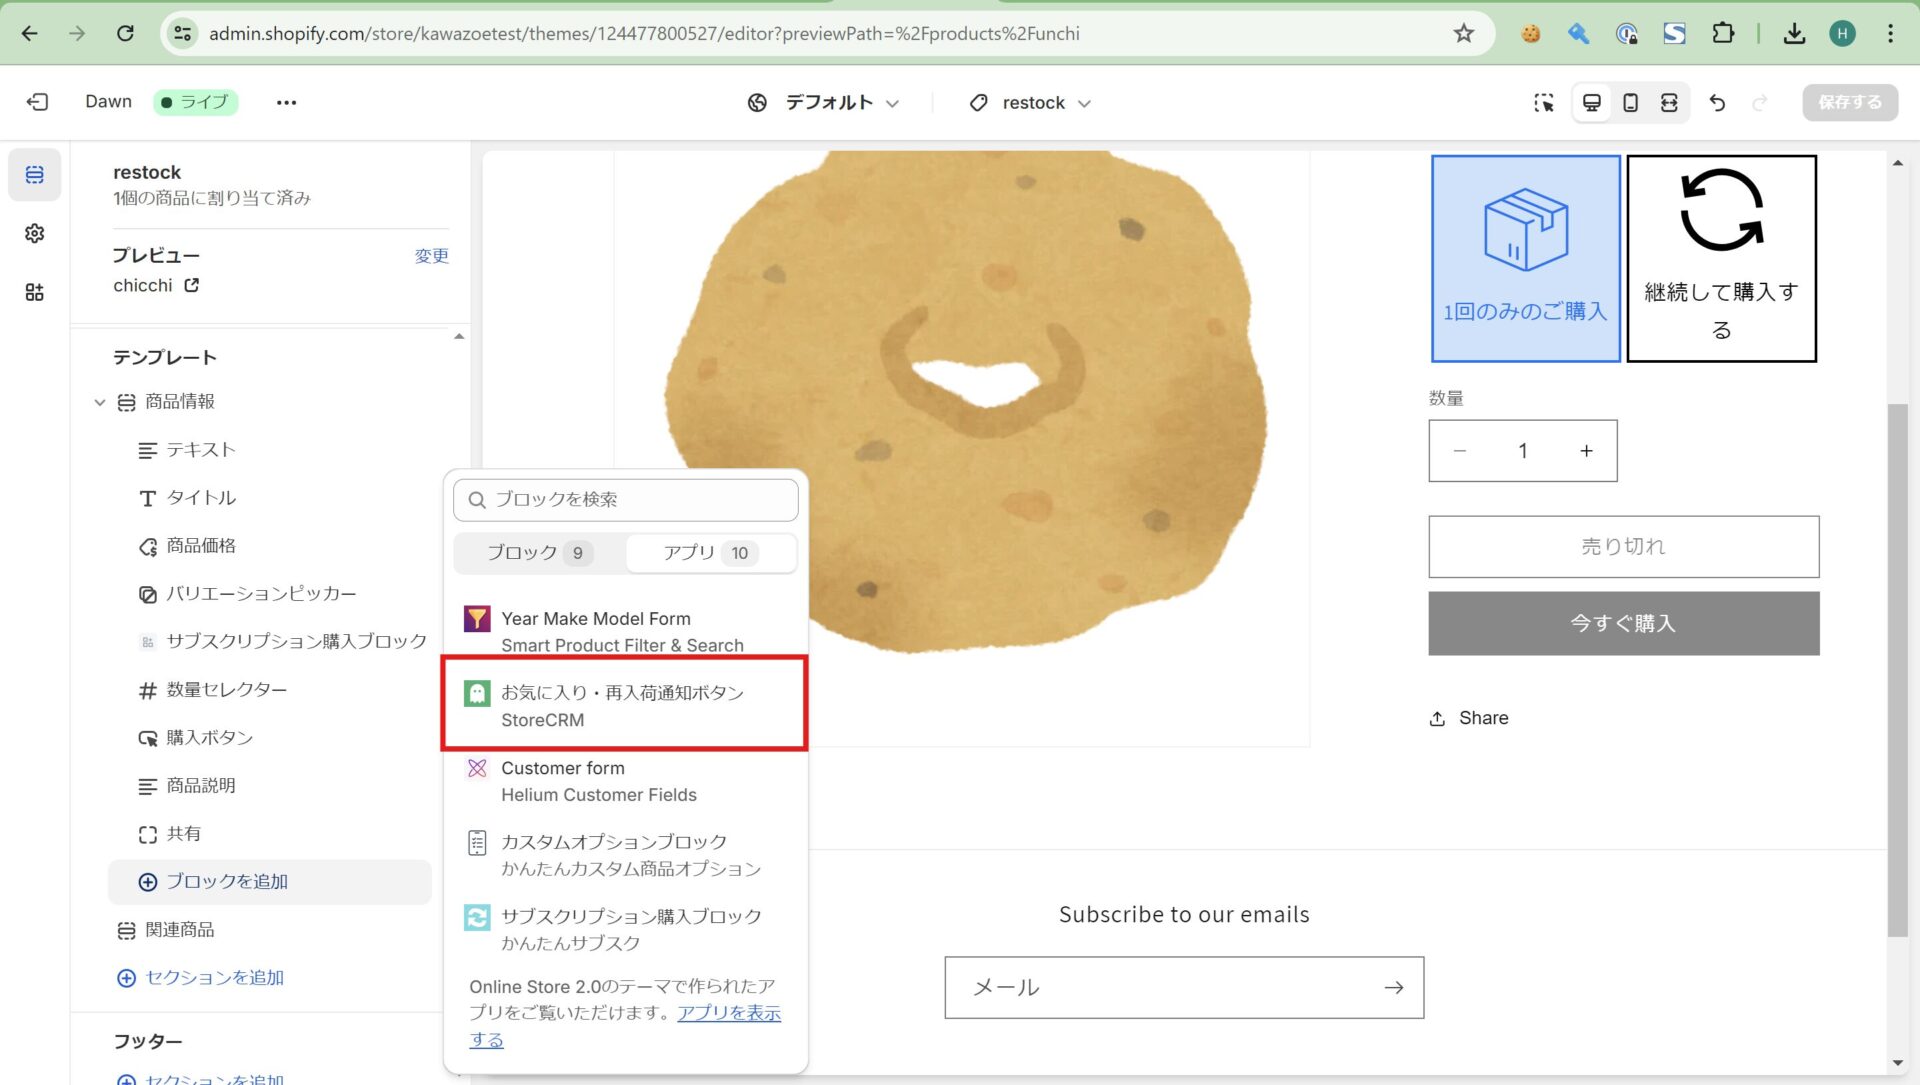
➁The block list will appear, switch the tab at the top to [Block]>[Apps].
In the application, click on the Favorites and Restock Notification button.
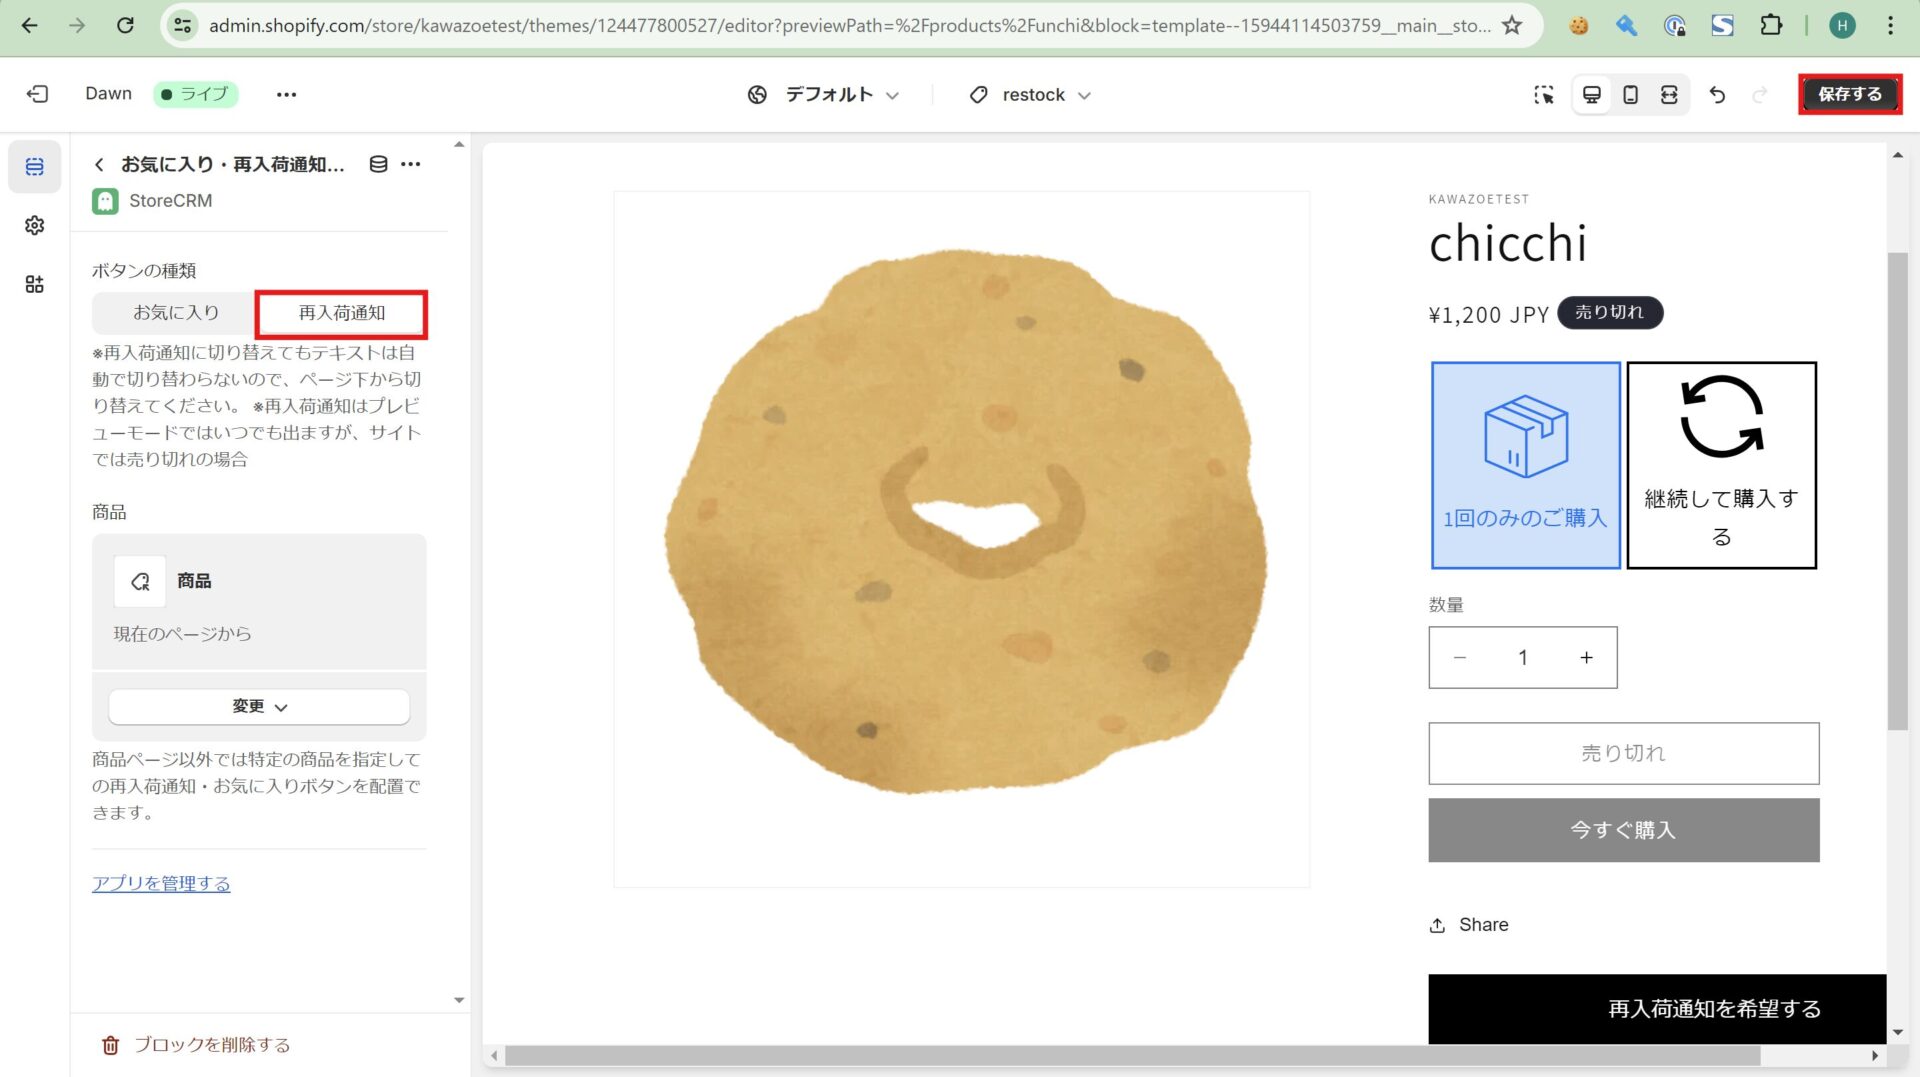
(3) If the item is successfully added, you will see a block of [Favorite/Restock Notification Button] at the bottom of [Product Information], so click on it.
Then the block settings screen will appear, and switch the "Button Type" to "Favorites">"Restock Notification".
Then click "Save" in the upper right corner of the page to save the theme and complete this section.
If you are using Theme 1.0
- If you are using Theme 1.0, please add the following code to the product detail page
- The product detail page can be found by clicking Shopify > [Sales Channels] > [Online Store] > [Themes] > [Edit Code] > search for "product".
- The file name depends on the Shopify theme you are using. Usually it is main-product.liquid, etc., but if you have a product.json file, it will be the filename.liquid written in the contents of that file.
- To find where to add it, for example, above the [add to cart] button, search for "buy-button" and so on.
<!-- StoreCRM Block -->
<div>
<script type="text/javascript">
if (typeof window.storecrm_data === 'undefined') {
window.storecrm_data = {};
}
window.storecrm_data.loaded = true;
if (!window.storecrm_data.customer_id) {
window.storecrm_data.customer_email = {% if customer %}'{{ customer.email }}'{% else %}null{% endif %};
window.storecrm_data.customer_id = {% if customer %}'{{ customer.id }}'{% else %}null{% endif%};
}
</script>
<div class="storecrm-button" data-type="restock-button" data-product-id="{{ product.id }}" data-variant-id="{{ product.selected_or_first_available_variant.id }}" data-variants="{{ product.variants | json | escape }}" data-current-variant-available="{{ product.selected_or_first_available_variant.available }}" data-product-tags="{{ product.tags | json | escape }}"></div>
</div>
<!-- StoreCRM Block -->
3. customization of restock notification button and registration form
StoreCRM provides simple, unobtrusive restock notification buttons and registration forms as standard in any store.
The design of this product is based on the concept of "a new product". However, if you want to pay more attention to the details of the design, or if you want the restock notification button to stand out more, you can use the
You can customize the look and feel of the restock notification button and registration form from the app page.
Customize restock notification button and registration form
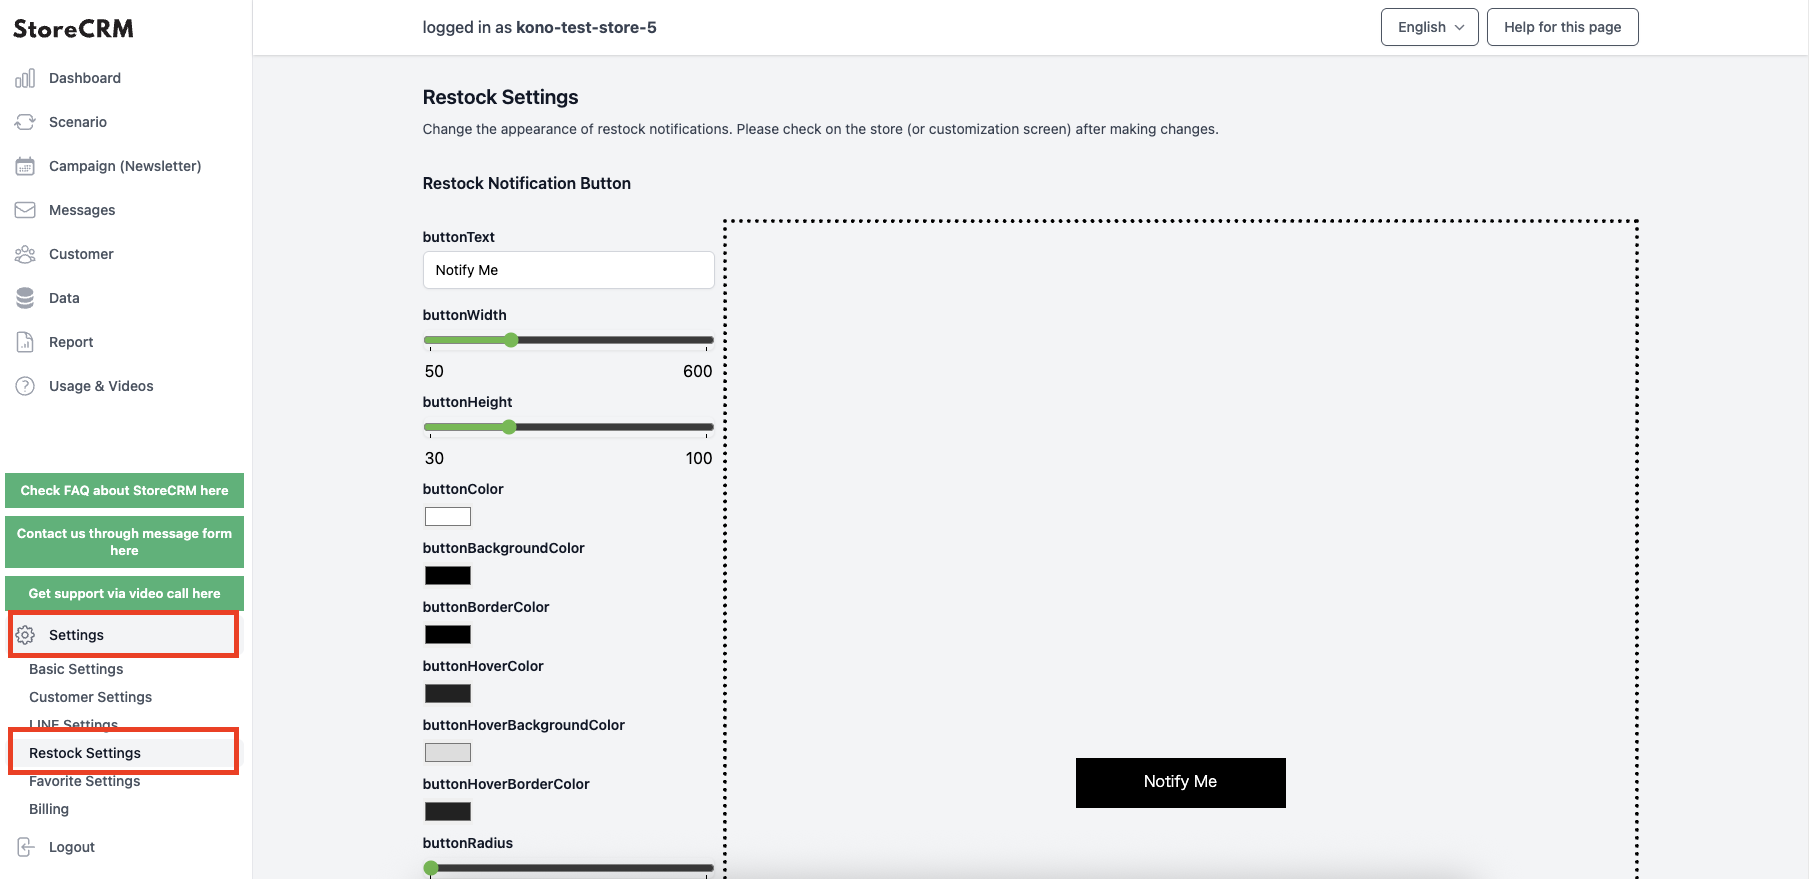
Open the (1) StoreCRM application screen. Click on "Settings" at the bottom left of the page, and then click on "Restocking Settings" that appears below it.
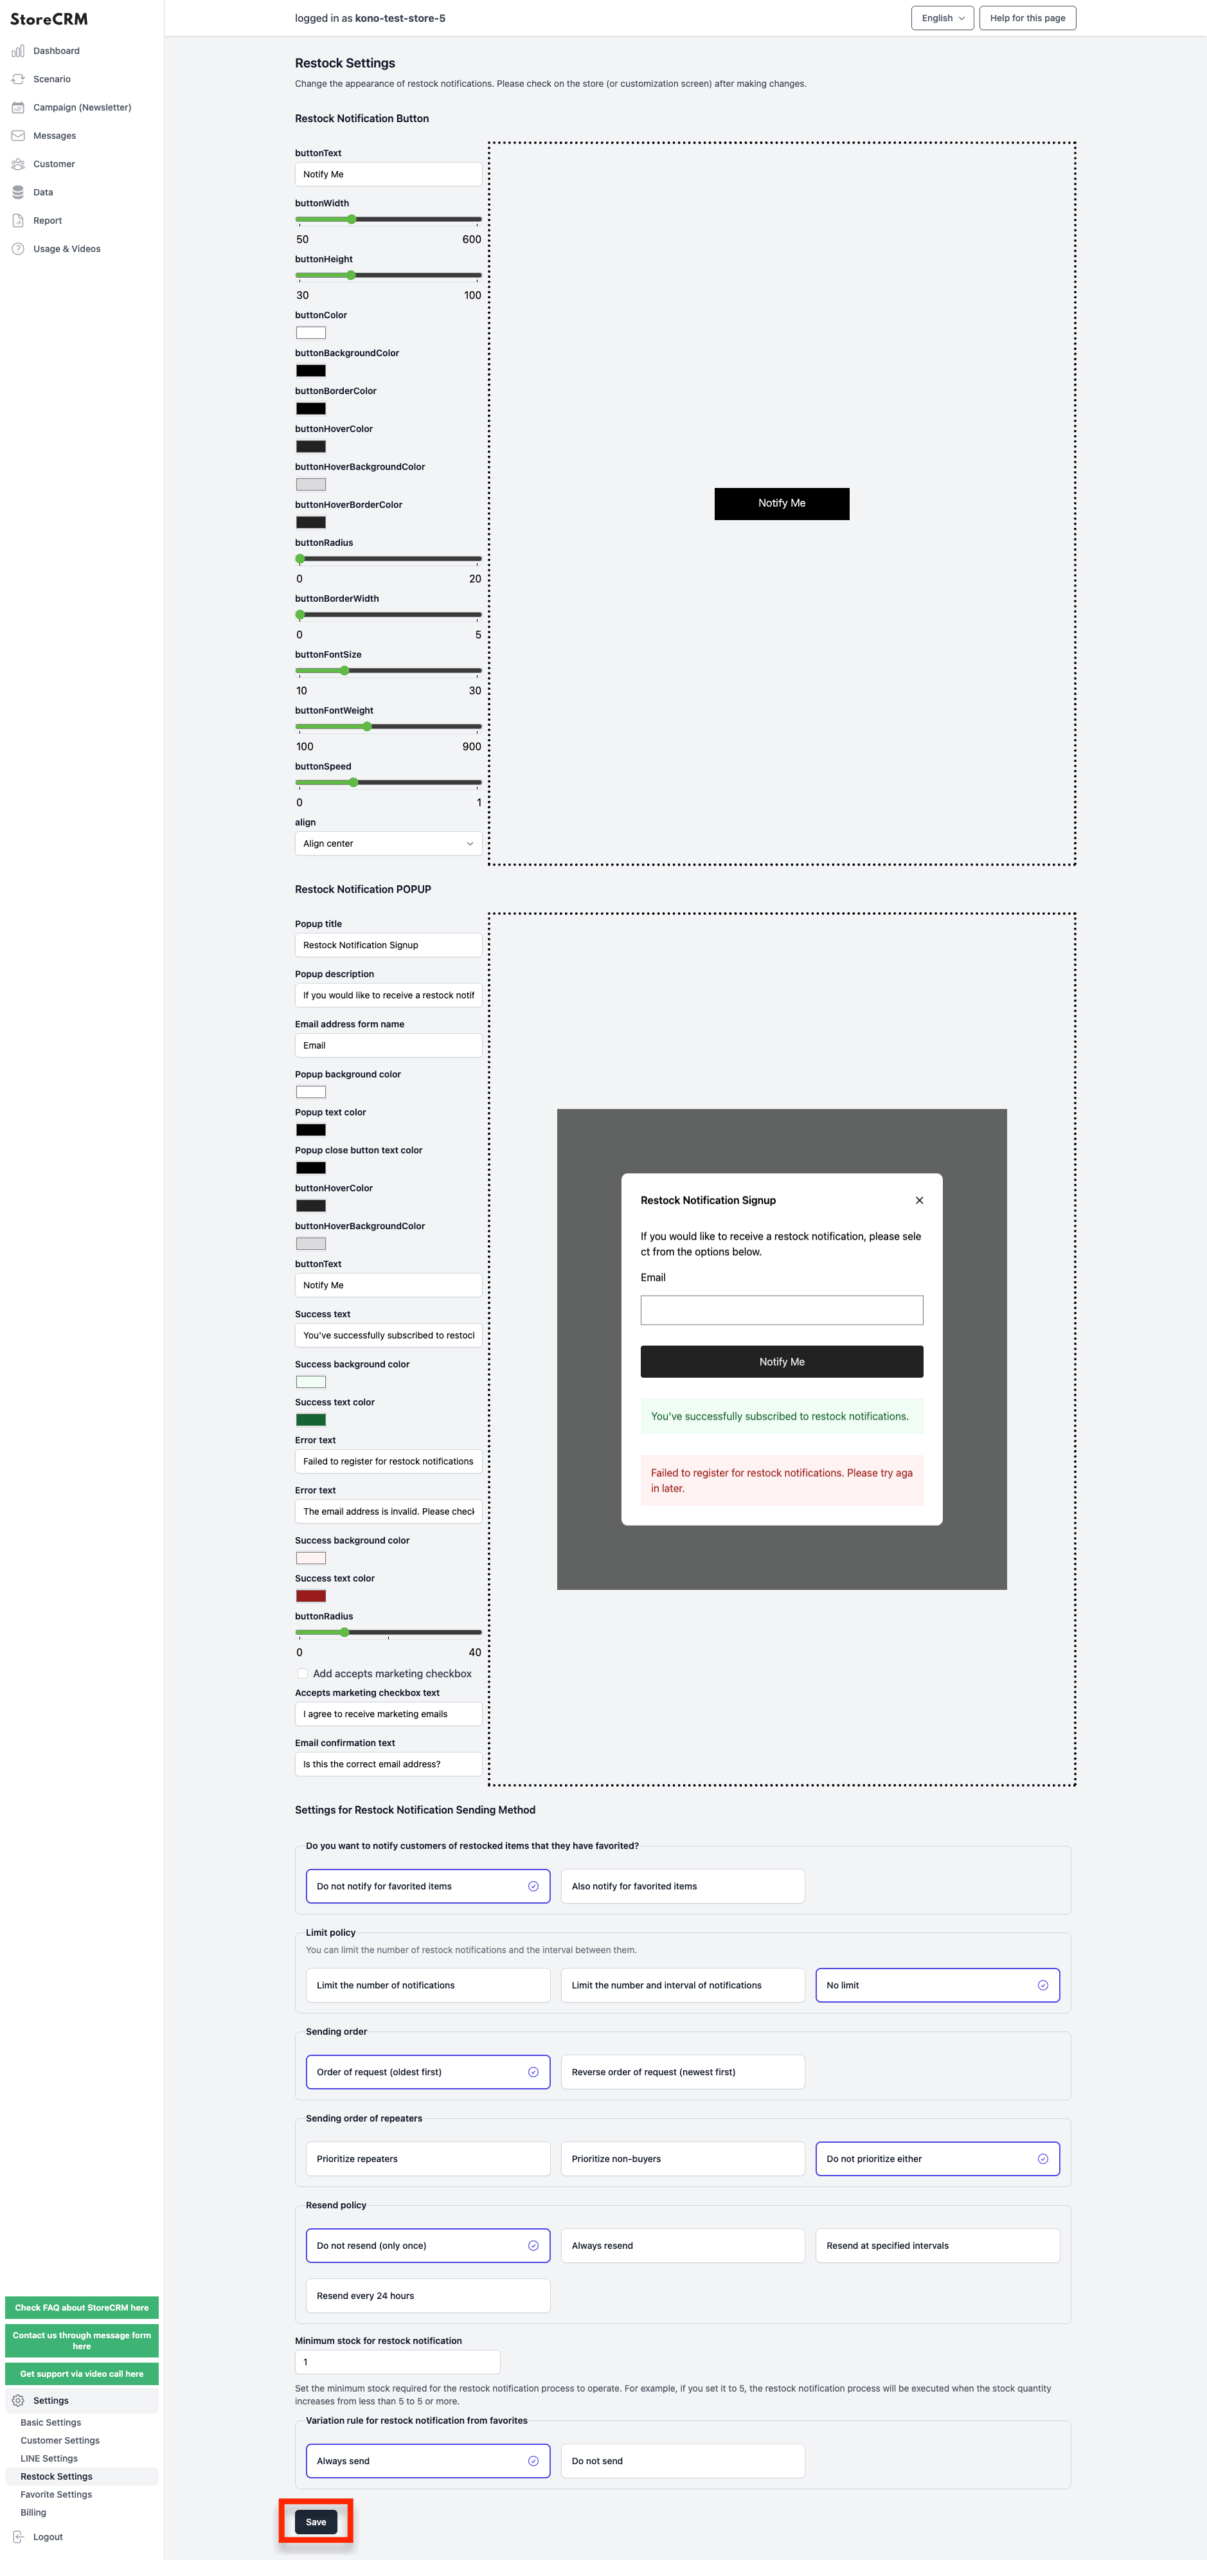
➁You can customize the wording, color, and size of the restock notification button and registration form to your liking by checking the preview on the right.When you have finished customizing, do not forget to save your customizations by clicking the Save button at the bottom of the page at the end.
After saving, you can actually check from the store or theme preview to see if your customizations are reflected as you envisioned.
4. create scenarios utilizing the restocking notification function
In this section, we will create a scenario to automatically send a restocking notification e-mail to customers who have registered for restocking notification when inventory is restocked, based on the restocking notification registration information collected through the use of sections 2 and 3.
Create a scenario
StoreCRM provides a scenario template called [Send Restocking Notification] that allows you to automatically send an email by simply setting a simple condition.
In this case, let's actually create a scenario for [provide a restocking notification].
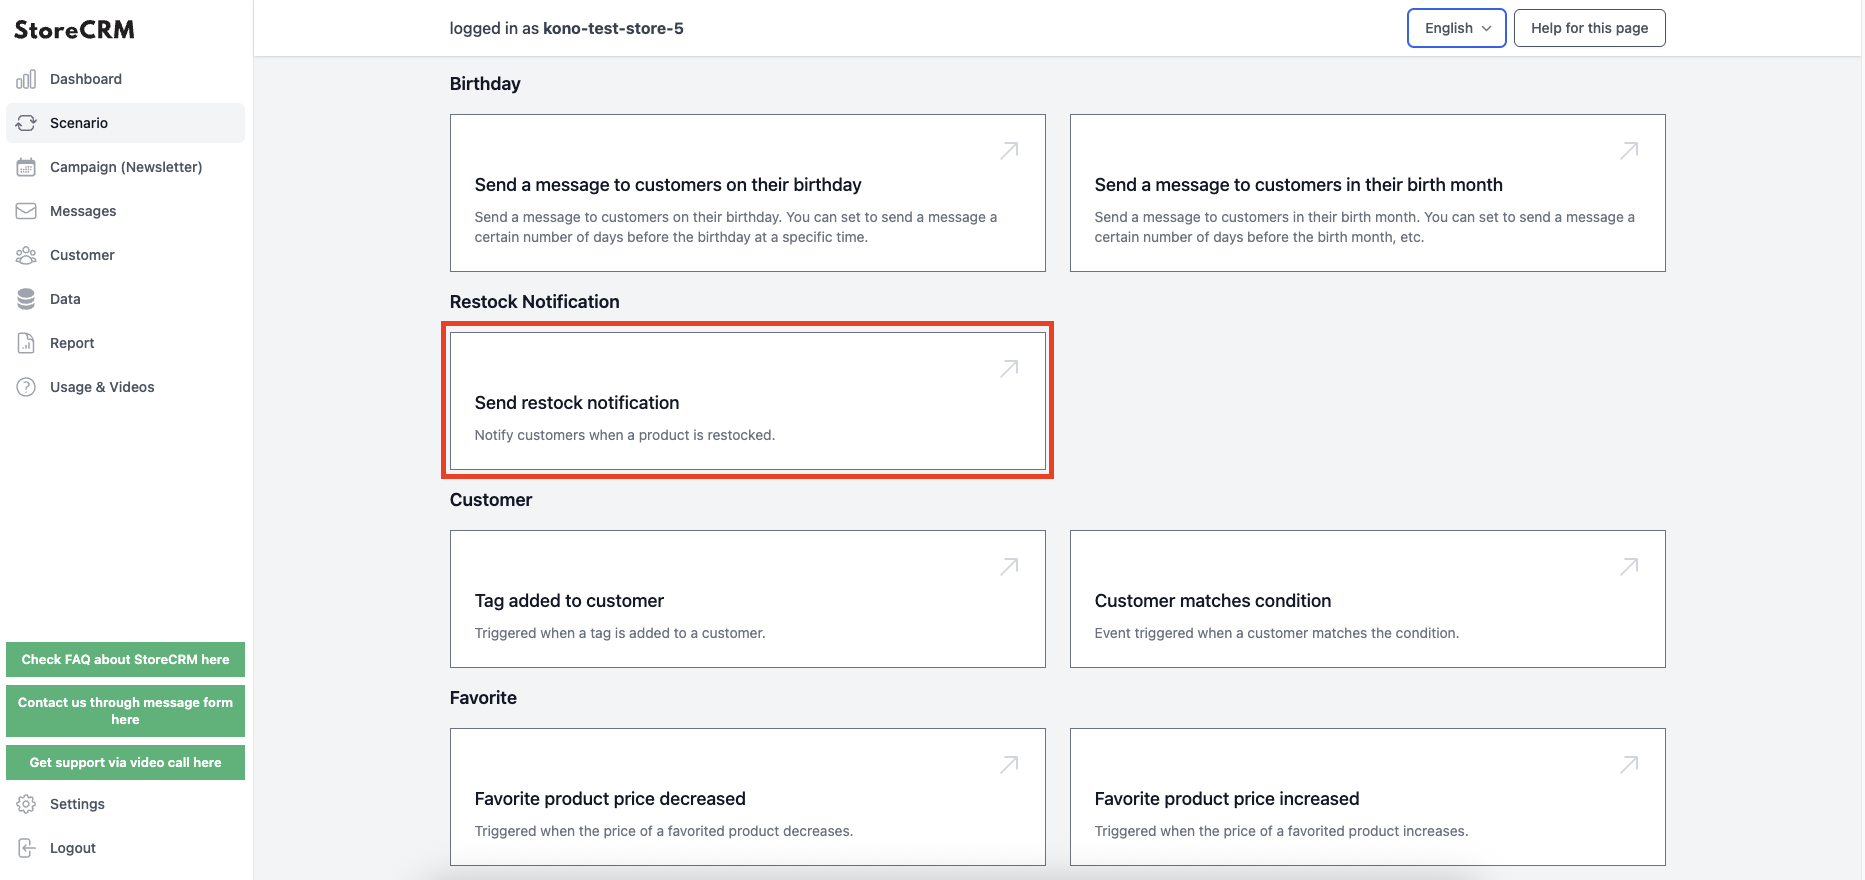
Open the ➀StoreCRM application page and click on Scenarios > "Notify me of restocking".
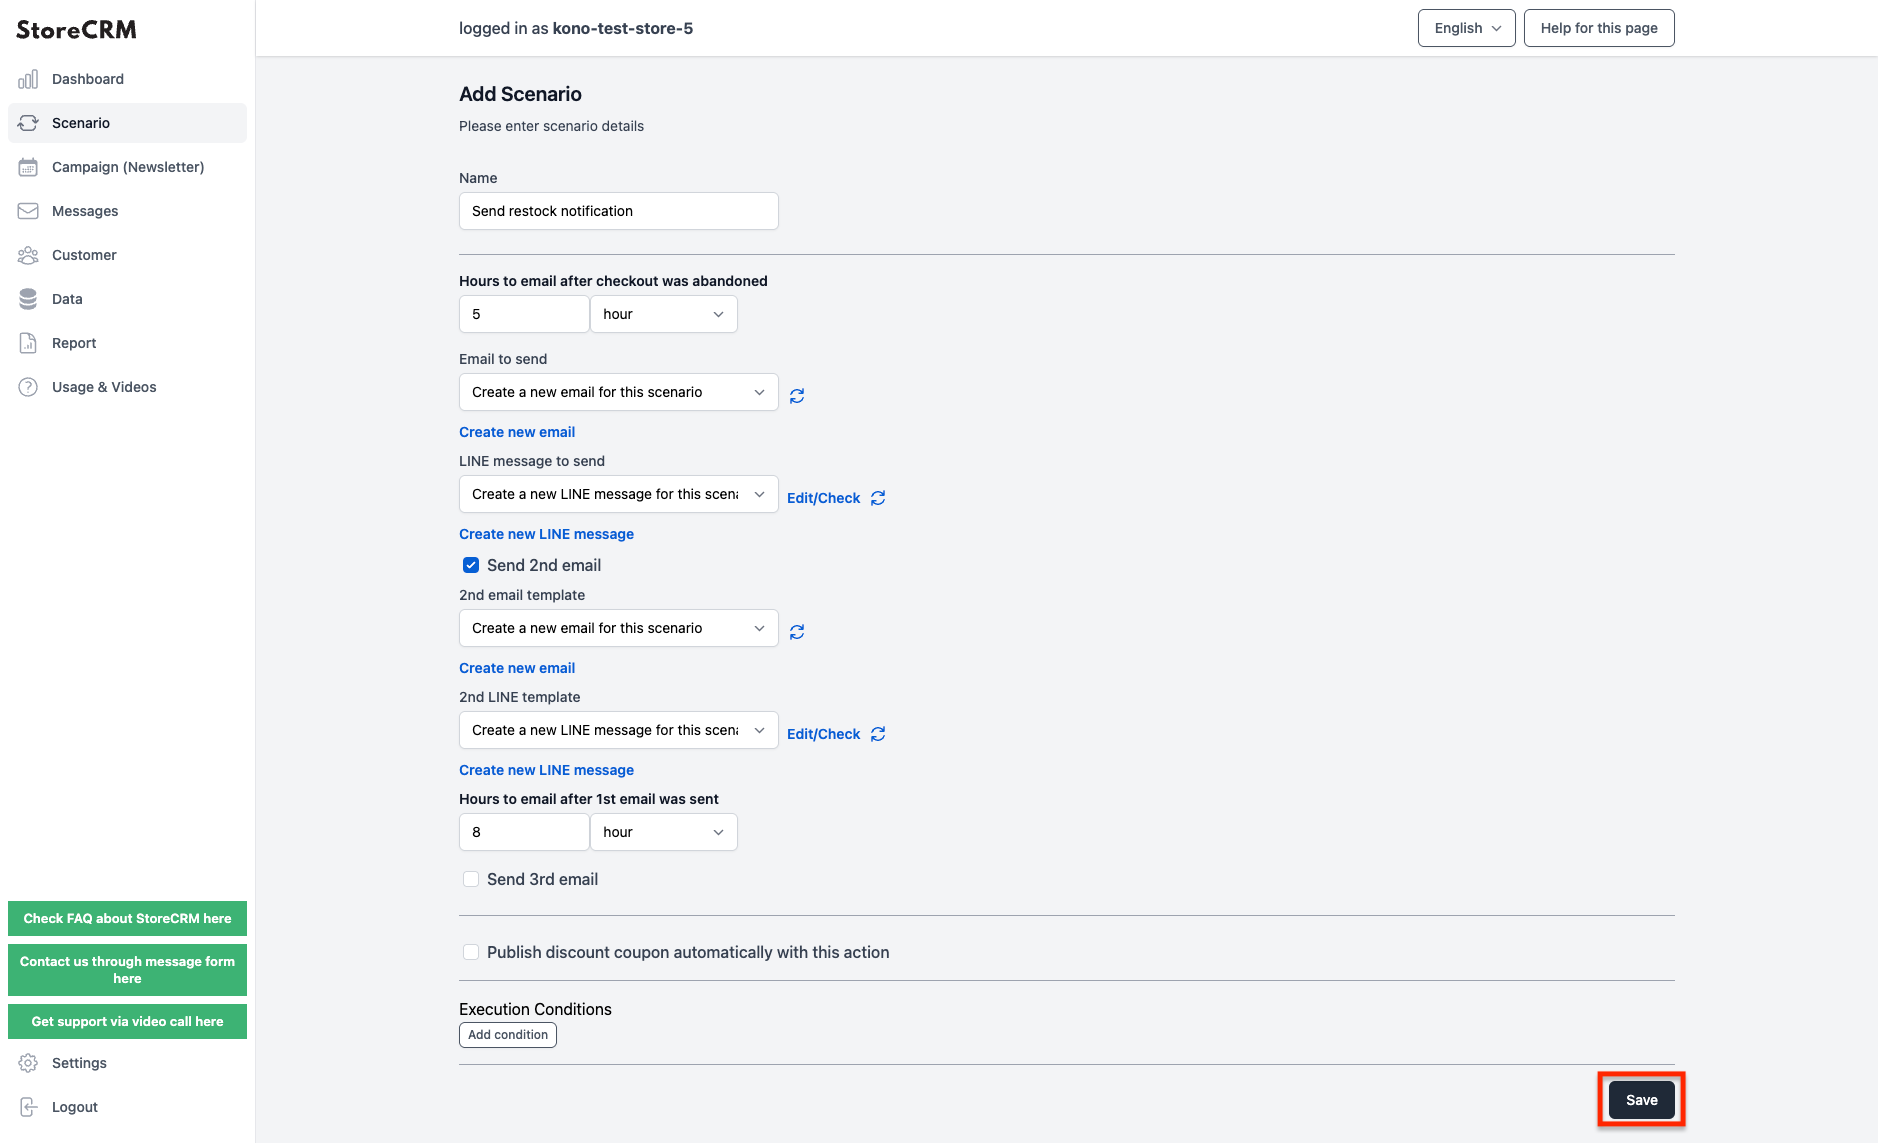
The "Scenario Settings" screen will appear, and you will need to set the date and time to send the email. In this case, the following settings were made
Email open rates may also vary depending on the time you send the email, so consider the time you add inventory and the time you send the email. Also, by sending multiple emails, you can expect to increase open and click-through rates.
When you have completed your settings, click "Save" at the bottom right of the page to save your settings.
important
- After waiting 5 hours after restocking, a restocking notification e-mail is sent to registered users.
- After sending the first email, wait 8 hours and send a follow-up email.
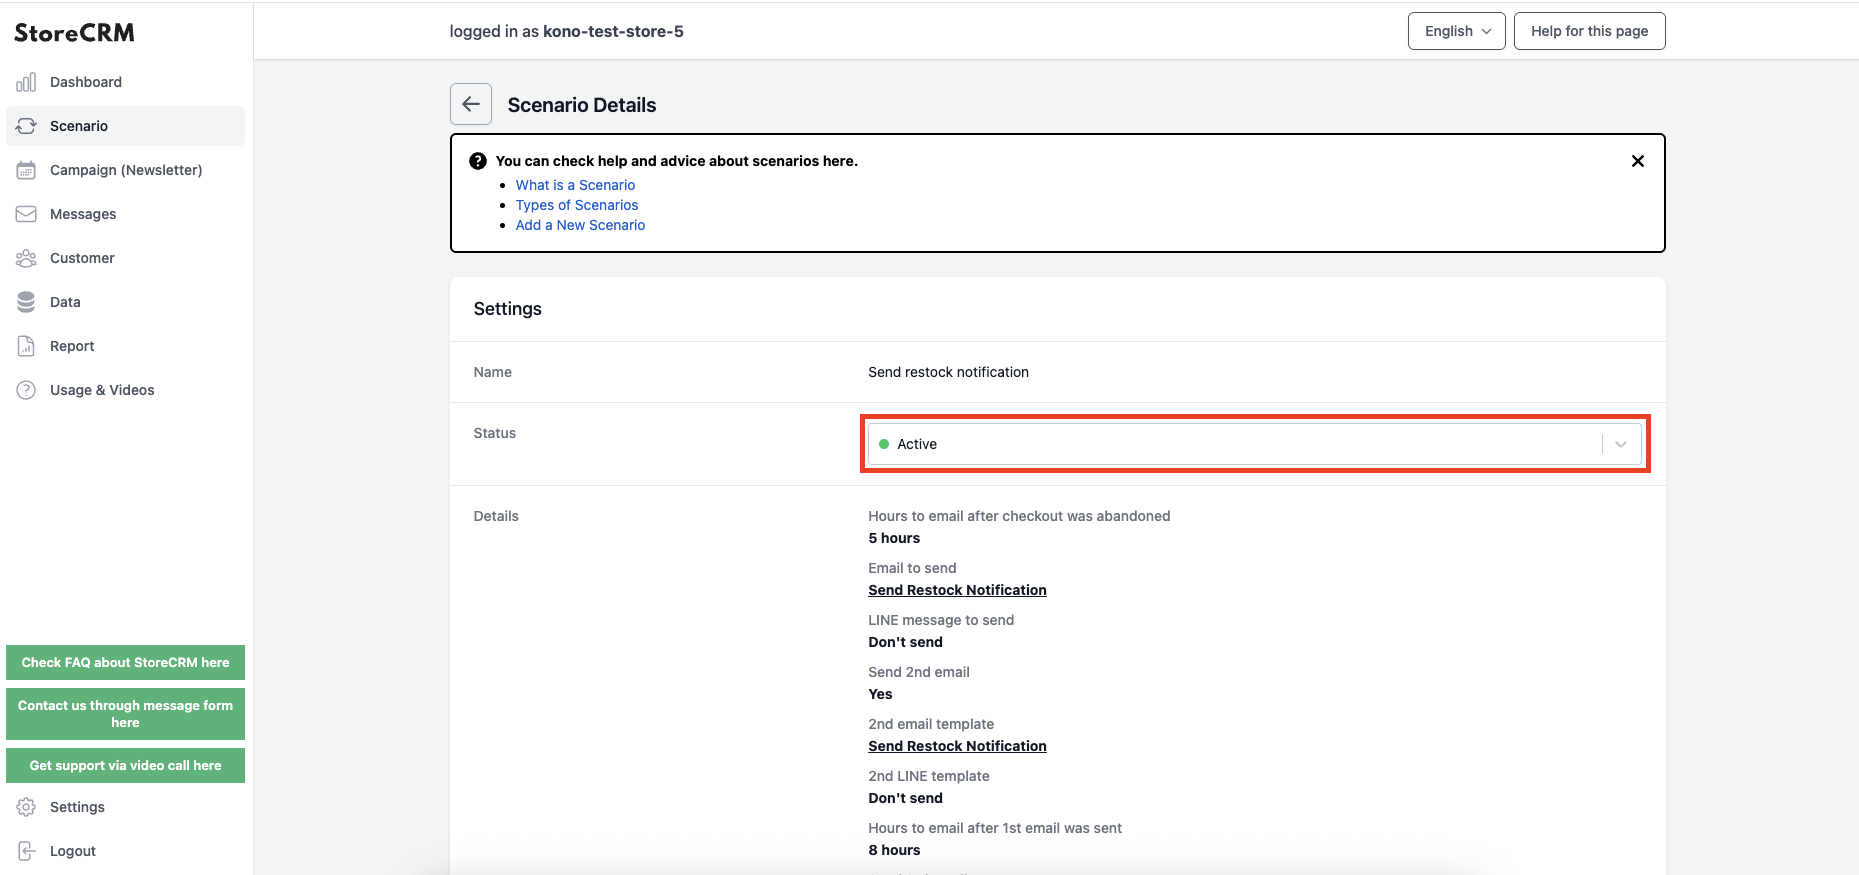
(3) When the settings are complete, click the "Save" button to create the scenario and display the scenario details.
Click on the pull-down under [Settings]>[Status] and set to [Enable] to send the email according to the conditions you have set.
*At the point of creating a scenario, an email that fits the scenario is automatically generated.
If you wish to customize your email, please refer to the next section for editing.
This completes the creation of the scenario.
Edit Email
In StoreCRM, emails are automatically generated when scenarios are created, and the scenarios can be operated without modification.
However, if you would like to customize the wording and design of your emails to match the atmosphere of your store, or if you would like to deliver your message to customers in your own words, you can use the email editor to customize your emails.
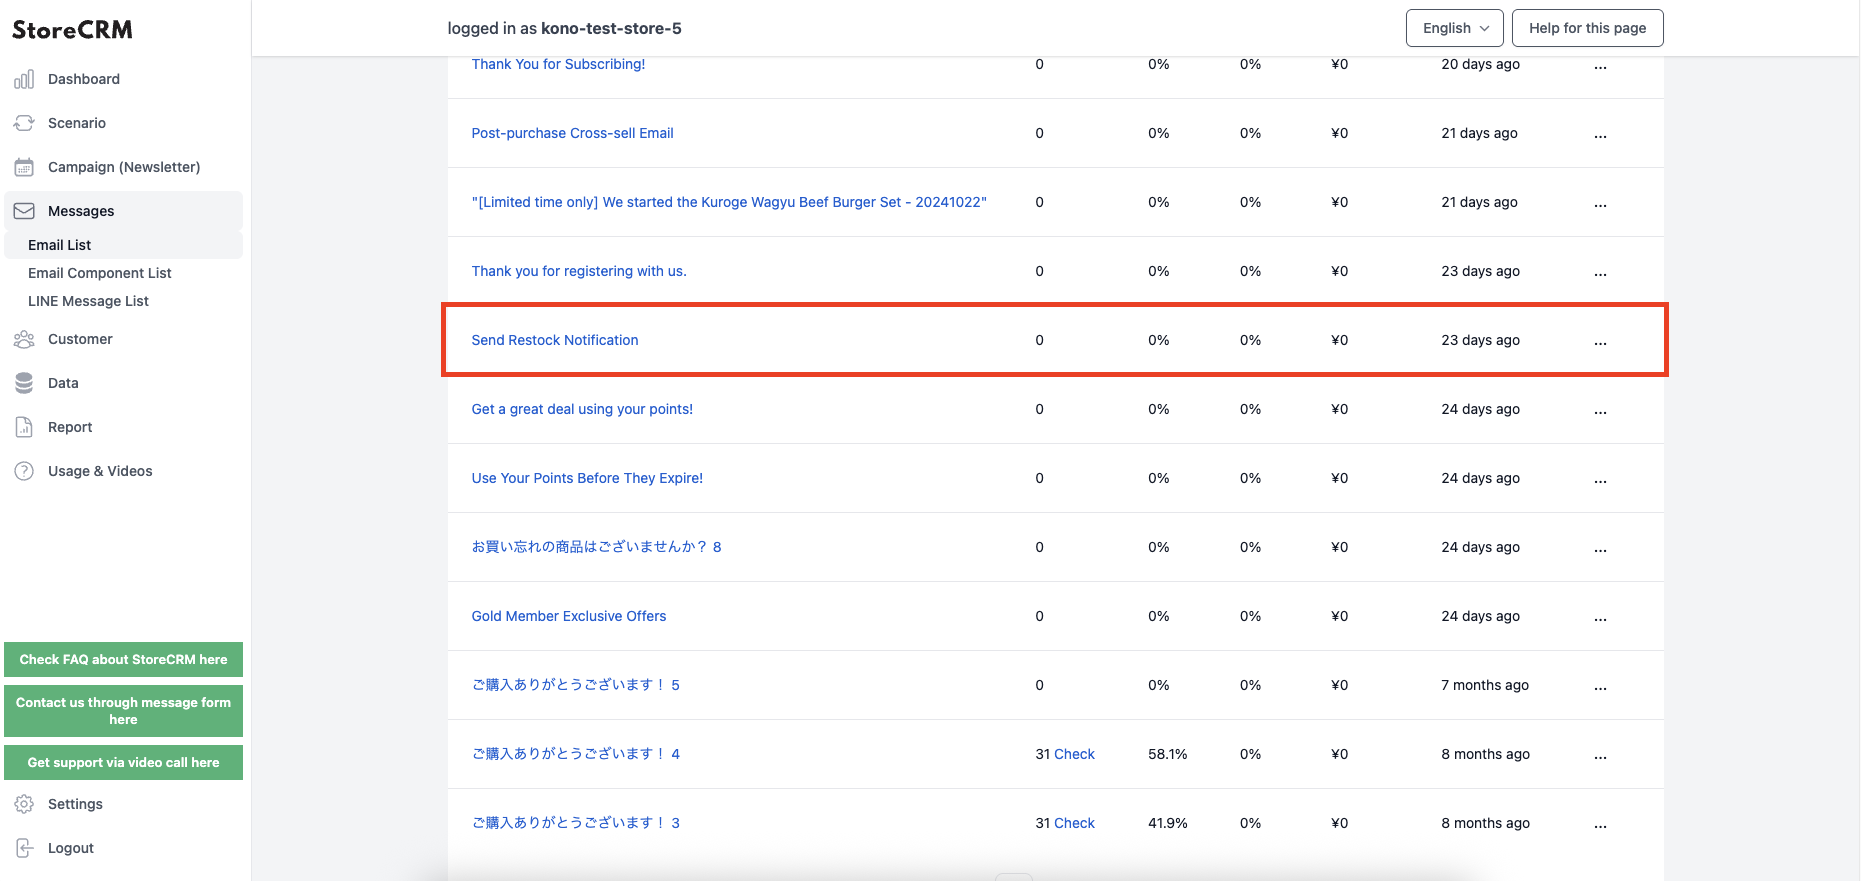
Open the ➀StoreCRM application page and click on [Mail] > [Mail List].
Click on the name of the e-mail you wish to edit in the list of e-mails.
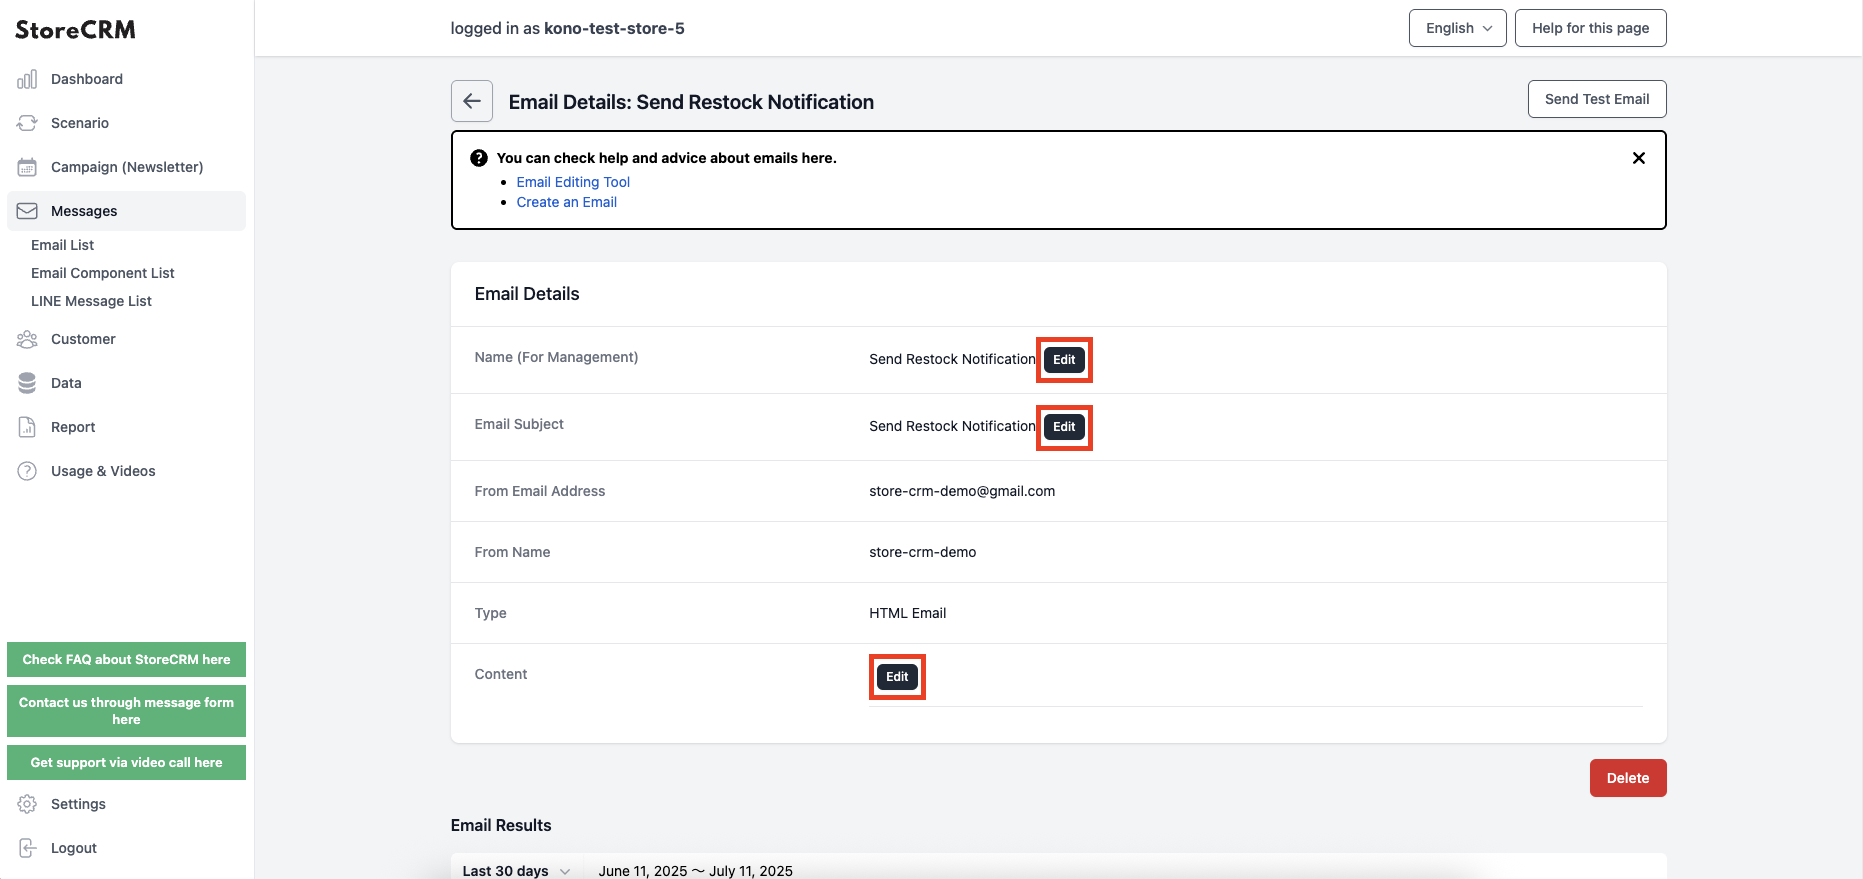
You can customize [Mail Name (for management)], [Mail Title], and [Body] from [Edit] on the ➁Mail Detail page.
Create emails that match the atmosphere of your store to increase open rates and CVR*.
CVR stands for "Conversion Rate" and is also called "CV rate." It is an indicator that expresses the percentage of visitors who have achieved a conversion (purchase or application for a product) on a website.
5. summary
By using StoreCRM, various measures that could not be realized without installing a separate application and linking it with other MA applications, such as the restocking notification registration measures introduced this time, can be realized with this single application. StoreCRM also provides free support for app-related settings (setting up on behalf of the customer) and consulting services to increase sales for customers who have implemented StoreCRM. Inquiry FormPlease feel free to contact us from
Related Pages