To add the Favorites feature to the product detail screen in Shopify, do the following
1. Introduction
This article explains the specific settings and notes for adding Shopify's "Favorites Feature" and "Favorites List Screen" using StoreCRM.
Introducing a "favorite" function to an e-commerce site is an important measure to improve the customer experience, as it saves customers the trouble of having to re-search for products they are interested in and makes it easier for them to find related products and special offers that interest them, starting with their favorite products.
The management can also improve the accuracy of marketing strategies by understanding the interests and needs of each customer, and create additional sales opportunities through additional proposals and campaign invitations (cross-selling and up-selling) based on favorite products.
StoreCRM does not require the introduction of other applications for the favorite function, and everything from the favorite function to measures using the favorite information can be realized only with this application.
The favorite function is beneficial to both the customer and the management, so we encourage you to implement it.
memo
This article will use the Dawn theme, a free theme.
Paid themes and customized themes may have different file structures.
Inquiry FormPlease feel free to contact us from
2. introduction of a favorite function (favorite button)
Goal of this item
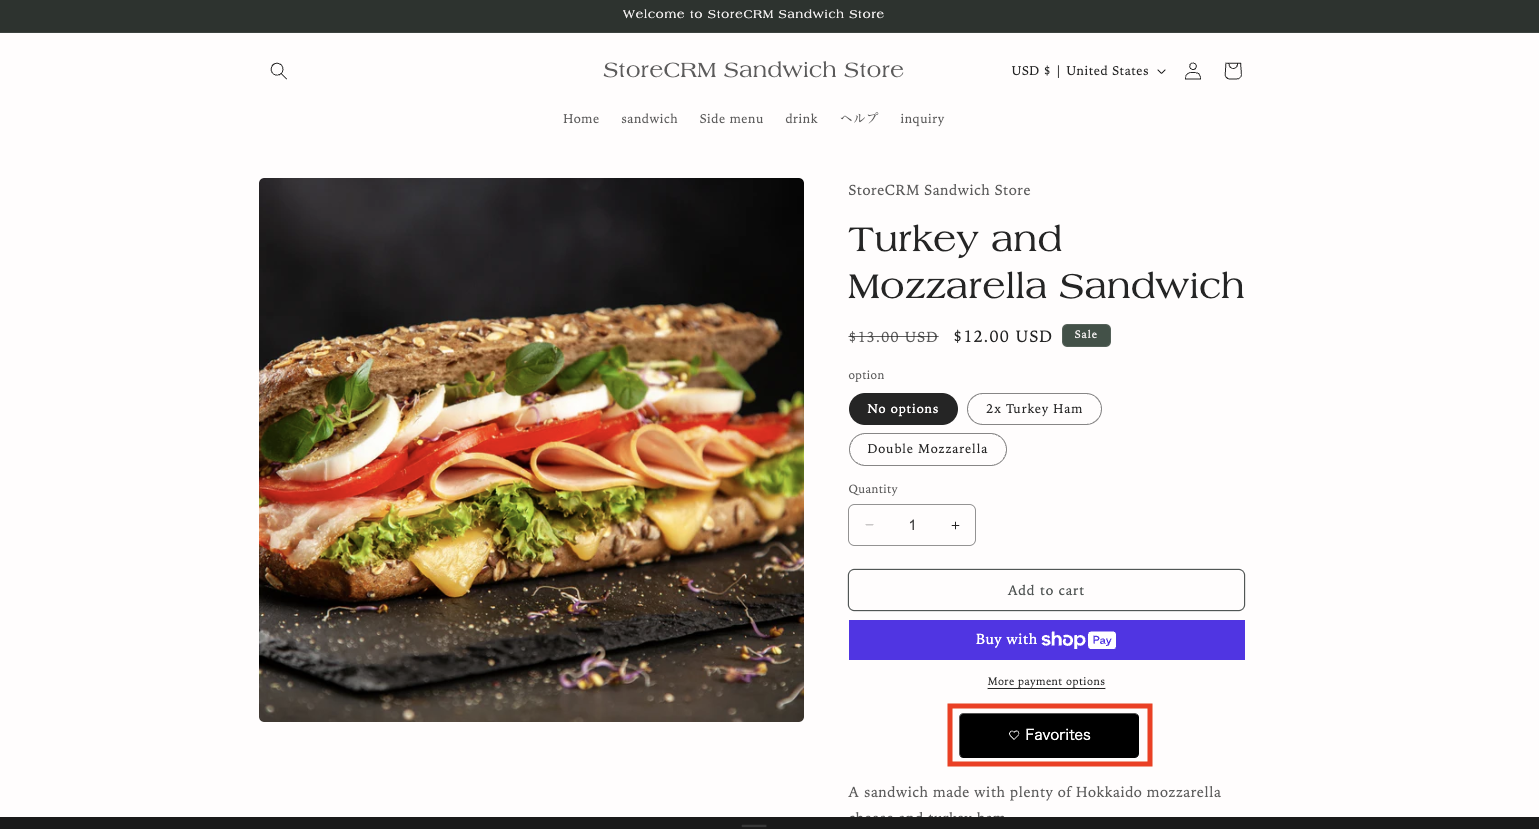
First, let's check the completed screen of the favorite function (favorite button) to be implemented this time.
The button in the red frame is the favorite button.
Open the theme customization screen for the implementation location.
attention (heed)
Since you will be editing the theme in the steps ahead, we recommend that you select "Duplicate" to copy the theme and edit the copied theme if you are unsure.
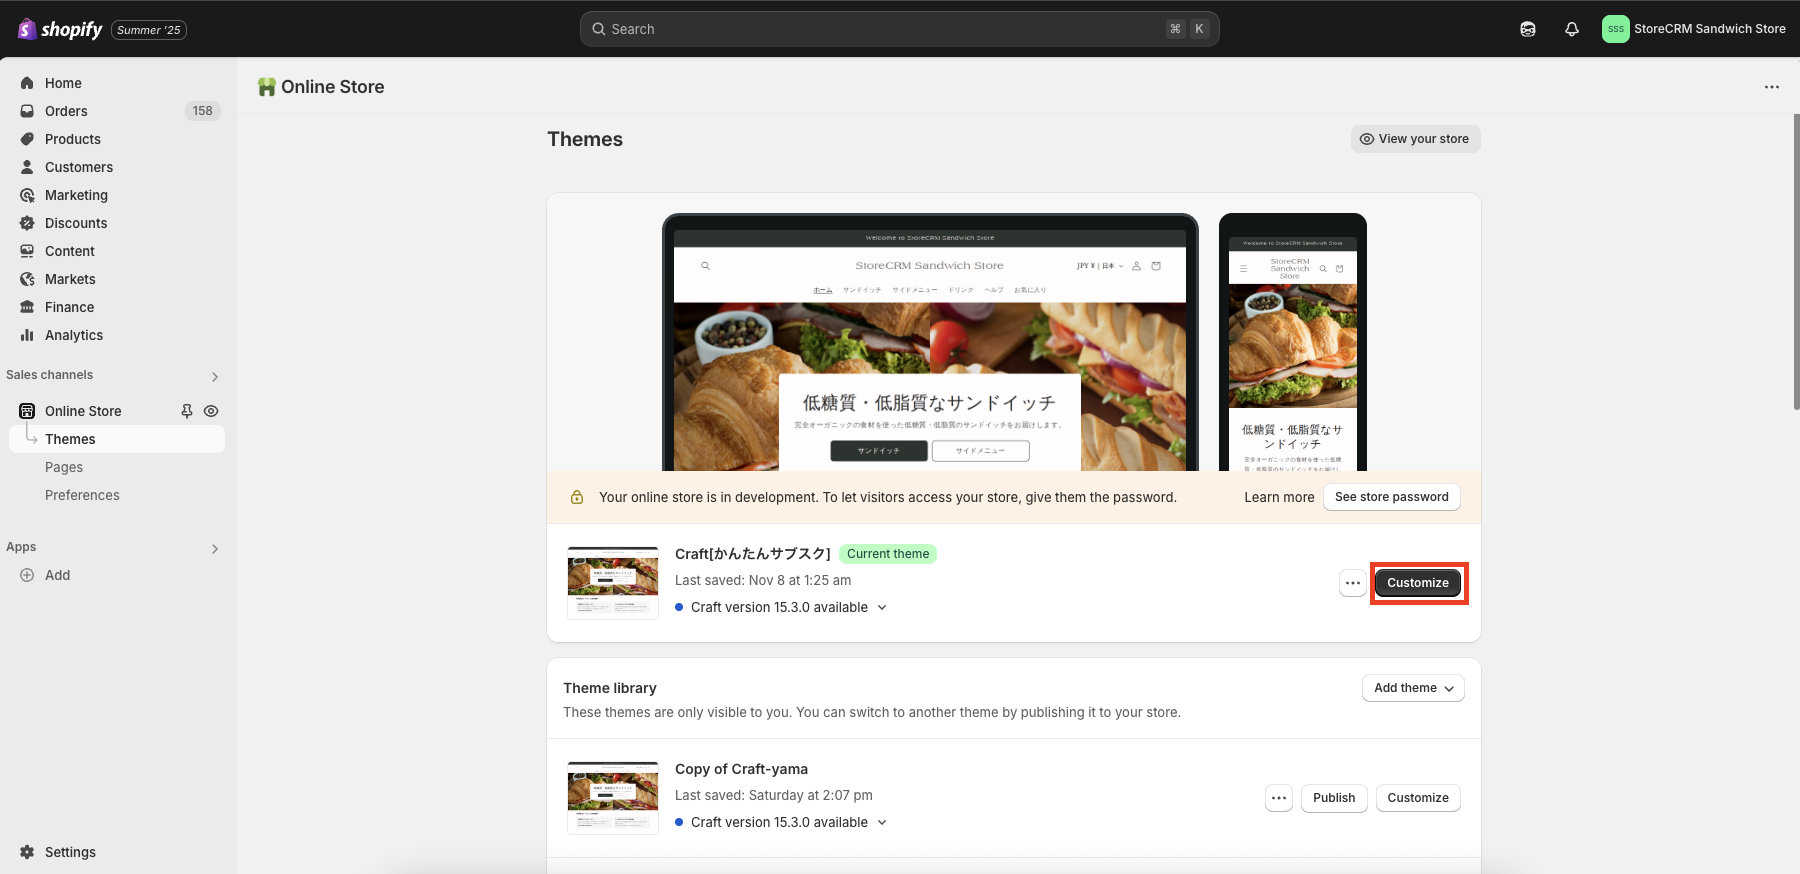
➀Go to [shopify admin] > [Sales Channels] > [Online Store] > [Themes] to open the list of themes.
Click Customize to the right of the theme you wish to edit.
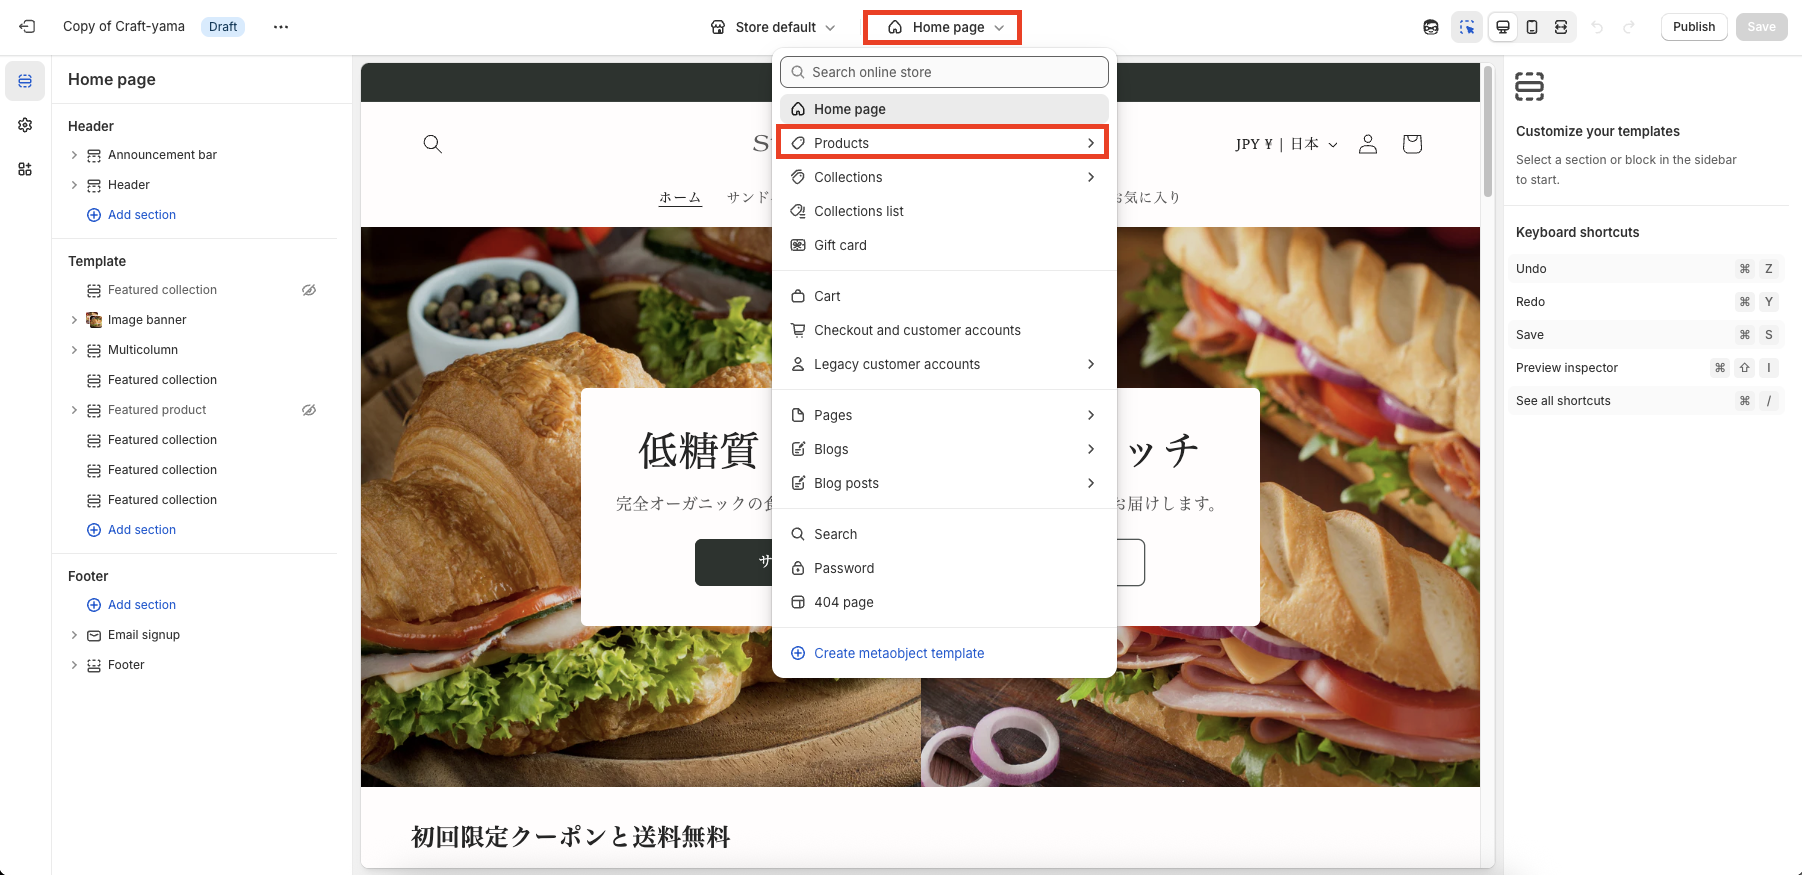
➁Click [Customize] to go to the theme customization screen. In this case, we will edit the product details screen, so click [Home Page] > [Products] at the top of the page.
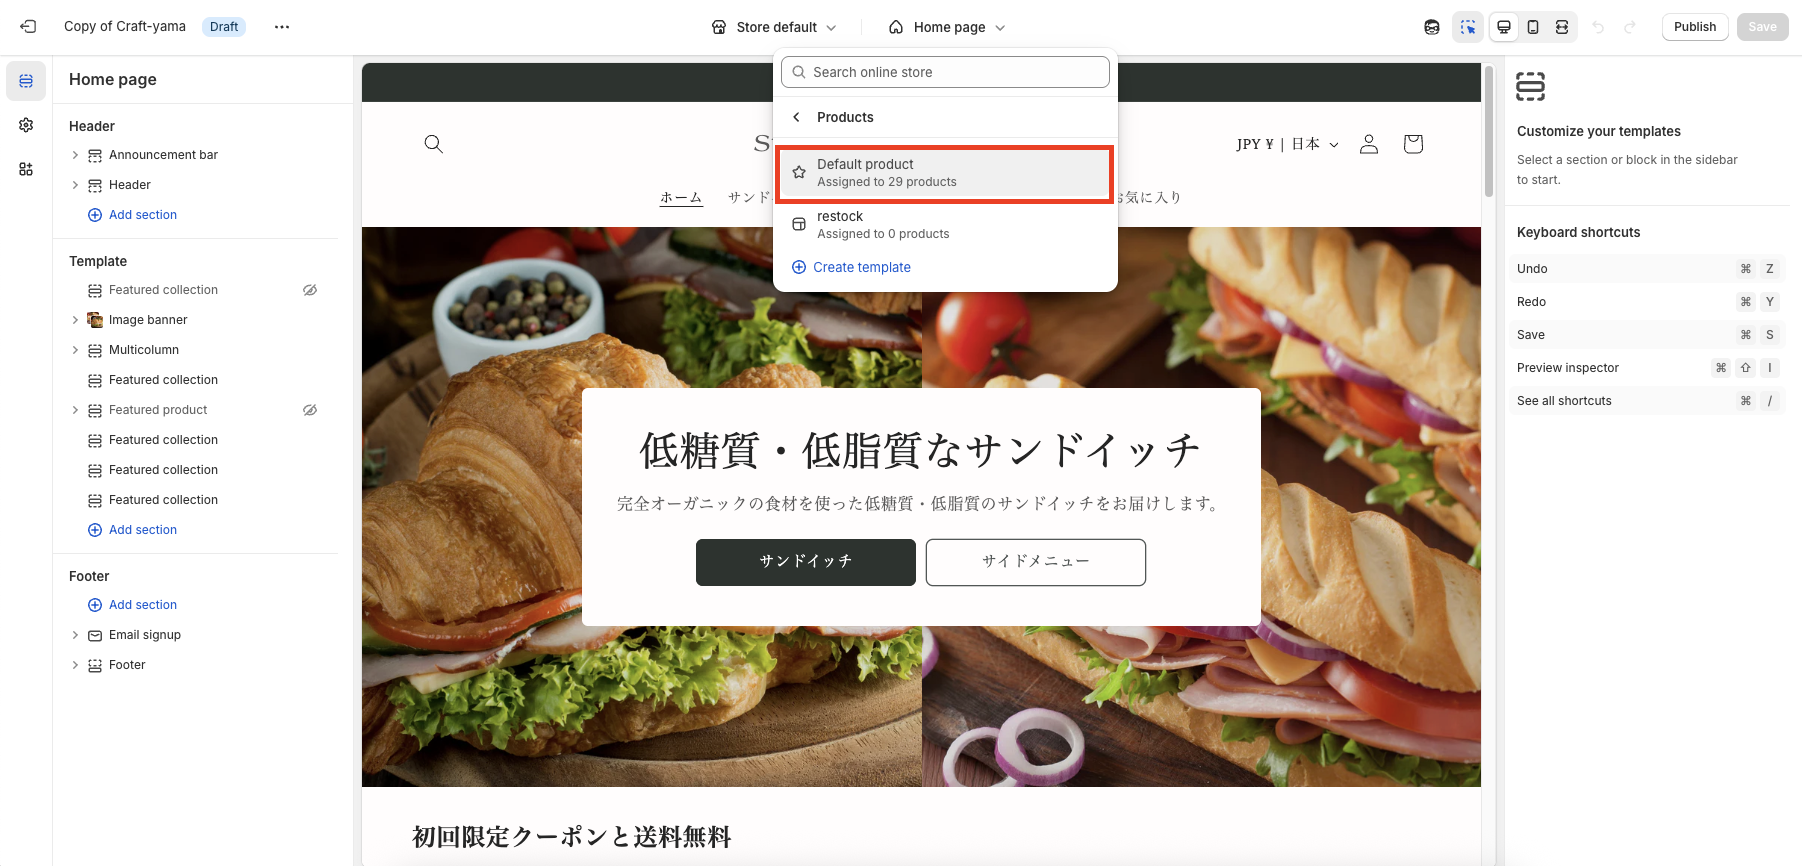
Click [Products] to see the list of templates for product detail pages, and select the template for which you wish to introduce the Favorite Button function.
If you want to apply the favorite button only to specific products, you can create a new template by copying an existing template from [Create Template], and introduce the button to the template you have created. In this case, we will create a template named [Default Products] and apply it.
Add an application block for the favorite function (favorite button)
- No code implementation is required to install the favorite function (favorite button) if you are using Theme 2.0 or later.
- This can be implemented by adding a theme block for the application, which will be explained in this section.
- If you are using Theme 1.0, you will find the following information on the product detail pageAdd codeThe following is a list of the most important factors that need to be taken into account when making a purchase.
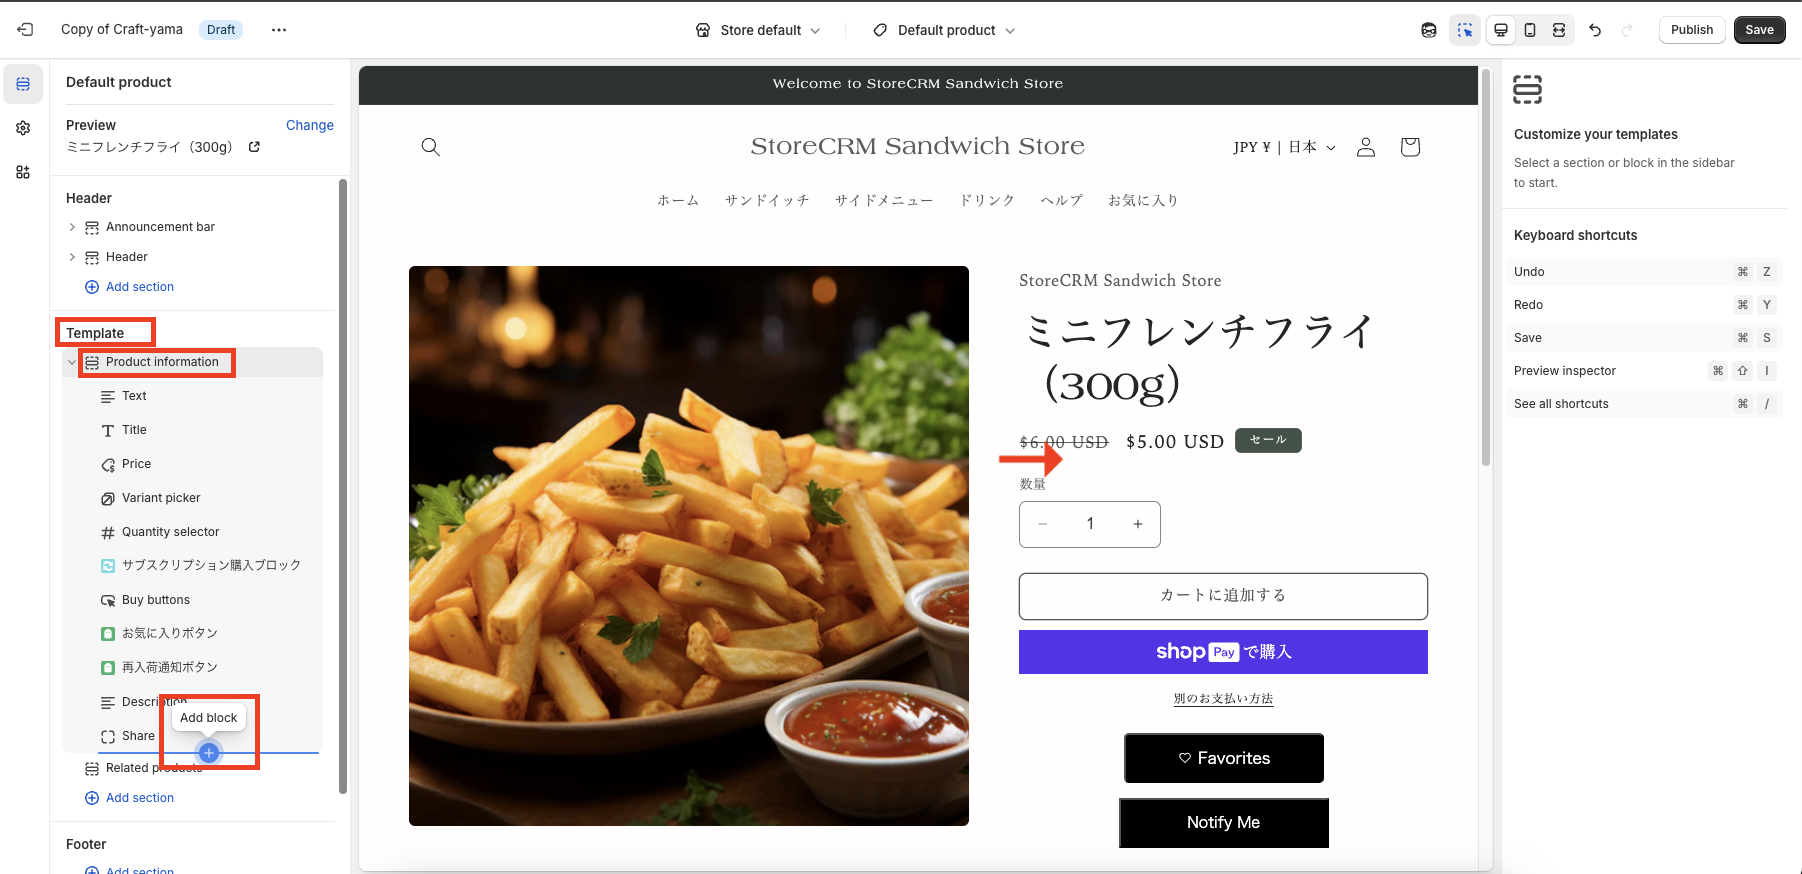
➀First, decide where you want to place the restocking notification button.
This time, we will place it at the bottom of [Product Price]. First, click [Product Information] > [Add Block] in the left menu.
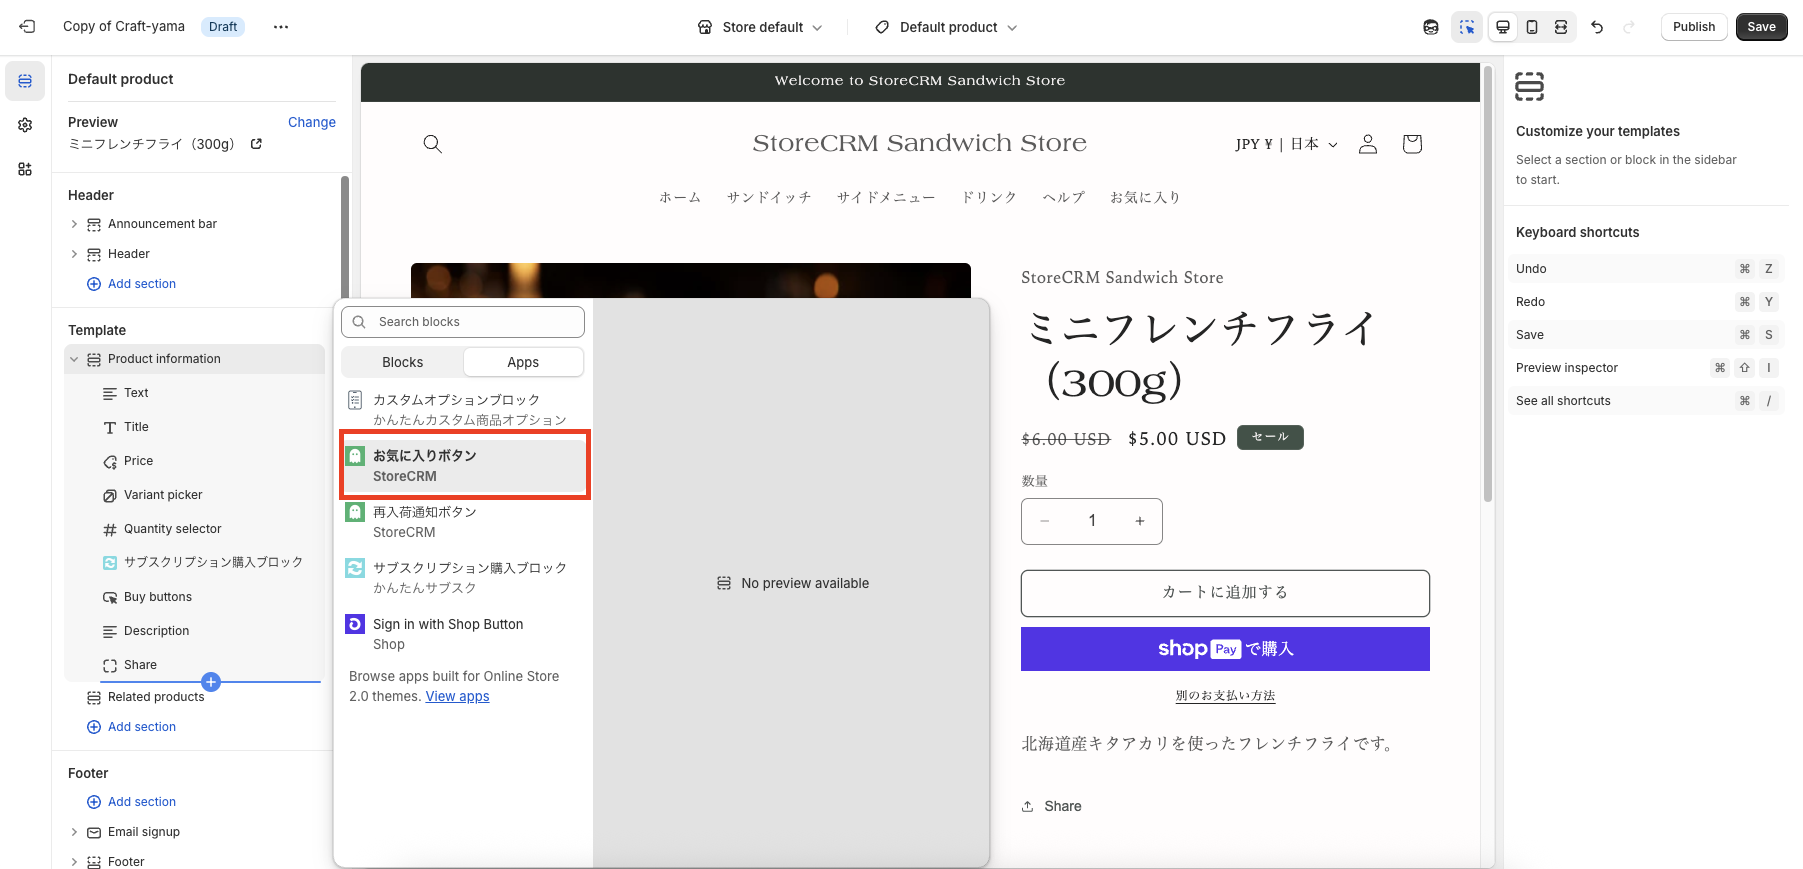
➁The block list will appear, switch the tab at the top to [Block]>[Apps].
In the application, click on the Favorites and Restock Notification button.
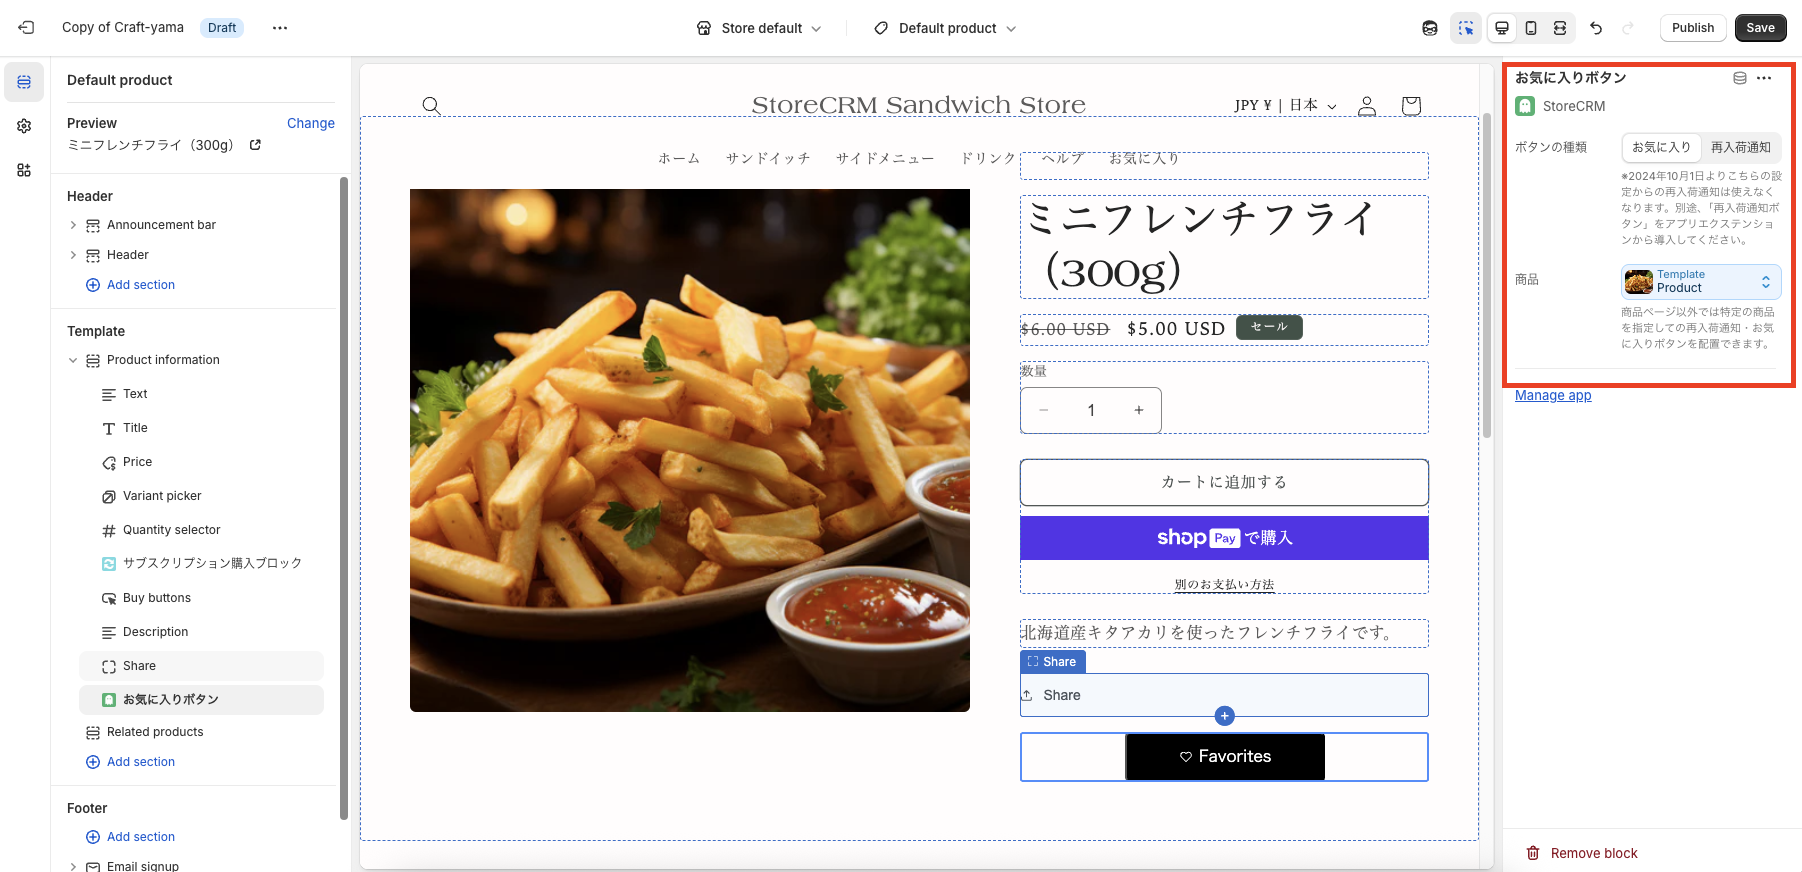
(3) If the item is successfully added, you will see a block of [Favorite/Restock Notification Button] at the bottom of [Product Information], so click on it.
The block settings screen will then appear, and confirm that the "Button Type" is set to "Favorite.
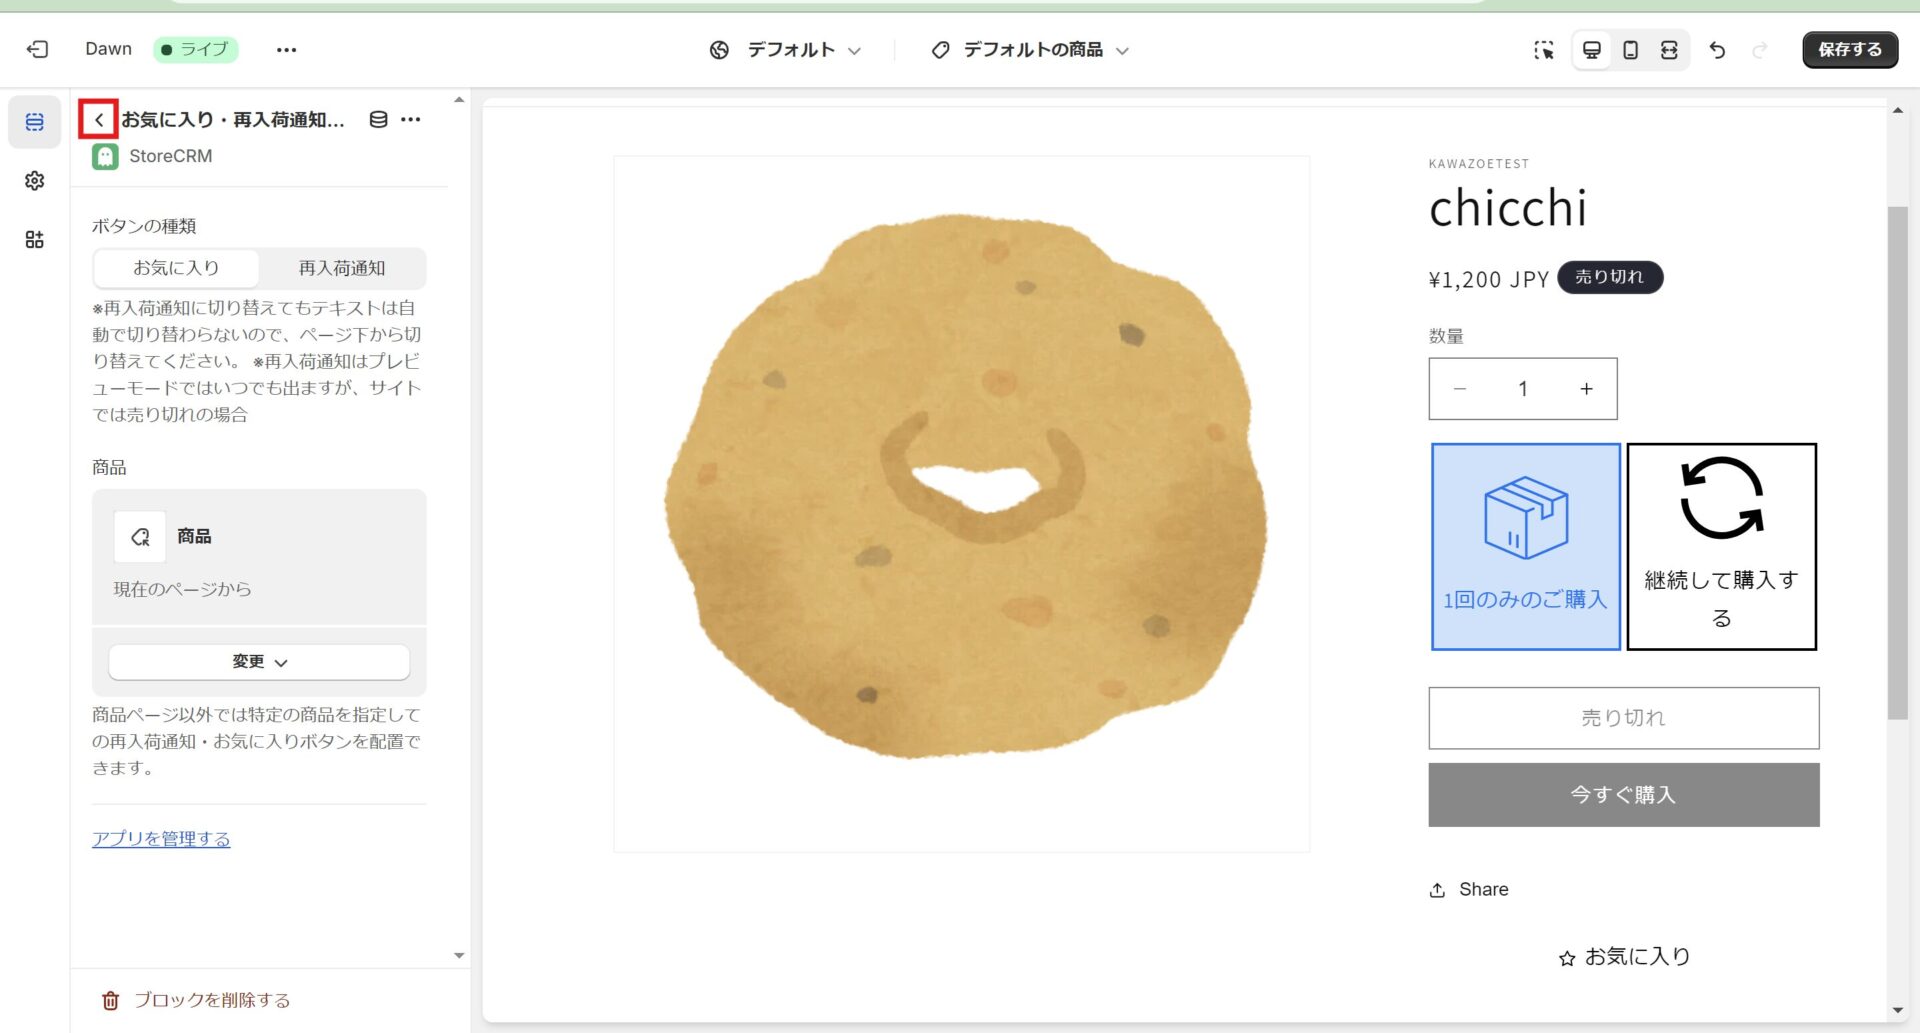
(4) Click the Back button to the left of [Favorites, Restock Notification...].
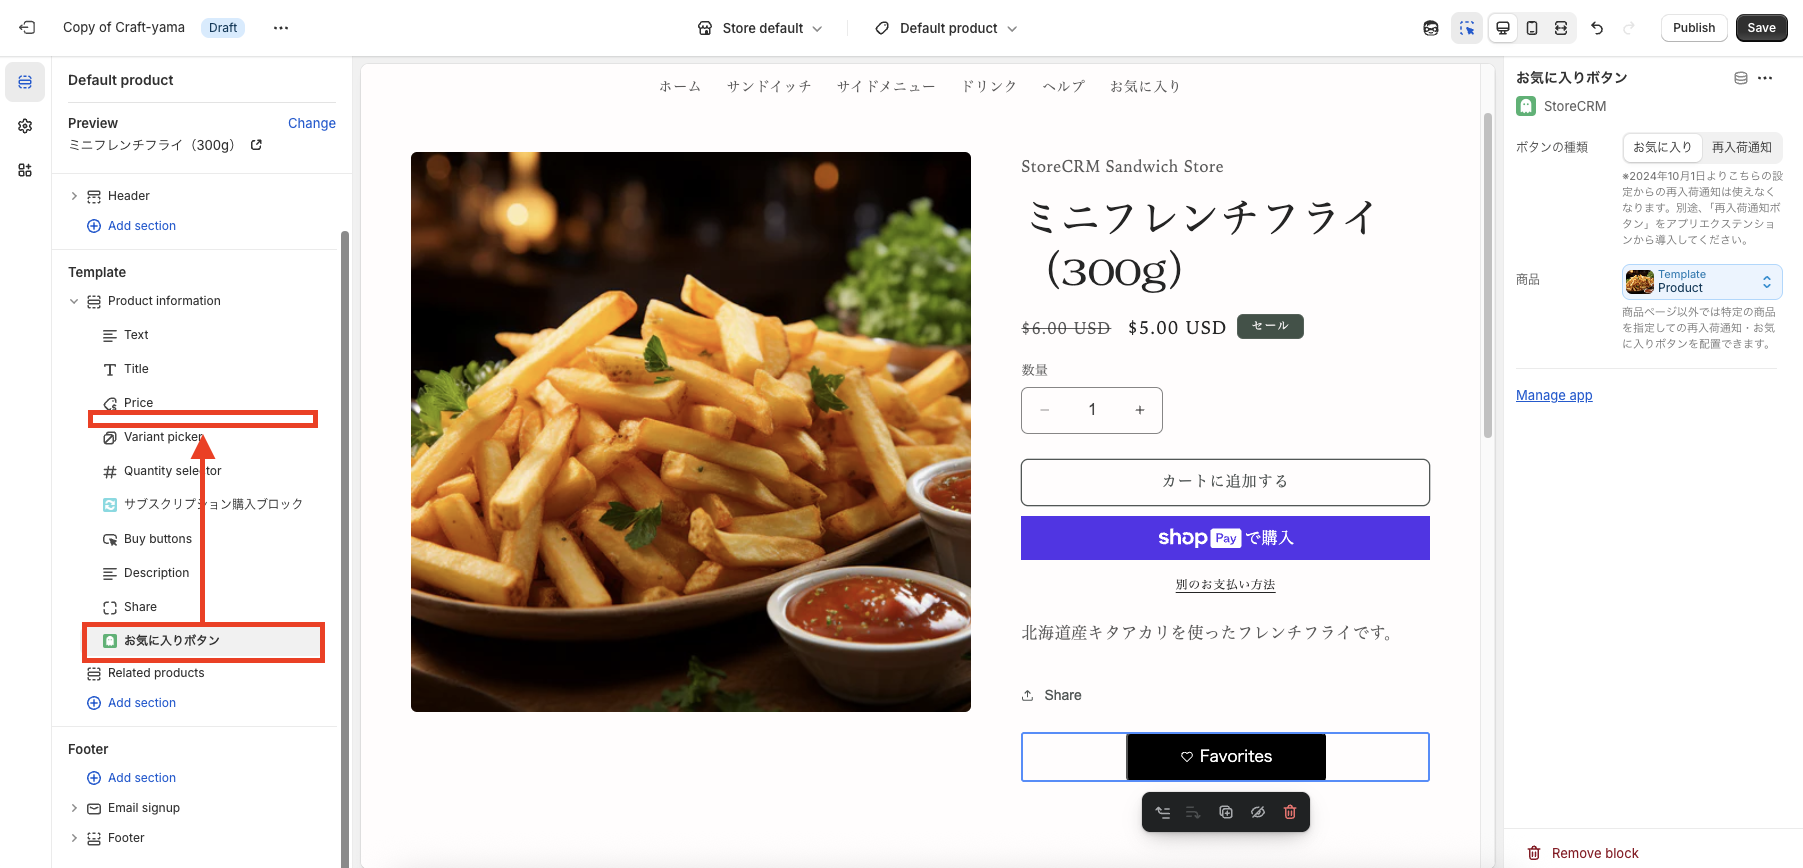
(5) Return to the Block List screen, and drag and drop the [Favorite/Restock Notification Button] at the bottom of the screen to move it under [Product Price].

(6) Make sure that the favorite button appears where you want it to appear and click the Save button.
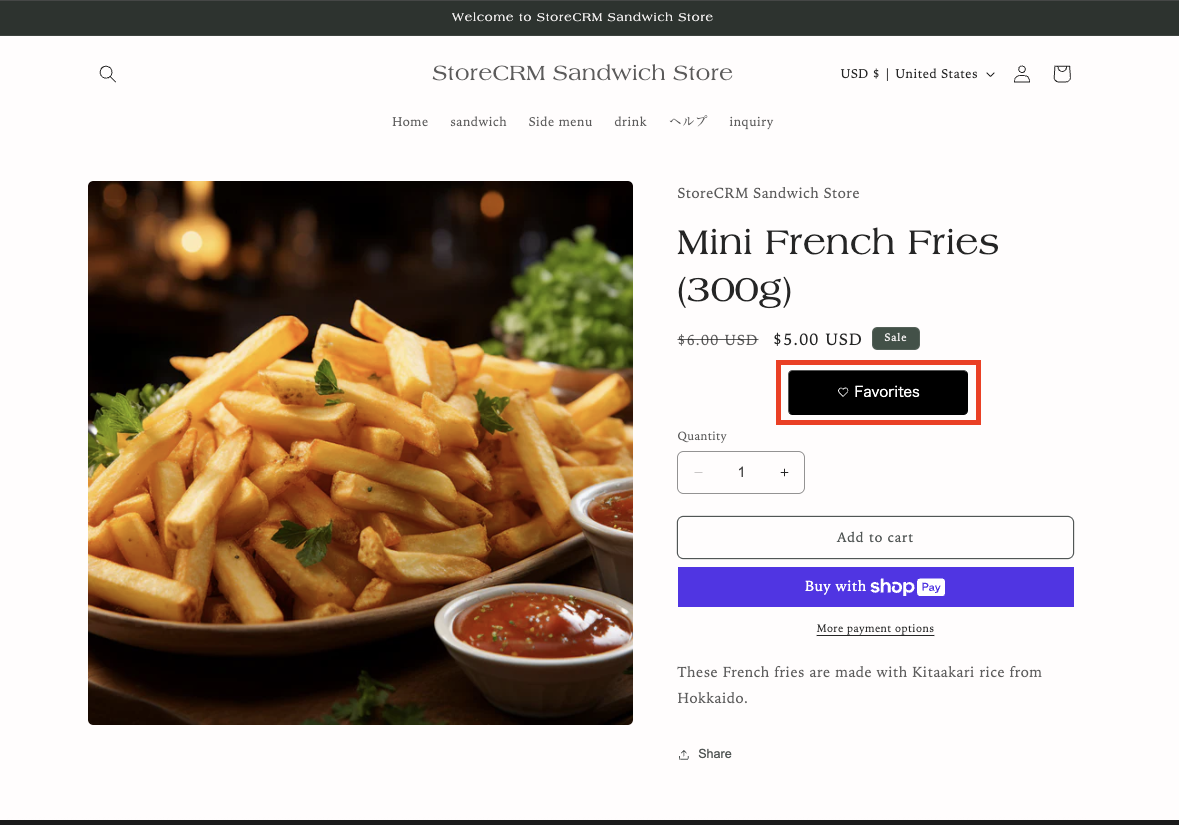
(7) Access the actual product page and confirm that the display switches to the favorite button by clicking it, and that it remains in the same state even after reloading the screen. This completes this section.
If the "Favorite" button is not displayed, please reconfirm that you have performed steps (1) through (6) correctly.
If you are using Theme 1.0
- If you are using Theme 1.0, please add the following code to the product detail page
- The product detail page can be found by clicking Shopify > [Sales Channels] > [Online Store] > [Themes] > [Edit Code] > search for "product".
- The file name depends on the Shopify theme you are using. Usually it is main-product.liquid, etc., but if you have a product.json file, it will be the filename.liquid written in the contents of that file.
- To find where to add it, for example, above the [add to cart] button, search for "buy-button" and so on.
To add only favorite icons
<div class="storecrm-button" data-type="wishlist-button" data-product-id="{{ product.id }}" data-variant-id="{{ product.variants[0].id }}" data-product-tags="{{ product.tags | json | escape }}" data-variants="{{ product.variants | json | escape }}"></div>To add labels such as favorite icon + favorite
<div class="storecrm-button" data-type="wishlist-button" data-product-id="{{ product.id }}" data-variant-id="{{ product.variants[0].id }}" data-product-tags="{{ product.tags | json | escape }}" data-no-label data-variants="{{ product.variants | json | escape }}"></div>3. introduction of a favorite function (favorite list screen)
Goal of this item
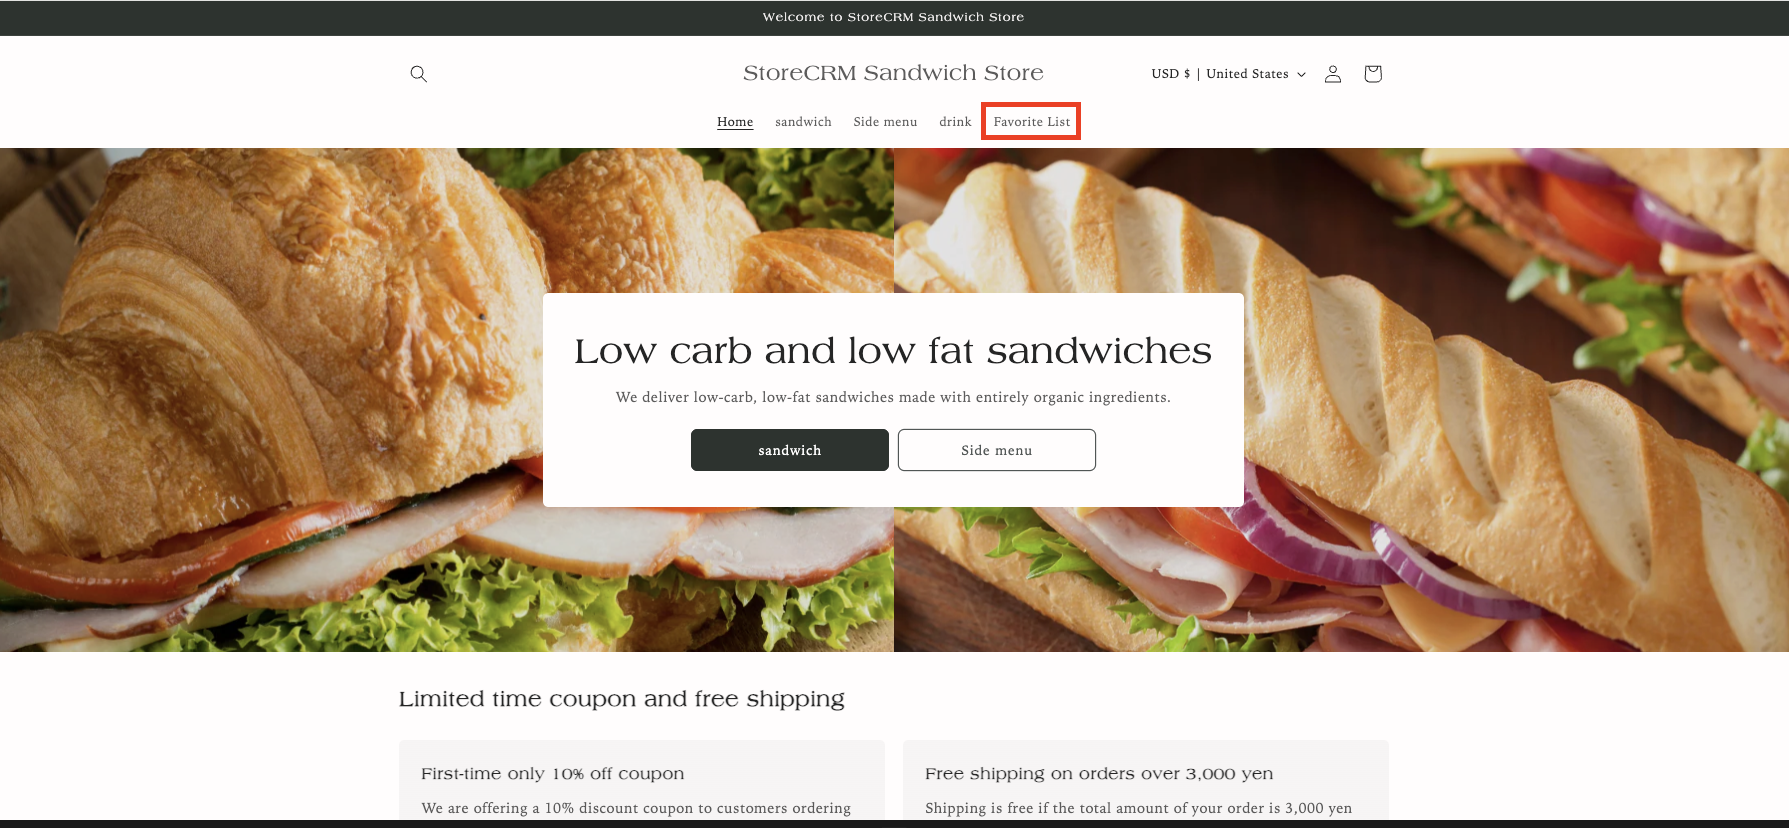
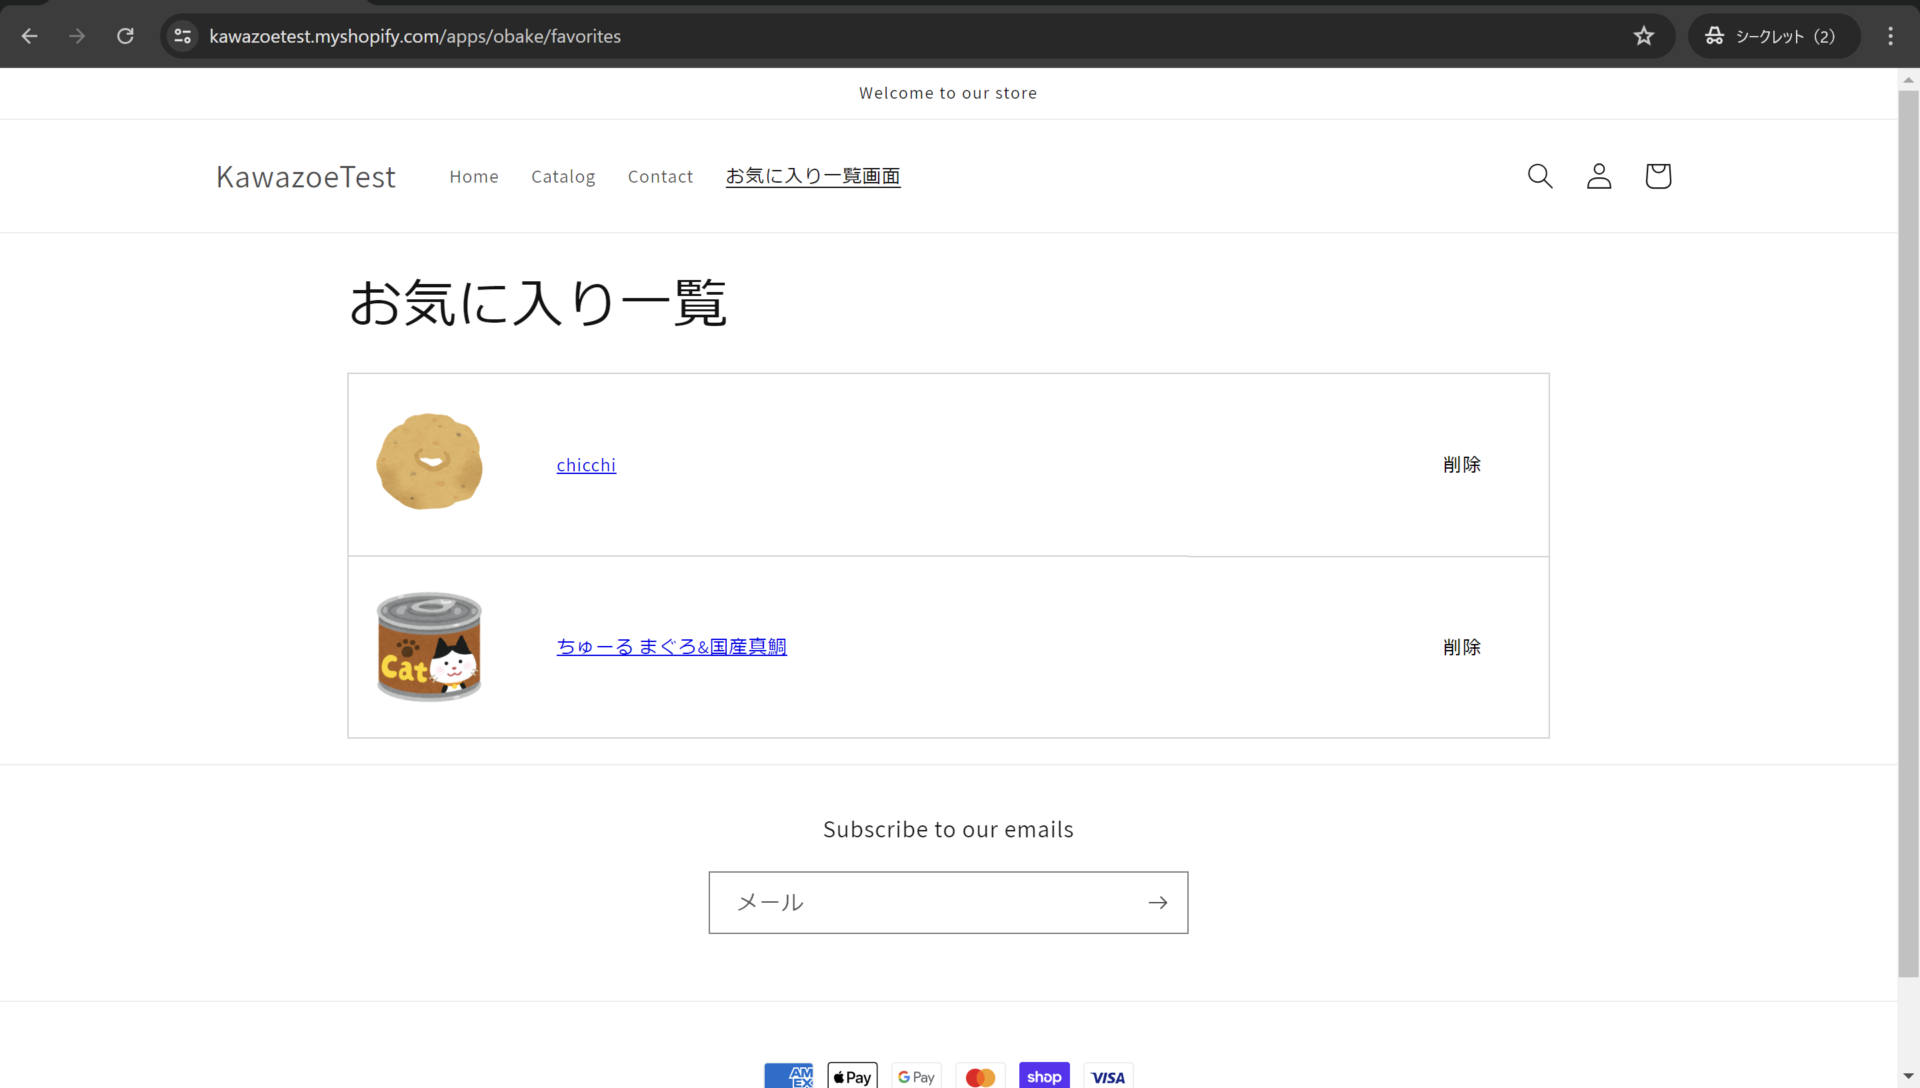
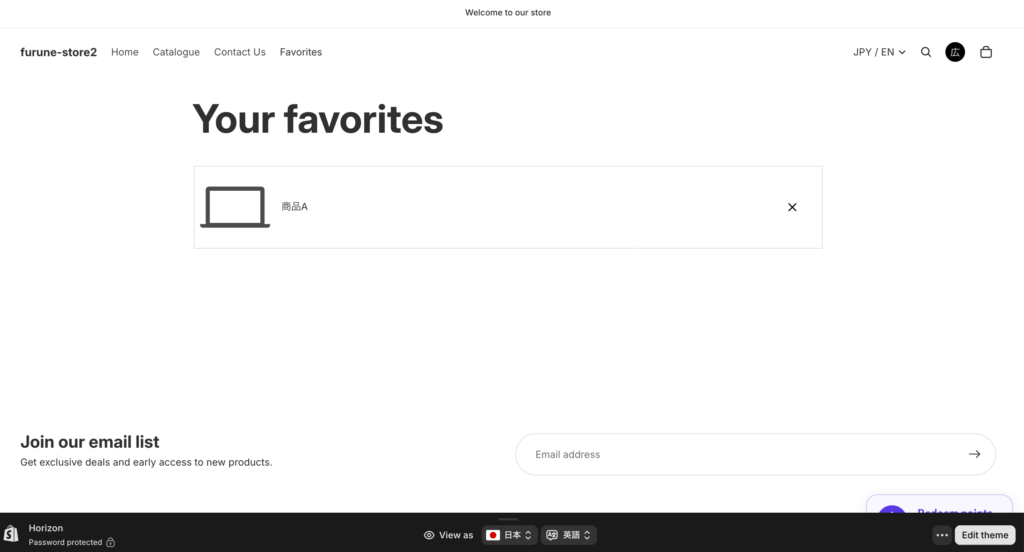
First, let's check the completed screen of the favorite function (favorite list screen) to be implemented this time.
The favorite list screen is automatically generated by the application, and can be introduced simply by setting the URL specified by the application in the menu, etc.
This time, we will introduce a menu item named "Favorite List" in the header menu.
Set the URL of the favorite list screen in the header menu
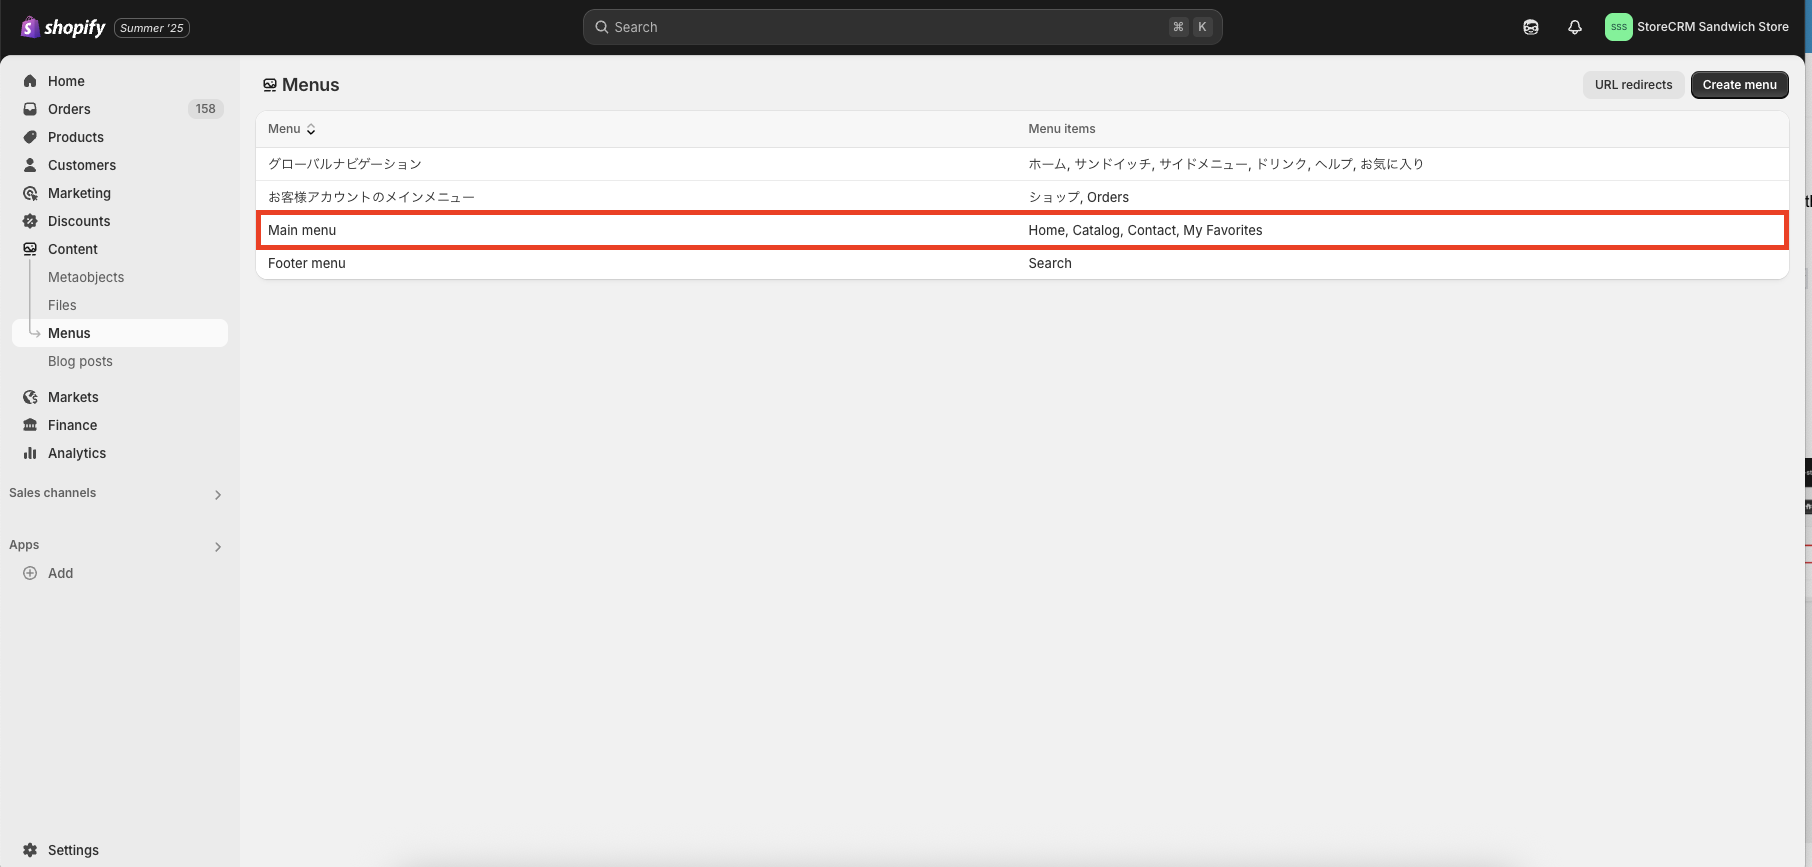
➀Open the menu list from [shopify admin] > [Contents] > [Menu].
This time, click on "Main menu" to add a link to the menu in the header.

➁[Click on "Add Menu Item.
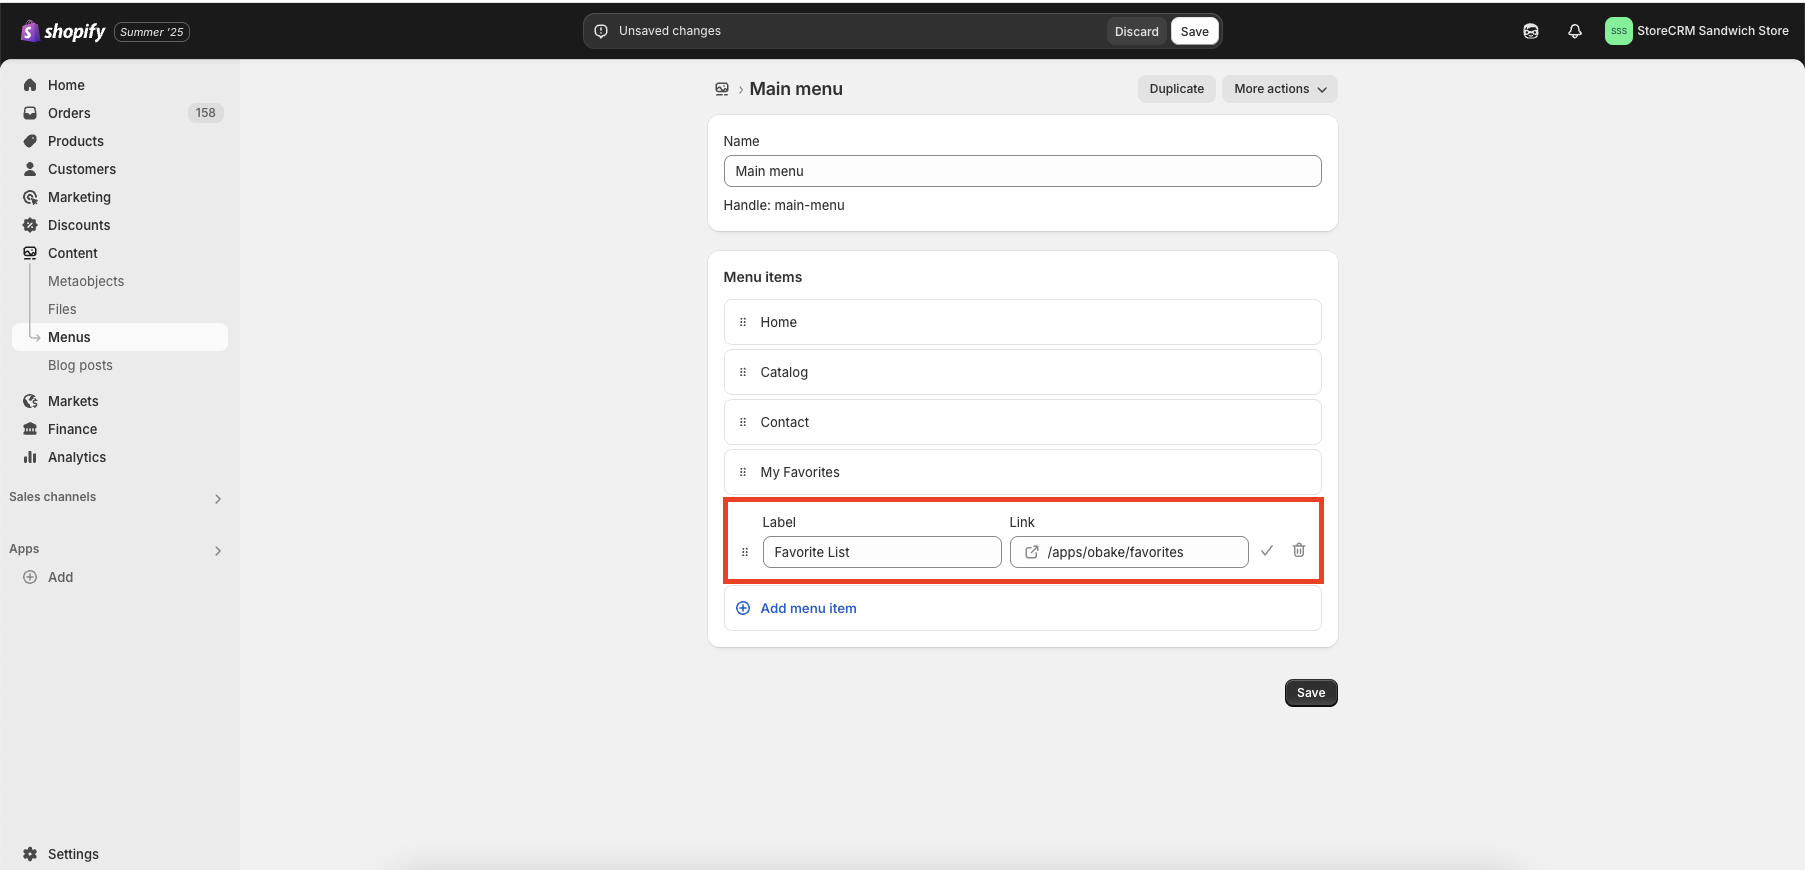
(iii)Enter the name and link in the fields that appear.
You can use any name you like, but in this case, enter [Favorite List Screen].
Enter the following for the URL. Click "Add" when you are finished.
/apps/obake/favorites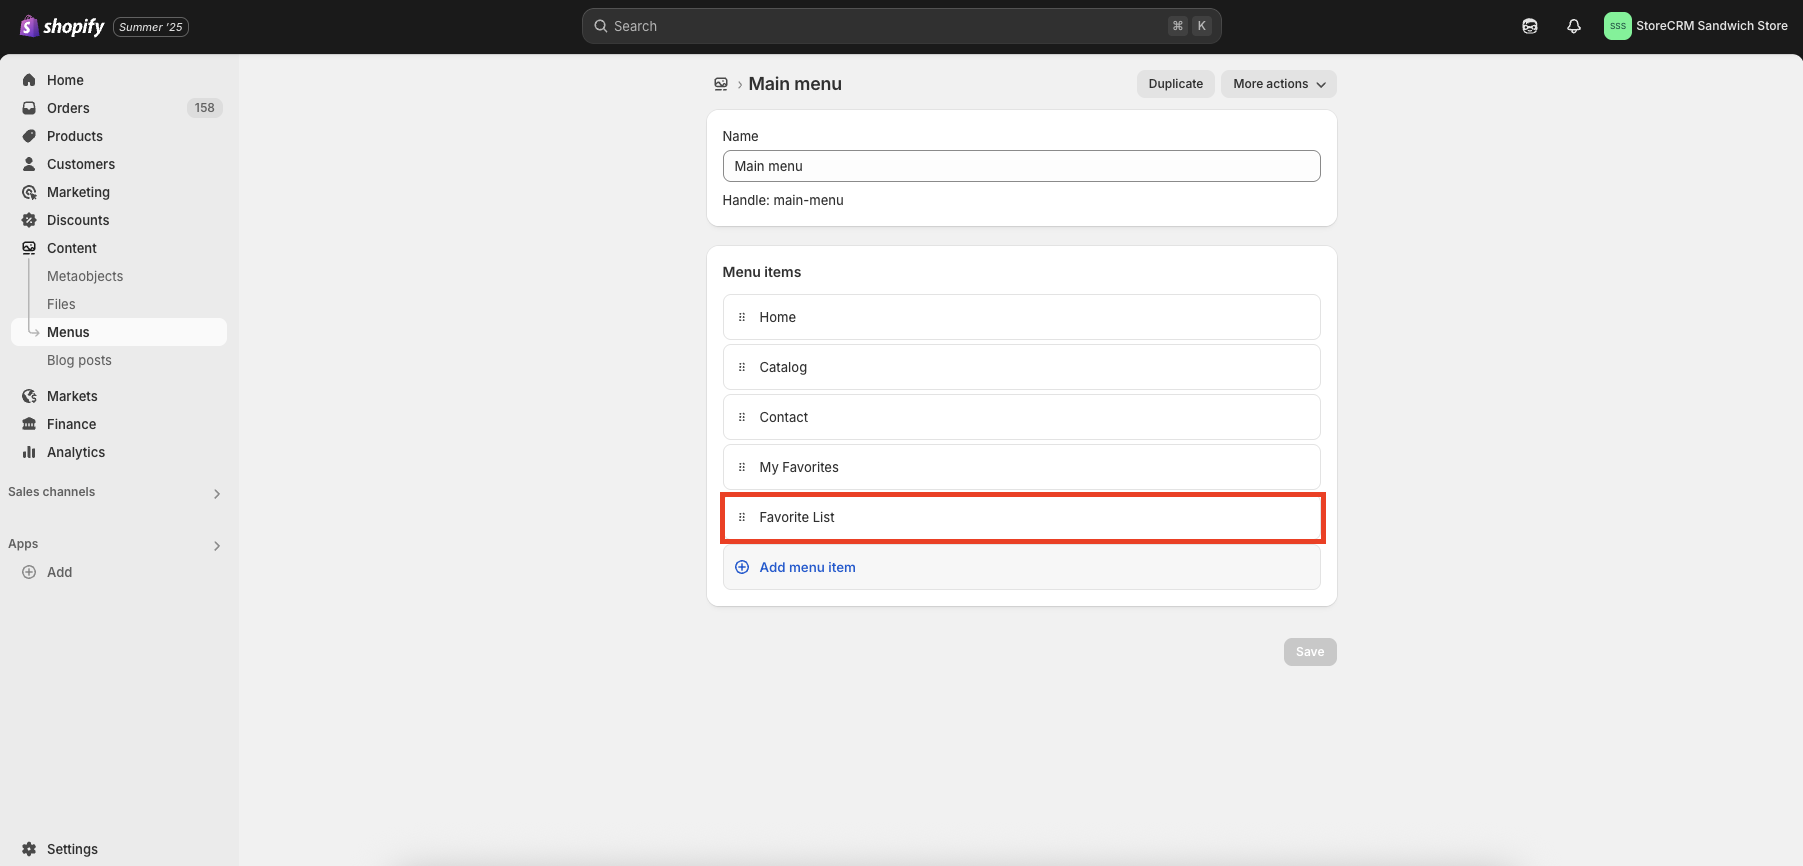
4)Make sure the name of the menu item you just added is added and click "Save" at the top of the screen.

5)Access the home page and confirm that the menu you have set up has actually increased and that you can actually click on the link to go to the list of favorites screen. This completes this section.
If the "Favorite" button is not displayed, please reconfirm that you have performed steps (1) through (4) correctly.
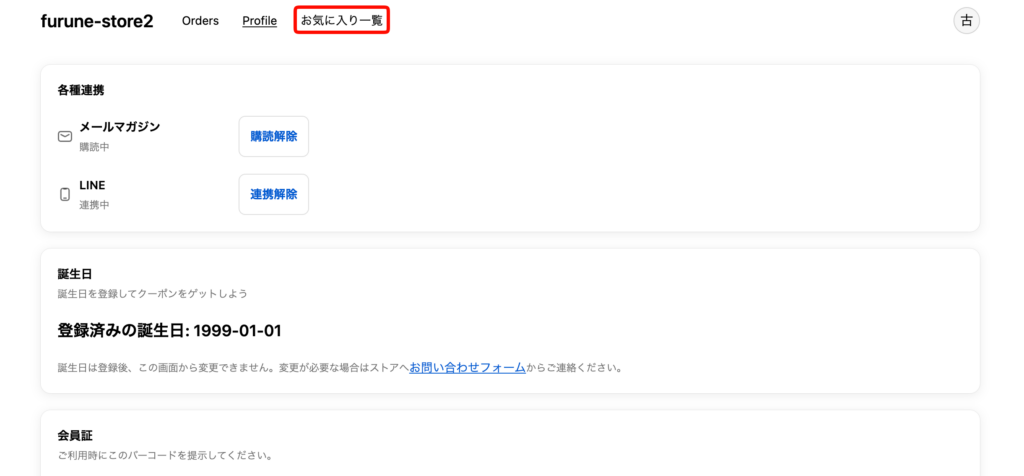
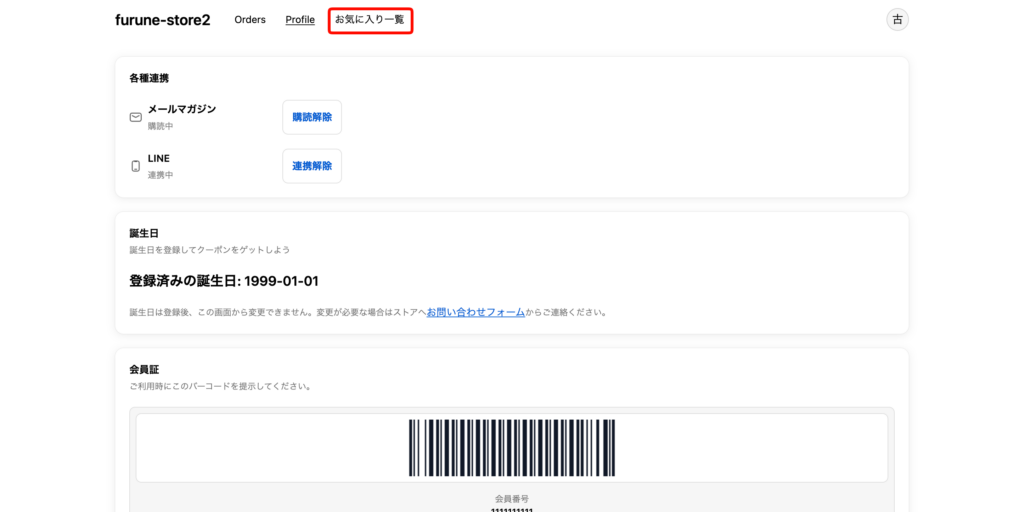
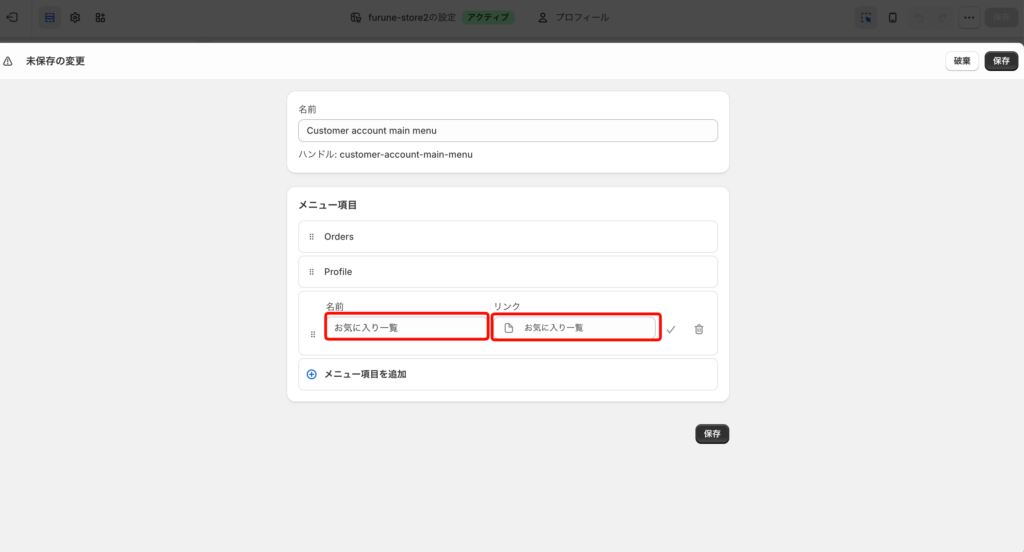
新しいお客様アカウントのヘッダーメニューにお気に入り一覧を追加する
新しいお客様アカウントを利用している場合は、お客様アカウントのヘッダーメニューにもお気に入り一覧画面へのリンクを追加できます。
マーケットを複数設定している場合は、次項の「マーケットごとにお気に入り一覧画面のURLを切り替える」の設定を行ってください。
Goal of this item
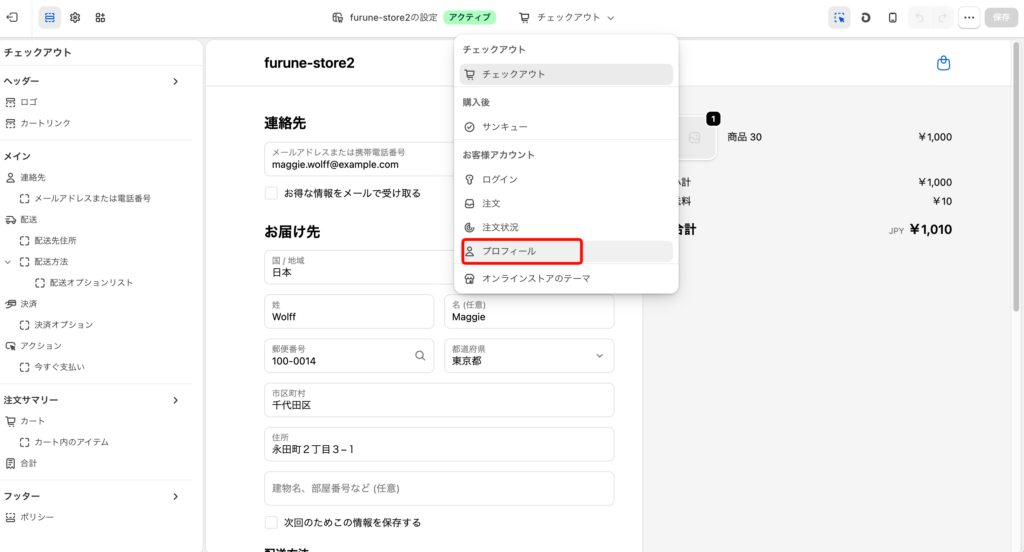
①[Shopify管理画面]>[設定]>[チェックアウト]を開き、[設定]の[編集]をクリックします。
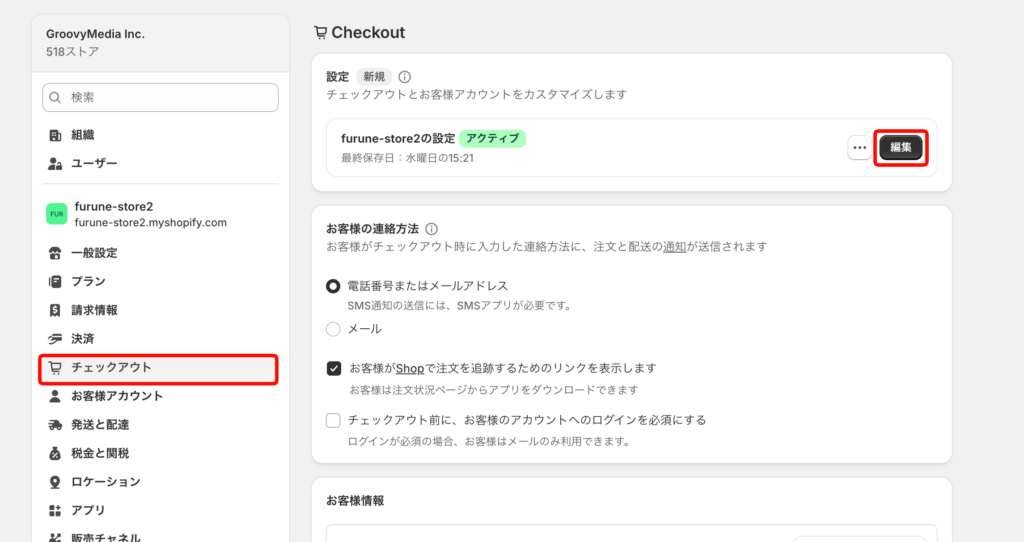
②編集画面上部にあるページ選択メニューから[プロフィール]を選択します。
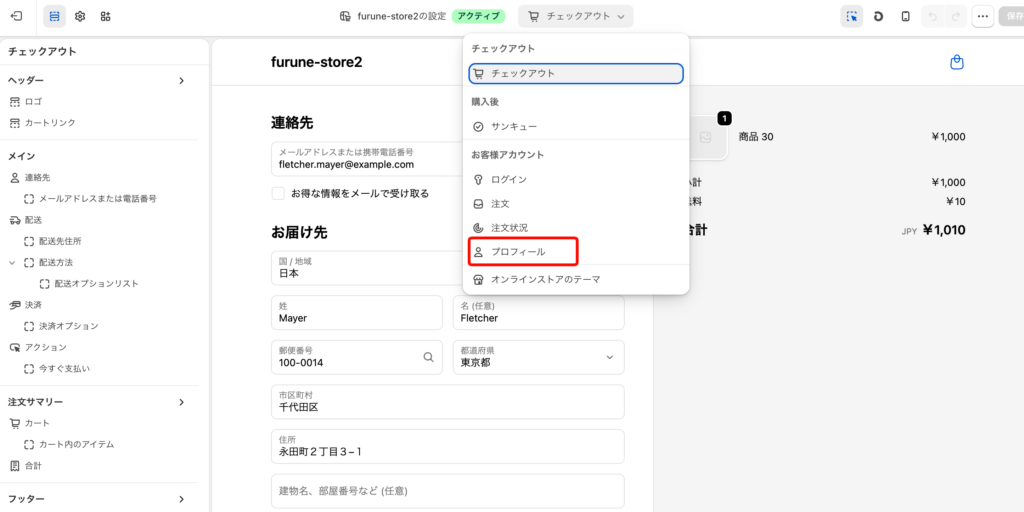
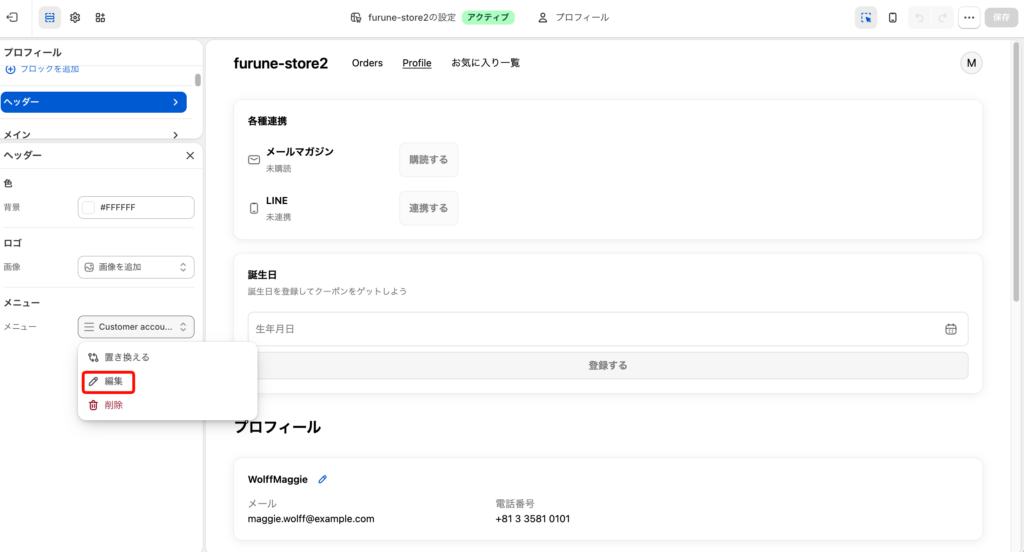
③左側から[ヘッダー]をクリックし、ヘッダーに設定されているメニューをクリックします。
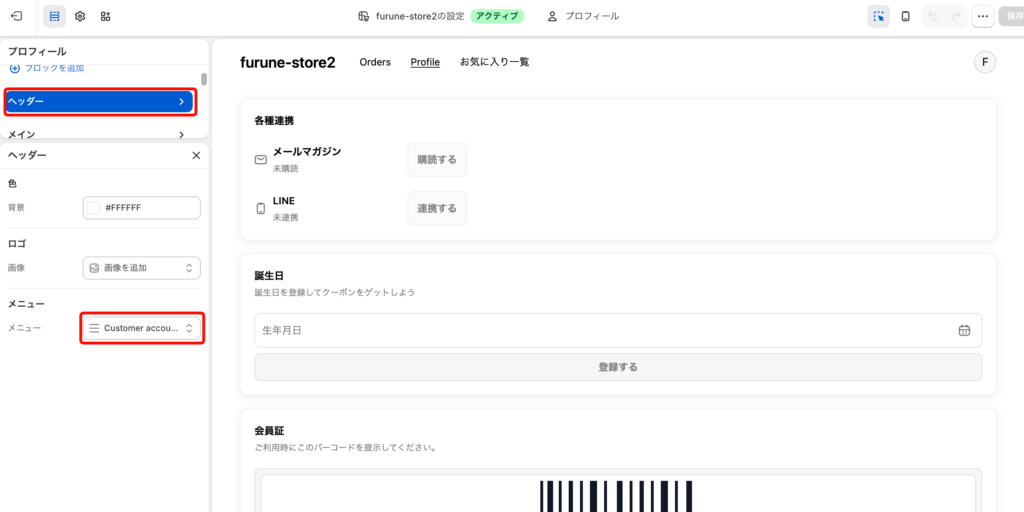
④「編集」をクリックします。
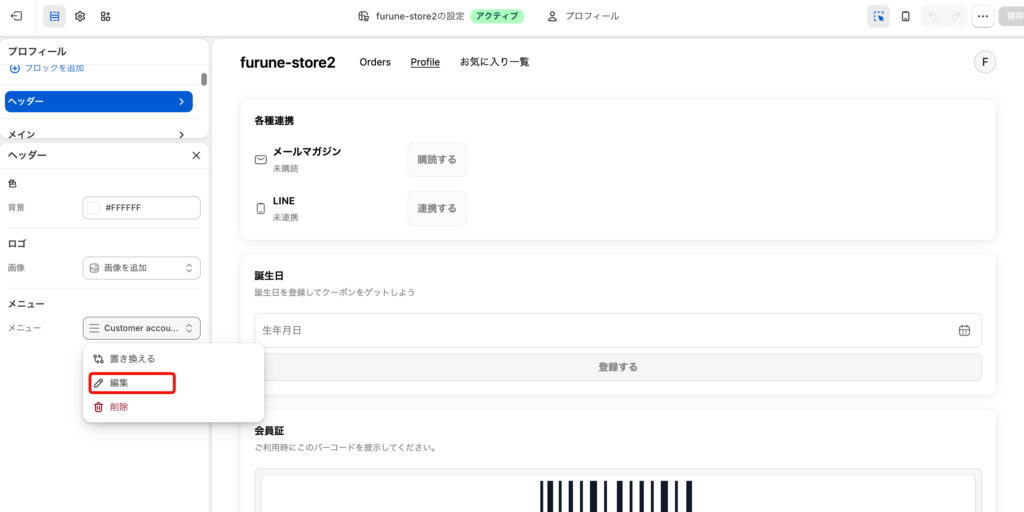
⑤[メニュー項目を追加]をクリックします。
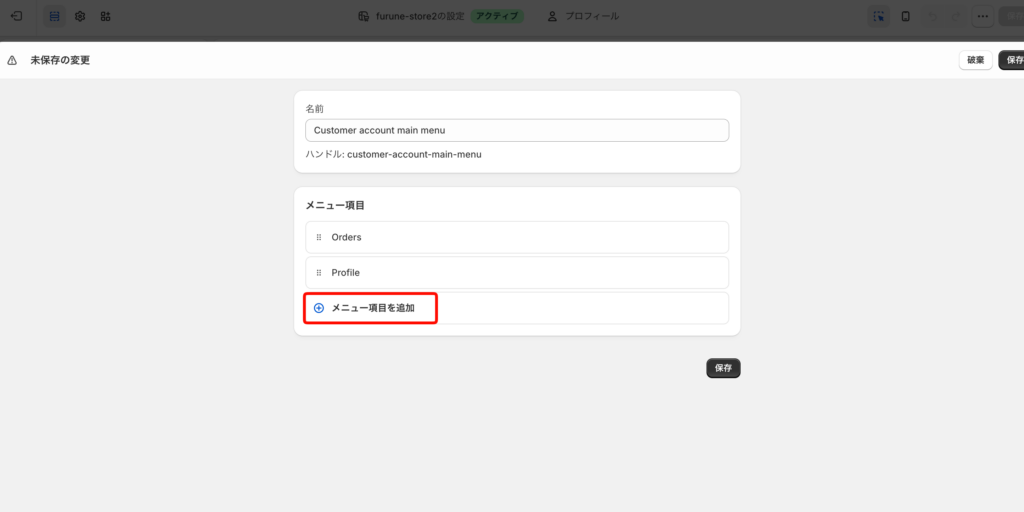
⑥名前とリンクを入力し、保存します。
名前は任意ですが、今回は[お気に入り一覧]と入力します。
リンクには以下のURLを入力します。
/apps/obake/favorites
⑦実際に新しいお客様アカウントへログインし、ヘッダーメニューに[お気に入り一覧]が表示されること、クリックするとお気に入り一覧画面へ遷移することを確認してください。
マーケットごとにお気に入り一覧画面のURLを切り替える
Shopify Marketsで複数のドメインや言語を設定している場合、/apps/obake/favoritesを直接設定する方法では、表示中の言語に対応するお気に入り一覧ページが表示されません。
以下の手順でリダイレクト用のページを作成すると、現在表示しているマーケットのURLに合わせてお気に入り一覧画面へ遷移できます。
なお、お気に入り機能の多言語設定については「お気に入り機能・再入荷通知機能の多言語対応」for more information.
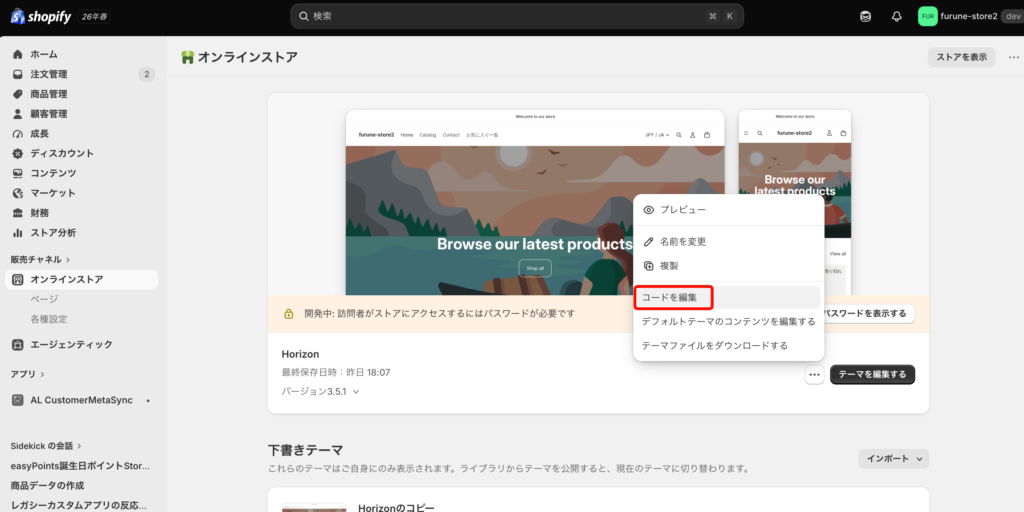
①[Shopify管理画面]>[販売チャネル]>[オンラインストア]>[テーマ]からテーマ一覧を開き、編集するテーマのメニューから[コードを編集]をクリックします。
※注意:公開中のテーマを編集する場合は、編集前にテーマを複製してバックアップを取ることをおすすめします。
(2)sectionsディレクトリに新しいファイルを作成します。ファイル名は任意ですが、今回はfavorites-list-redirect.liquidとします。

③作成したファイルに以下のコードを入力し、保存します。
{% assign root_url = routes.root_url %}
{% assign last_char = root_url | slice: -1 %}

{% unless last_char == '/' %}
  {% assign root_url = root_url | append: '/' %}
{% endunless %}

{% assign redirect_url = root_url | append: 'apps/obake/favorites' %}

<script>
  window.location.replace({{ redirect_url | json }});
</script>4)templatesディレクトリに新しいファイルを作成します。ファイル名は任意ですが、今回はpage.favorite-list-redirect.jsonとします。
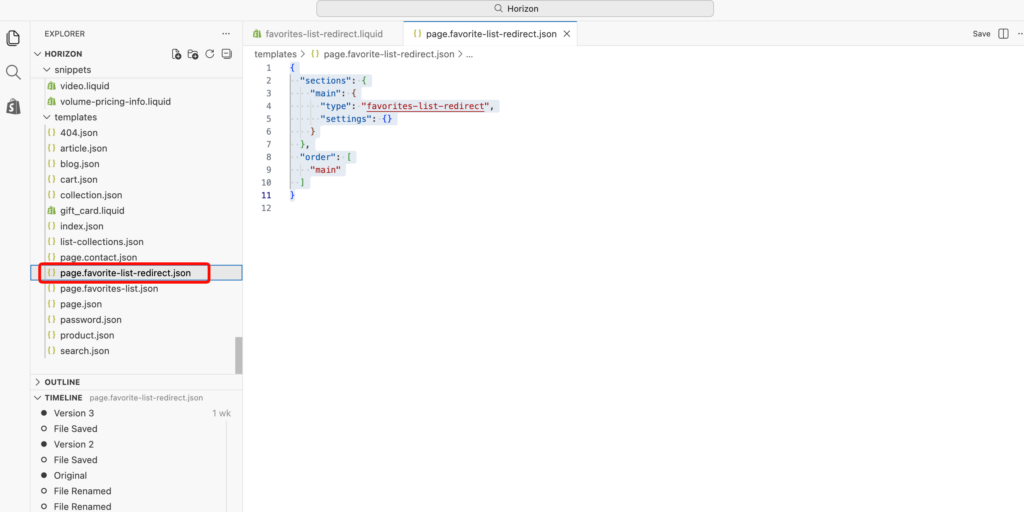
⑤作成したファイルに以下のコードを入力し、保存します。
{
  "sections": {
    "main": {
      "type": "favorites-list-redirect",
      "settings": {}
    }
  },
  "order": [
    "main"
  ]
}
⑥[Shopify管理画面]>[販売チャネル]>[オンラインストア]>[ページ]から[ページを追加する]をクリックします。
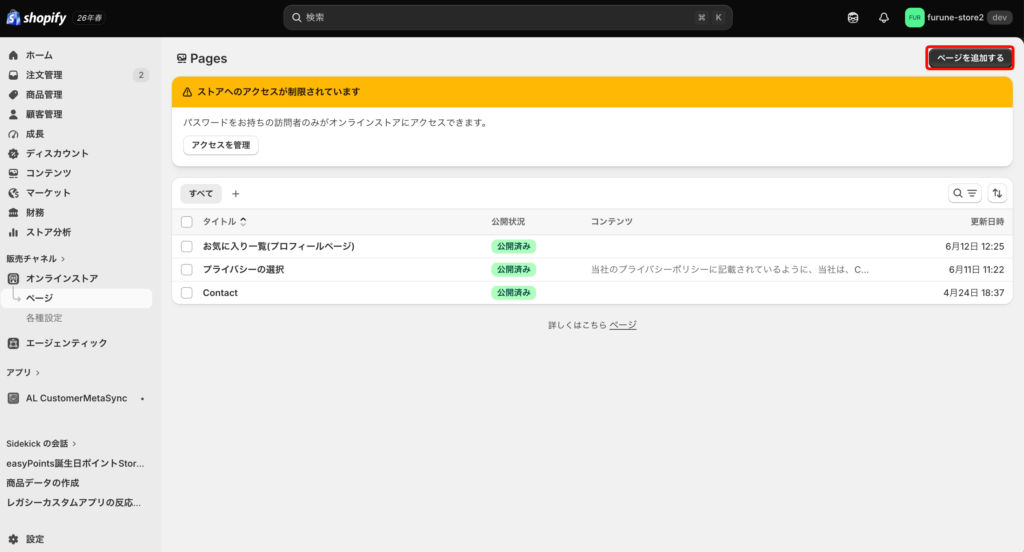
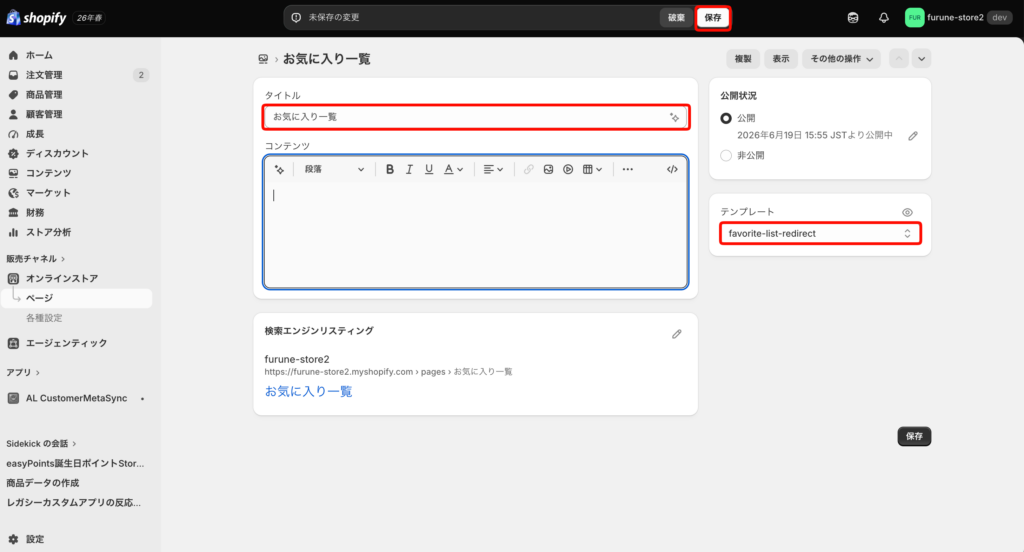
⑦ページのタイトルに任意のタイトルを入力し、テンプレートから先ほどコード編集から追加した[favorite-list-redirect]を選択し、保存します。
⑧[Shopify管理画面]>[設定]>[チェックアウト]からお客様アカウントの[編集]をクリックし、ページ選択メニューから[プロフィール]を選択します。
⑨左側から[ヘッダー]をクリックし、ヘッダーに設定されているメニューをクリックした後、編集をクリックします。
⑩[メニュー項目を追加]をクリックします。
⑪名前とリンクを入力し、保存します。
名前は任意ですが、今回は[お気に入り一覧]と入力します。
リンクには先ほど作成したページ「お気に入り一覧」を設定します。
⑫各マーケットのストアへアクセスして新しいお客様アカウントへログインし、ヘッダーメニューの[お気に入り一覧]をクリックします。表示中のマーケットに対応したドメインまたは言語のパスでお気に入り一覧画面へ遷移することを確認してください。
4. customize favorite buttons and favorite list screen
Customize favorite buttons and favorite list screen
StoreCRM provides a simple, unobtrusive favorite button and favorite list screen as standard in any store. However, if you want to customize the design down to the smallest detail, or if you want your favorite buttons to stand out more, you can customize the look and feel of the favorite buttons and favorite list screen from the application page.
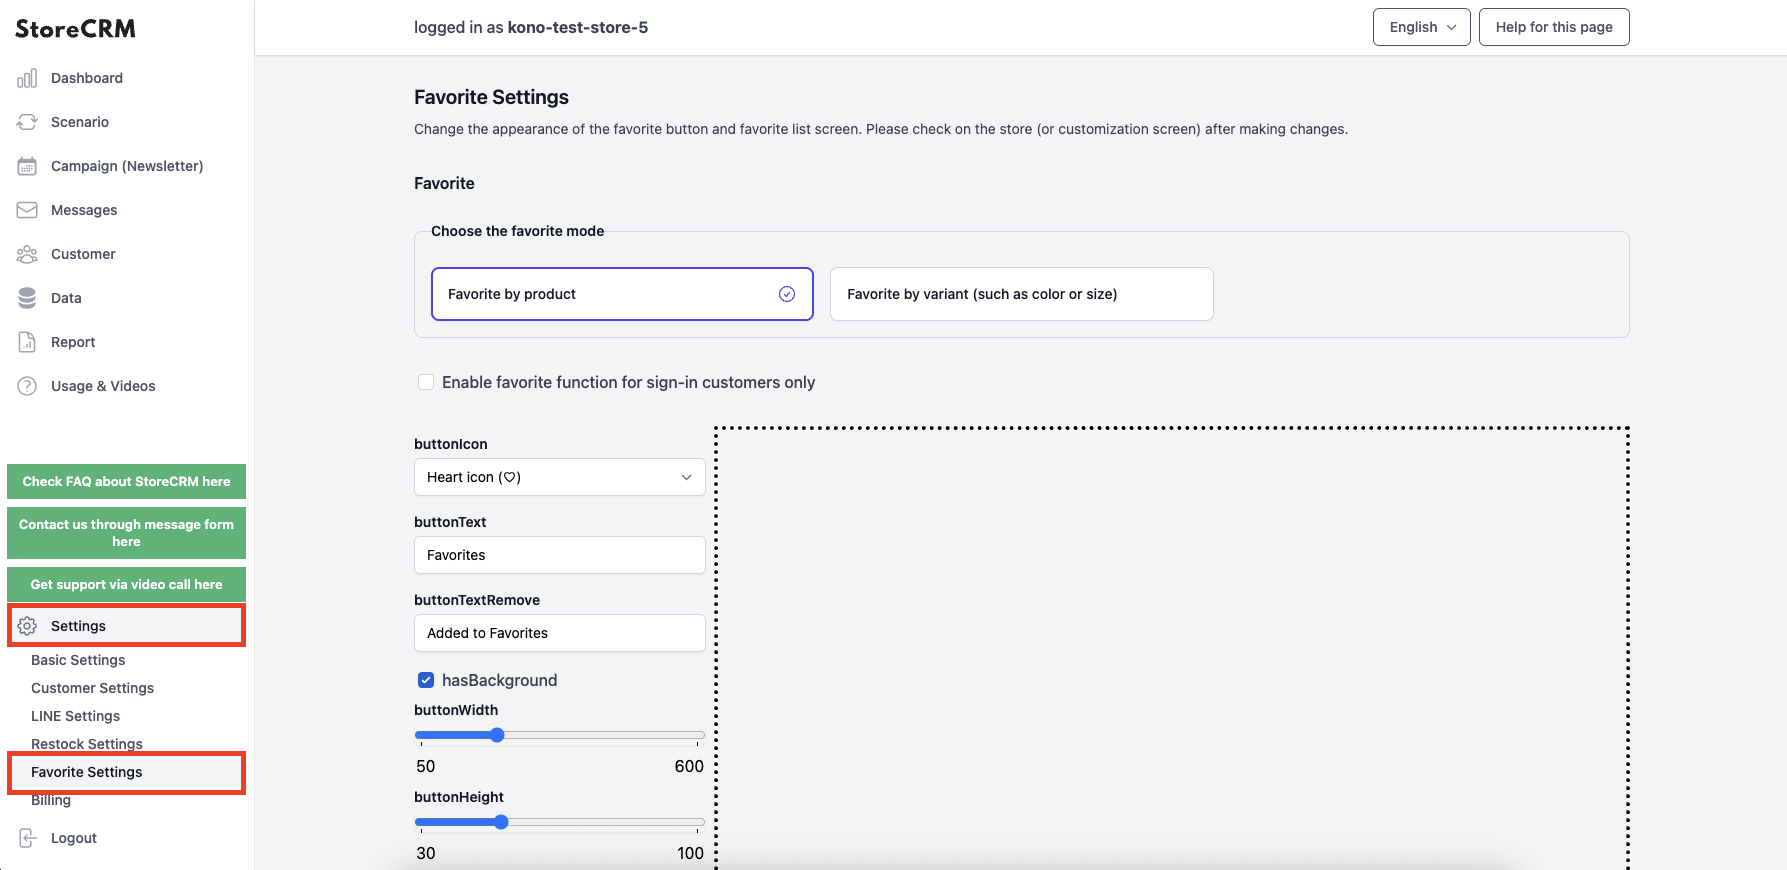
Open the (1) StoreCRM application screen. Click on "Settings" at the bottom left of the page, and then click on "Favorite Settings" that appears below it.
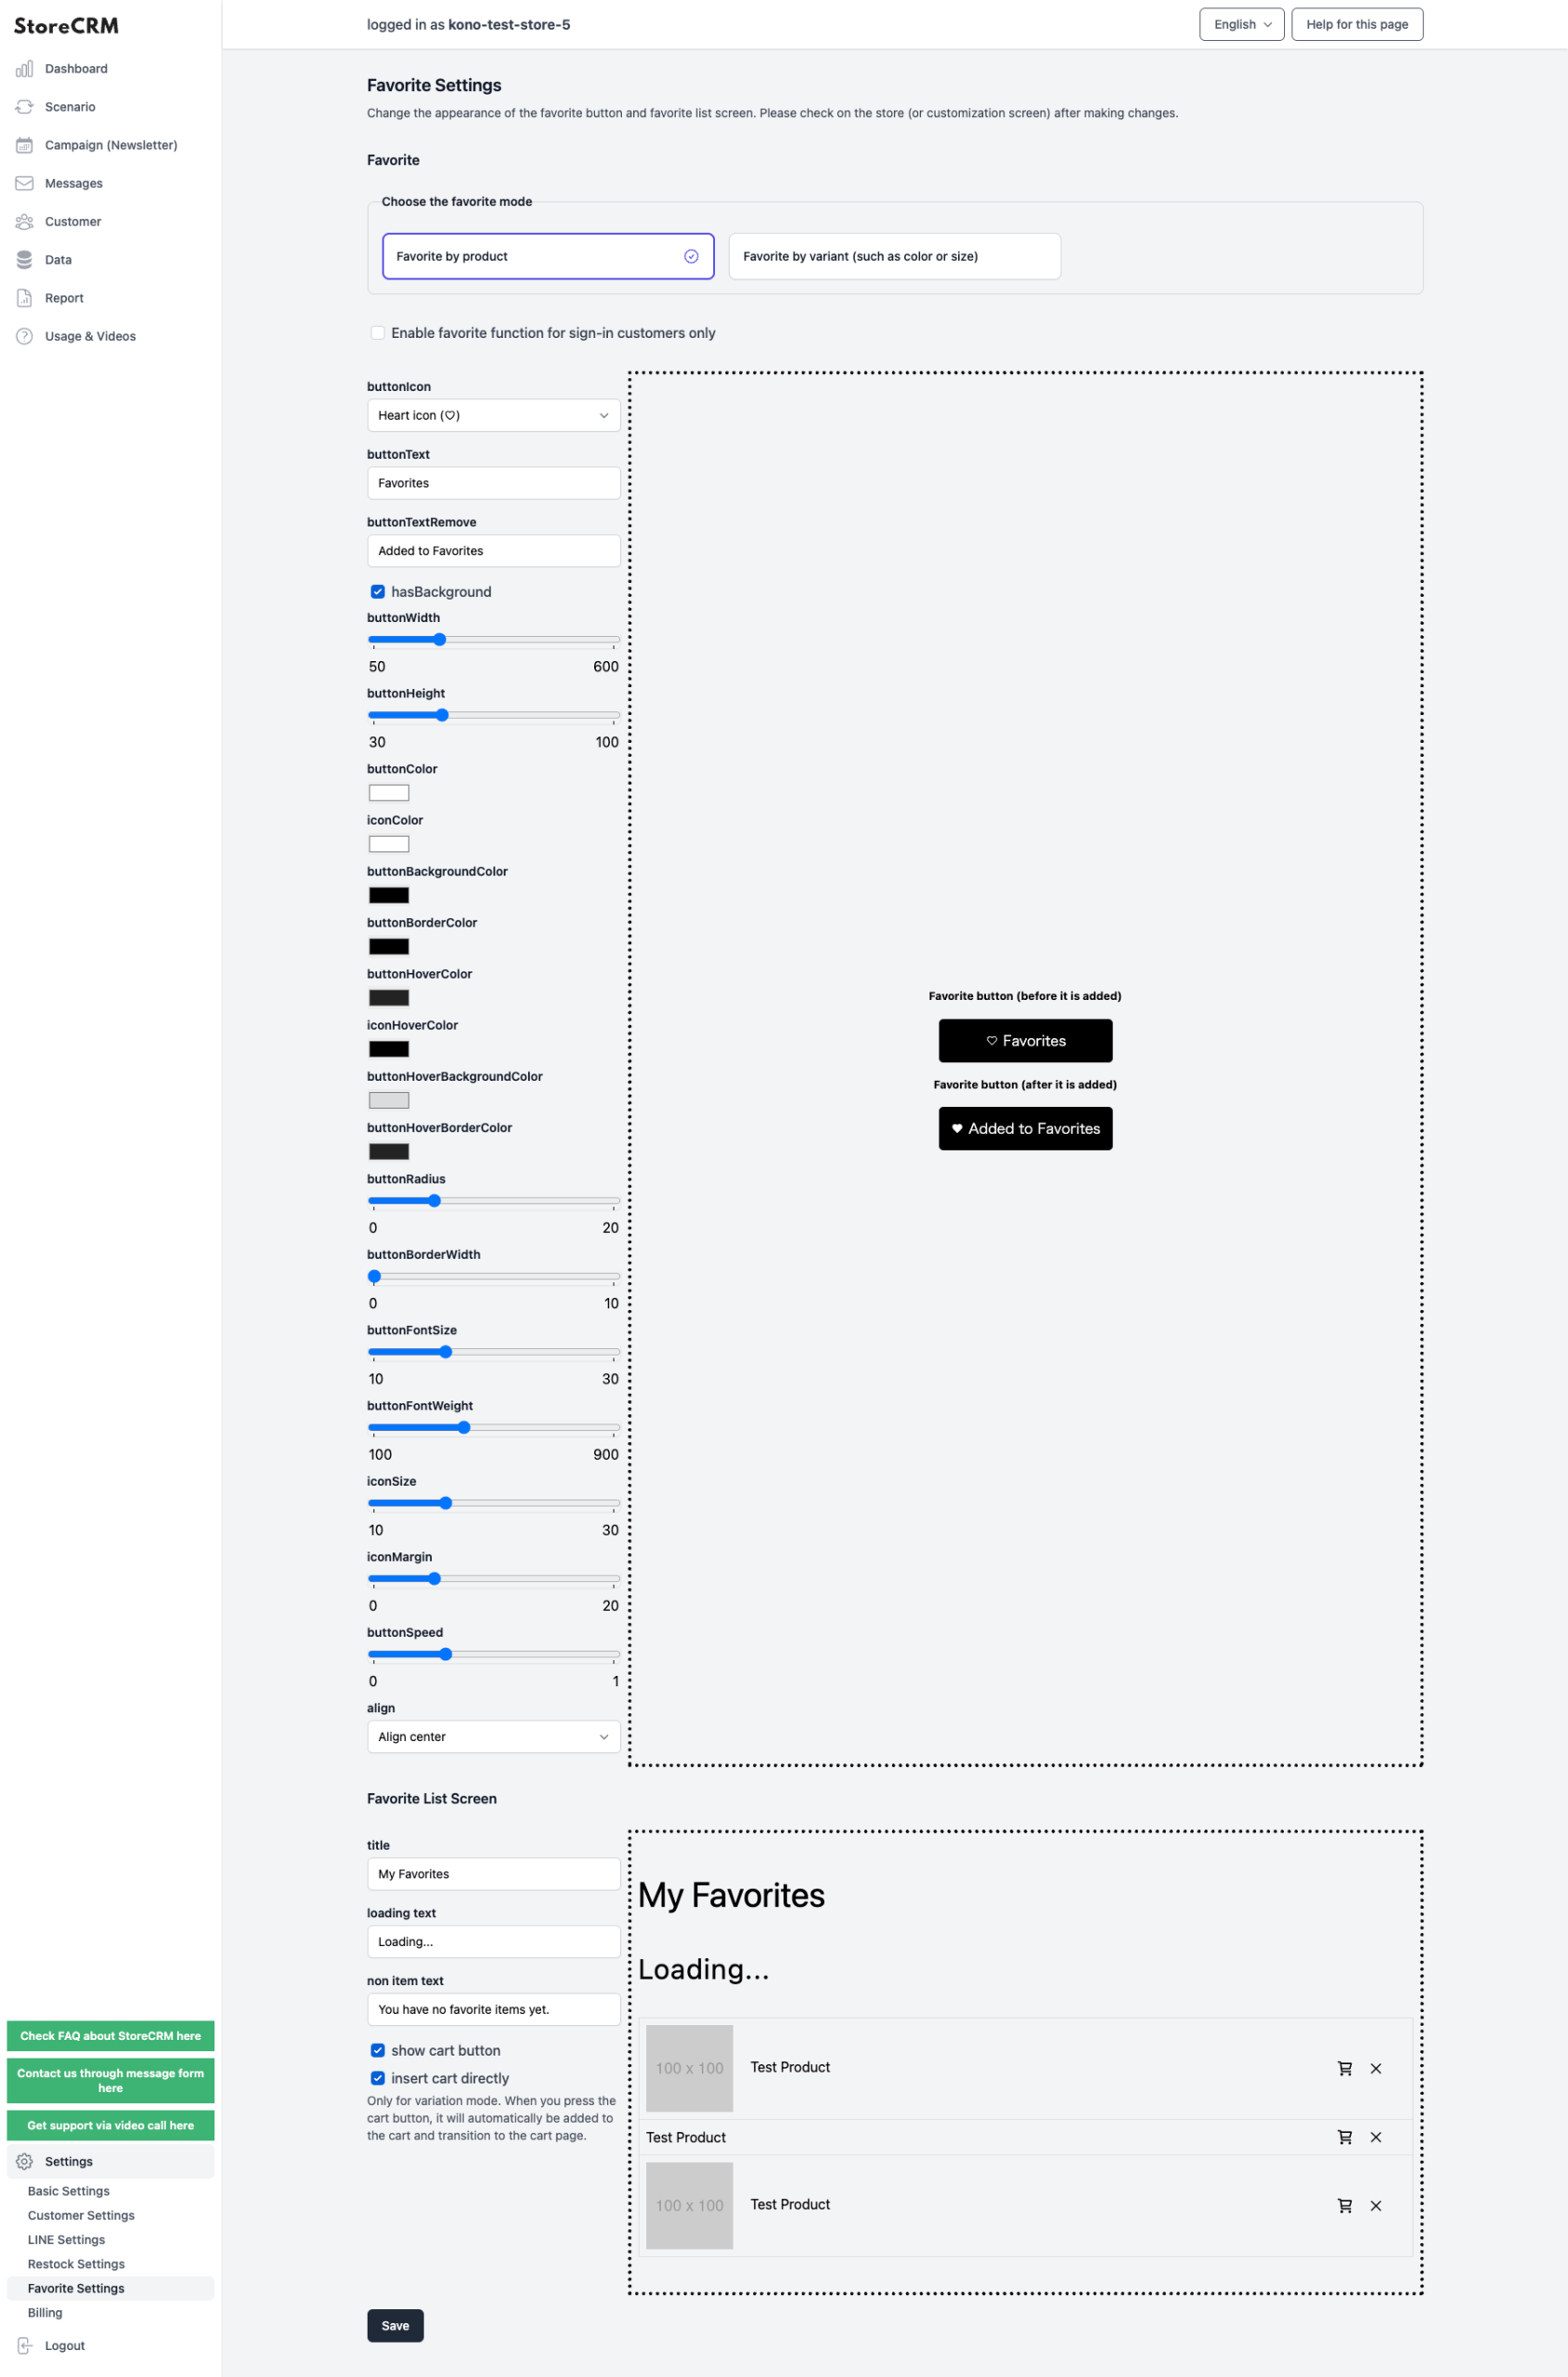
➁You can customize the wording, color, and size of the favorite buttons and favorite list screen to your liking by checking the preview on the right side.When you have finished customizing, do not forget to save your customizations by clicking the Save button at the bottom of the page at the end.
After saving, you can actually check from the store or theme preview to see if your customizations are reflected as you envisioned.
5. summary
By utilizing StoreCRM, various measures that could not be realized without adding a separate application, setting up a favorite function, or linking with other MA applications, such as the favorite function introduced this time, can be realized with this single application.
We are also preparing to create scenarios using the favorite registration information introduced this time, so please stay tuned for further information.
StoreCRM also provides free support for application setup (setup on behalf of the customer) and consulting services to help customers increase sales.
Inquiry FormPlease feel free to contact us from
Related Pages