
Campaign automation can create a campaign from a selected email template or LINE message at a specified date and time or when a product is published, restocked, or changes price. You can create it as a draft, schedule it, or send it immediately.
- Before starting configuration
- 1. Create an automation rule
- 2. Enter the rule name
- 3. Select a campaign trigger
- 4. Select a delivery channel and template
- 5. Set the sending method
- 6. Configure the audience
- 7. Perform a final review before saving
- 8. Enable the saved rule
- 9. Edit, stop, or manually run a rule
- 10. Review run results
- What to check if you cannot save
Before starting configuration
- Use for automationEmail templatesorLINE messagePrepare first. If you use LINE, firstConnect a LINE Official AccountPlease complete the test send and create a usable LINE message.
- To send only to specific customers, prepare the data used to determine the audience, such as customer segments, products, collections, product tags, and product metafields.
- Dates and times are based on the time zone configured in StoreCRM. When using a recurring schedule or daily grouping, check the time zone shown in the settings.
- We recommend starting with [Create as draft], then checking the message, product information, and audience before enabling the rule.
1. Create an automation rule
- From the left menu of StoreCRMCampaigns → Campaign automationOpen.
- Create newClick it. Open an existing rule by selecting its name in the list. You can also view details, edit, or delete a rule from the row actions menu.
![Under Campaigns, open [Campaign automation] and select [Create new] to create a rule.](https://storecrm.com/help/wp-content/uploads/2026/07/main-storecrm-en-campaign-automation-list-20260903.png)
2. Enter the rule name
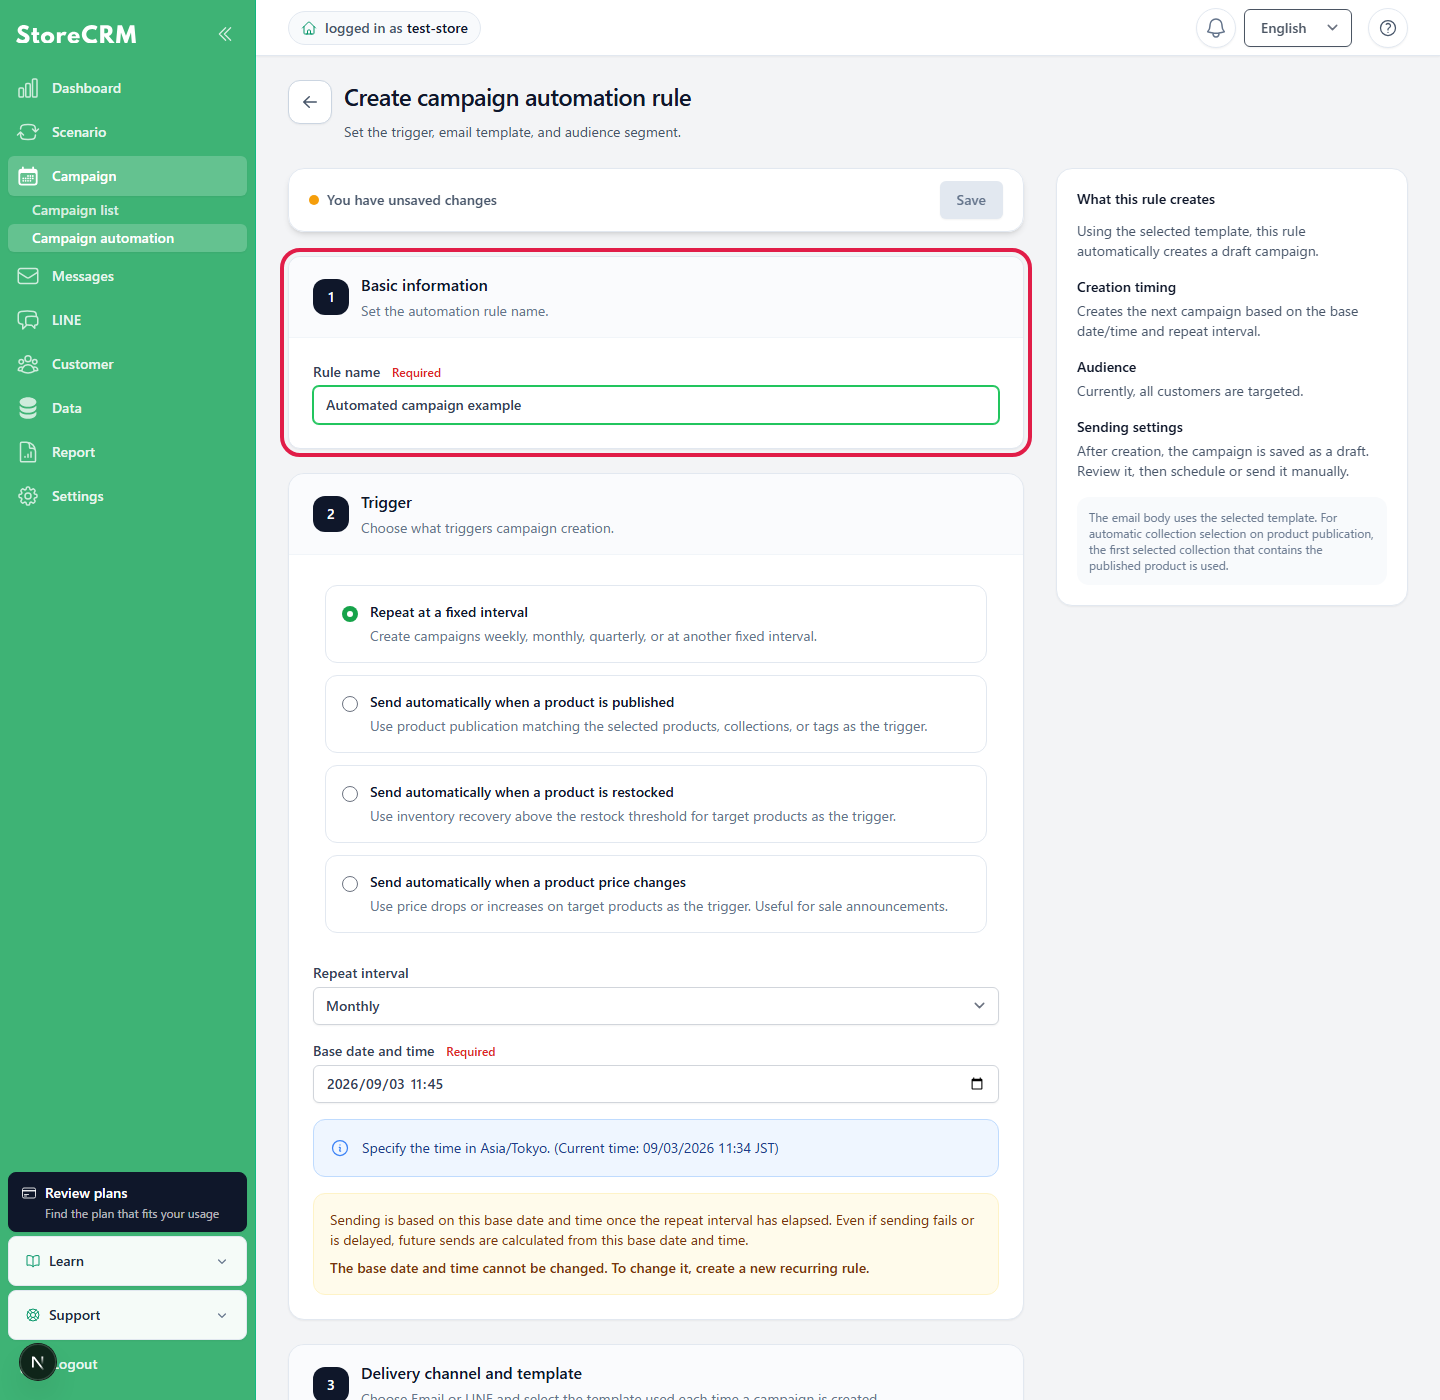
Enter a name that makes the purpose and run timing clear, such as [New product announcement] or [Weekly recommended products]. The rule name and email template are required.
3. Select a campaign trigger
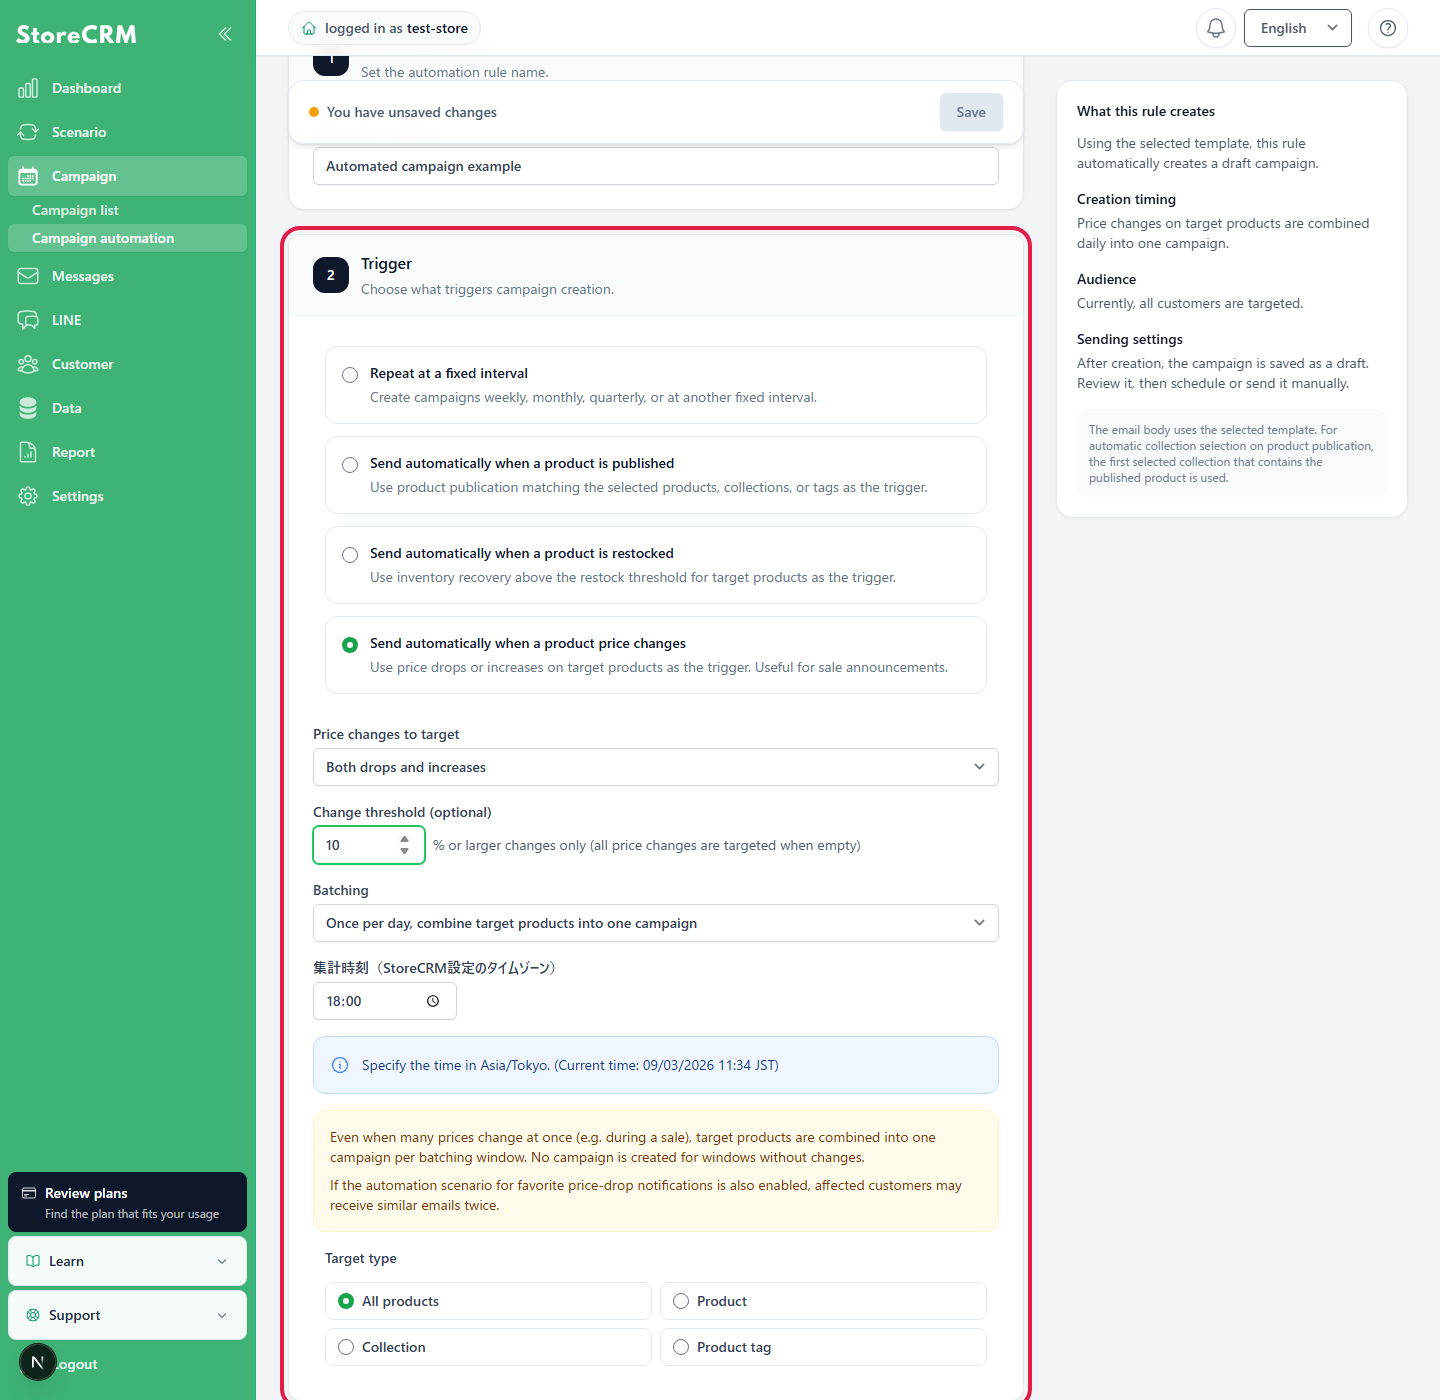
Under [Trigger], select one condition that creates a campaign. The available product conditions and audience options depend on the selected trigger.
Repeat at a specified interval
Select a repeat interval of weekly, monthly, or quarterly, then specify the first reference date and time. You can change the reference date and time while a rule is a draft or stopped. Stop an enabled rule before changing it.
Automatically send when a product is published
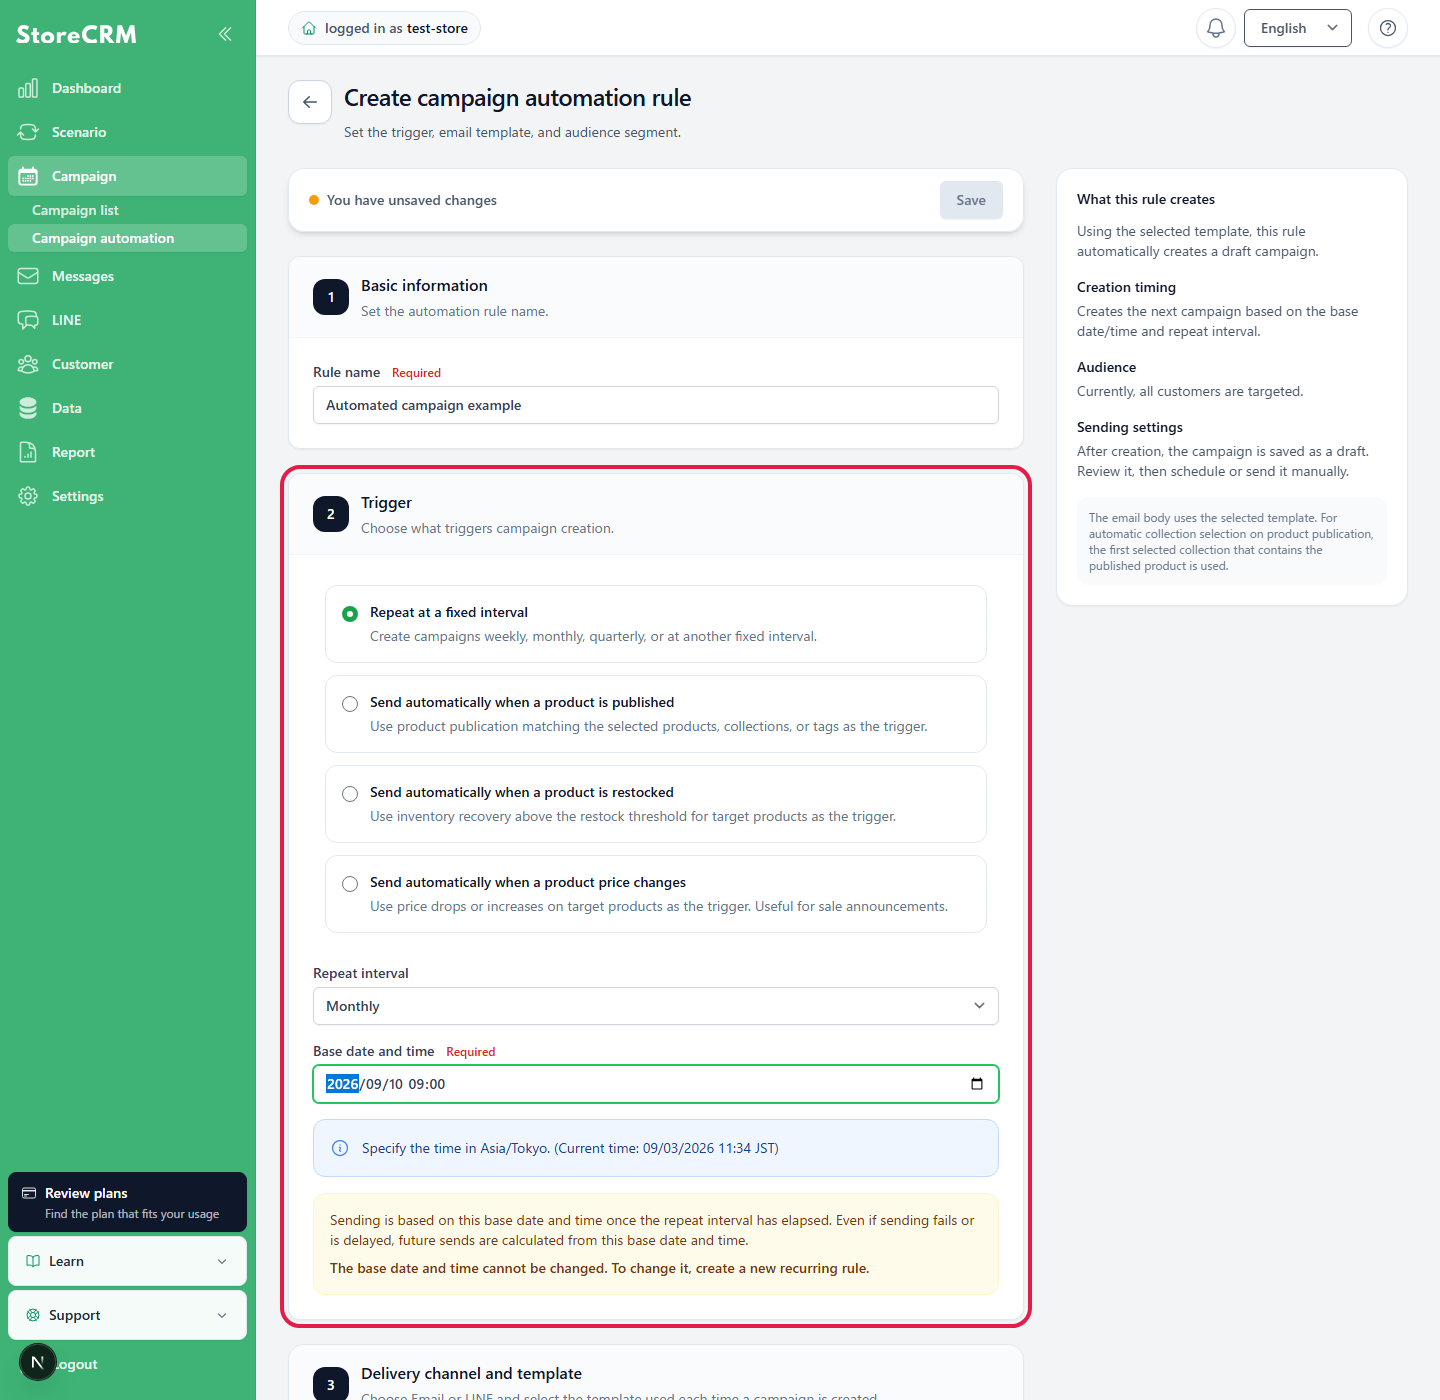
Triggers when a product is published. Choose one target method: [All products], [Products], [Collections], or [Product tags]. You can select up to 100 products or collections and up to 20 synchronized product tags.
If you specify multiple collections and the published product belongs to more than one of them, the first collection in this setting is used for automatic selection in the email.
Automatically send when product is back in stock
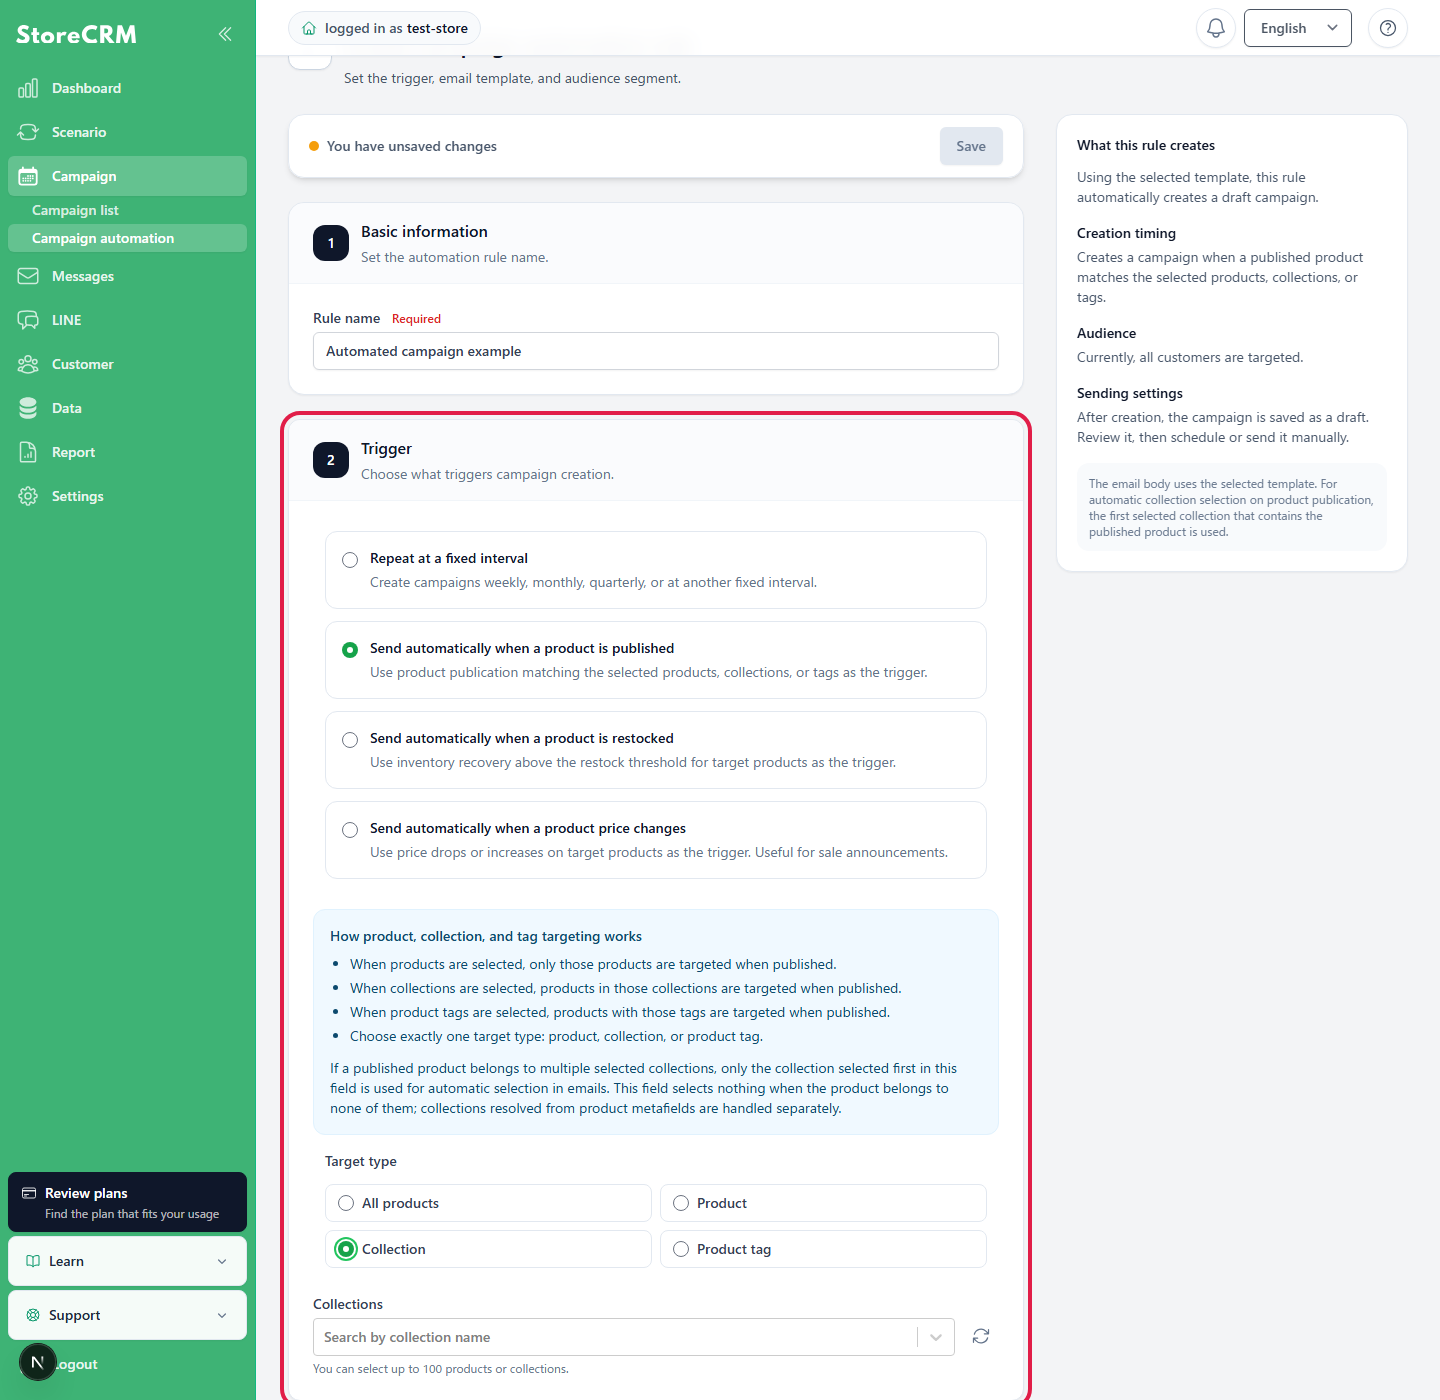
Triggers when a product's inventory recovers to the restock threshold. Set [Prevent recreating for the same product] to 1–365 days to prevent repeated campaigns for the same product during that period. If no products are specified, all products are included.
If an active [Back-in-stock notification] automation exists, customers who requested a notification may receive two similar emails. Check the audience for both automations.
Automatically send when the price of a product changes
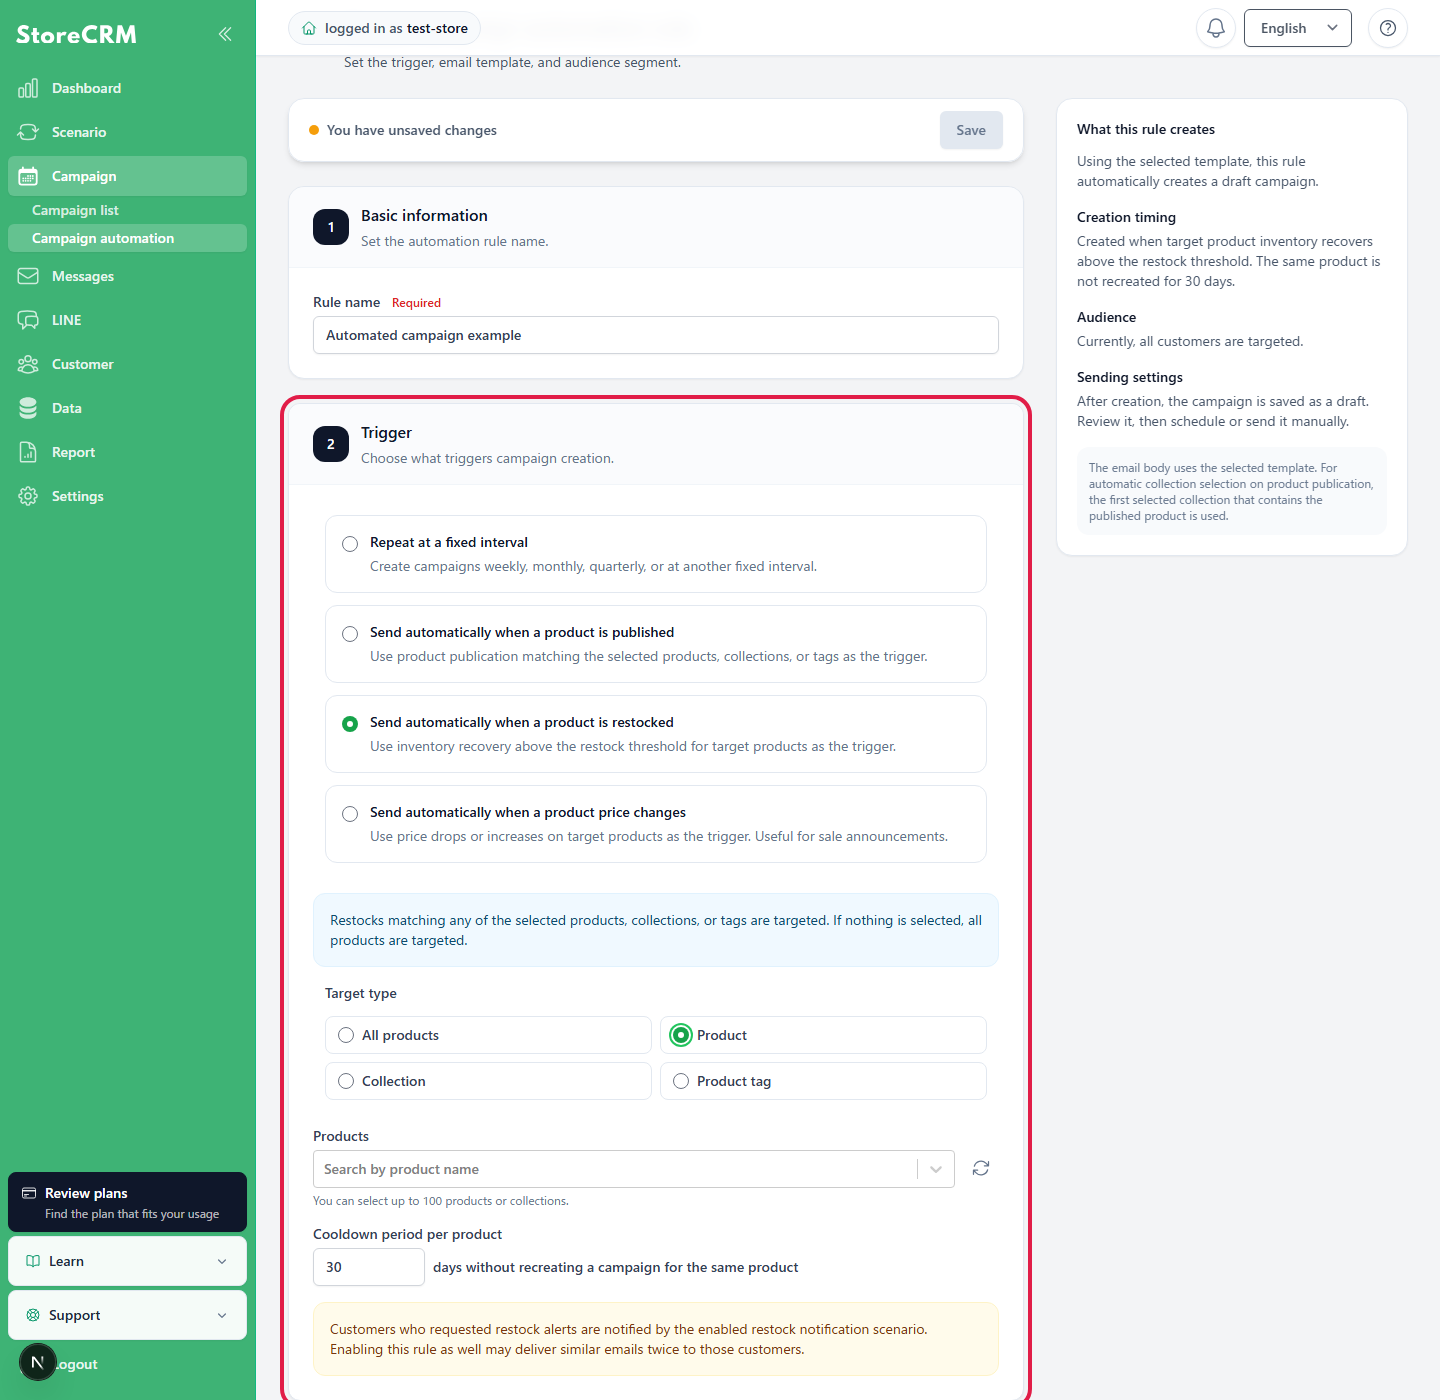
You can target price decreases, price increases, or both. Set the percentage-change threshold from 1% to 100%; if left blank, every price change is included.
For [Creation grouping], select once per hour or once per day. For once per day, specify the grouping time in the StoreCRM time zone. Even when many prices change during a sale, changes are grouped into one campaign per period. No campaign is created if no target product changes.
If you also use a price-drop notification automation for customers who favorited a product, check that recipients will not receive two similar emails.
4. Select a delivery channel and template
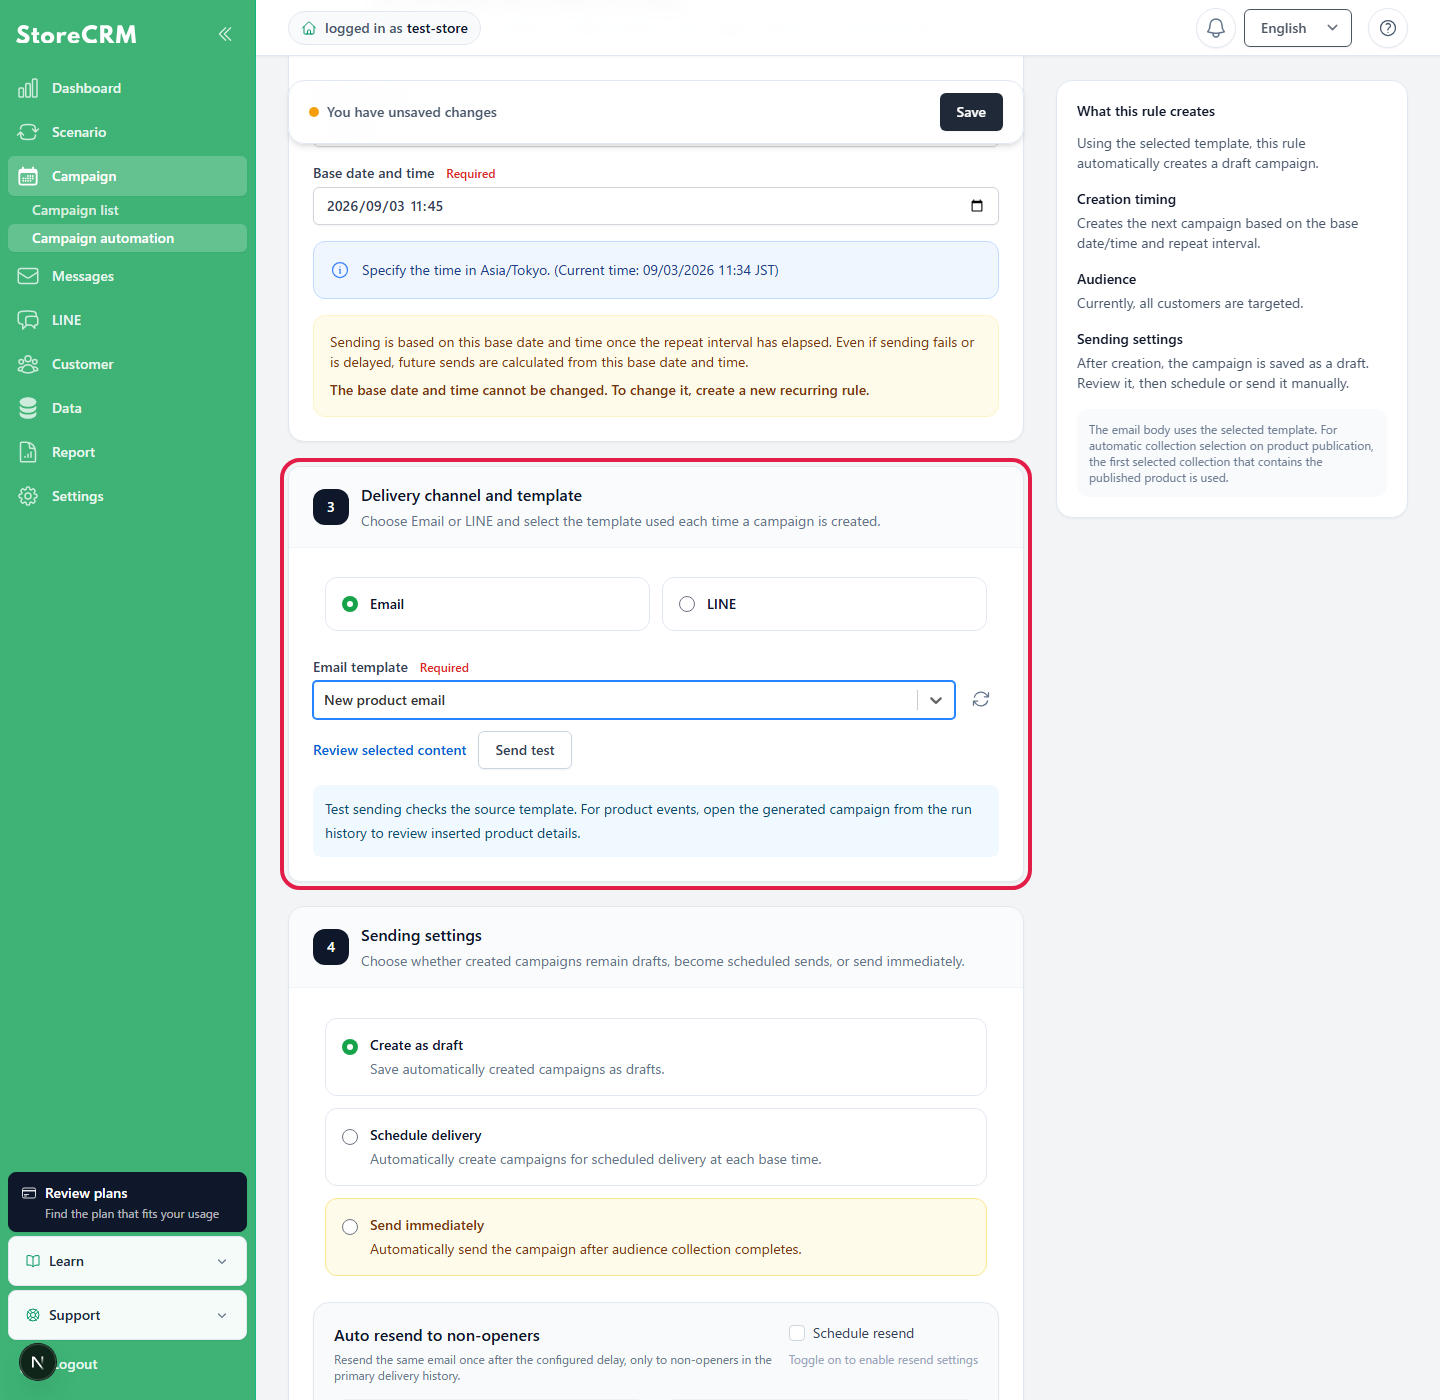
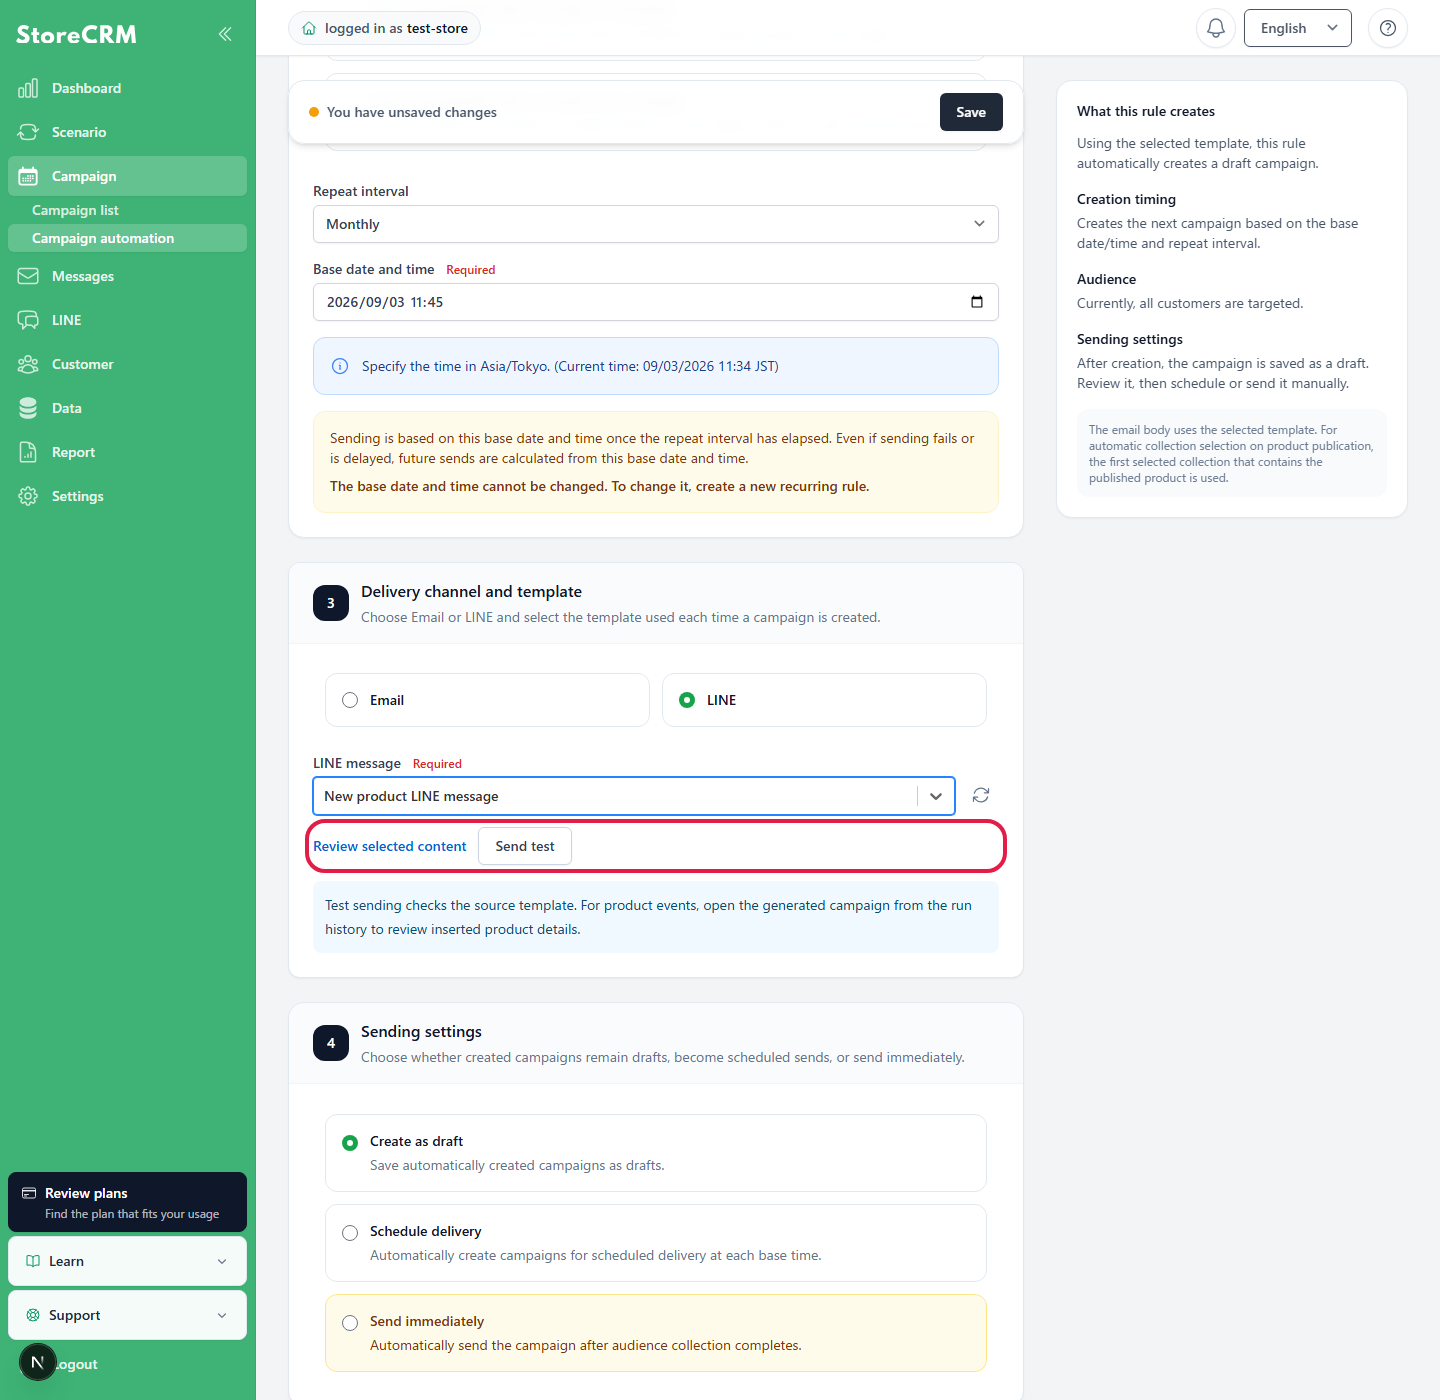
Select [Email] or [LINE] as the delivery channel, then choose the email template or LINE message to use. When you switch channels, the template selected for the other channel is not retained.
If you choose email
Under [Email template to send], select the email used to create campaigns. For product triggers, send a test email first to confirm that the target product information appears correctly.
When choosing LINE
Under [LINE message], select an available message for the automation. The email-only setting for resending to recipients who did not open is not shown for LINE.
Each run creates a dedicated LINE message and campaign based on the selected LINE message. The original LINE message is not changed. To insert product information for a product trigger such as publication or restock, addProduct information template tagPlease set it up and send a test in advance.
Review and test the selected content
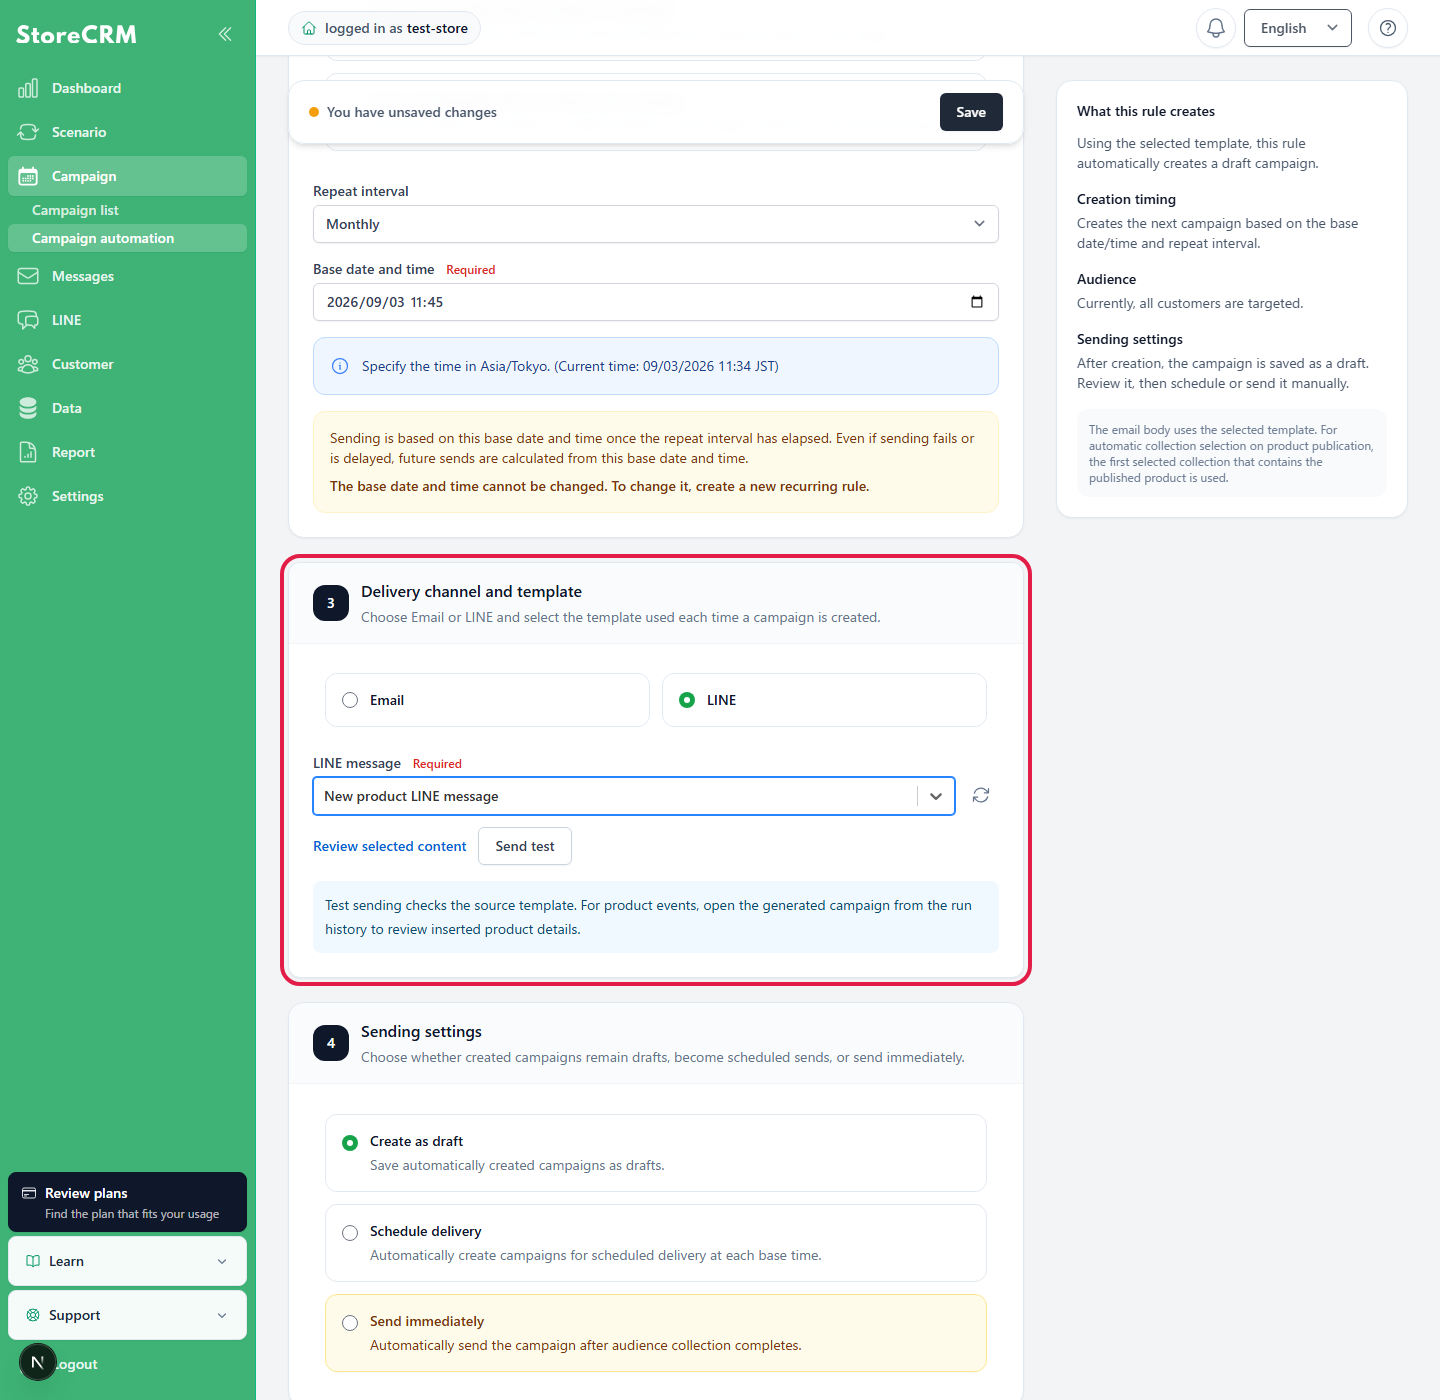
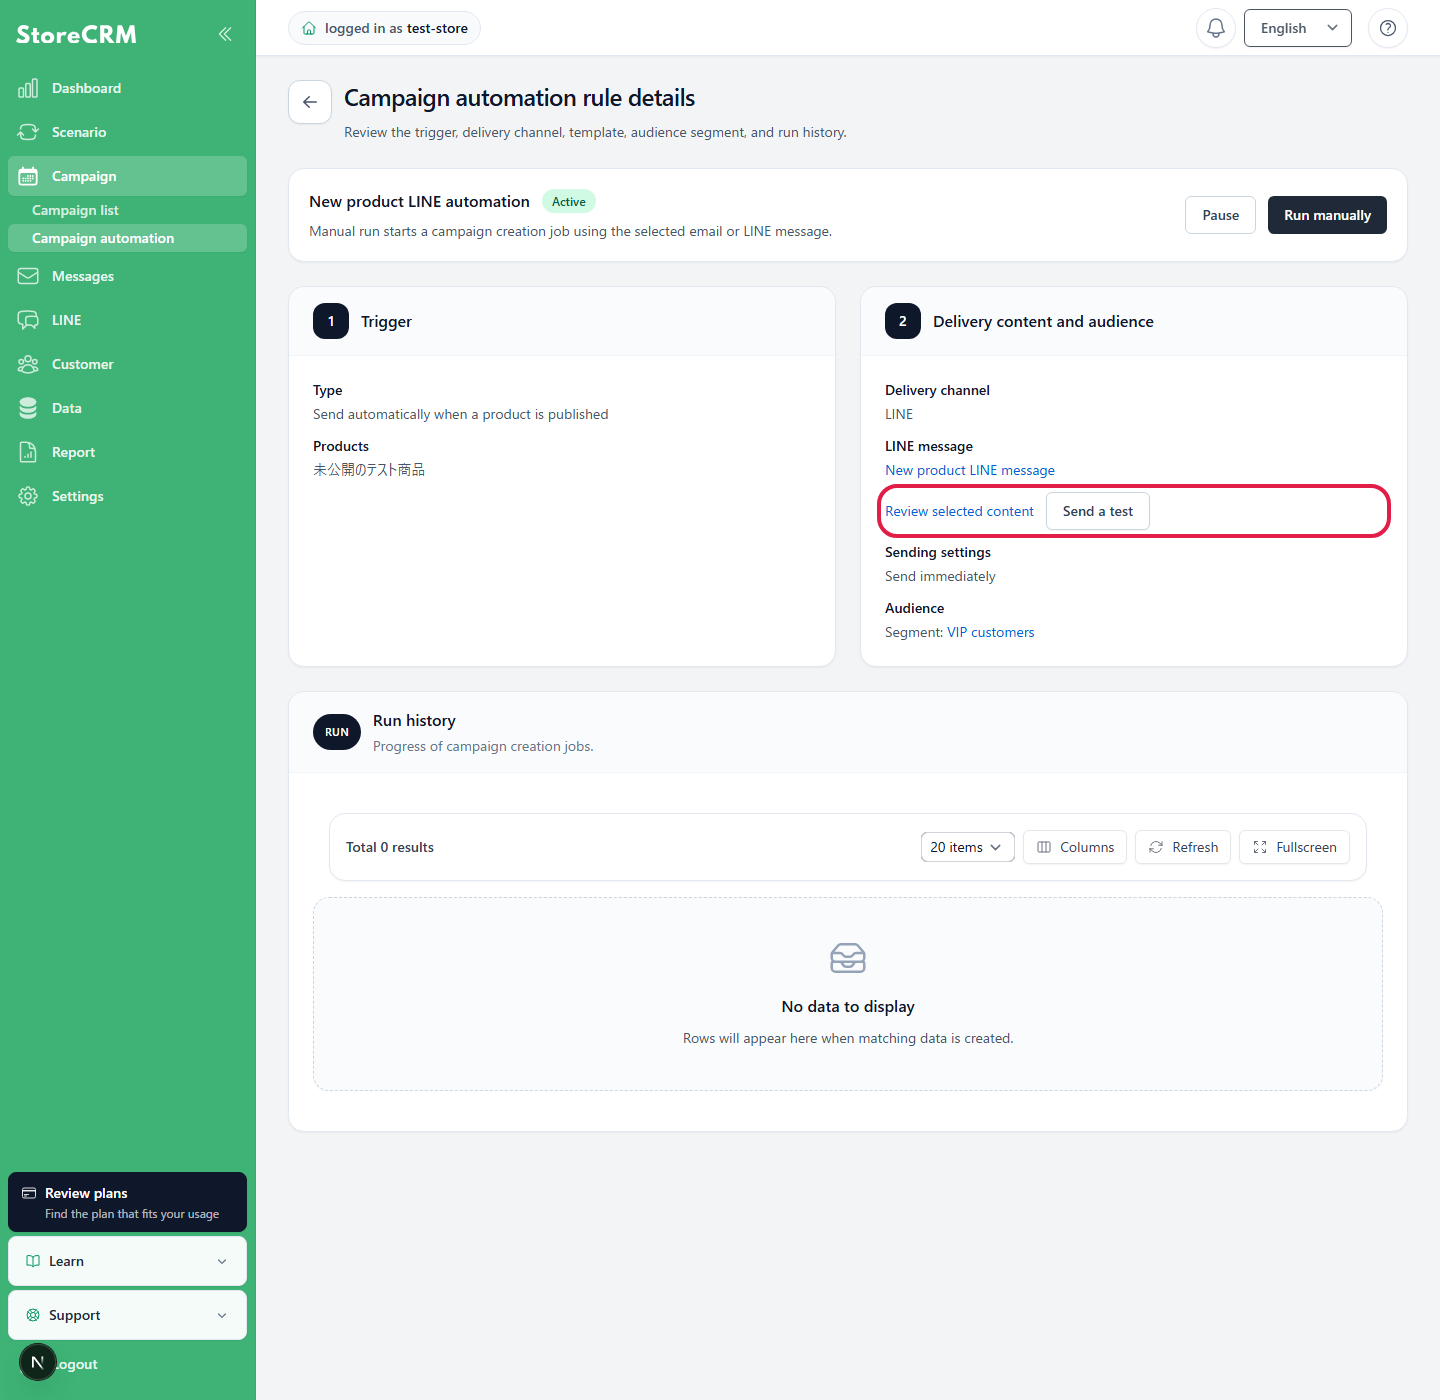
After selecting a template or LINE message, open the original from [Review selected content]. Before a live send, use [Send test] to check the subject, body, product information, and expanded template tags. Test recipients follow the test settings.
Prepare email blocks for automatic product and collection selection
For campaigns triggered by a product publication or restock, StoreCRM can automatically insert the published or restocked product and related collections obtained from its product metafield into the created email. To use this feature, place the following empty blocks in the selected email template in advance.
Block for the published product
Shopify product blockPlace one block and leave its product setting as [Automatically select the automation product]. The published or restocked product is inserted when the campaign is created.
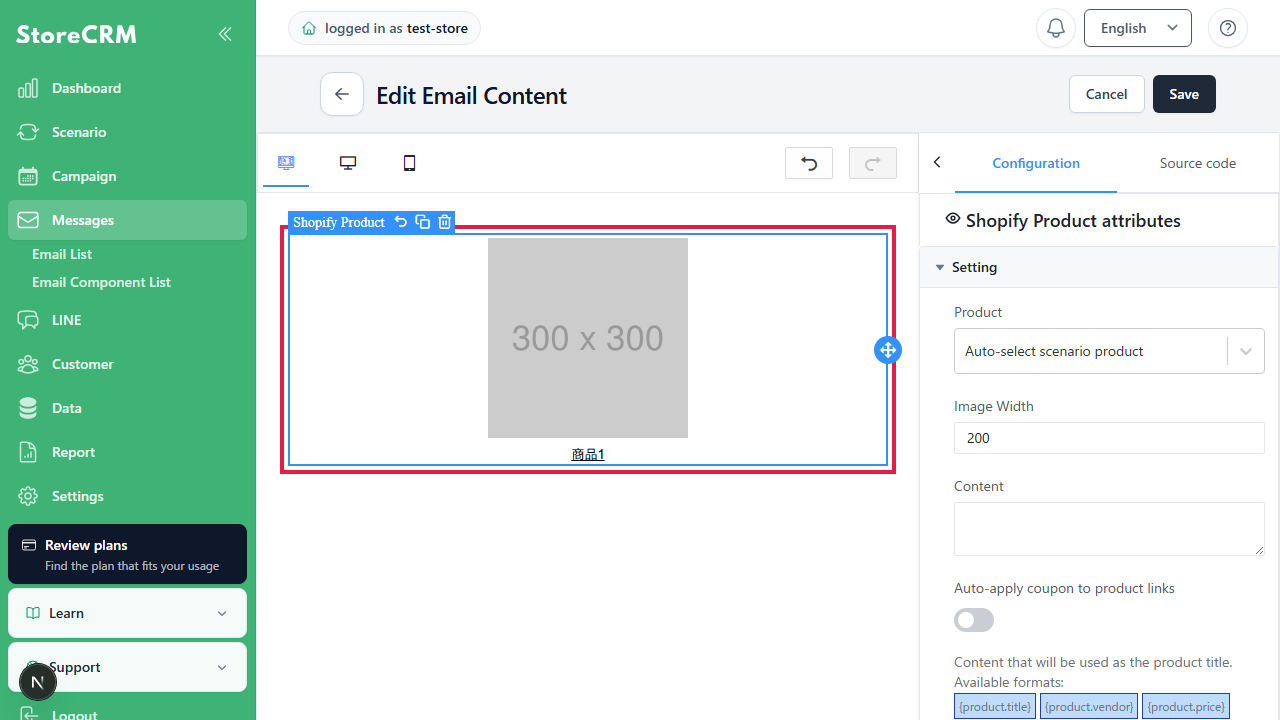
Block for configuring related collections
Shopify Collection BlockPlace the block and leave its collection unselected. Each related collection obtained from the product metafield is inserted into one empty block.
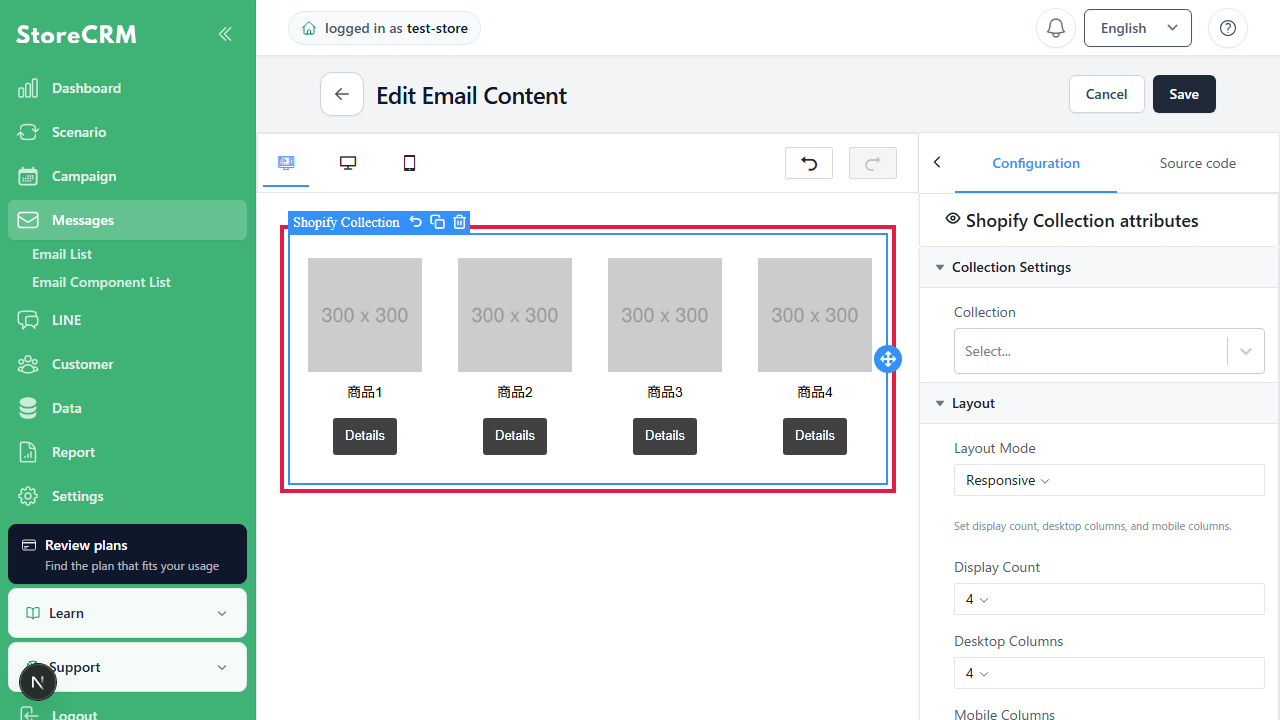
Here, an [empty block] means a block already added to the email editor with no fixed product or collection selected. A block that already has a product or collection selected is not overwritten.
When a product metafield can contain multiple related collections, add the same number of empty Shopify collection blocks as the maximum you want to show in the email. For example, add three empty blocks to show up to three collections. If there are too few blocks, additional collections do not appear in the email. This does not change how the audience is extracted.
First run the rule with [Create as draft]. Open the email editor from the created campaign and confirm that the target product and all related collections are set before sending.
5. Set the sending method
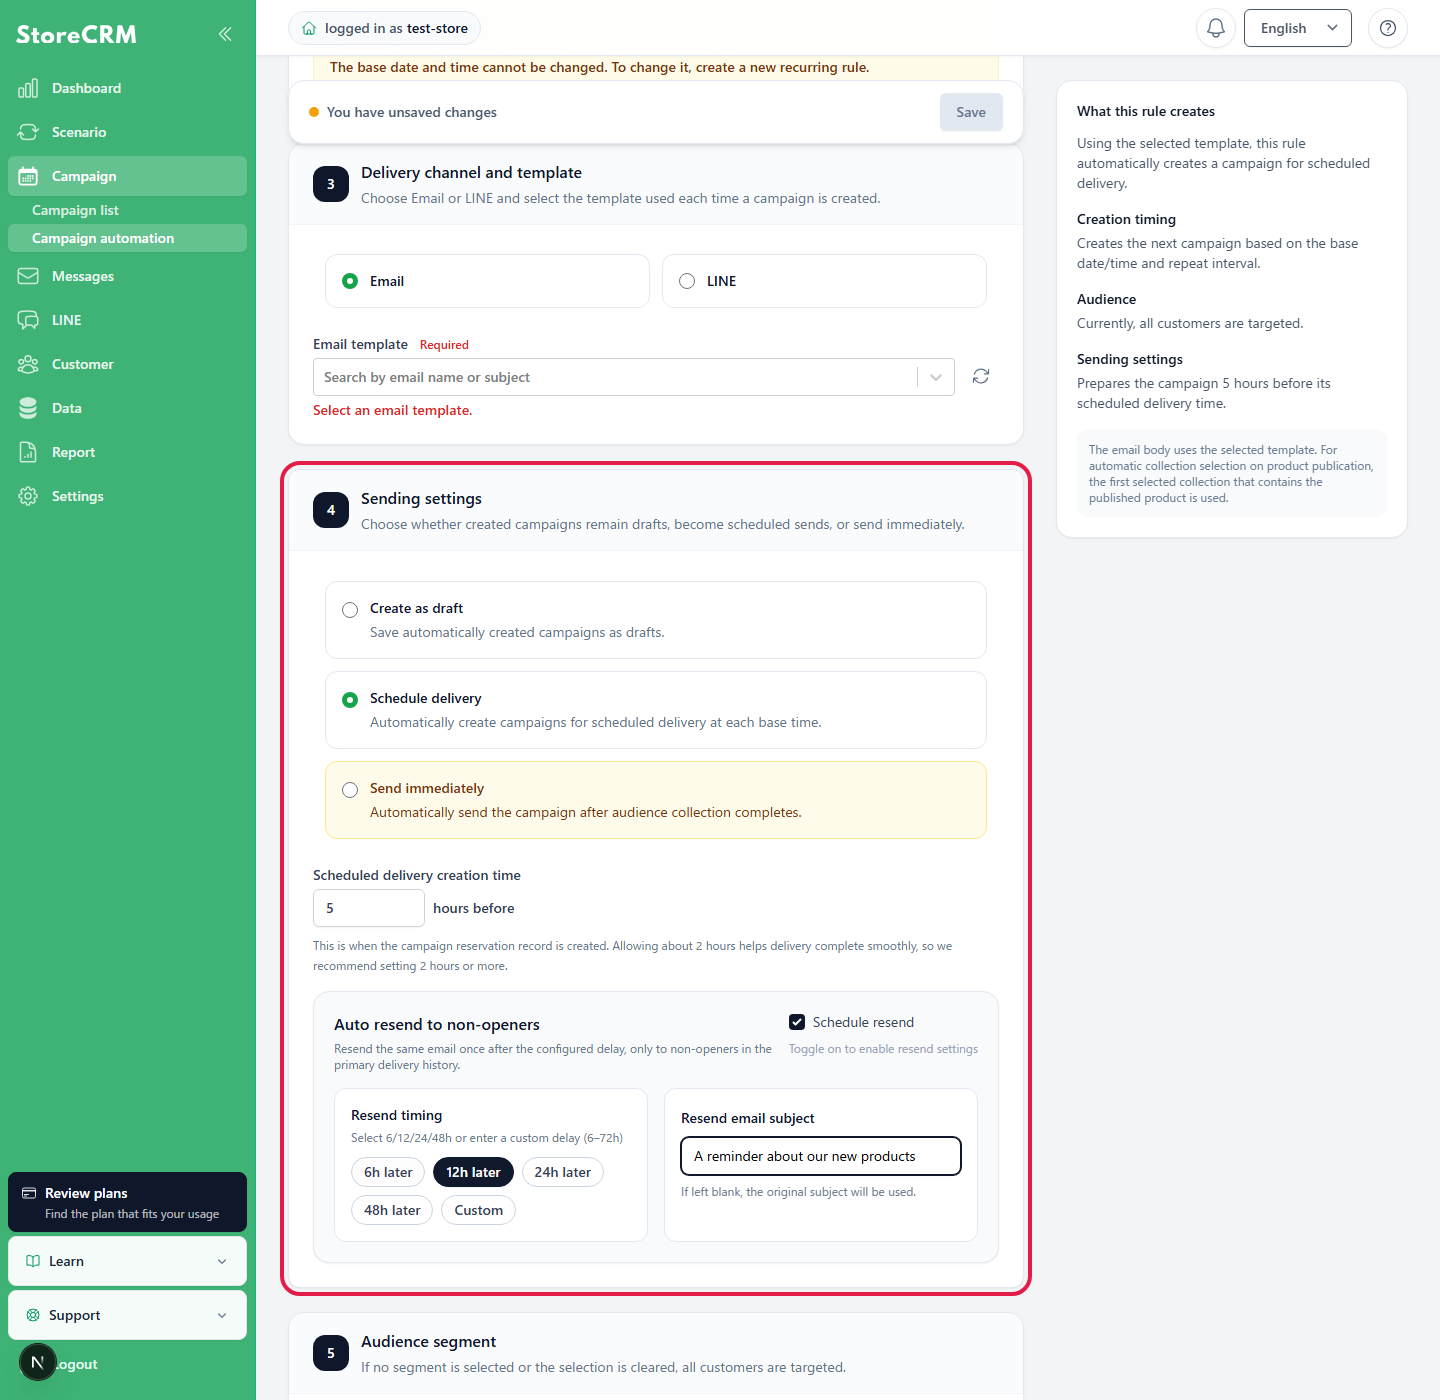
For both email and LINE, you can create a draft, schedule delivery, or send immediately. For the first run, use [Create as draft] and review the result.
| Sending method | Behavior | What to check |
|---|---|---|
| Create as draft | Save your campaign as a draft. | After creation, check the message and audience, then schedule or send it from the campaign page. |
| Schedule delivery | For recurring rules, creates a campaign scheduled relative to the reference date and time. For product events, creates a campaign scheduled for the specified amount of time after an event such as publication. | For recurring rules, [Scheduled delivery lead time] must be at least one hour. We recommend at least two hours to allow for processing. |
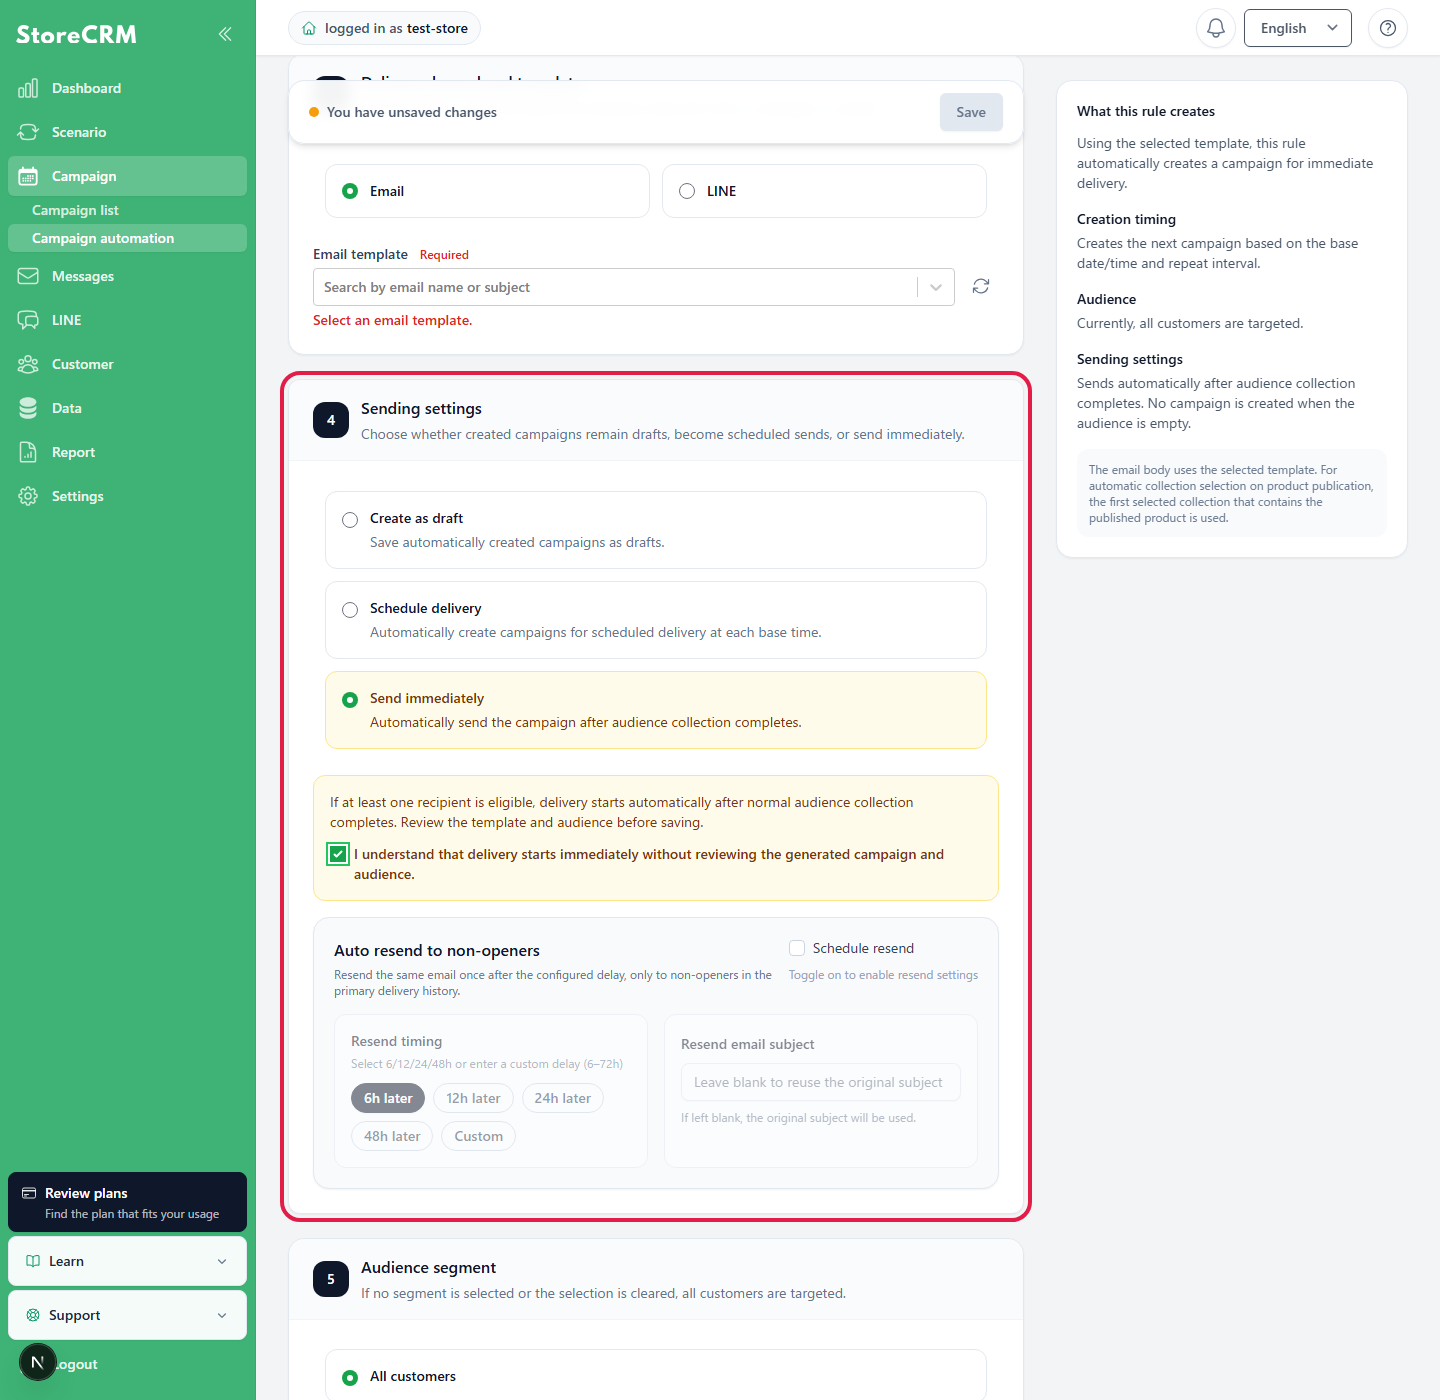
| Send immediately | Once the audience has been collected, distribution will begin automatically. | You cannot review the message and audience before it is sent. You must accept the warning. |
Configure automatic resending to recipients who did not open
Automatic resending to recipients who did not open is available only for email.When [Schedule resend] is ON, the same email is resent once only to recipients who did not open the initial email. Select 6, 12, 24, or 48 hours, or enter an integer from 6 to 72 hours. If the resend title is blank, the initial email subject is used.
Use immediate delivery
Immediate delivery starts automatically after audience collection finishes if there is at least one recipient. Review the email or LINE message and audience, then select [I understand that this will be sent immediately without an opportunity to review the content and audience]. You cannot save without selecting it.
6. Configure the audience
If you do not select an audience or clear the selection, [All customers] is used. Audience options related to products depend on the selected trigger and target product settings.
For LINE, only customers who match the selected conditions, have connected LINE, and can receive messages are included.Customers who are not connected, have blocked the account, or have an invalid token are excluded. Check the actual audience count in the run history.
| Audience | Purpose and conditions |
|---|---|
| All customers | Target all available customers. |
| Specific segment | Search and target the selected customer segment. Segment selection is required. |
| People who have purchased products from the same collection | Used when one or more collections are specified in the trigger. |
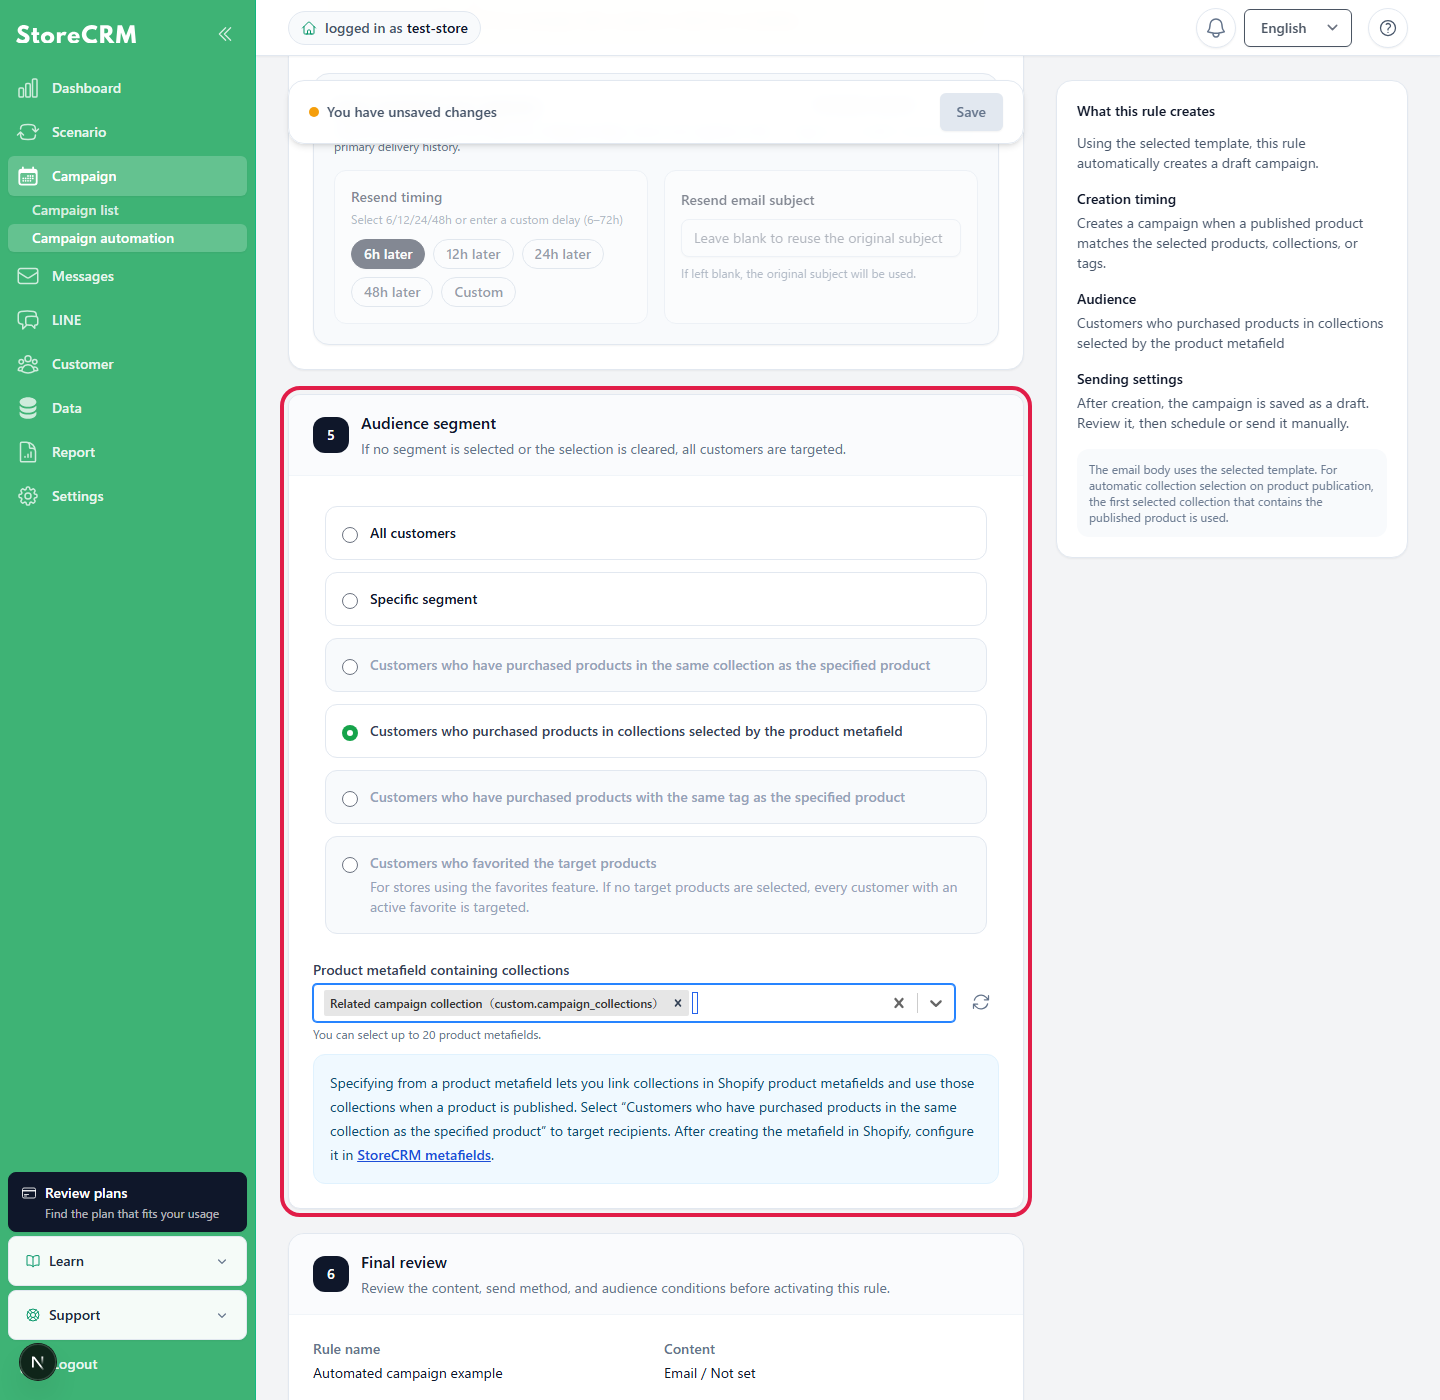
| Customers who purchased from a collection specified by a product metafield | Available for the product-published trigger. Select a product metafield that stores links to collections. |
| People who have purchased products with the same tag | Used when one or more product tags are specified in the trigger. |
| People who have added the target product to their favorites | For stores using Favorites. If you do not specify target products, the audience includes customers who have favorited any product. |
Target buyers of collections specified by a product metafield
This setting readsCollections set for newly published productsand targets customers who previously purchased products in that collection. It does not select only customers who purchased the newly published product itself.
For example, if you set [Snowboards] as the [Related collection] for new product A, the audience includes customers who have purchased products in the Snowboards collection. Configure this in order: create the definition in Shopify, set the value on the product, register it in StoreCRM, and select it in the campaign rule.
Create a product metafield definition in Shopify
- In the lower-left corner of Shopify admin, openSettingsOpen.
- Metafields and metaobjects → Productsthen clickAdd definitionClick.
- Enter a descriptive name, such as "Related Collection".
- Check the namespace and key. In this example, it iscustom.campaign_collections. Copy this value because you will register the same value in StoreCRM later.
- For the type, selectCollectionsthen set the number of values toList. You can use [One collection] if each product always links to only one collection, but we recommend a list so that multiple collections can be specified.
- At the top of the page, clickSave. Leave settings that this feature does not use, such as Storefront API access, at their defaults.
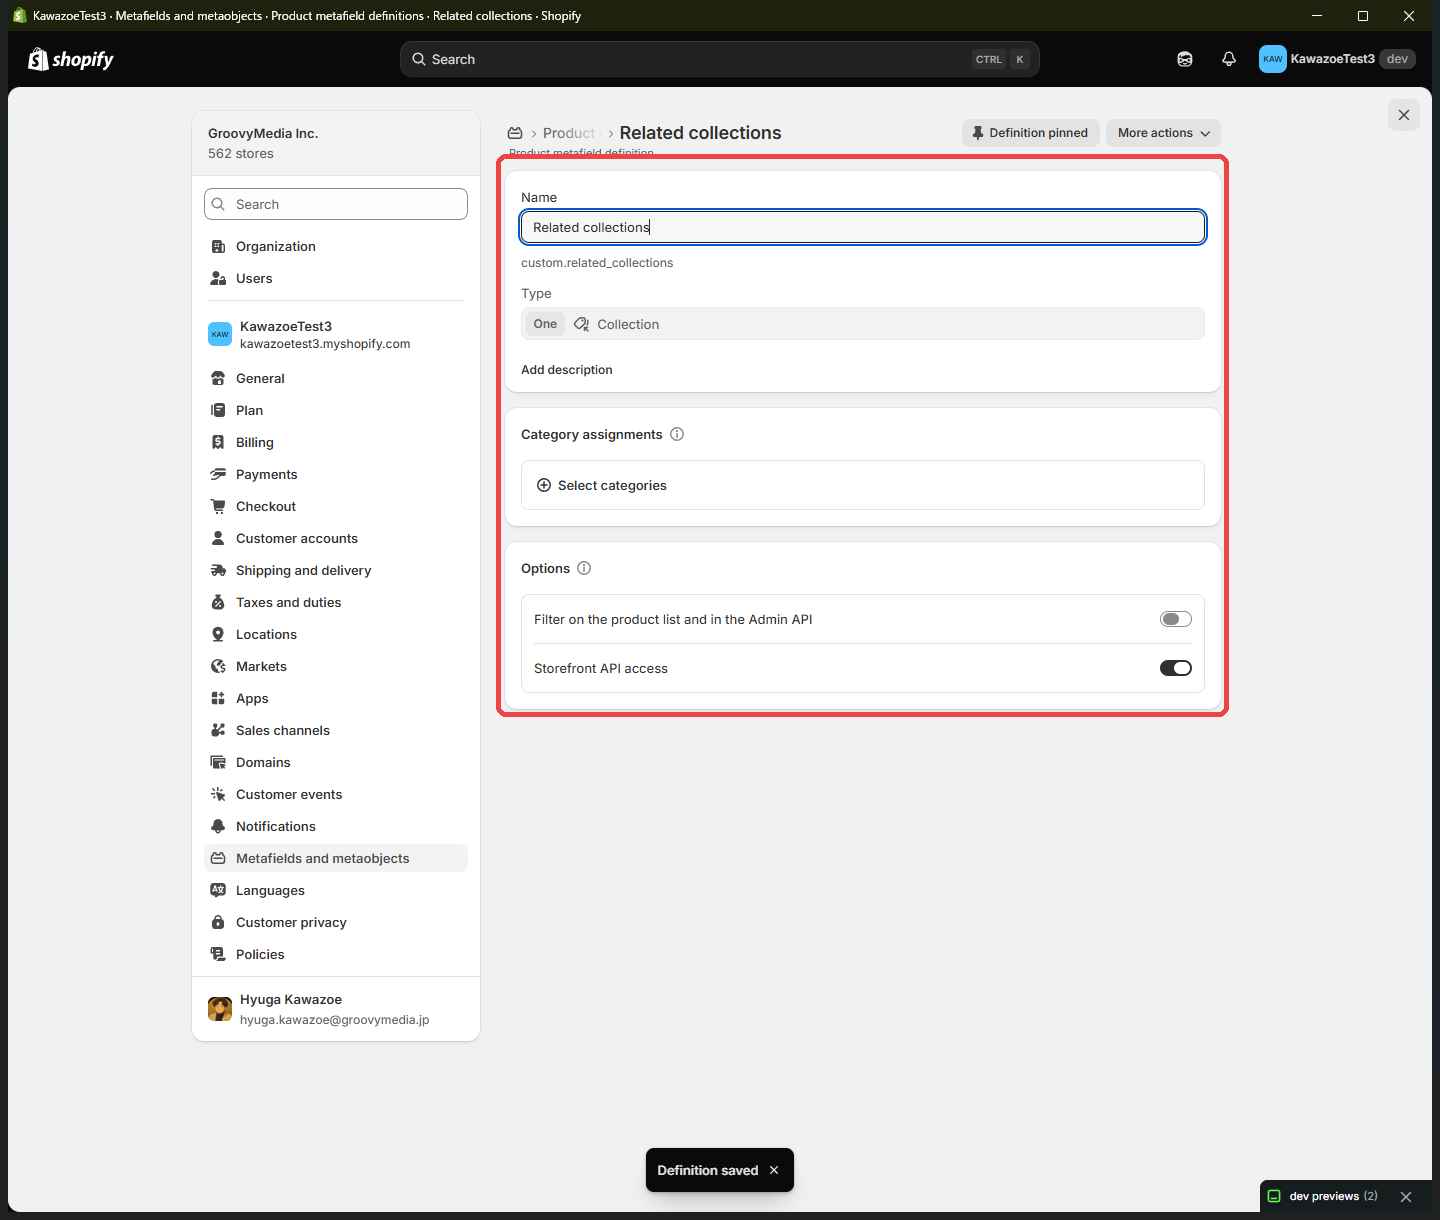
Set up related collections for Shopify products
- In the Shopify admin screenProductsand select the product that will trigger Campaign automation.
- On the product editing page, scroll toProduct metafields. If the definition is not visible, click [Show all].
- Click on the "Related Collection" you created earlier and select the collection you want to associate with this product. Multiple selections are also possible.
- Product screenSave. Set a value for each target product before the campaign runs. StoreCRM cannot identify the audience for a product with no value.
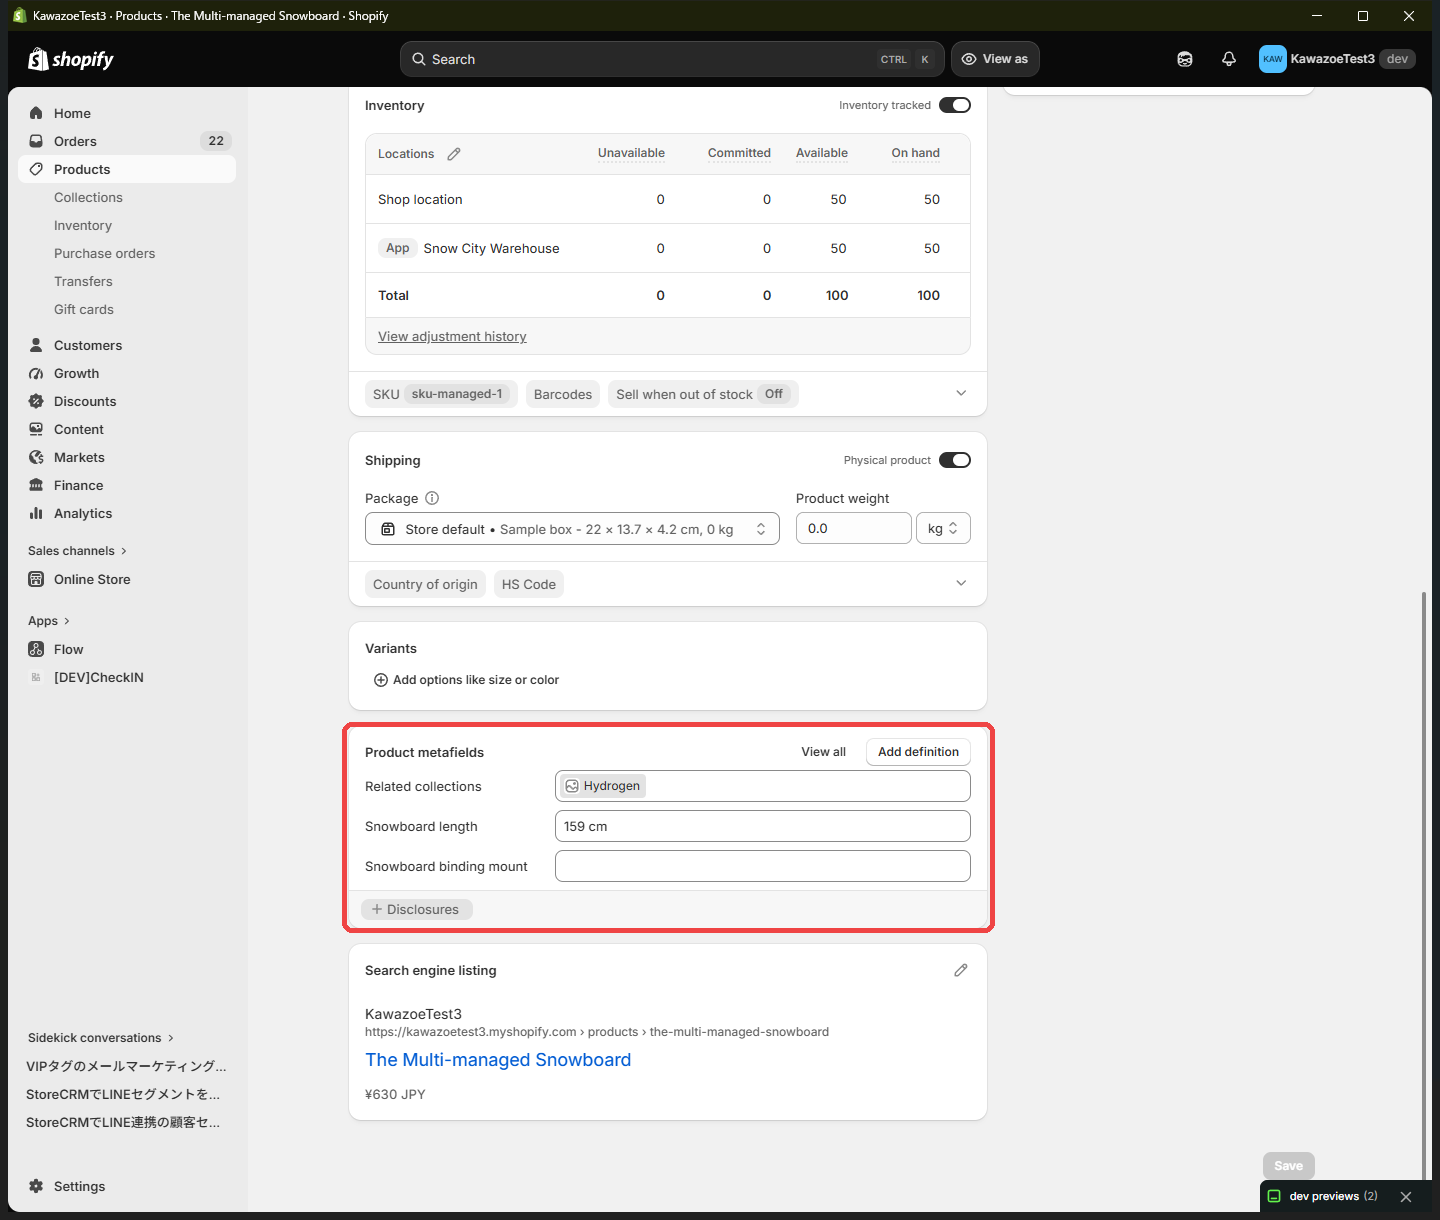
Register the product metafield in StoreCRM
- From the left menu of StoreCRMData → MetafieldOpen.
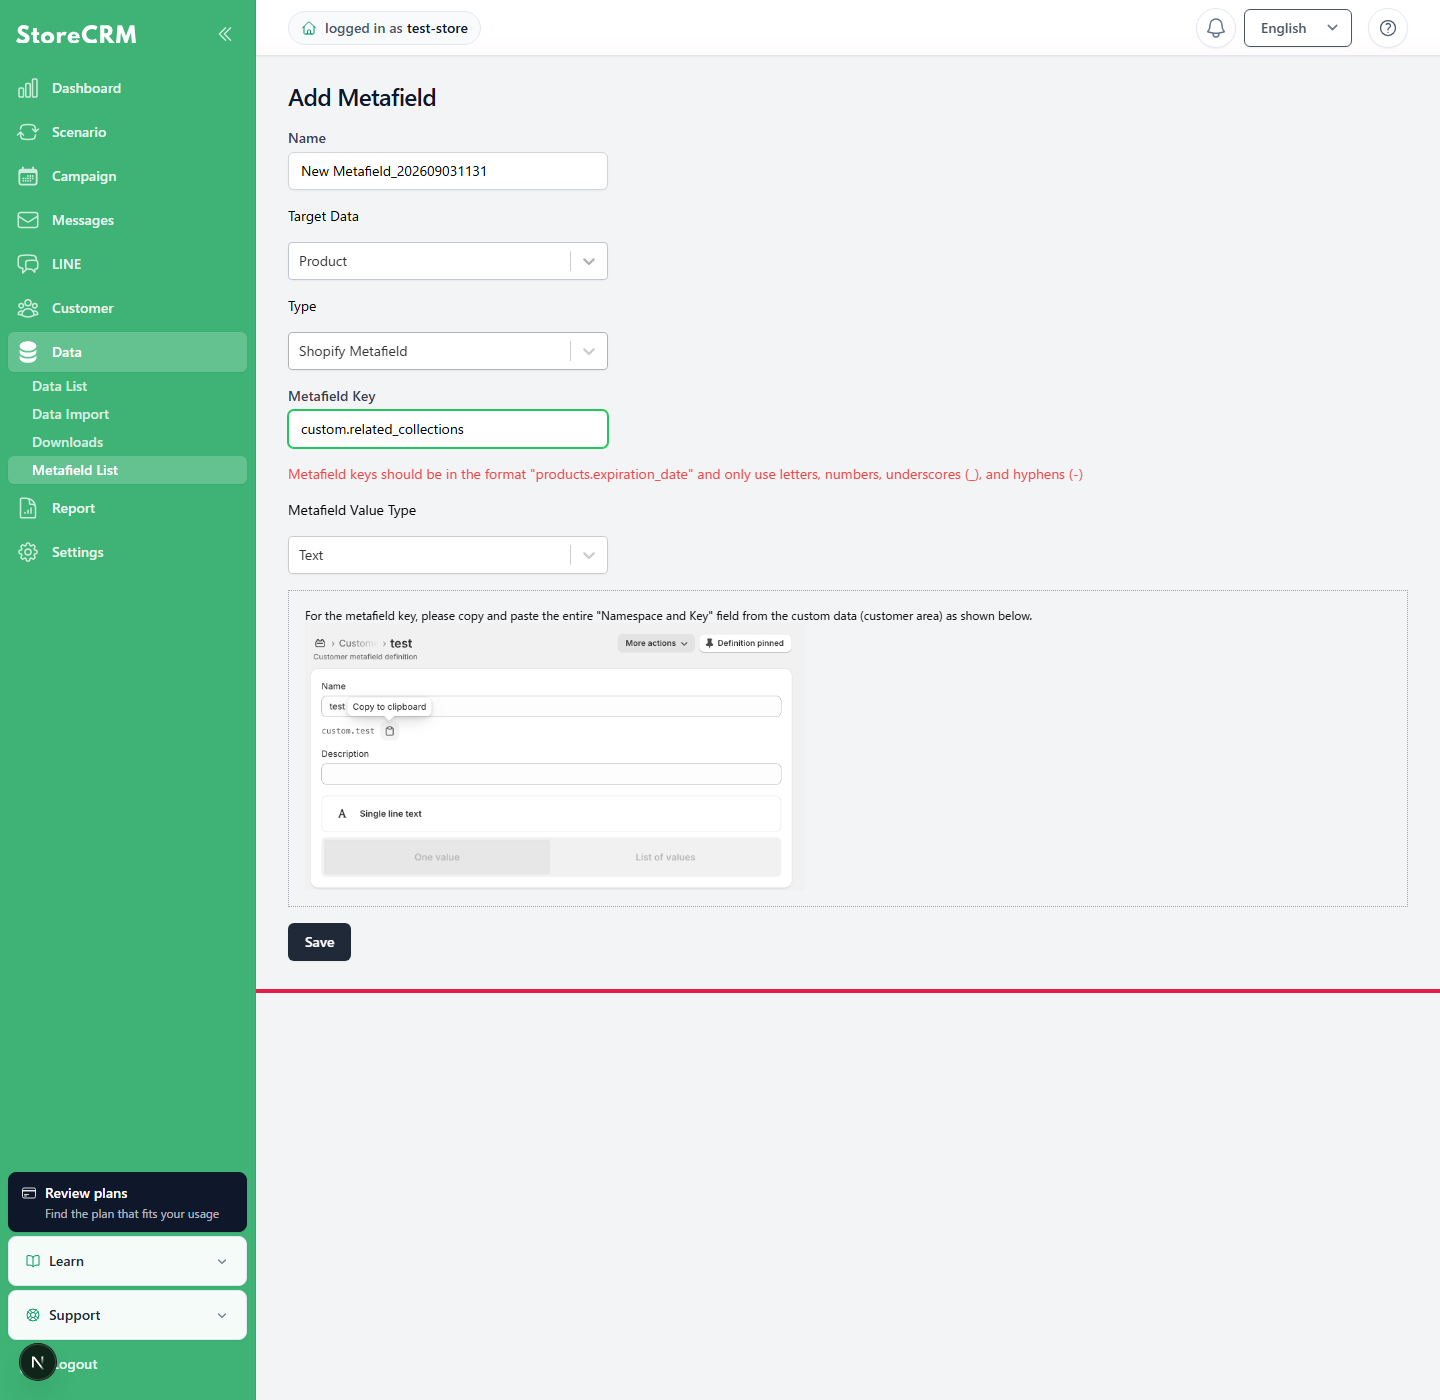
- Add new. If a product metafield with the same namespace and key is already registered, you can use that setting.
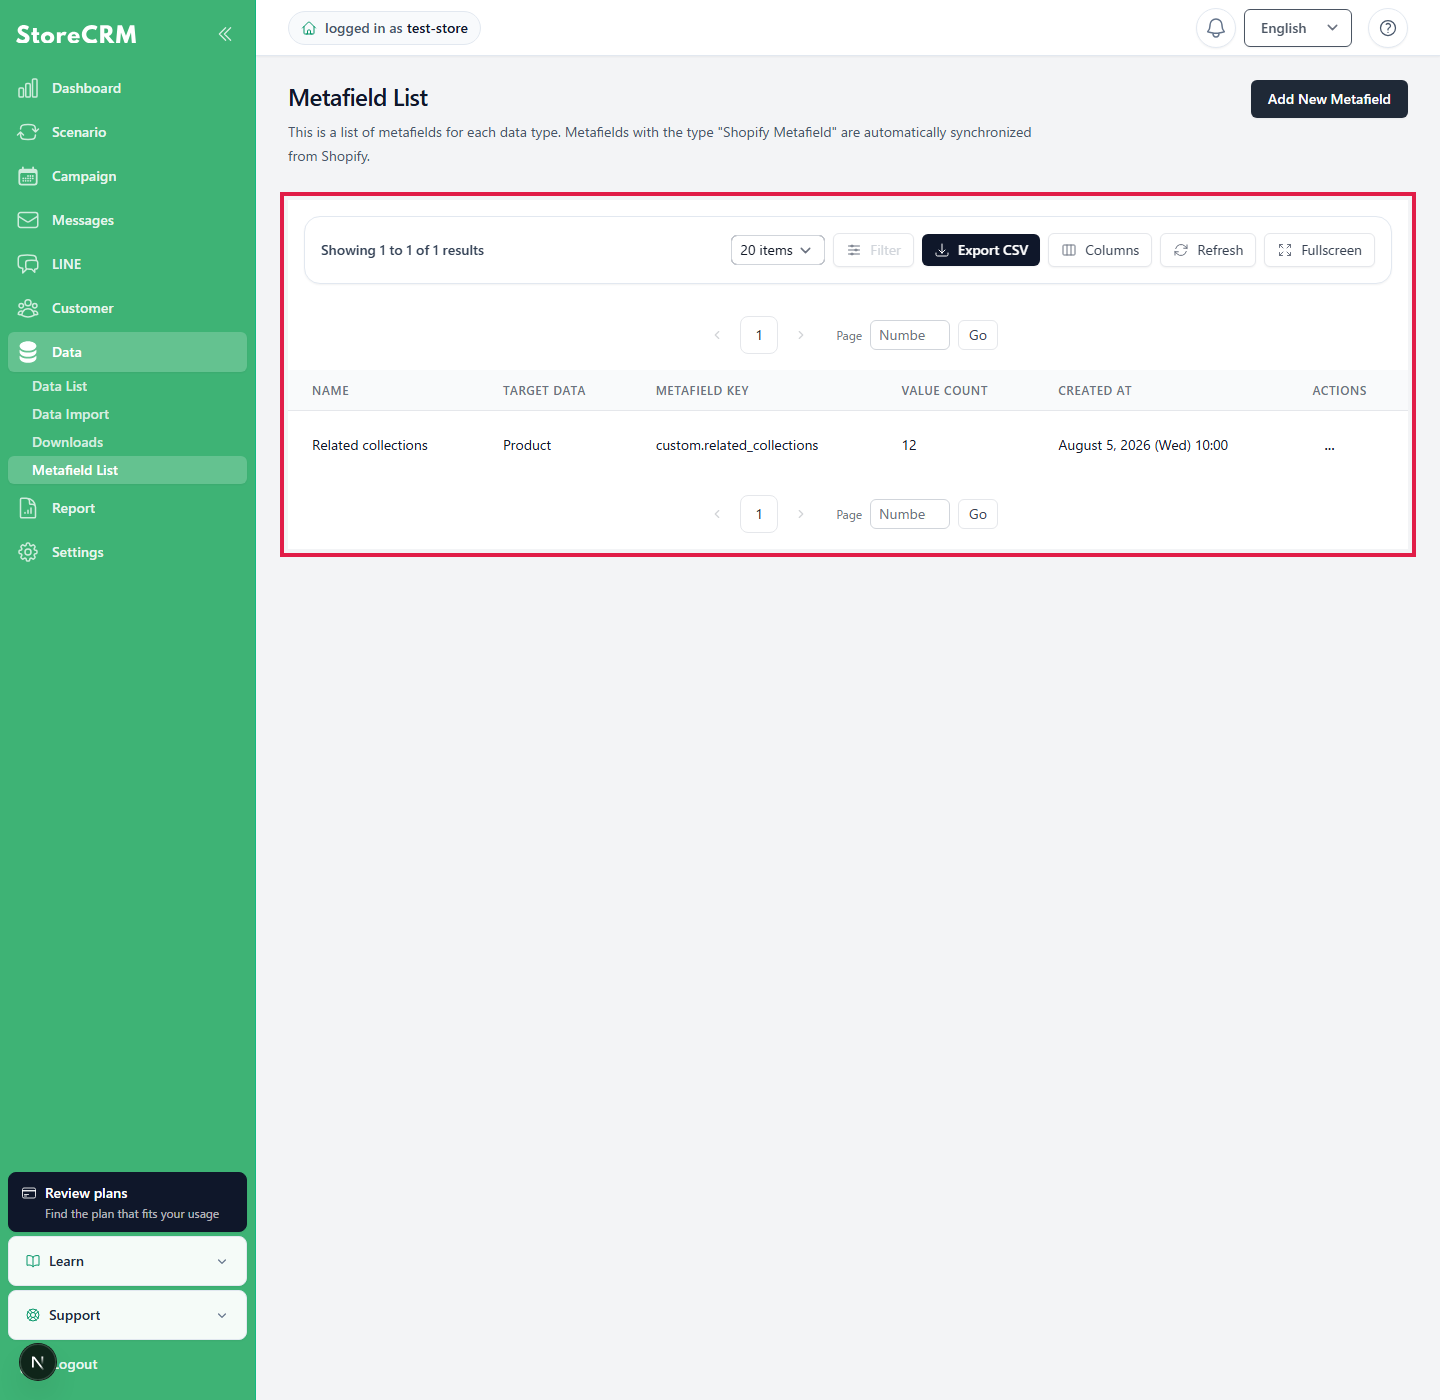
- nameEnter a name that you can recognize in the campaign settings, such as Related collection.
- Data typeFor the data type, select [Product], and for the sourceTypeselect [Shopify metafield]. If you select Customer or Order, it will not appear as an option in the campaign rule.
- Metafield keyEnter the complete namespace and key copied from Shopify. Example:custom.campaign_collectionsThe following is a list of the most common problems with the
- Metafield value typeselect [Text], thenSaveClick.
- Return to the list and confirm that the data type is [Product] and the key matches Shopify. If the value count is not updated, wait for the Shopify product save and StoreCRM sync to finish, then reload.
Use it as an audience condition in Campaign automation
- On the create or edit page for Campaign automation, select the triggerAutomatically send when a product is published.
- Under Audience, selectCustomers who purchased from a collection specified by a product metafield.
- under [Product metafields that store collections], select the [Related collection] metafield registered in StoreCRM. You can select up to 20 product metafields.
- For the first run, set the sending method toCreate as draft, save the rule, and run it manually from the rule details.
- Once the run history is 'Completed', open the created campaign, verify that the audience and products are as intended, and then enable the rule.
What to check when the audience count is zero
- Check if the "Related Collection" value is saved in the published product.
- Make sure the namespace and key match exactly in Shopify and StoreCRM. Case, periods, and underscores are significant.
- Check if the target data is set to "Product" in the StoreCRM metafield settings.
- Confirm that the specified collection has not been deleted and that the products/collections have been synced to StoreCRM.
- Confirm that customers have purchased products in the specified collection. [No recipients] is a successful result when nobody matches.
7. Perform a final review before saving
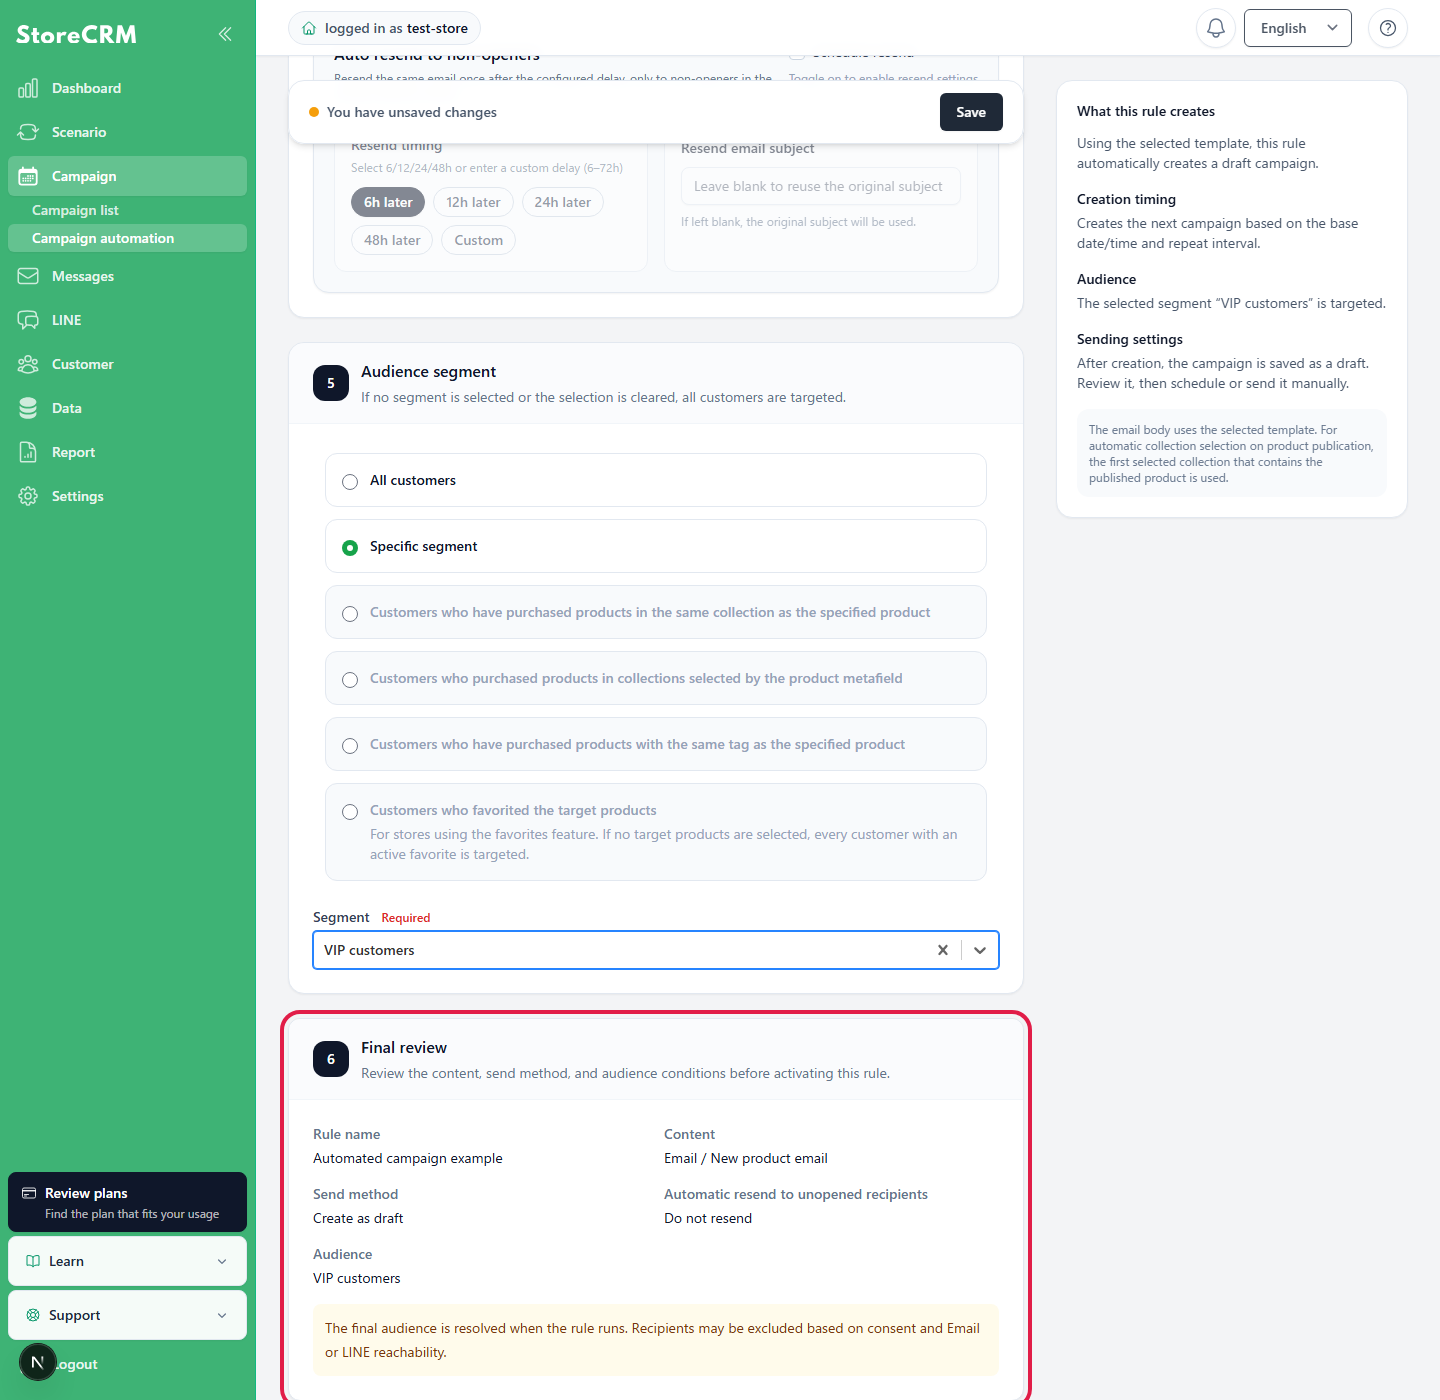
[Final review] before saving shows the rule name, content, sending method, and audience. Pay particular attention to the LINE message, immediate/scheduled/draft setting, and target segment. The final audience is determined at run time and may exclude customers based on consent or deliverability.
8. Enable the saved rule
- Review the entered settings, then clickSaveClick.
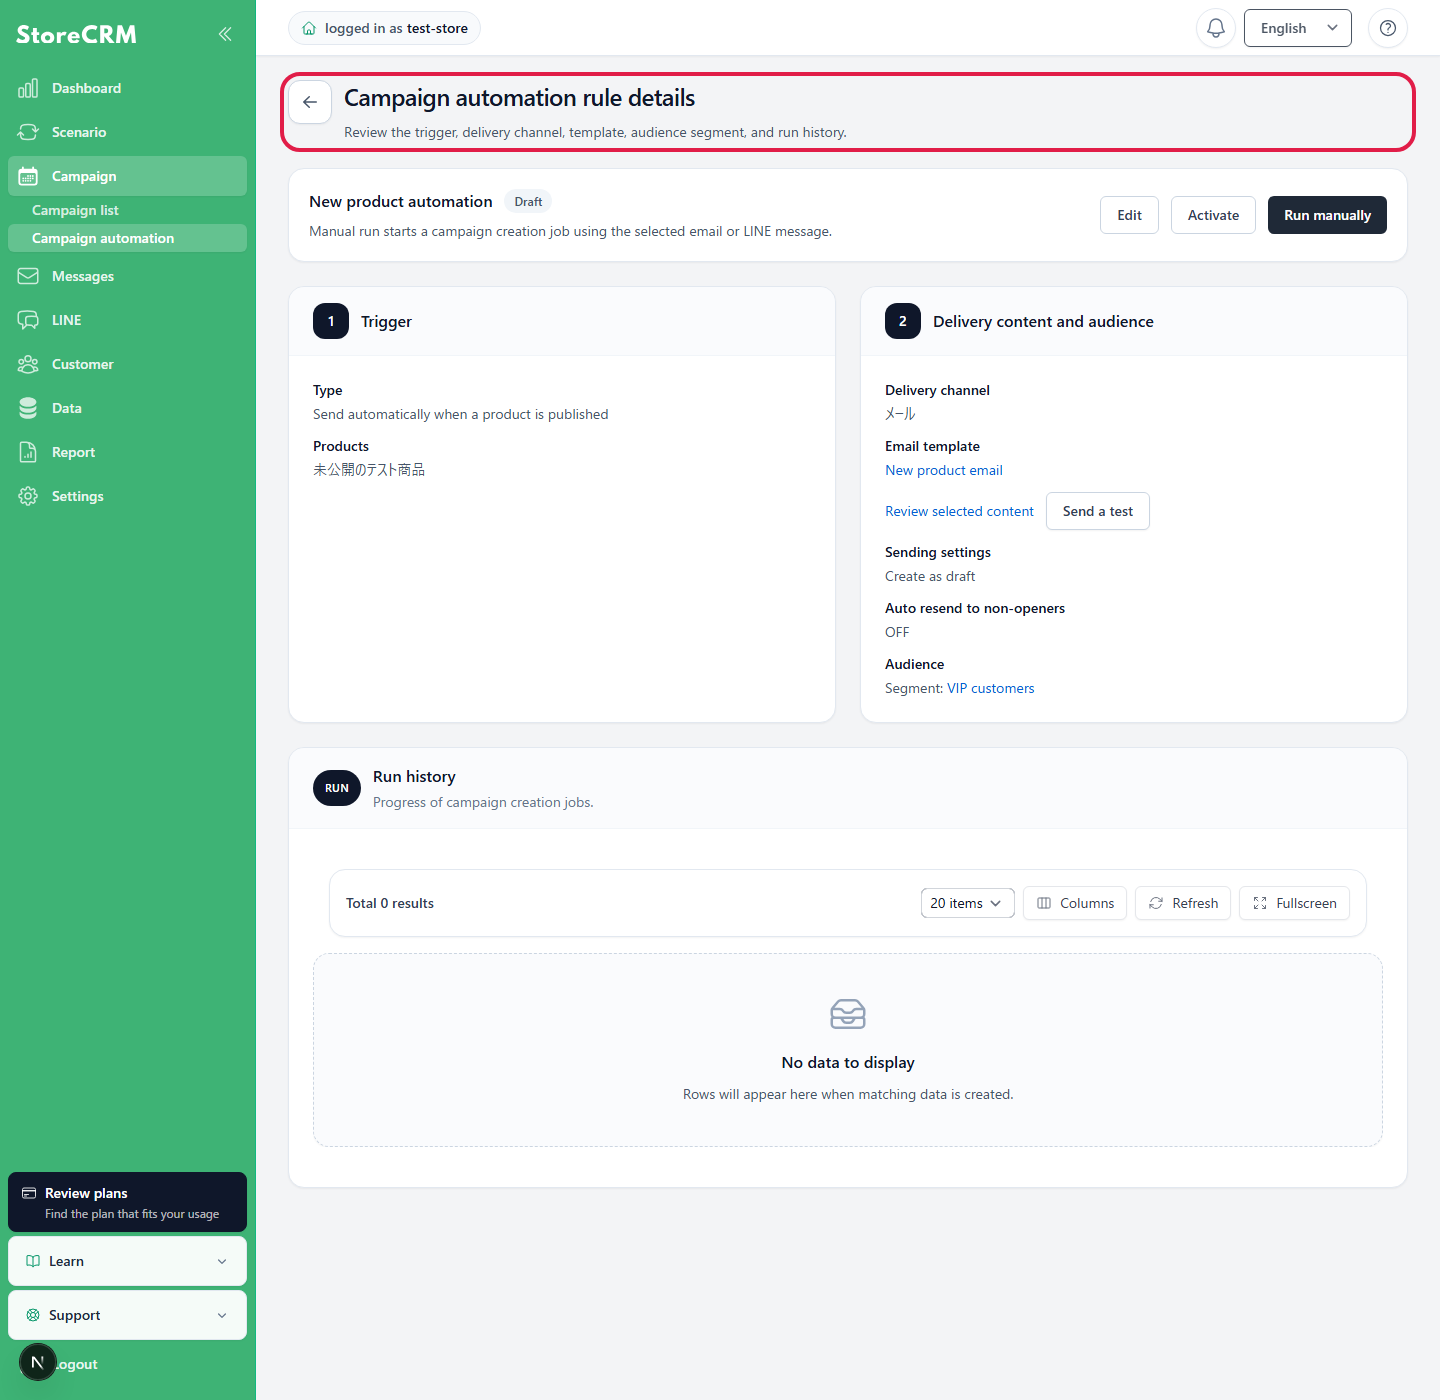
- After saving, open the rule details and recheck the trigger, delivery channel, email template or LINE message, sending settings, and audience.
- For a draft rule, clickEnableand enable it on the confirmation screen. After it is enabled, the rule runs automatically when its configured trigger occurs.
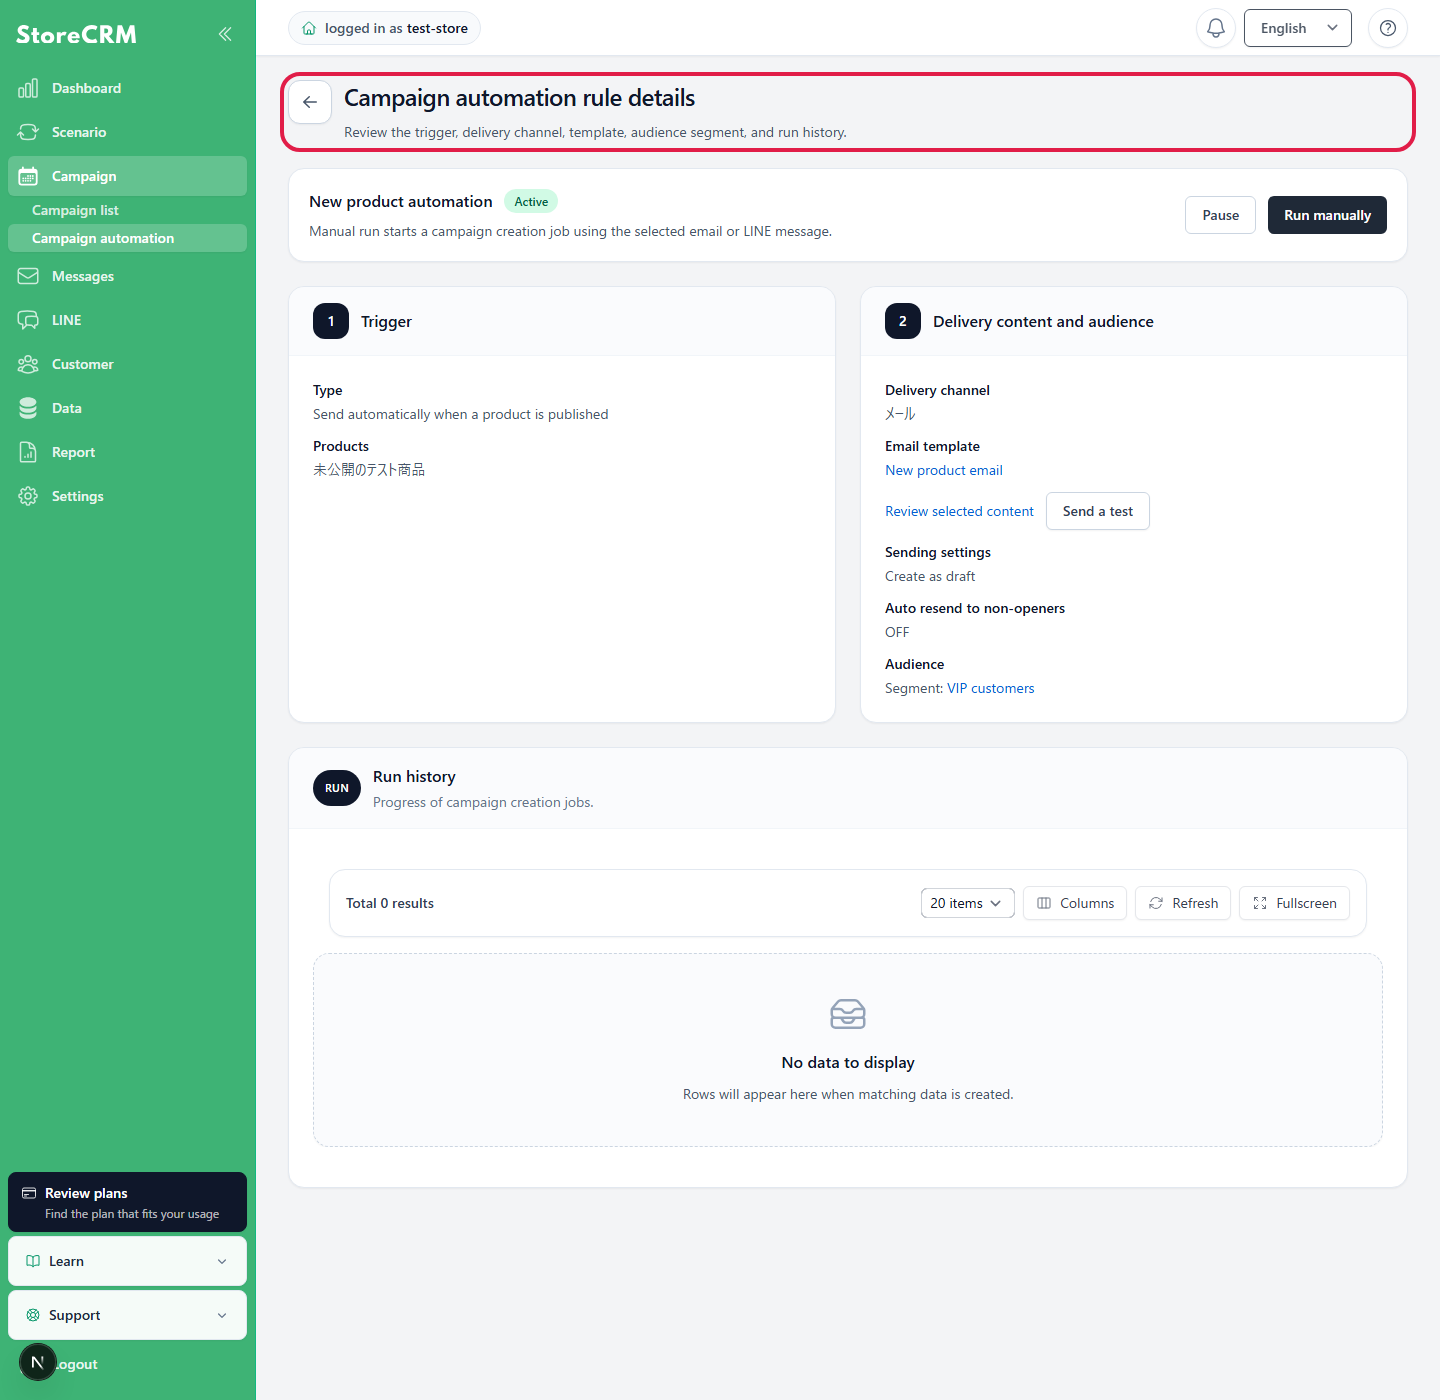
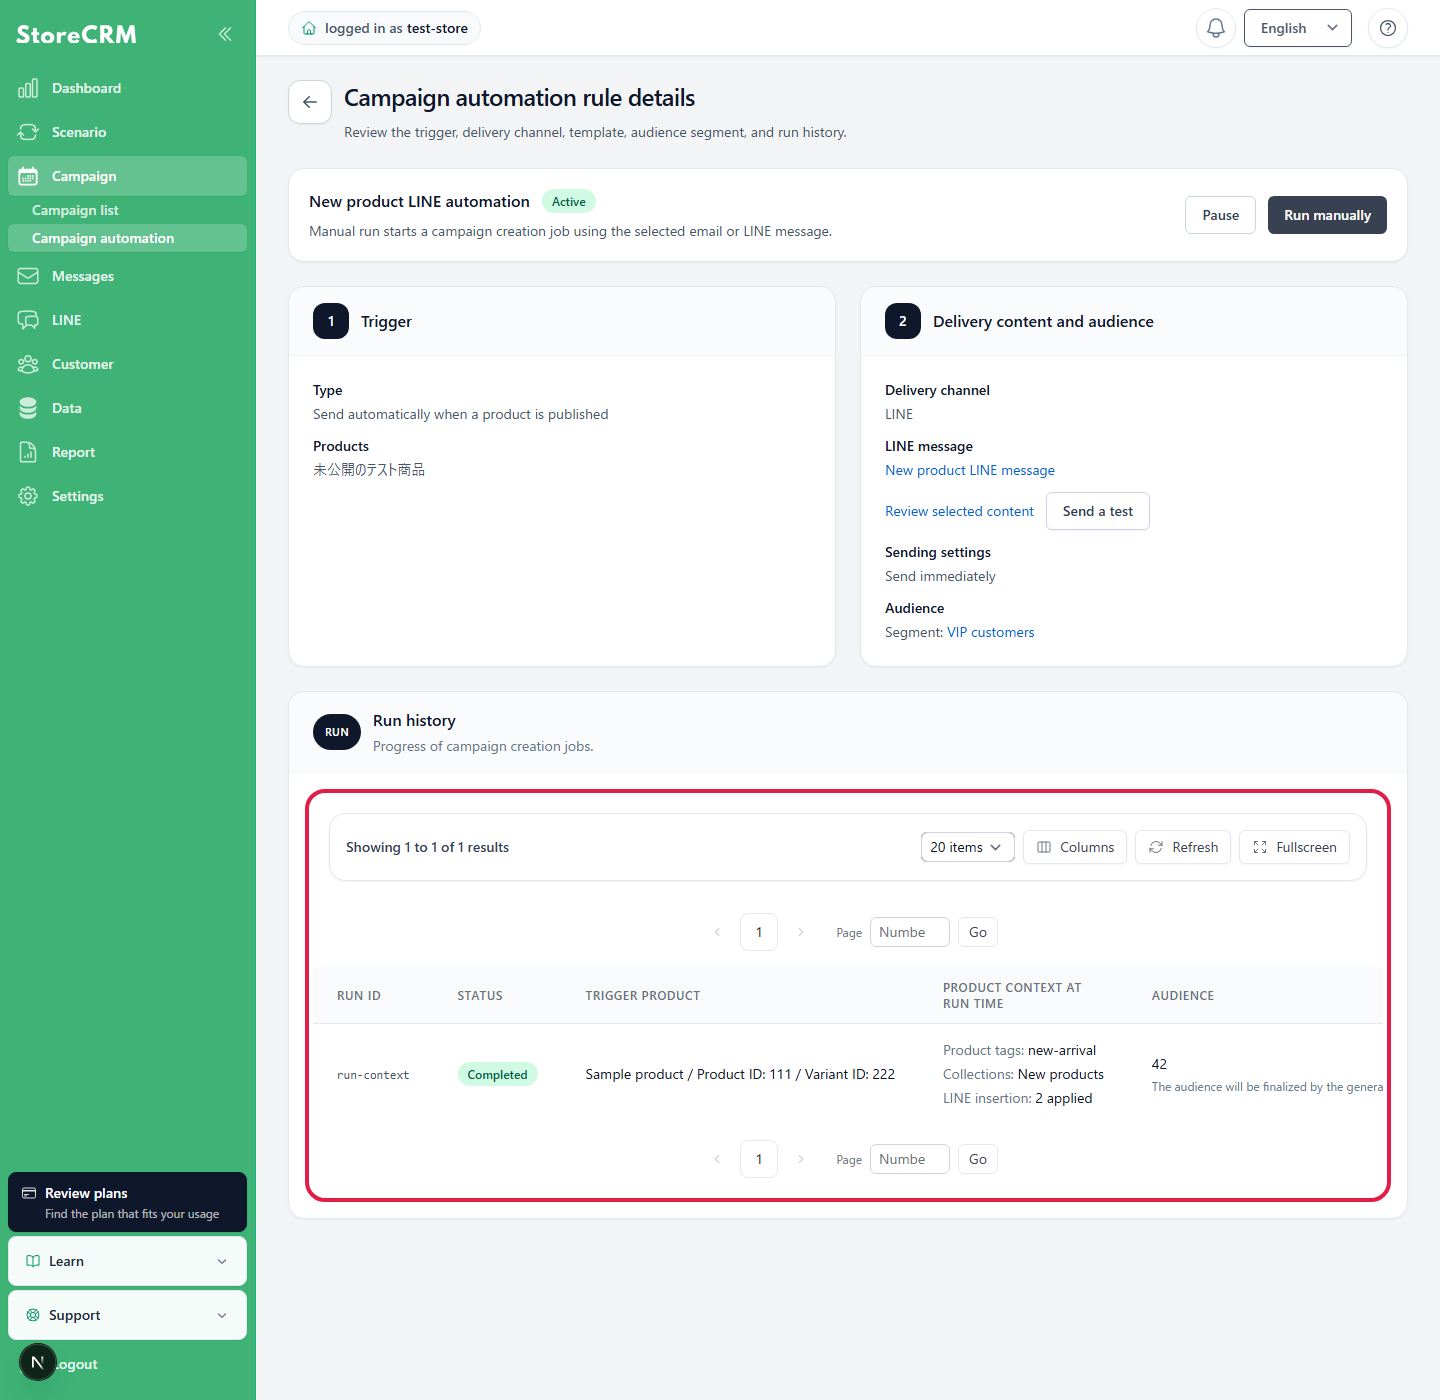
For a LINE rule, the details page shows the LINE delivery channel, selected LINE message, sending settings, and audience. Open the original message from the LINE message name link.
9. Edit, stop, or manually run a rule
- Edit: Edits a draft or stopped rule. Stop an enabled rule before changing it.
- Stop: Stops automated runs. While stopped, the rule does not run when its configured trigger occurs.
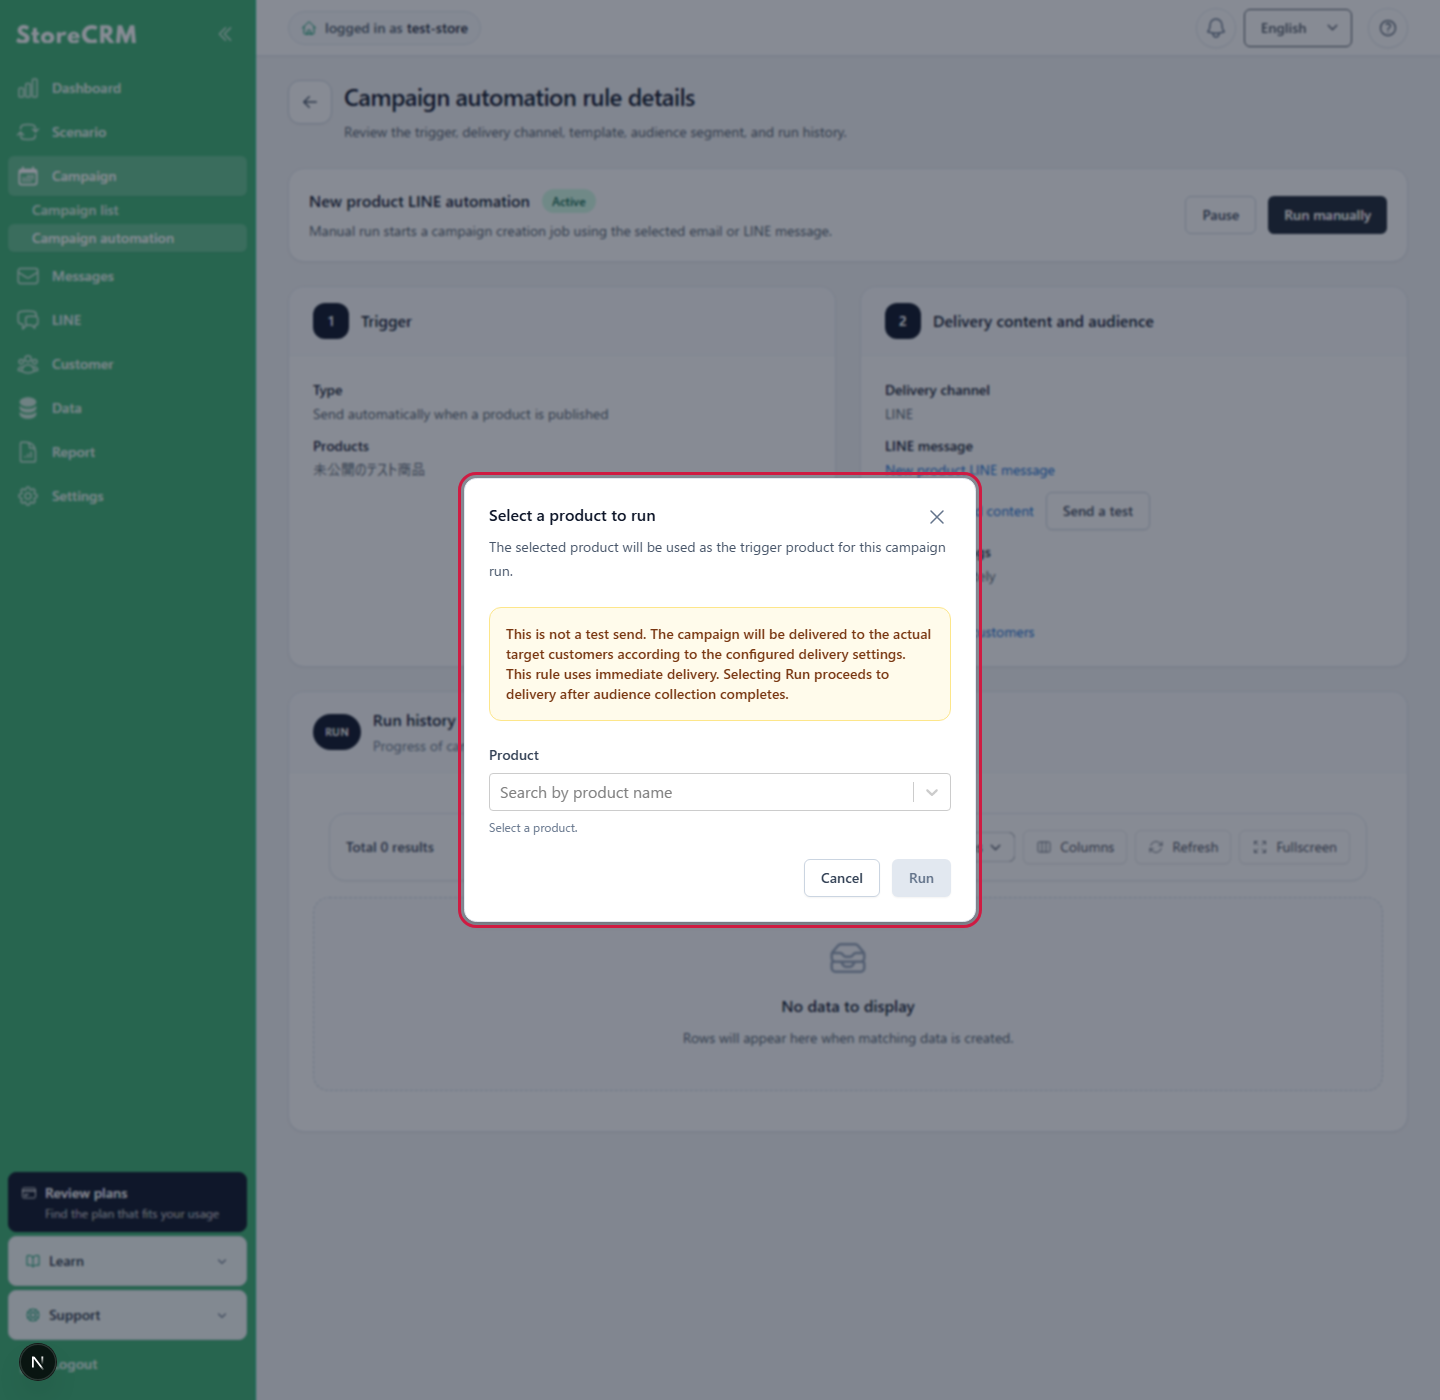
- Run manually: Starts a campaign job using the selected email template or LINE message and the current conditions. For a product-triggered rule, select one product for the run. You cannot run multiple products at once.
- Confirming a live send: Manually running an immediate or scheduled delivery rule sends to actual recipients, not to test recipients. Review the warning before clicking [Run]. A draft rule does not send anything.
10. Review run results
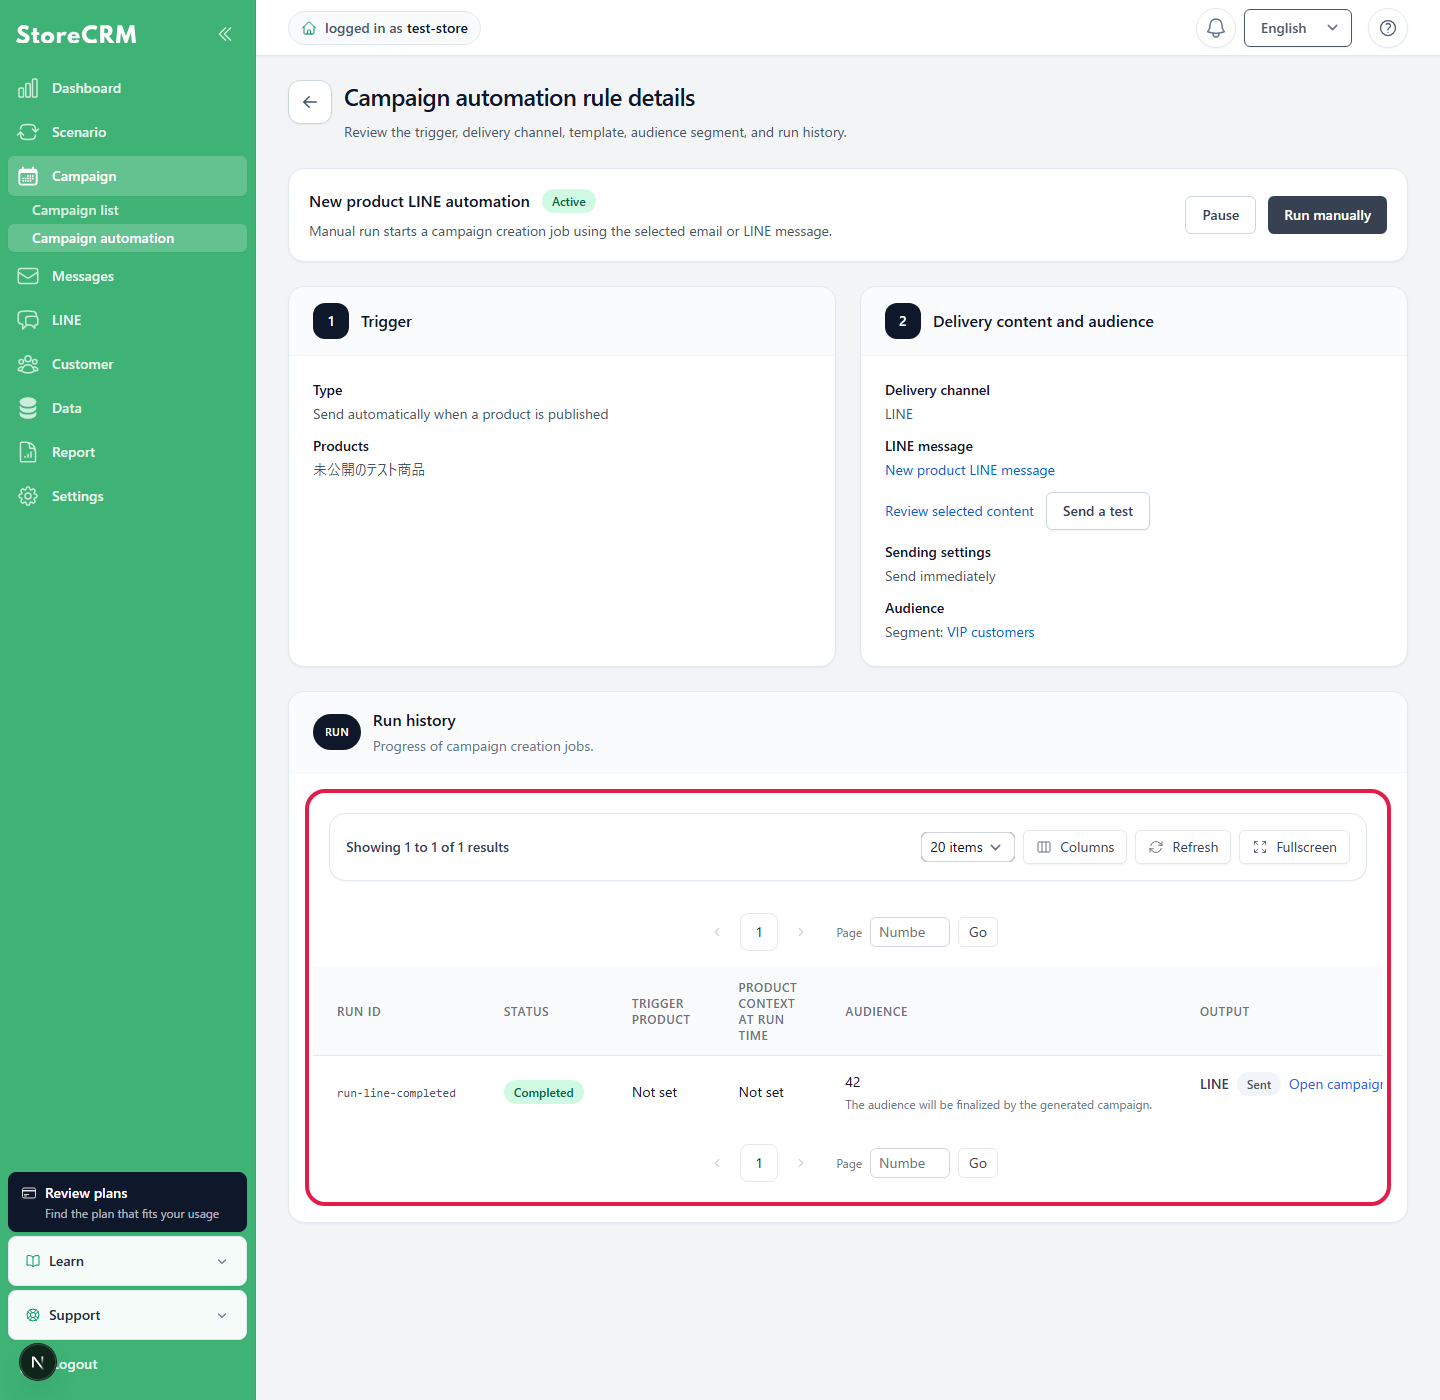
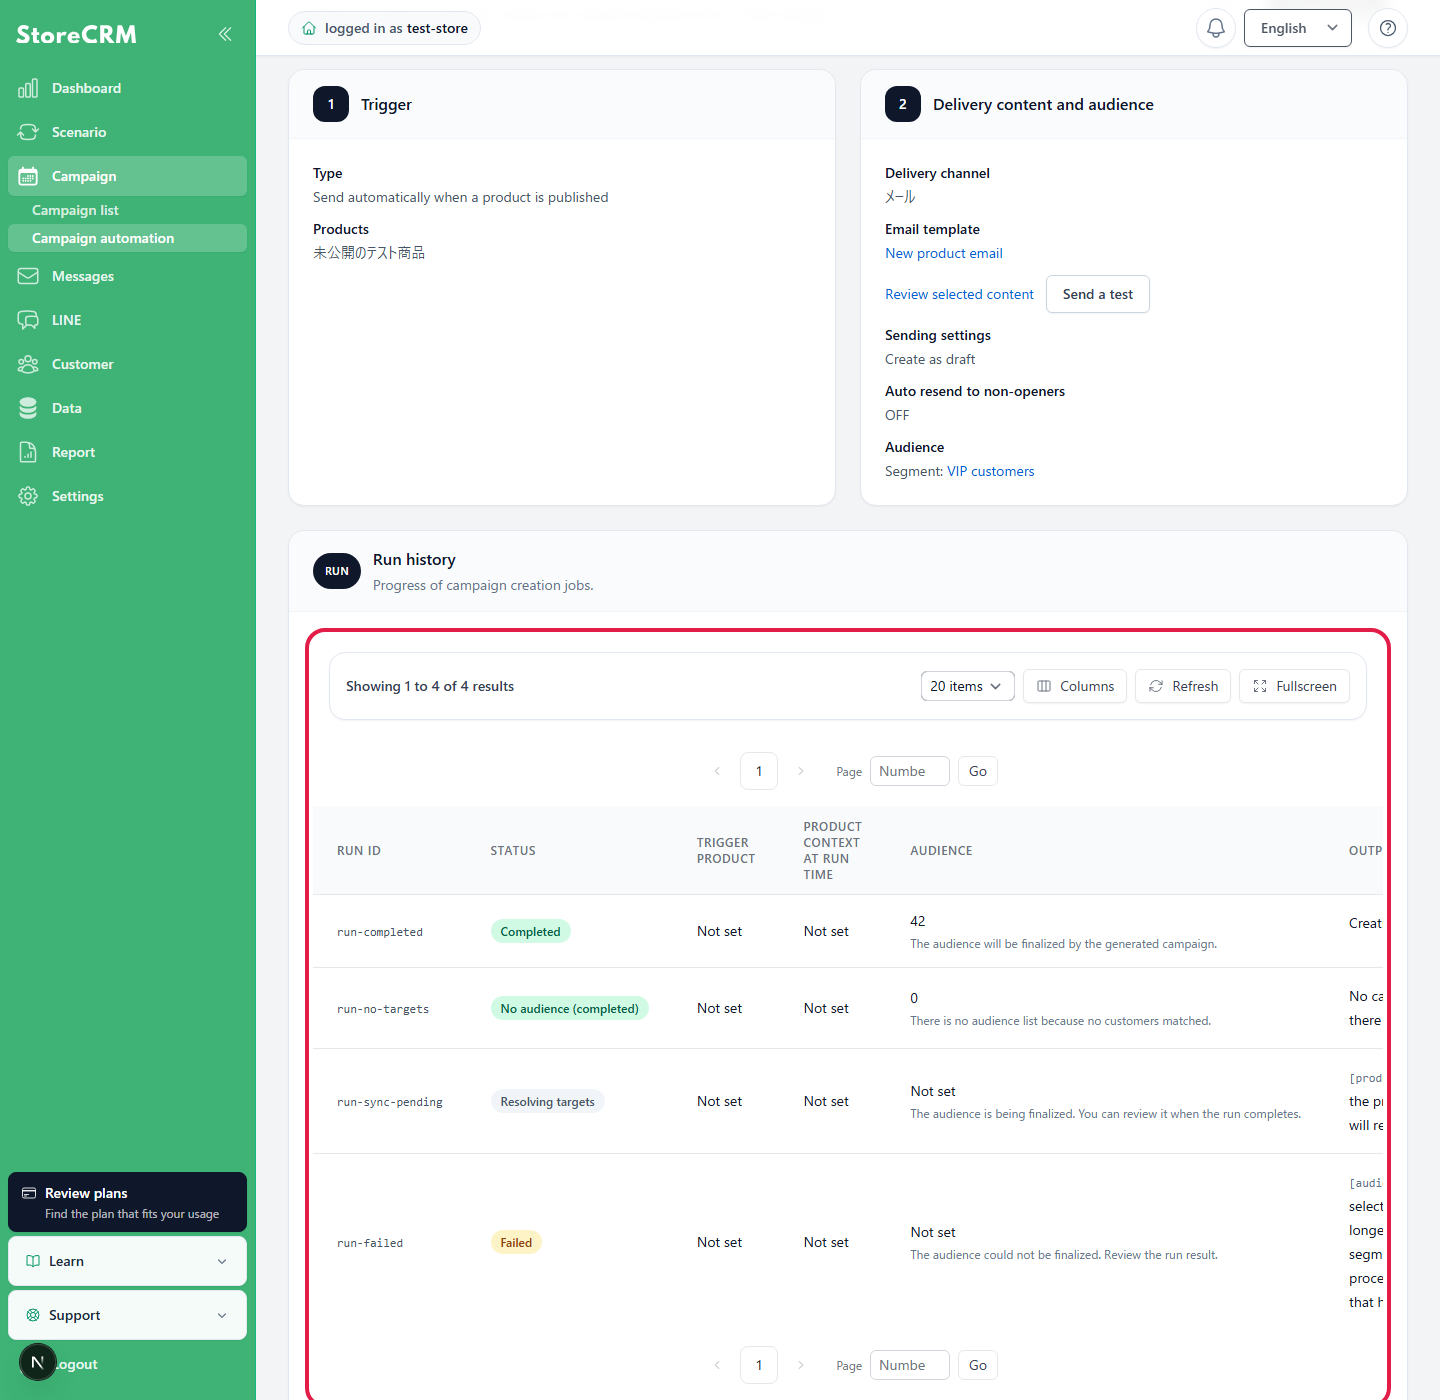
Under [Run history] in the rule details, check the campaign job's progress, audience count, created campaign, and any errors. Select [Open campaign] on a completed row to review the result.
For a LINE rule, [Output] shows the sending status for LINE and the campaign. The snapshot count is the audience count determined at run time. Select [Open campaign] to review the LINE campaign and LINE message created for each run.
| Display | Meaning and action |
|---|---|
| Accepted / Checking target products / Extracting audience / Generating content / Creating campaign | Processing in progress. Refresh to check progress. |
| Completed | A campaign has been created. Select [Open campaign] to check its content, products, and audience. |
| No recipients (completed successfully) | No campaign was created because there are no customers matching the criteria. This is not necessarily a configuration error. |
| Checking target products (waiting for sync) | Automatically retries after products, variants, and collections finish syncing. |
| Failed | Check the reason displayed in the row. Check the deleted, published, and synced status of products and collections, as well as the status of product tags, product metafields, and customer segments, and stop and edit rules as needed. |
| Canceled | The run was canceled. If necessary, check the conditions and run it manually. |
Check the product conditions and audience for the run
Run history shows the trigger product, product tags and collections at run time, audience snapshot count, and created email or LINE campaign. Use [Review audience] and the output links to check the inputs and results for that run.
What to check if you cannot save
- Check that all required fields are filled in, including the rule name, email template or LINE message for the selected channel, and the reference date and time for a recurring rule.
- If you chose a specific segment, search for and select the segment.
- If you want to select buyers from the same collection, specify the collection on the trigger side, and if you want to select buyers with the same tag, specify one or more product tags.
- Enter 1–365 days for restock recreation prevention, 1%–100% for the price-change threshold, and an integer from 6–72 hours for a custom resend time.
- If you are unable to obtain candidates for products, collections, product tags, and product metafield, check the communication and synchronization status and perform a "reload".
- If you see a product tag that does not exist in the current product data, reselect an existing tag that has been synchronized.
 English
  Japanese