
Introduction
This article explains how to add StoreCRM's wishlist and wishlist page to Shopify, including the settings to use and the details to watch out for.
A wishlist is an important addition to any ecommerce store. It saves customers from having to search for a product again, and it gives them an easy route from a saved product to related items and offers they will care about — a better experience all round.
For the merchant, it also reveals what each customer is interested in, which sharpens your marketing, and it opens up extra sales through recommendations and campaigns based on saved items (cross-selling and upselling).
With StoreCRM you do not need a separate wishlist app: the wishlist itself and the campaigns built on the data it collects are all handled inside this one app.
Because a wishlist benefits both the customer and the store, it is well worth adding.
The steps below use the free Dawn theme. Paid themes and heavily customised themes may have a different file structure; if that is the case, contact StoreCRM customer support and we can carry out the implementation for you.
Related pages
7 Shopify wishlist apps compared
How to add a wishlist button to Shopify collection pages
Adding the wishlist button
What you will build in this section
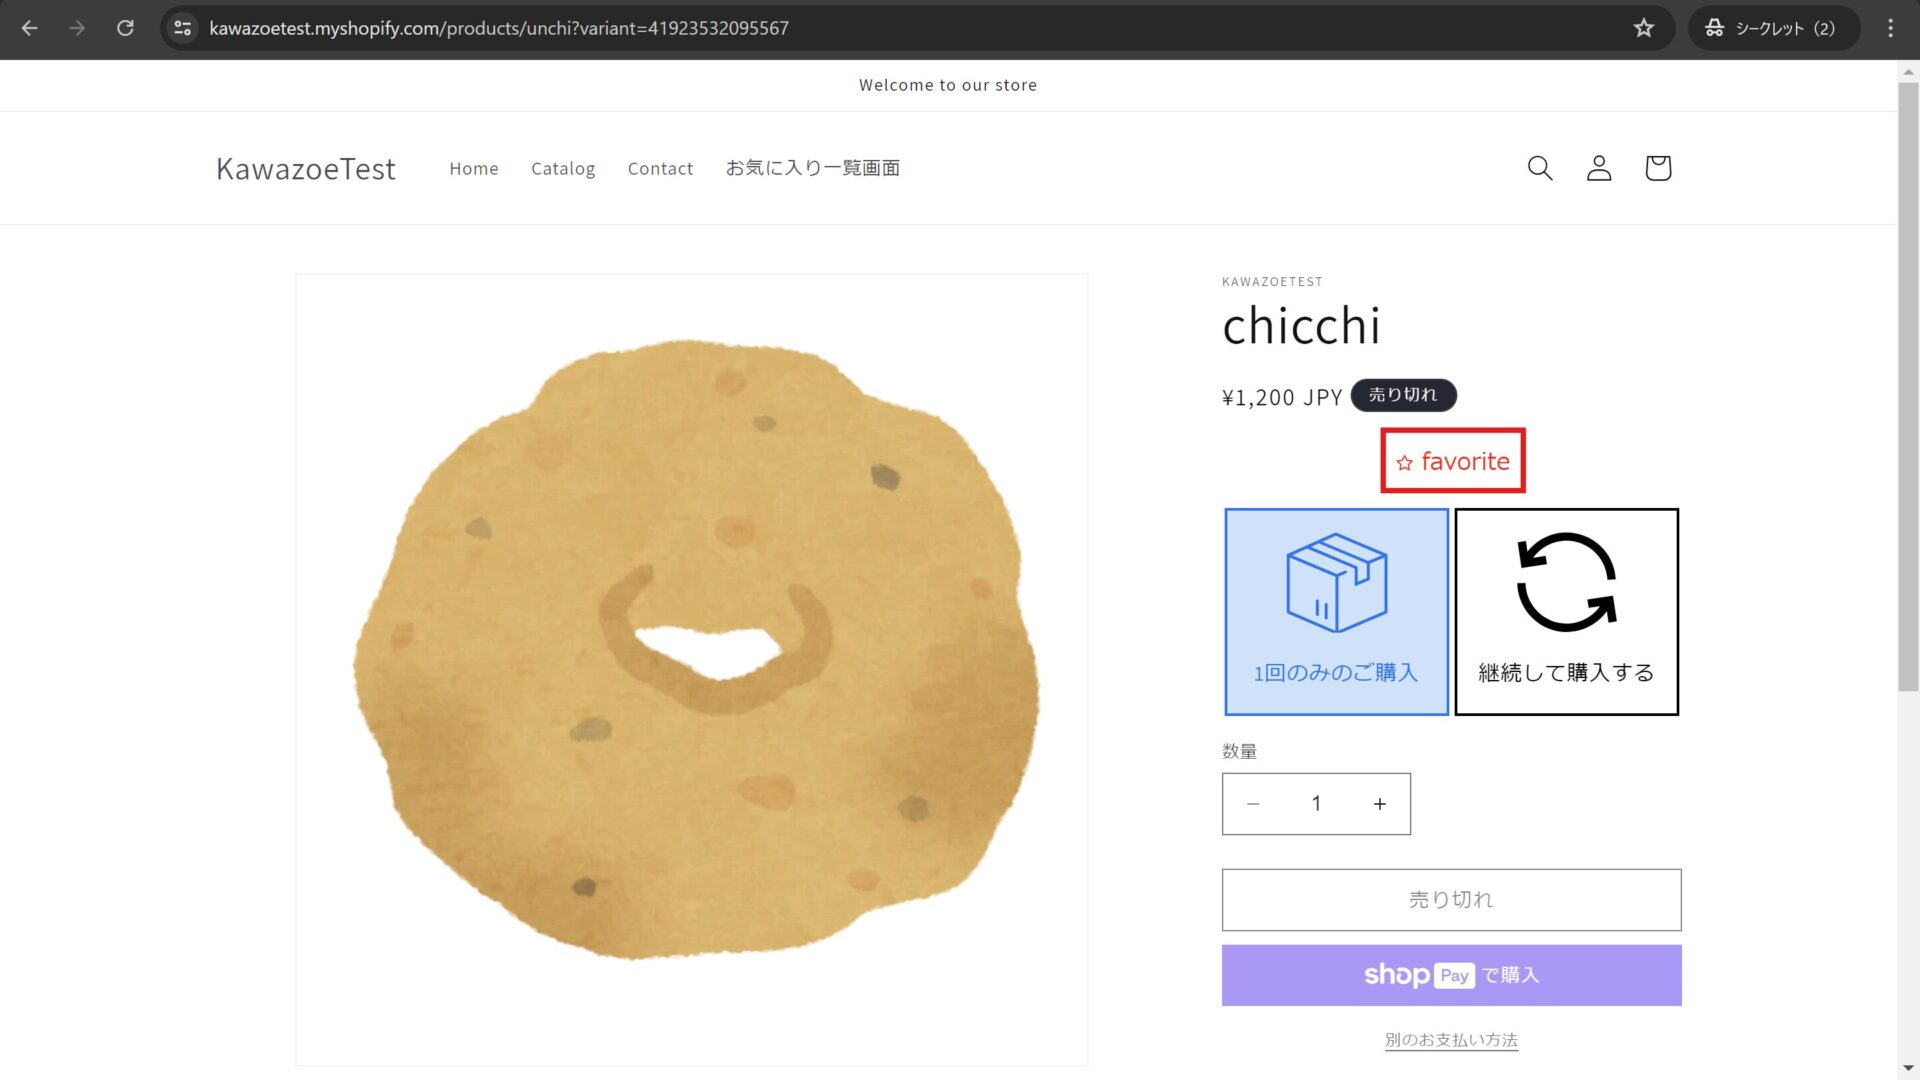
Let us start by looking at the finished wishlist button. The red box marks the button.
Open the theme editor for the page you want to edit
The steps that follow involve editing your theme, so if you are at all unsure, use "Duplicate" to make a copy of the theme and edit the copy instead.
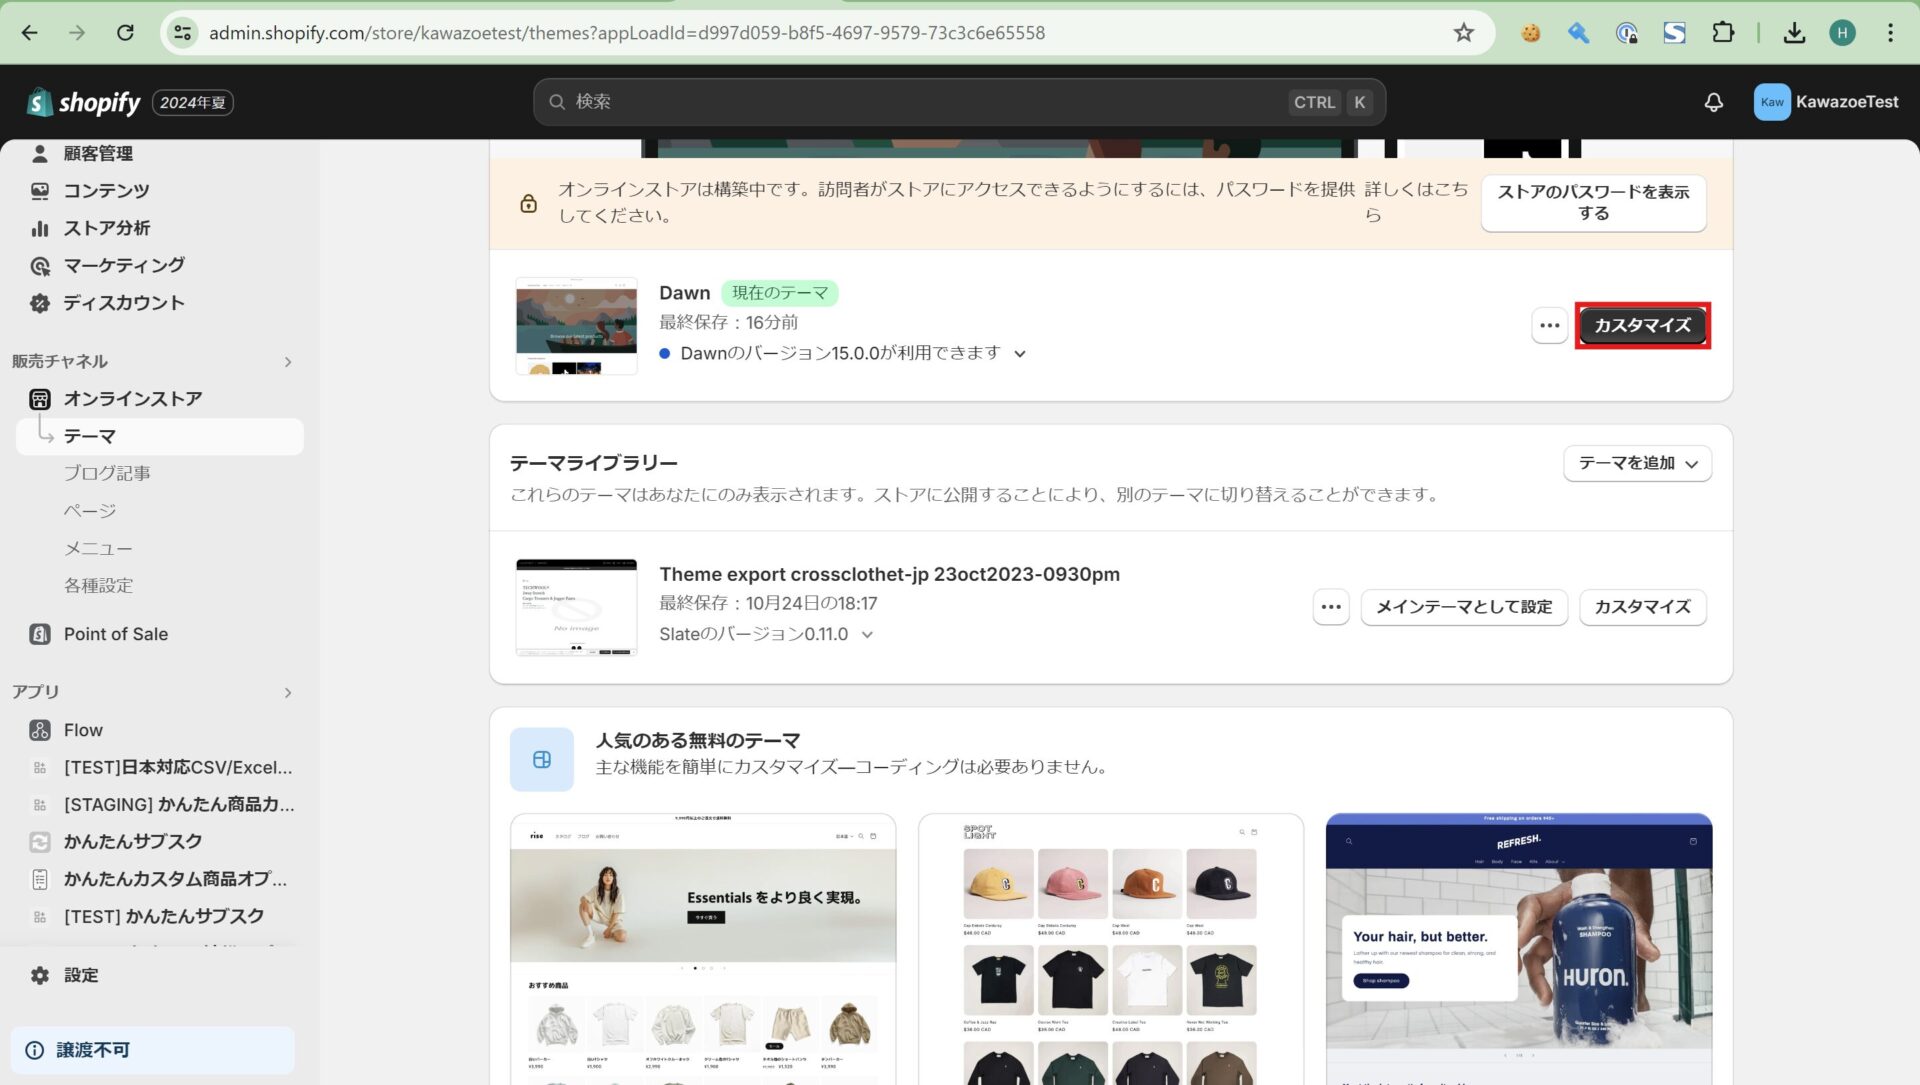
1. Open the theme list from [Shopify admin] > [Sales channels] > [Online Store] > [Themes]. Click [Customize] to the right of the theme you want to edit.
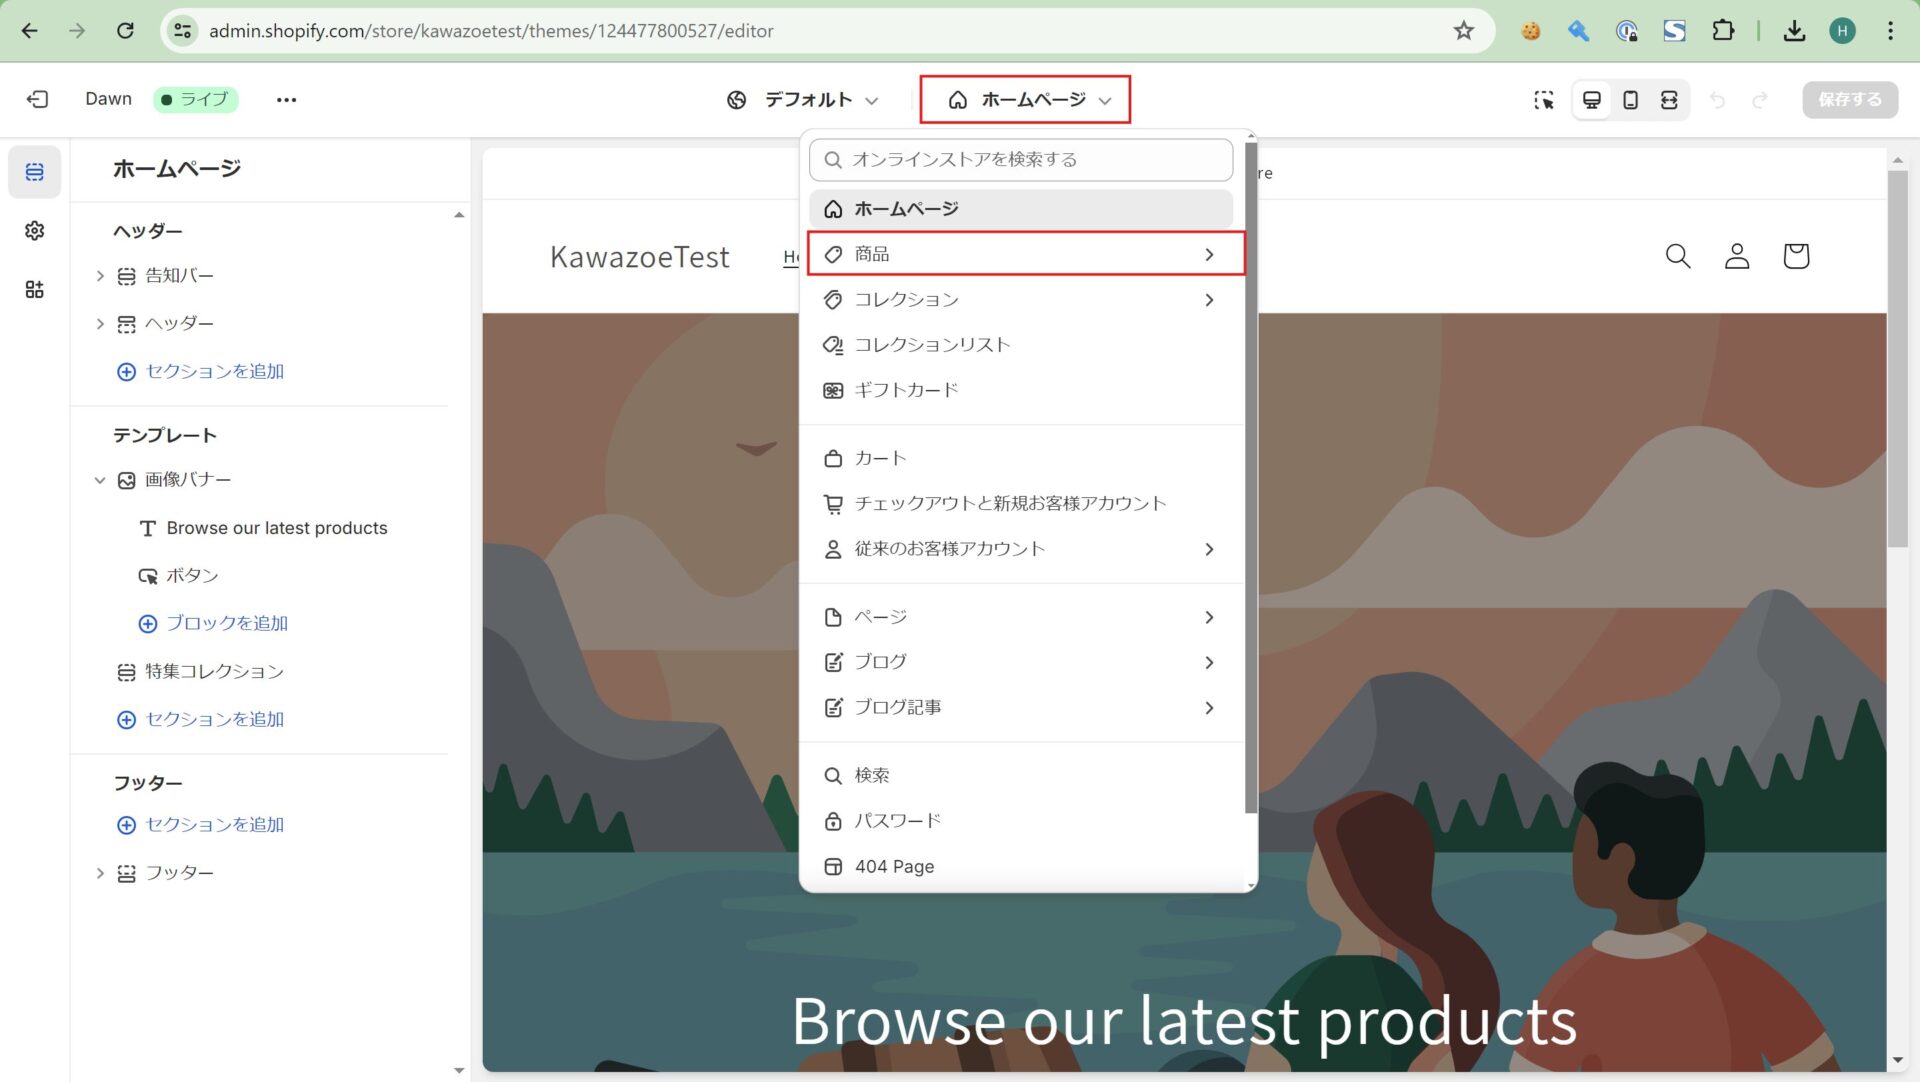
2. Clicking [Customize] opens the theme editor. Because we are editing the product page, click [Home page] > [Products] at the top of the screen.
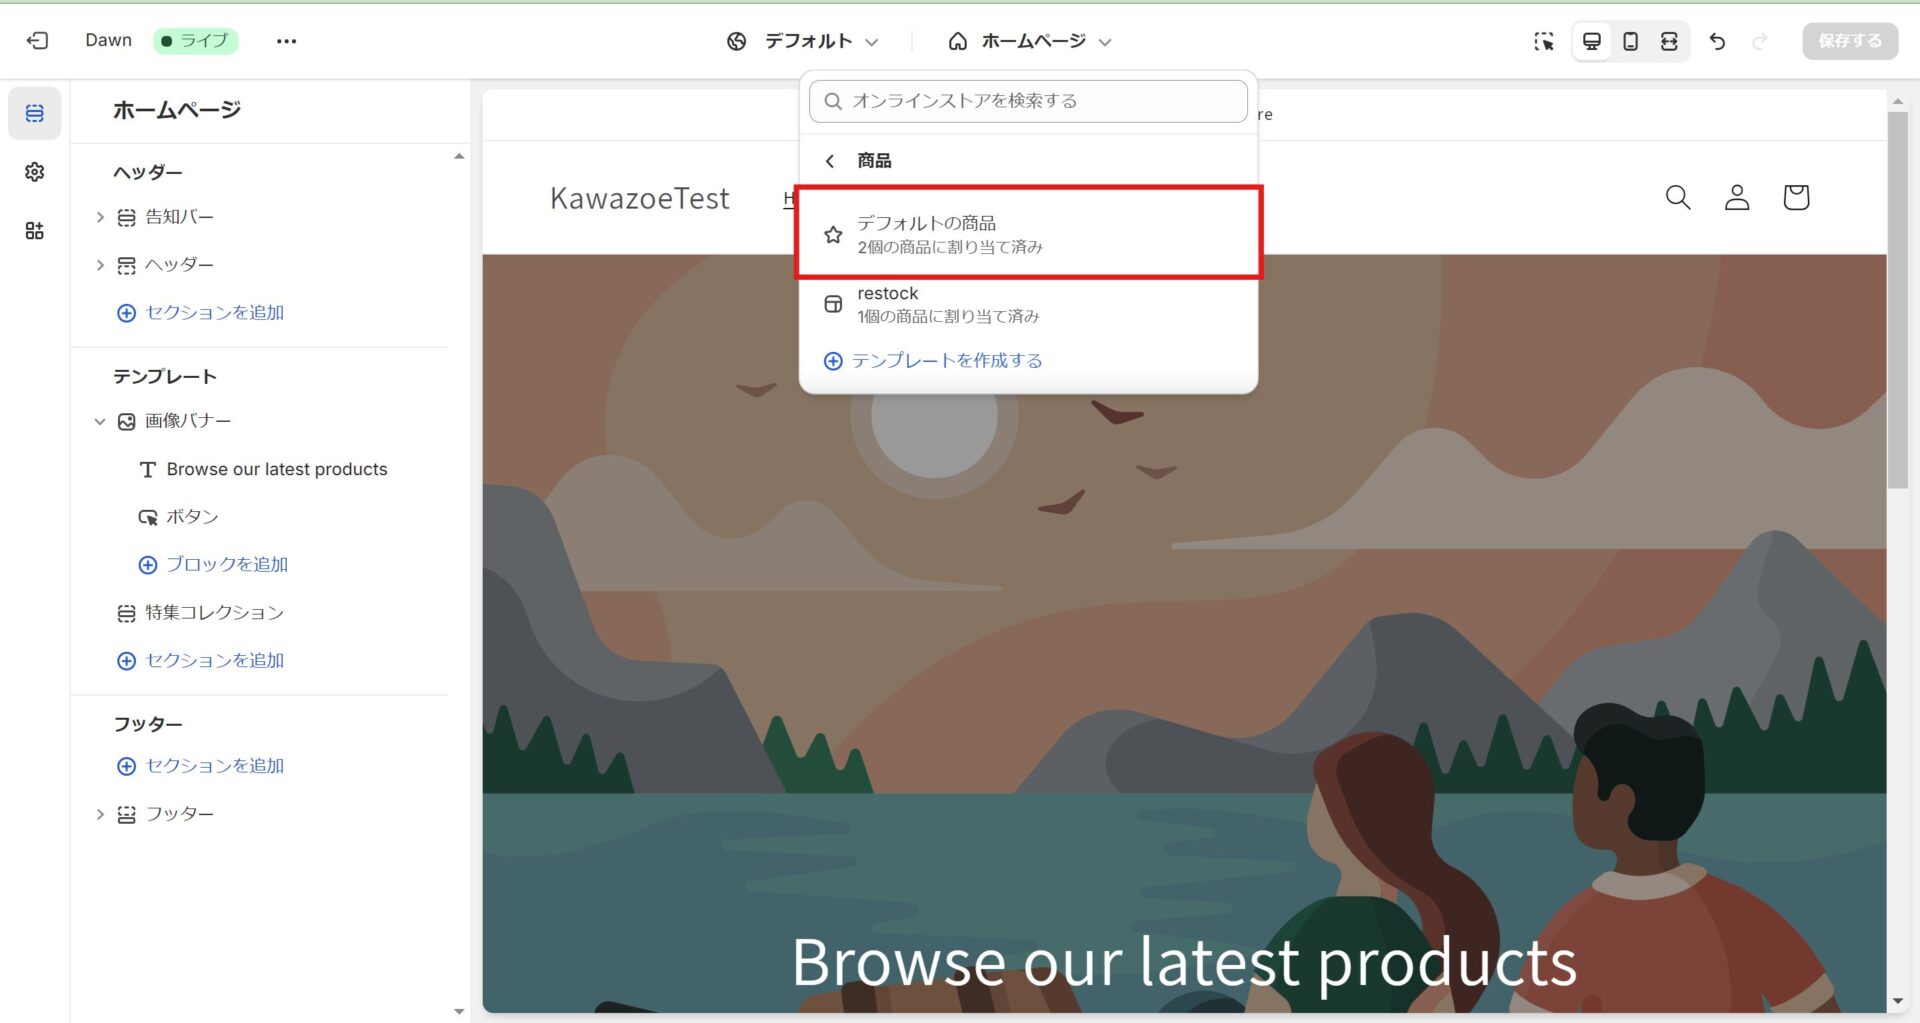
3. Clicking [Products] lists the product page templates. Select the template you want to add the wishlist button to. If you only want the button on certain products, you can use [Create template] to make a new template based on an existing one and add the button there instead. In this example we create a template named [Default product] and use that.
Adding the wishlist app block
- If you are on theme architecture 2.0 or later, no code is required to add the wishlist button.
- You add the app's theme block instead, which is what this section covers.
- If you are on theme 1.0, you need to add code to the product page.
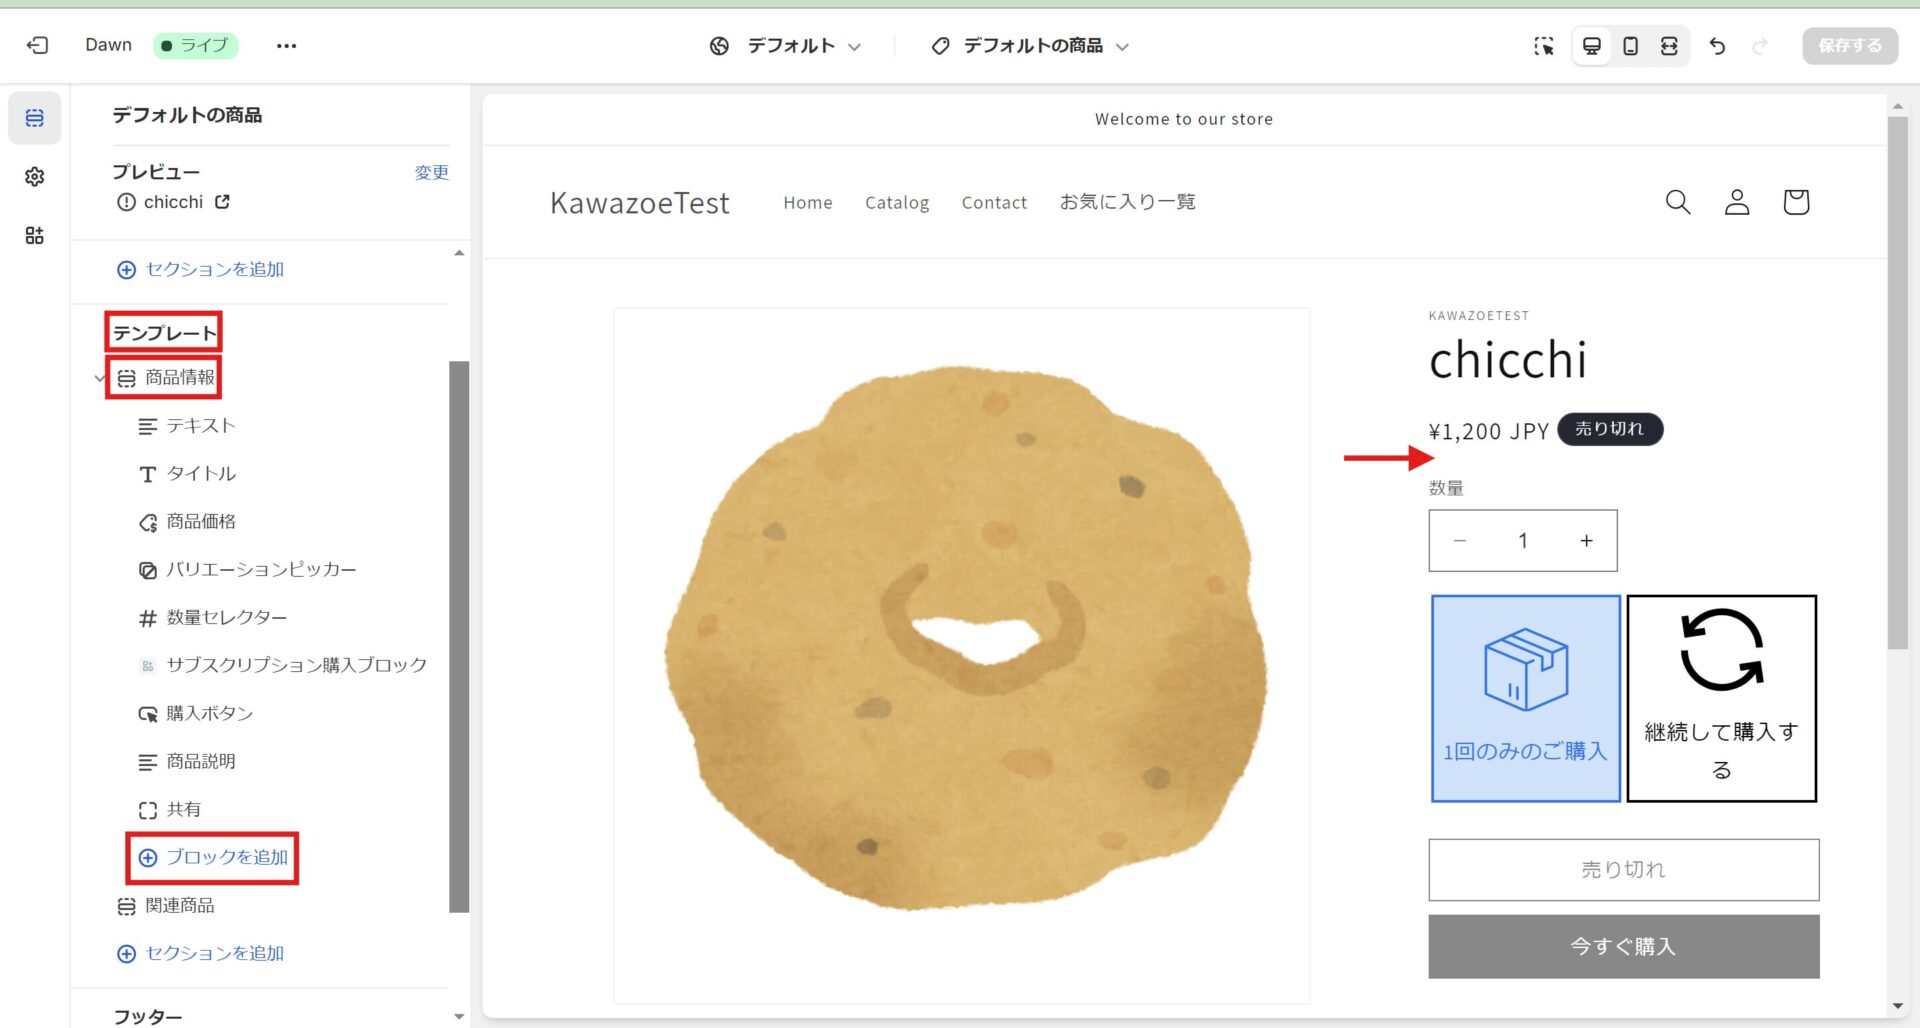
1. First decide where the button should sit. Here we place it below the [product price]. Start by clicking [Product information] > [Add block] in the left-hand menu.
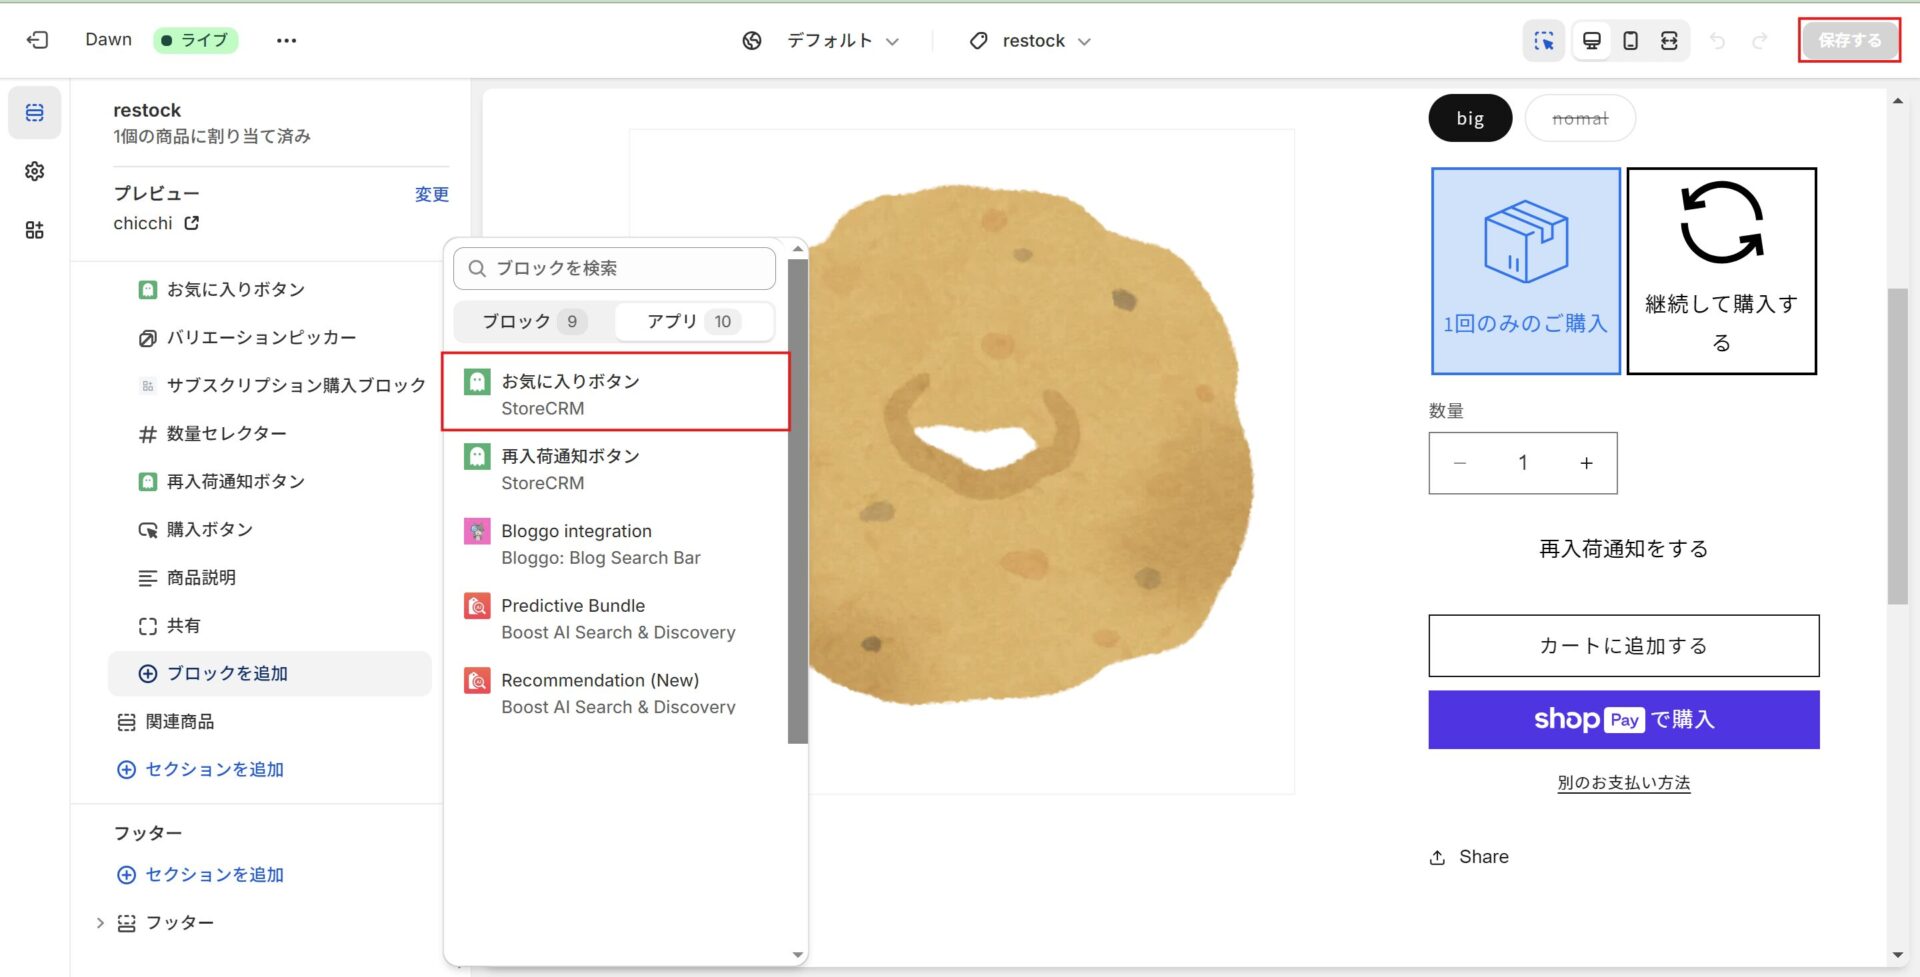
2. When the block list appears, switch the tab at the top from [Blocks] to [Apps]. Click [Wishlist button] under the apps. The block is added to the product information section; drag and drop it to the position you want. Then click [Save] at the top right of the page to save the theme, and this section is done.
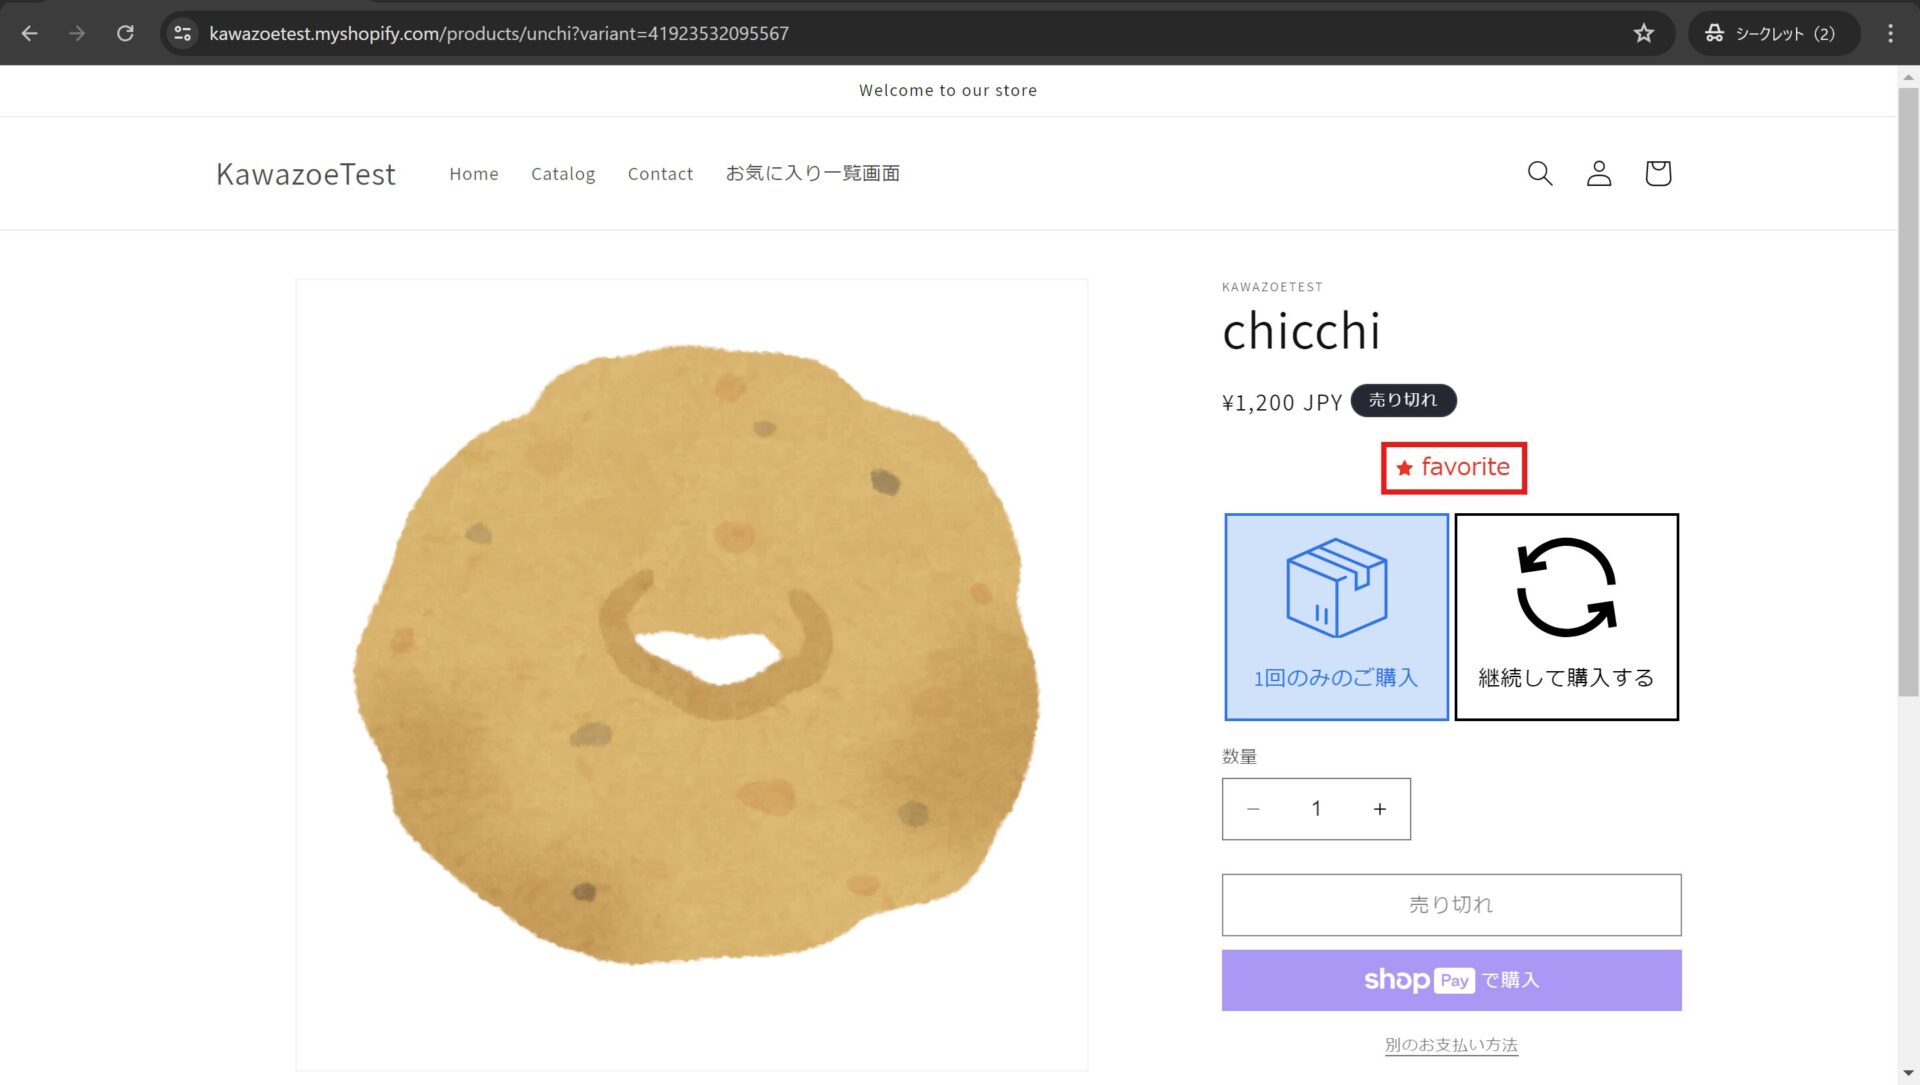
3. Open a product page and confirm that clicking the wishlist button changes its state, and that the state persists when you reload the page. That completes this section. If the button does not appear, go back and check that you followed steps 1 and 2 correctly.
If you are using theme 1.0
- On theme 1.0, add the following code to the product page.
- You can find the product page from Shopify > [Sales channels] > [Online Store] > [Themes] > [Edit code], then searching for "product".
- The file name depends on your Shopify theme. It is usually something like main-product.liquid, but if there is a product.json file, use the .liquid file named inside it.
- As for where to insert it — to place the button above [Add to cart], for example, search for "buy-button" and you will find the right spot.
To add the wishlist icon only
<div class="storecrm-button"
data-type="wishlist-button"
data-product-id="{{ product.id }}"
data-variant-id="{{ product.selected_or_first_available_variant.id }}"
data-product-tags="{{ product.tags | json | escape }}"
data-no-label
data-variants="[{%- for v in product.variants -%}{"id":{{ v.id }},"title":{{ v.title | json | escape }}}{%- unless forloop.last -%},{%- endunless -%}{%- endfor -%}]"></div>
To add the wishlist icon with a label
<div class="storecrm-button"
data-type="wishlist-button"
data-product-id="{{ product.id }}"
data-variant-id="{{ product.selected_or_first_available_variant.id }}"
data-product-tags="{{ product.tags | json | escape }}"
data-variants="[{%- for v in product.variants -%}{"id":{{ v.id }},"title":{{ v.title | json | escape }}}{%- unless forloop.last -%},{%- endunless -%}{%- endfor -%}]"></div>
Keeping the page HTML small
Output only id and title in data-variants, the fields used by the current wishlist button. Serialising the complete variants object also outputs prices, images, inventory details and other unused fields, making the HTML larger for products with many variants.
Set data-no-label only for the icon-only version. Omit it when displaying a label. These examples are for wishlist buttons. Restock buttons also use fields such as available, so do not apply this reduction to restock buttons unchanged.
For an existing installation, duplicate the theme before replacing the button's data-variants attribute with the format above. An app update does not change manually pasted theme code. After updating, check the heart icon and label, registration after changing the selected variant, adding and removing wishlist items, and the wishlist page.
Adding the wishlist page
What you will build in this section
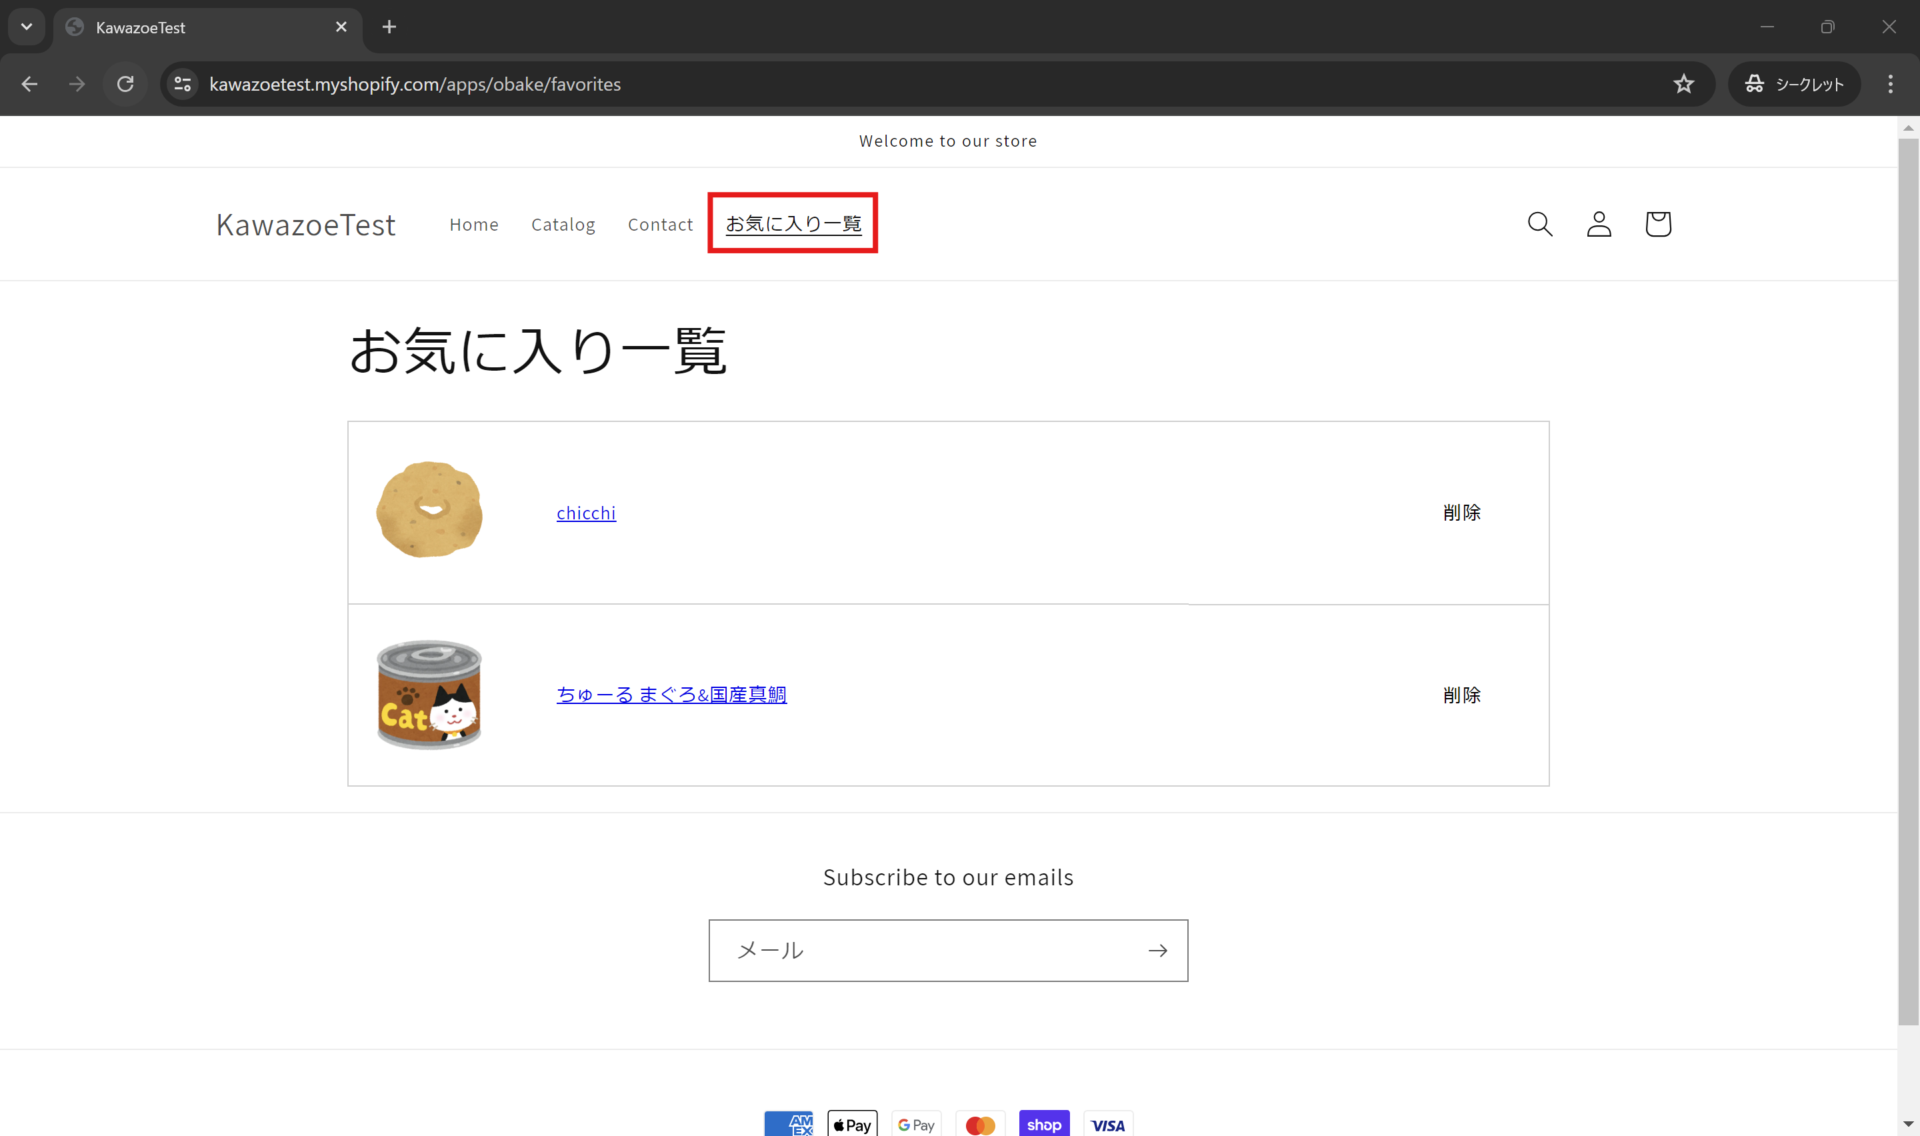
Let us start by looking at the finished wishlist page. The page itself is generated by the app, so adding it is simply a matter of pointing a menu at the URL the app provides. Here we add it as a [Wishlist] item in the header menu.
Adding the wishlist URL to the header menu
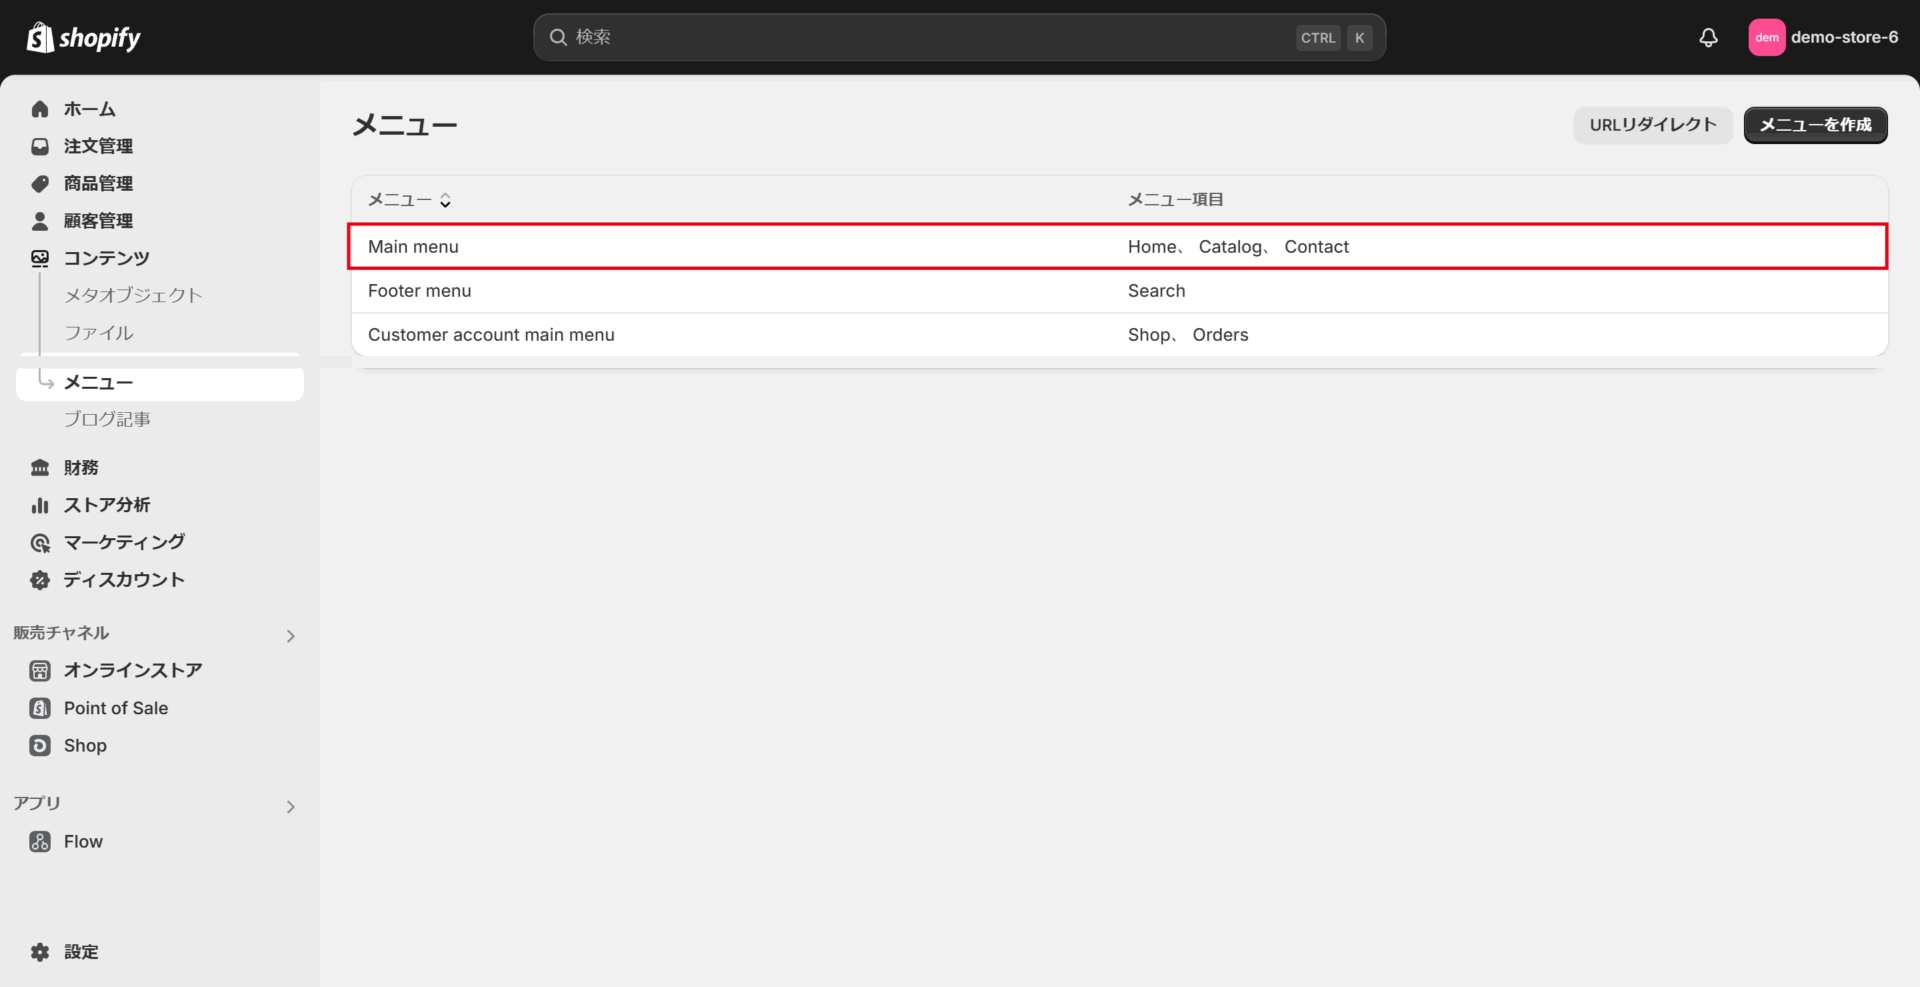
1. Open the menu list from [Shopify admin] > [Content] > [Menus]. We are adding a link to the header menu, so click [Main menu].
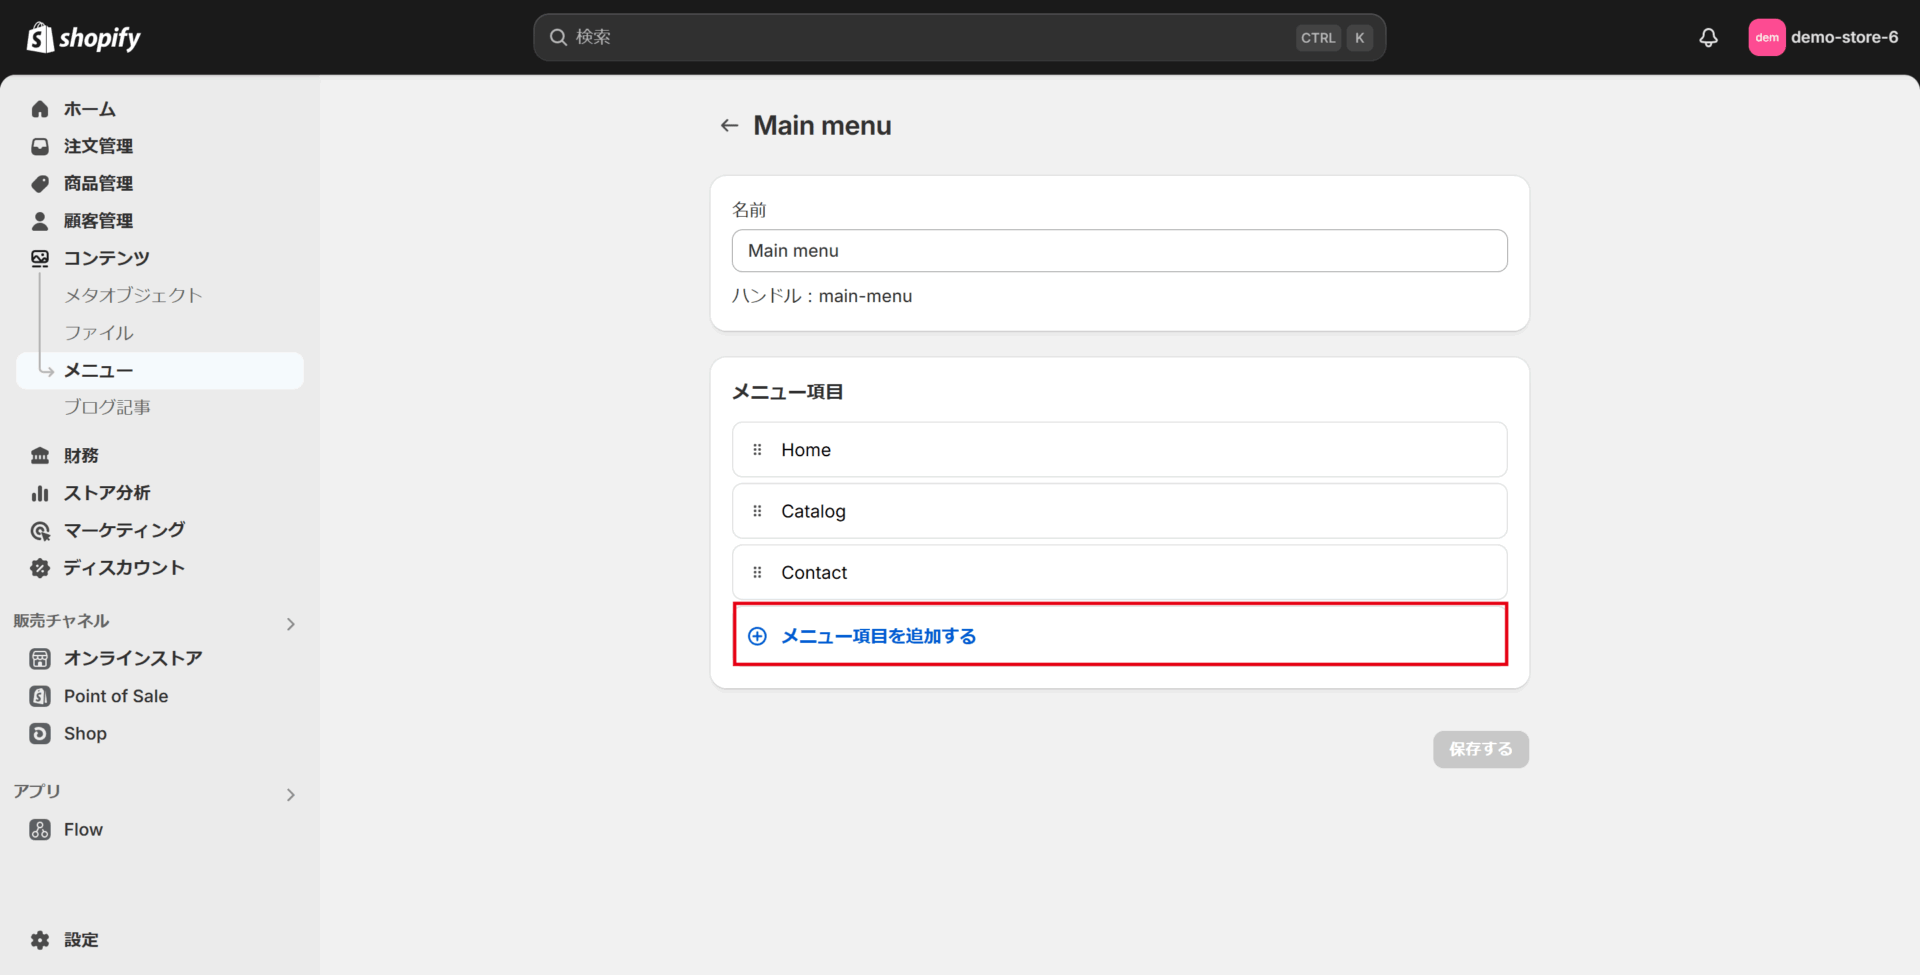
2. Click [Add menu item].
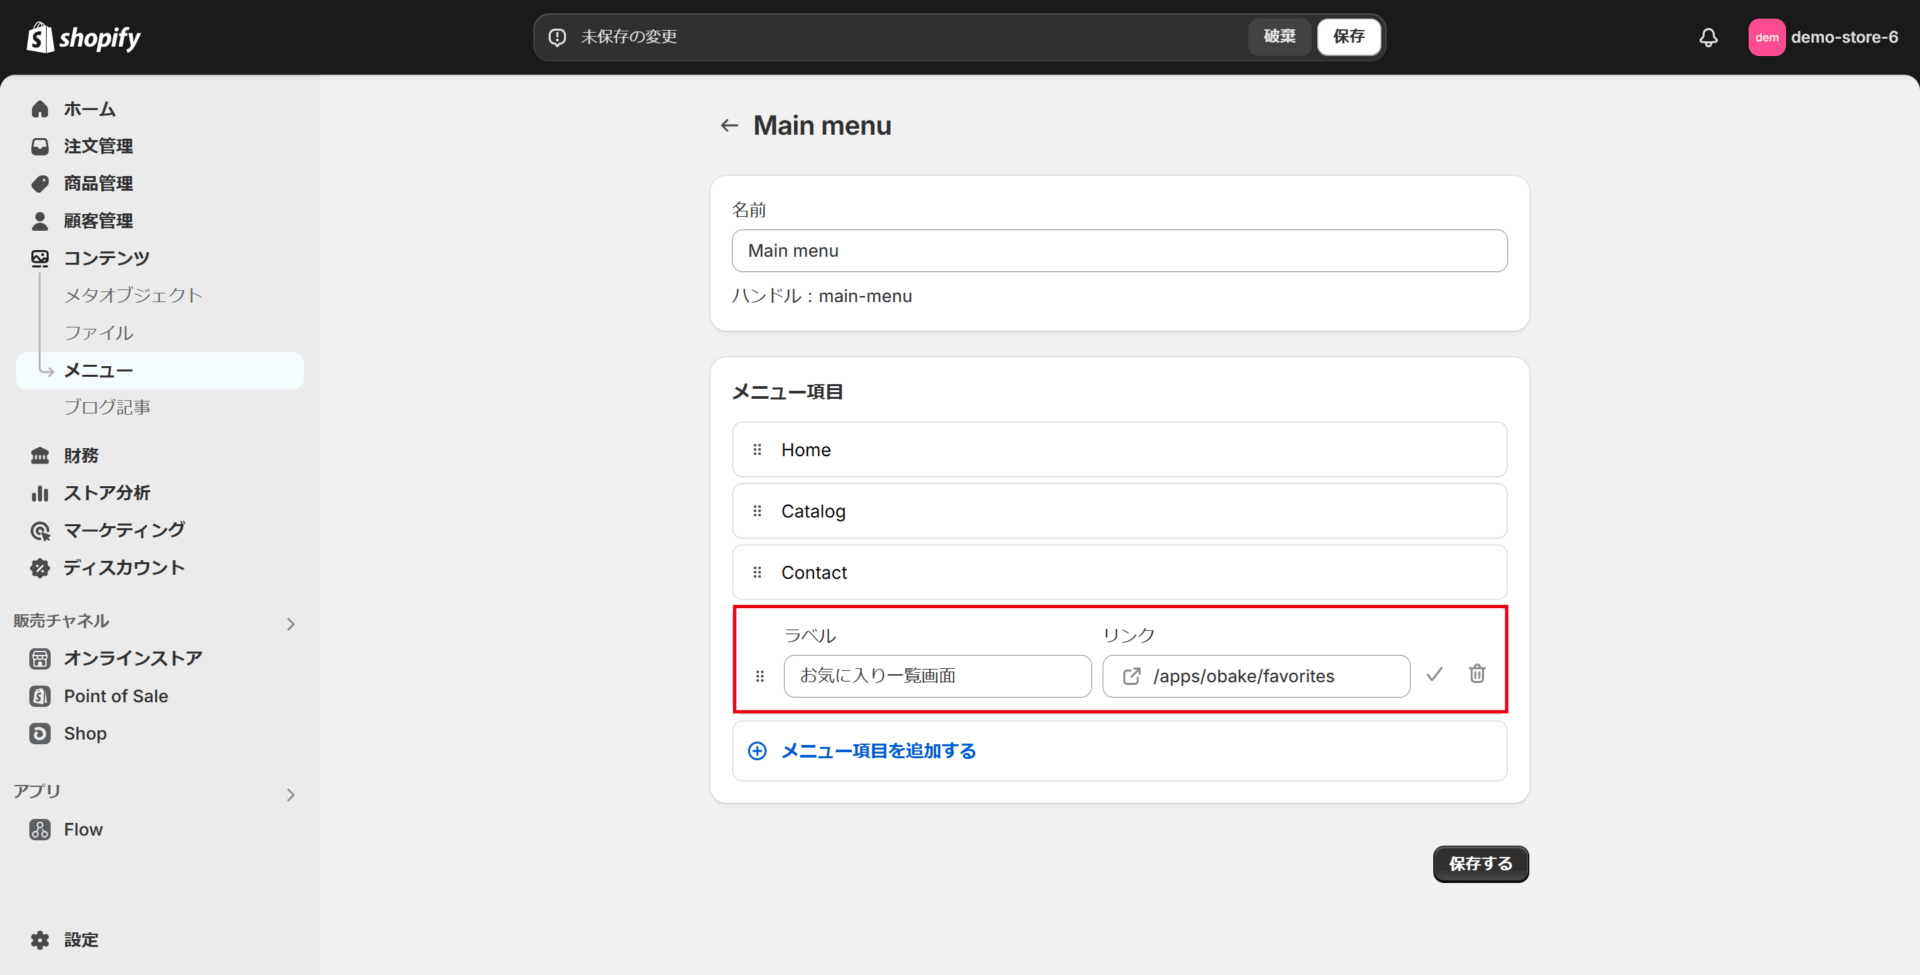
- Fields for the name and the link appear; fill them in.
The name can be whatever you like; here we use [Wishlist].
Enter the URL below, then click [Add].
/apps/obake/favorites
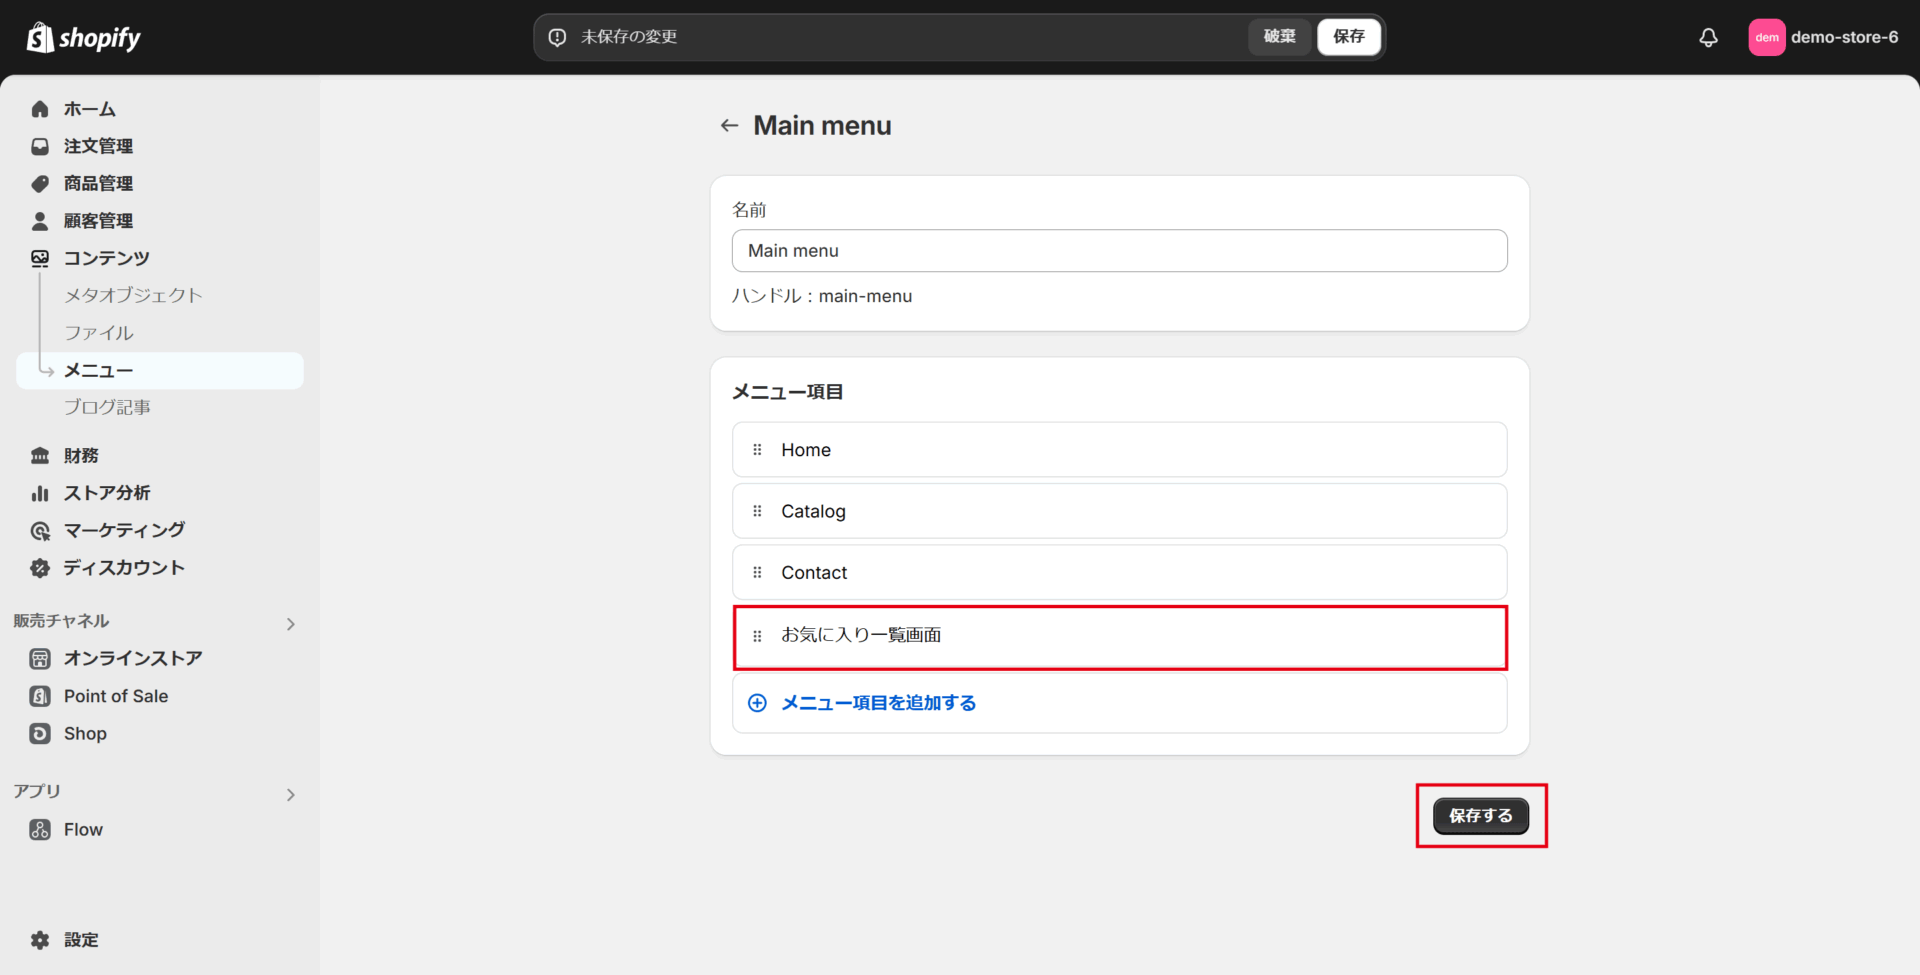
- Confirm that the new item appears in the menu, then click [Save] at the top of the screen.
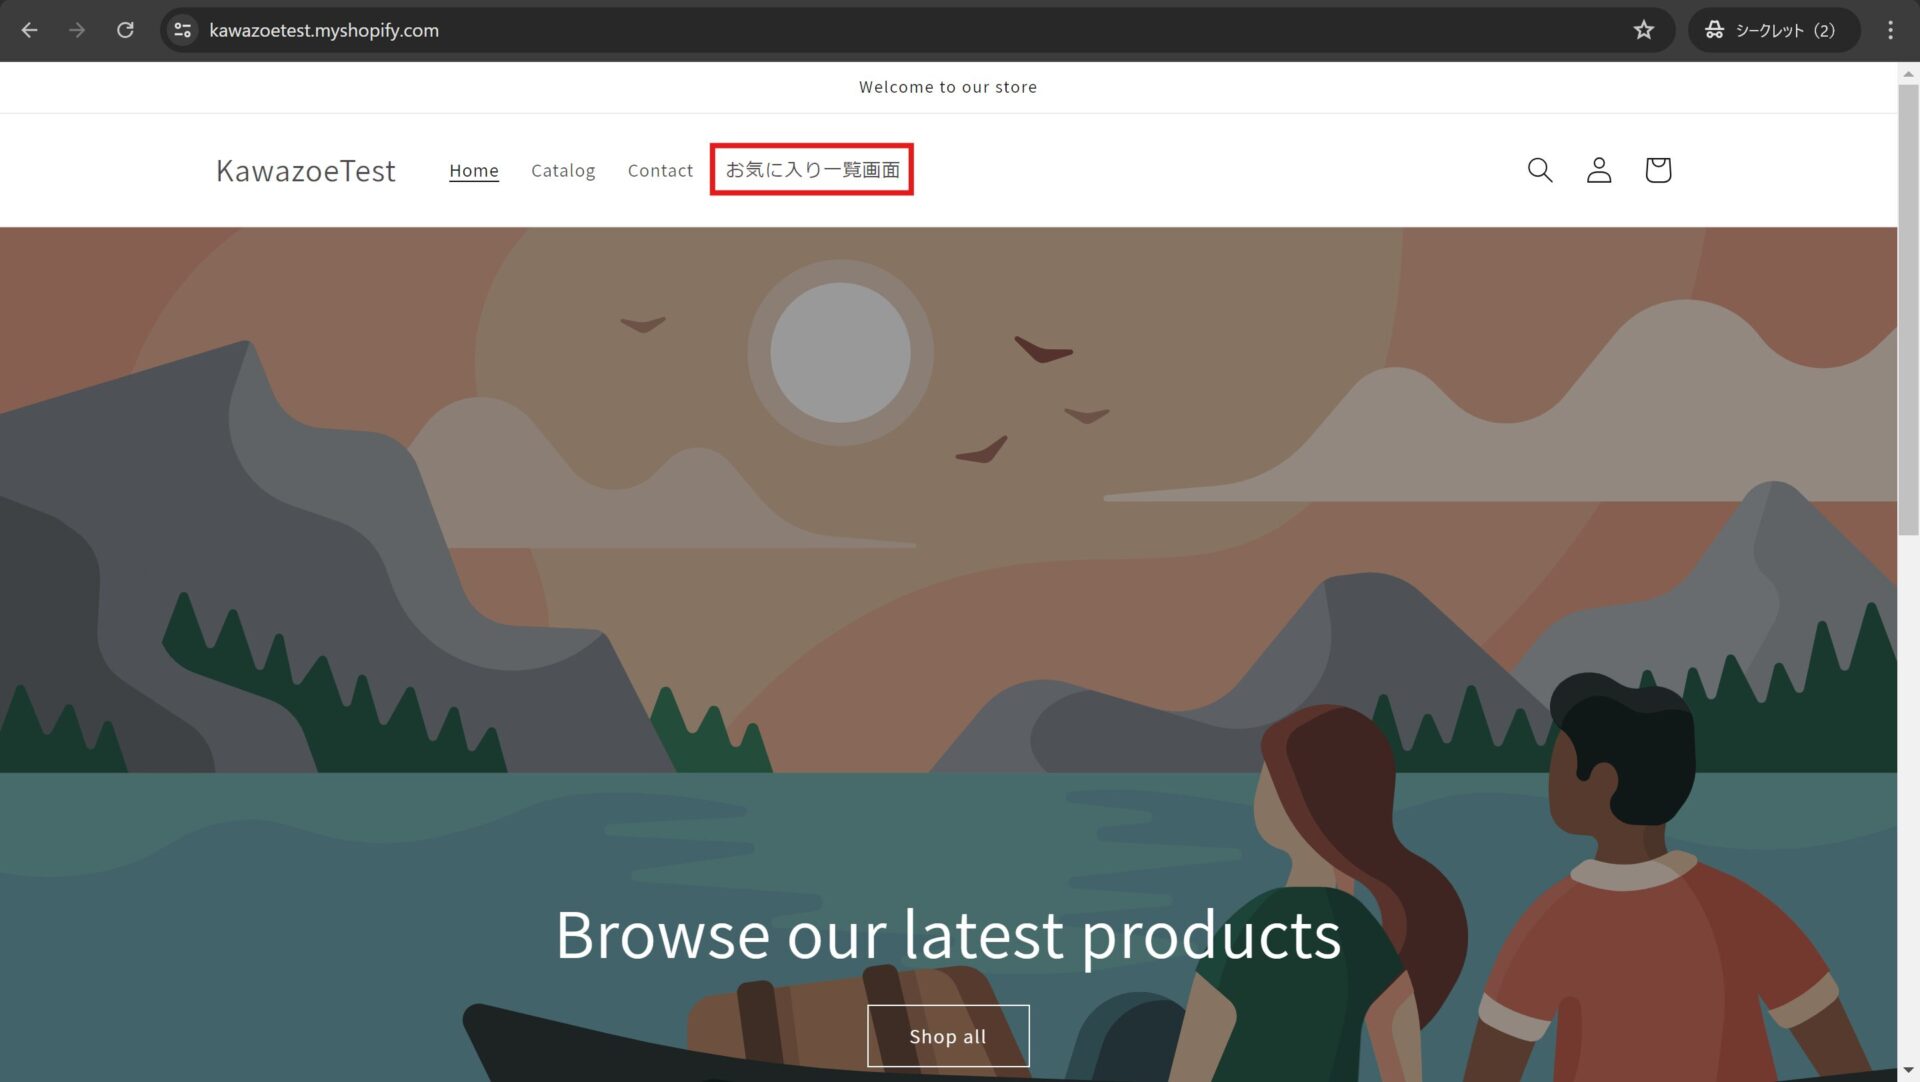
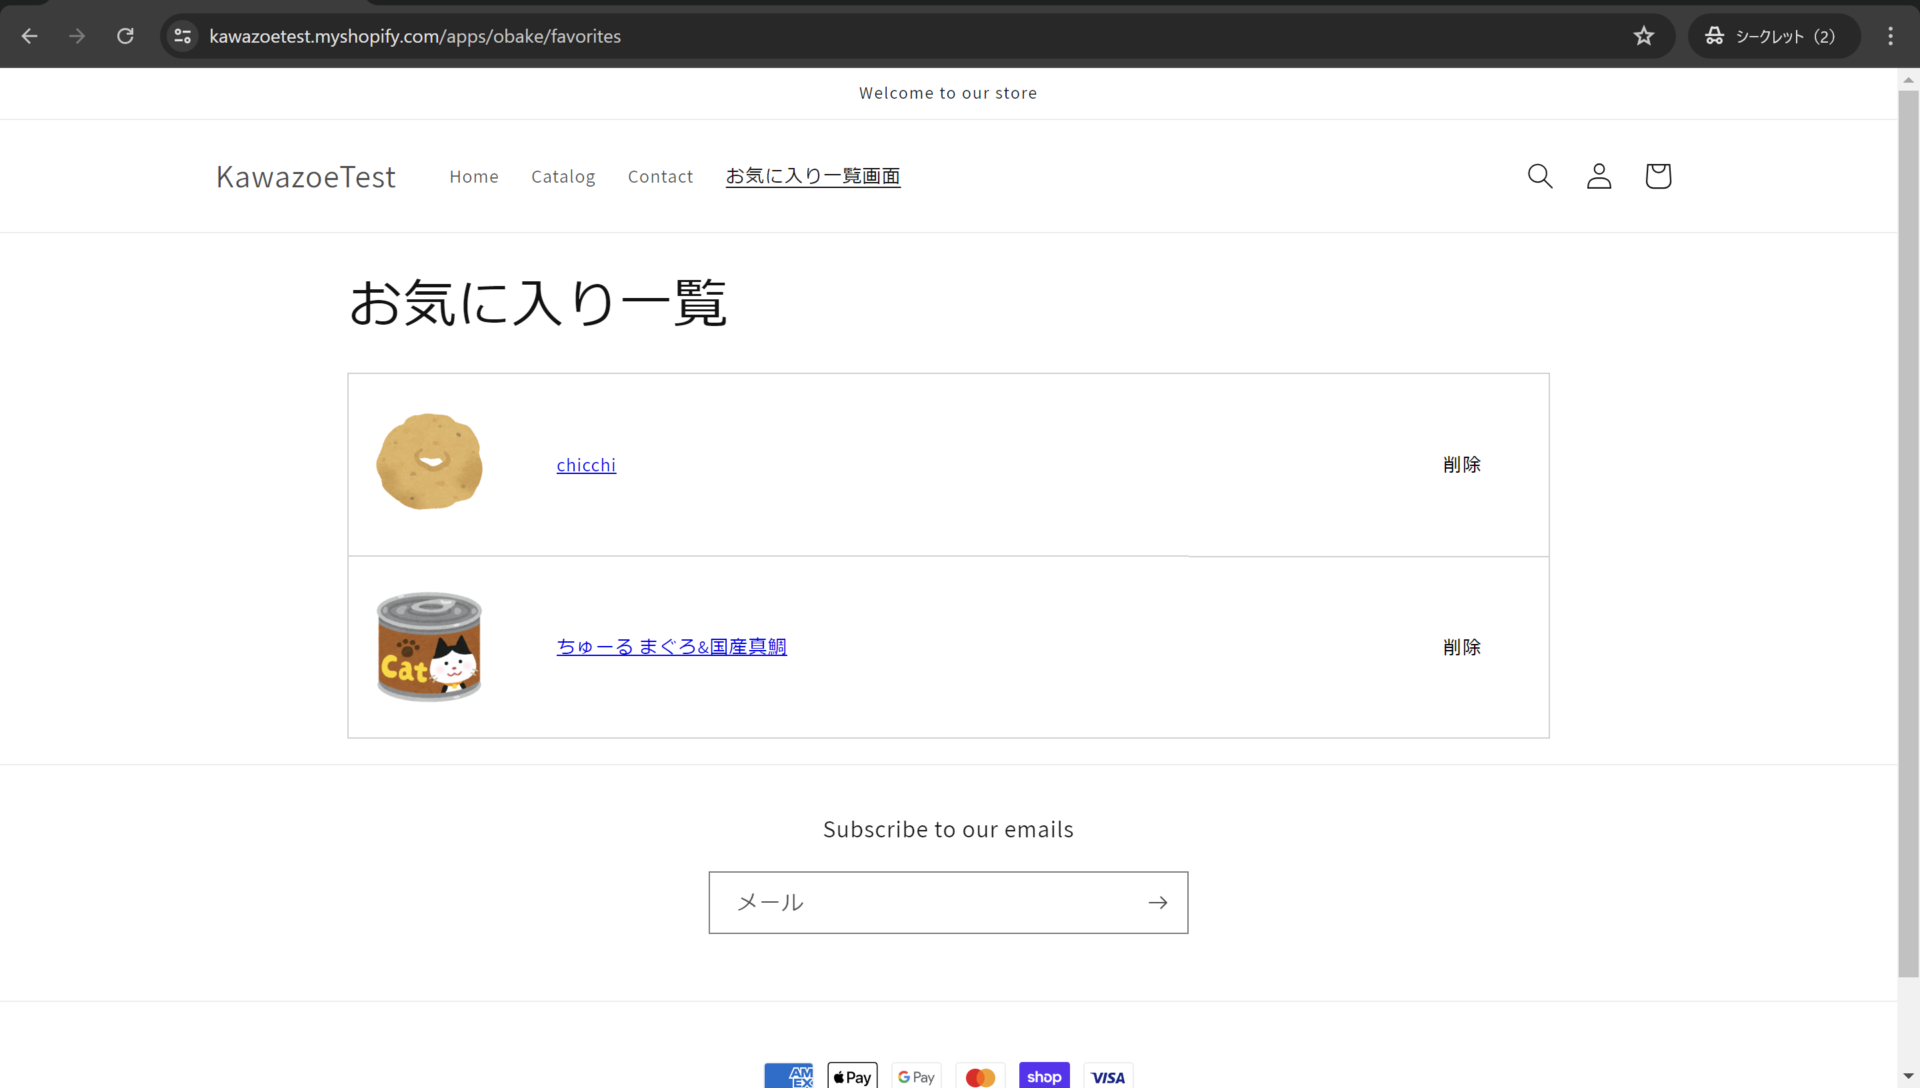
- Open your home page, confirm that the new menu item is there, and click it to confirm that it opens the wishlist page. That completes this section.
If the menu item does not appear, go back and check that you followed steps 1 to 4 correctly.
Customising the button and the wishlist page
Customising the wishlist button and page
StoreCRM ships a deliberately simple button and wishlist page that stay out of the way in any store. If you want the design to match your store down to the details, or you want the button to stand out more, you can customise how both look from the app.
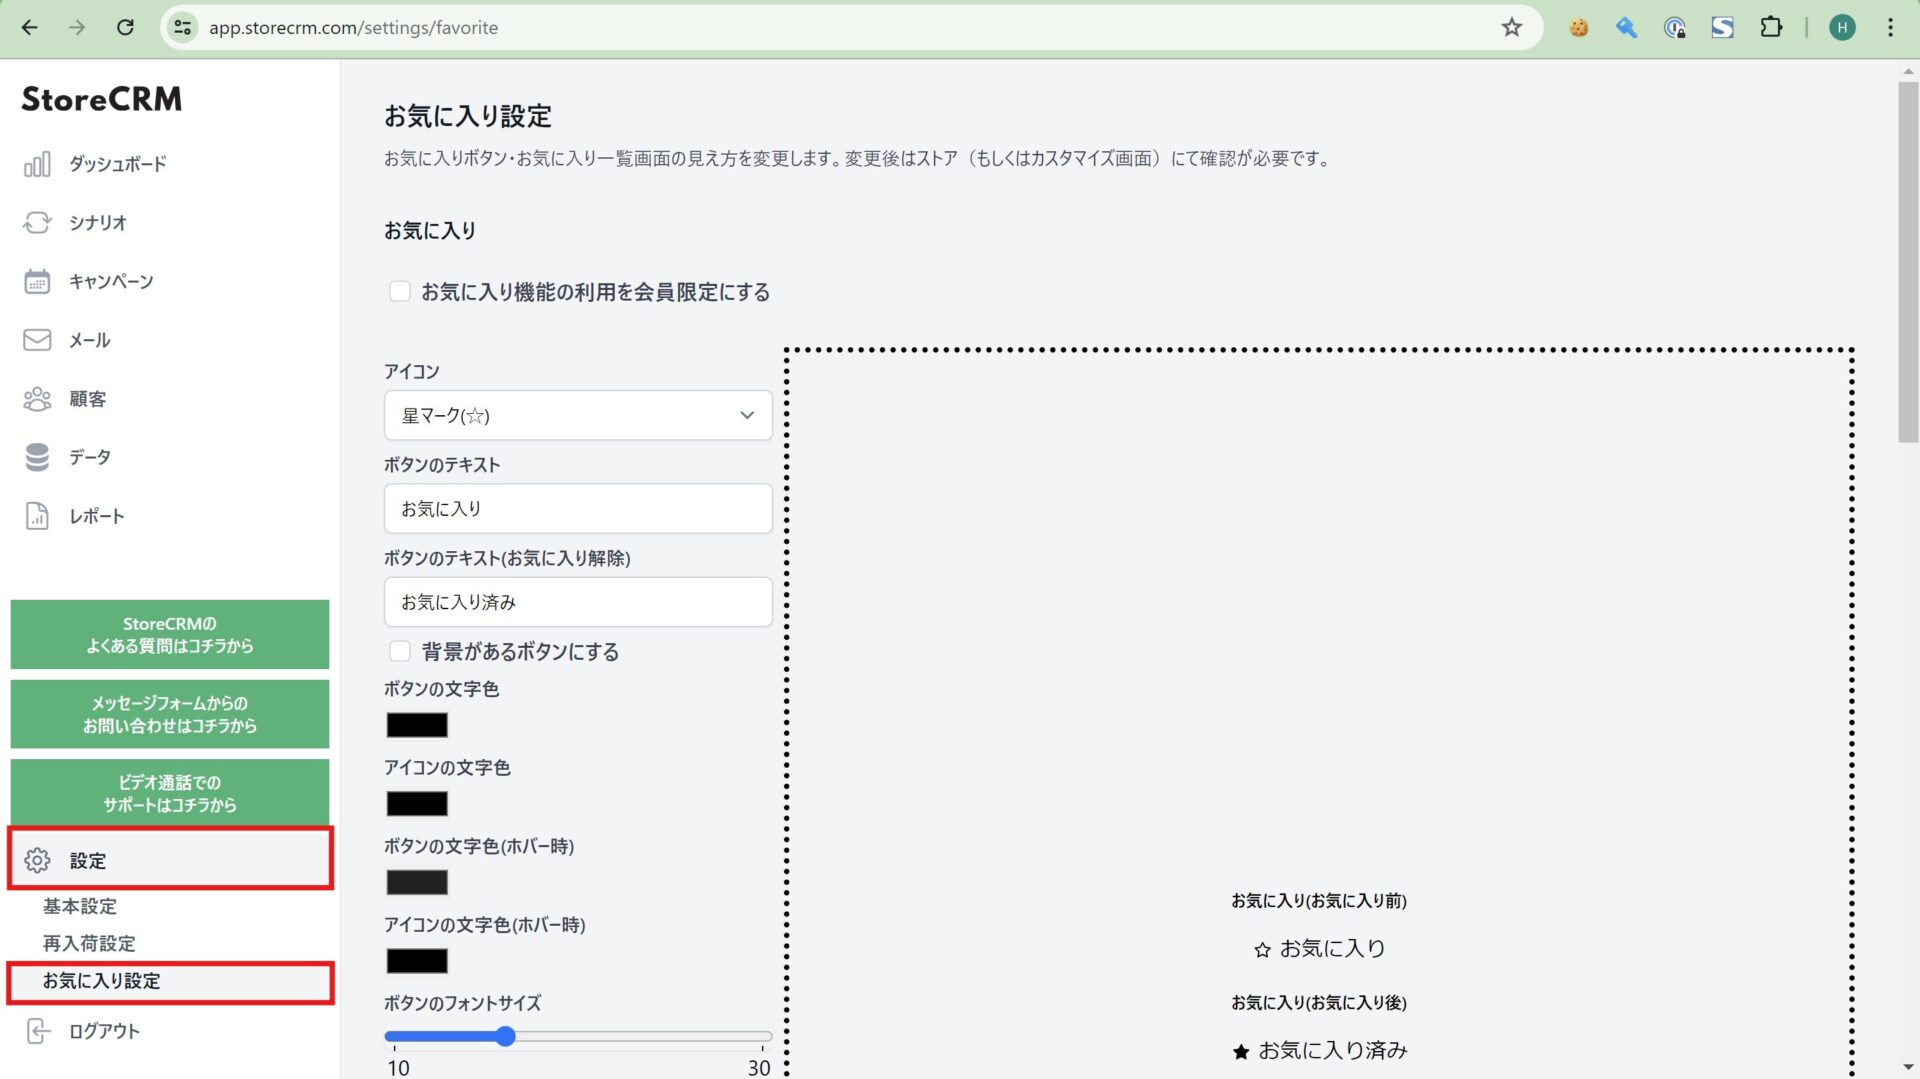
1. Open the StoreCRM app. Click [Settings] at the bottom left of the page, then [Wishlist settings] underneath it.
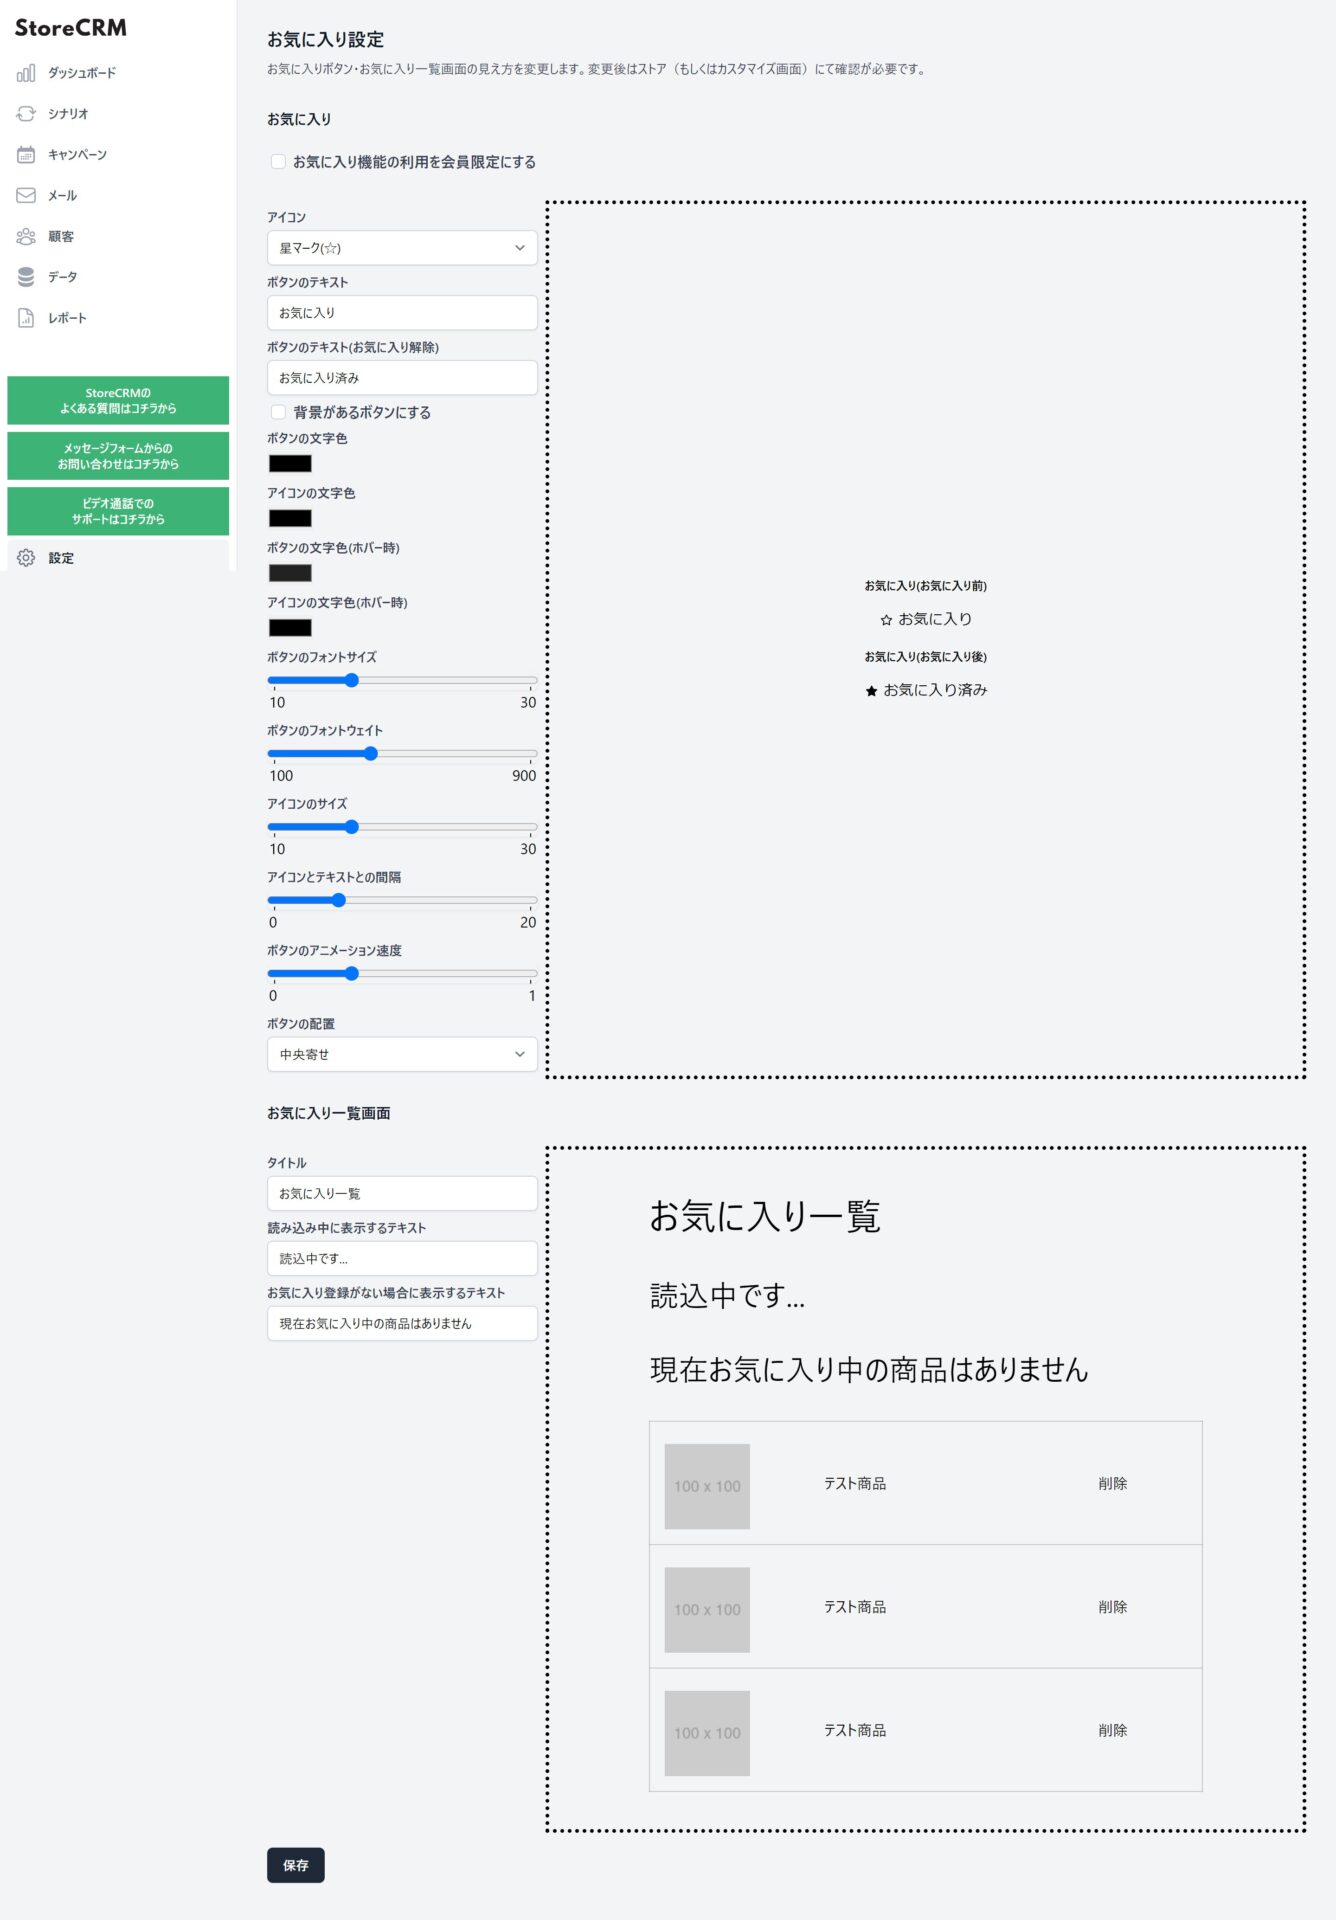
2. Using the preview on the right, adjust the wording, colours and size of the wishlist button and page to suit your store. When you are finished, do not forget to click the save button at the bottom of the page.
After saving, check your live store or the theme preview to confirm that the changes look the way you expected.
Summary
As this wishlist example shows, StoreCRM lets you run in a single app the kind of features that previously required installing another app or wiring up a separate marketing automation tool. Automations built on the wishlist data you are now collecting are in the works, so watch this space. We also offer free setup support — we will configure the app for you — and consulting on growing revenue for customers who have adopted StoreCRM. Feel free to get in touch through the contact form.


