
Introduction
Sending a coupon in a birthday email is a highly effective way to improve retention in an ecommerce store. Telling customers that they will receive a coupon on their birthday is also a good way to encourage them to create an account in the first place.
This article covers the groundwork for birthday email campaigns: how to add a date-of-birth form to Shopify with StoreCRM, and what to watch out for along the way.
Read here for how to send birthday emails.
Related articles
6 Shopify signup form customisation apps compared
Store settings
The steps below use the free Dawn theme. Paid themes and heavily customised themes may have a different file structure. We are happy to make the theme changes for you at no charge — just ask through the contact form. (Requests for a bespoke design may need a separate quote.) This method only works when Shopify > [Settings] > [Customer accounts] is set to [Classic]. With new customer accounts, login uses a one-time code and the customer's input is not carried over, so it cannot be used.
Creating the customer metafield
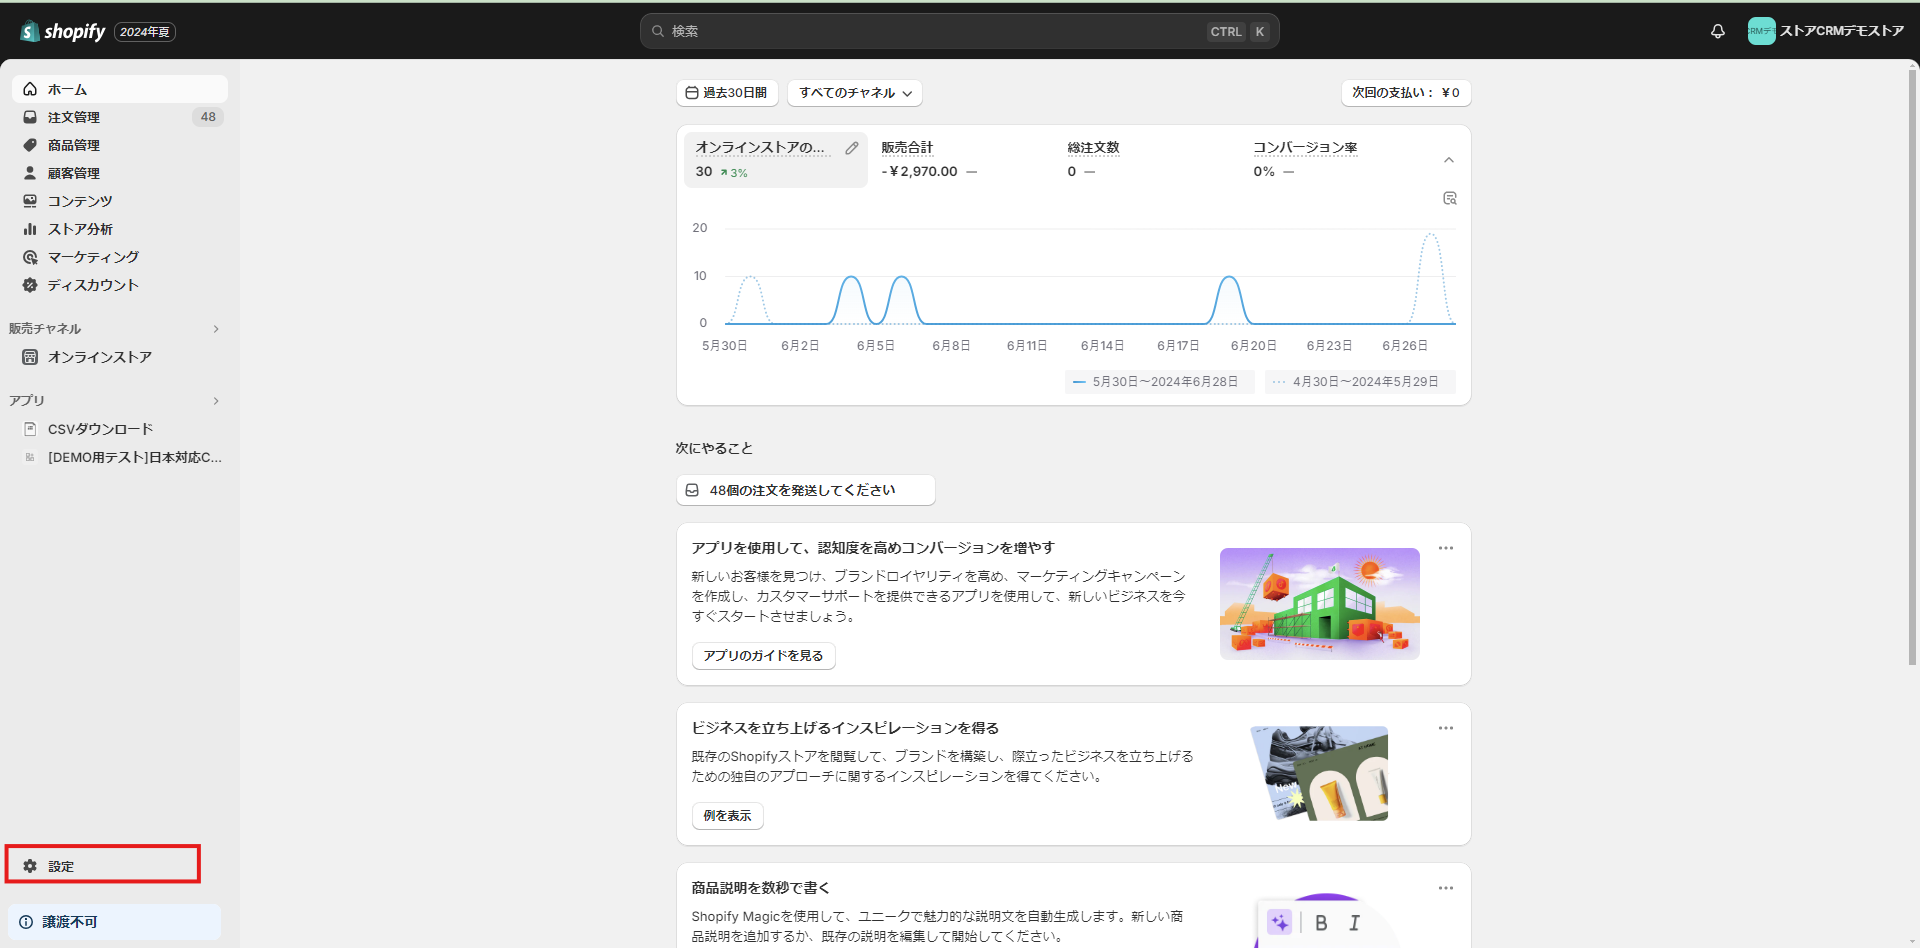

To offer a birthday field you first need a customer metafield to store it in.
1. In the Shopify admin, go to [Settings] > [Custom data] > [Customers].

2. Click [Add definition].

3. Type [Date of birth] as the name and a suggestion appears below the field; click it.

4. Under Options > Customer account access, select [Read and write], turn on Storefront API access, and click [Save].
Adding the birthday form to the signup page
What you will build in this section
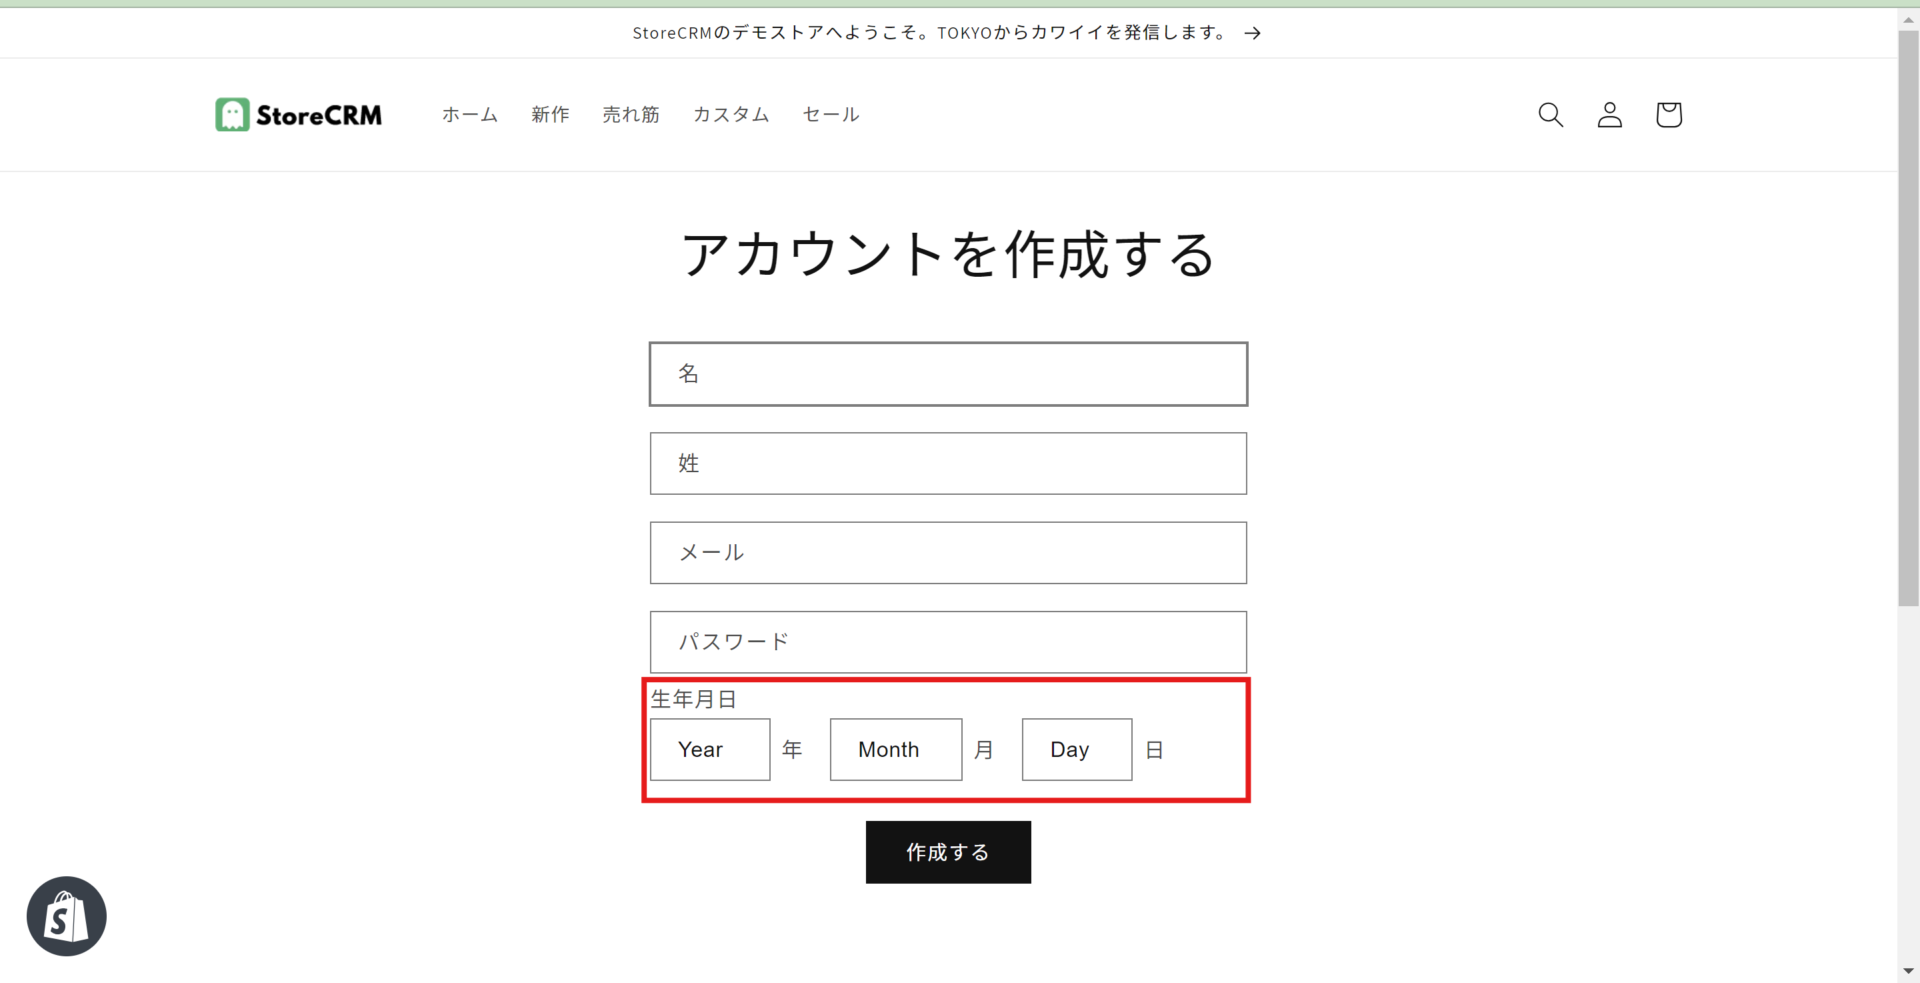
Let us start by looking at the finished birthday form. The red box marks the date-of-birth field.
Opening the code you need to edit
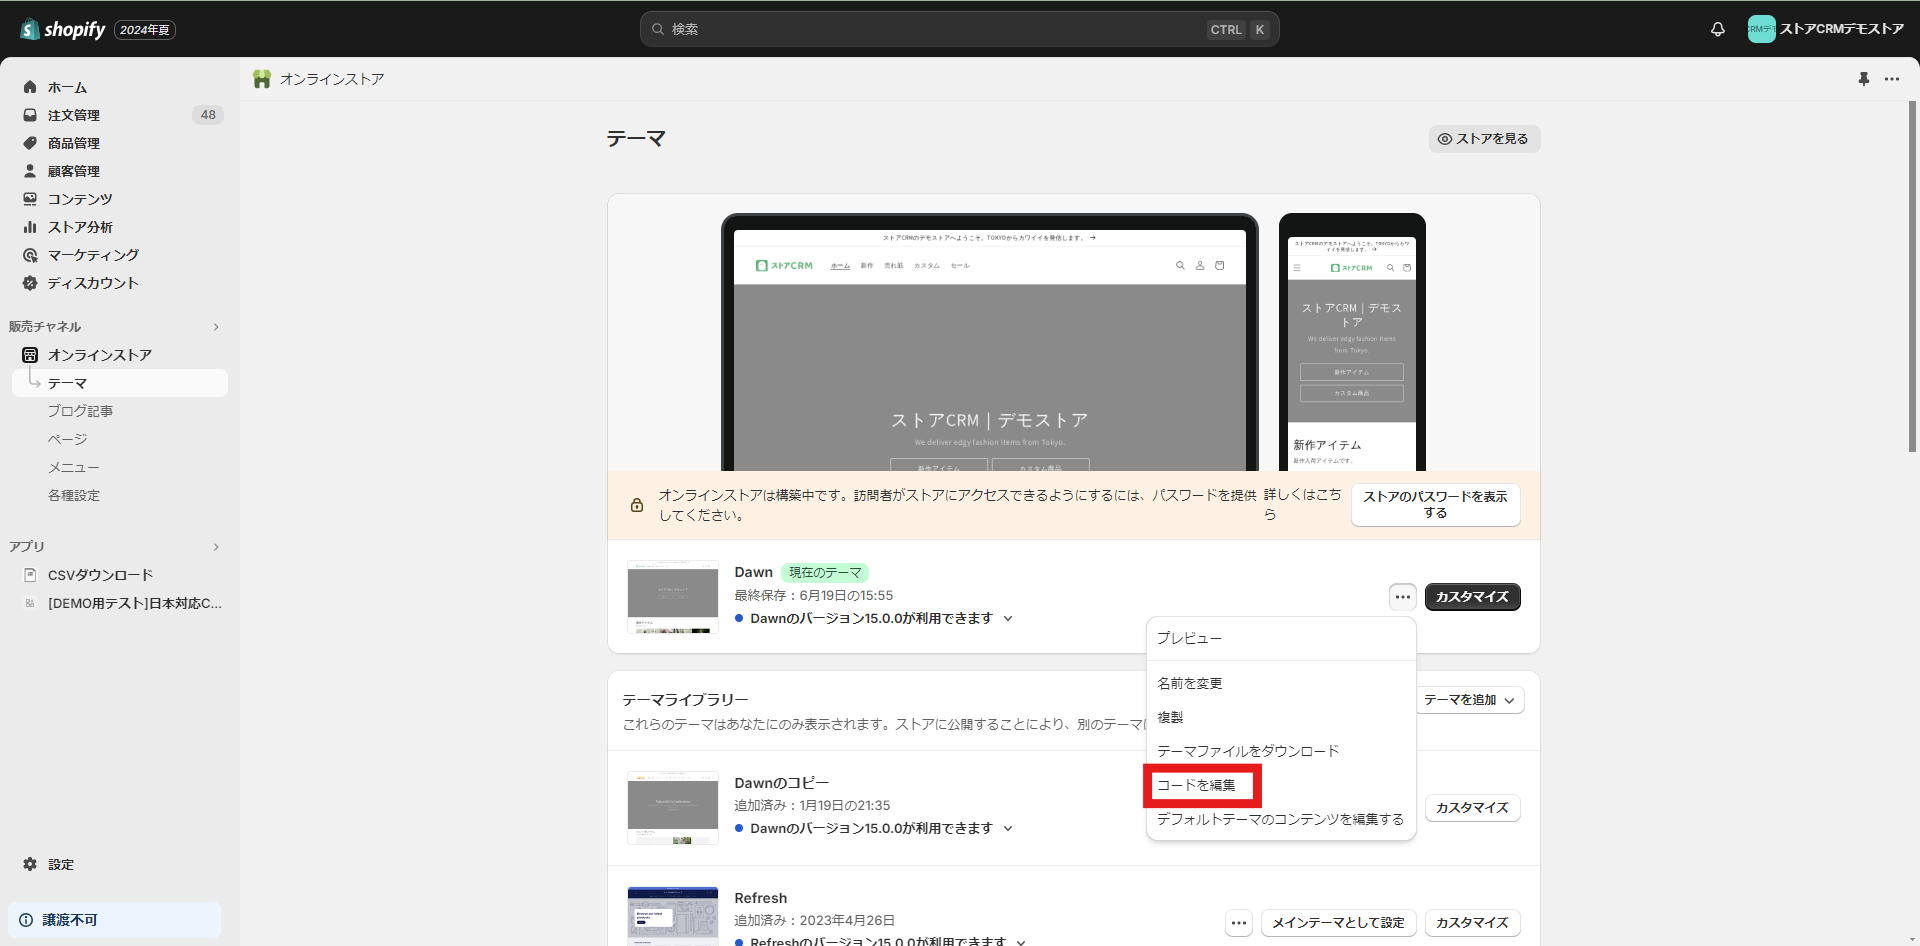
1. Open the theme list from [Shopify admin] > [Sales channels] > [Online Store] > [Themes]. Click [...] and then [Edit code].
The steps that follow involve editing theme code, so if you are at all unsure, duplicate the theme first and edit the copy.
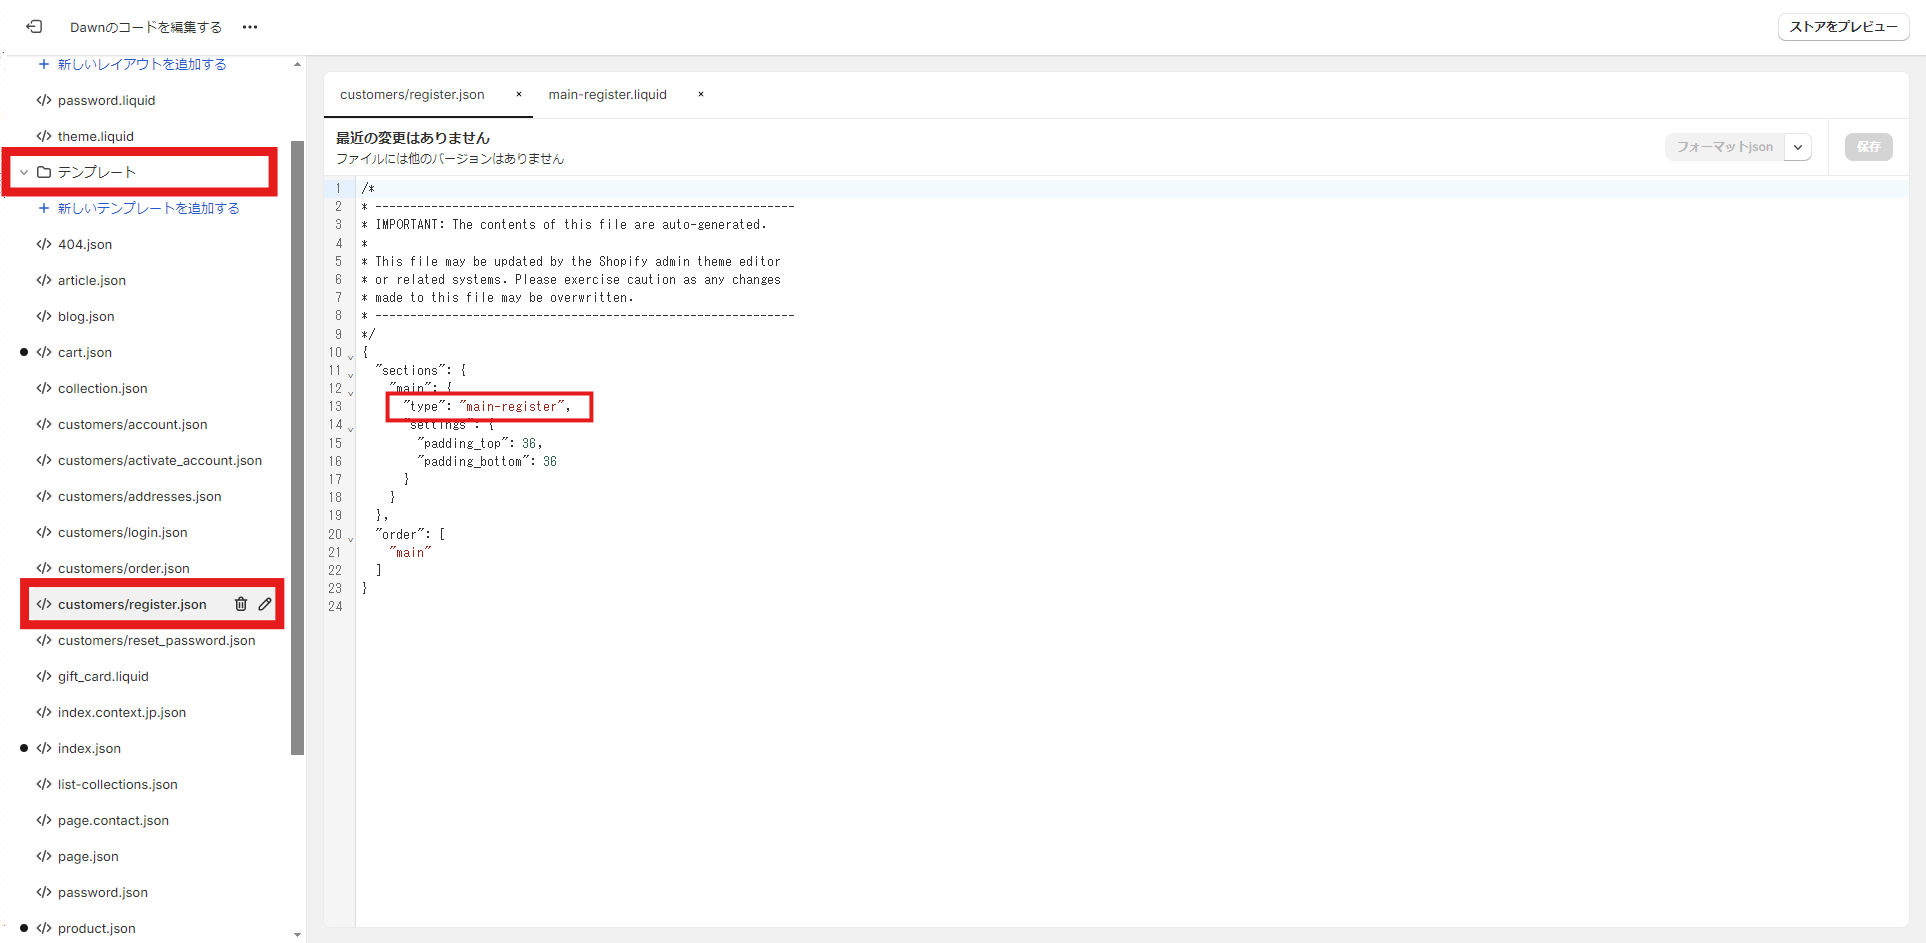
2. As an example, here is how it works in the Dawn theme.
The file you need differs from theme to theme, so check the Liquid/JSON mapping for customer templates. This method only works when Shopify > [Settings] > [Customer accounts] is set to [Classic]. With new customer accounts, login uses a one-time code, the customer's input is not carried over, and there are no Liquid files to edit.
Clicking [Edit code] opens the file list. Because we are editing the signup page, open [Templates] > [customer/register.json]. Open the file and look at the value written at sections > main > type. In the Dawn theme it says [main-register]. That tells you where the signup page's code lives — in this case [Sections] > [main-register.liquid].

3. Click [Sections] > [main-register.liquid] to open that file.
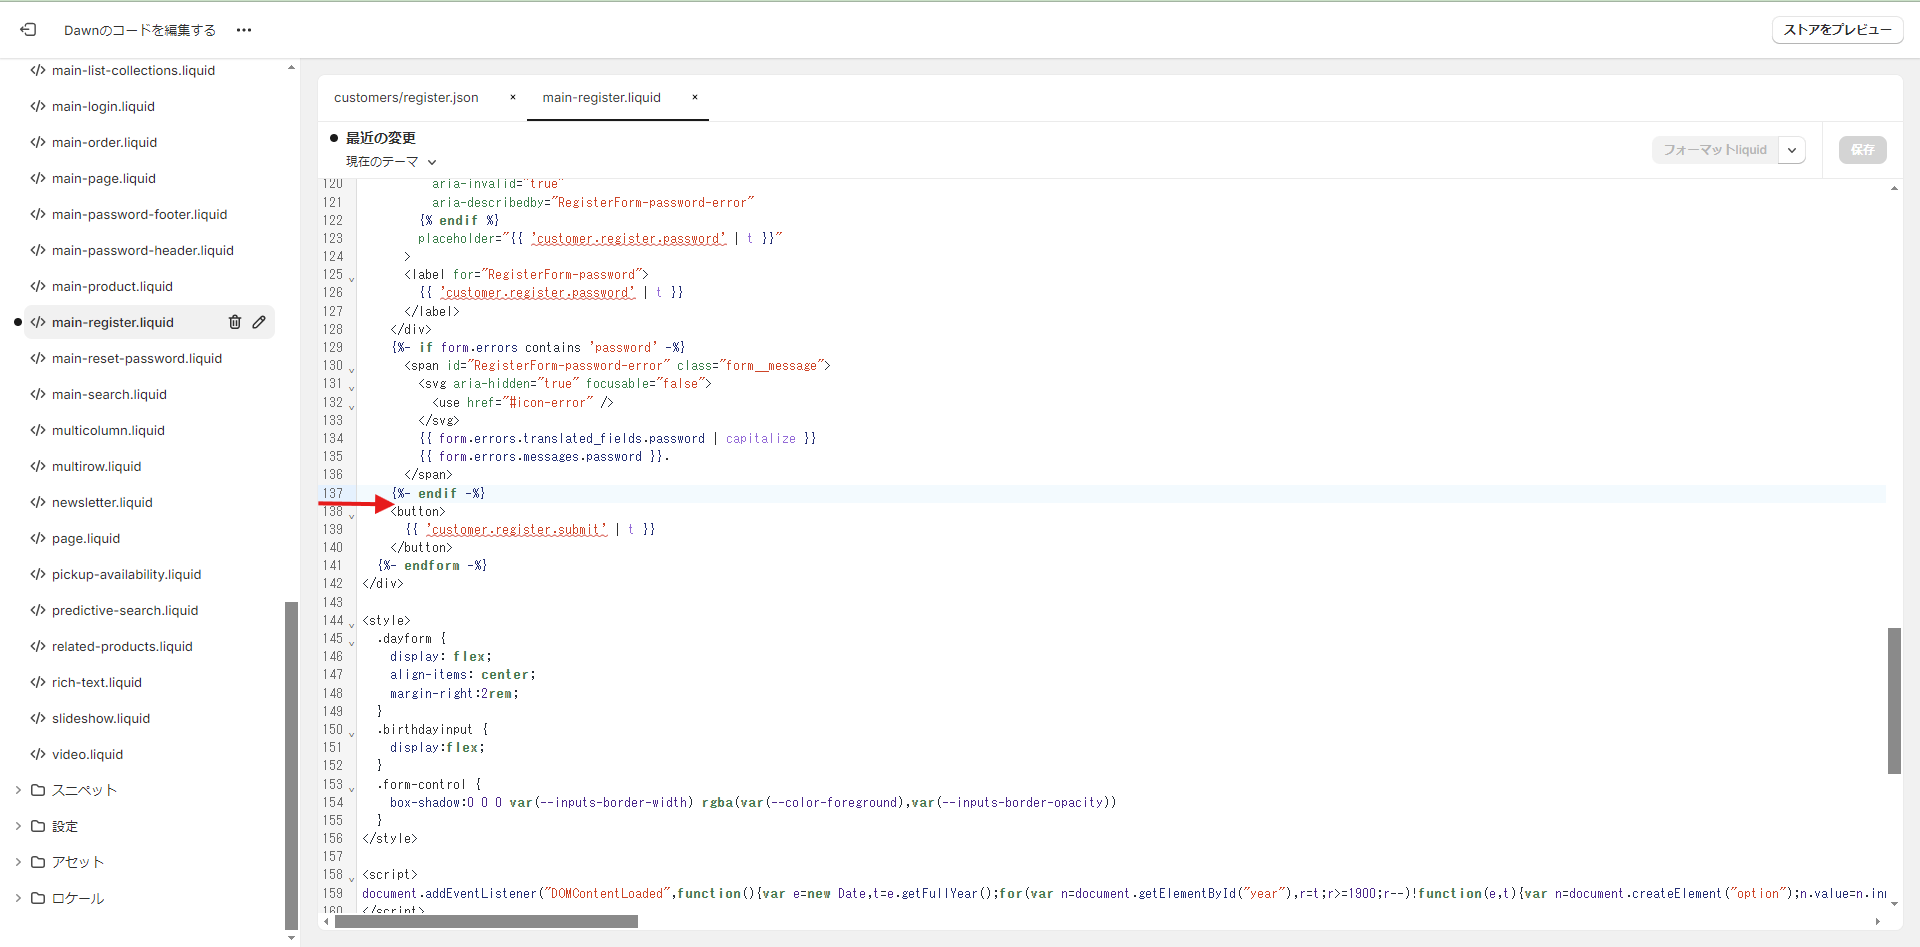
Here we want the field below the password input and above the [Create] button, so we insert the code between lines 137 and 138.
1. Copy and paste the HTML below.
<div class="customer-birthday">
    <div class="birthdaylabel">Date of birth</div>
	<ul class="birthdayinput" style="padding-left: 0;margin-bottom: -10px;margin-top: 0px;">
		<li class="dayform">
	    <select class="form-control yearselect" id="year" name="customer_year" >
	      <option value="0">Year</option>
      </select>
      <input type="text" class="birthdayyear" aria-required="true" style="width:0px;height:0px;opacity: 0;" name="customer[note][birthday-year]" value="">
      <span class="daychar">Year</span>
    </li>
    <li class="dayform">
	    <select class="form-control monthselect" id="month" name="customer_month" >
	      <option value="0">Month</option>
      </select>
      <input type="text" class="birthdaymonth" aria-required="true" style="width:0px;height:0px;opacity: 0;" name="customer[note][birthday-month]" value="">
      <span class="daychar">Month</span>
		</li>
    <li class="dayform">
	    <select class="form-control dayselect" id="day" name="customer_day" >
	      <option value="0">Day</option>
      </select>
      <input type="text" class="birthdayday" aria-required="true" style="width:0px;height:0px;opacity: 0;" name="customer[note][birthday-day]" value="">
      <span class="daychar">Day</span>
    </li>
   </ul>
  </div>
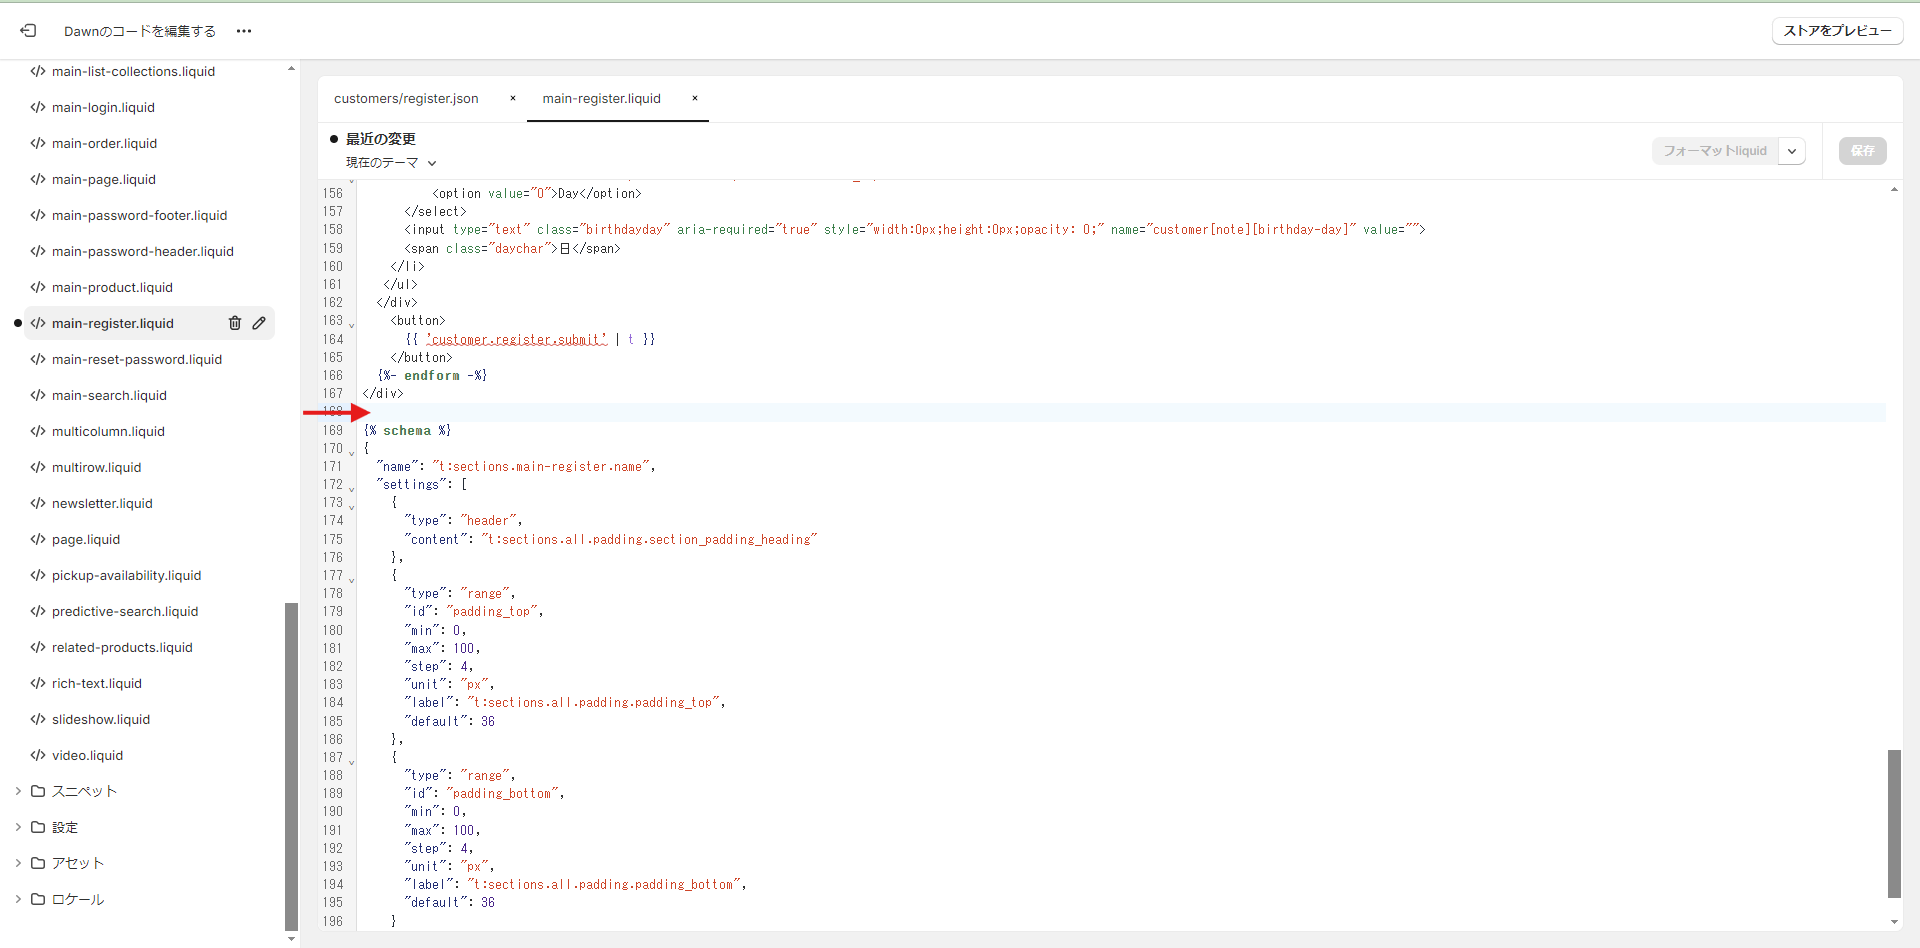
2. Next, add the CSS and JavaScript. The CSS is deliberately minimal, so feel free to restyle it to taste.
The JavaScript simply populates the year, month and day selectors, so paste it as it is. Paste the code, click [Save], and you are done.
<style>
  .dayform {
    display: flex;
    align-items: center;
    margin-right:2rem;
  }
  .birthdayinput {
    display:flex;
  }
  .form-control {
    box-shadow:0 0 0 var(--inputs-border-width) rgba(var(--color-foreground),var(--inputs-border-opacity))
  }
  .birthdaylabel {
    text-align: left;
    margin-top: 5px;
  }
</style>
<script>
  document.addEventListener("DOMContentLoaded",function(){var e=new Date,t=e.getFullYear();for(var n=document.getElementById("year"),r=t;r>=1900;r--)!function(e,t){var n=document.createElement("option");n.value=n.innerHTML=t,e.appendChild(n)}(n,r);for(var o=document.getElementById("month"),a=1;a<=12;a++)!function(e,t){var n=document.createElement("option");n.value=n.innerHTML=t,e.appendChild(n)}(o,a);for(var c=document.getElementById("day"),i=1;i<=31;i++)!function(e,t){var n=document.createElement("option");n.value=n.innerHTML=t,e.appendChild(n)}(c,i);var l=document.querySelector(".yearselect"),d=document.querySelector(".birthdayyear"),s=document.querySelector(".monthselect"),u=document.querySelector(".birthdaymonth"),g=document.querySelector(".dayselect"),m=document.querySelector(".birthdayday");l.addEventListener("change",function(e){var t=l.options[l.selectedIndex].value;d.value=t}),s.addEventListener("change",function(e){var t=s.options[s.selectedIndex].value;t<10&&(t="0"+t),u.value=t}),g.addEventListener("change",function(e){var t=g.options[g.selectedIndex].value;t<10&&(t="0"+t),m.value=t})});
</script>
Testing your setup
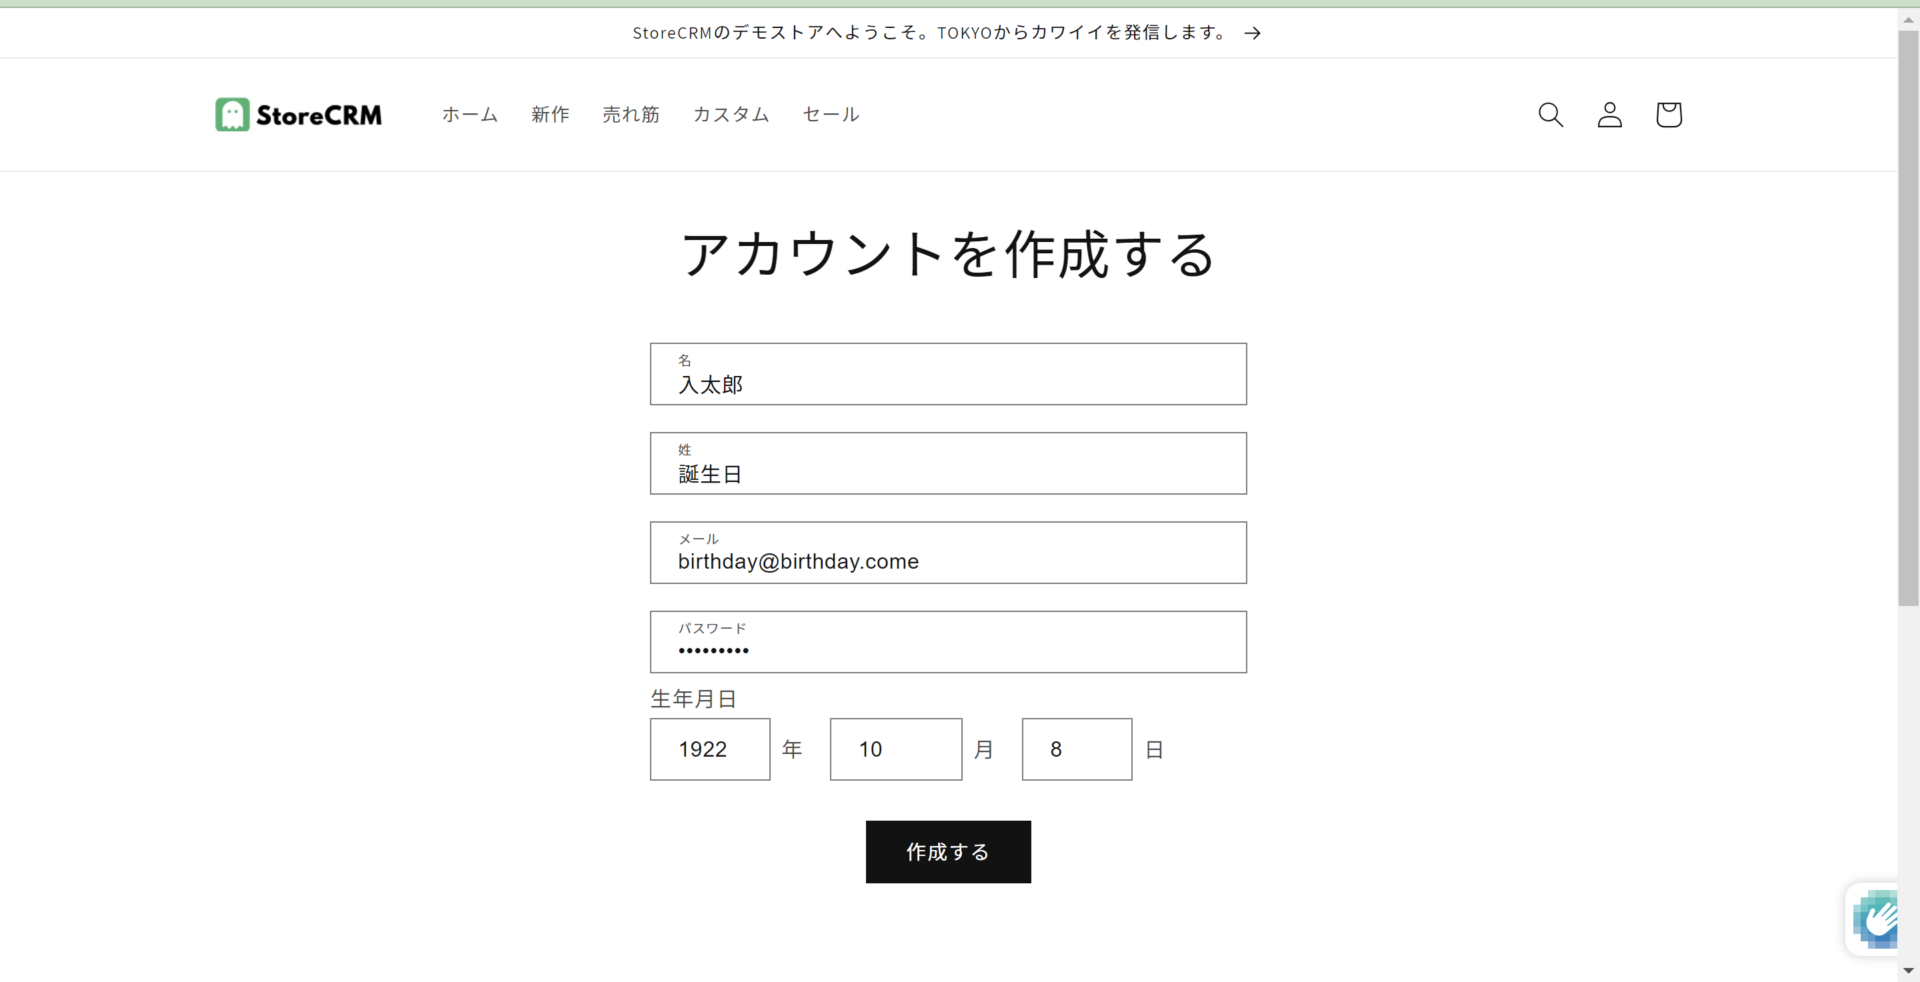
Once the code is in place, test it.
1. Open the account creation page and the birthday form should be there. Fill in the account details and a date of birth, then click [Create].
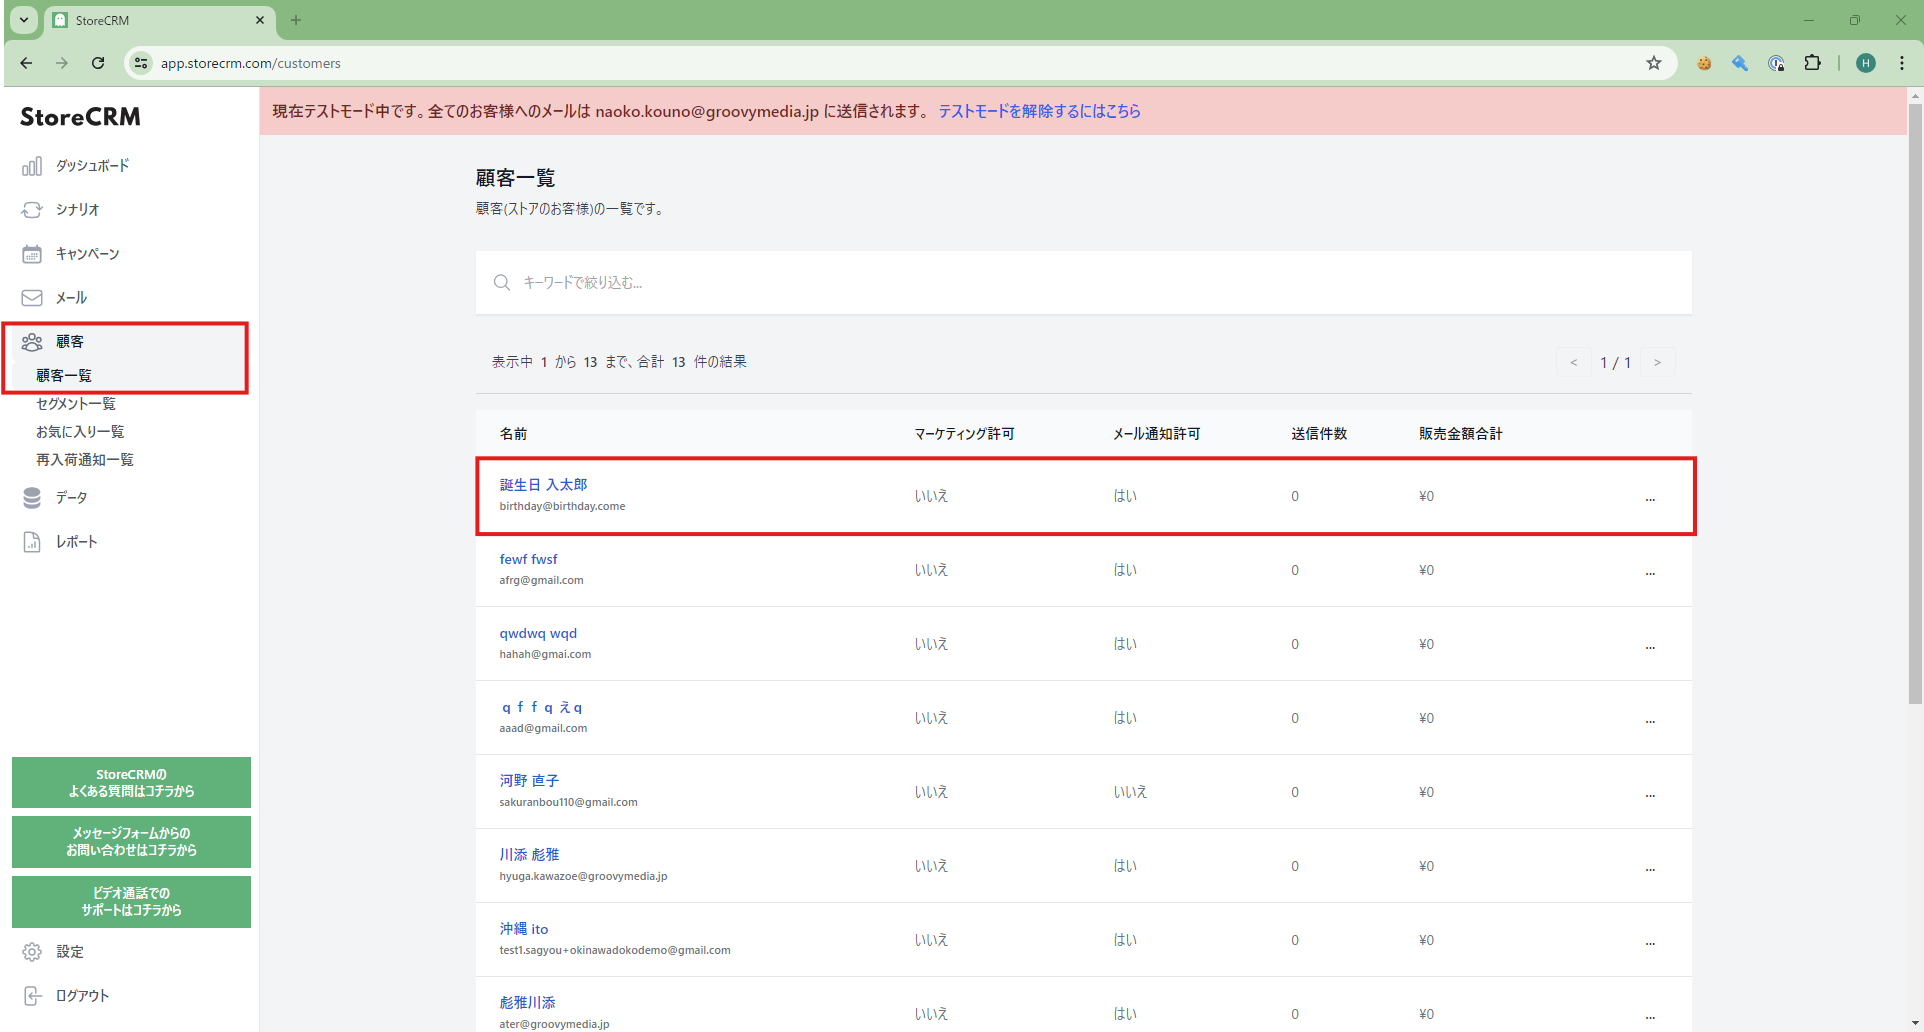
2. With the account created, check that the birthday was captured. Open the StoreCRM app and click [Customers] > [Customer list]. The account you just created is at the top of the list; click the name to open the customer detail page.
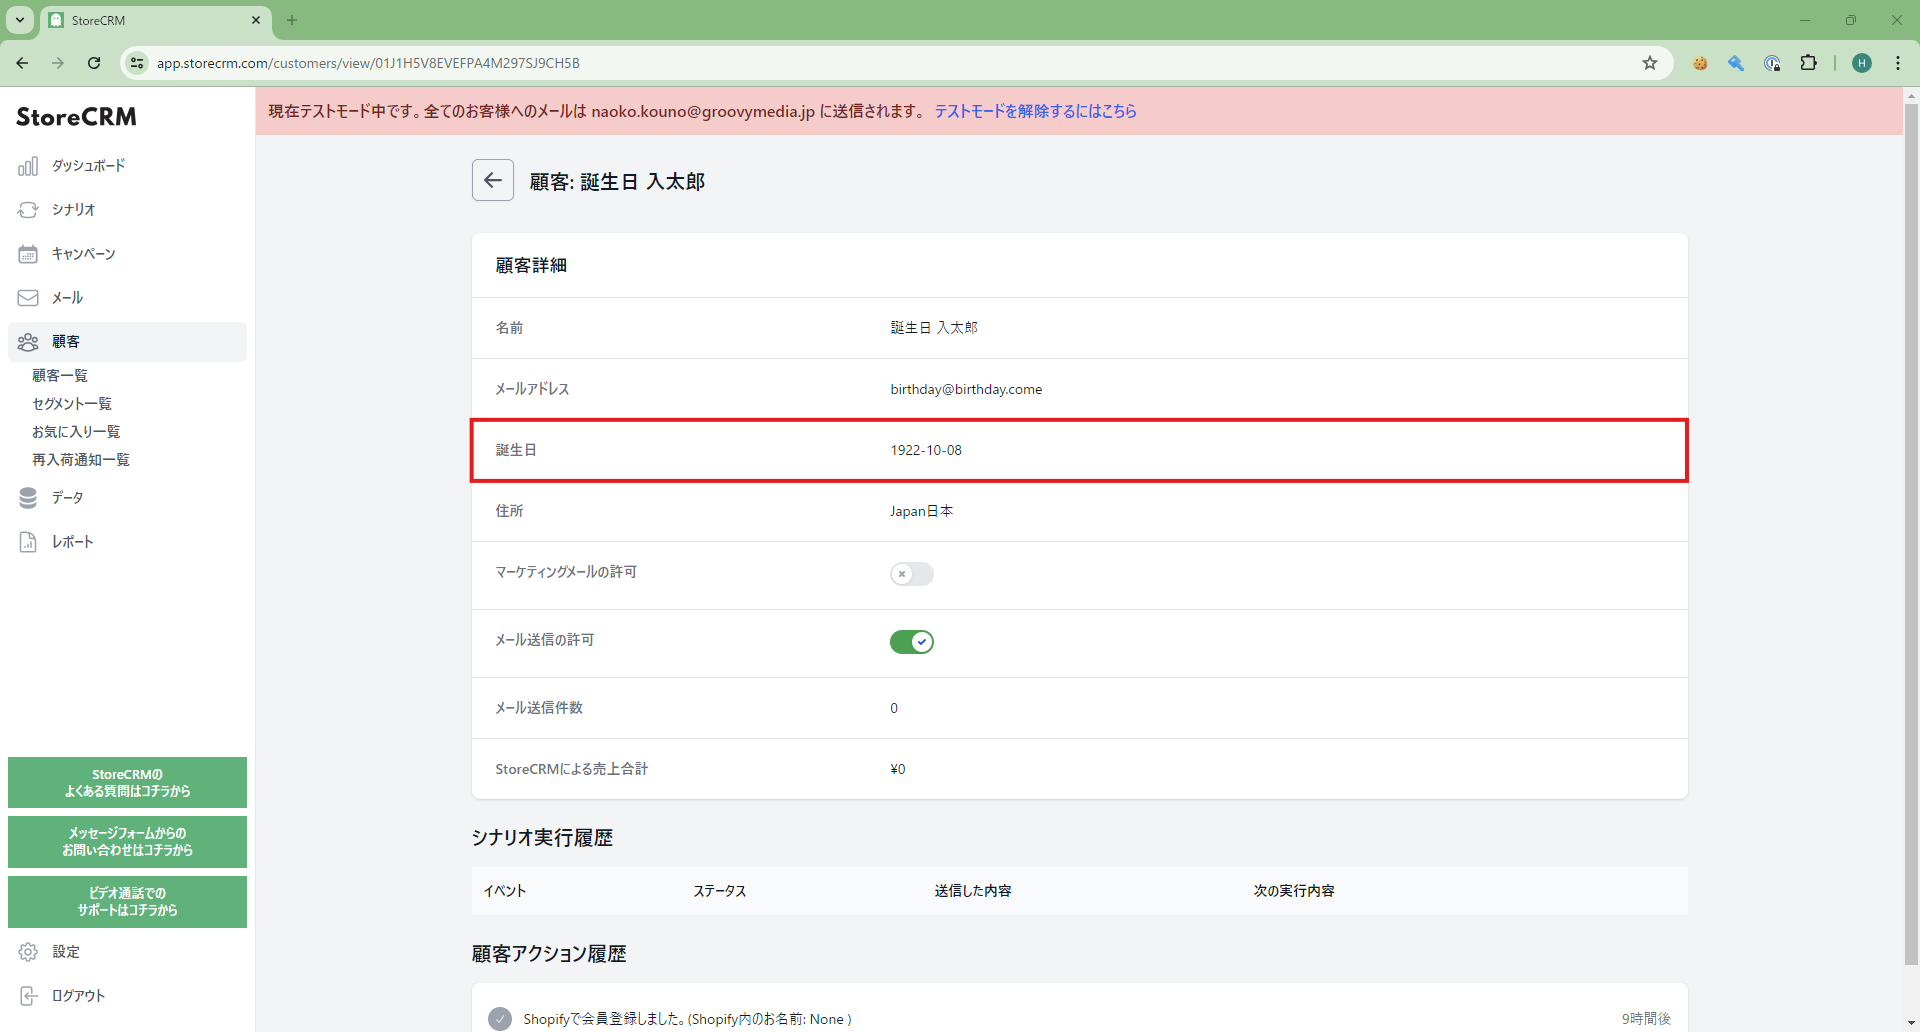
3. Check the birthday field on the customer detail page. If it shows the date you entered, everything is working. If it does not, compare the code you pasted with the code in the section above and make sure there are no differences.
Adding the birthday form to the account page
What you will build in this section
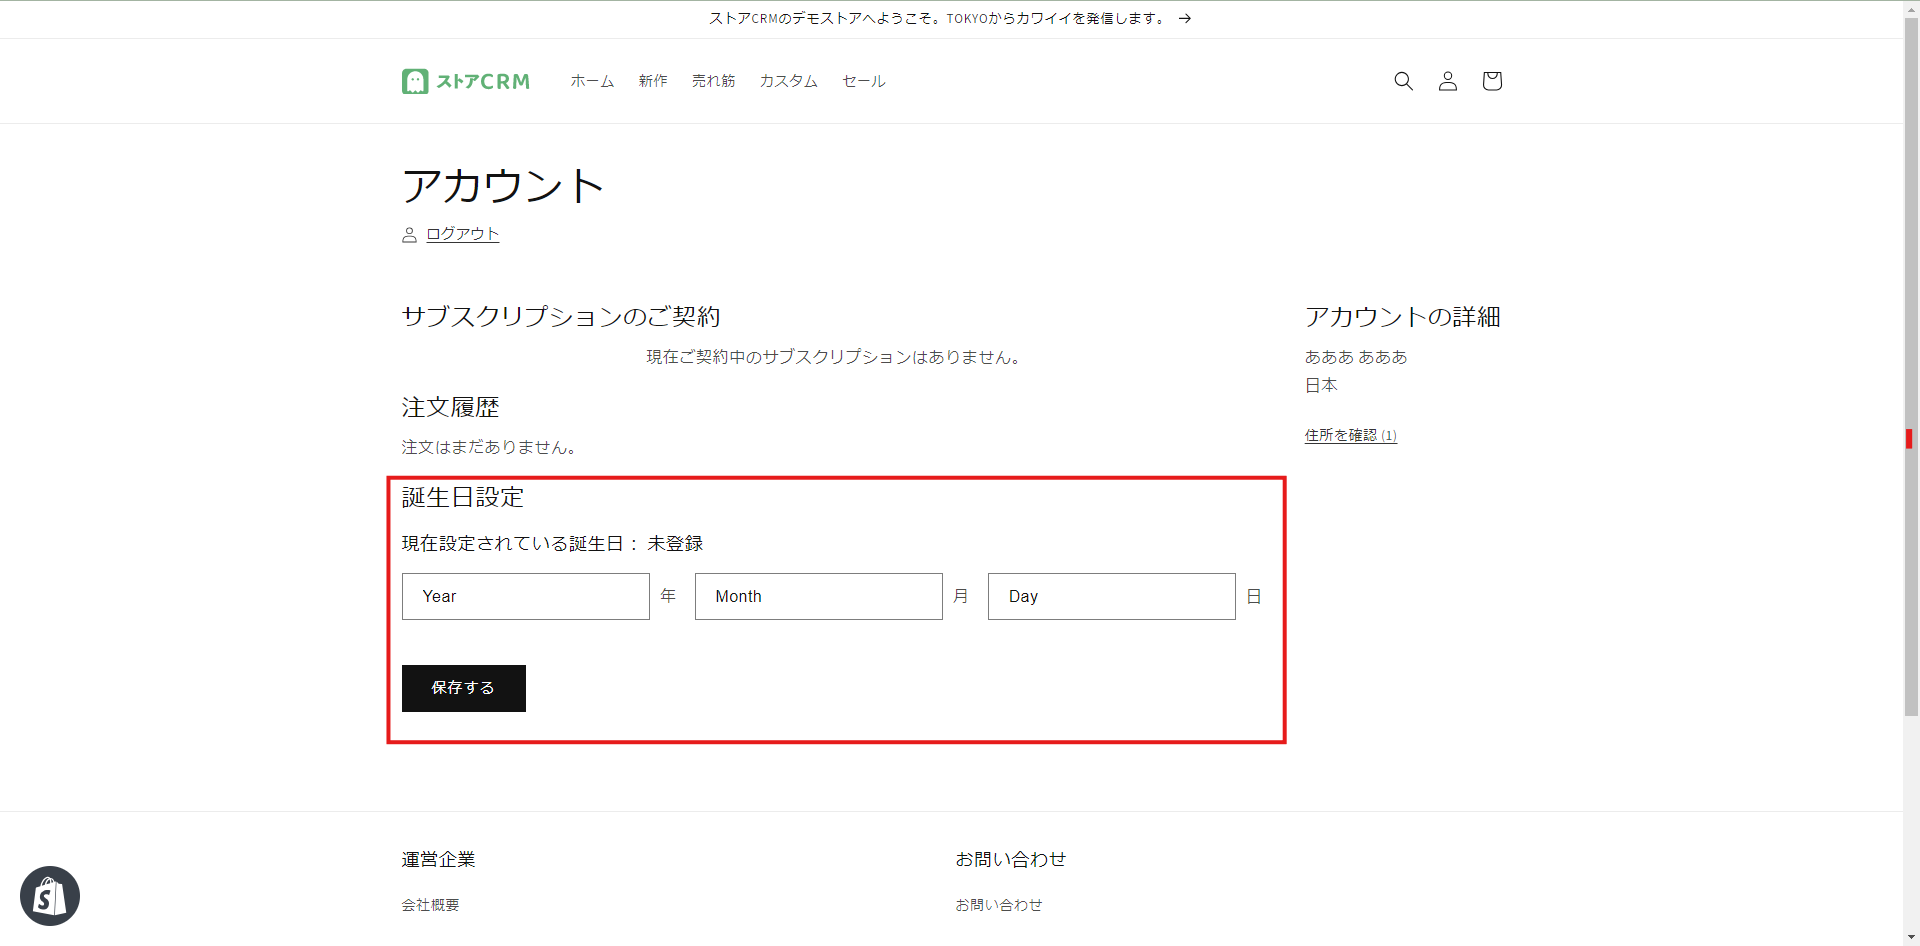
Let us start by looking at the finished form. Unlike the signup page, the account page can be revisited any number of times, so the birthday must be locked once it has been registered.
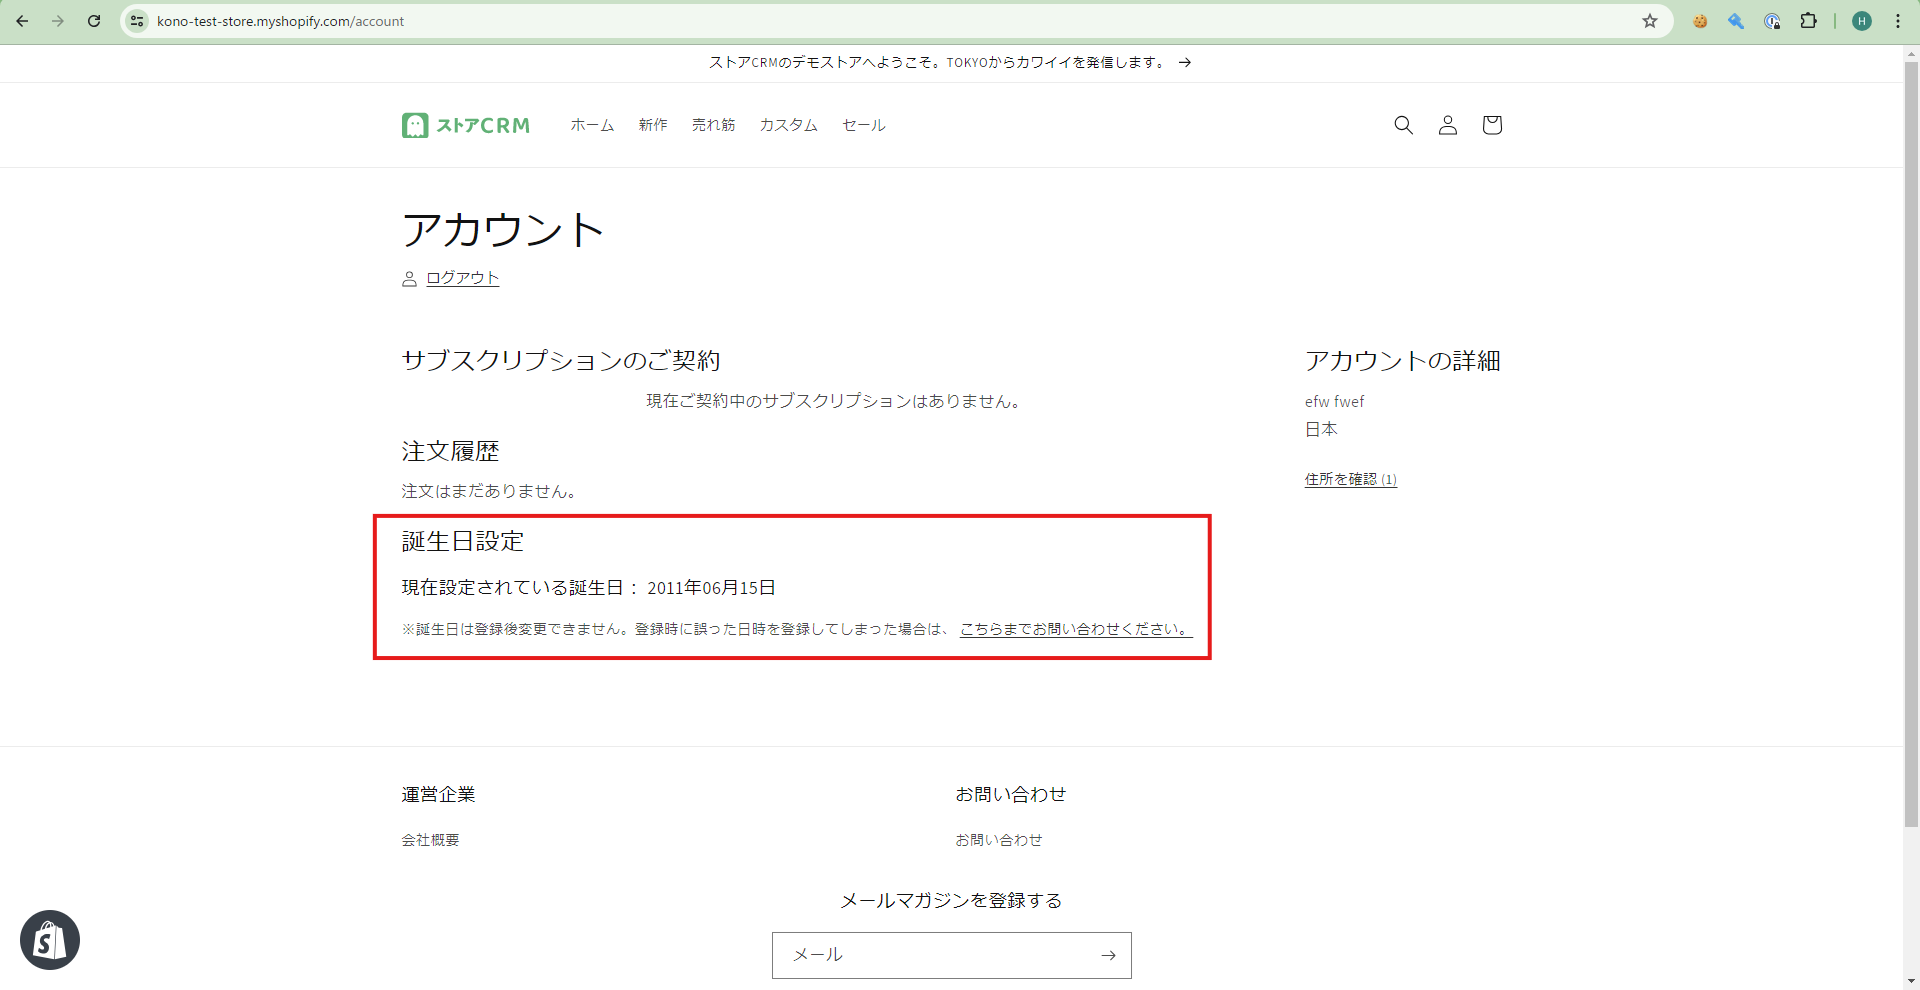
The implementation below checks whether a birthday is already registered and shows different content accordingly.
Opening the code you need to edit
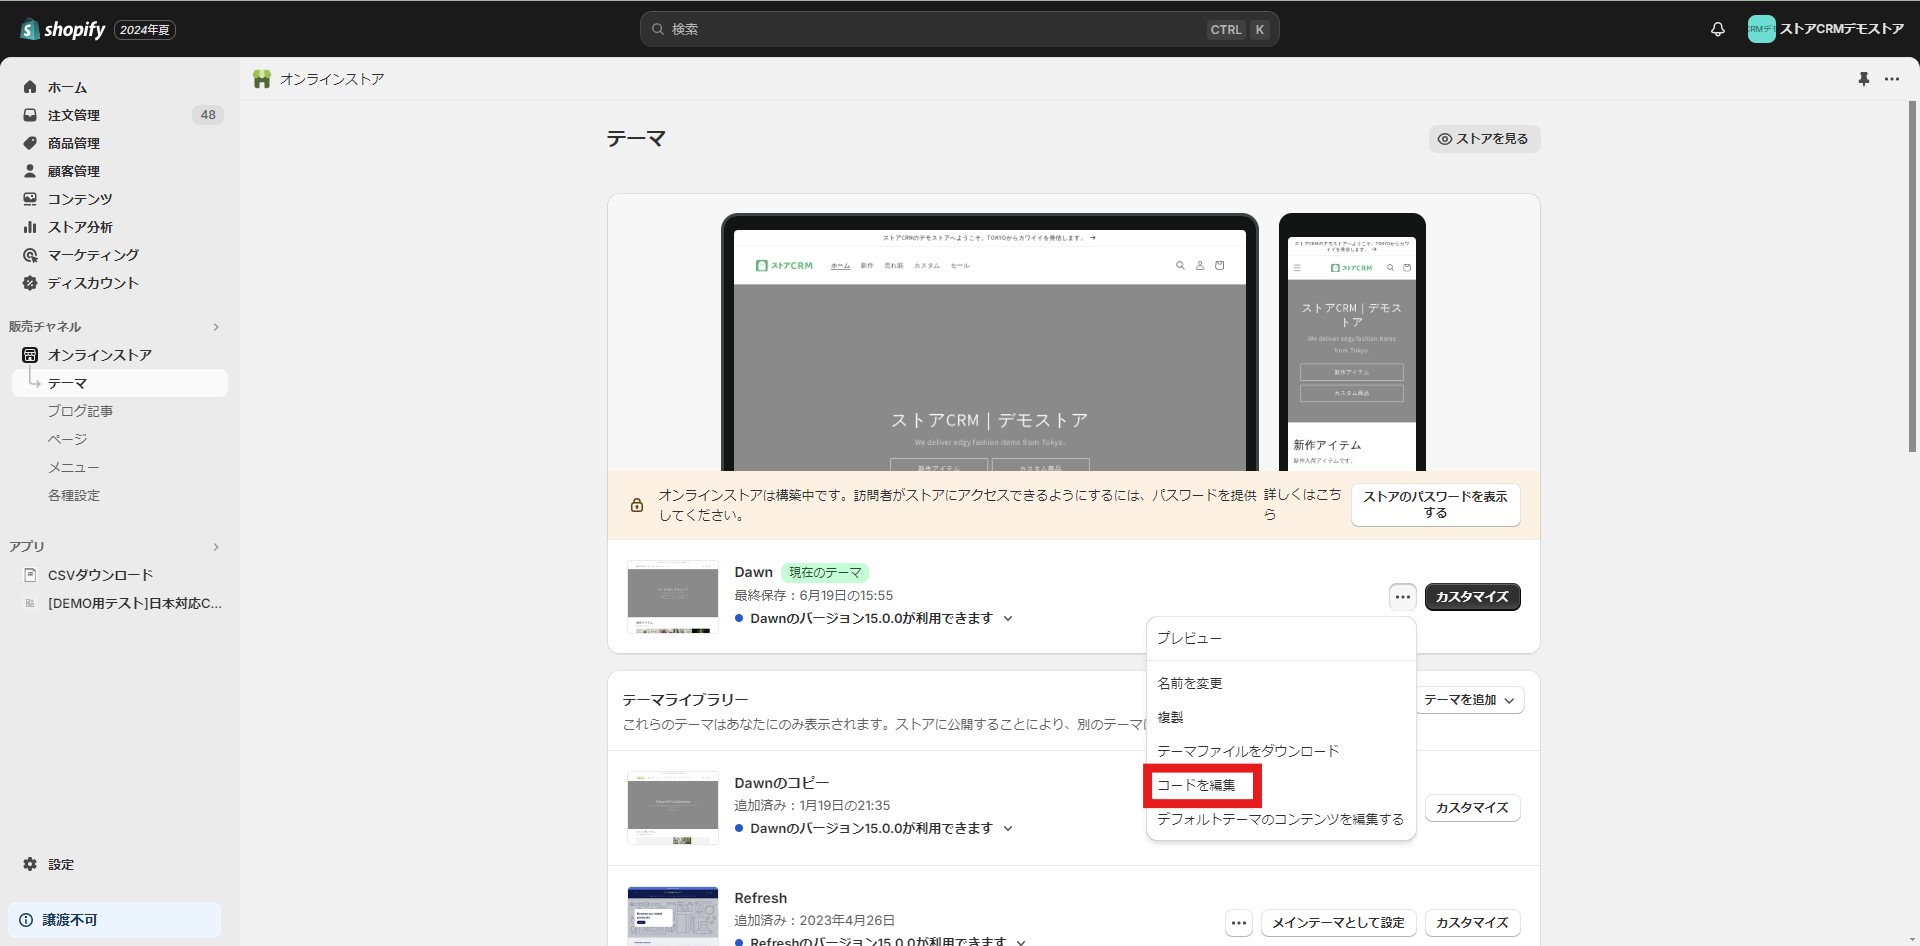
Open the theme list from [Shopify admin] > [Sales channels] > [Online Store] > [Themes]. Click [...] and then [Edit code].
The steps that follow involve editing theme code, so if you are at all unsure, duplicate the theme first and edit the copy.
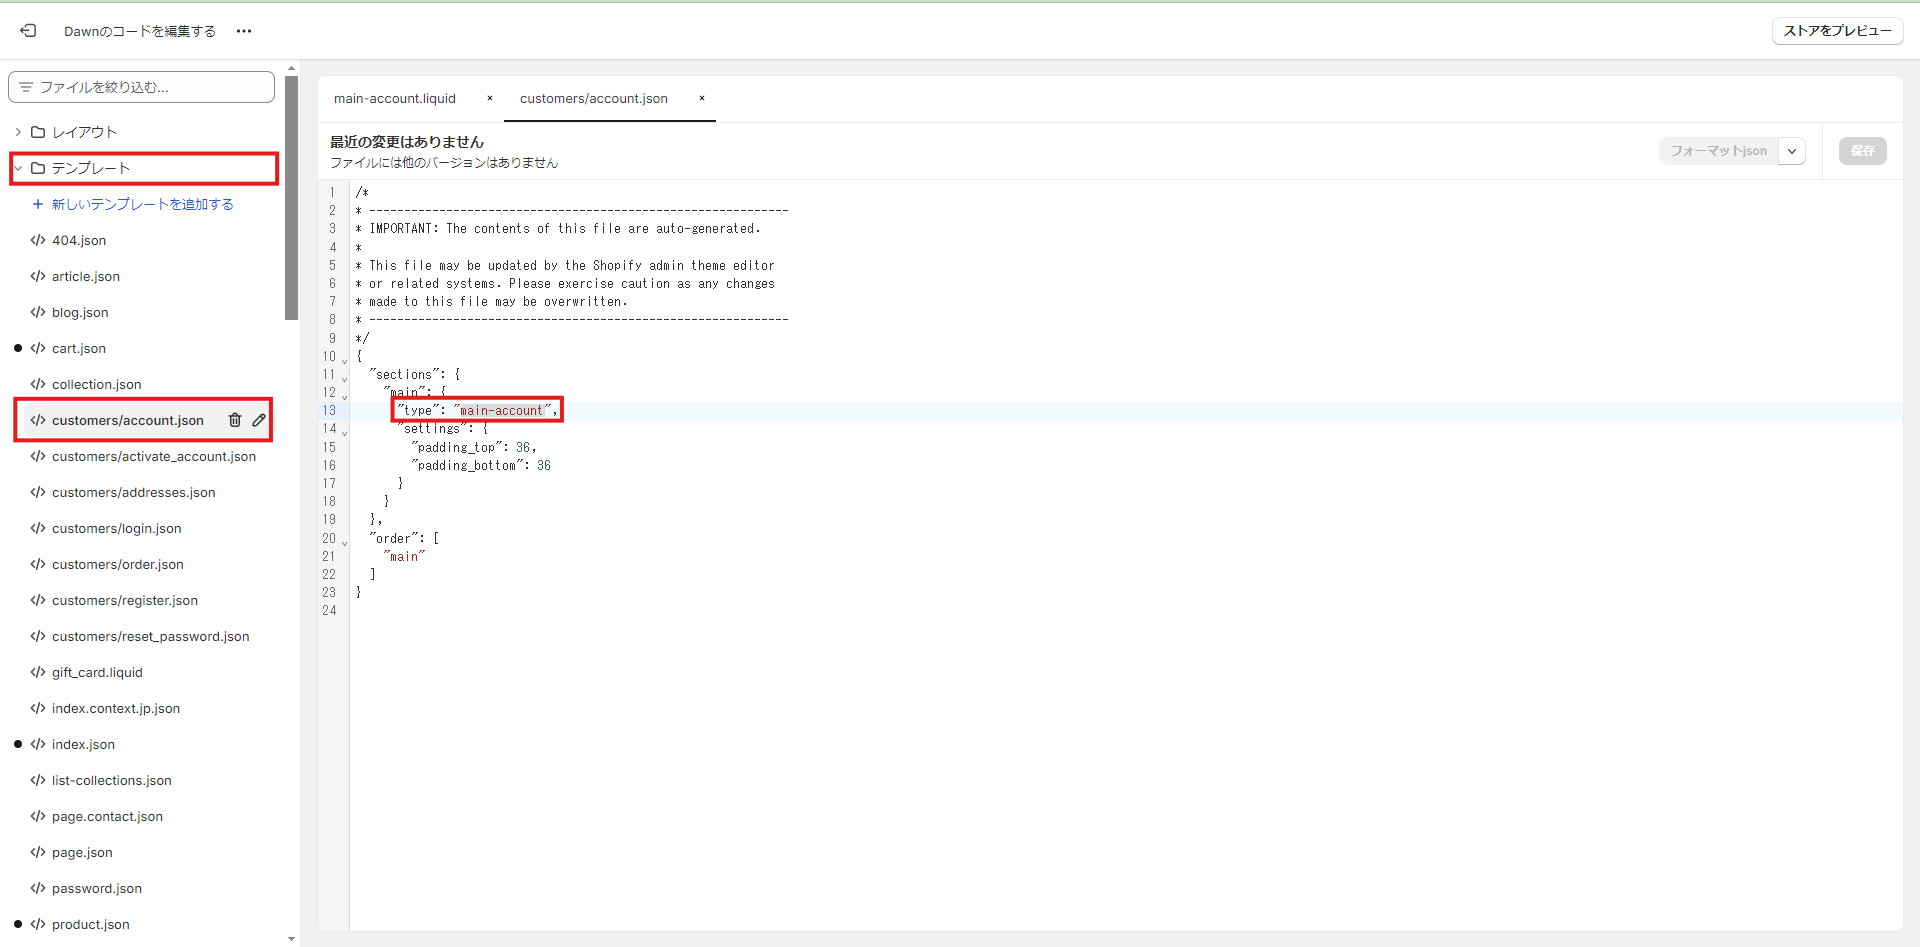
1. Clicking [Edit code] opens the file list. This time we are editing the account page, so open [Templates] > [customer/account.json]. Open the file and look at the value written at sections > main > type. In the Dawn theme it says [main-account]. That tells you where the page's code lives — in this case [Sections] > [main-account.liquid].
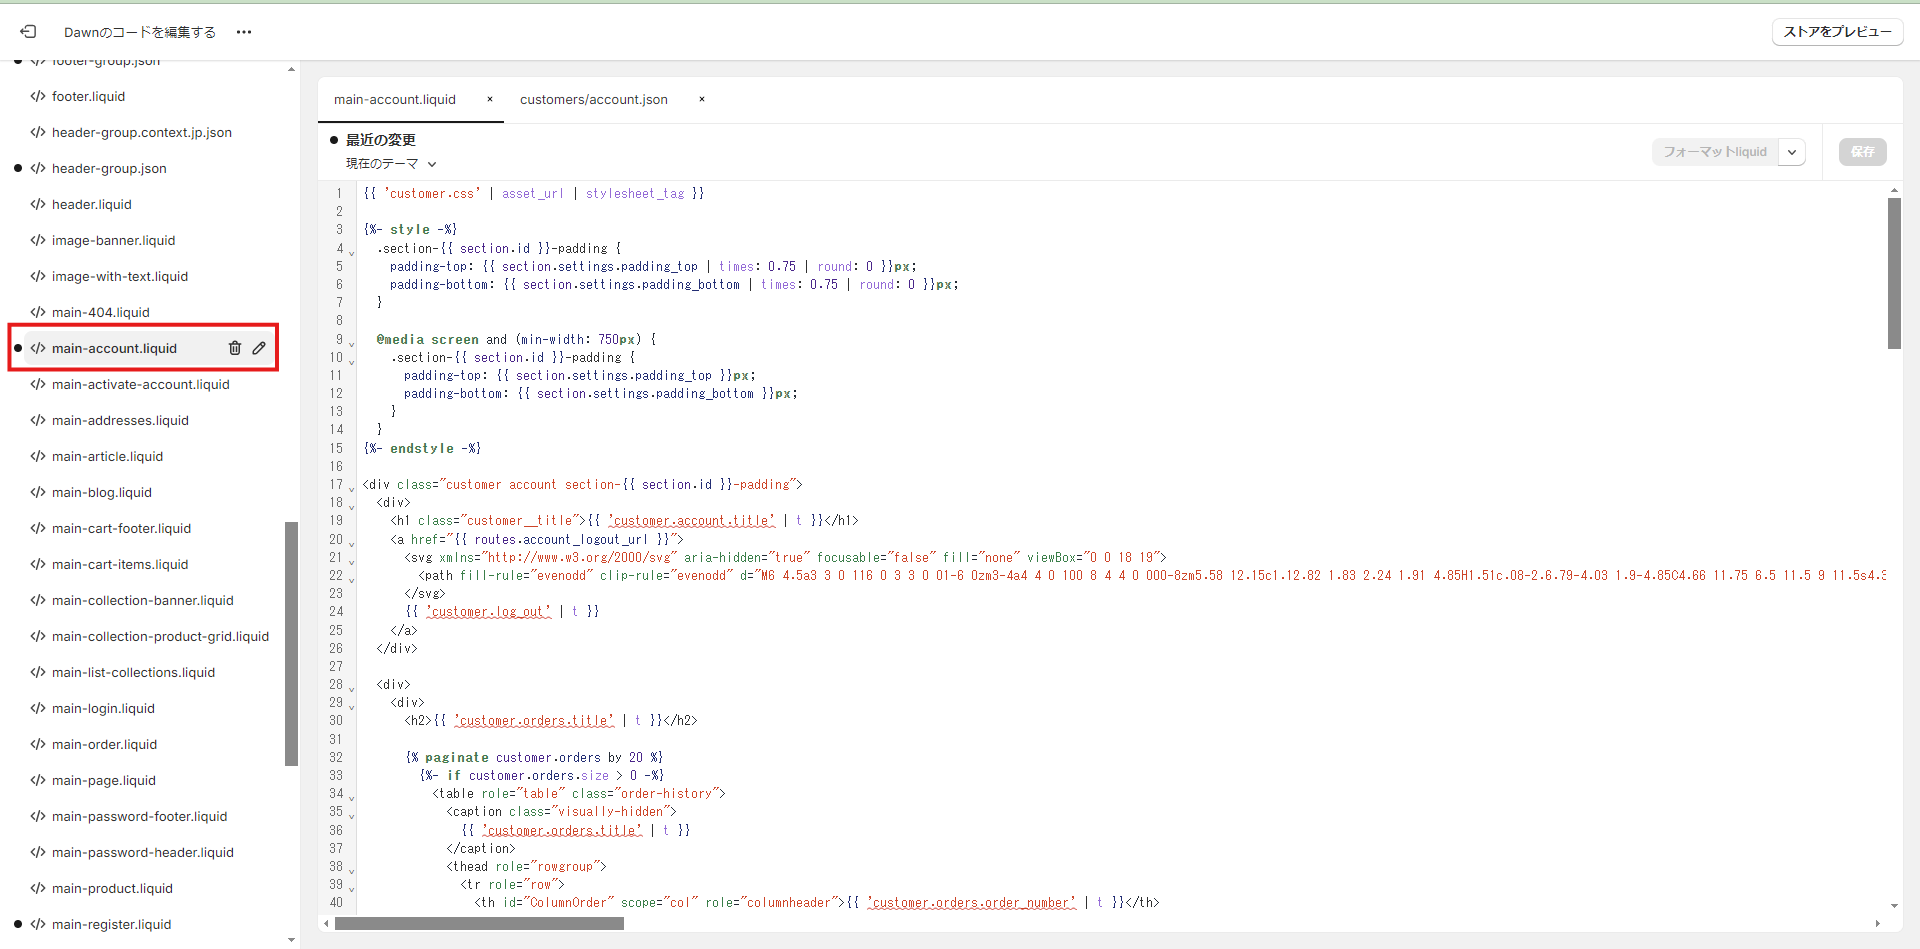
2. Click [Sections] > [main-account.liquid] to open that file.
Adding the code
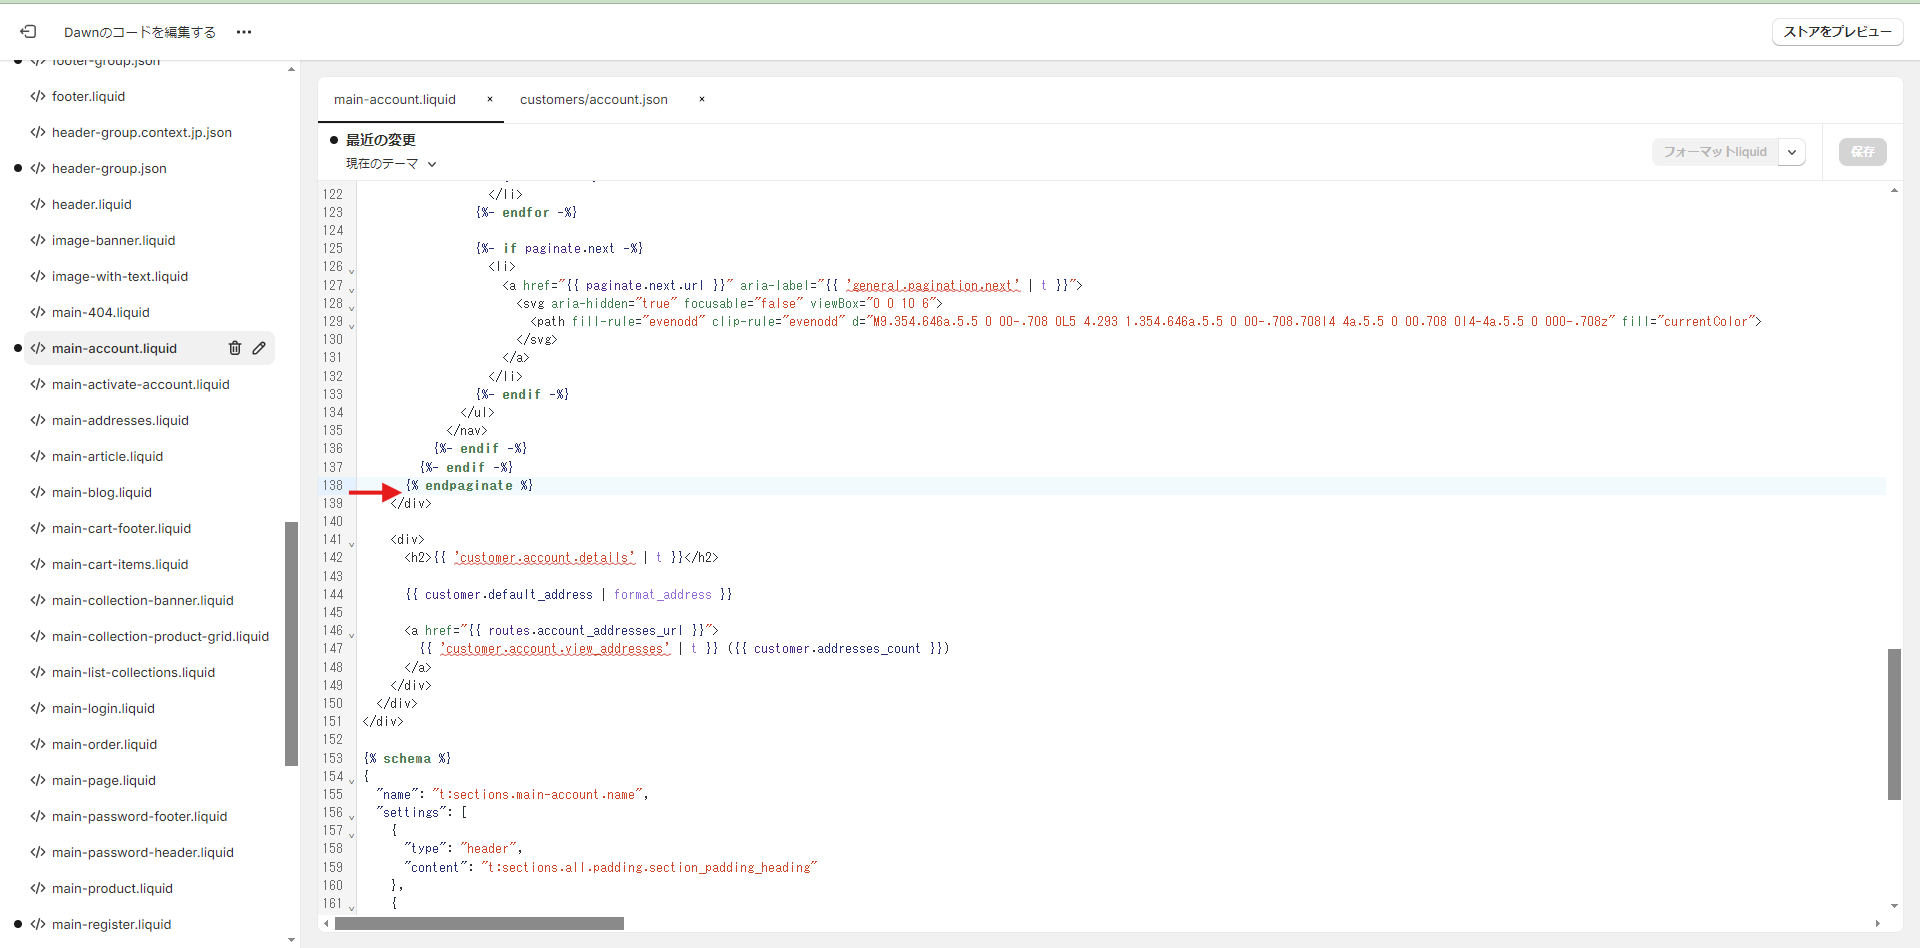
Here we want the form below the order history, so we insert the code between lines 137 and 138.
1. Copy and paste the HTML below.
On line 24, replace href="#" with a link to your own store's contact form.
<div id="accountBirthday" class="acountInfoSp sp" style="margin-top:20px;">
	<h2>Birthday settings</h2>
  <h3 class="setbirthday">
	  Current birthday:
    {% if customer.metafields.facts.birth_date == null %}
	    Not registered
    {% else %}
      {{ customer.metafields.facts.birth_date | date: "%Y/%m/%d" }}
    {% endif %}
   </h3>
   {% if customer.metafields.facts.birth_date == null %}
      <!-- Birthday Widget By OBAKE -->
      <div>
	      <ul class="grid grid--3-col birthdayinput" style="padding-left: 0;margin-bottom: 5px;">
	        <li class="grid__item dayform"><select class="form-control" id="year" name="customer_year" ><option value="0">Year</option></select><span class="daychar">Year</span></li>
          <li class="grid__item dayform"><select class="form-control" id="month" name="customer_month" ><option value="0">Month</option></select><span class="daychar">Month</span></li>
          <li class="grid__item dayform"><select class="form-control" id="day" name="customer_day" ><option value="0">Day</option></select><span class="daychar">Day</span></li>
        </ul>
        <button id="birthdaySave" class="btn btn-primary" onClick="window.obakeStoreBirthday(obakeGetBirthday());">Save</button>
        <div class="saveok">Your birthday has been added</div>
       </div>
    {% else %}
	     <p style="font-size:14px;">Your birthday cannot be changed after registration. If you registered an incorrect date,
       <a style="text-decoration: underline;" href="#">please contact us here.</a></p>
    {% endif %}
 </div>
2. Next, add the CSS and JavaScript.
The CSS is deliberately minimal, so feel free to restyle it to taste.
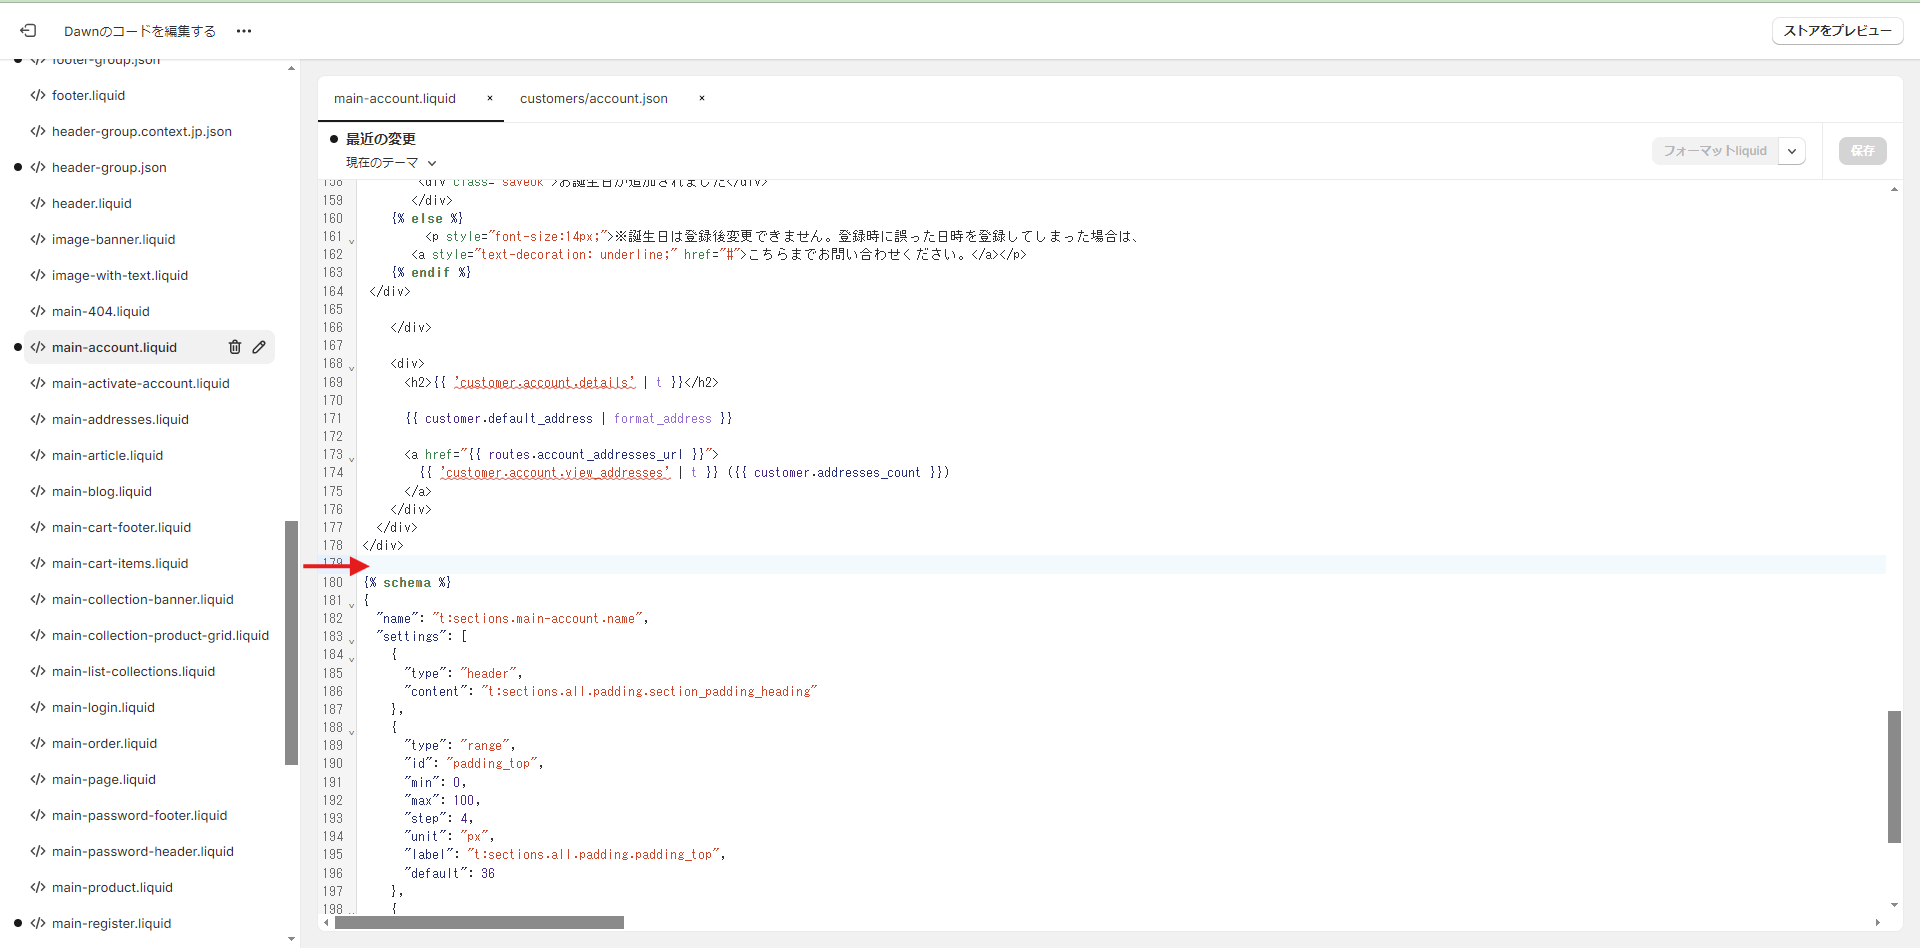
3. Paste the code, click [Save], and you are done.
<style>
.dayform {
    display: flex;
    align-items: center;
    position: relative;
    margin-bottom: 0;
}

.birthdayinput {
    display: flex;
    margin-left: 0;
}

.yearselect, .monthselect, .dayselect {
    min-width: 100px;
}

.birthdayyear, .birthdaymonth, .birthdayday {
    padding: 0;
    left: 10px;
    position: absolute;
}

.daychar {
    margin: 0 10px;
}

.form-control {
    box-shadow: 0 0 0 var(--inputs-border-width) rgba(var(--color-foreground), var(--inputs-border-opacity));
}

.saveok {
    color: red;
    font-size: 16px;
    display: none;
    margin-top: 15px;
}

@media (max-width: 500px) {
    .daychar {
        font-size: 14px;
        margin: 0 -20px 0 5px;
    }

    .birthdayinput {
        display: flex;
        justify-content: space-between;
    }

    .customer-birthday {
        padding-right: 25px;
    }

    .dayform {
        max-width: 100px !important;
        min-width: 0 !important;
    }

    #year {
        min-width: 90px;
    }

    #month {
        min-width: 70px;
    }

    #day {
        min-width: 70px;
    }
}
</style>
<script>var obakeCurrentBirthday='{{ customer.metafields.facts.birth_date }}';function addZero(e,t){return('00'+e).slice(-t)}function createOption(e,t,n){var a=document.createElement('option');a.value=e,a.text=t,document.getElementById(n).appendChild(a)}function populateDateFields(e){for(var t=new Date().getFullYear();t>=1900;t--)createOption(t,t,'year');for(var t=1;t<=12;t++)createOption(t,t,'month');for(var t=1;t<=31;t++)createOption(t,t,'day');var n=e.match(/([0-9]+)-([0-9]+)-([0-9]+)/);n&&(t=parseInt(n[1]),n=parseInt(n[2]),a=parseInt(n[3]),document.getElementById('year').value=t,document.getElementById('month').value=n,document.getElementById('day').value=a)}(function(){populateDateFields(obakeCurrentBirthday)})(),window.obakeGetBirthday=function(){var e=document.getElementById('year').value,t=addZero(document.getElementById('month').value,2),n=addZero(document.getElementById('day').value,2);return[].forEach.call(document.querySelectorAll('.saveok'),function(e){e.style.display='block'}),document.getElementById('birthdaySave').disabled=!0,[].forEach.call(document.querySelectorAll('.form-control'),function(e){e.disabled=!0}),e+'-'+t+'-'+n};</script>
<script defer src="/apps/obake/birthdayscript"></script>
Testing your setup
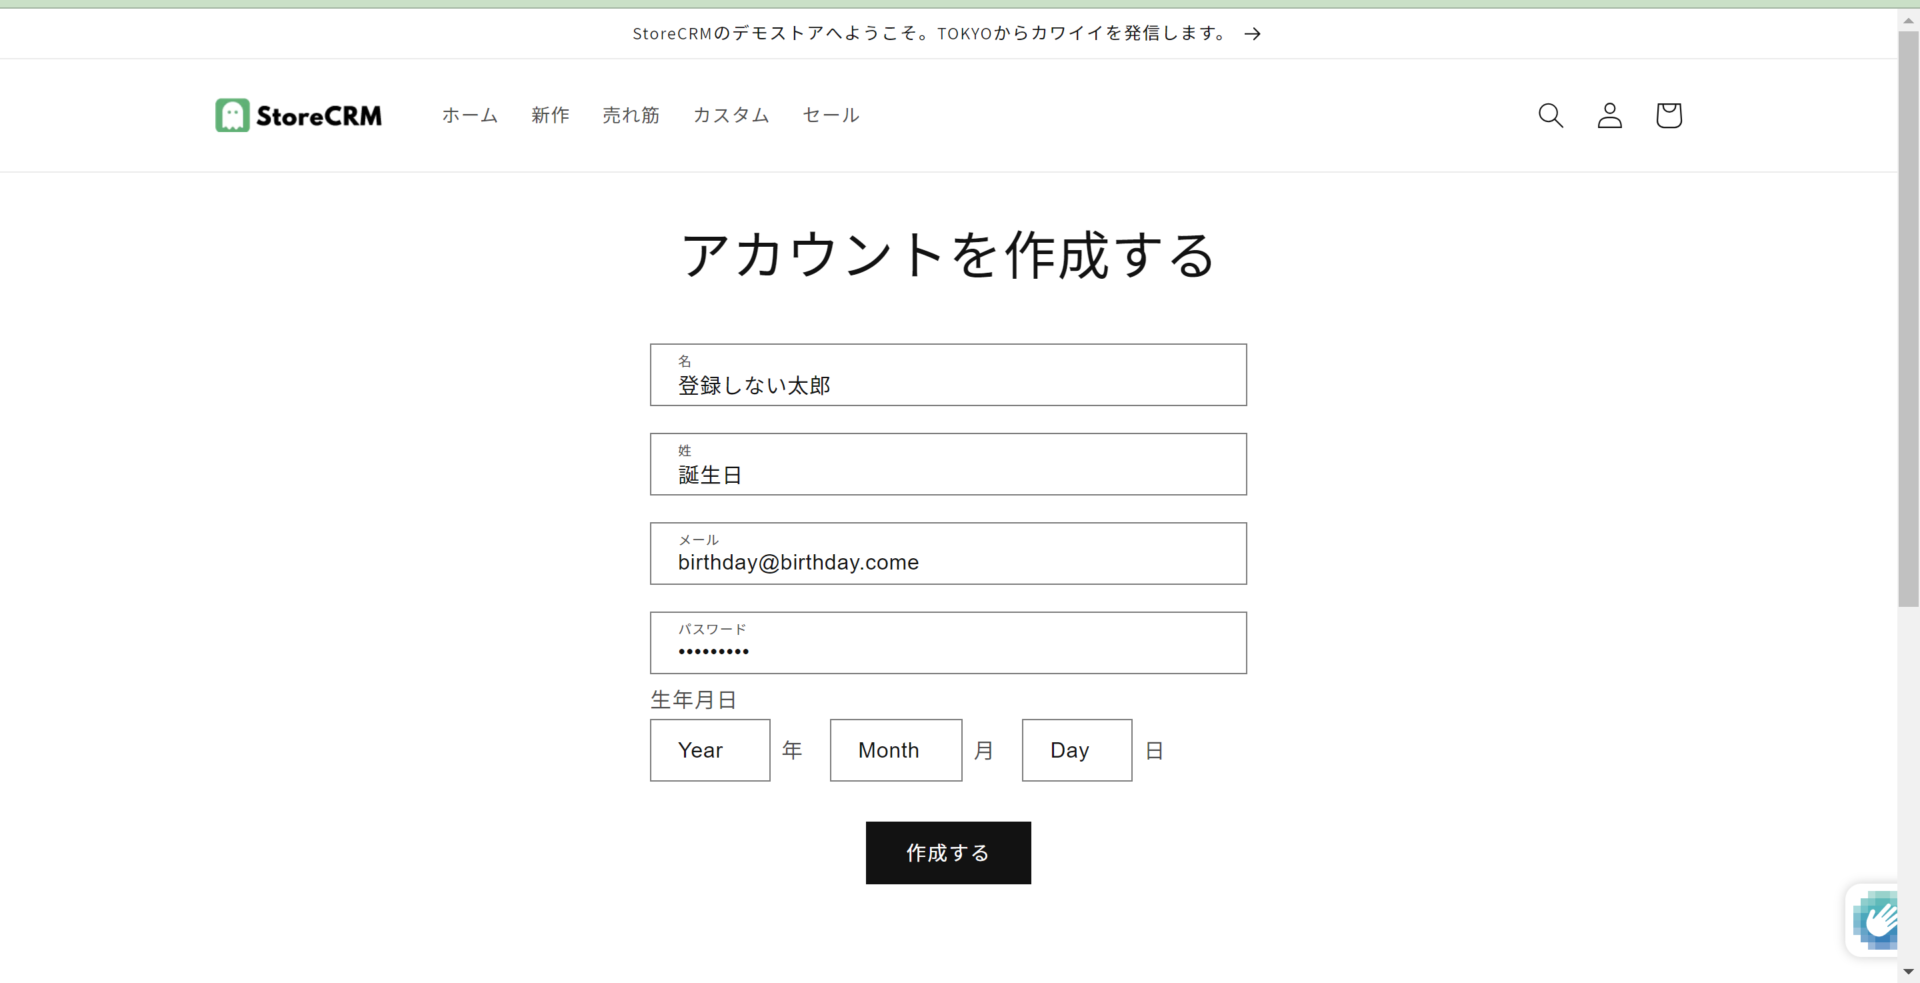
Once the code is in place, test it.
1. Create an account from the signup page without entering a birthday.
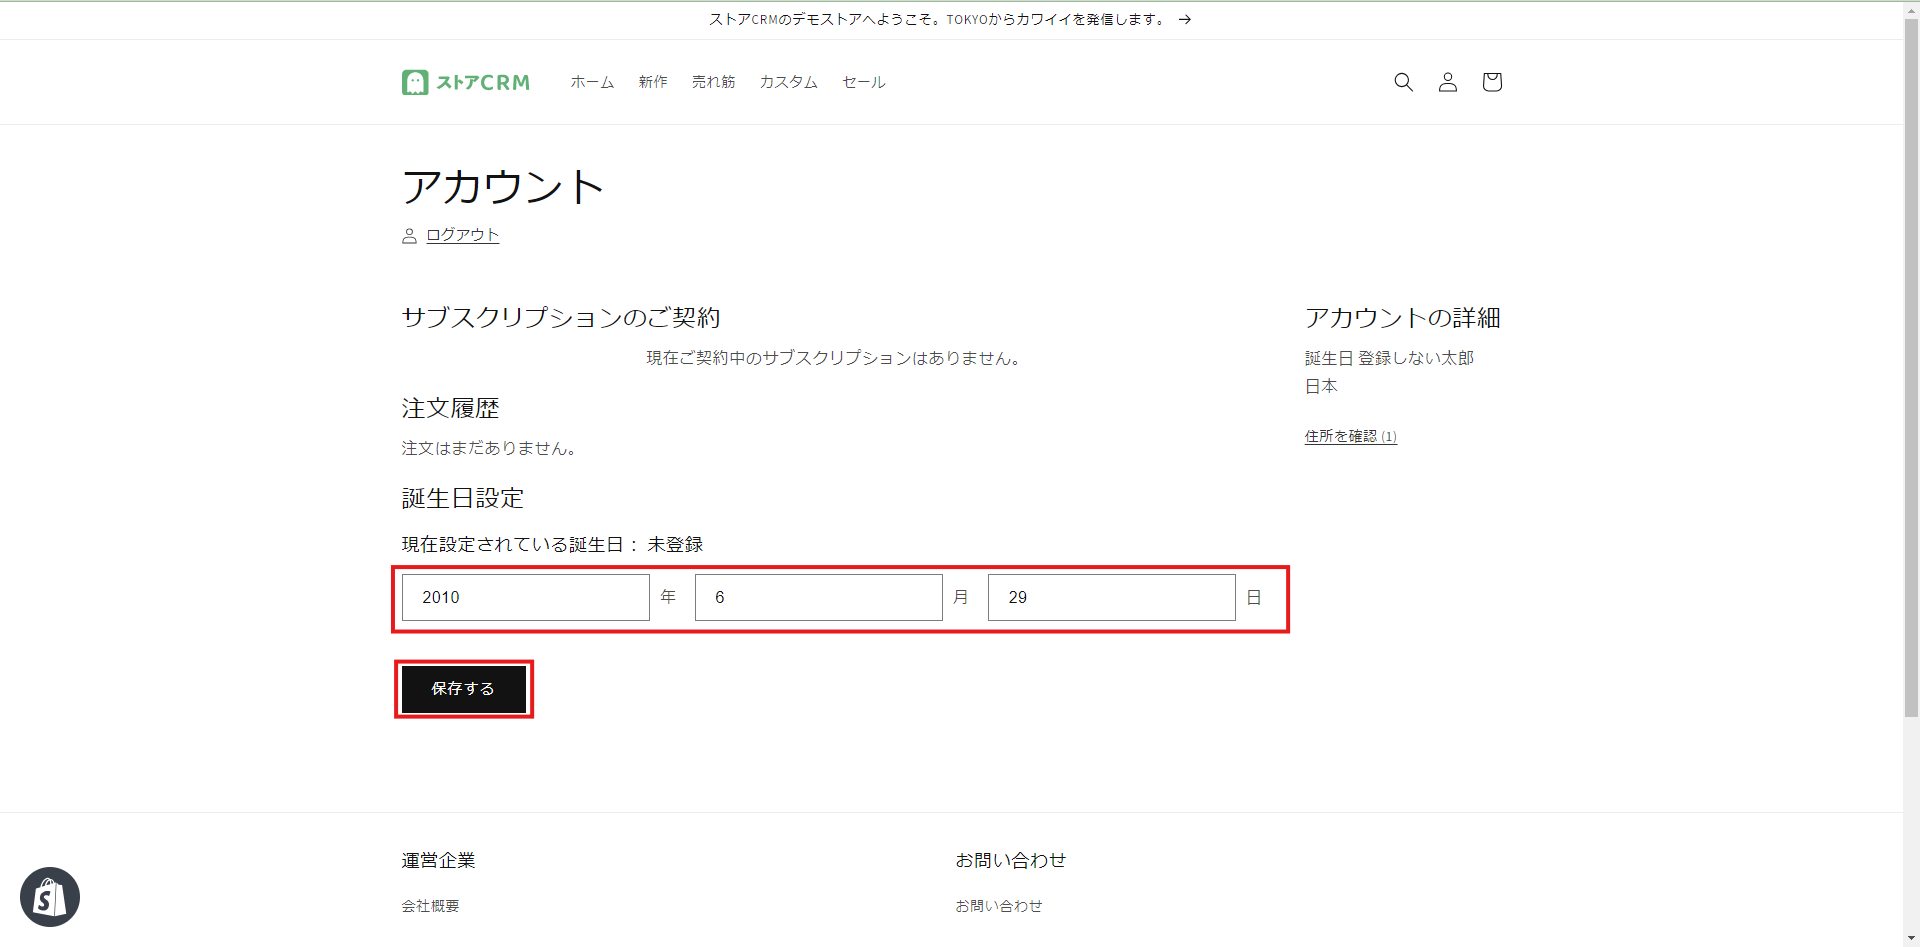
2. After the account is created, open the account page. The birthday field is displayed; choose a date and click the save button.
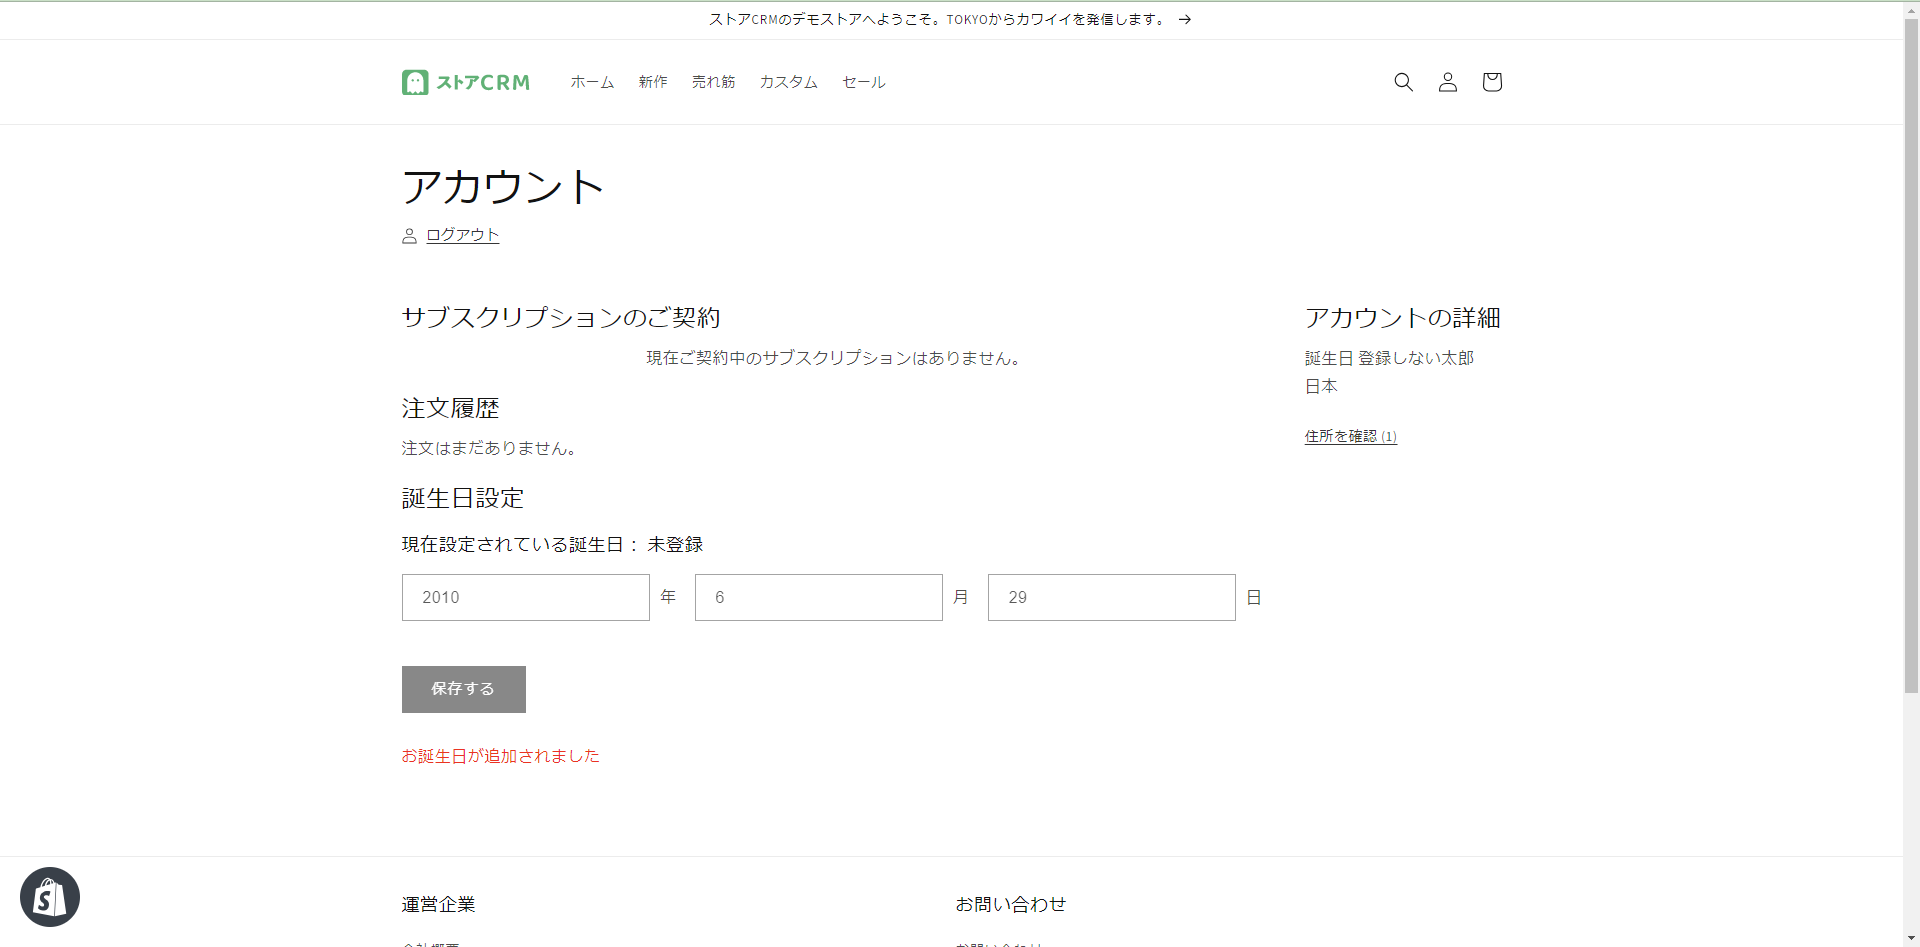
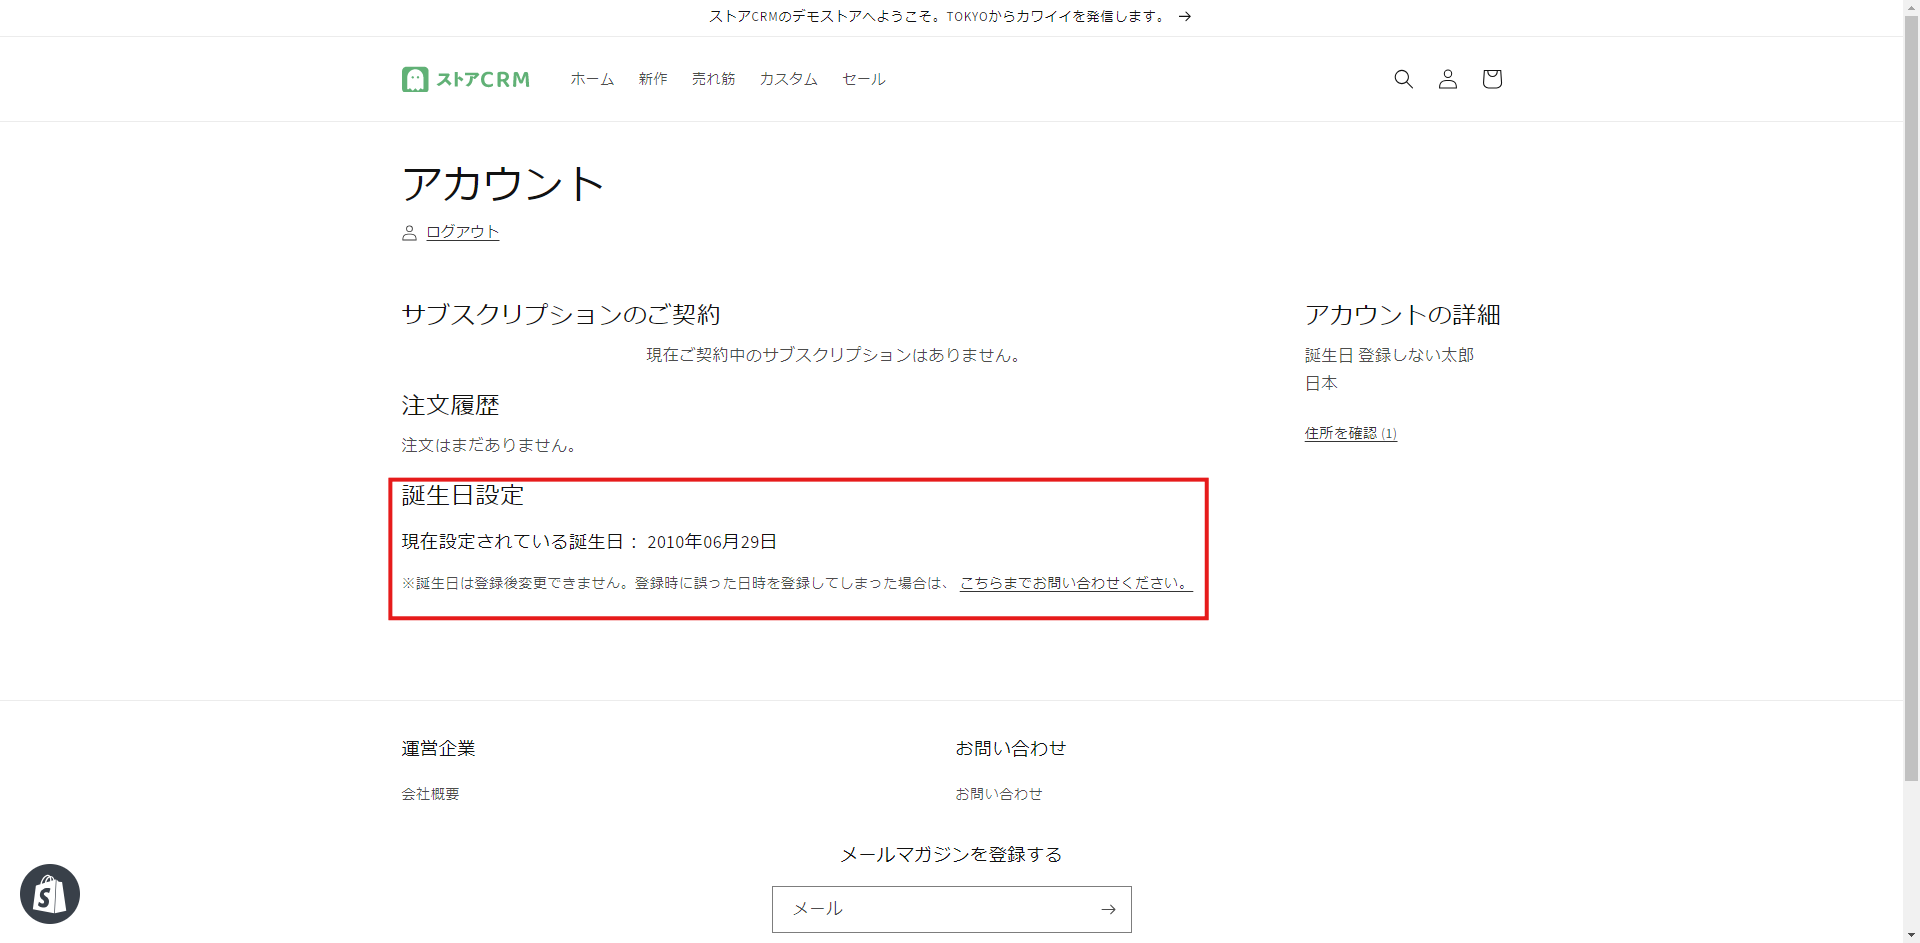
Check the following behaviour while you do it.
-
Once saving completes, [Your birthday has been added] appears below the [Save] button.
-
The date select boxes and the [Save] button become unusable.
-
Reloading the page or returning to the account page shows the registered state, with no way to change the birthday.
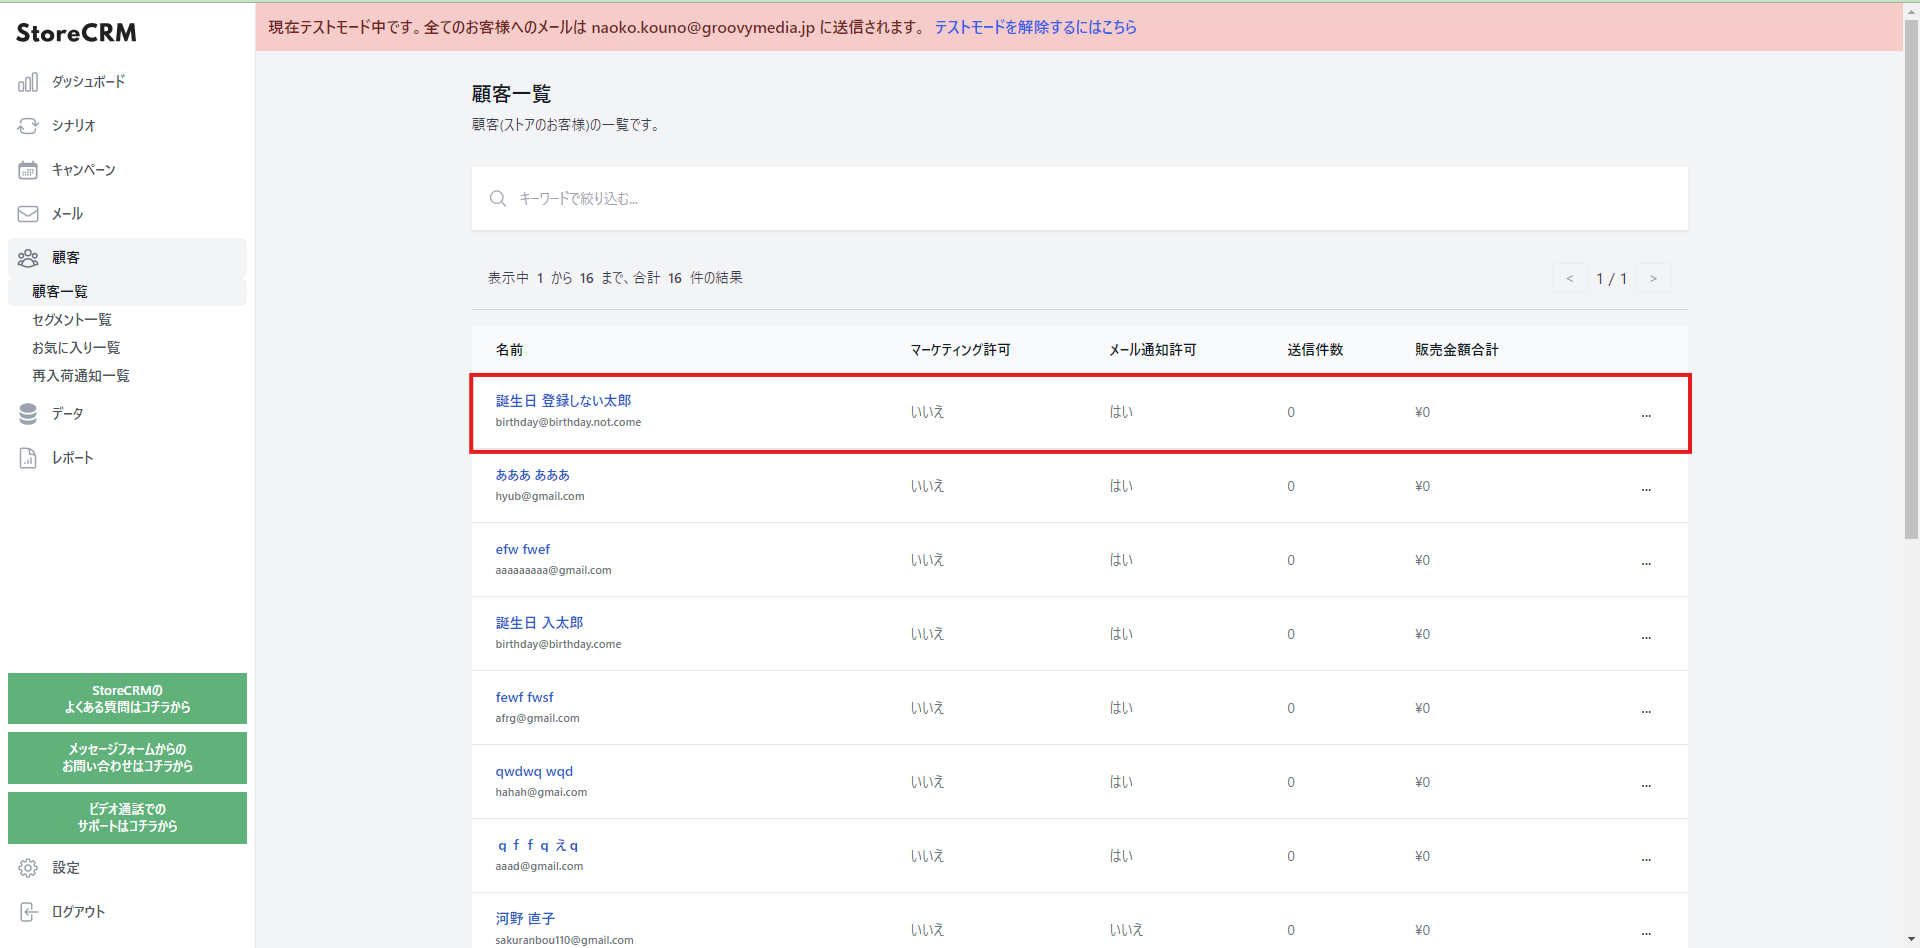
3. Open the StoreCRM app and click [Customers] > [Customer list]. The account you just created is at the top of the list; click the name to open the customer detail page.
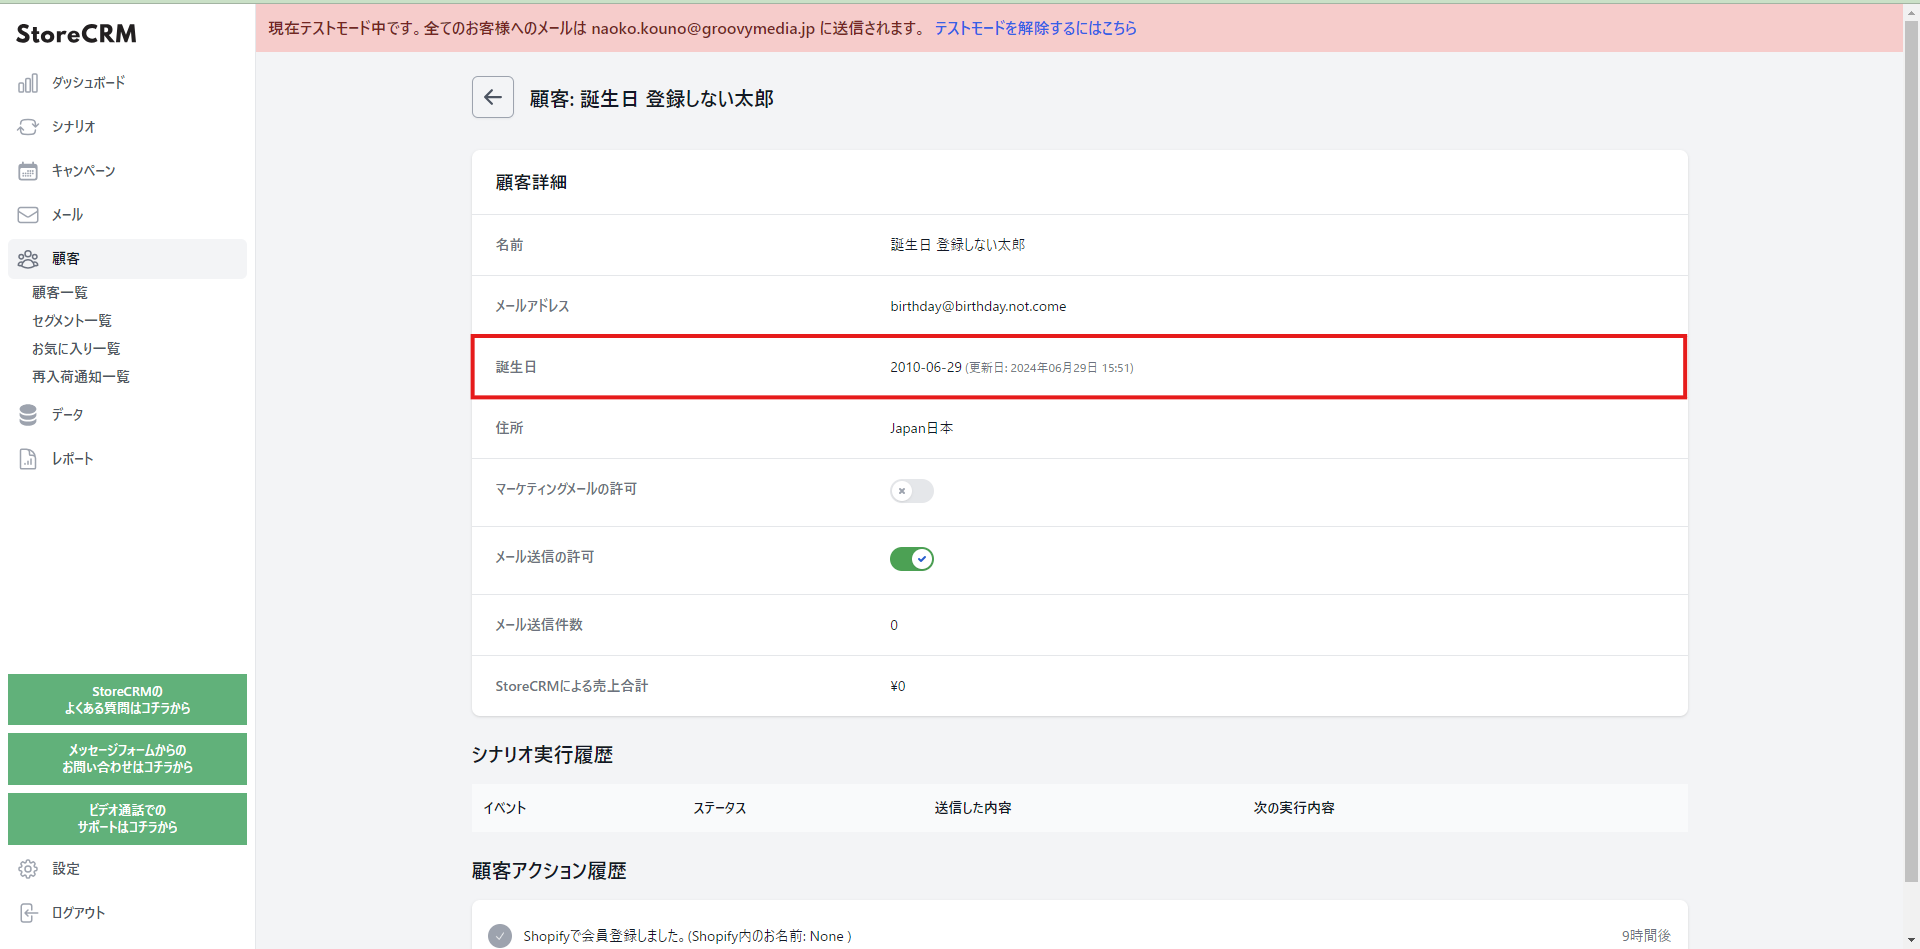
4. Check the birthday field on the customer detail page. If it shows the date you registered, everything is working. If it does not, compare the code you pasted with the code in the section above and make sure there are no differences.
Summary
StoreCRM brings campaigns like this birthday form — which previously meant writing code or combining Shopify Flow with other Shopify apps and configuring all of it — into a single app.
Read here for how to send birthday emails.
We also offer free setup support — we will configure the app for you — as well as suggestions for growing revenue once you are up and running. Feel free to get in touch through the contact form.


