
Introduction
Adding back-in-stock notifications to an ecommerce store is one of the most effective ways to stop losing sales when a product runs out.
This article walks through how to add Shopify back-in-stock notifications with StoreCRM and how to build an automated campaign around them, including the settings to use and the details to watch out for.
With StoreCRM you do not need a separate back-in-stock app: the notification feature itself and the campaigns built on top of it are all handled inside this one app.
Back-in-stock notifications do more than recover lost sales — they also collect customer data — so they are well worth setting up.
The steps below use the free Dawn theme. Paid themes and heavily customised themes may have a different file structure; if that is the case, contact StoreCRM customer support and we can carry out the implementation for you.
With StoreCRM you can also send back-in-stock notifications from your Shopify store over LINE. See the link below for how to set that up. /knowhow/line-backinstock-setting/
Related pages
How to send Shopify back-in-stock notifications over LINE
7 recommended Shopify back-in-stock notification apps compared
StoreCRM feature: back-in-stock notification emails
[Video manual] Setting up StoreCRM back-in-stock notifications on Shopify
Adding the back-in-stock notification feature
What you will build in this section
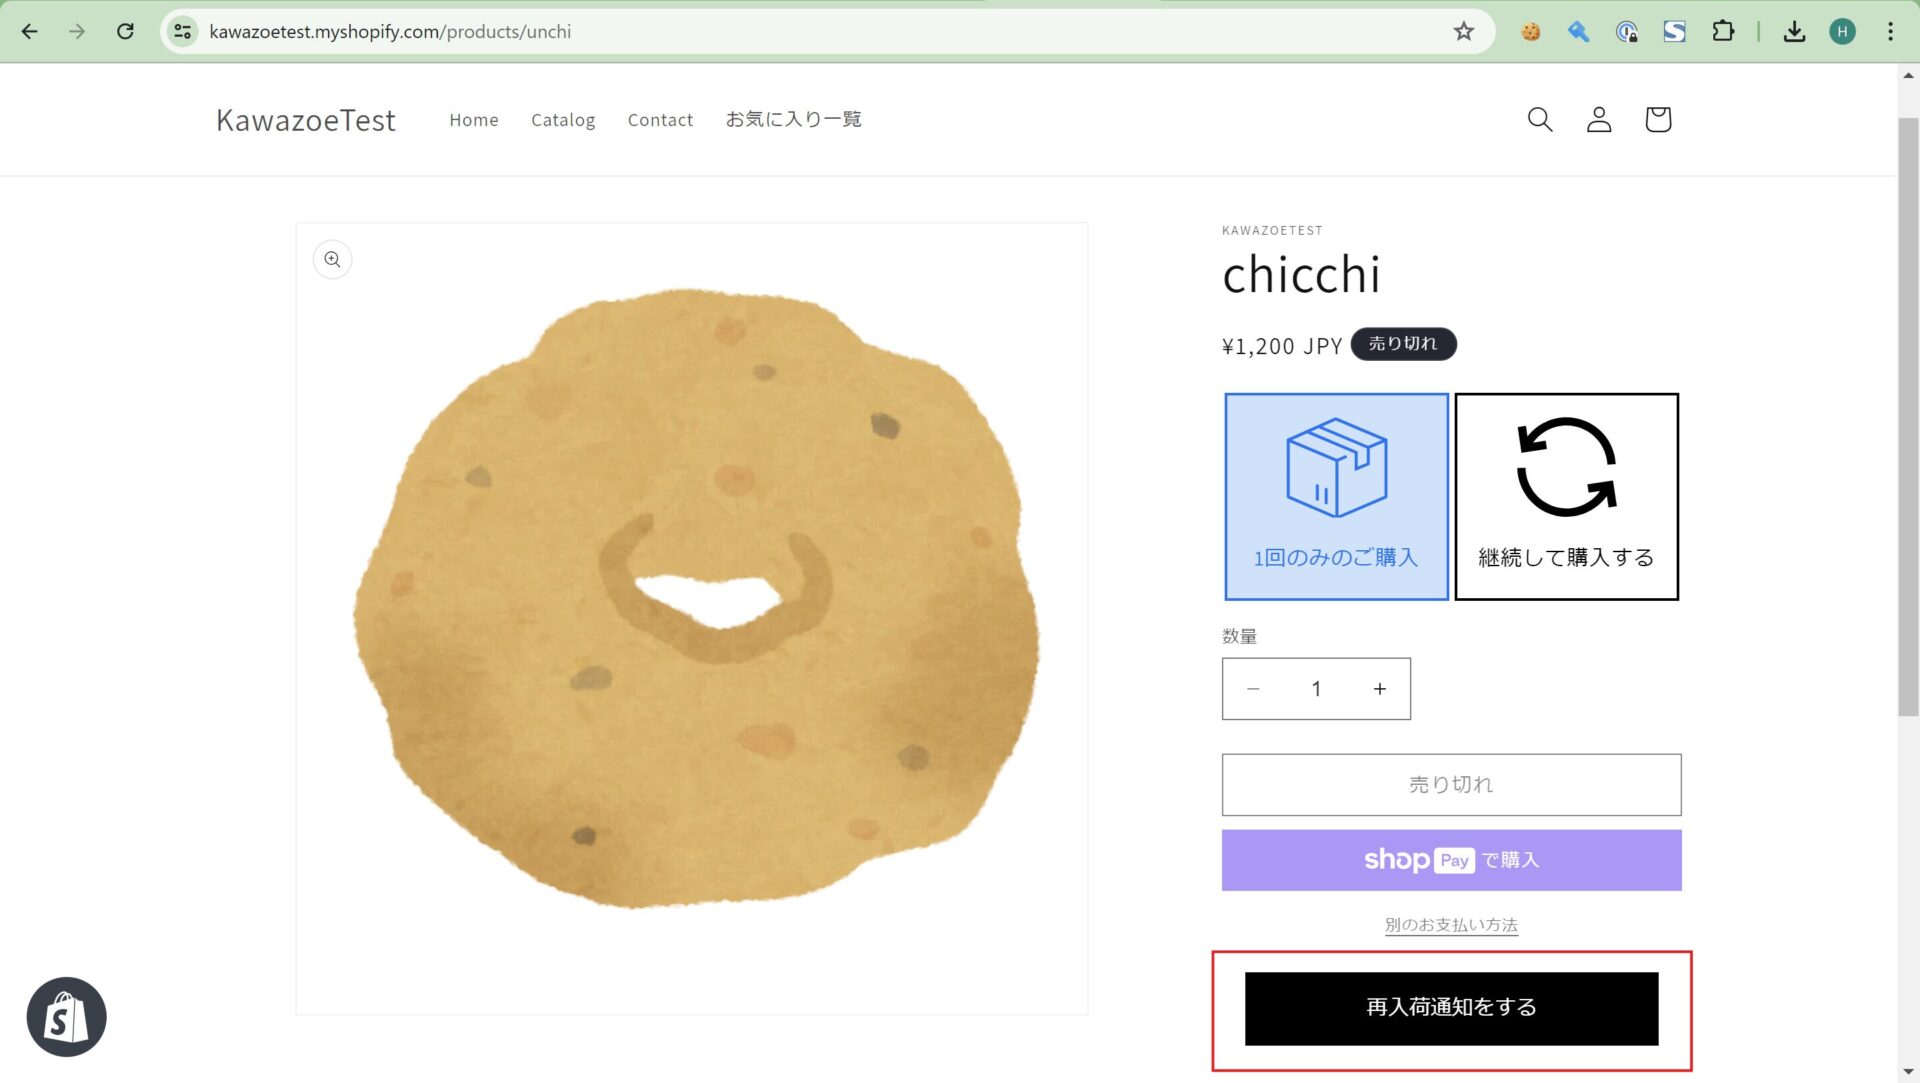
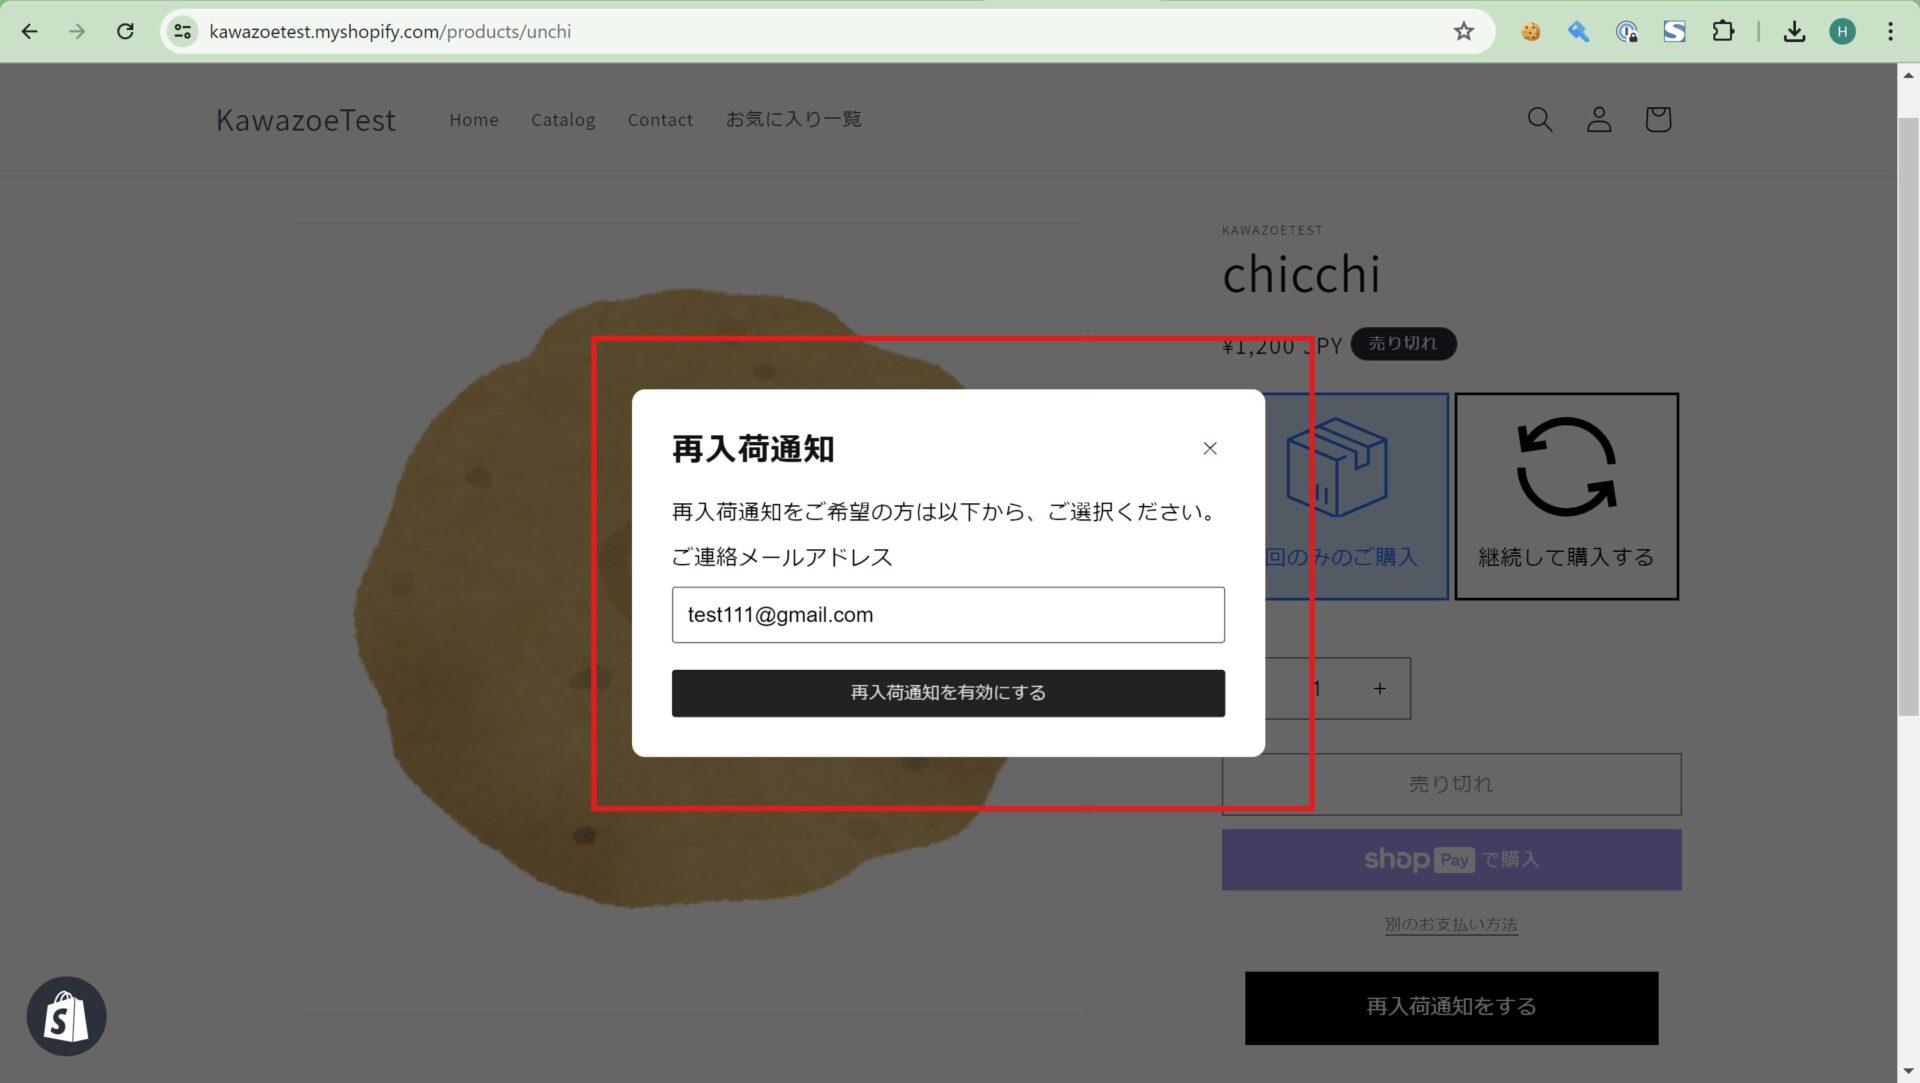
Let us start by looking at the finished back-in-stock feature. The red boxes mark the back-in-stock button and the back-in-stock signup form.
Open the theme editor for the page you want to edit
The steps that follow involve editing your theme, so if you are at all unsure, use Duplicate to make a copy of the theme and edit the copy instead.
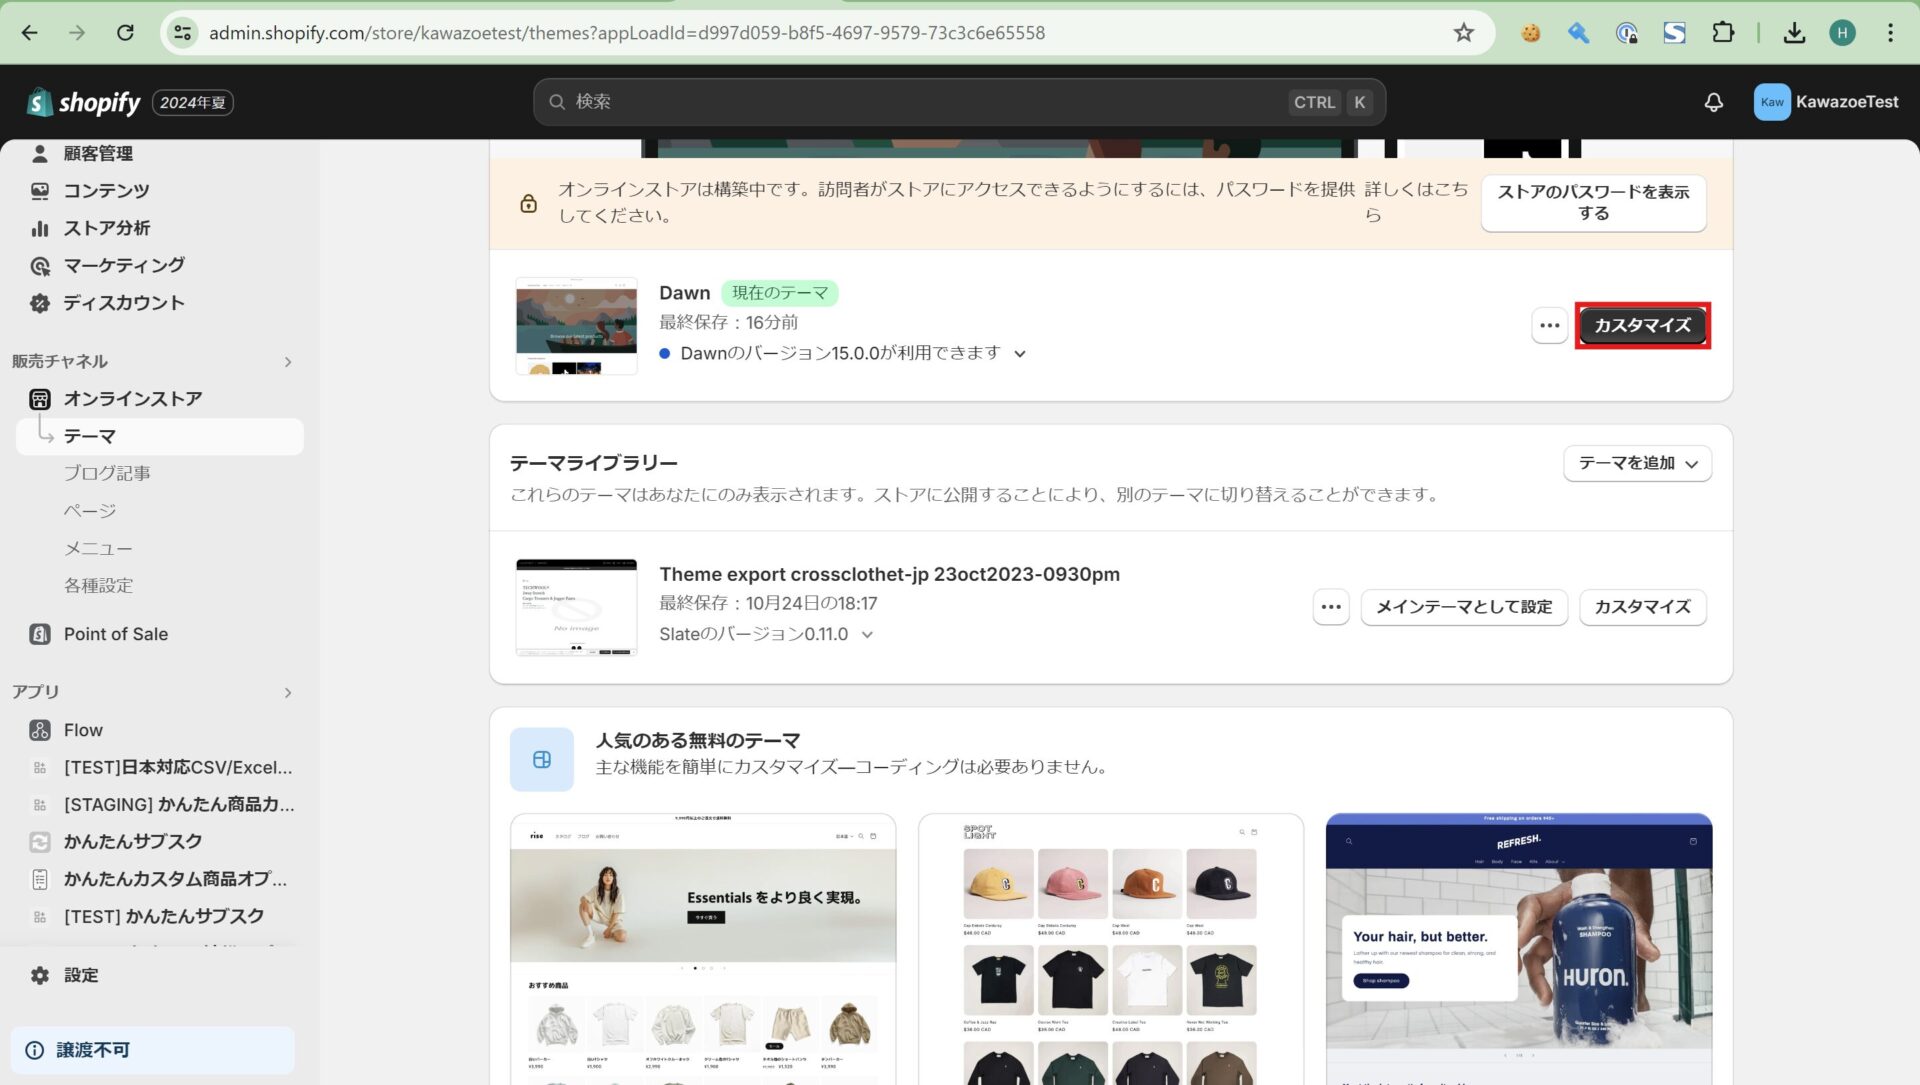
1. Open the theme list from [Shopify admin] > [Sales channels] > [Online Store] > [Themes]. Click [Customize] to the right of the theme you want to edit.
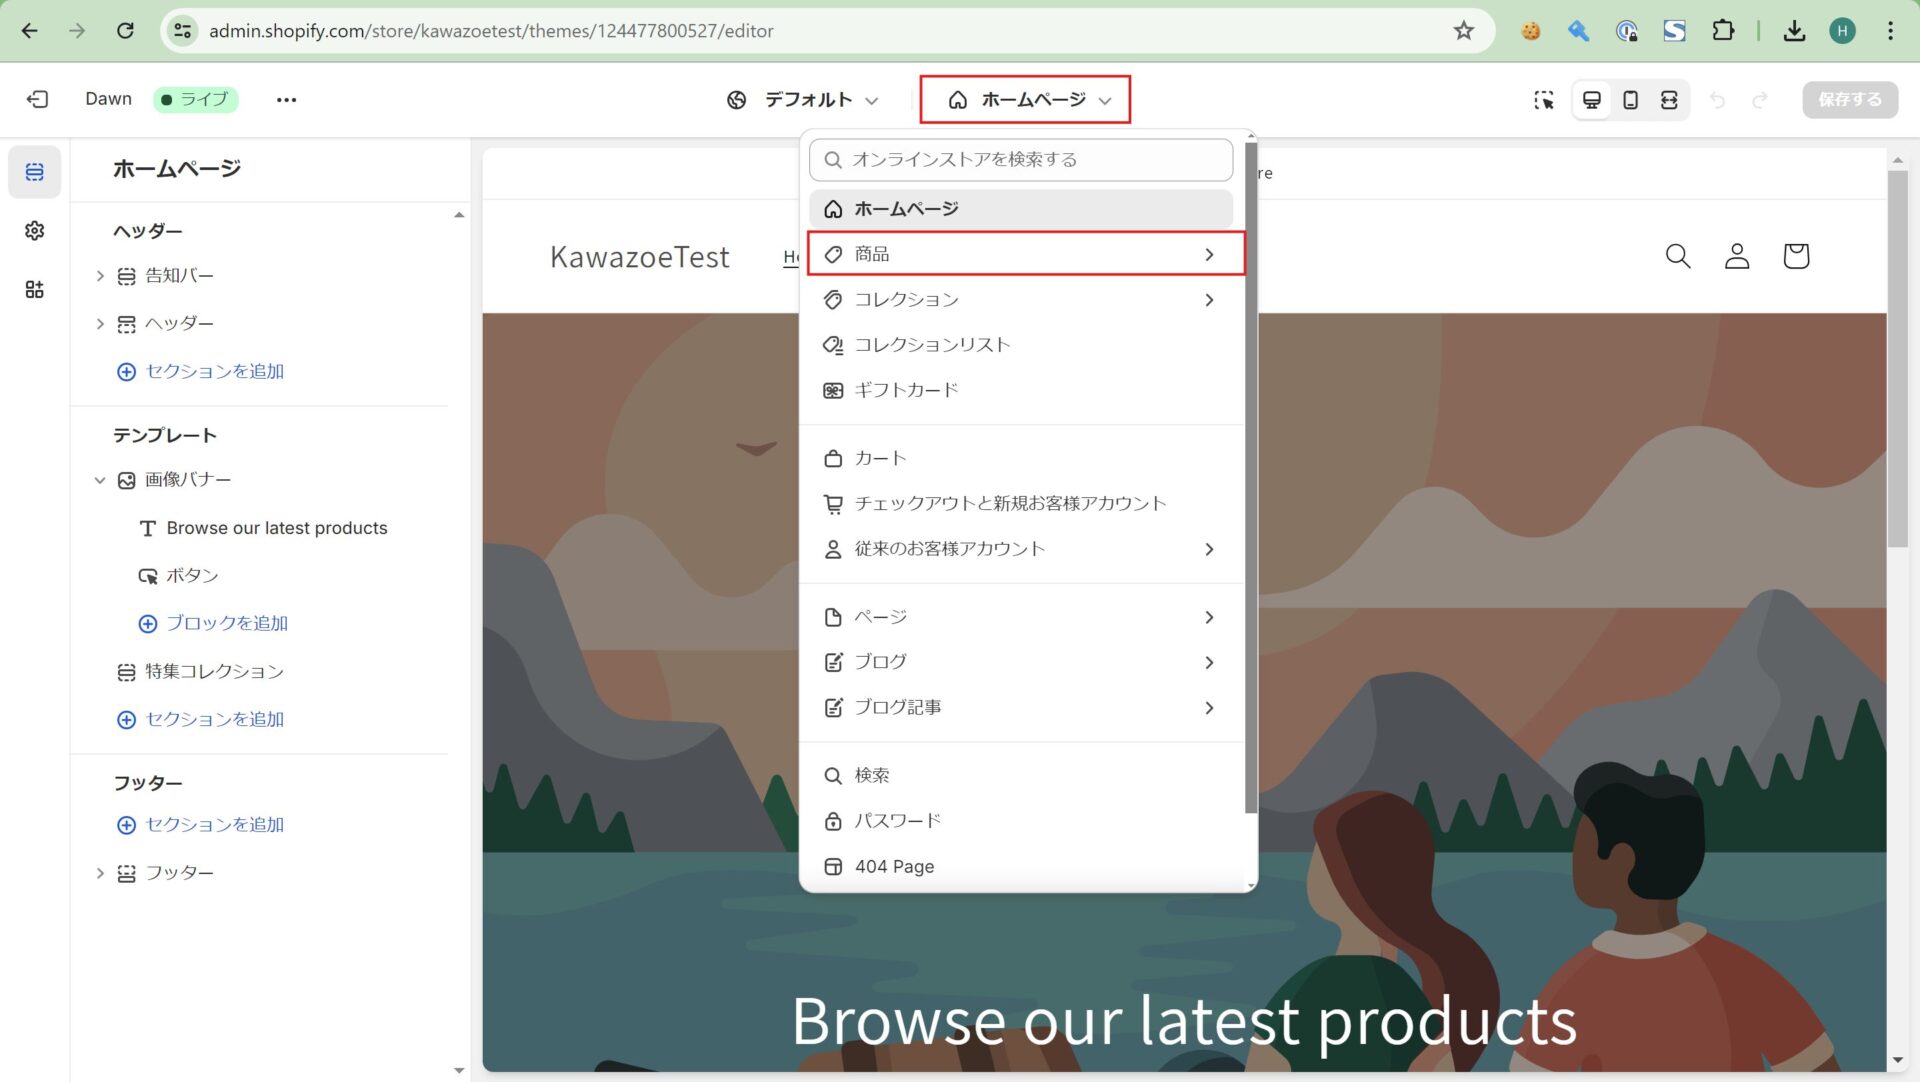
2. Clicking [Customize] opens the theme editor. Because we are editing the product page, click [Home page] > [Products] at the top of the screen.
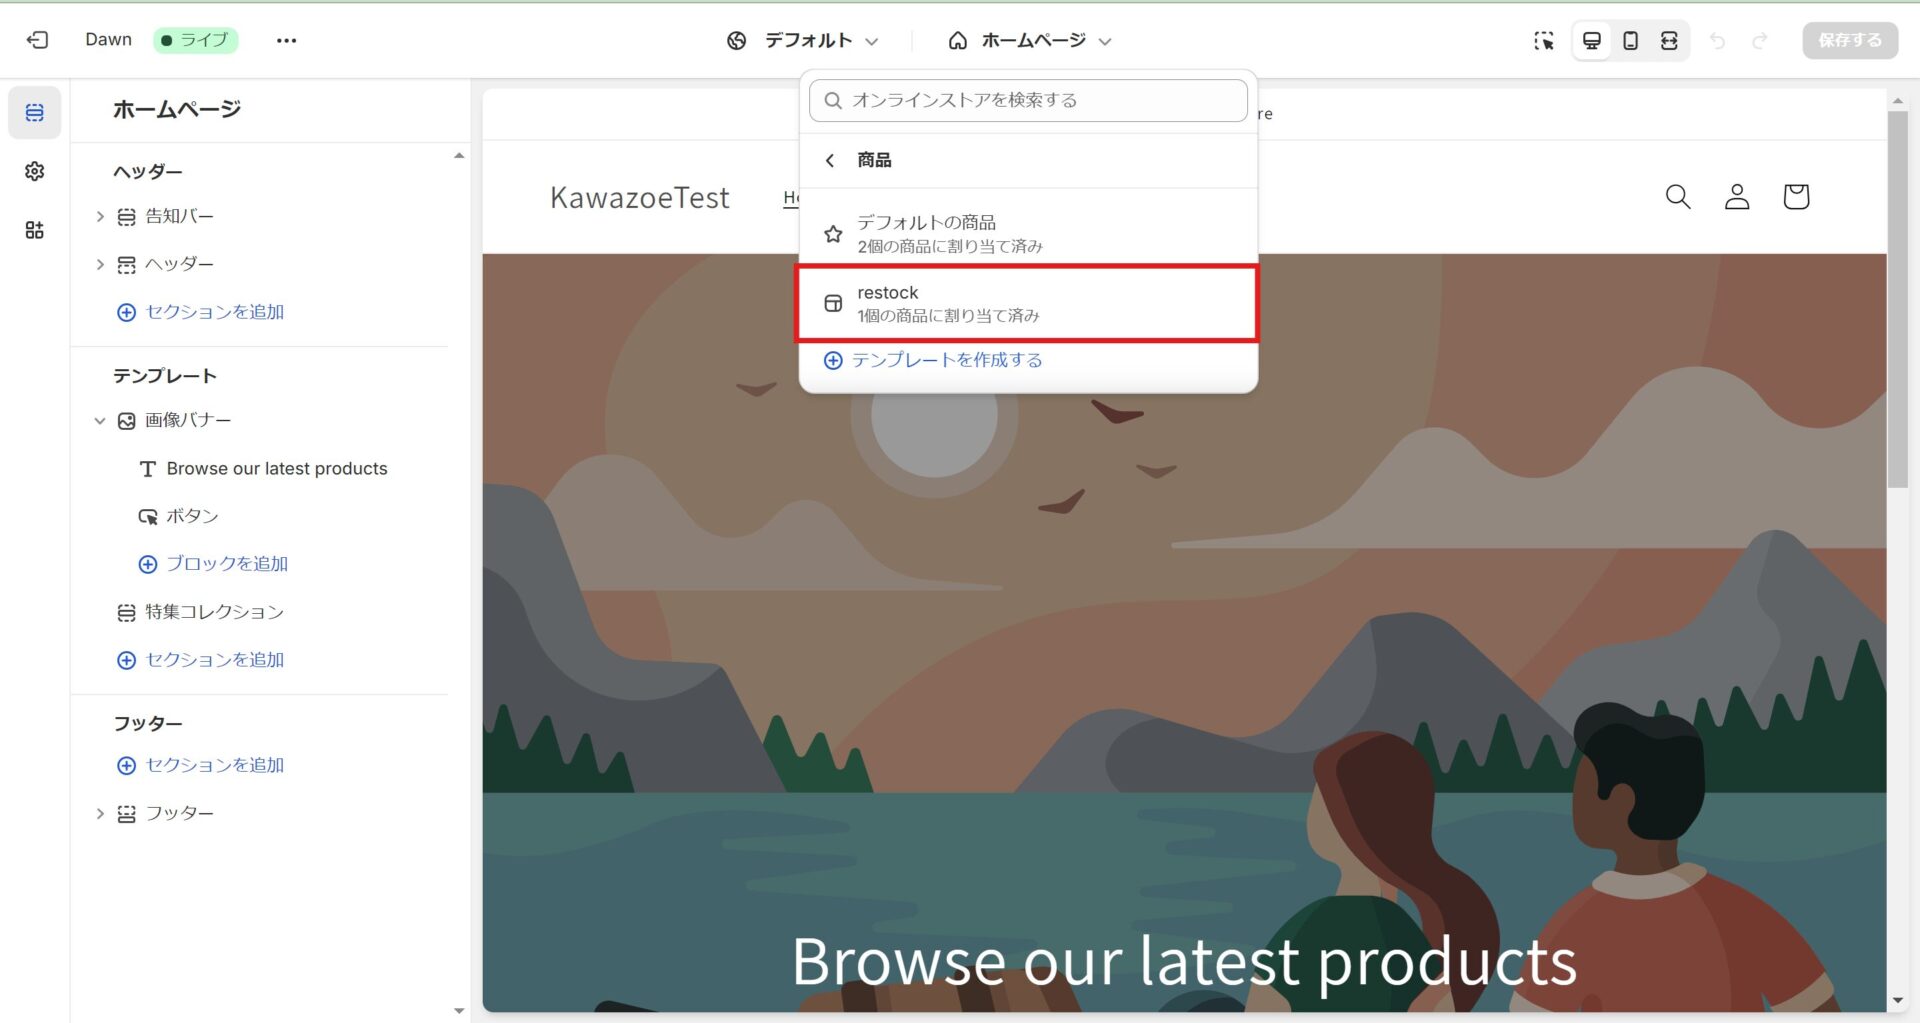
3. Clicking [Products] lists the product page templates. Select the template you want to add back-in-stock notifications to. If you only want the feature on certain products, you can use [Create template] to make a new template based on an existing one and add the feature there instead. In this example we create a template named [restock] and use that.
Add the back-in-stock app block
- If you are on theme architecture 2.0 or later, no code is required to add back-in-stock notifications.
- You add the app's theme block instead, which is what this section covers.
- If you are on theme 1.0, you need to add code to the product page.
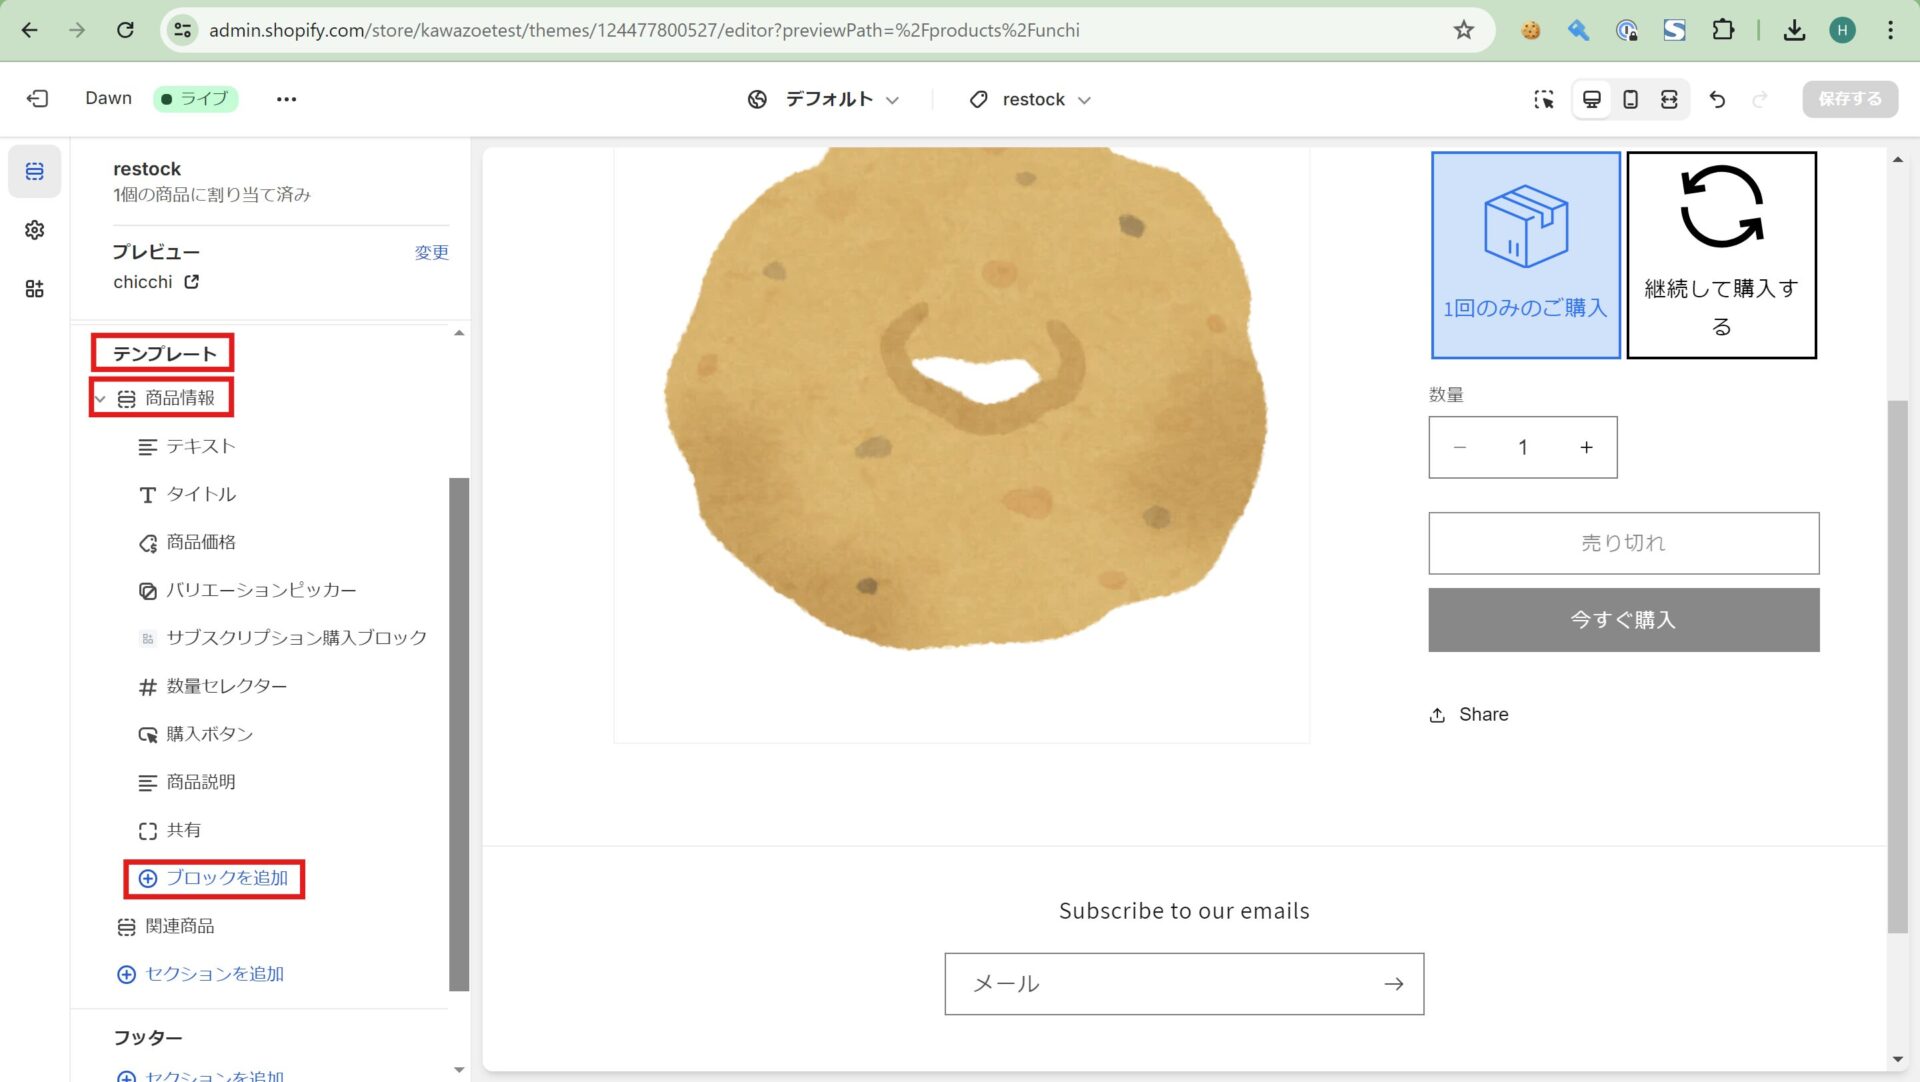
1. First decide where the back-in-stock button should sit. Here we want it below the [Buy it now] button, so click [Product information] > [Add block] in the left-hand menu.
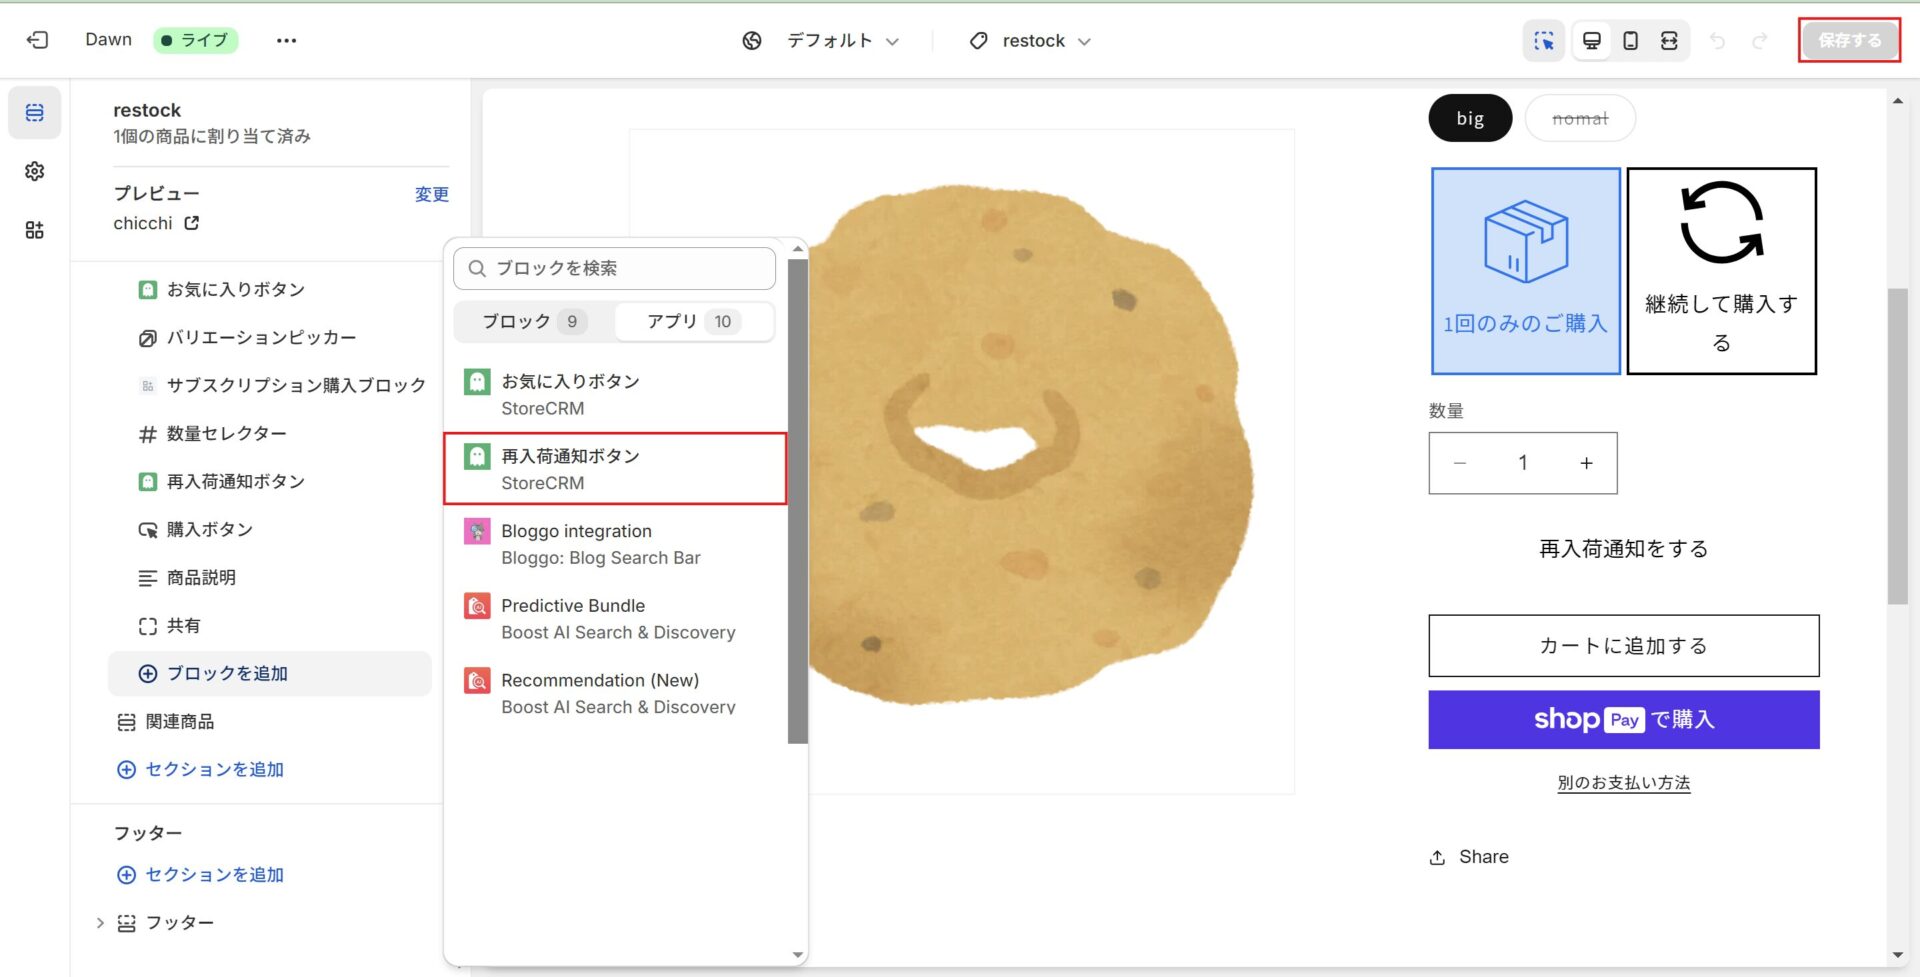
2. When the block list appears, switch the tab at the top from [Blocks] to [Apps]. Click [Back-in-stock button] under the apps. The block is added to the product information section; drag and drop it to the position you want. Then click [Save] at the top right of the page to save the theme, and this section is done.
If you are using theme 1.0
- On theme 1.0, add the following code to the product page.
- You can find the product page from Shopify > [Sales channels] > [Online Store] > [Themes] > [Edit code], then searching for "product".
- The file name depends on your Shopify theme. It is usually something like main-product.liquid, but if there is a product.json file, use the .liquid file named inside it.
- As for where to insert it — to place the button above [Add to cart], for example, search for "buy-button" and you will find the right spot.
<!-- StoreCRM Block -->
<div class="storecrm-button storecrm-restock" data-type="restock-button" data-product-id="{{ product.id }}" data-variant-id="{{ product.selected_or_first_available_variant.id }}" data-variants="{{ product.variants | json | escape }}" data-current-variant-available="{{ product.selected_or_first_available_variant.available }}" data-product-tags="{{ product.tags | json | escape }}"></div>
<!-- StoreCRM Block -->
Customising the button and the signup form
StoreCRM ships a deliberately simple button and signup form that stay out of the way in any store. If you want the design to match your store down to the details, or you want the button to stand out more, you can customise how both look from the app.
Customising the back-in-stock button and signup form
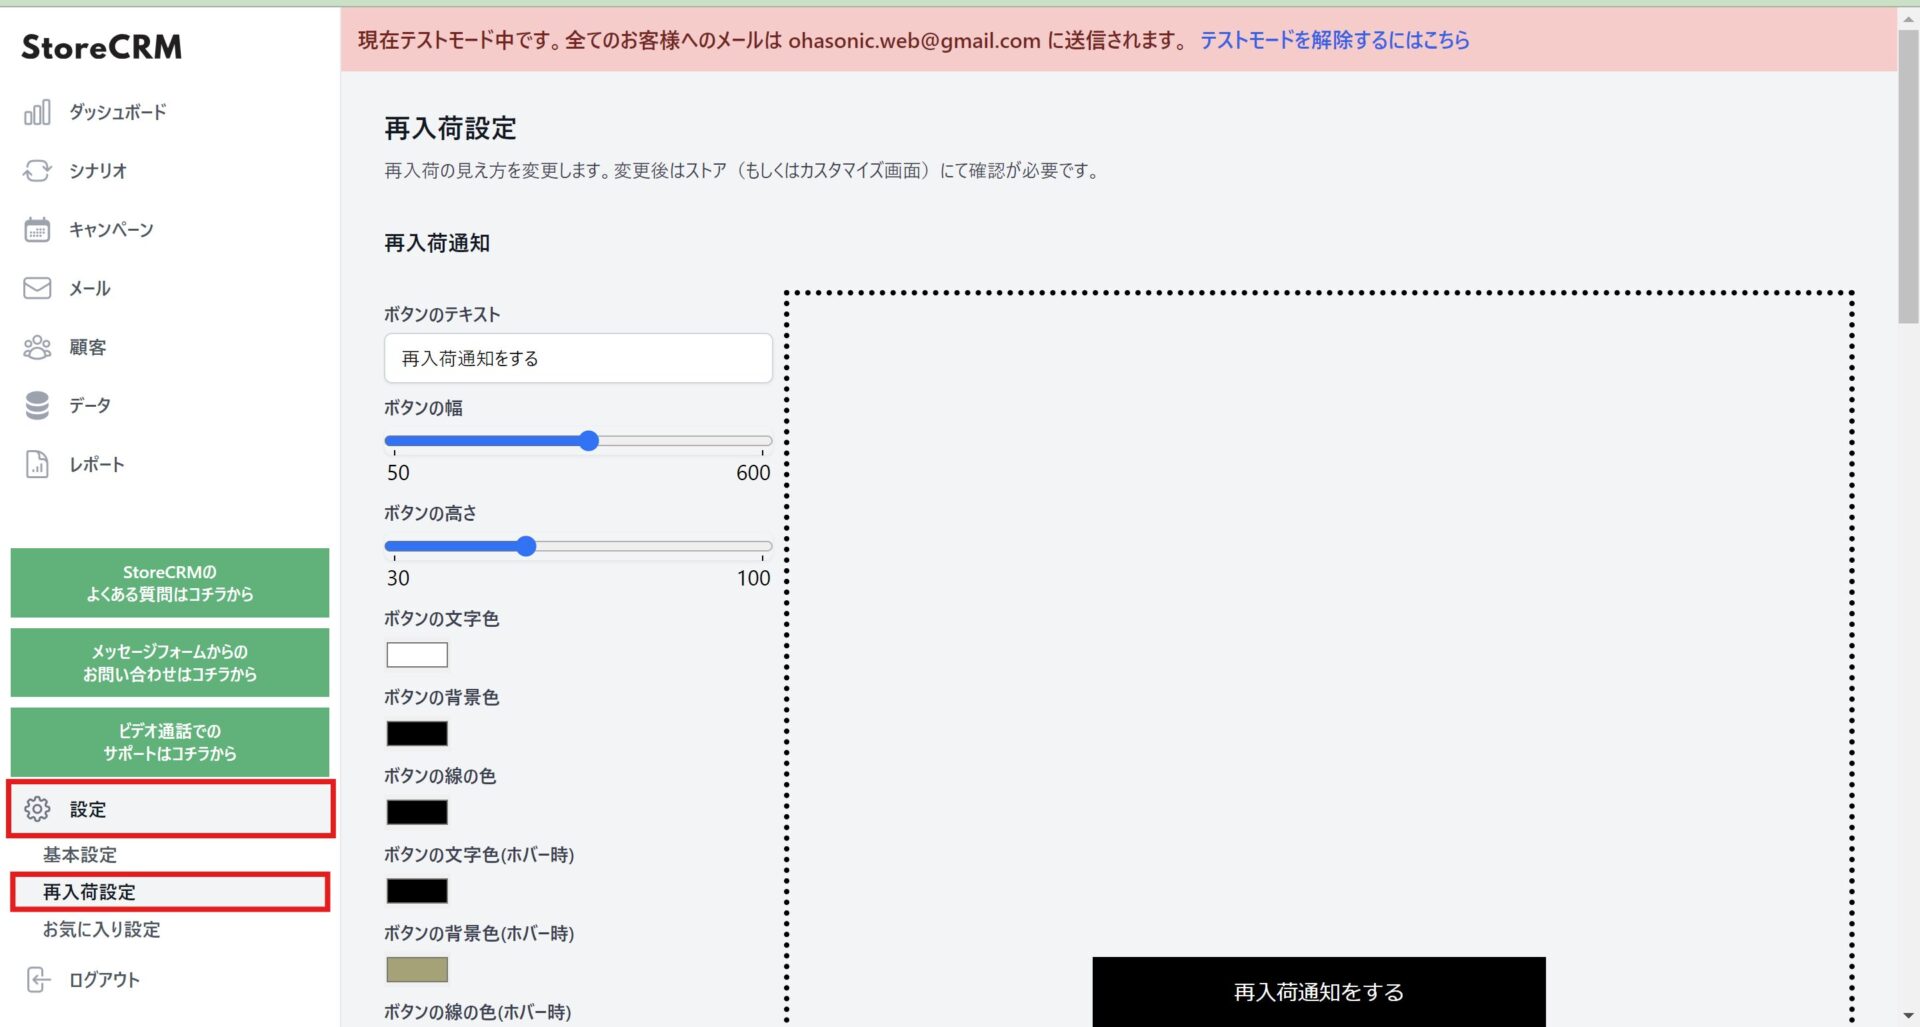
1. Open the StoreCRM app. Click [Settings] at the bottom left of the page, then [Back-in-stock settings] underneath it.
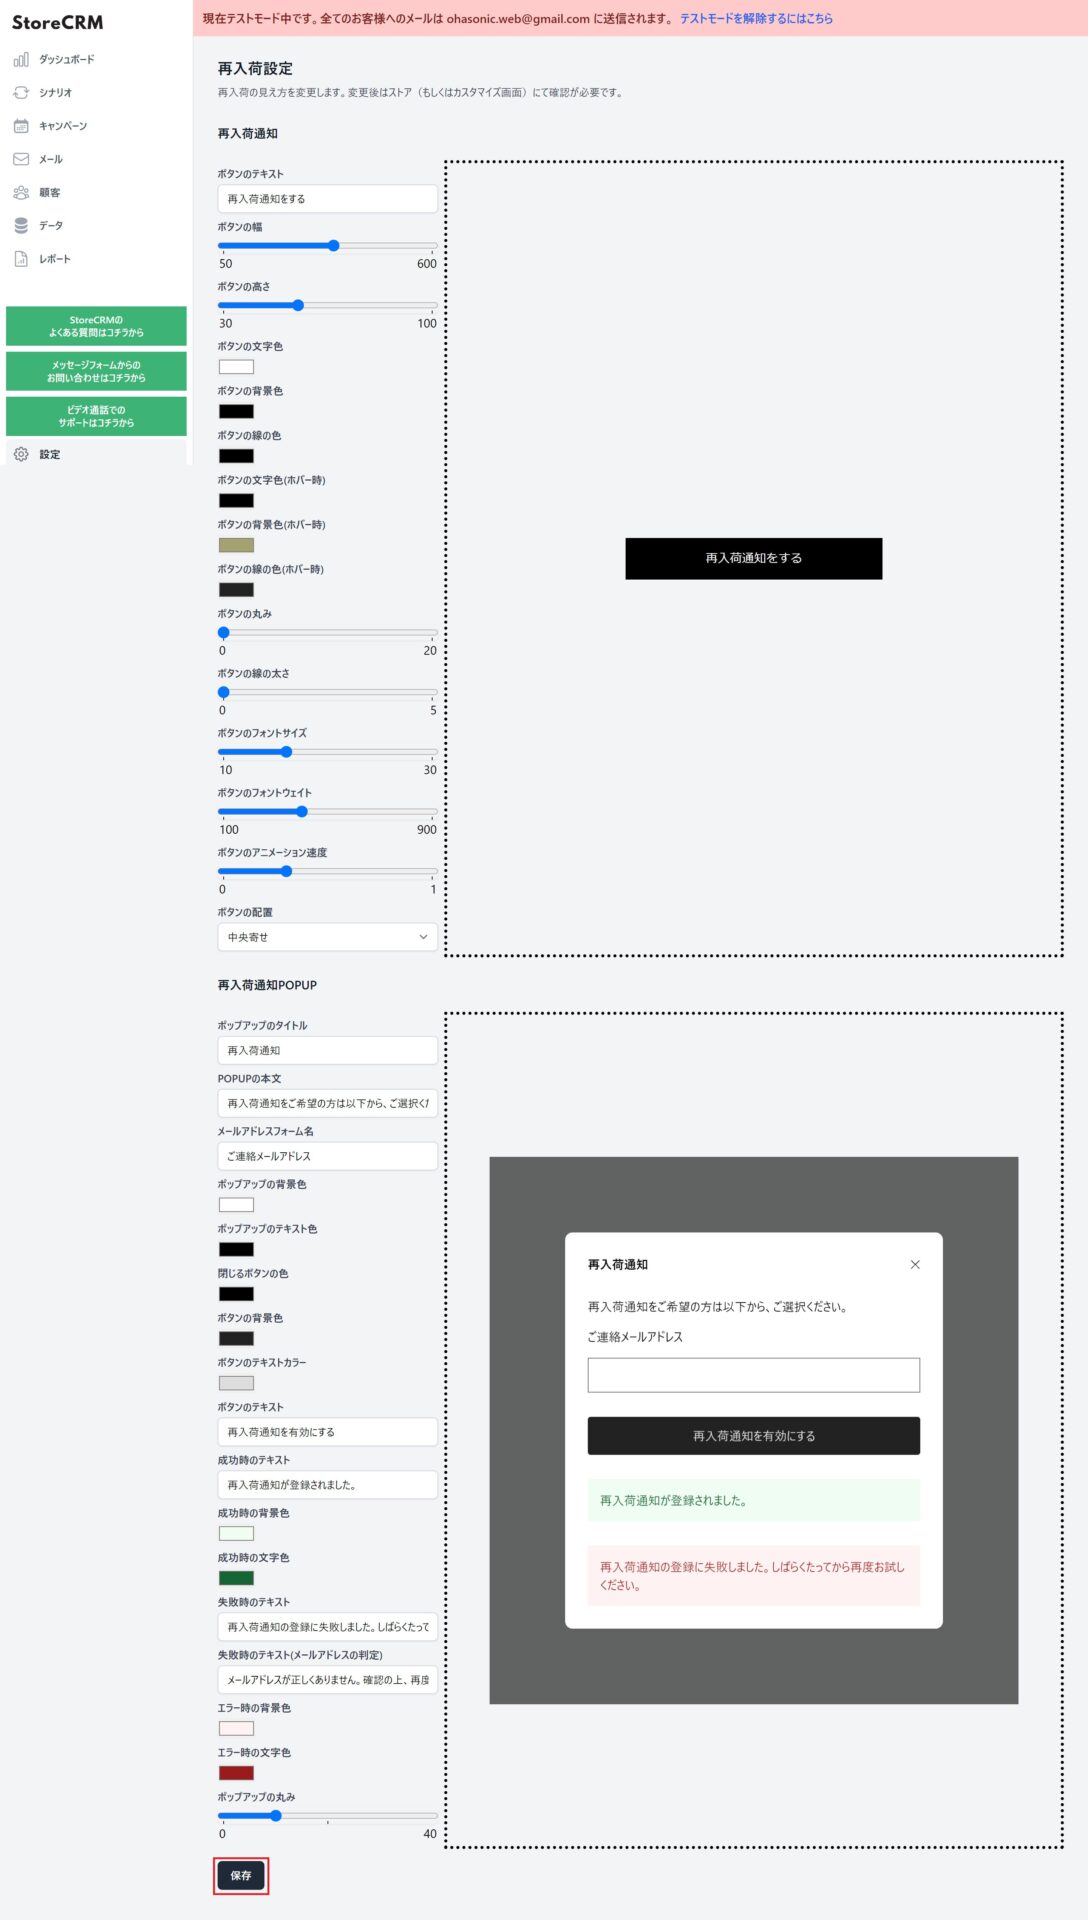
2. Using the preview on the right, adjust the wording, colours and size of the back-in-stock button and signup form to suit your store. When you are finished, do not forget to click the save button at the bottom of the page.
After saving, check your live store or the theme preview to confirm that the changes look the way you expected.
Building an automated campaign around back-in-stock notifications
In this section we use the signup data collected in the previous two sections to build an automation that emails registered customers automatically as soon as stock comes back in.
Creating the automation
StoreCRM provides a [Send back-in-stock notifications] automation template, so a few simple settings are all it takes to send the emails automatically. Let us actually create that automation.
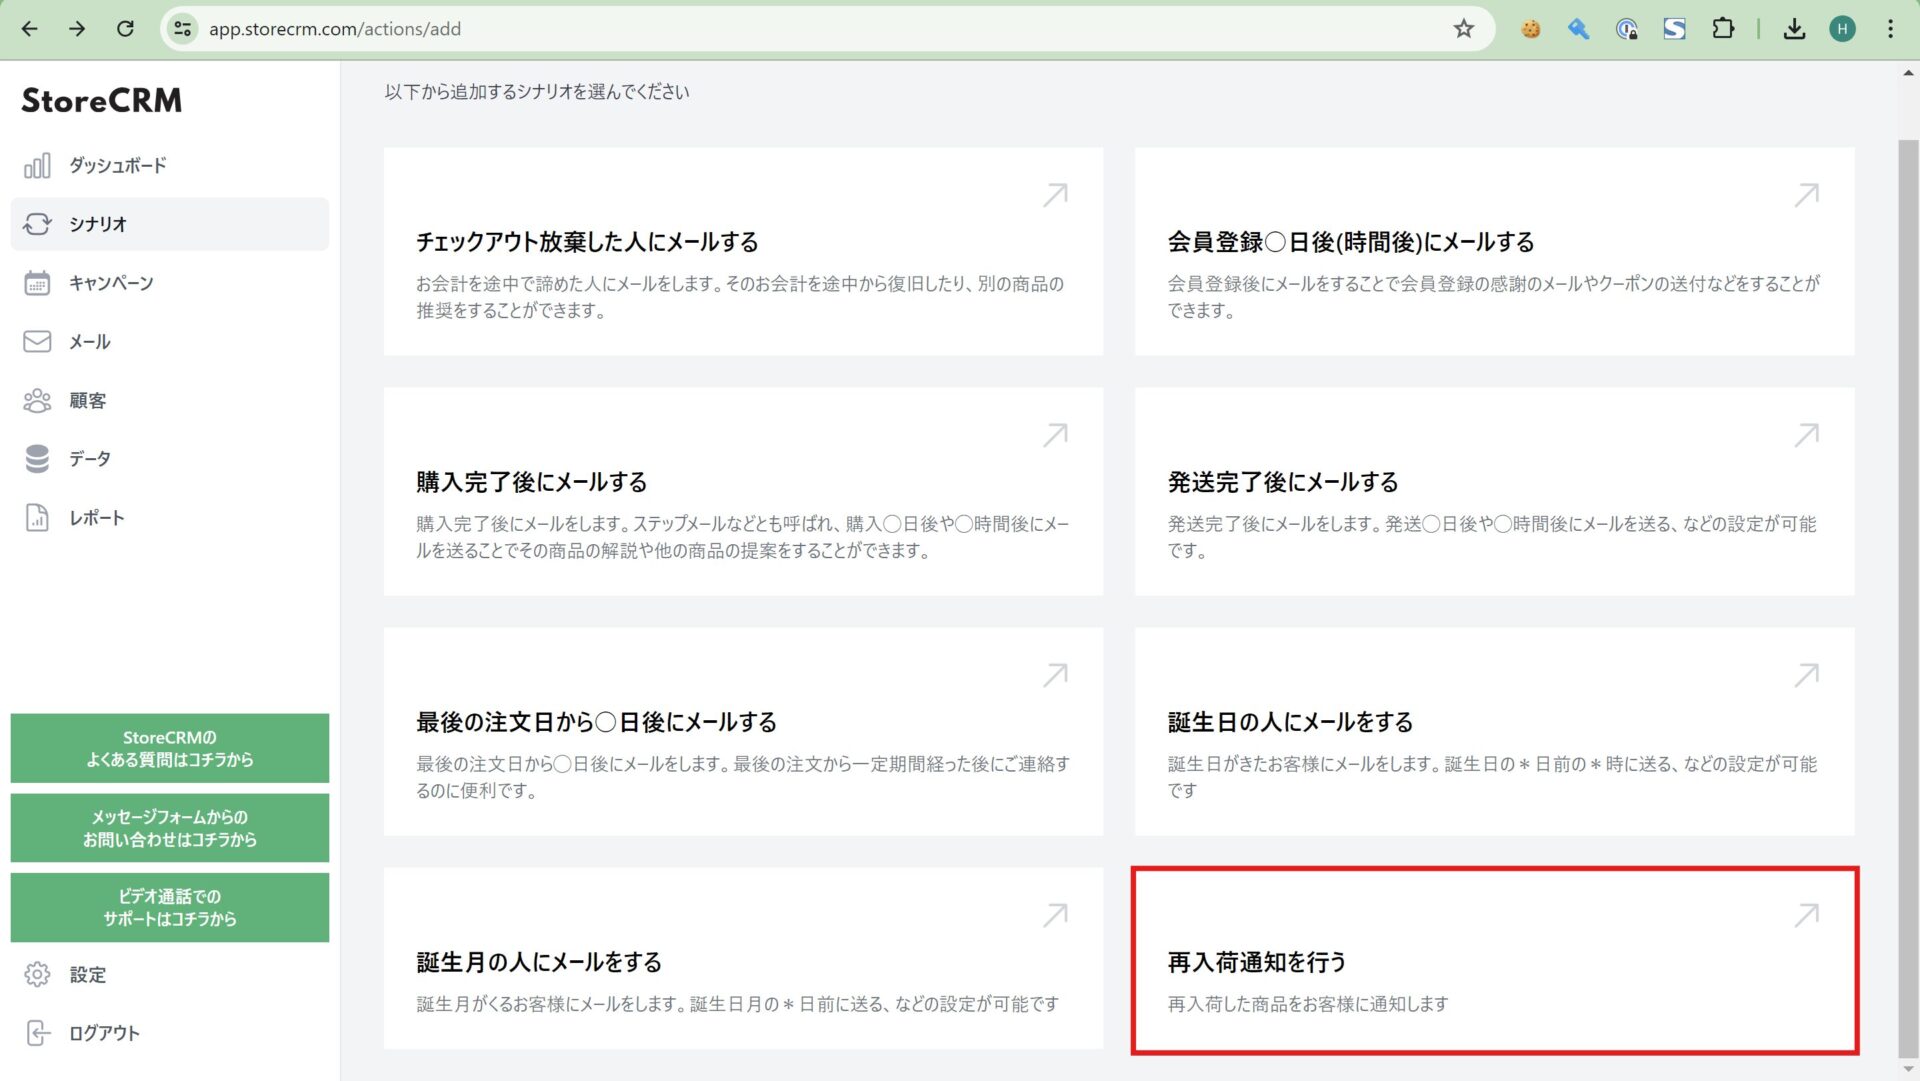
1. Open the StoreCRM app and click [Automations] > [Send back-in-stock notifications].
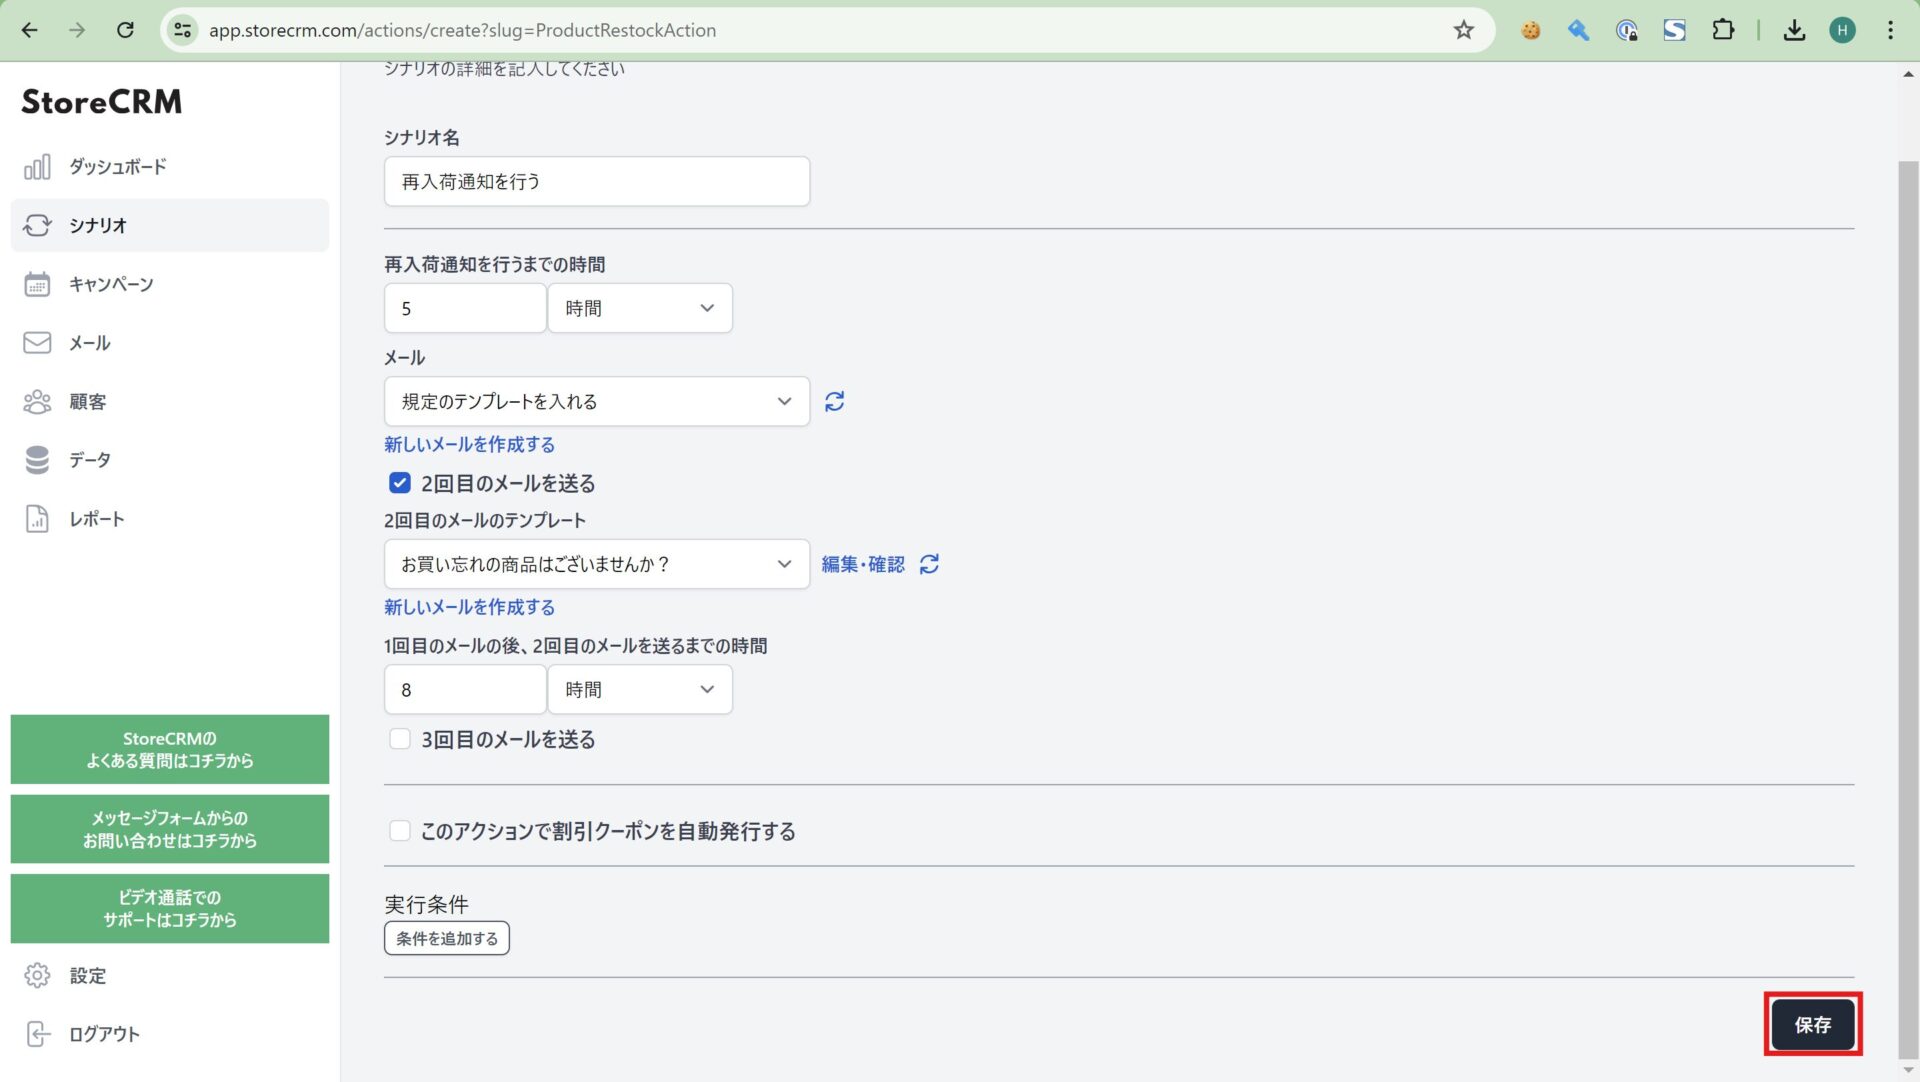
2. The automation settings appear; set when the email should be sent. Here we used the schedule below.
Open rates can vary with send time, so decide the schedule with your restocking hours in mind. Sending more than one message can also lift open and click rates.
When you have finished, click [Save] at the bottom right of the page.
- Wait five hours after the restock, then send the back-in-stock email to everyone who registered.
- Wait eight hours after the first email, then send a follow-up.
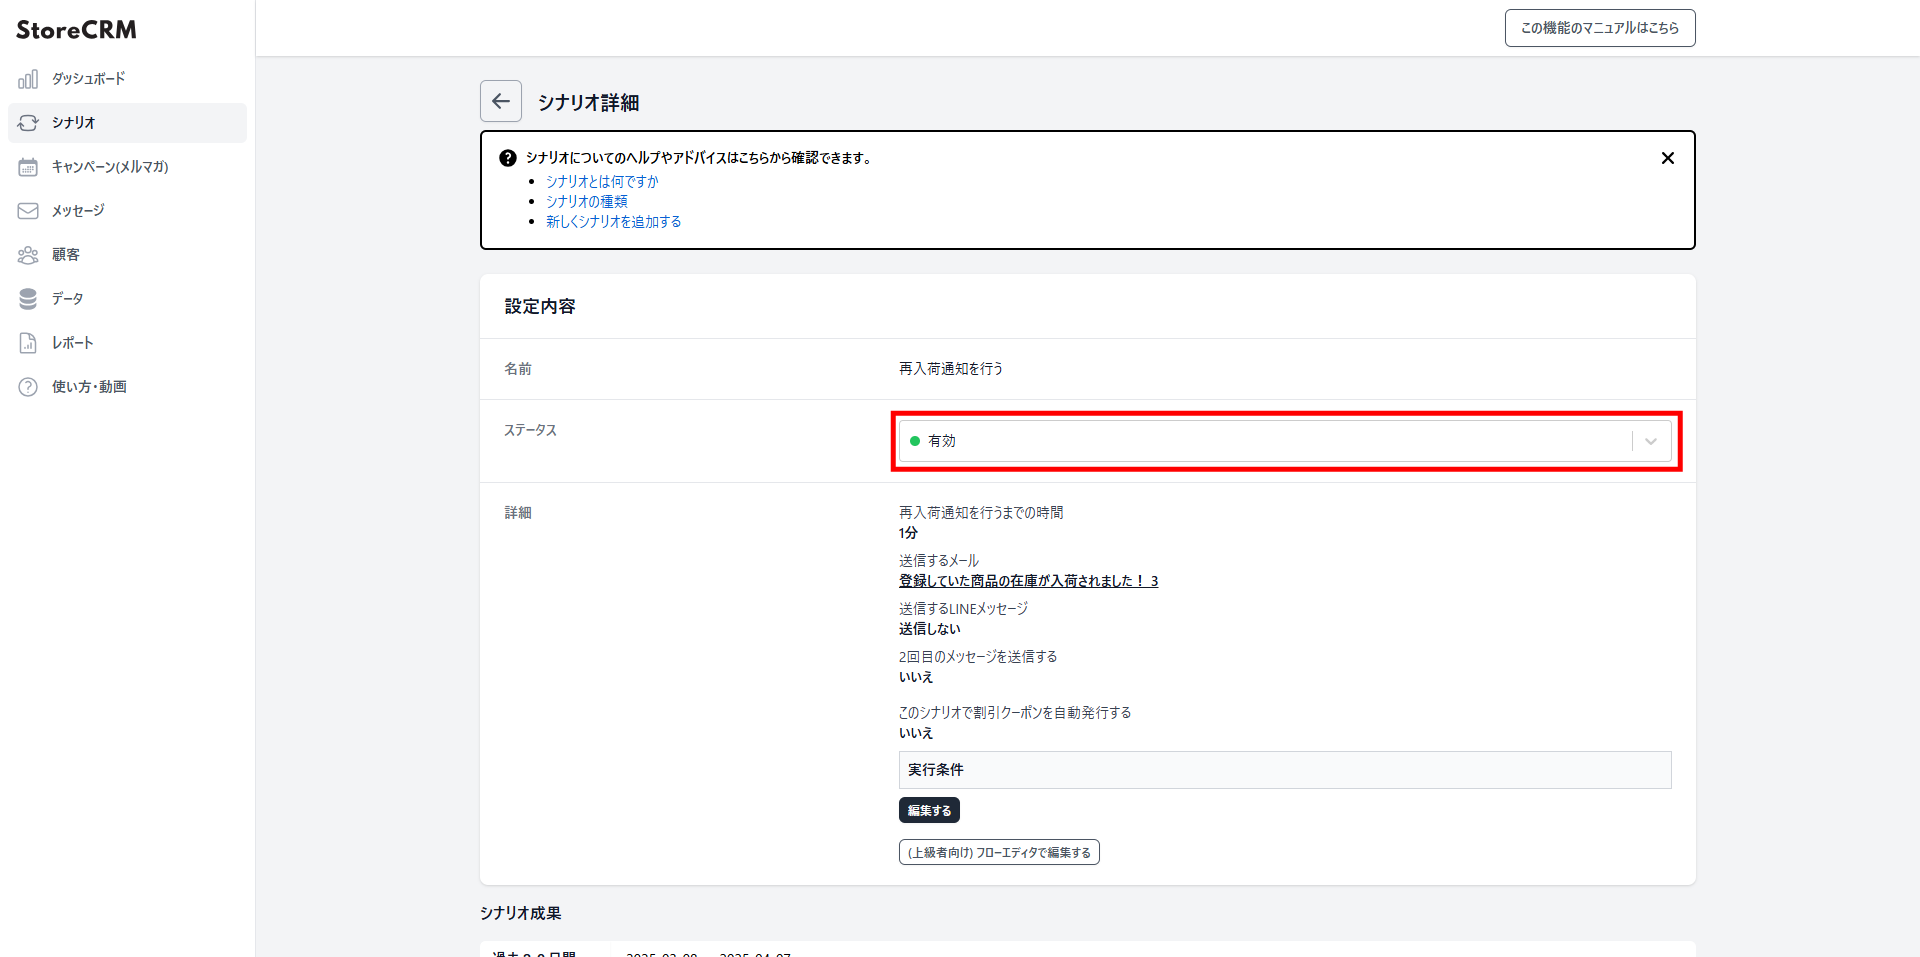
3. Click [Save] and the automation is created, and its detail page opens.
Open the [Settings] > [Status] dropdown and set it to [Active], and the emails will go out according to the conditions you set.
Note that the matching email is generated automatically when the automation is created.
If you want to customise it, follow the next section.
That completes the automation.
Editing the email
StoreCRM generates the email automatically when you create the automation, and you can run the automation as it is. If you would rather match the copy and design to your store, or write the message in your own words, you can customise it in the email editor.
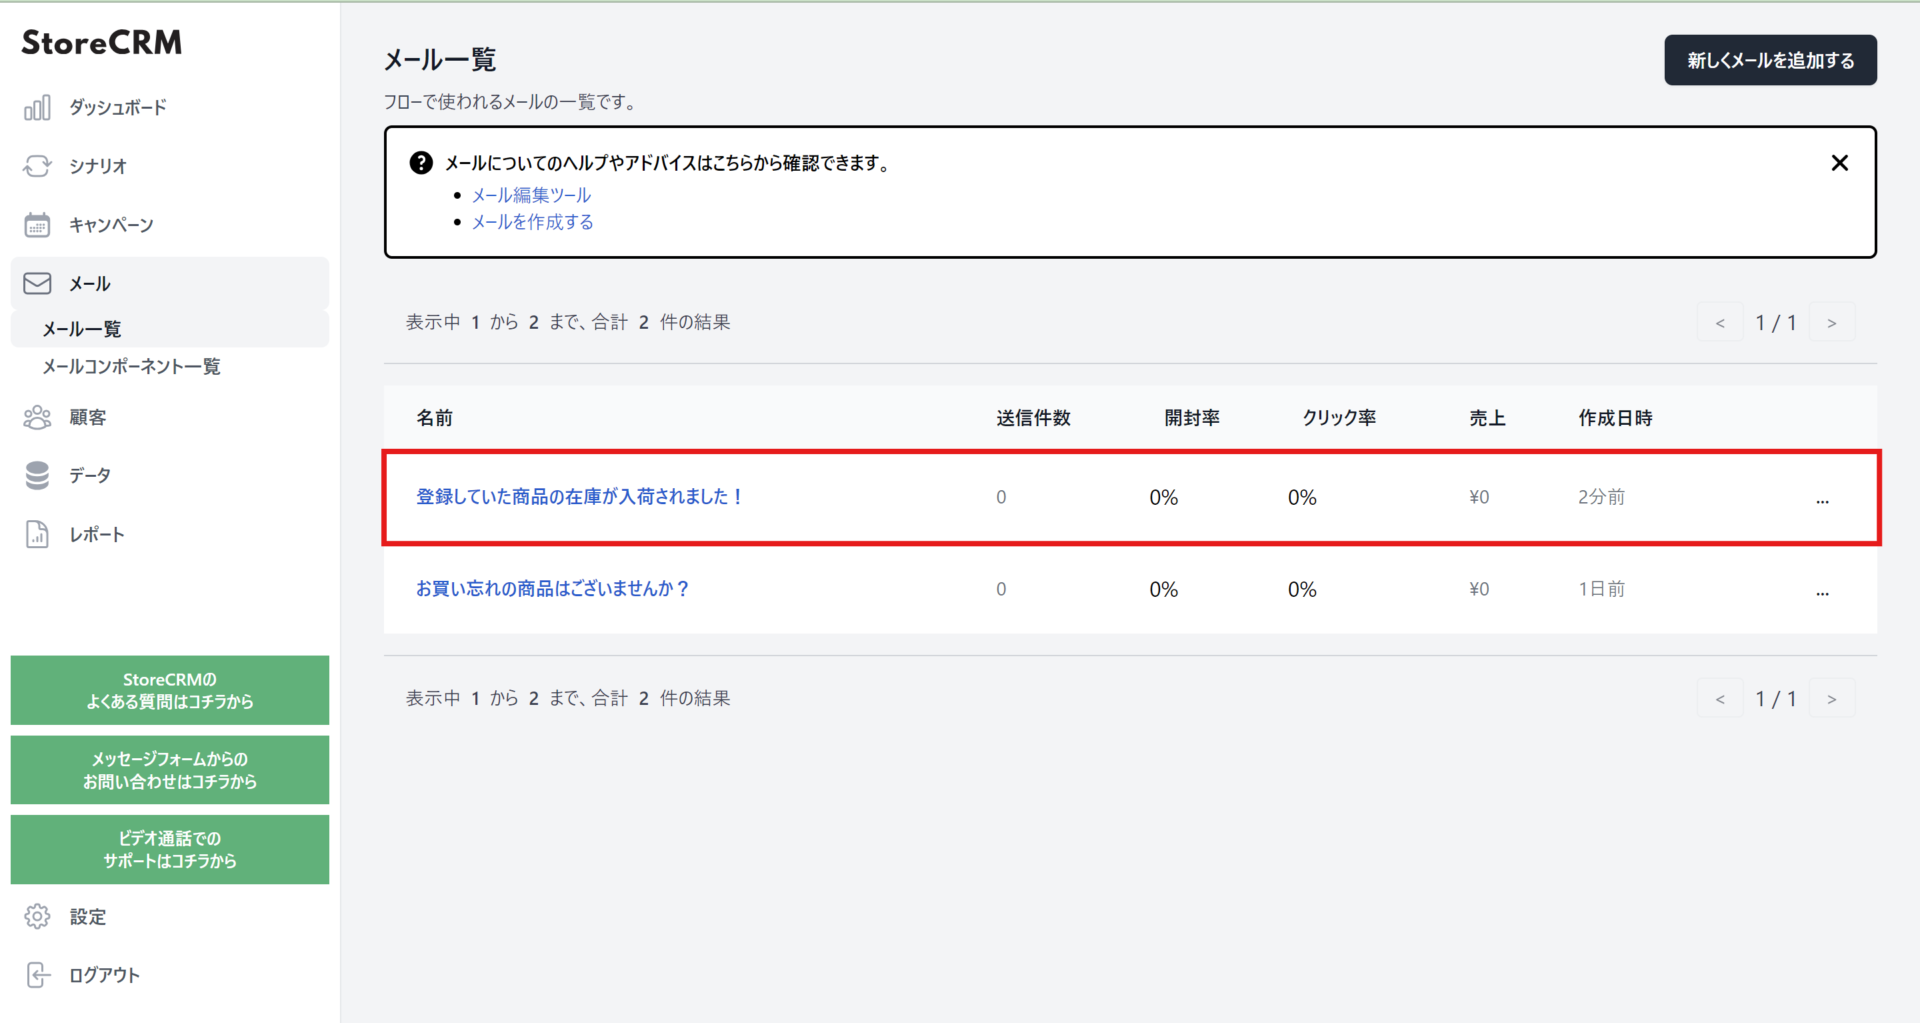
1. Open the StoreCRM app and click [Email] > [Email list]. Click the name of the email you want to edit.
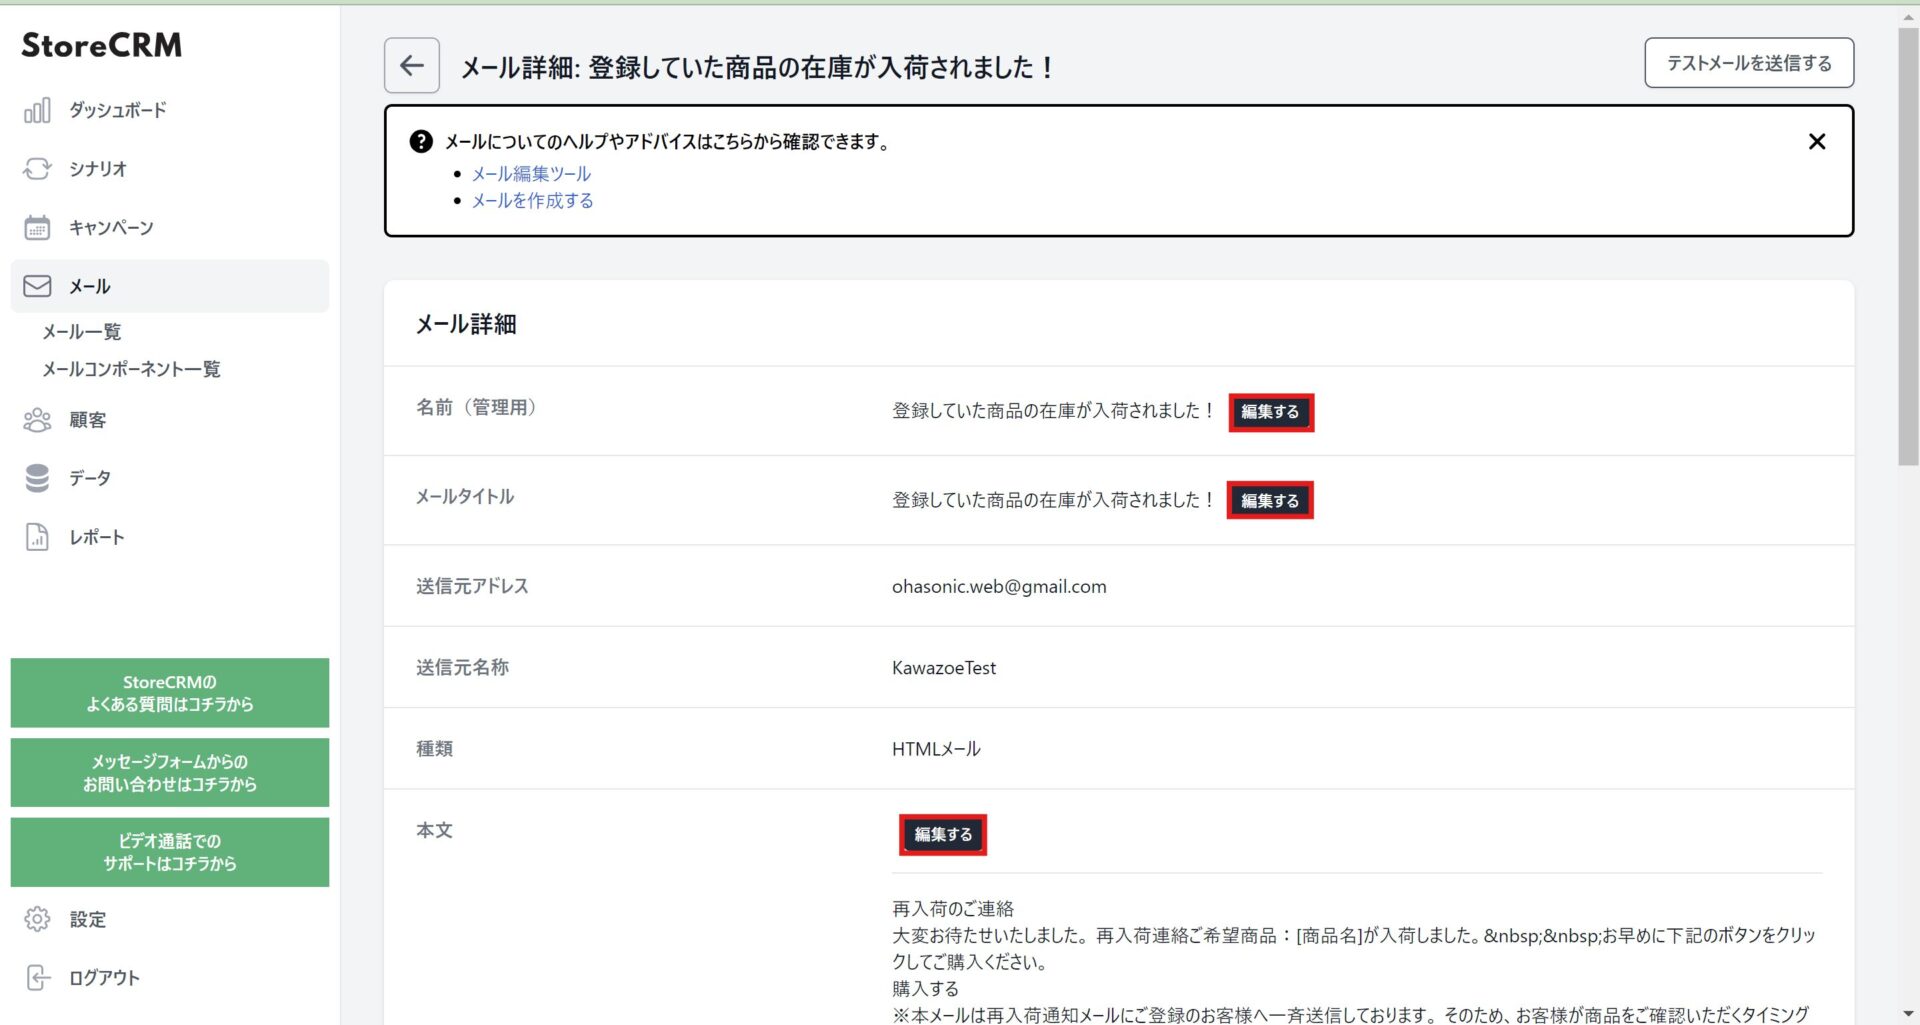
2. From [Edit] on the email detail page you can customise the [email name (internal)], the [subject line] and the [body].
Write an email that fits your store and use it to push up open rates and CVR.
CVR stands for conversion rate: the share of visitors who complete the action you care about, such as buying a product or signing up.
Summary
As this back-in-stock example shows, StoreCRM lets you run in a single app the kind of campaigns that previously required installing another app or wiring up a separate marketing automation tool. We also offer free setup support — we will configure the app for you — and consulting on growing revenue for customers who have adopted StoreCRM. Feel free to get in touch through the contact form.


