
Introduction
This article explains how to use the flow editor, one of StoreCRM's features. StoreCRM lets you run all kinds of campaigns — checkout abandonment emails, welcome sequences after signup and much more — with very little configuration. What makes those campaigns work is delivering information that is personalised to each customer's interests. With the flow editor you can set that up intuitively: send different emails and branch the processing based on customer and order data, down to fine-grained conditions.
Personalised campaigns built in the flow editor raise LTV and reduce unsubscribes, so they are well worth setting up.
How the flow editor works
Opening the flow editor
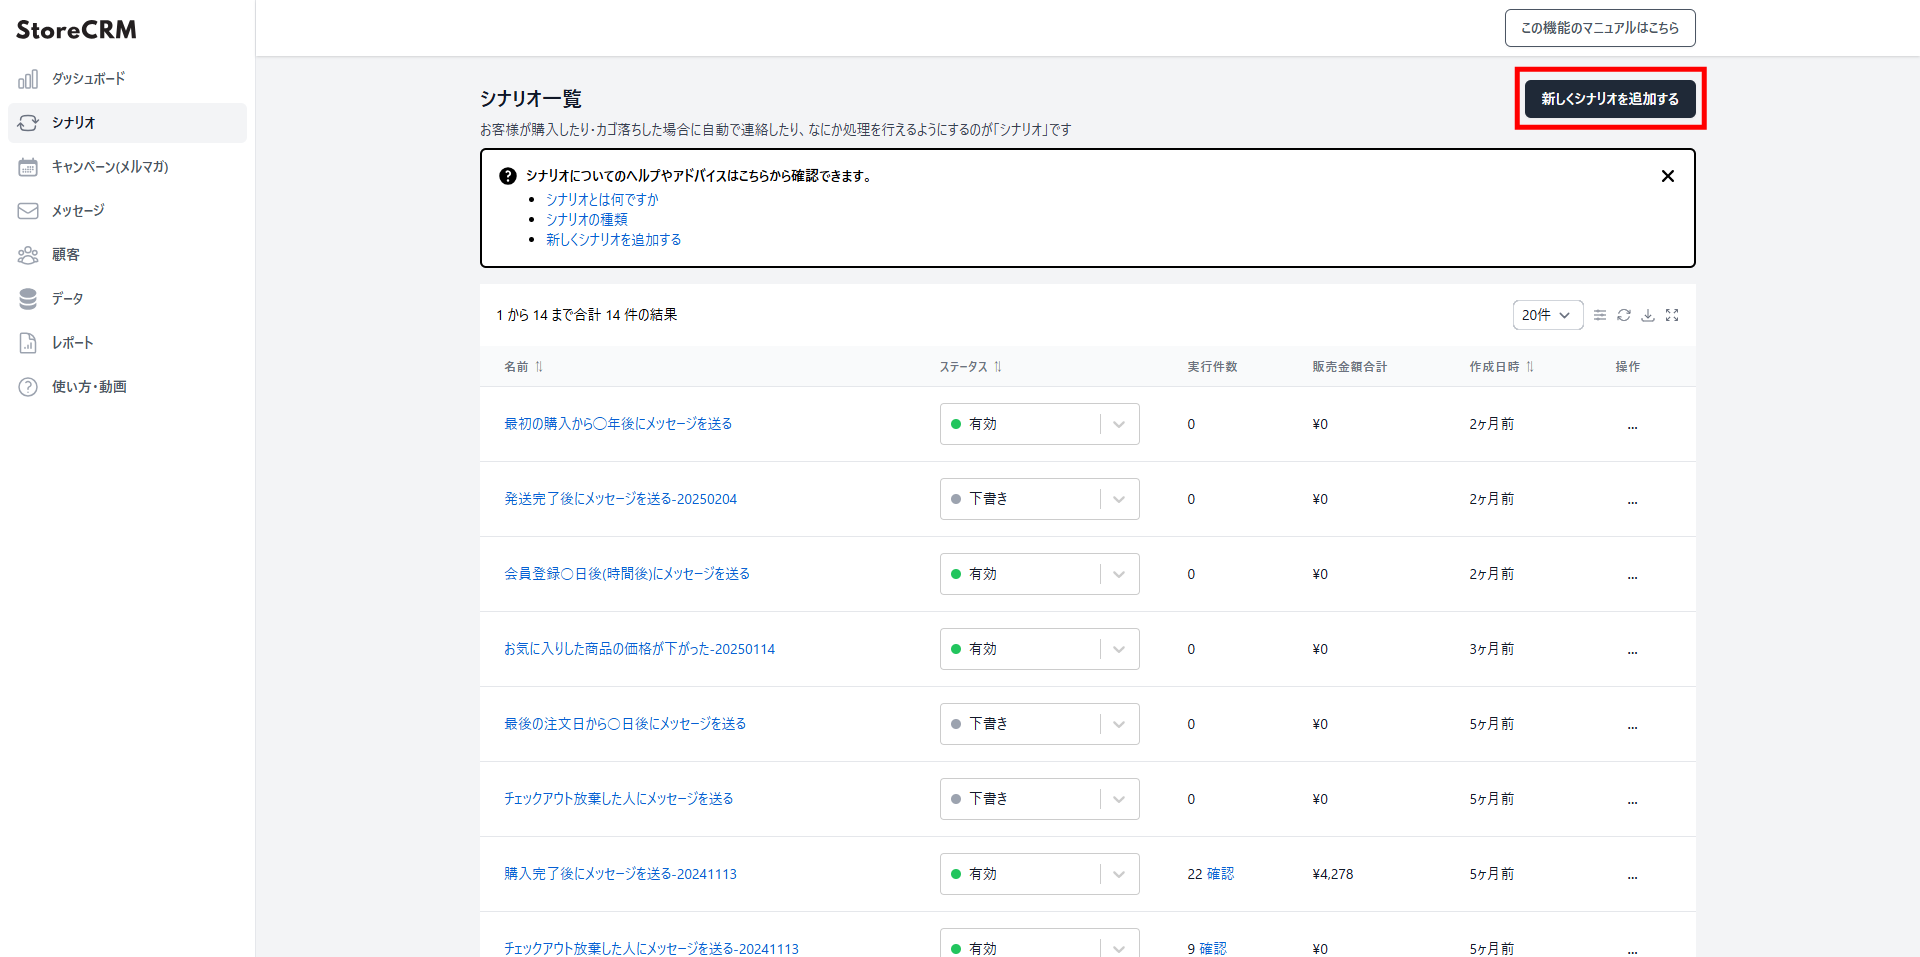
1. Open the automation list from [StoreCRM app] > [Automations]. Click [Add new automation] at the top right.
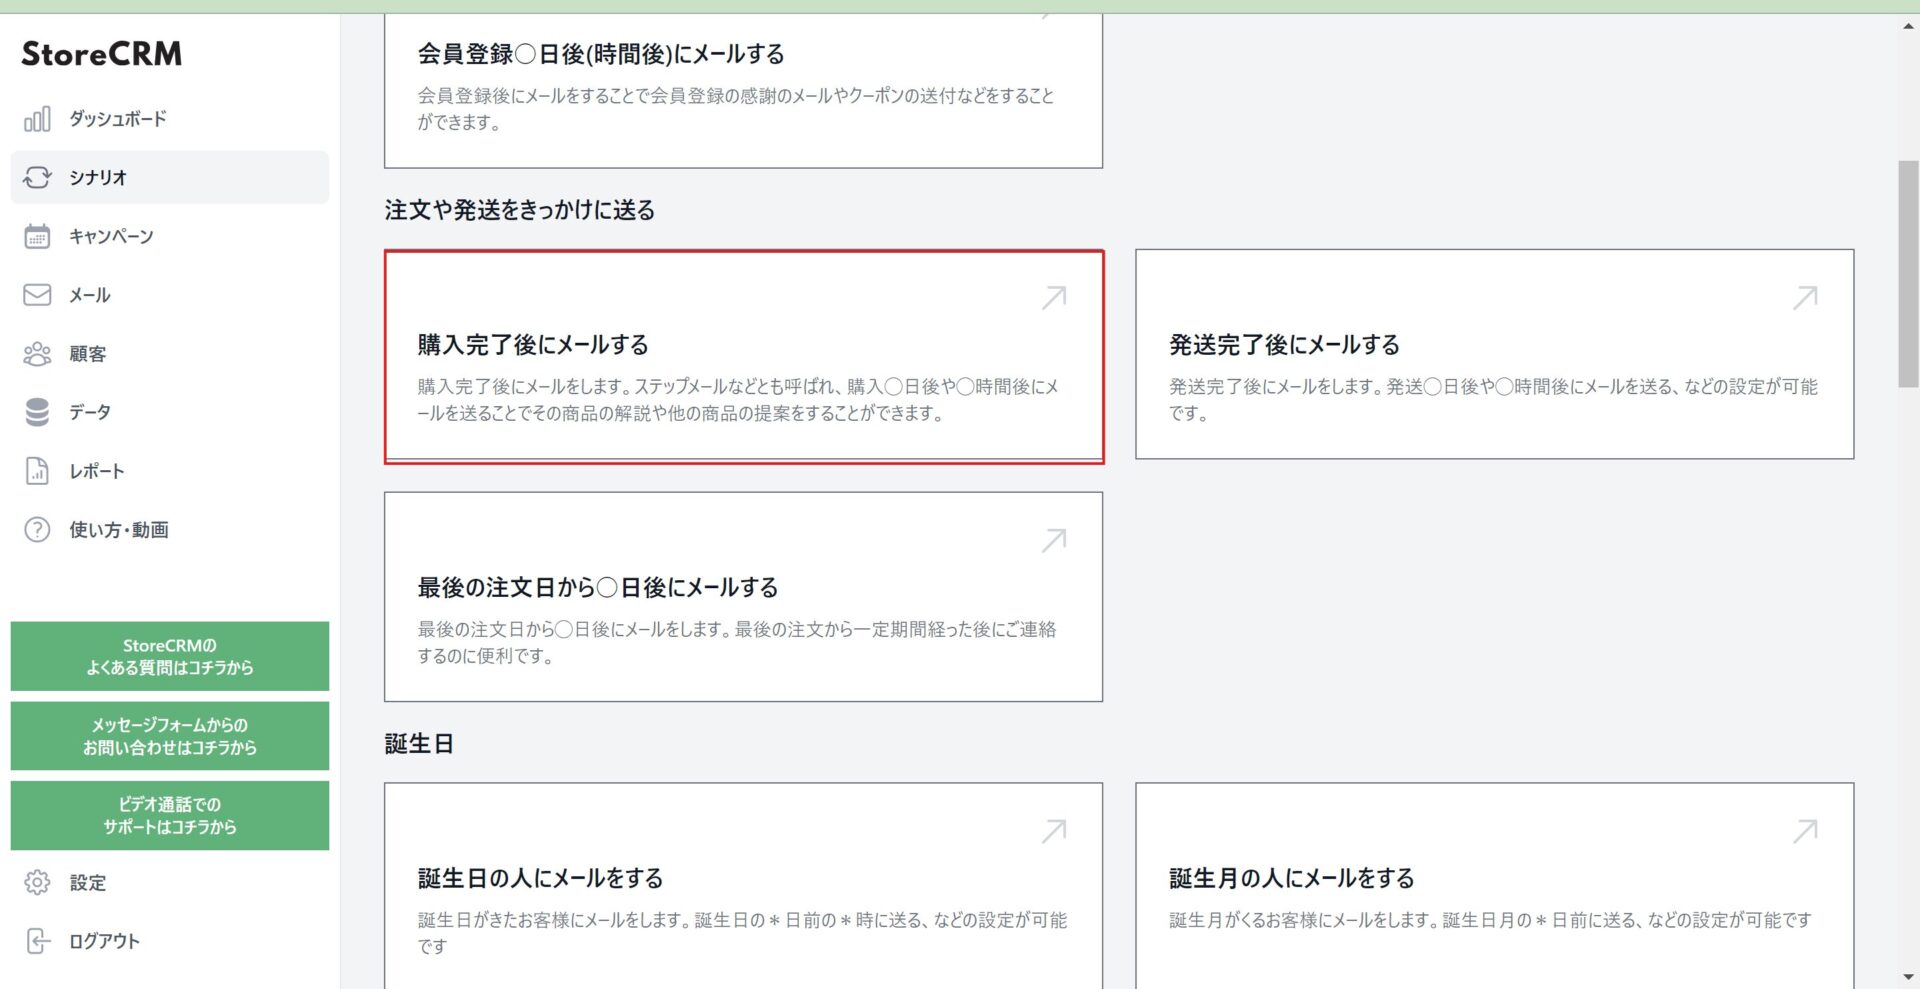
- Click the automation you want to build. Here we choose [Email after purchase].
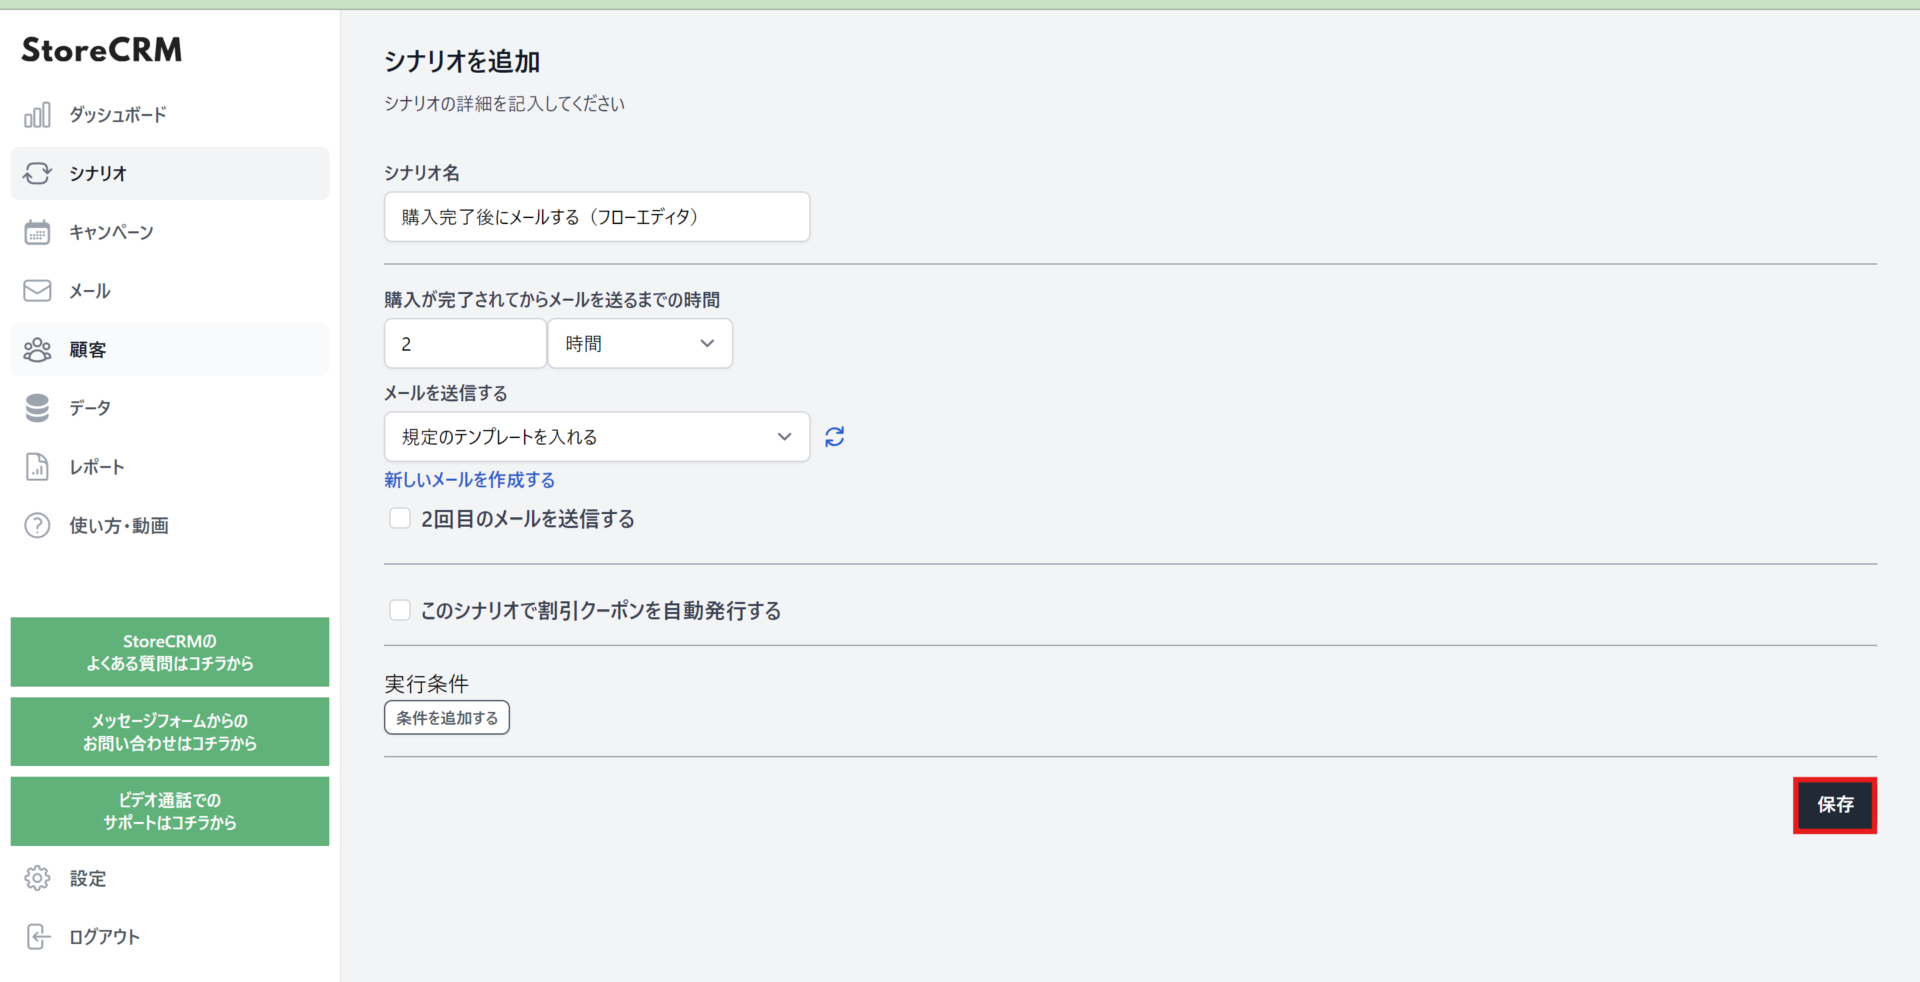
3. The automation settings open, but since we will configure everything in the flow editor, just save.
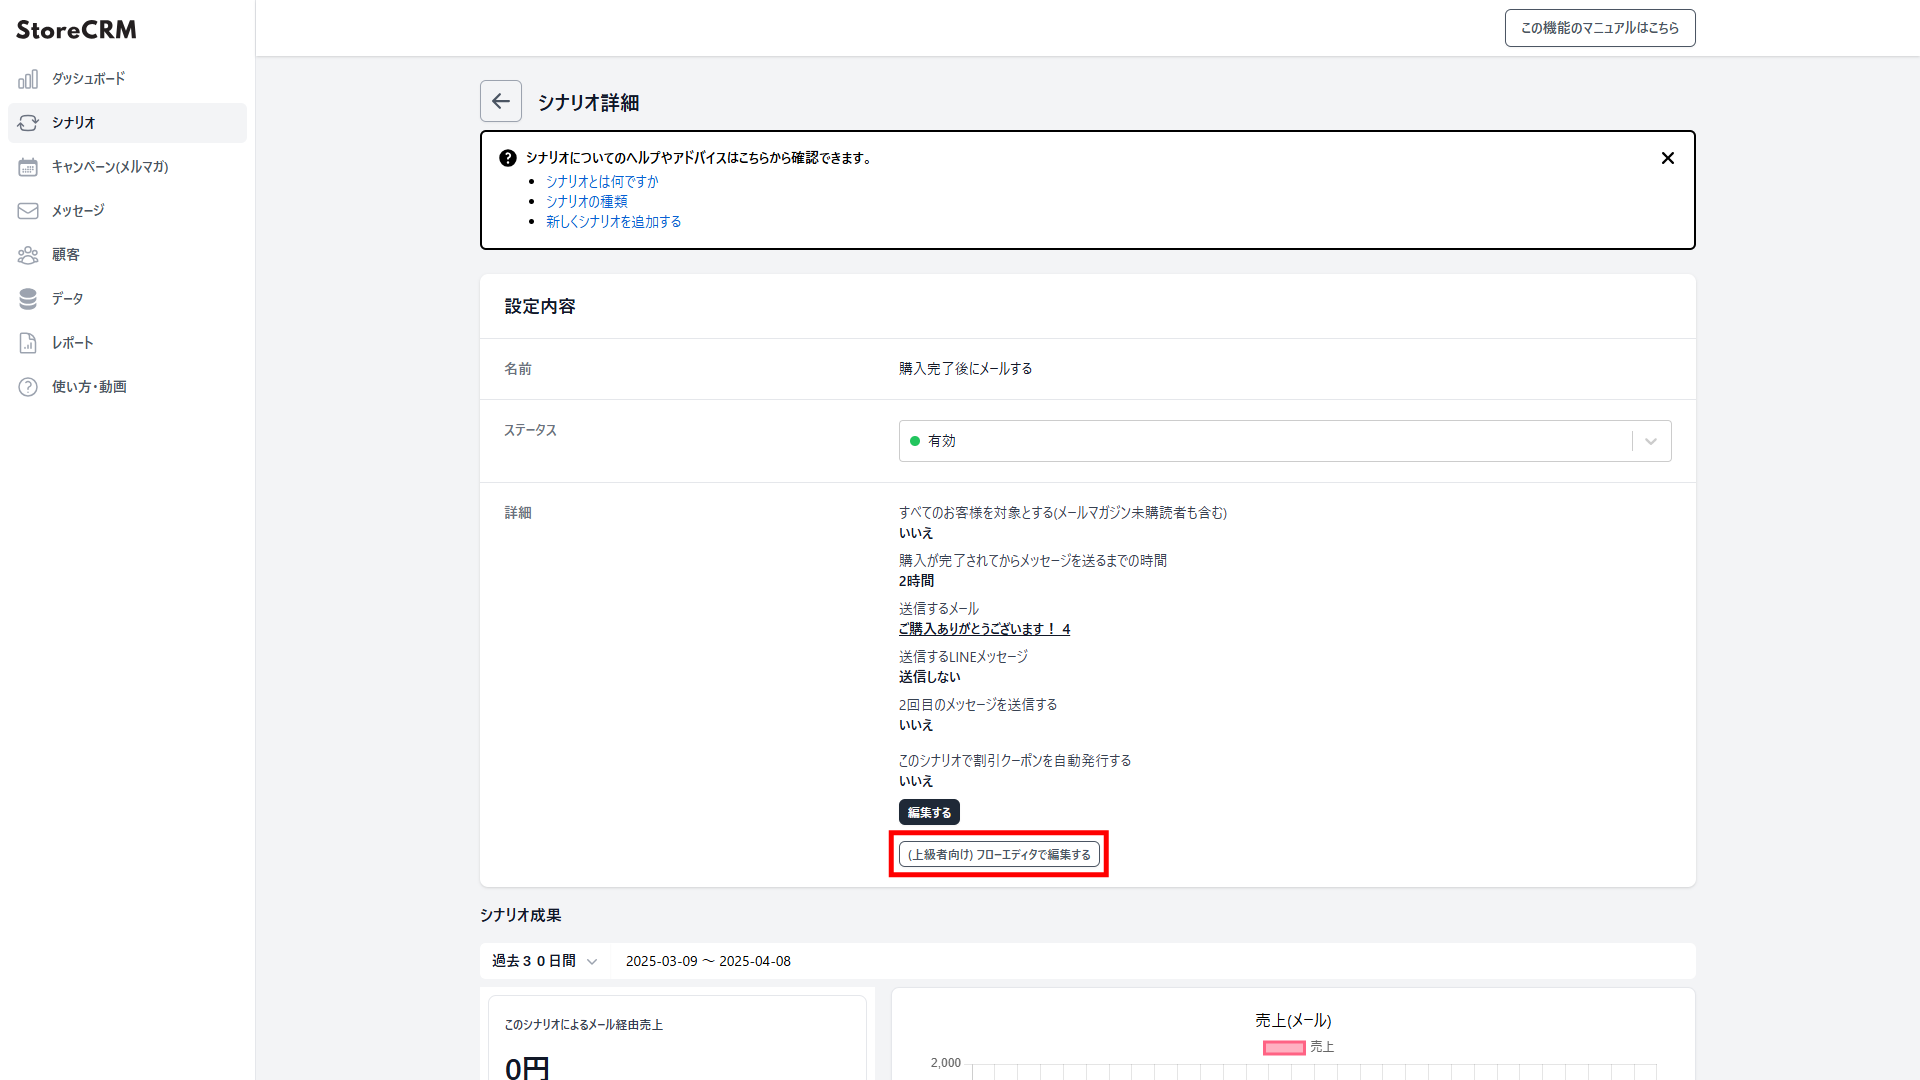
4. On the automation detail page, click [Settings] > [Details] > [(Advanced) Edit in the flow editor].
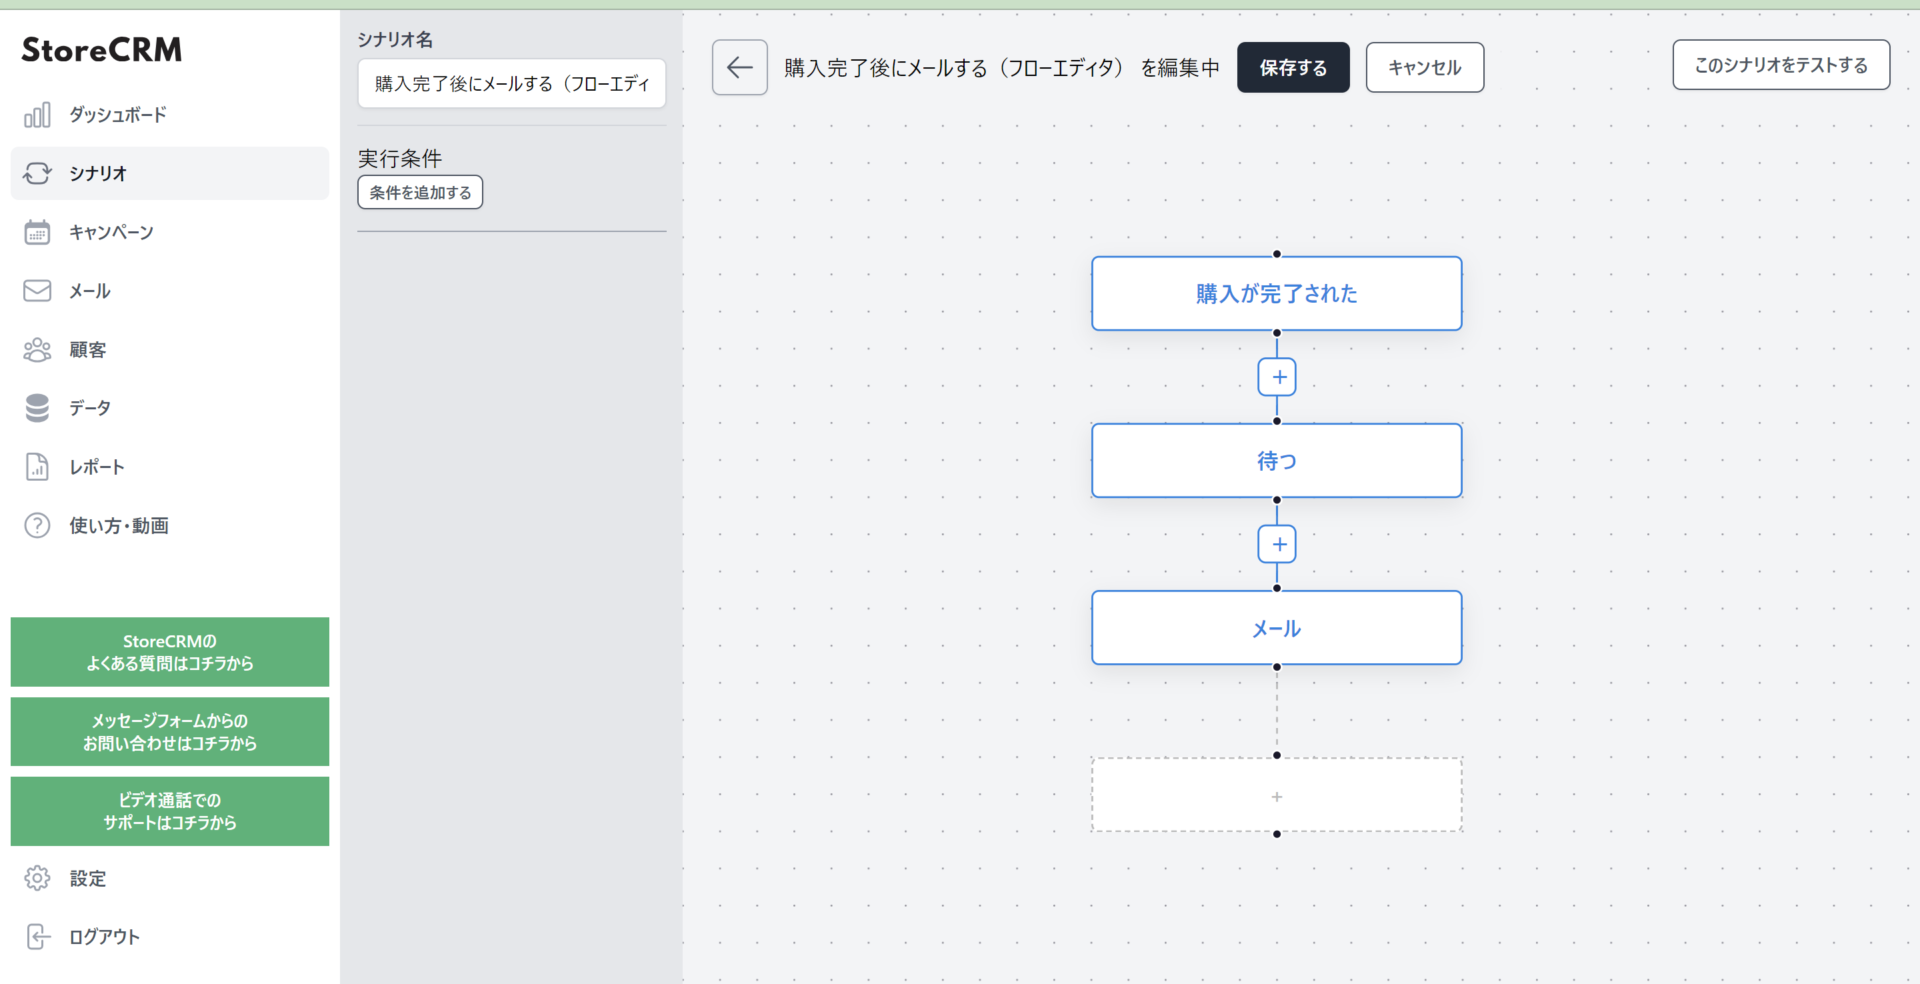
5. The flow editor opens, and that is this section done. You can open the flow editor for an existing automation the same way, from step 4 onwards.
The parts of the flow editor
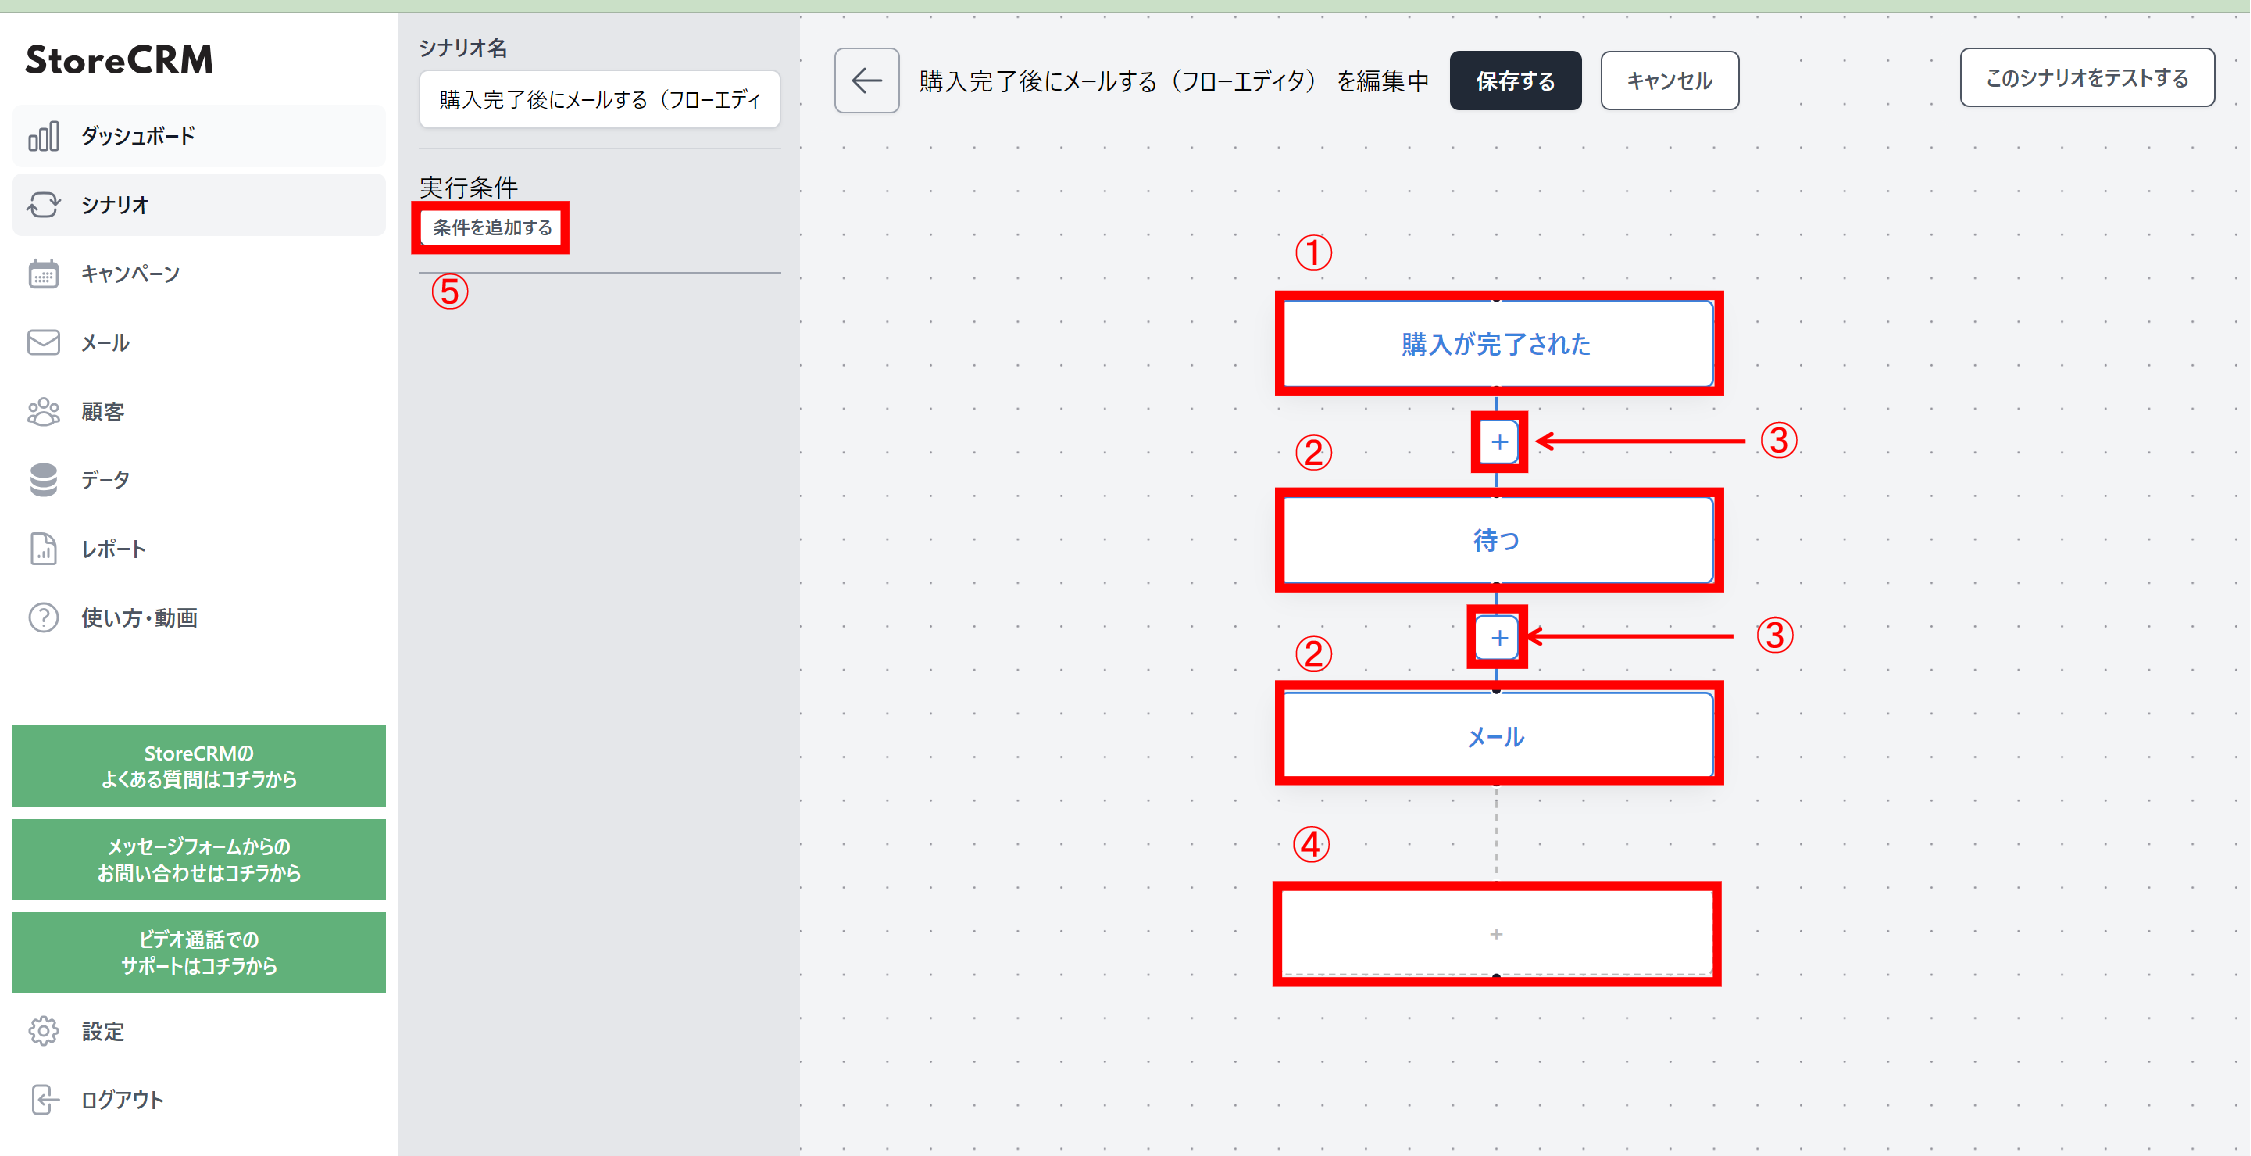
Here is what each part of the flow editor does. An automation starts from the trigger (1) and then works through the nodes (2) from top to bottom.
1. The trigger The event that starts the automation. We chose [Email after purchase], so processing begins when a customer buys something. The trigger depends on the automation you selected, so pick the automation that matches the event you want to act on. Note that the trigger cannot be changed or removed afterwards.
2. Nodes The steps that actually run once the trigger fires, executed from top to bottom. They include waiting a number of days or hours, sending a specific email, and branching on a condition.
3. Add-node button Inserts a new node between two existing steps. There are several node types, covered below.
4. Add-node button (append to the end)
Adds a new node at the end of the current flow.
5. Automation conditions Sets whether the automation runs at all, based on the order or the customer. You can restrict it to customers carrying a particular tag, for example, or to orders above a given value. When a node is selected, that node's settings appear here instead.
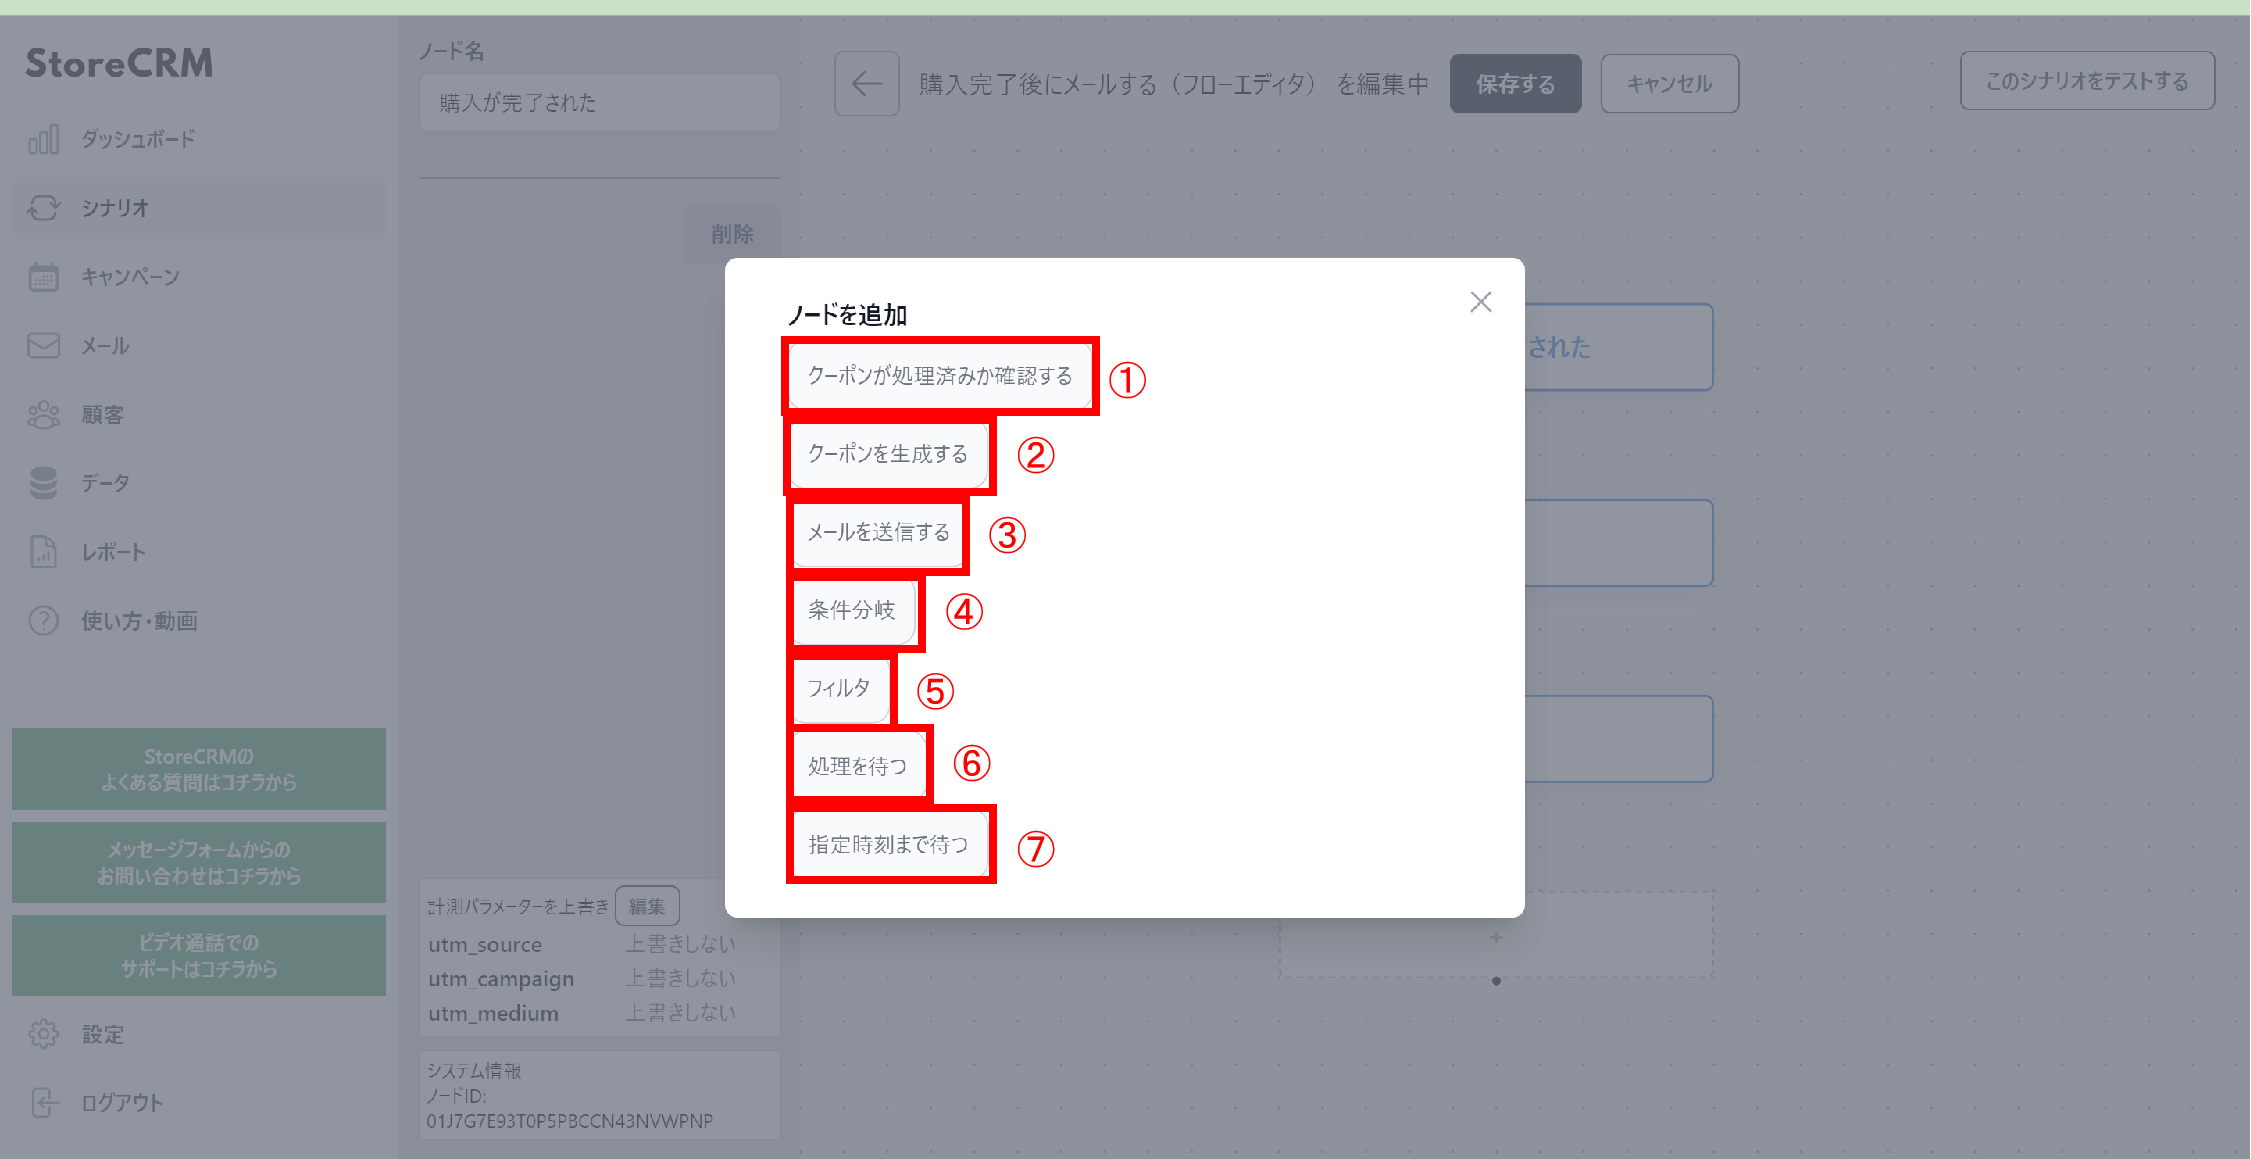
Clicking either add-node button (3 or 4 above) opens the node picker. Here is what each node type is for.
1. Check whether a coupon has been used Checks whether a coupon you generated has been redeemed and, if it has, stops the rest of the flow. Use it when an automation sends several emails and you want to stop once the coupon is used.
-
Generate a coupon To send an email containing a coupon, add this node before the email node. Selecting it lets you set the discount rate, the expiry date and the usage conditions. You can also specify a prefix for the coupon code if you want to keep the codes organised.
-
Send an email Sends the email you specify.
-
Condition Like the automation conditions, this looks at order and customer data and splits the flow depending on whether the condition is met. (Multiple conditions are supported.) The usual use is to send a different email down each branch.
-
Filter Like conditions and branches, this looks at order and customer data: if the condition is met the flow continues, and if it is not, the flow stops there. (Multiple conditions are supported.) Use it when you do not need a full branch but only want the rest of the flow to run for certain customers or orders.
-
Wait Use it to put time between one step and the next. The wait can be set in days, hours or minutes.
7. Wait until a specific time Use it when the gap between steps should be based on a clock time rather than a duration. You can express things like "wait until 10am, three days from now".
Advanced customisation
What we are building
In this section we use the flow editor to build a more advanced automation. From here on we refer to nodes and the steps for adding them by name, so if you are unsure, keep the previous section open as you go. As the base template we continue with [Email after purchase].
The specification is as follows.
- Send first-time customers a follow-up email designed to convert them into repeat buyers, chosen according to what they bought.
- Seven days after the purchase, for customers with no returns or refunds, split the email as follows:
- If the purchased product carries the [coffee] tag, send the "top coffee gear" ranking email.
- If the purchased product carries the [Beer] tag, send the beer server rental email.
- If neither 1 nor 2 applies, send the recommended collection email.
- If the order was over ¥10,000, include a 20% off coupon in the email.
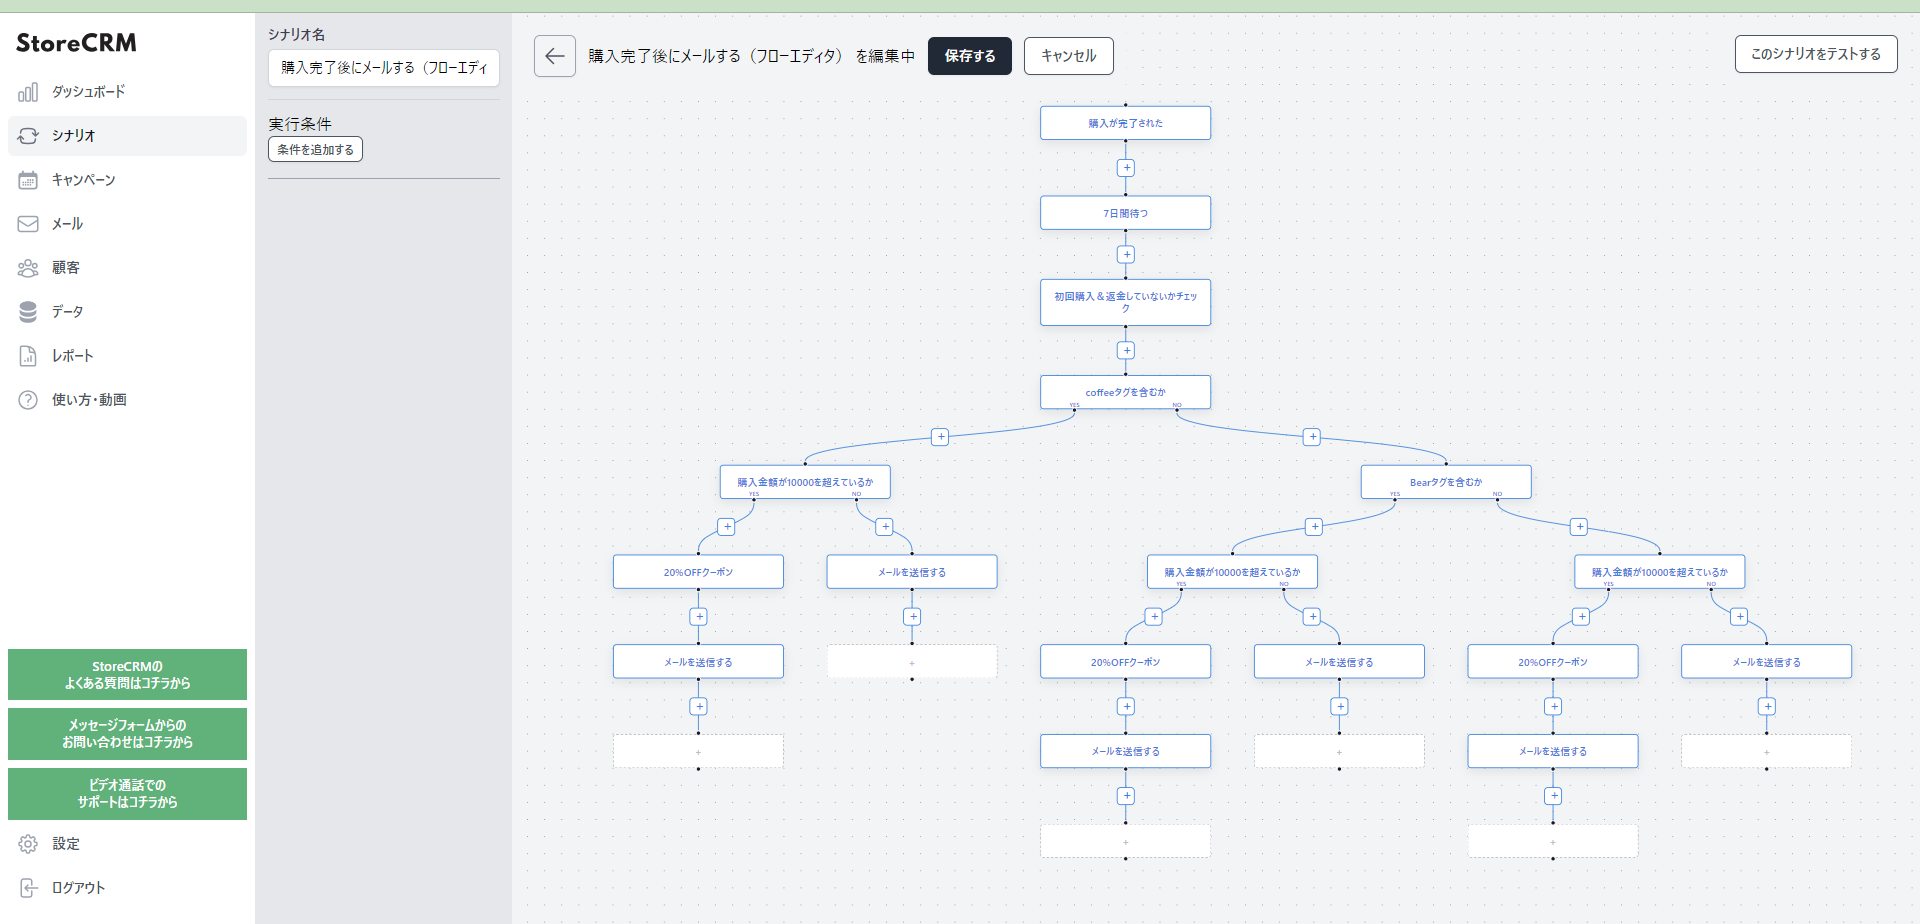
This is what the finished flow looks like. It may look complicated, but taking it one step at a time makes it straightforward.
Writing the emails
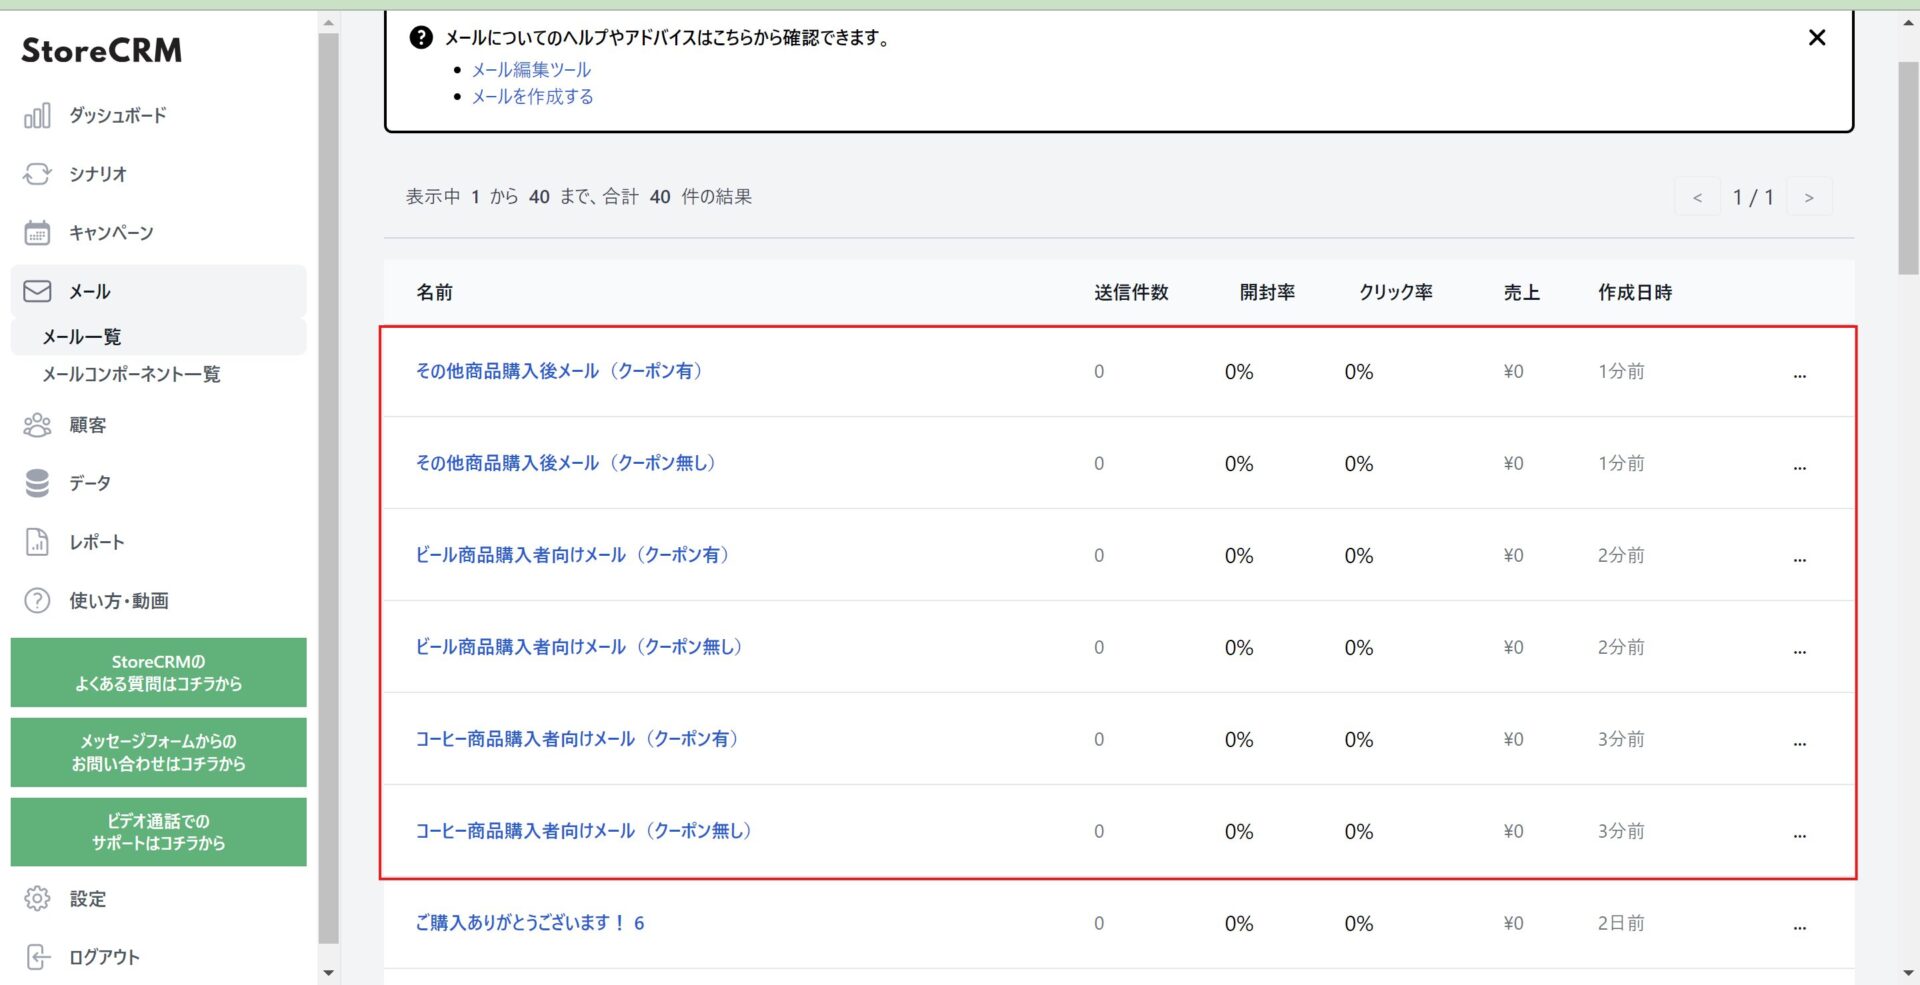
Write the emails before you edit the flow. This automation sends six variants, so create the following.
- Coffee buyers (with coupon)
- Coffee buyers (without coupon)
- Beer buyers (with coupon)
- Beer buyers (without coupon)
- All other buyers (with coupon)
- All other buyers (without coupon)
If you are not sure how to create an email, watch this video.
Building the flow
Now let us edit the flow editor and build the automation. If the previous sections gave you a feel for how it works, feel free to skip the walkthrough and build it from the specification alone.
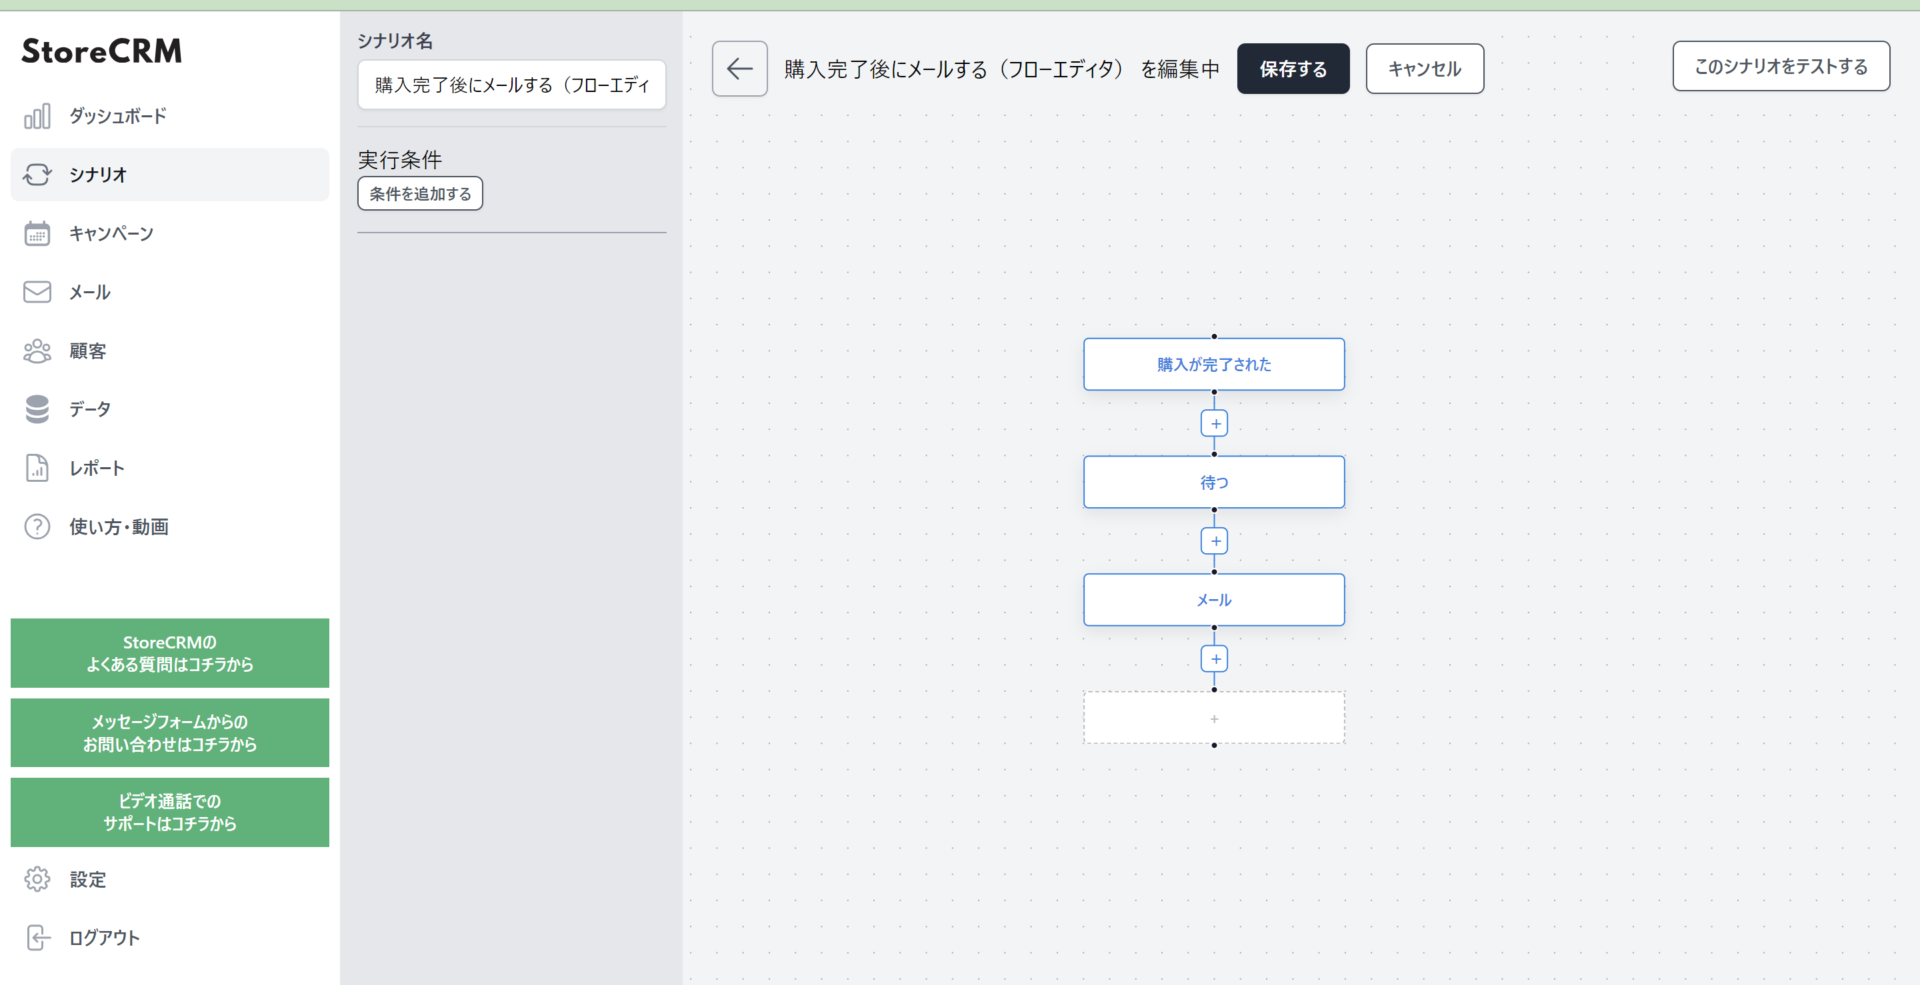
1. Open the flow editor you created in the previous section.
Once you save in the flow editor, you cannot go back to the simple settings mode. If you want to experiment with an automation that is already live, always duplicate it and customise the copy.
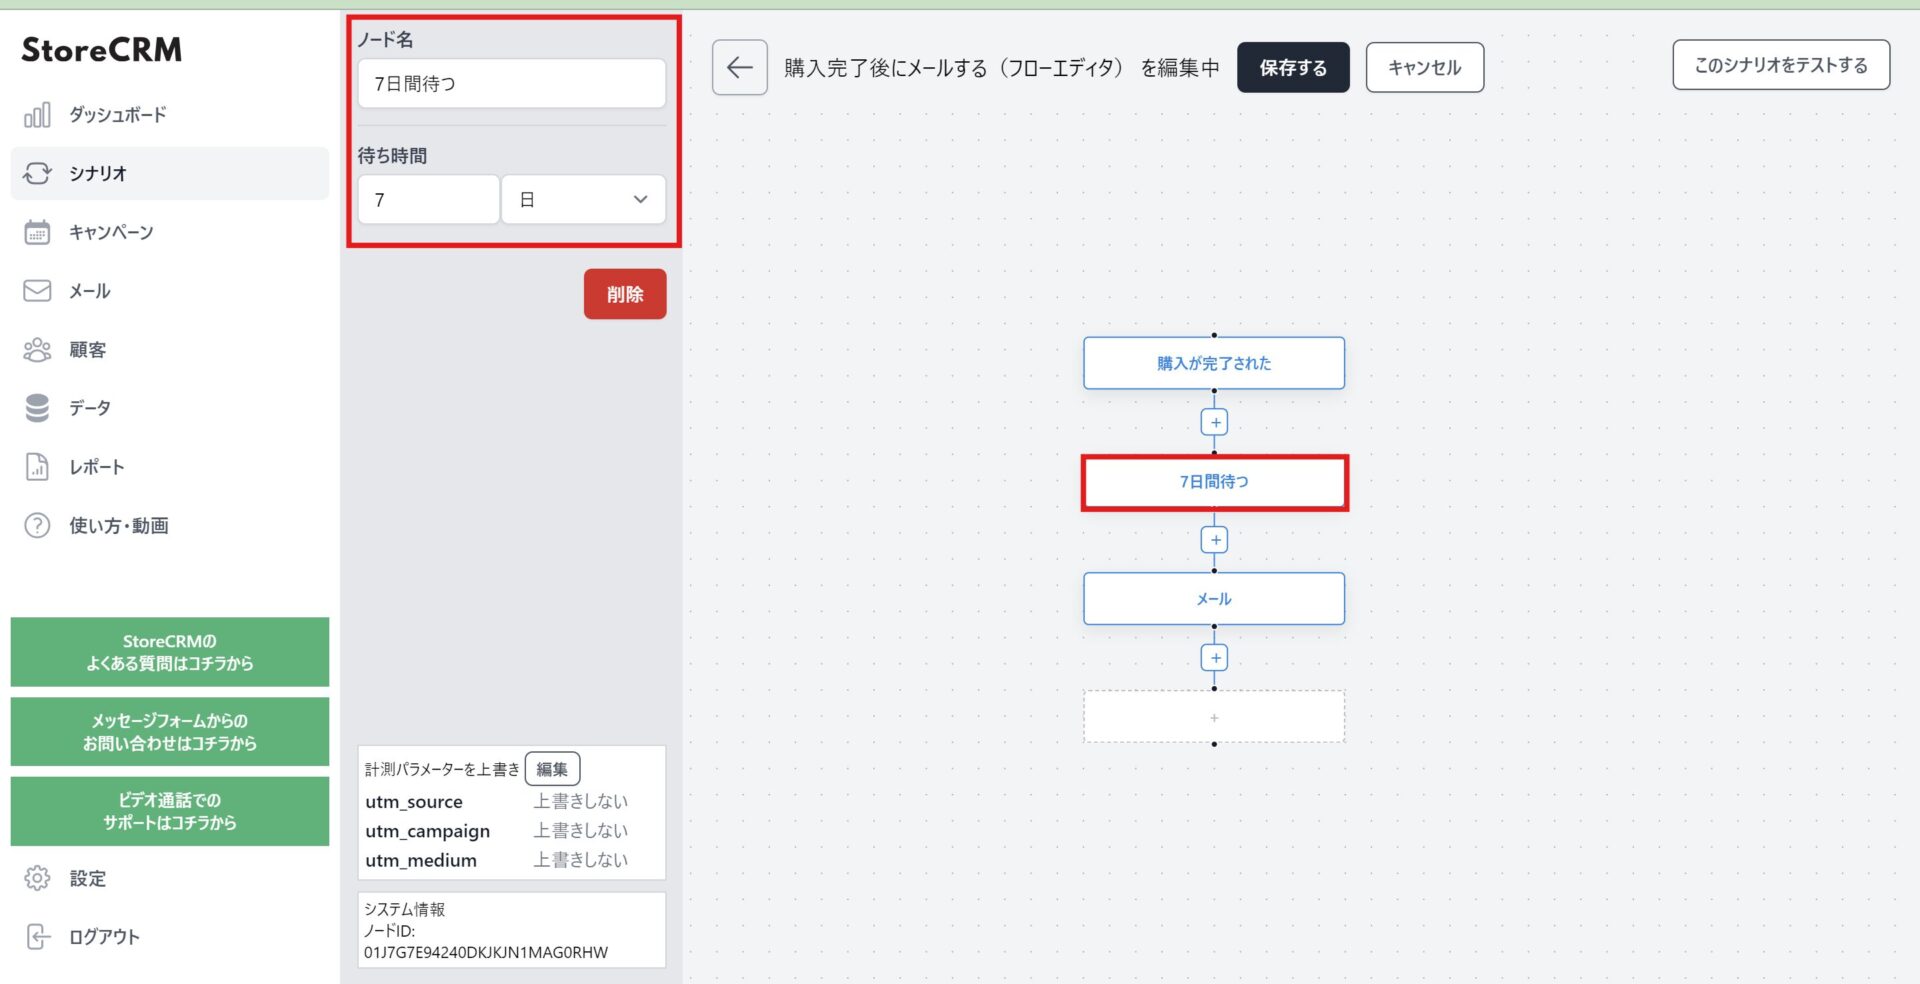
2. Select the [Wait] node and set the wait to seven days. Give the node any name that makes sense to you.
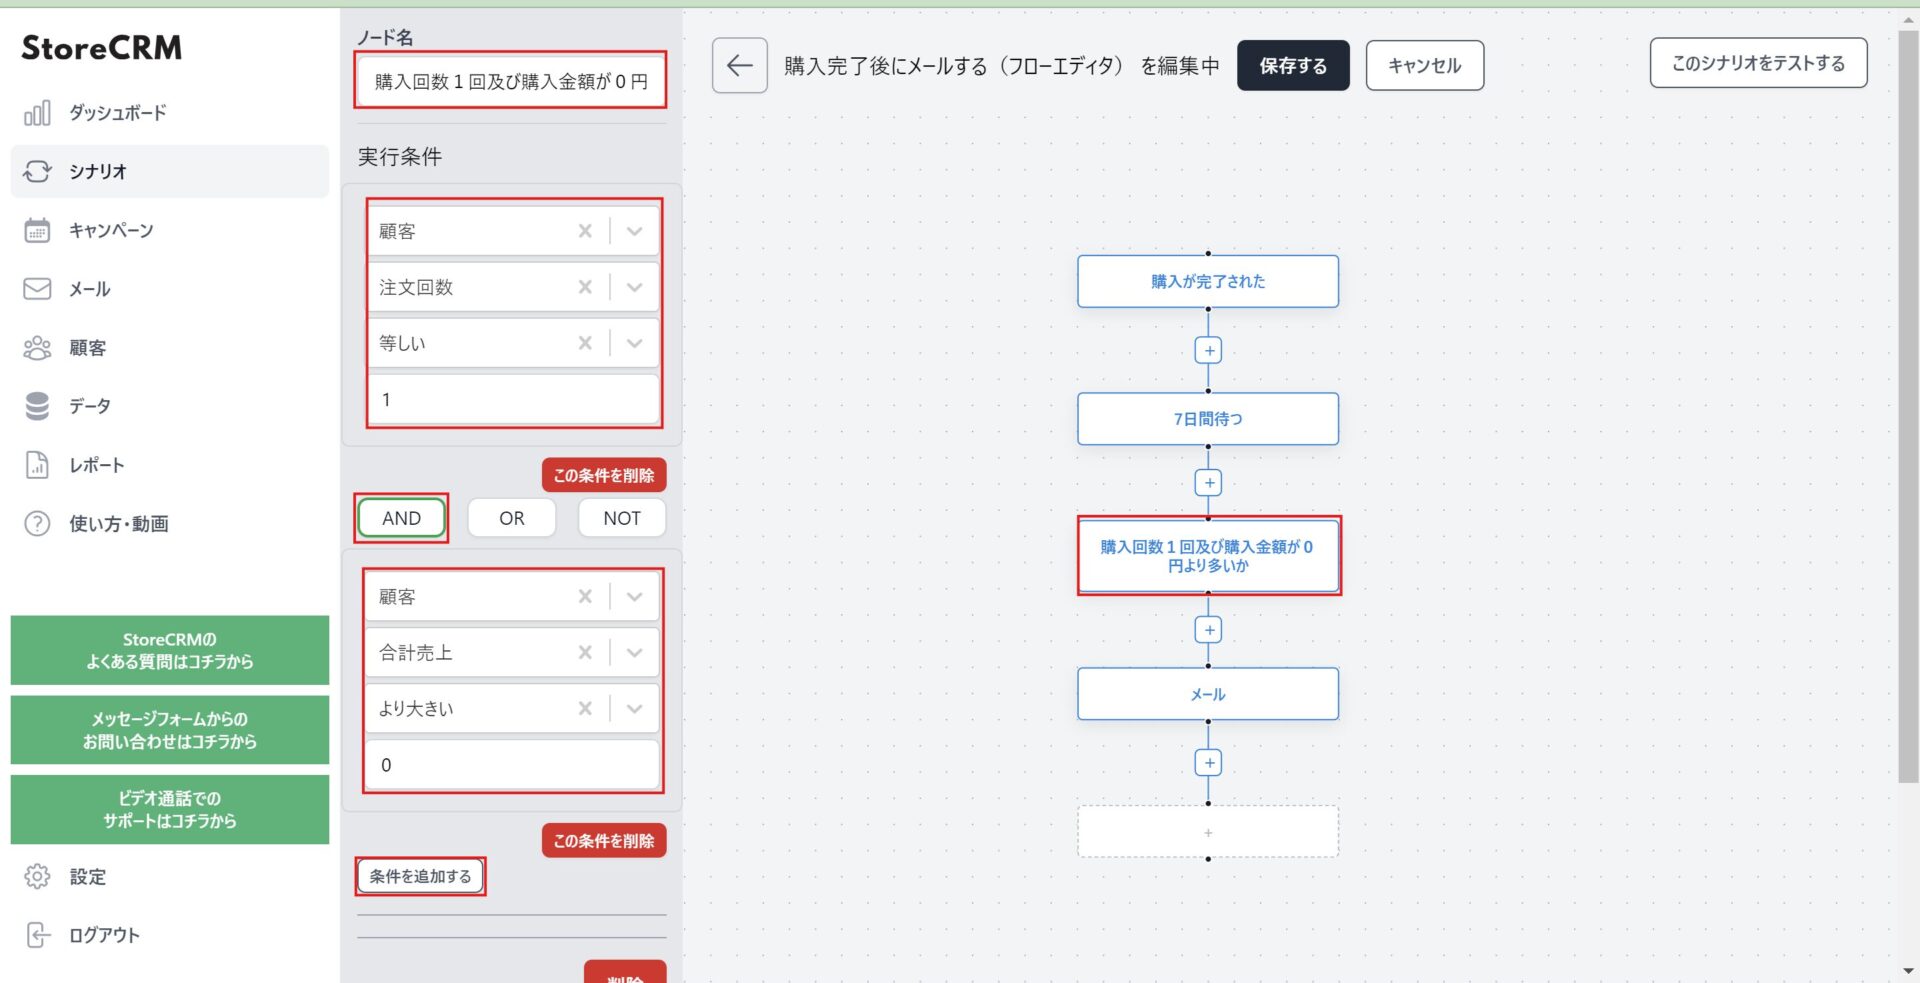
3. Add a [Filter] node between the [Wait] node and the [Email] node. We only want to email customers who are buying for the first time (order count of one) and who actually paid for the product (no refund or return), so we set those conditions to narrow down who the rest of the flow applies to. You can also click [Add condition] and join several conditions with [AND], [OR] and [NOT].
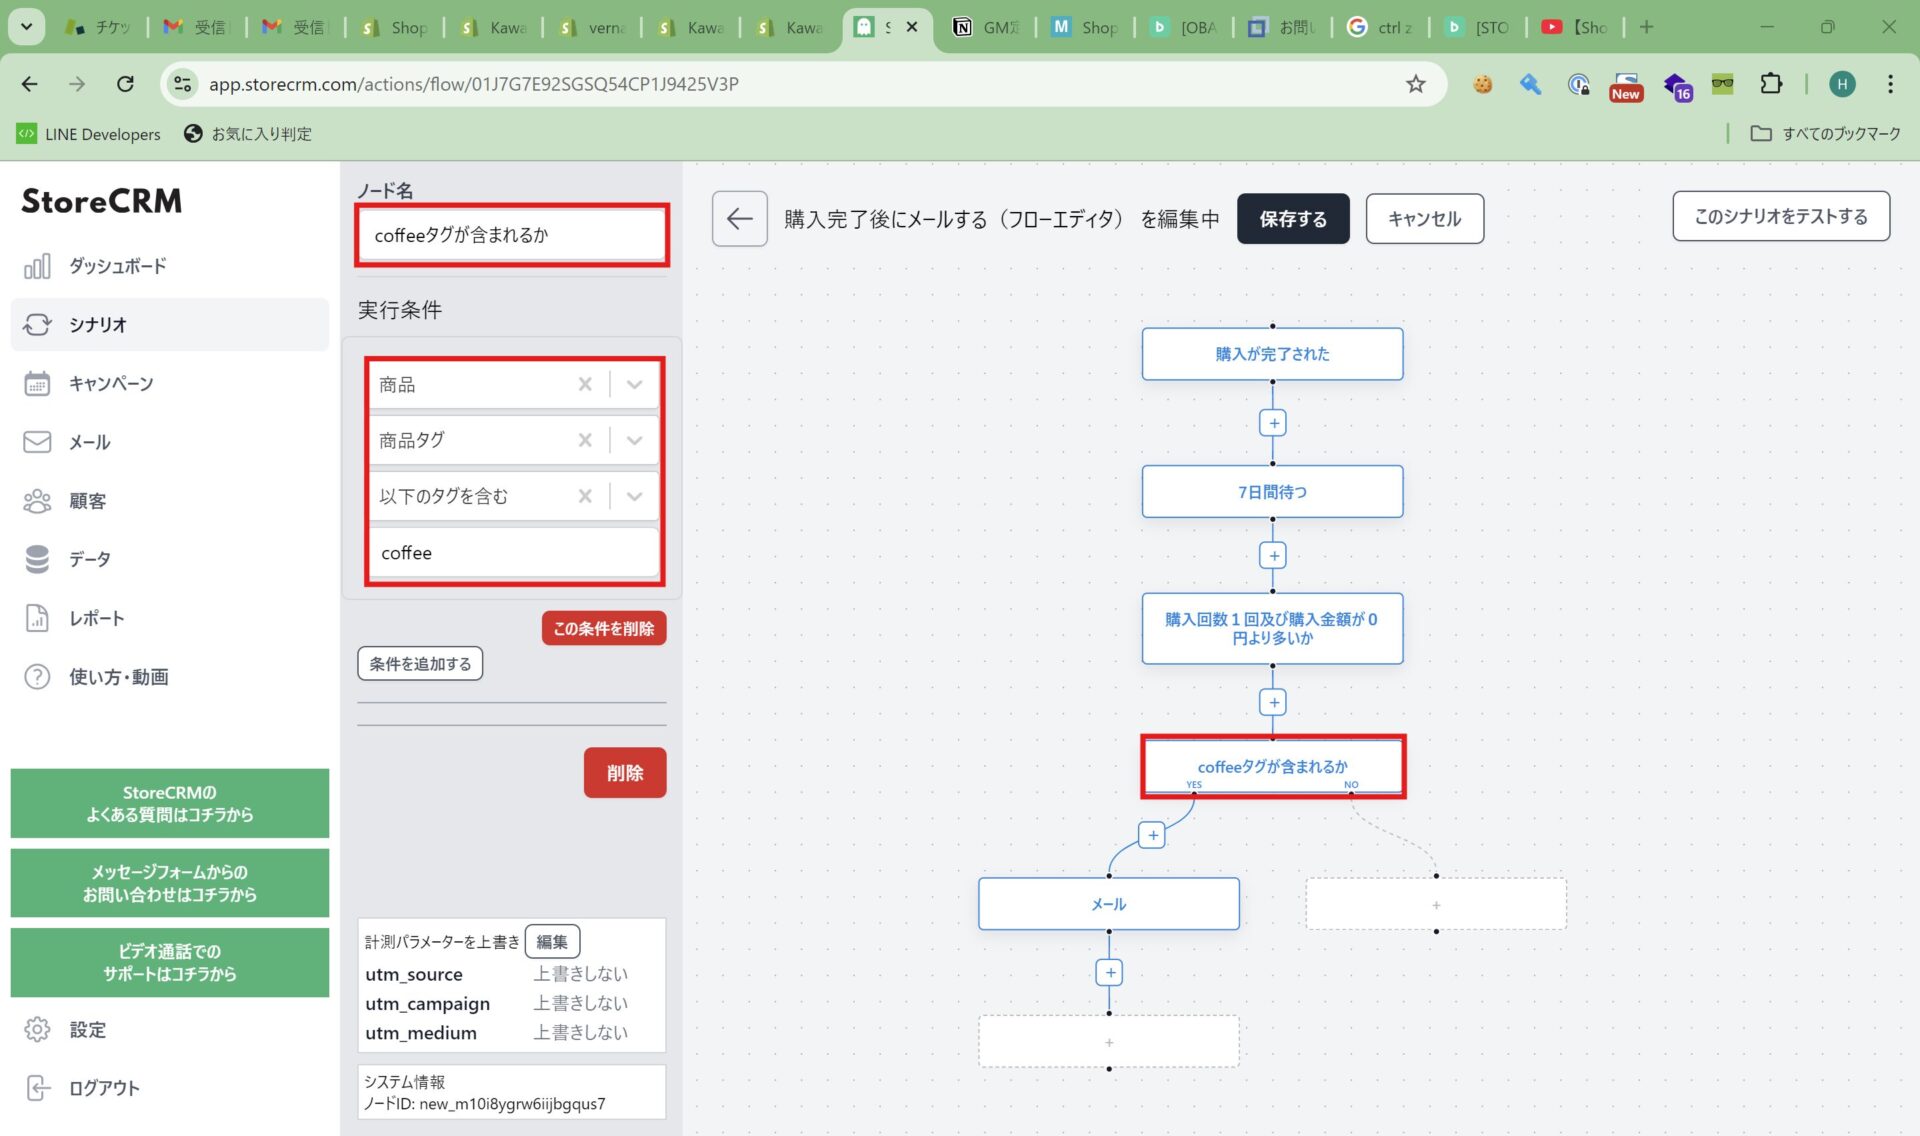
4. Add a [Condition] node between the [order count is 1 and amount paid is above ¥0] node and the [Email] node. This checks whether the purchase carries the [coffee] tag.
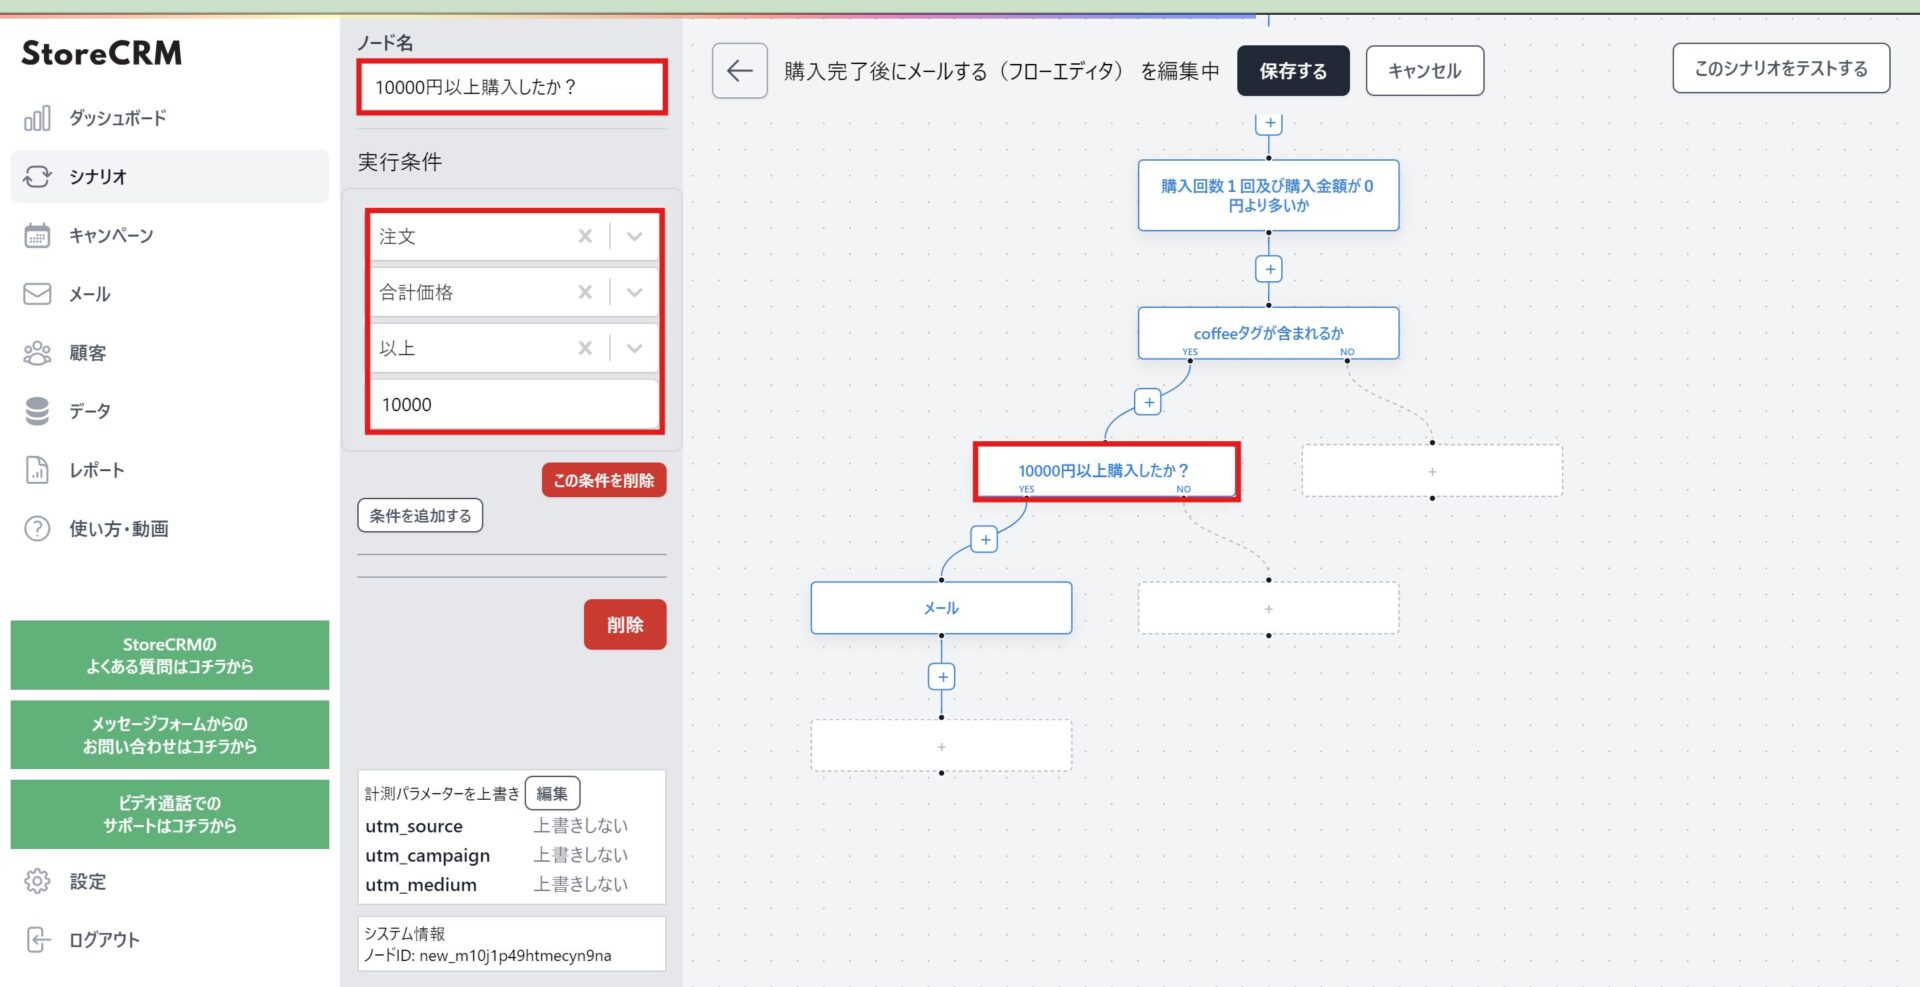
5. Add a [Condition] node between the [has the coffee tag] node and the [Email] node. This checks whether the order total is ¥10,000 or more.
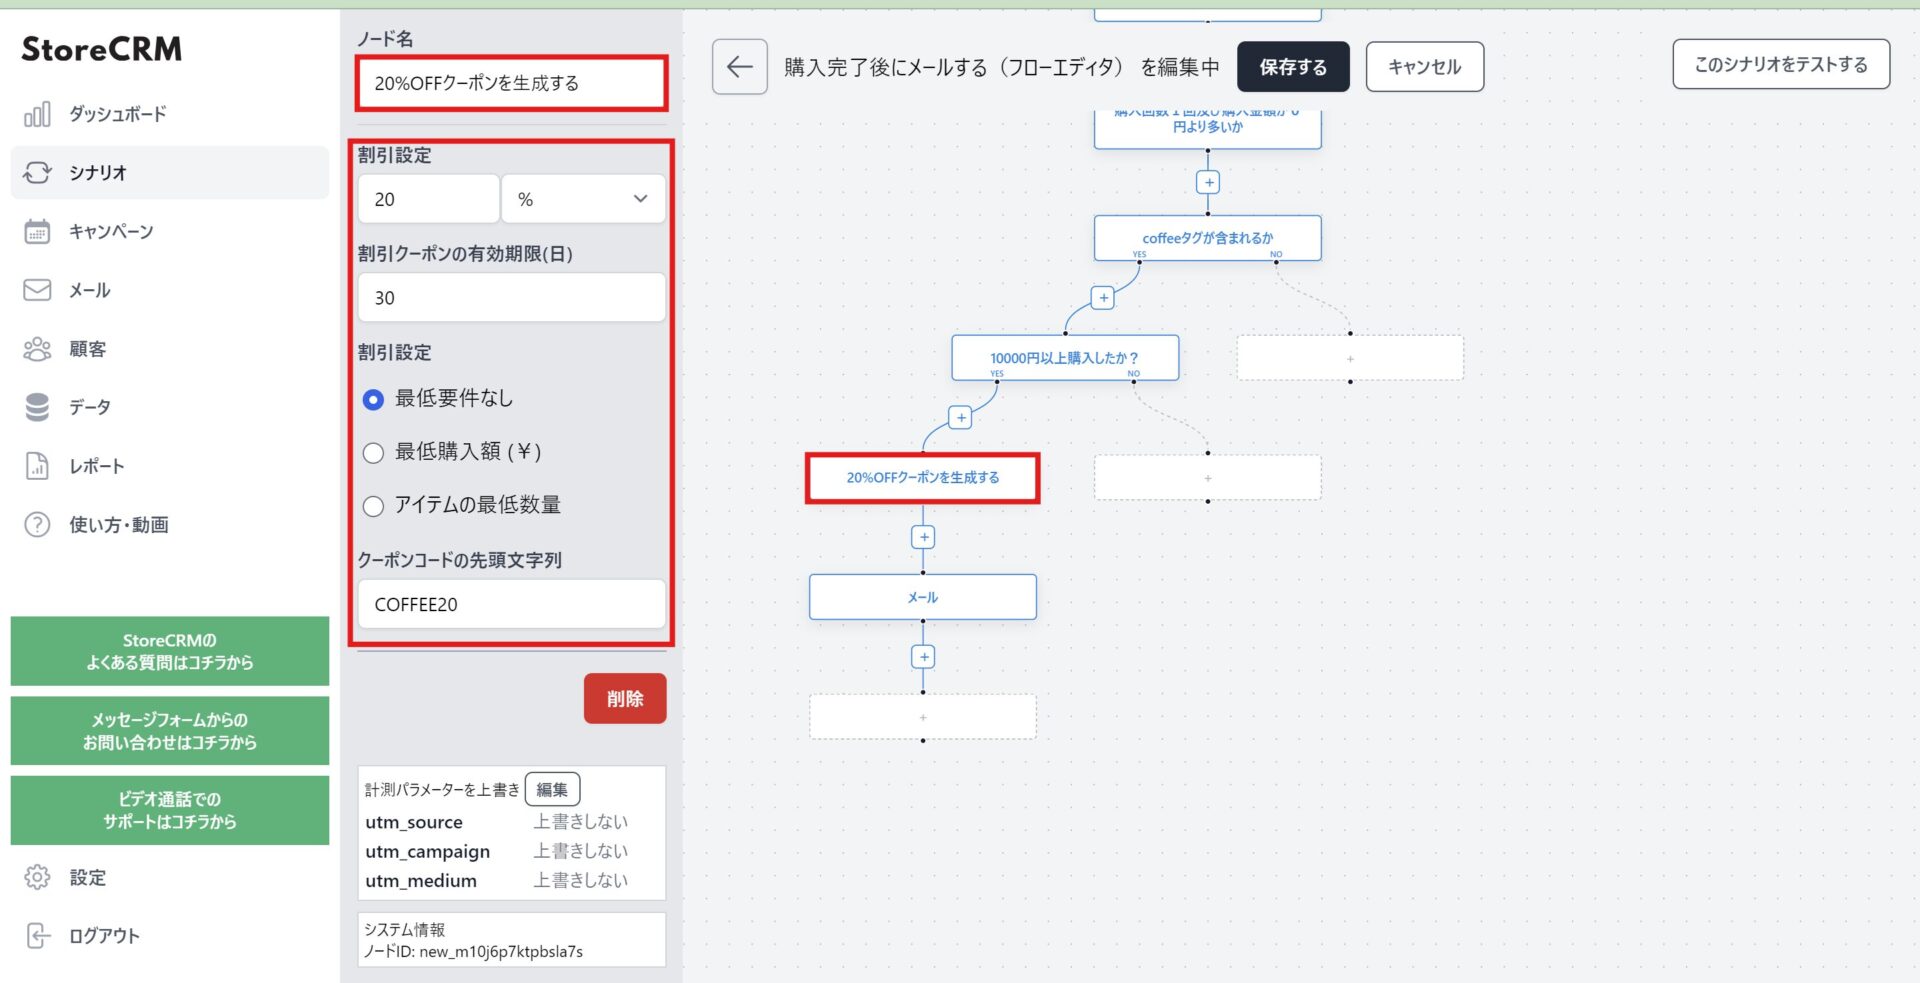
6. Add a [Generate a coupon] node between the [spent ¥10,000 or more?] node and the [Email] node. Customers who spent ¥10,000 or more get a coupon in their email, and this is the step that creates it. Set the discount, the expiry and the usage conditions however you like. This automation issues several different coupons, so use the prefix to make it clear which audience each one is for.
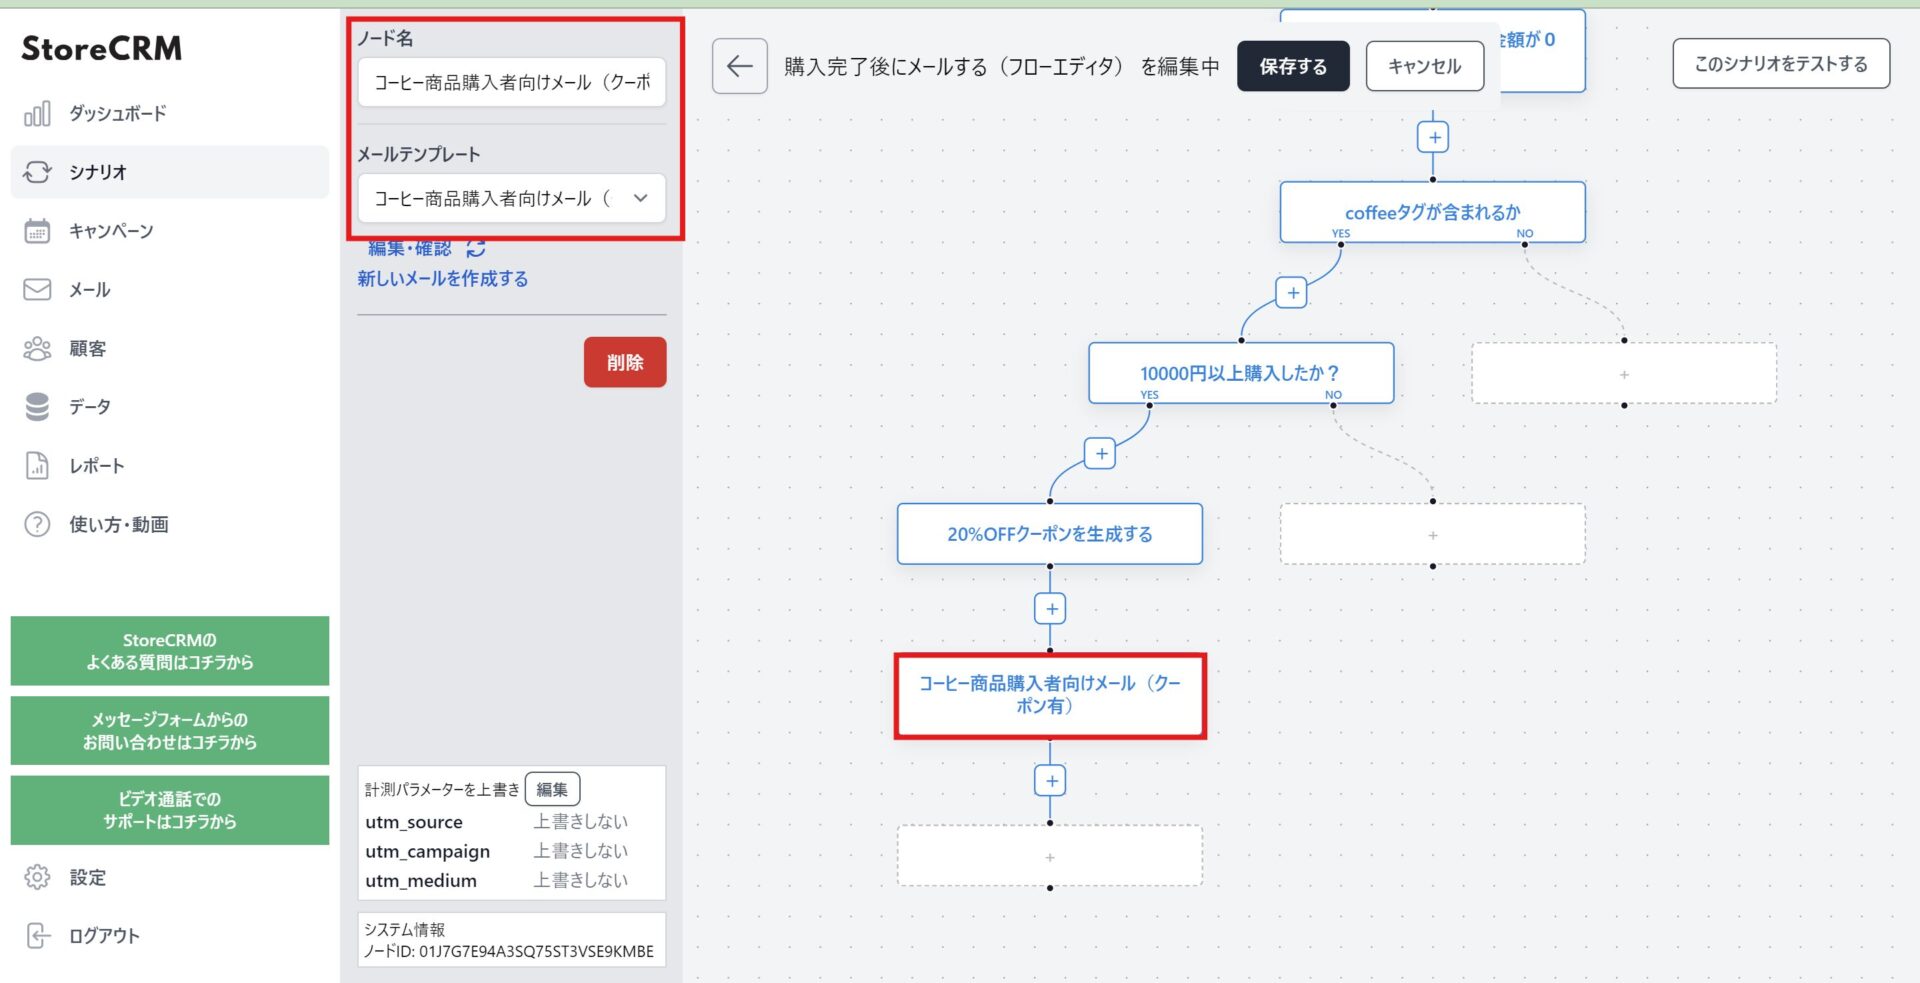
7. Click the [Email] node below the [Generate a 20% off coupon] node and choose the email template. Here, choose [Coffee buyers (with coupon)], and rename the node to match. Put the string [coupon] in the body of a coupon email and it is replaced with the generated coupon code when the email is sent.
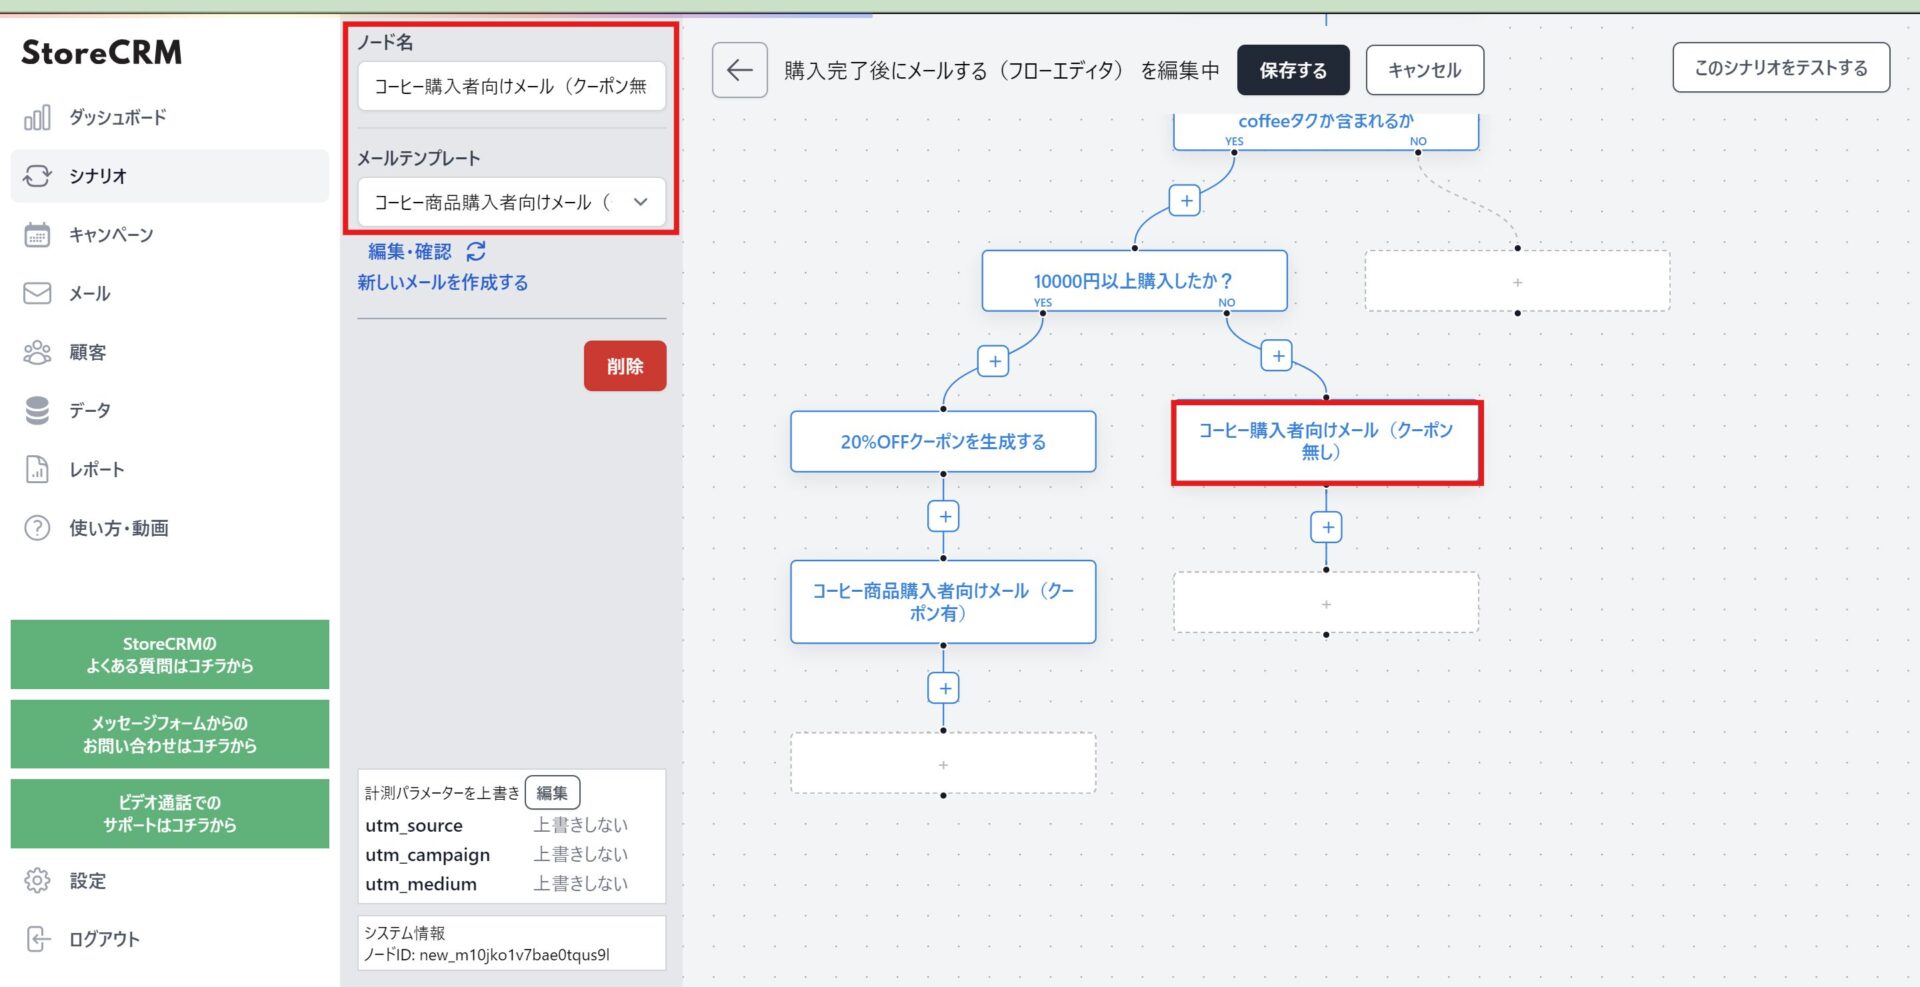
8. Add a [Send an email] node under the NO branch of the [spent ¥10,000 or more?] node. Here, choose [Coffee buyers (without coupon)], and name the node to match.
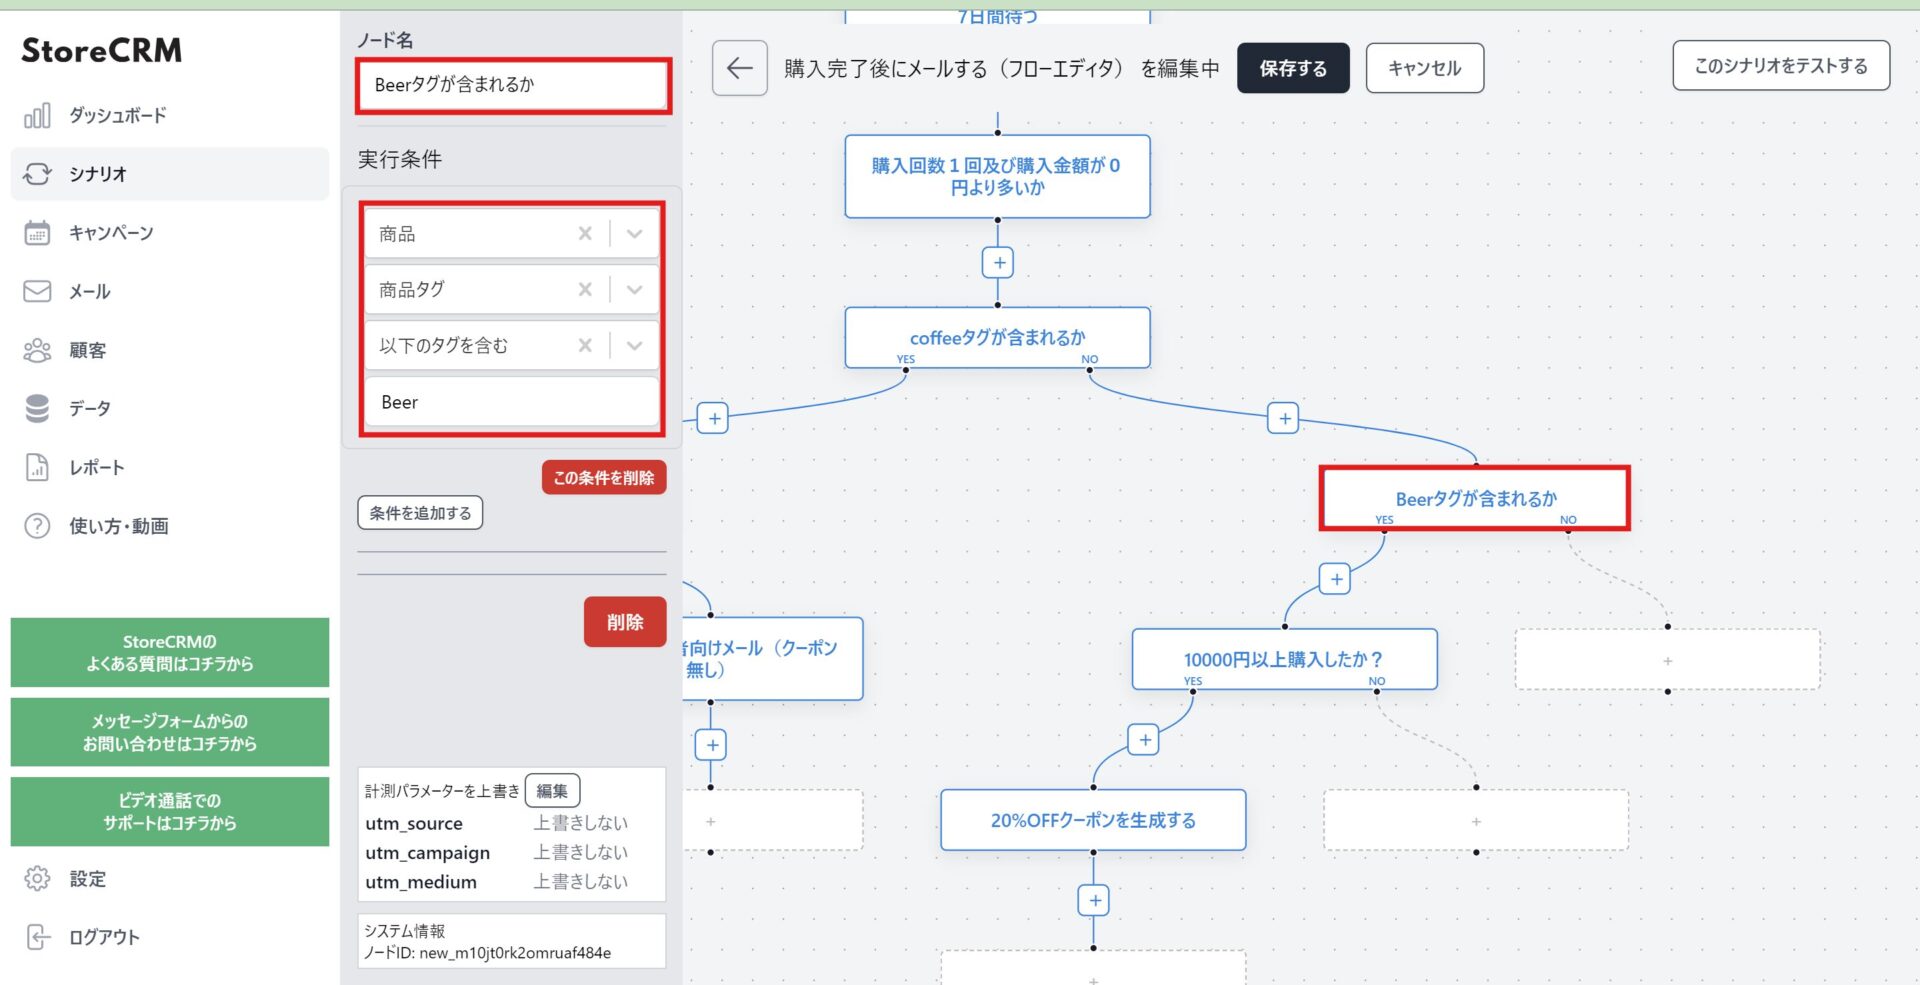
9. Add a [Condition] node under the NO branch of the [has the coffee tag] node. This checks whether the purchase carries the [Beer] tag.
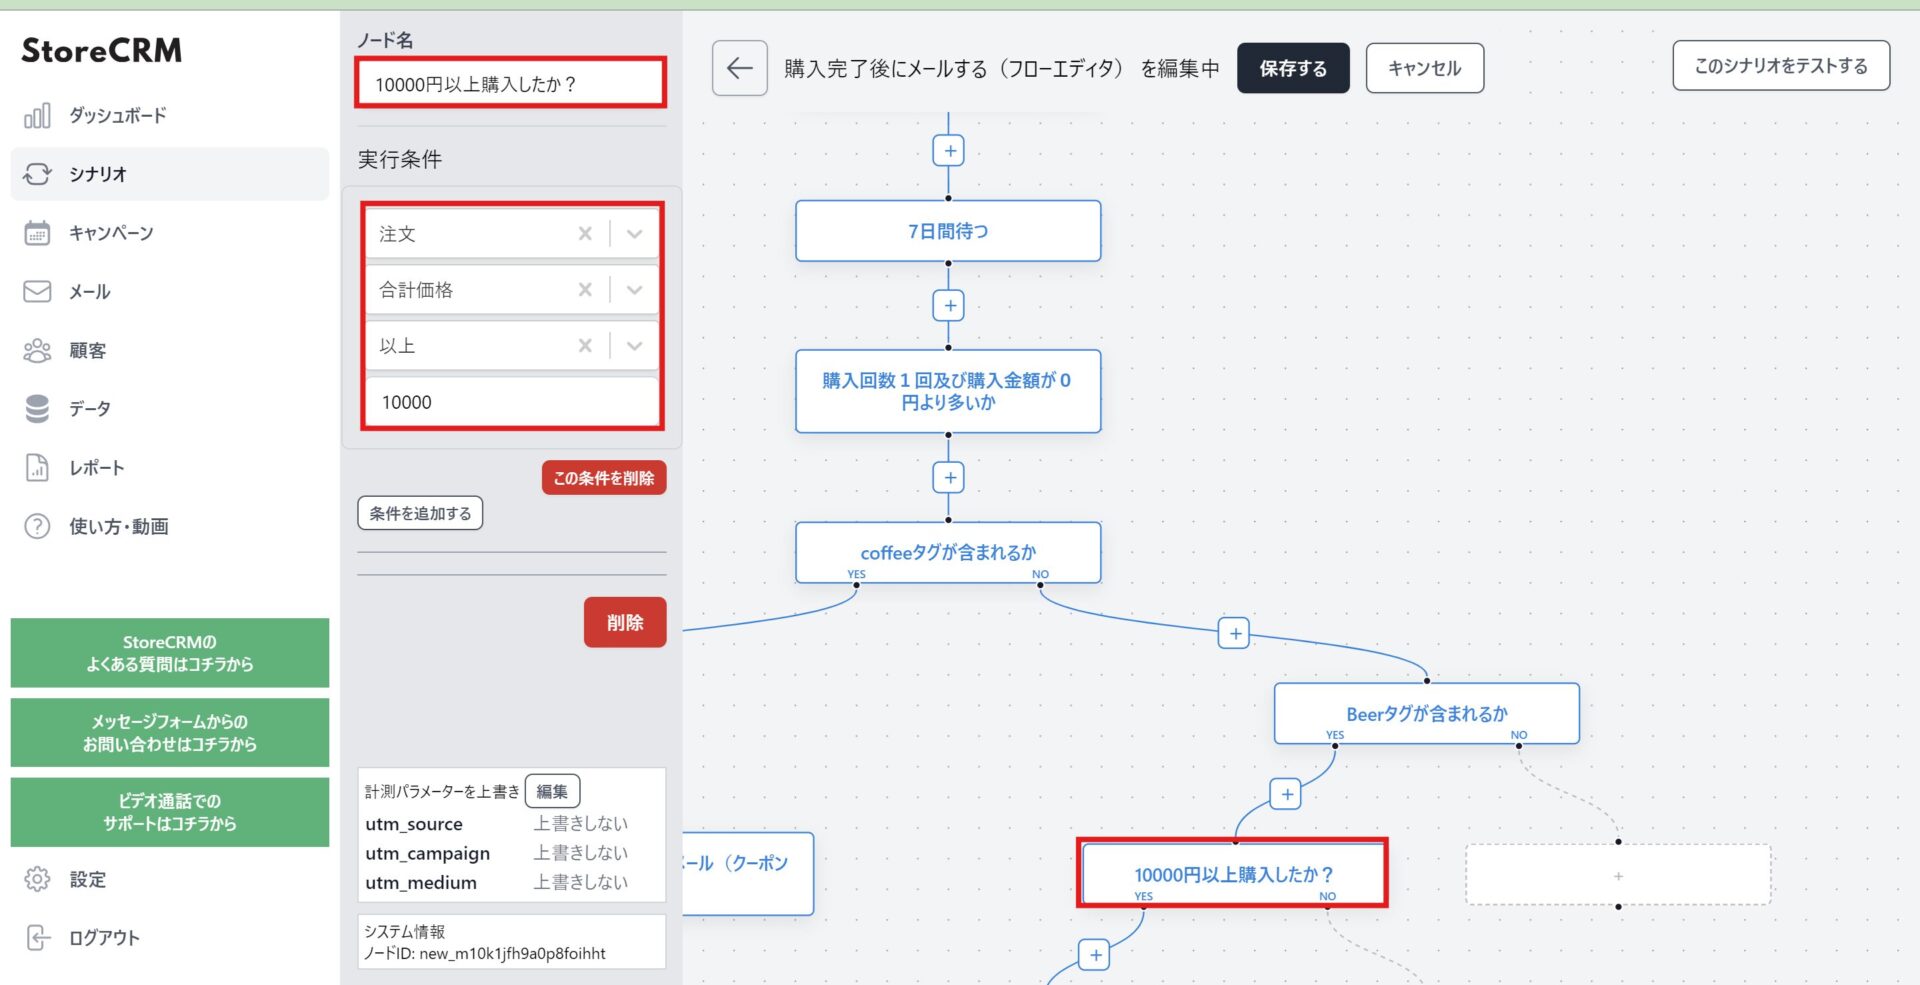
10. Add a [Condition] node under the YES branch of the [has the Beer tag] node. This checks whether the order total is ¥10,000 or more.

- Add a [Generate a coupon] node under the YES branch of the [spent ¥10,000 or more?] node. Customers who spent ¥10,000 or more get a coupon in their email, and this is the step that creates it. Set the discount, the expiry and the usage conditions however you like. This automation issues several different coupons, so use the prefix to make it clear which audience each one is for.
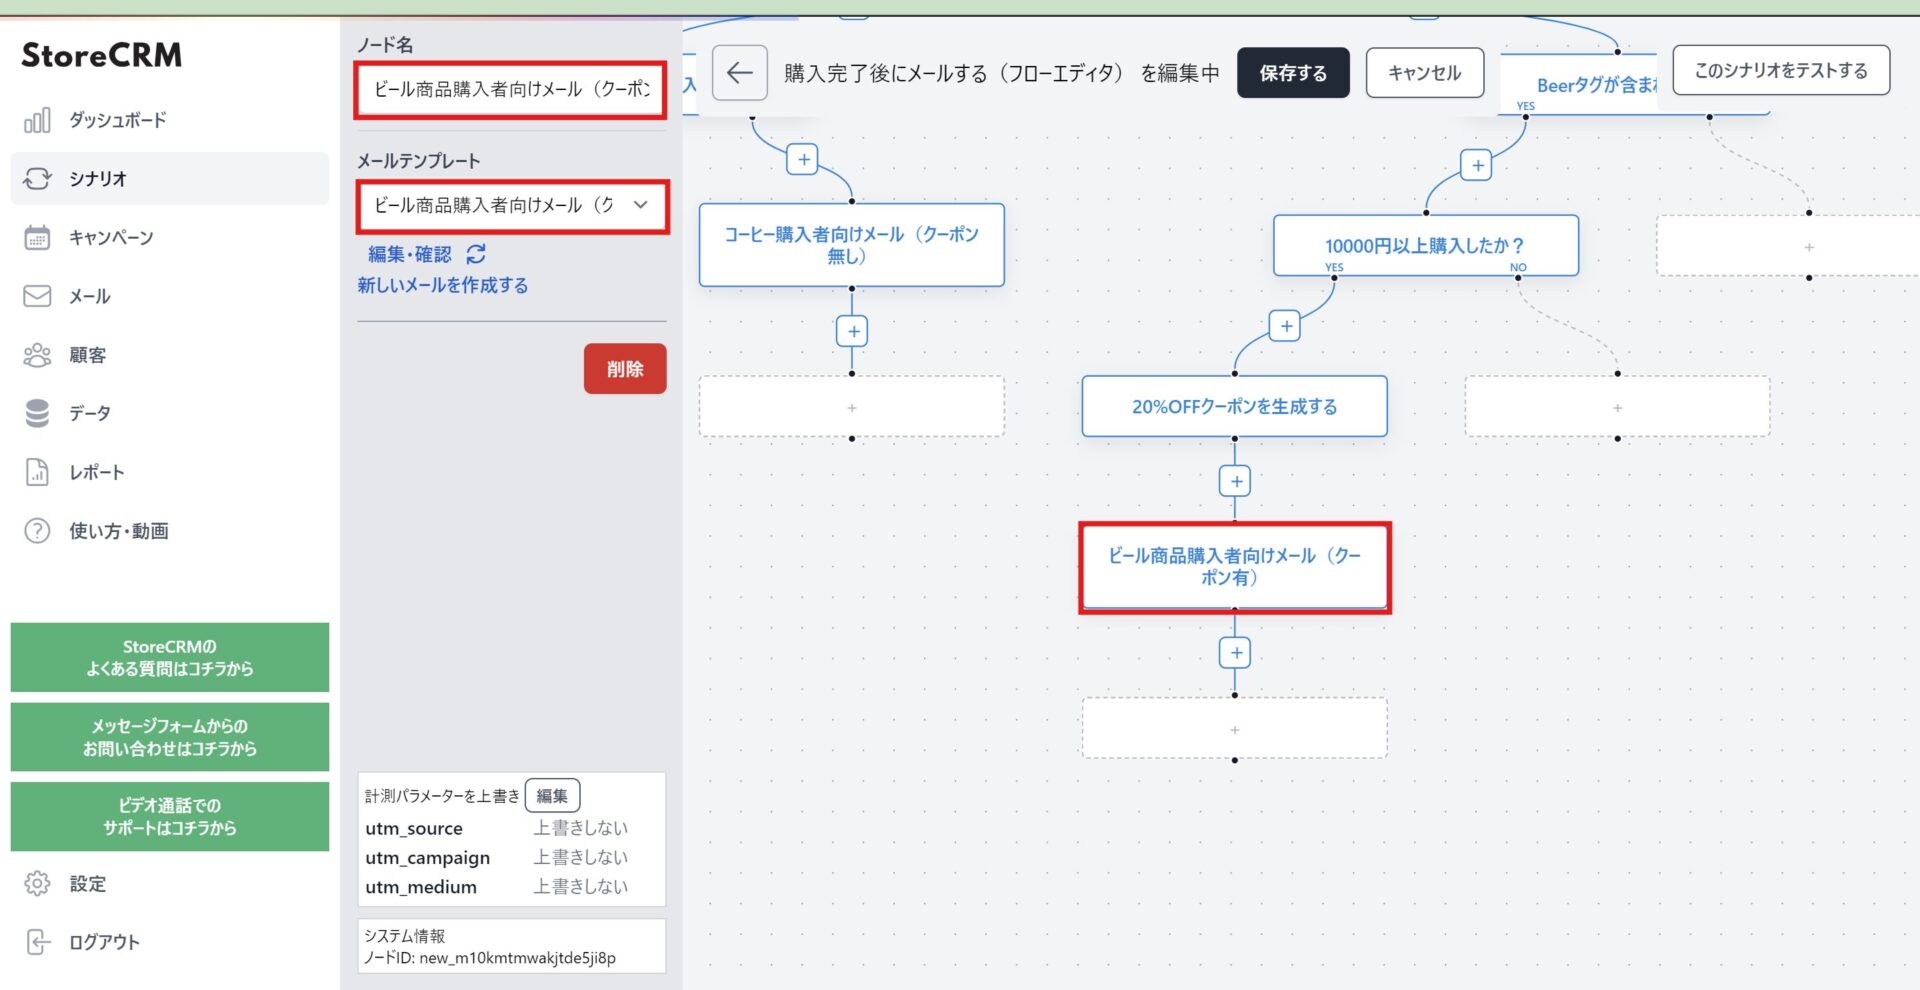
12. Add an [Email] node under the [Generate a 20% off coupon] node and choose the email template.
Here, choose [Beer buyers (with coupon)], and rename the node to match.
Put the string [coupon] in the body of a coupon email and it is replaced with the generated coupon code when the email is sent.
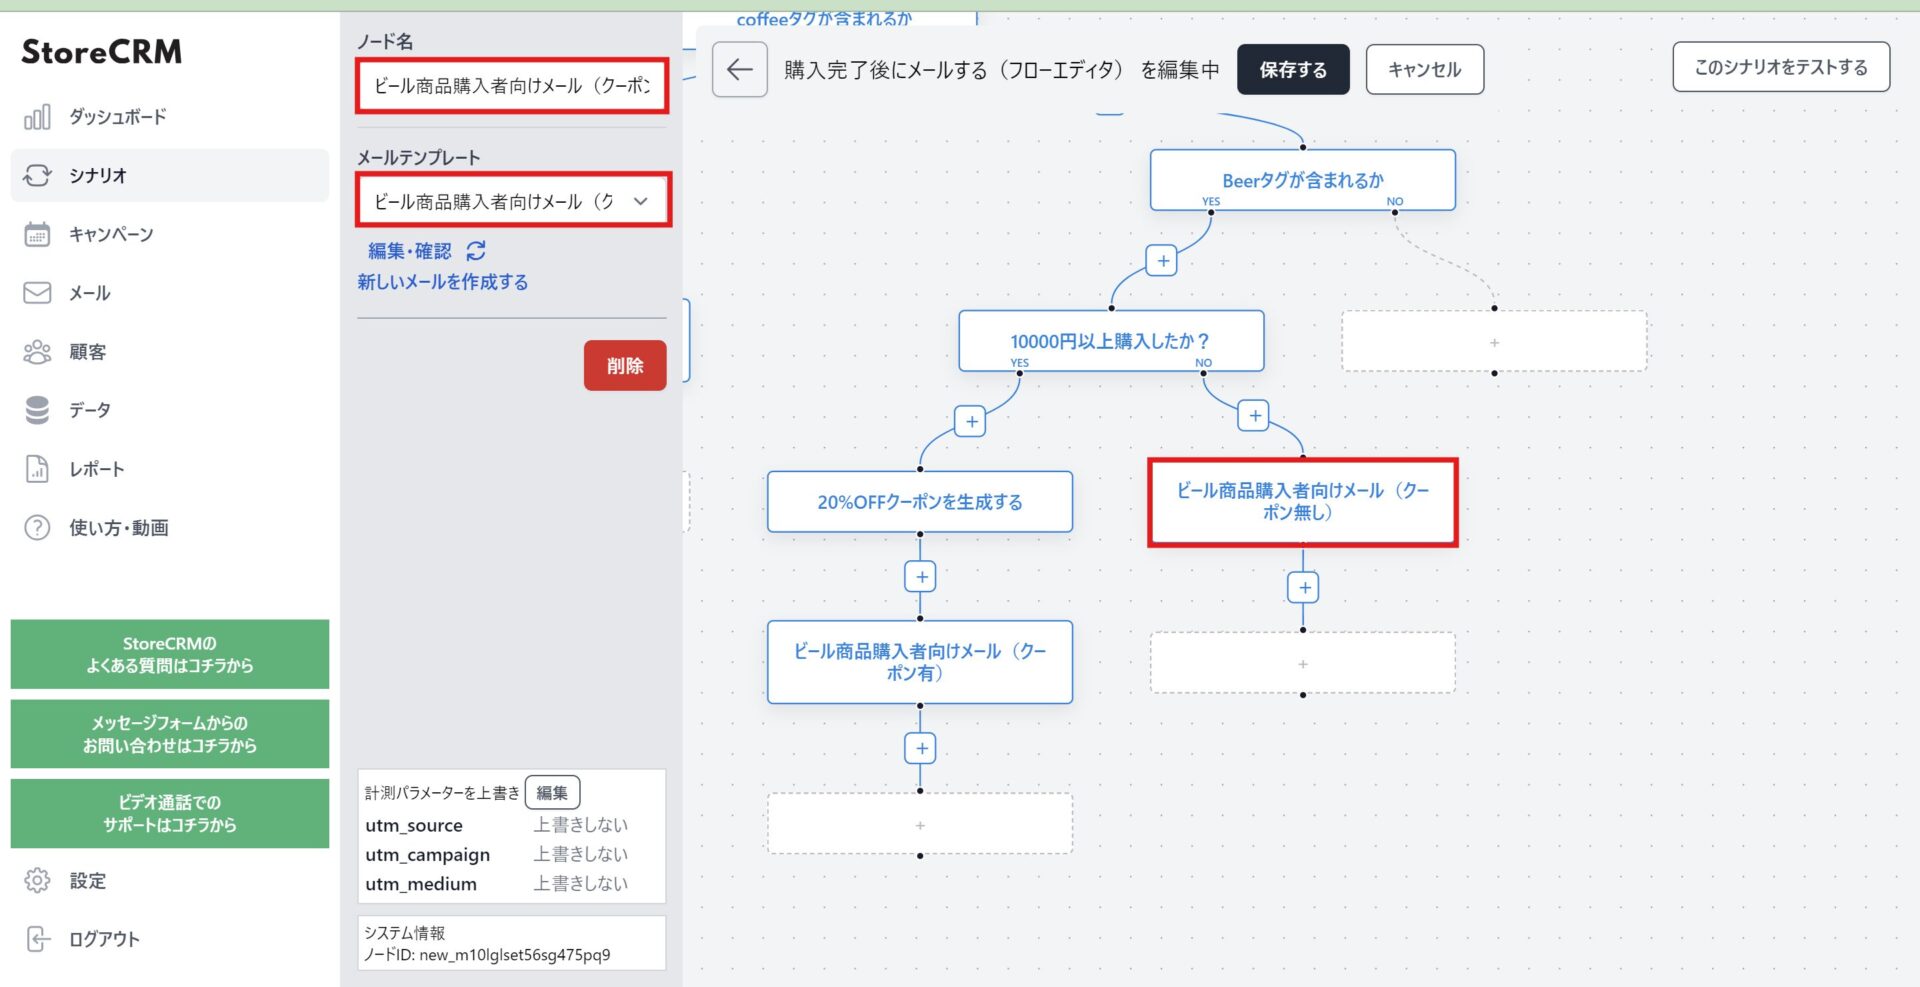
13. Add a [Send an email] node under the NO branch of the [spent ¥10,000 or more?] node. Here, choose [Beer buyers (without coupon)], and name the node to match.
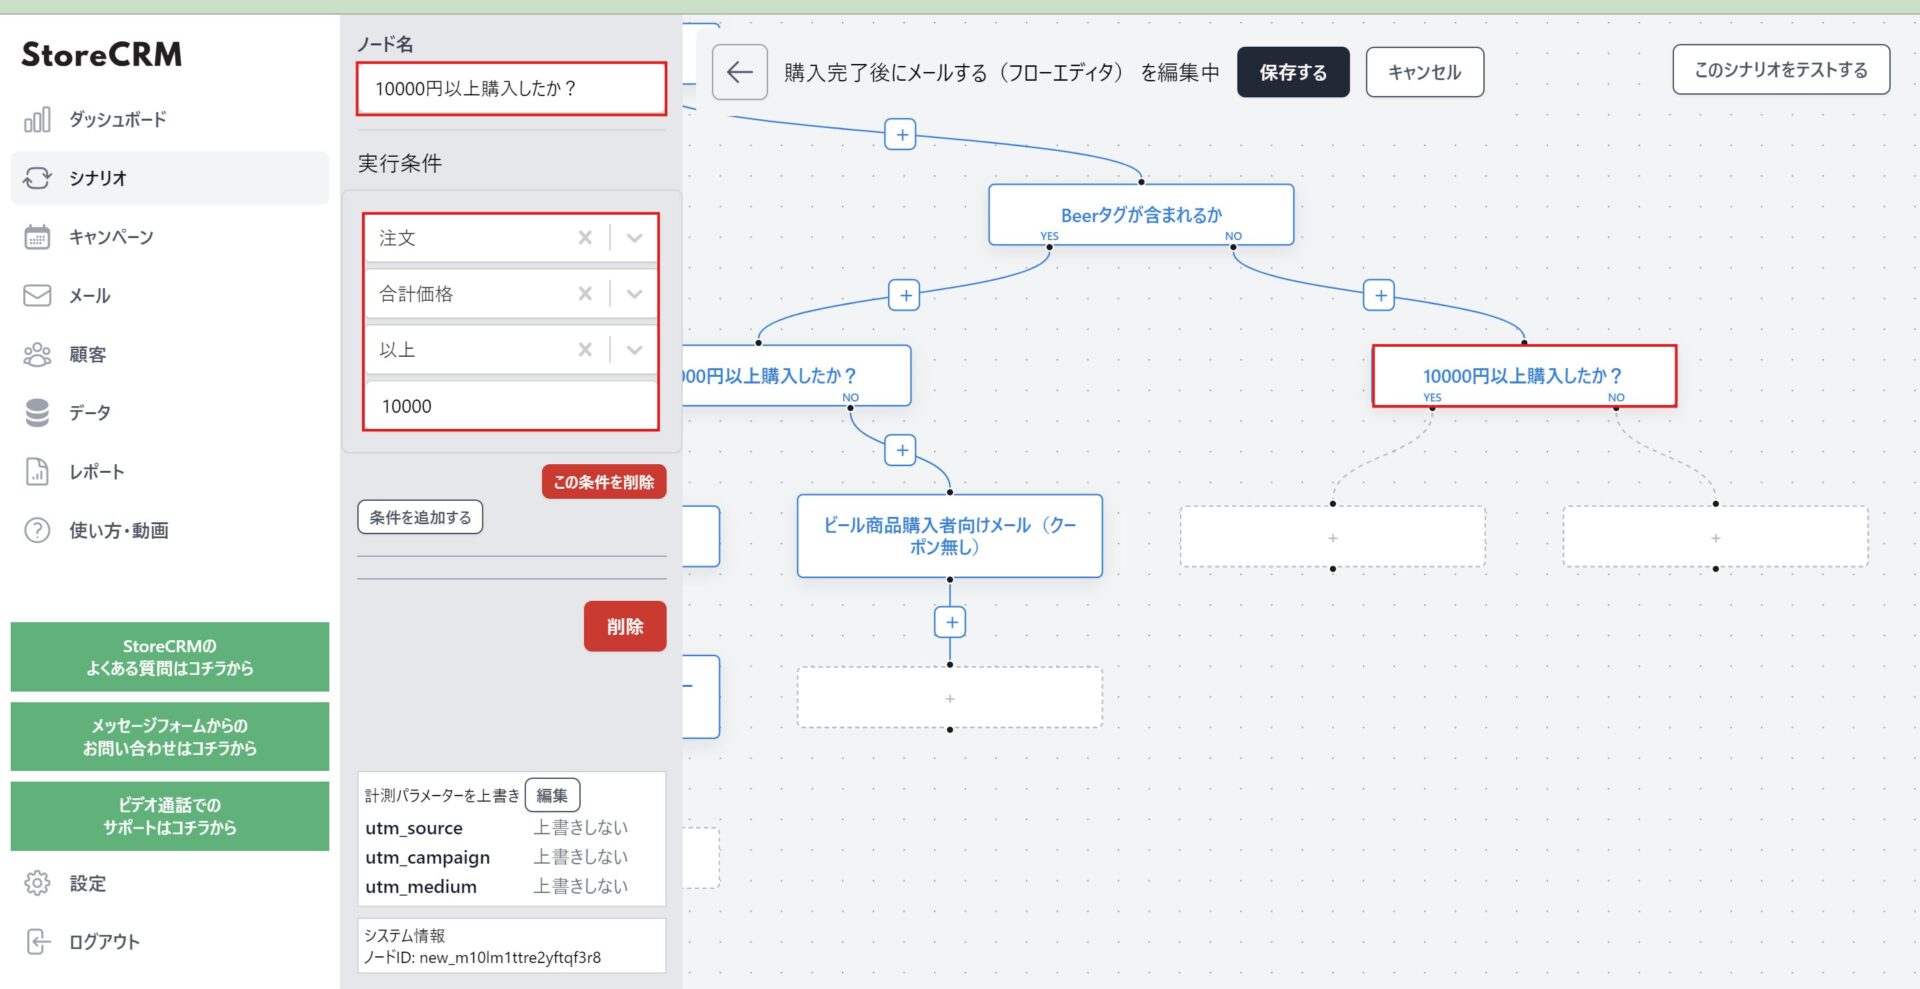
14. Add a [Condition] node under the NO branch of the [has the Beer tag] node. This checks whether the order total is ¥10,000 or more.
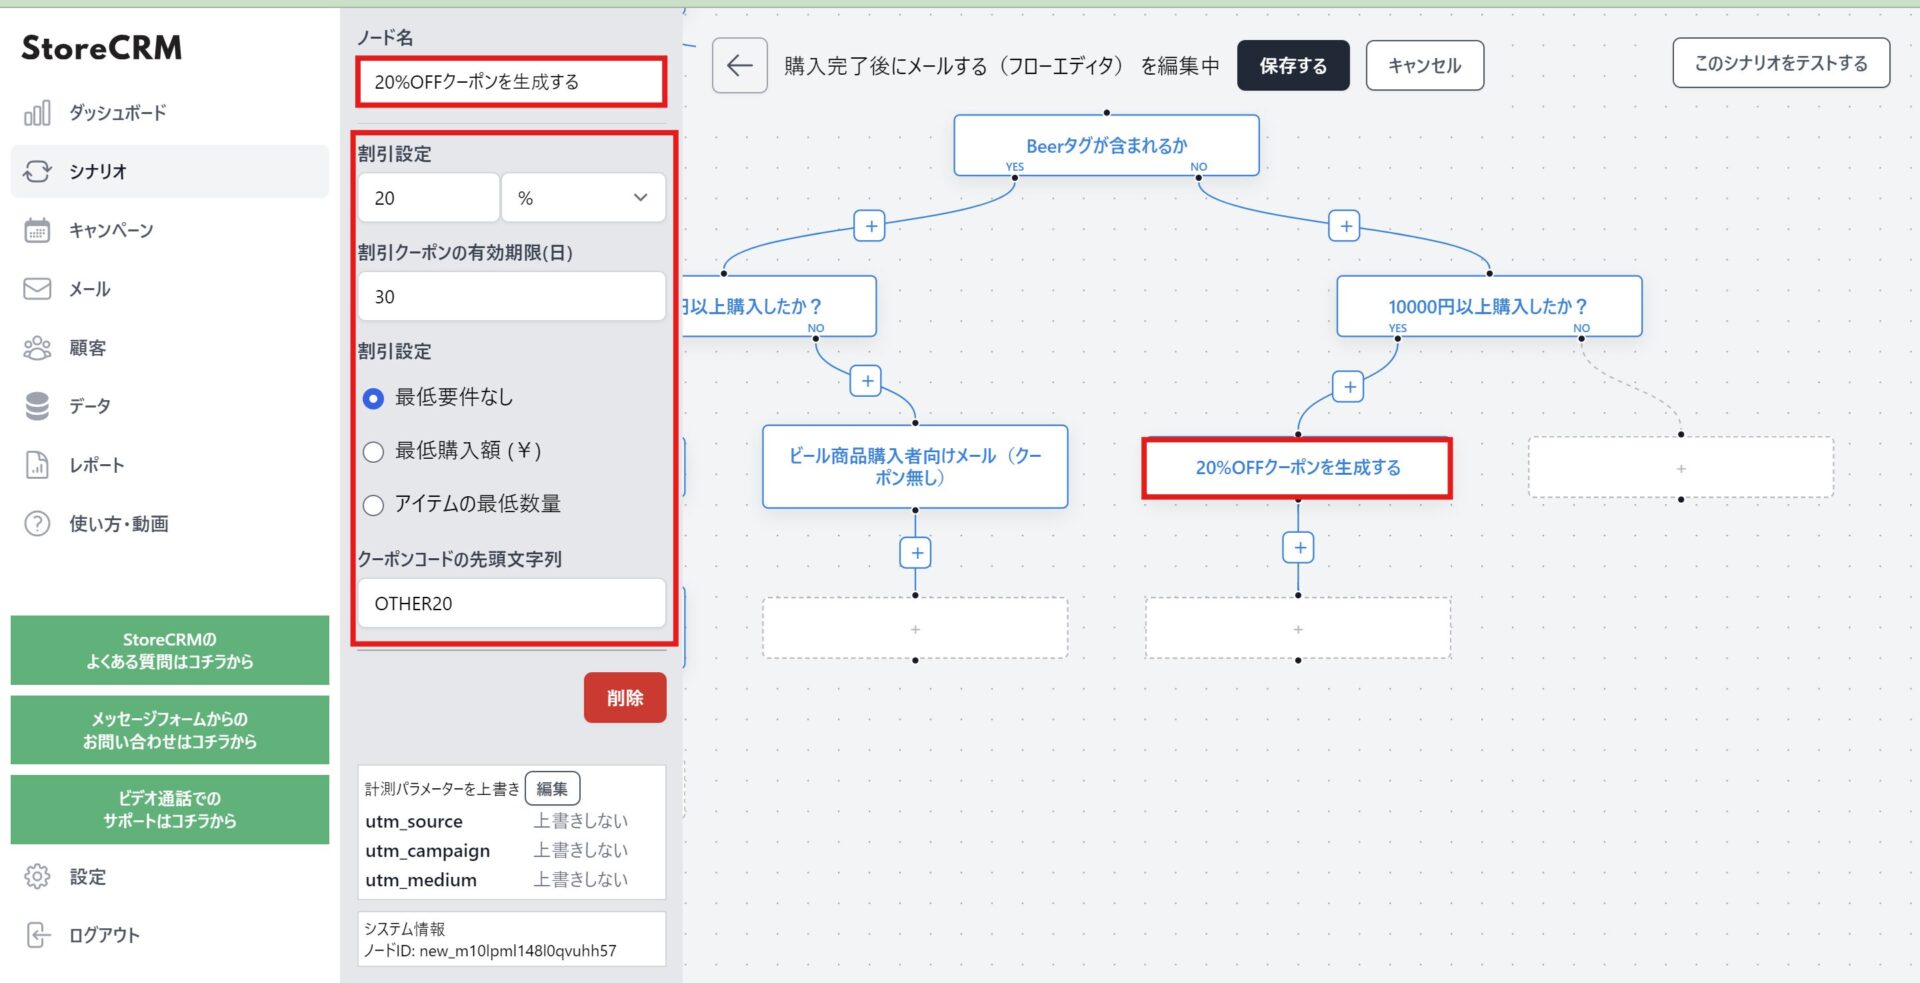
- Add a [Generate a coupon] node under the YES branch of the [spent ¥10,000 or more?] node. Customers who spent ¥10,000 or more get a coupon in their email, and this is the step that creates it. Set the discount, the expiry and the usage conditions however you like. This automation issues several different coupons, so use the prefix to make it clear which audience each one is for.
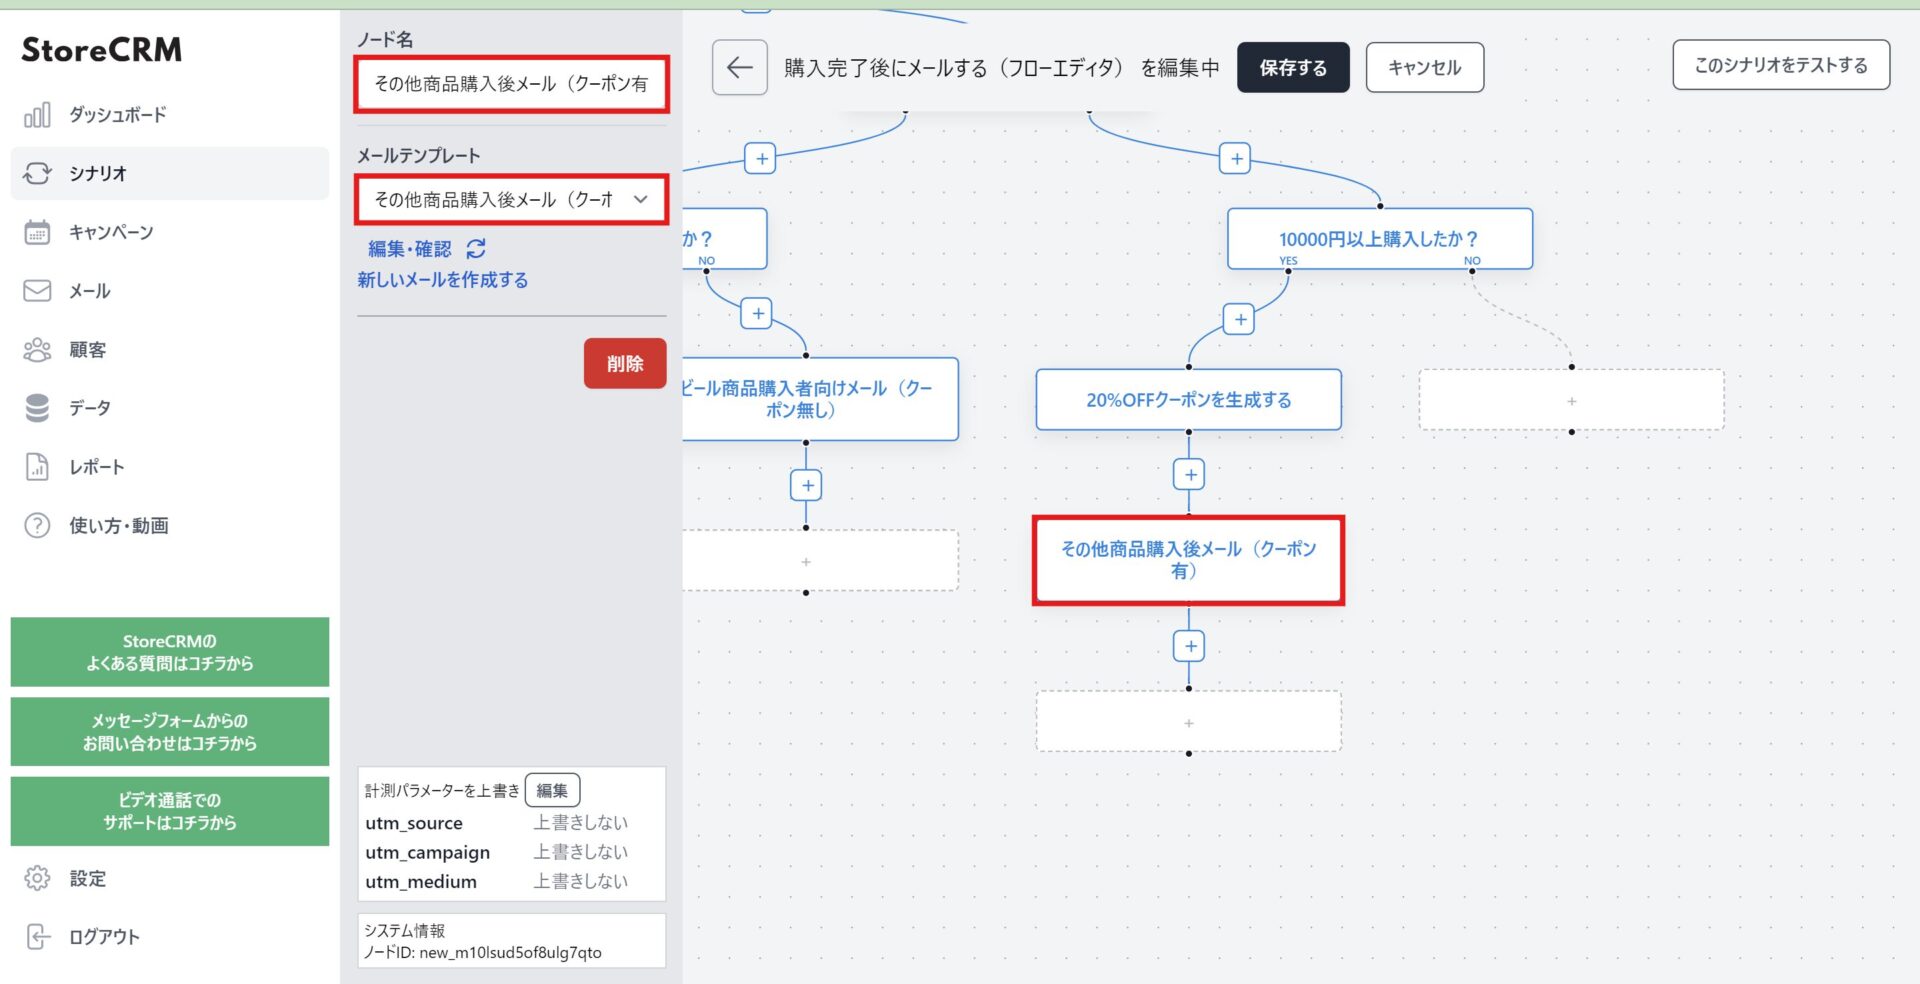
- Add an [Email] node under the [Generate a 20% off coupon] node and choose the email template. Here, choose [All other buyers (with coupon)], and rename the node to match. Put the string [coupon] in the body of a coupon email and it is replaced with the generated coupon code when the email is sent.
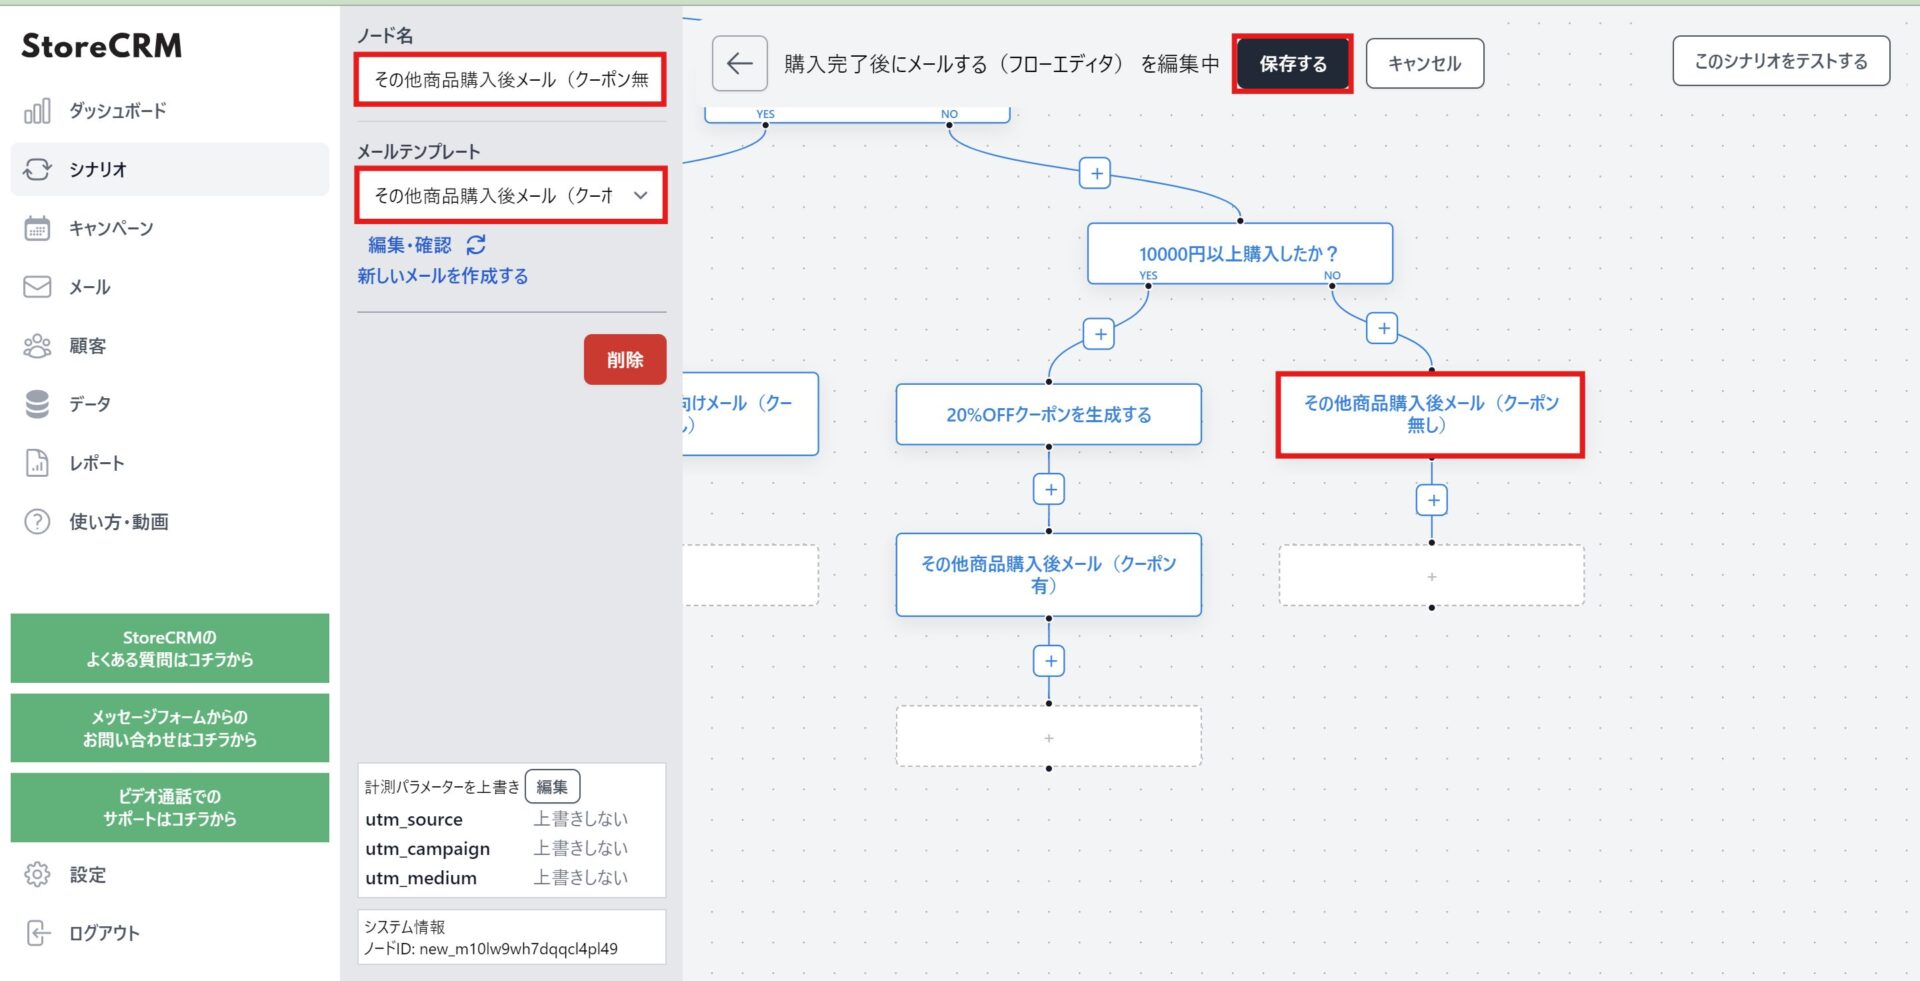
- Add a [Send an email] node under the NO branch of the [spent ¥10,000 or more?] node. Here, choose [All other buyers (without coupon)], and name the node to match. That completes the flow, so remember to click [Save] at the top of the screen.
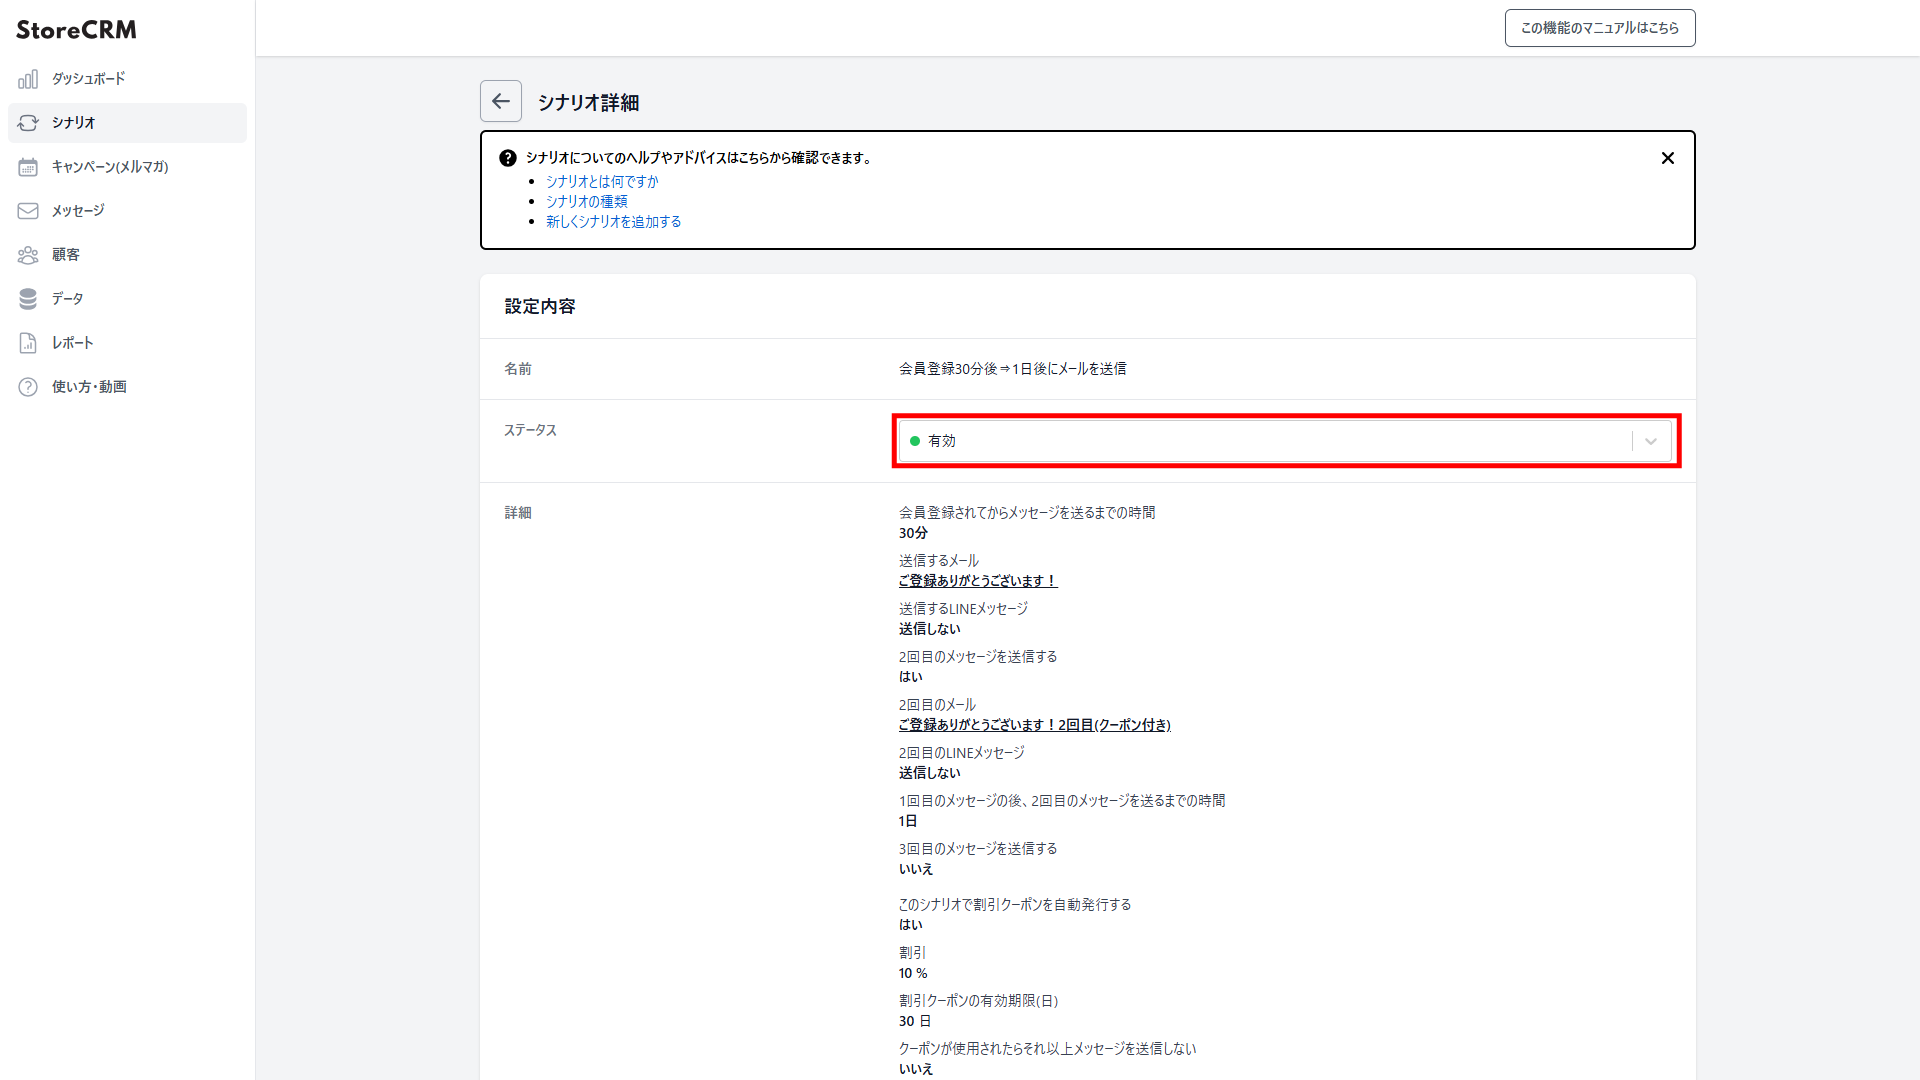
- After saving the flow, open [Settings] > [Status] on the automation detail page and set it to [Active]; the emails will then go out according to the conditions you set. Once the automation is active, this section is done.
Before you activate an automation, check that no other active automation uses the same trigger. Completely different automations are fine. This matters most with duplicates: make sure you actually want the original to stay active too.
Summary
The flow editor in StoreCRM lets you send campaigns personalised to each customer's interests. Personalised campaigns are highly effective at raising LTV and reducing unsubscribes. Work through this article and you can send sophisticated segmented campaigns without being an engineer, so give it a try.
We also offer support with the app's settings and consulting on growing revenue for customers who have adopted StoreCRM.
Get in touch any time through the contact form.


