How to Add a Date of Birth Field to the Member Registration Page in Shopify

Table of Contents
ToggleIntroduction
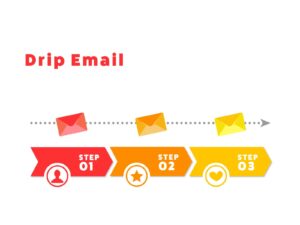
Sending birthday coupons is a highly effective way to increase customer retention. Informing customers about birthday gifts can also encourage them to register on your store.
This article explains how to prepare for a birthday email campaign by adding a ‘Date of Birth’ field in Shopify using StoreCRM, including setup instructions and tips.
Store Settings
This article explains using the free Dawn theme. Please note that the file structure may differ if you're using a paid or customized theme.
We may also offer free support for theme modifications. Feel free to contact us through our inquiry form.
(If you would like to implement a special design, we may provide a separate quotation.)
This feature is available only when Shopify → [Settings] → [Customer Accounts] is set to [Classic].
When using [New Customer Accounts], customer information is not carried over due to the one-time password system, so this feature is not supported.
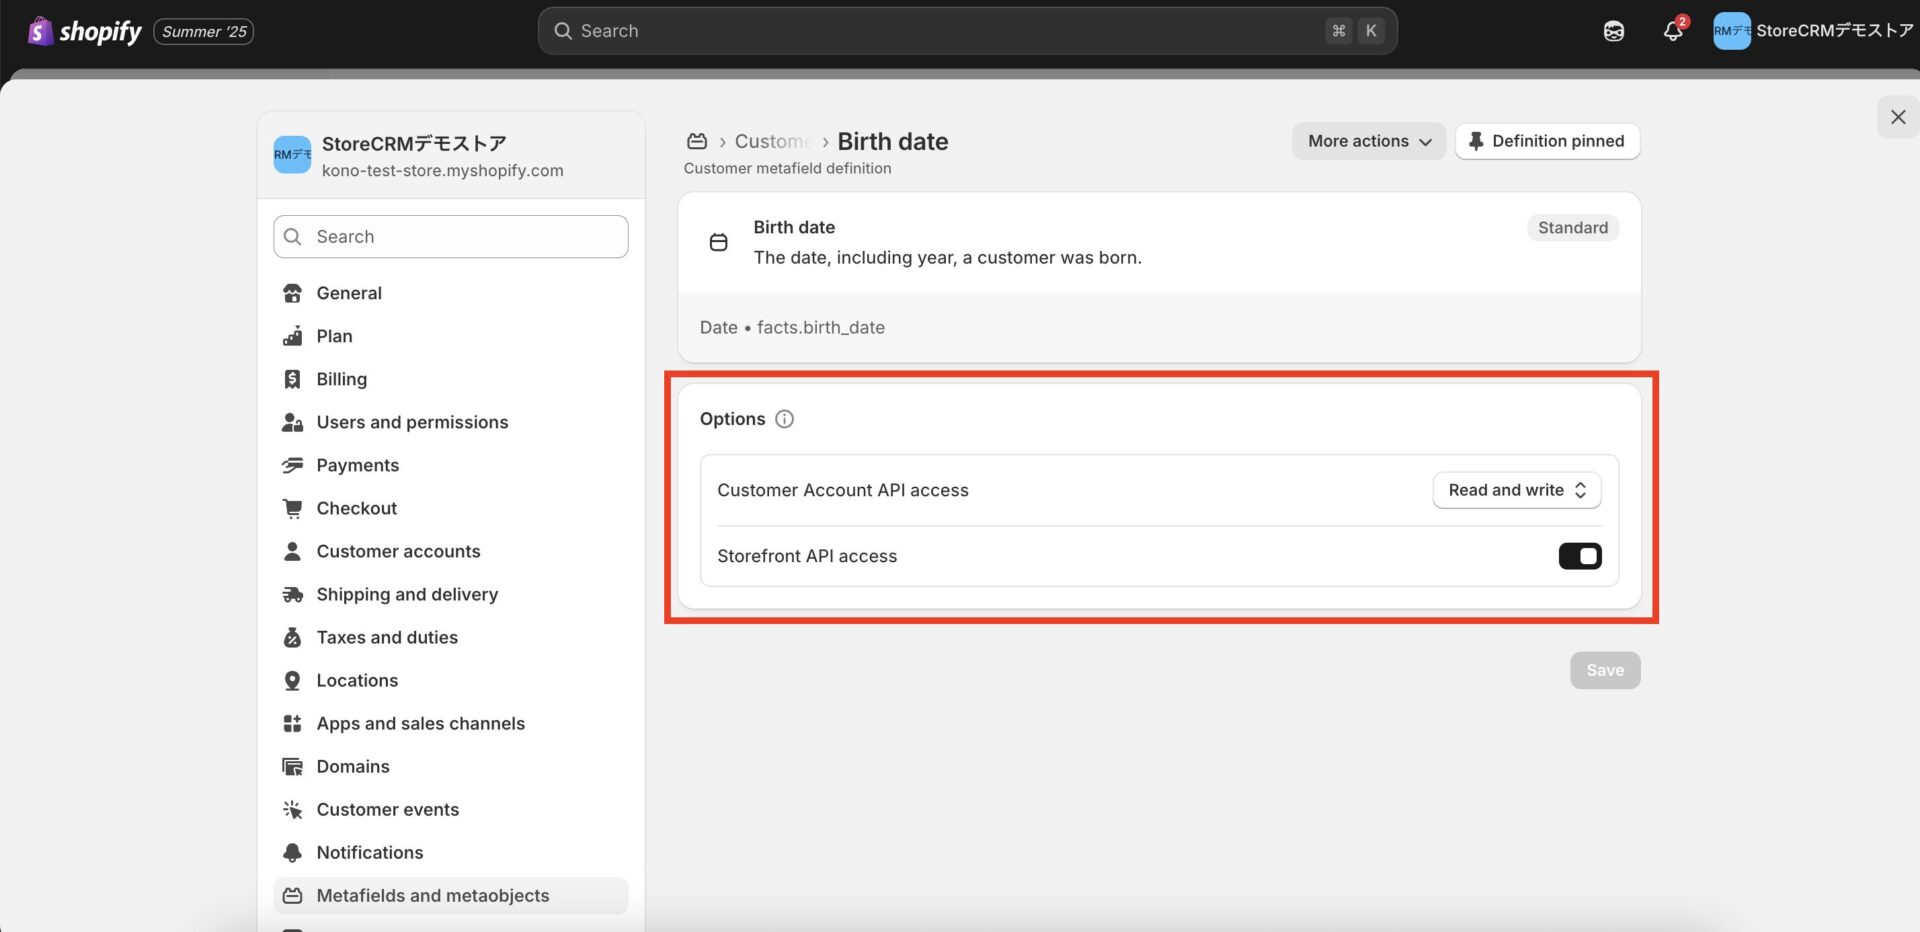
Creating Customer Metafields
To implement the birthday entry field, you need to create a metafield in the customer profile for storing birthdates.
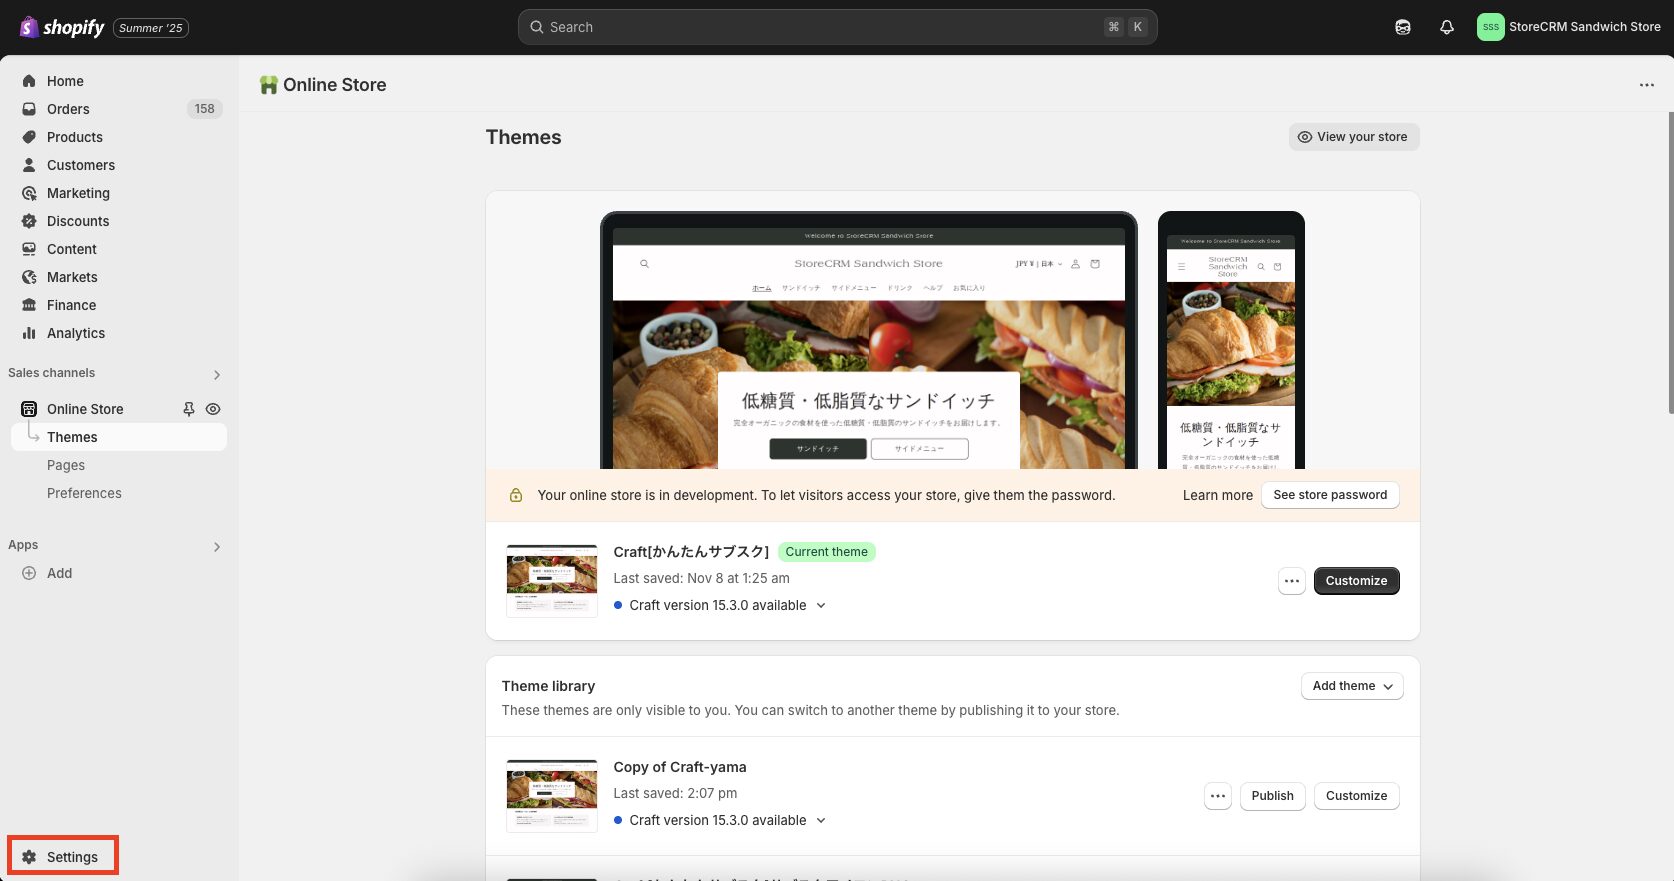
➀ In the Shopify admin panel, go to [Settings] > [Custom Data] > [Customers].
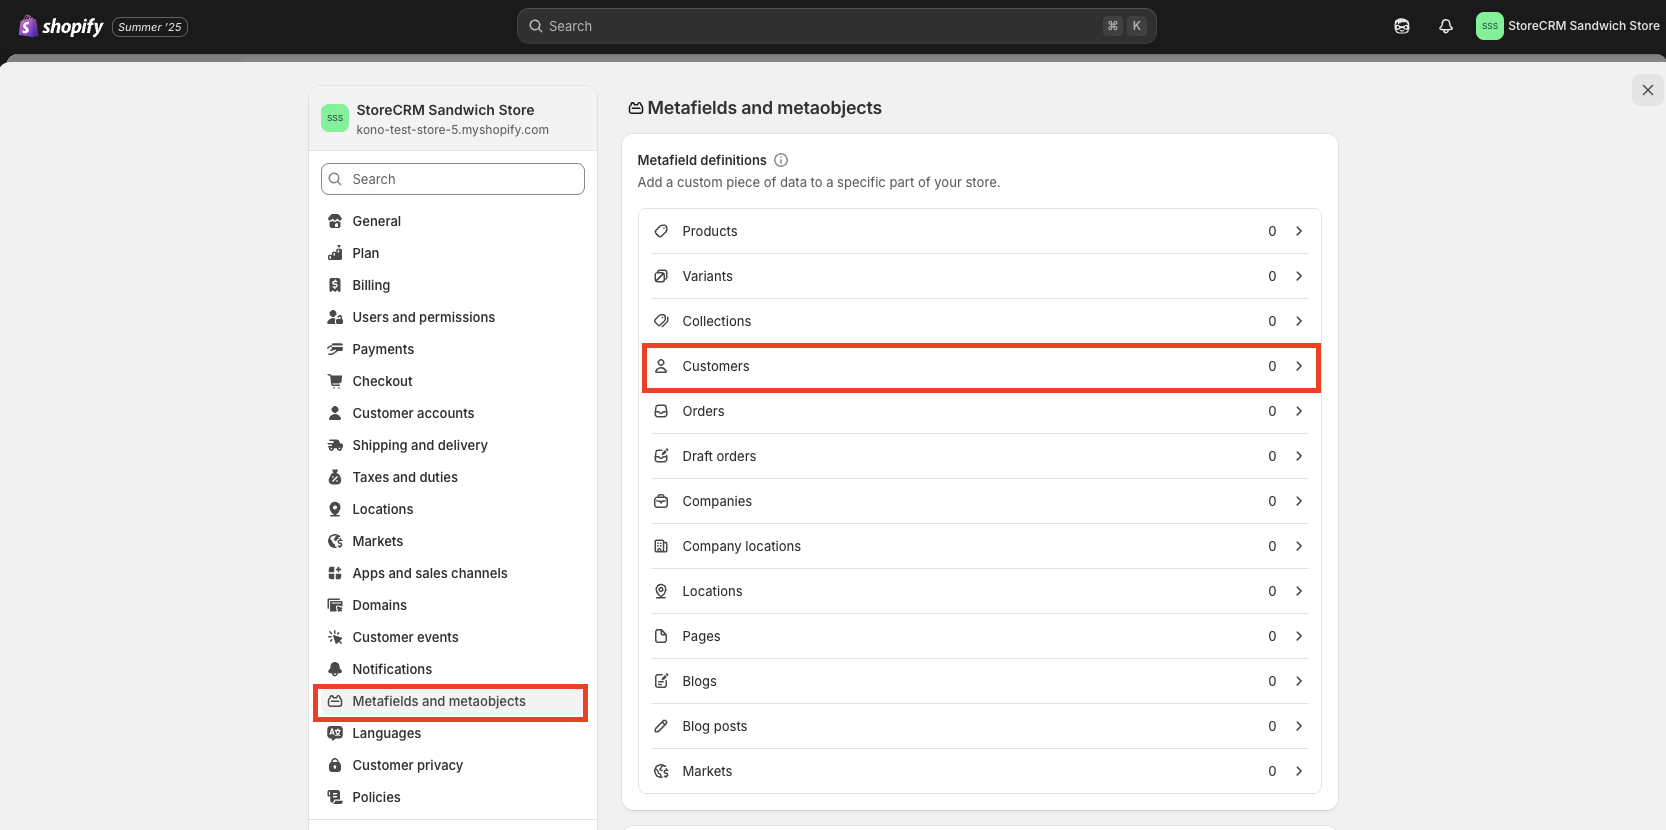
➁ Click on the Date of Birth.
Implementing the Birthday Registration Field on New Member Signup
Goal of this Section
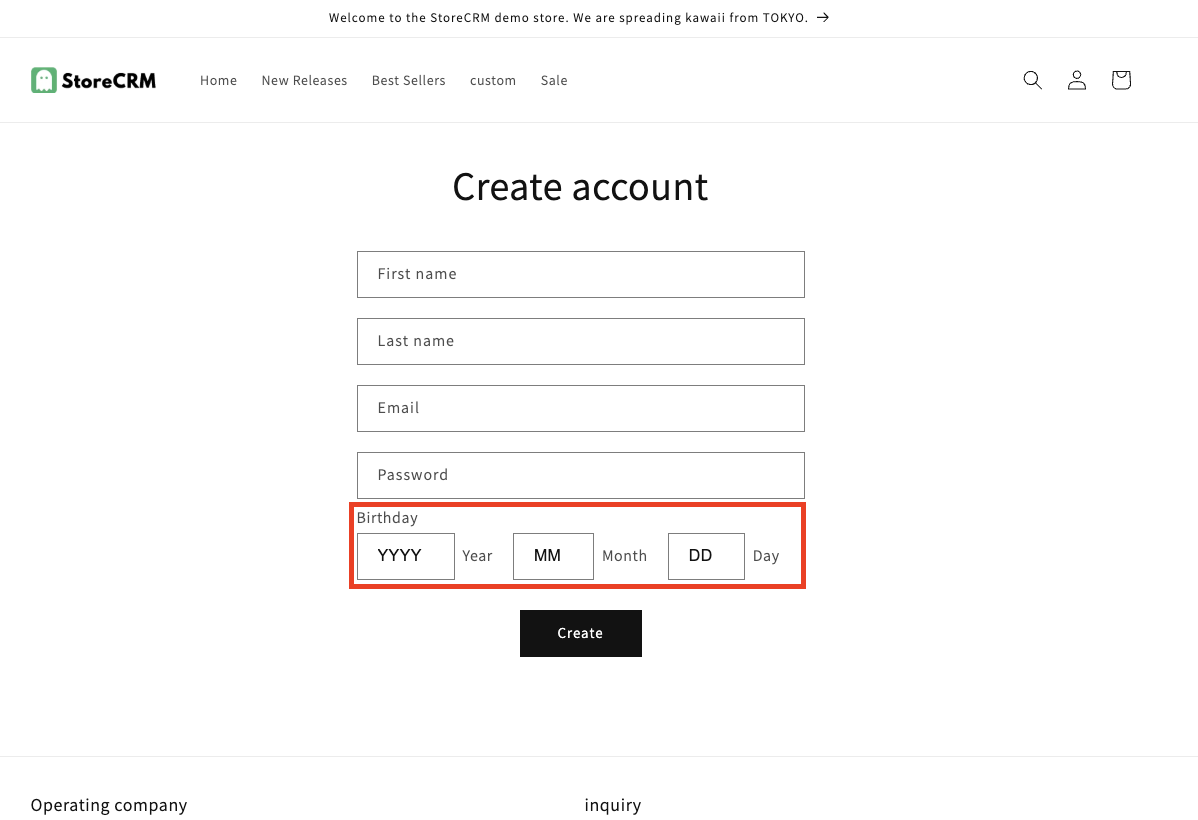
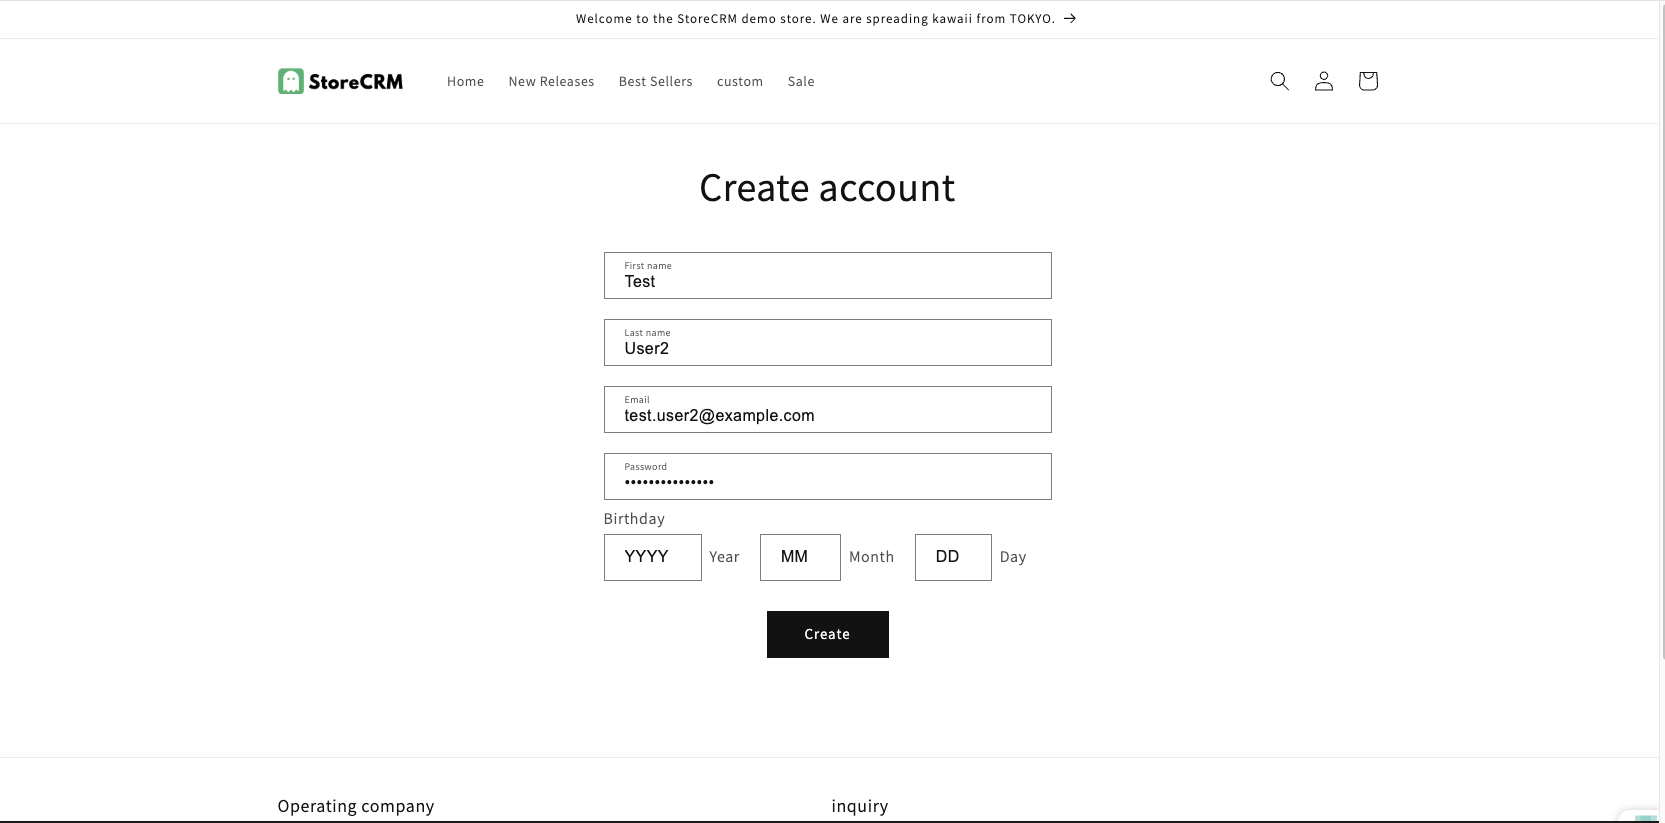
* The area outlined in red is the birthday entry field.
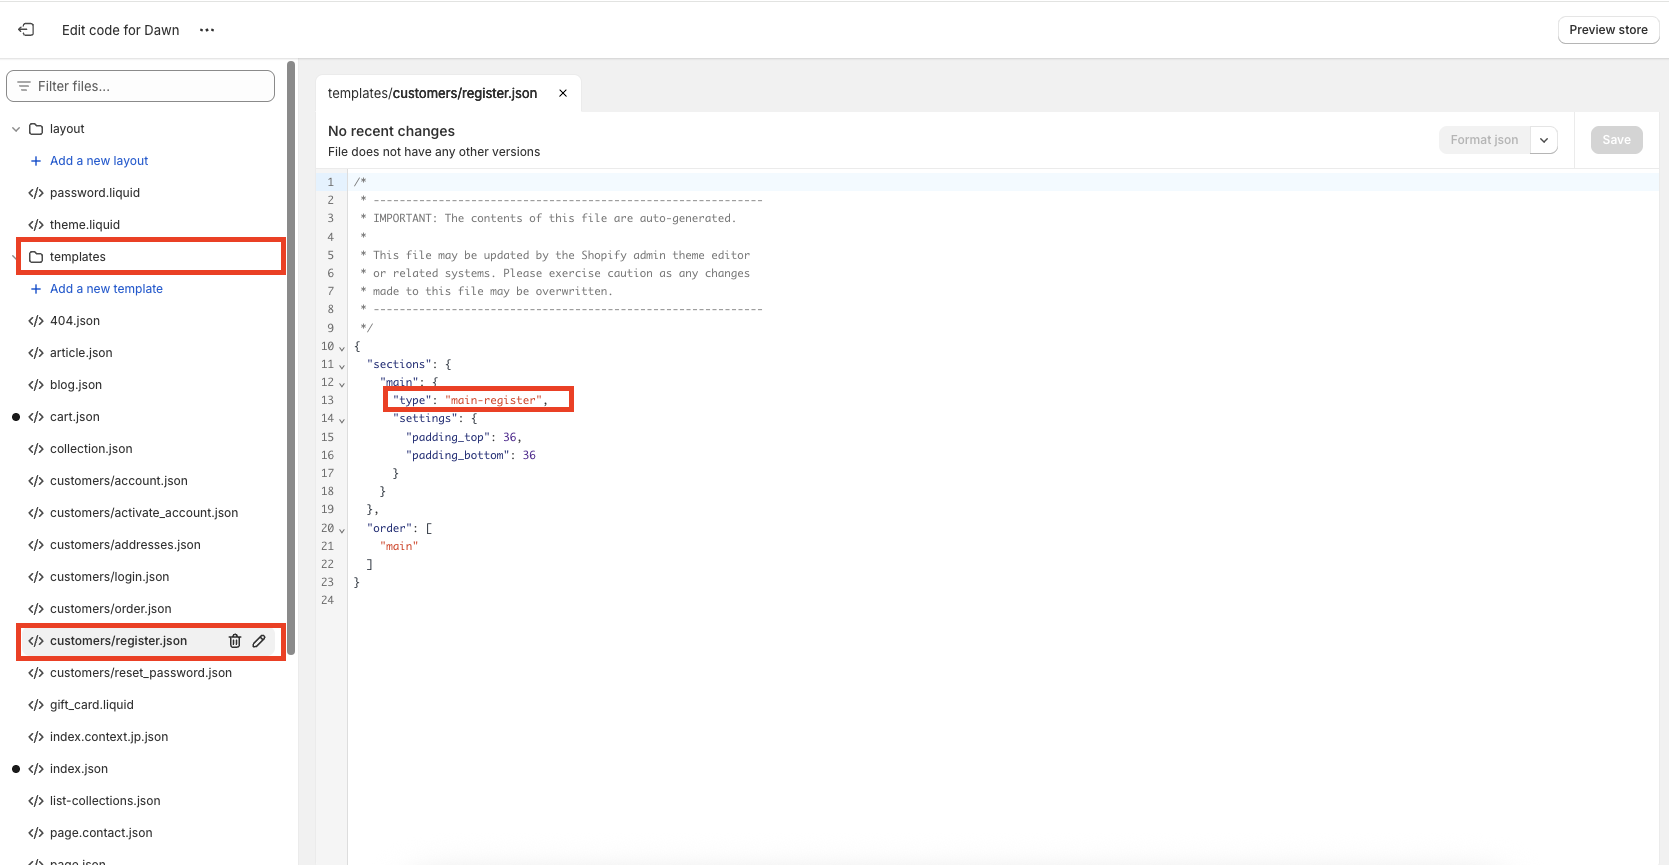
Open the code for implementation

Click on […] and then click [Edit Code].
In the following steps, you will be editing the theme code. If you are unsure or feel uneasy about this process, we recommend duplicating the theme and editing the duplicated version.
➁ As an example, we will explain using the Dawn theme.
The relevant file may differ depending on your theme, so please refer to the Liquid/JSON mapping table for customer-related templates.
This feature is only available when Shopify → [Settings] → [Customer Accounts] is set to [Classic].
If set to [New Customer Accounts], customer information is not retained due to the one-time password system, and no Liquid files are available, so this feature cannot be used.
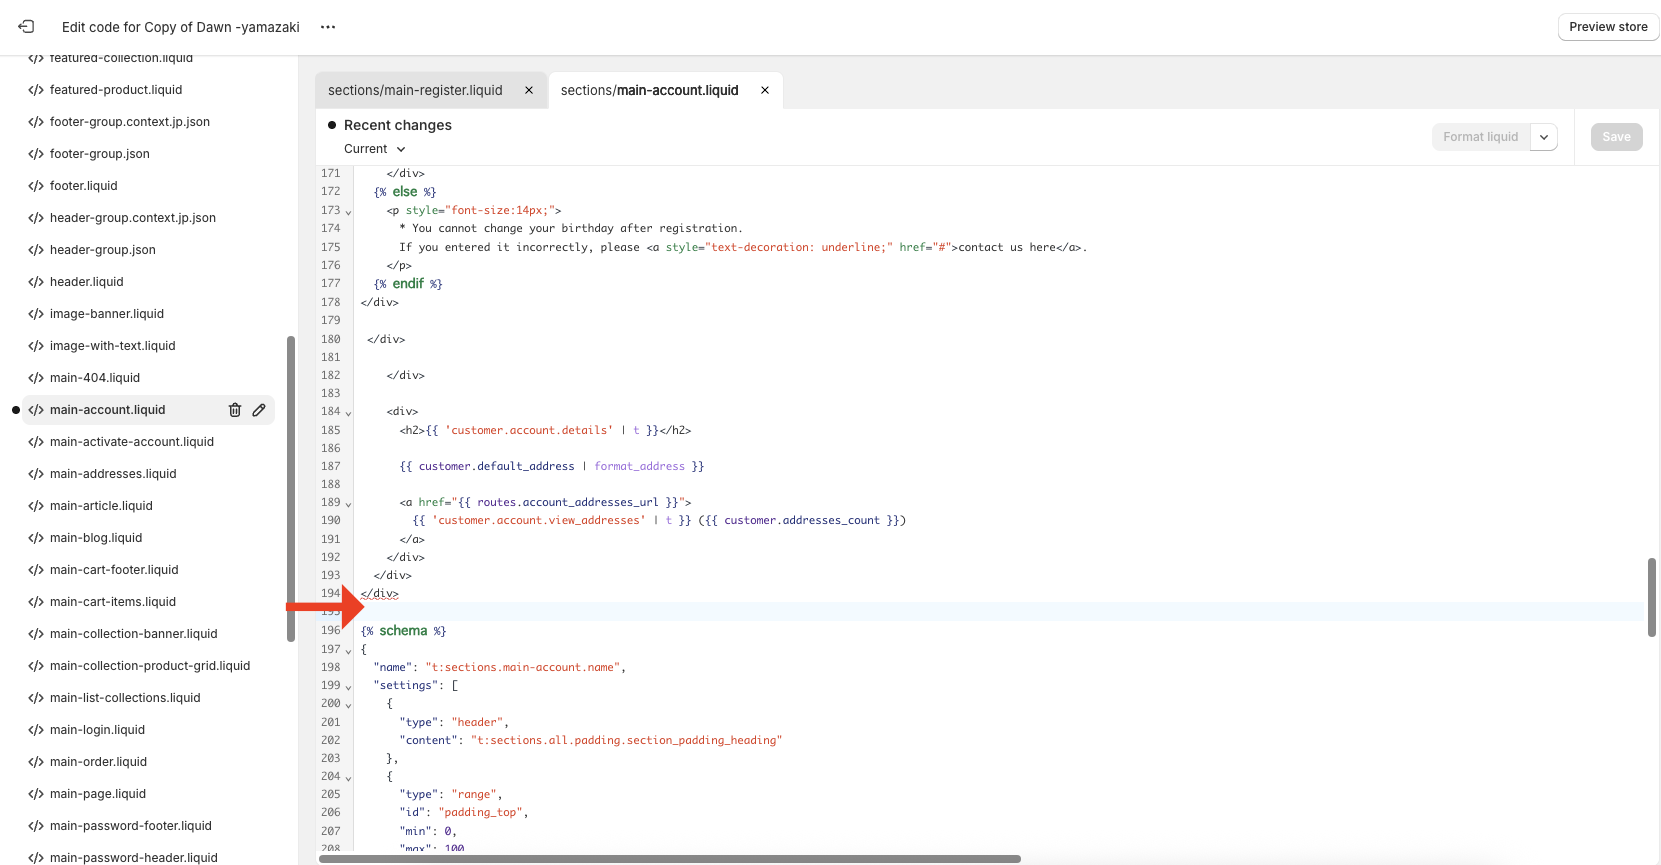
open [Templates] → [customer/register.json].
Once the file is open, check the value written in sections > main > type.
In the case of the Dawn theme, it is labeled as [main-register].
This indicates the location of the code for the registration page.
In this case, it means the relevant code is in [Sections] → [main-register.liquid].
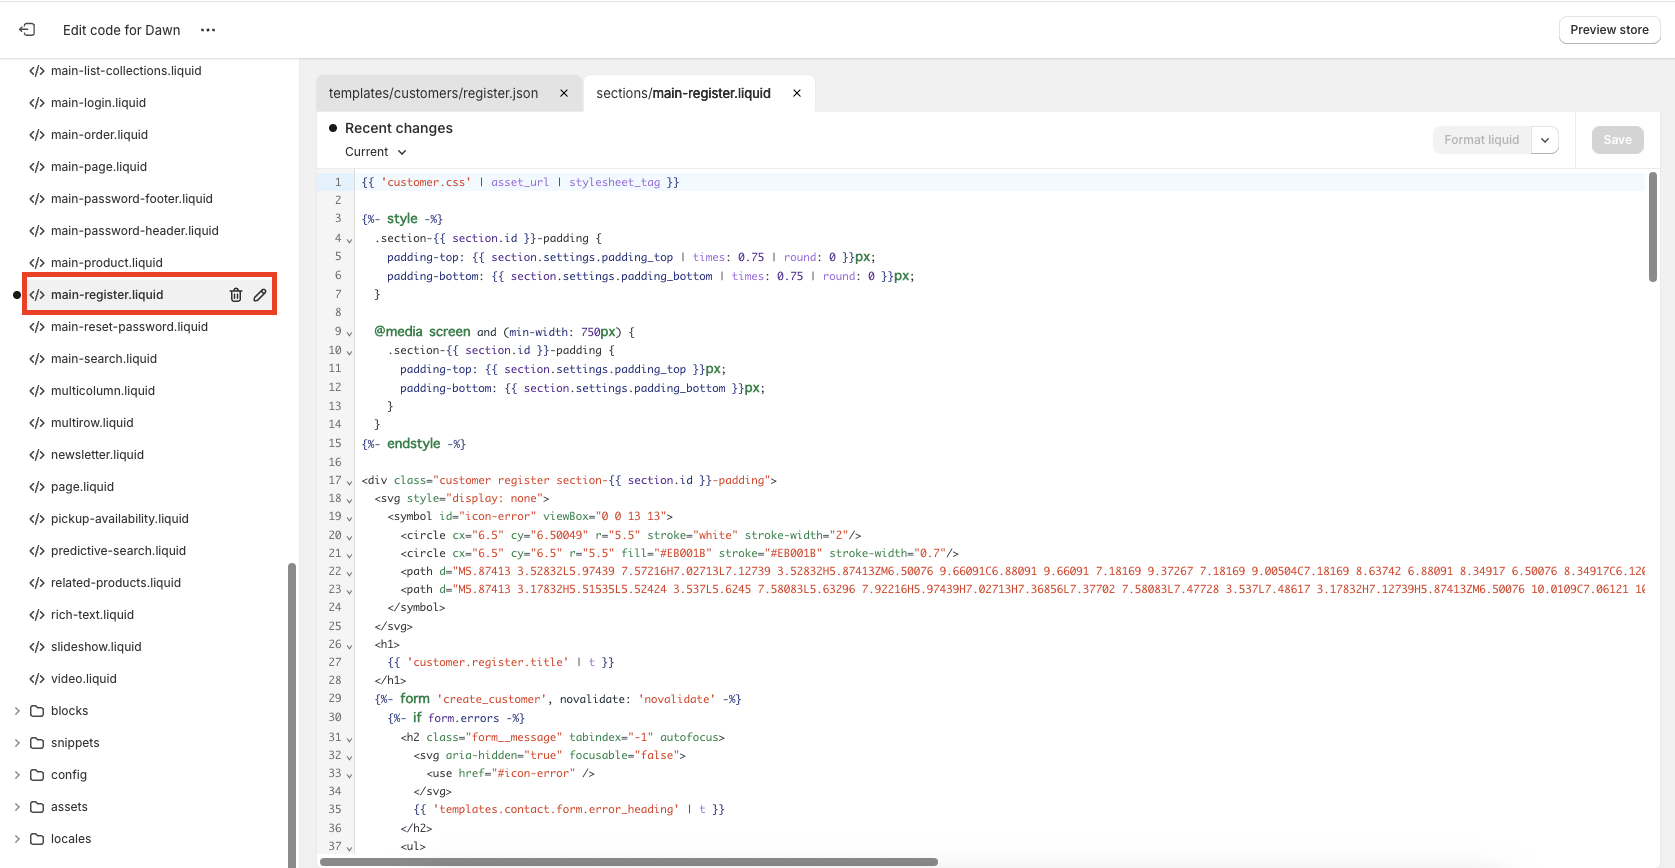
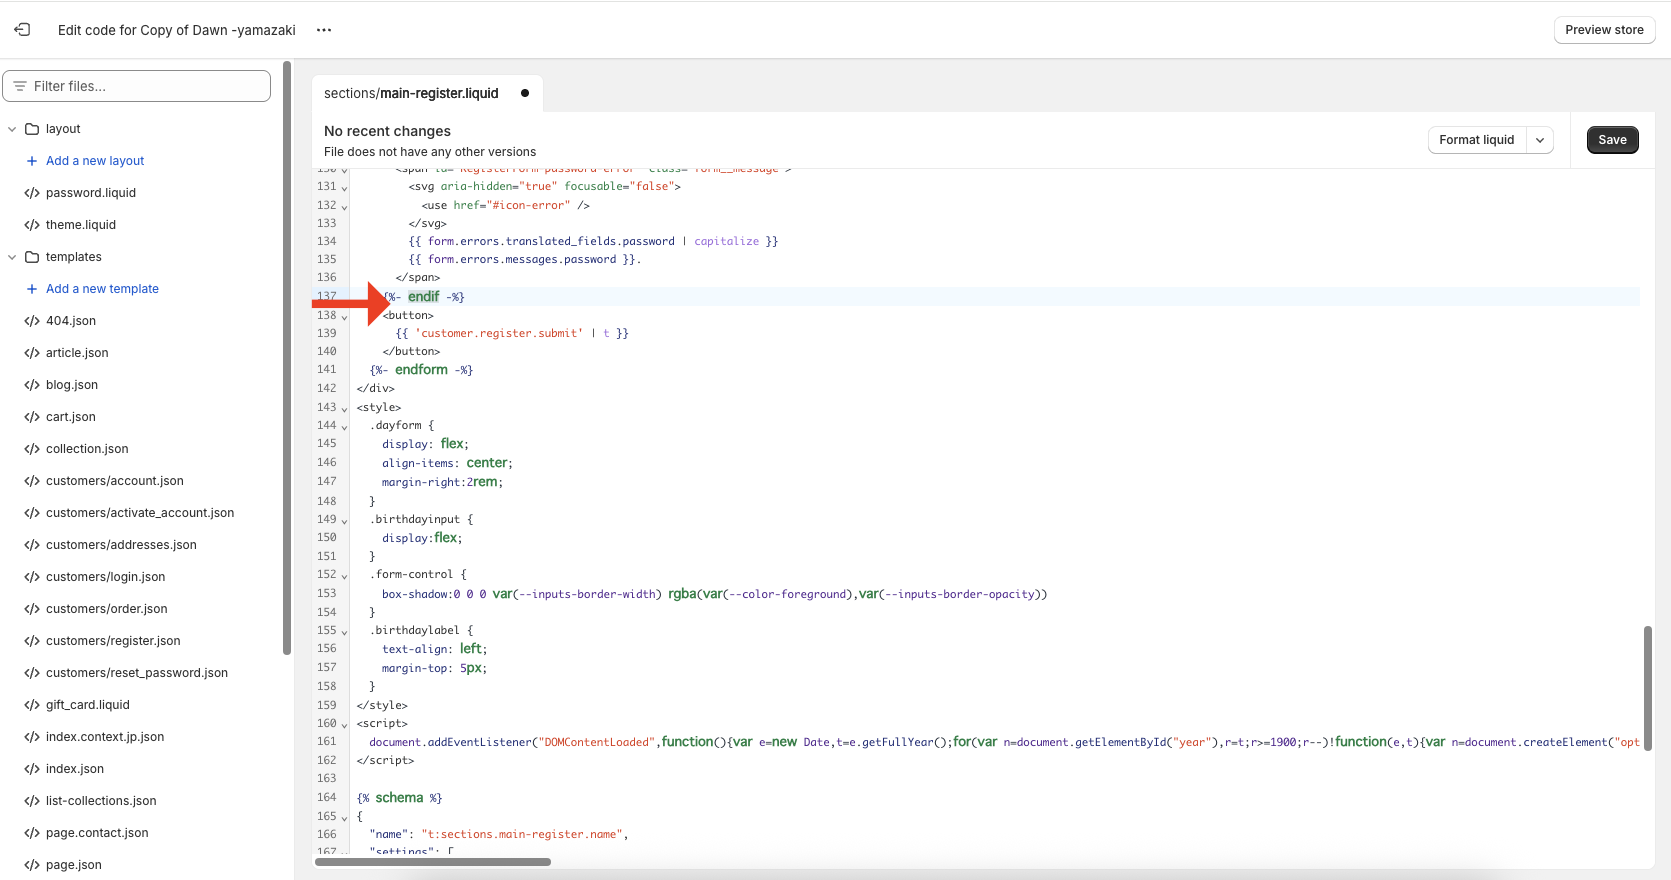
➀ Copy and paste the HTML code below.
<div class="customer-birthday">
    <div class="birthdaylabel">Birthday</div>
	<ul class="birthdayinput" style="padding-left: 0;margin-bottom: -10px;margin-top: 0px;">
		<li class="dayform">
	    <select class="form-control yearselect" id="year" name="customer_year" >
	      <option value="0">Year</option>
      </select>
      <input type="text" class="birthdayyear" aria-required="true" style="width:0px;height:0px;opacity: 0;" name="customer[note][birthday-year]" value="">
      <span class="daychar">Year</span>
    </li>
    <li class="dayform">
	    <select class="form-control monthselect" id="month" name="customer_month" >
	      <option value="0">Month</option>
      </select>
      <input type="text" class="birthdaymonth" aria-required="true" style="width:0px;height:0px;opacity: 0;" name="customer[note][birthday-month]" value="">
      <span class="daychar">Month</span>
		</li>
    <li class="dayform">
	    <select class="form-control dayselect" id="day" name="customer_day" >
	      <option value="0">Day</option>
      </select>
      <input type="text" class="birthdayday" aria-required="true" style="width:0px;height:0px;opacity: 0;" name="customer[note][birthday-day]" value="">
      <span class="daychar">Day</span>
    </li>
   </ul>
  </div>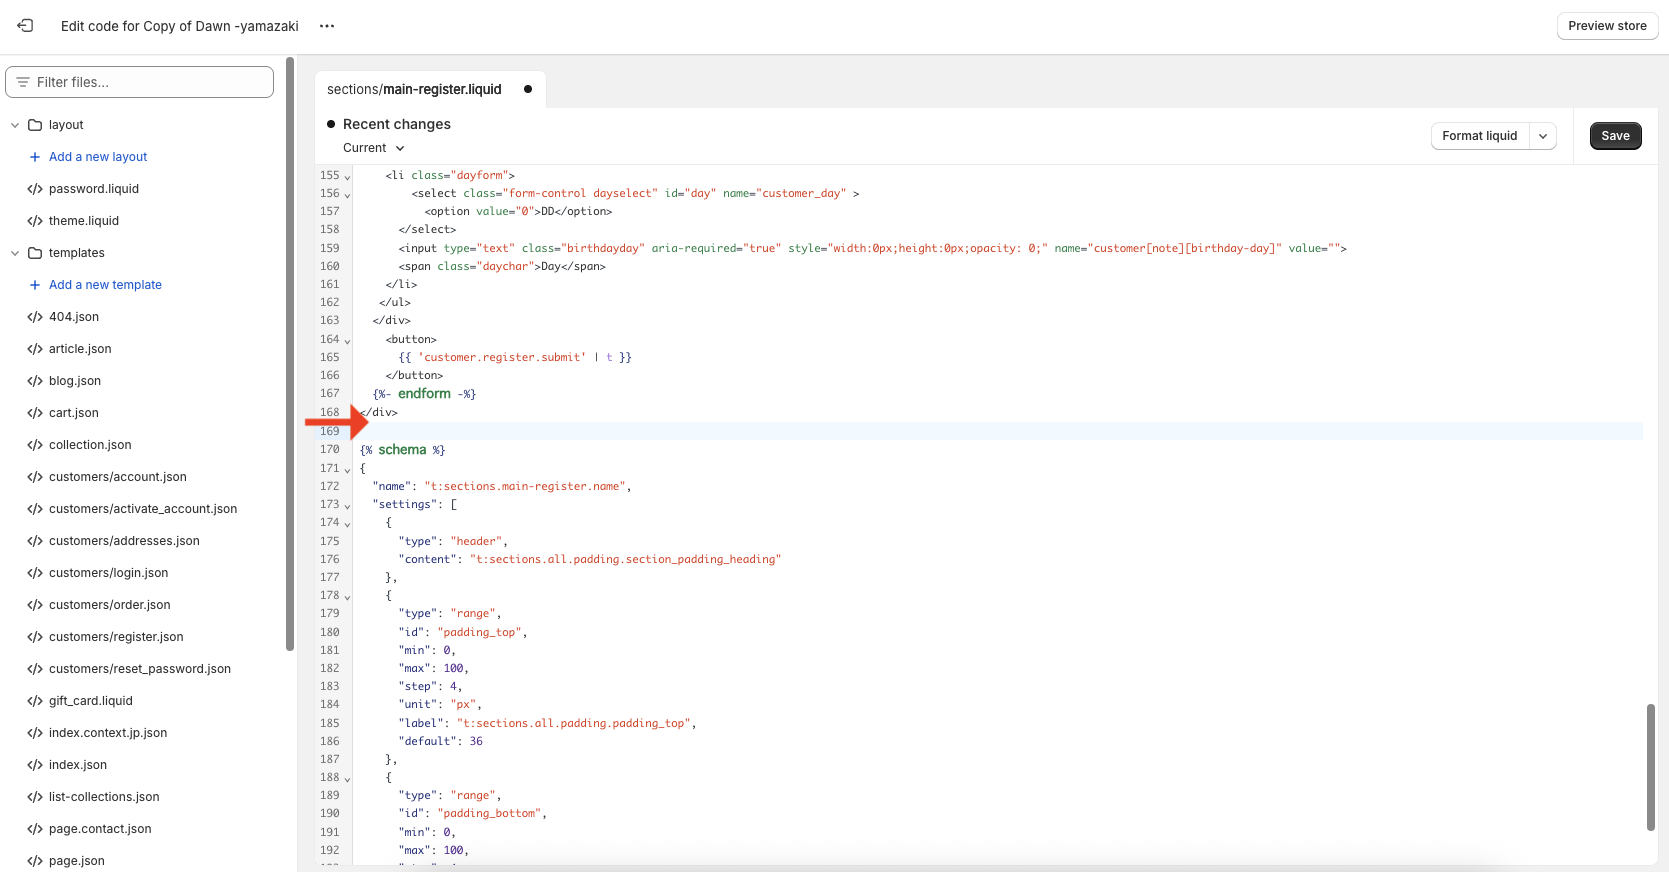
The JavaScript generates selectors for year, month, and day, so you can paste it as-is. Once you paste the code and click [Save], the addition is complete.
<style>
  .dayform {
    display: flex;
    align-items: center;
    margin-right:2rem;
  }
  .birthdayinput {
    display:flex;
  }
  .form-control {
    box-shadow:0 0 0 var(--inputs-border-width) rgba(var(--color-foreground),var(--inputs-border-opacity))
  }
  .birthdaylabel {
    text-align: left;
    margin-top: 5px;
  }
</style>
<script>
  document.addEventListener("DOMContentLoaded",function(){var e=new Date,t=e.getFullYear();for(var n=document.getElementById("year"),r=t;r>=1900;r--)!function(e,t){var n=document.createElement("option");n.value=n.innerHTML=t,e.appendChild(n)}(n,r);for(var o=document.getElementById("month"),a=1;a<=12;a++)!function(e,t){var n=document.createElement("option");n.value=n.innerHTML=t,e.appendChild(n)}(o,a);for(var c=document.getElementById("day"),i=1;i<=31;i++)!function(e,t){var n=document.createElement("option");n.value=n.innerHTML=t,e.appendChild(n)}(c,i);var l=document.querySelector(".yearselect"),d=document.querySelector(".birthdayyear"),s=document.querySelector(".monthselect"),u=document.querySelector(".birthdaymonth"),g=document.querySelector(".dayselect"),m=document.querySelector(".birthdayday");l.addEventListener("change",function(e){var t=l.options[l.selectedIndex].value;d.value=t}),s.addEventListener("change",function(e){var t=s.options[s.selectedIndex].value;t<10&&(t="0"+t),u.value=t}),g.addEventListener("change",function(e){var t=g.options[g.selectedIndex].value;t<10&&(t="0"+t),m.value=t})});
</script>
Perform operation check
Once you’ve finished adding the code, let’s check if it works properly.
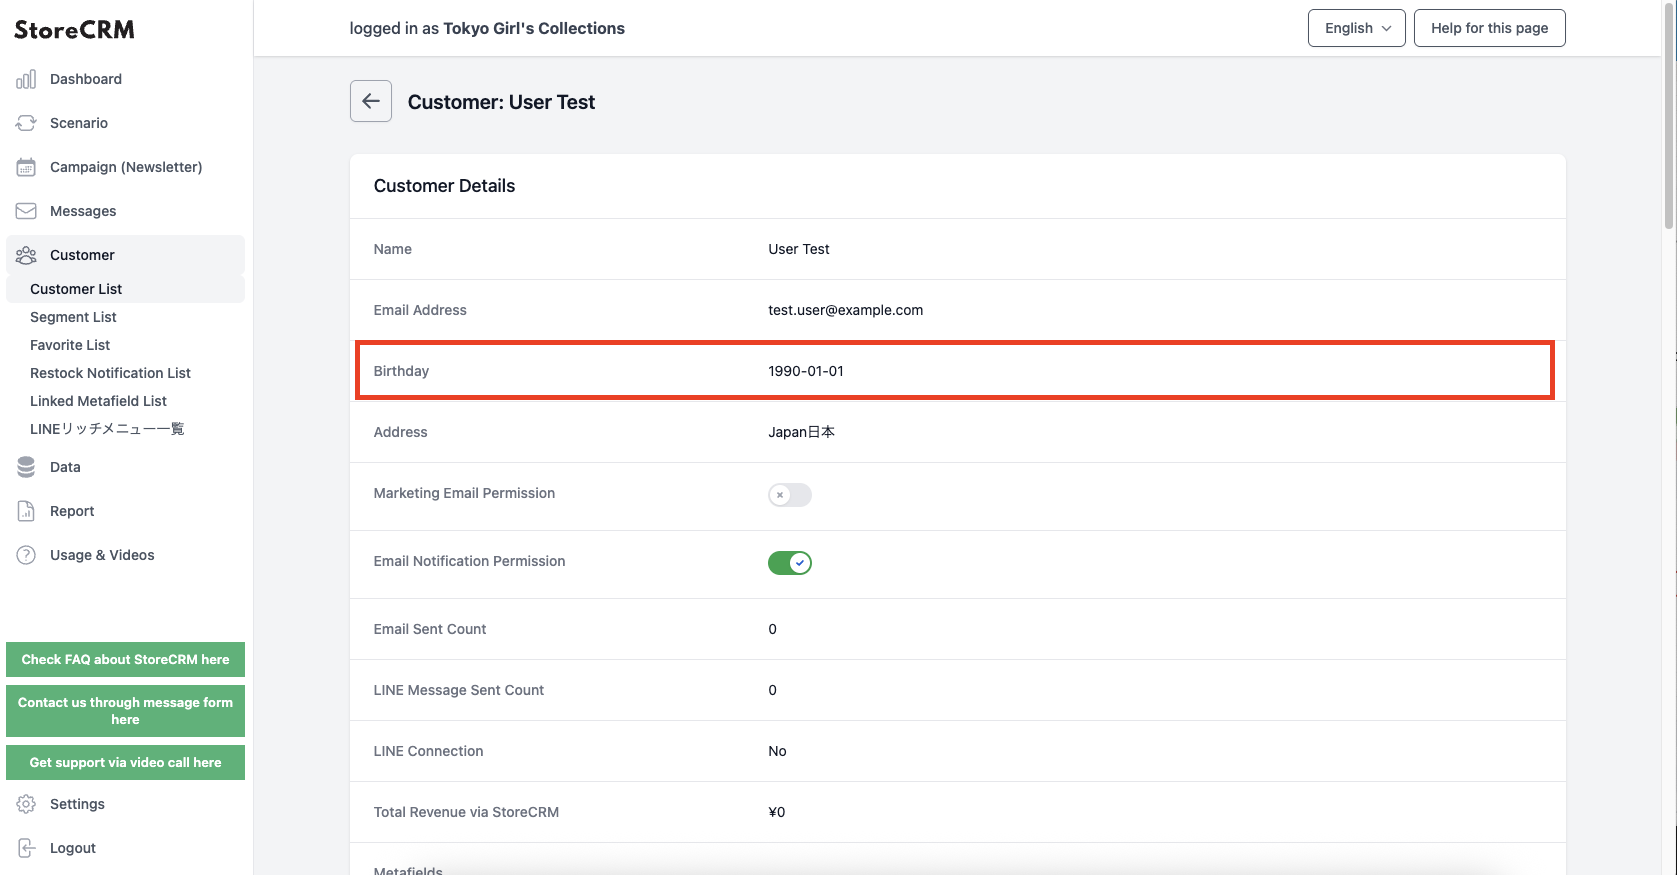
➀ When you open the account creation page, the birthday registration form should appear. To confirm it’s working, fill in the account information, select a birthday, and click [Create].
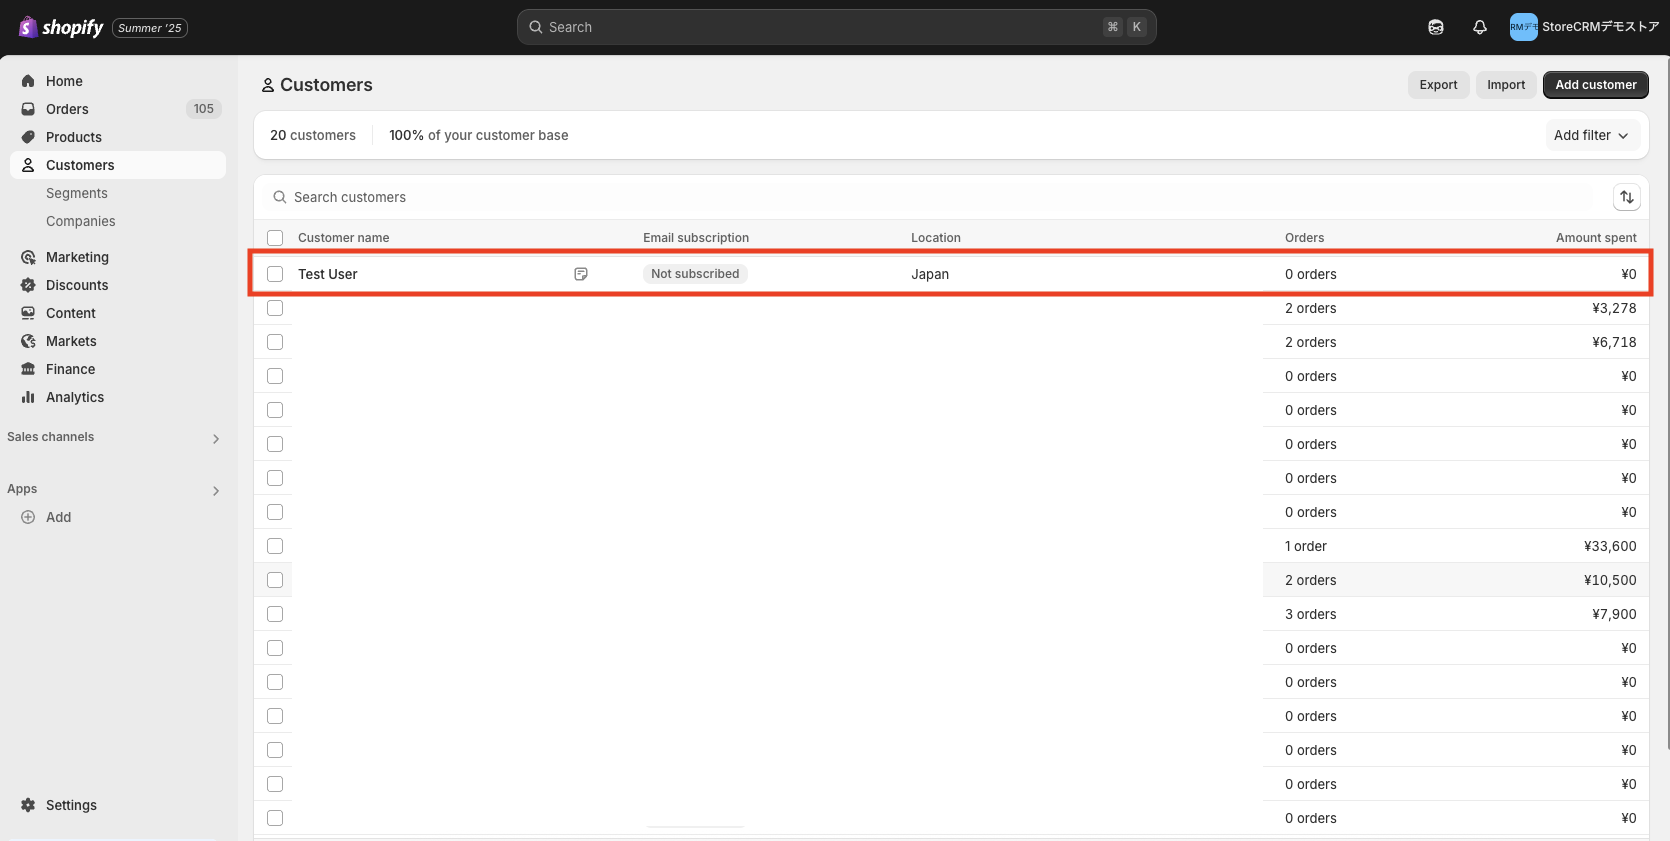
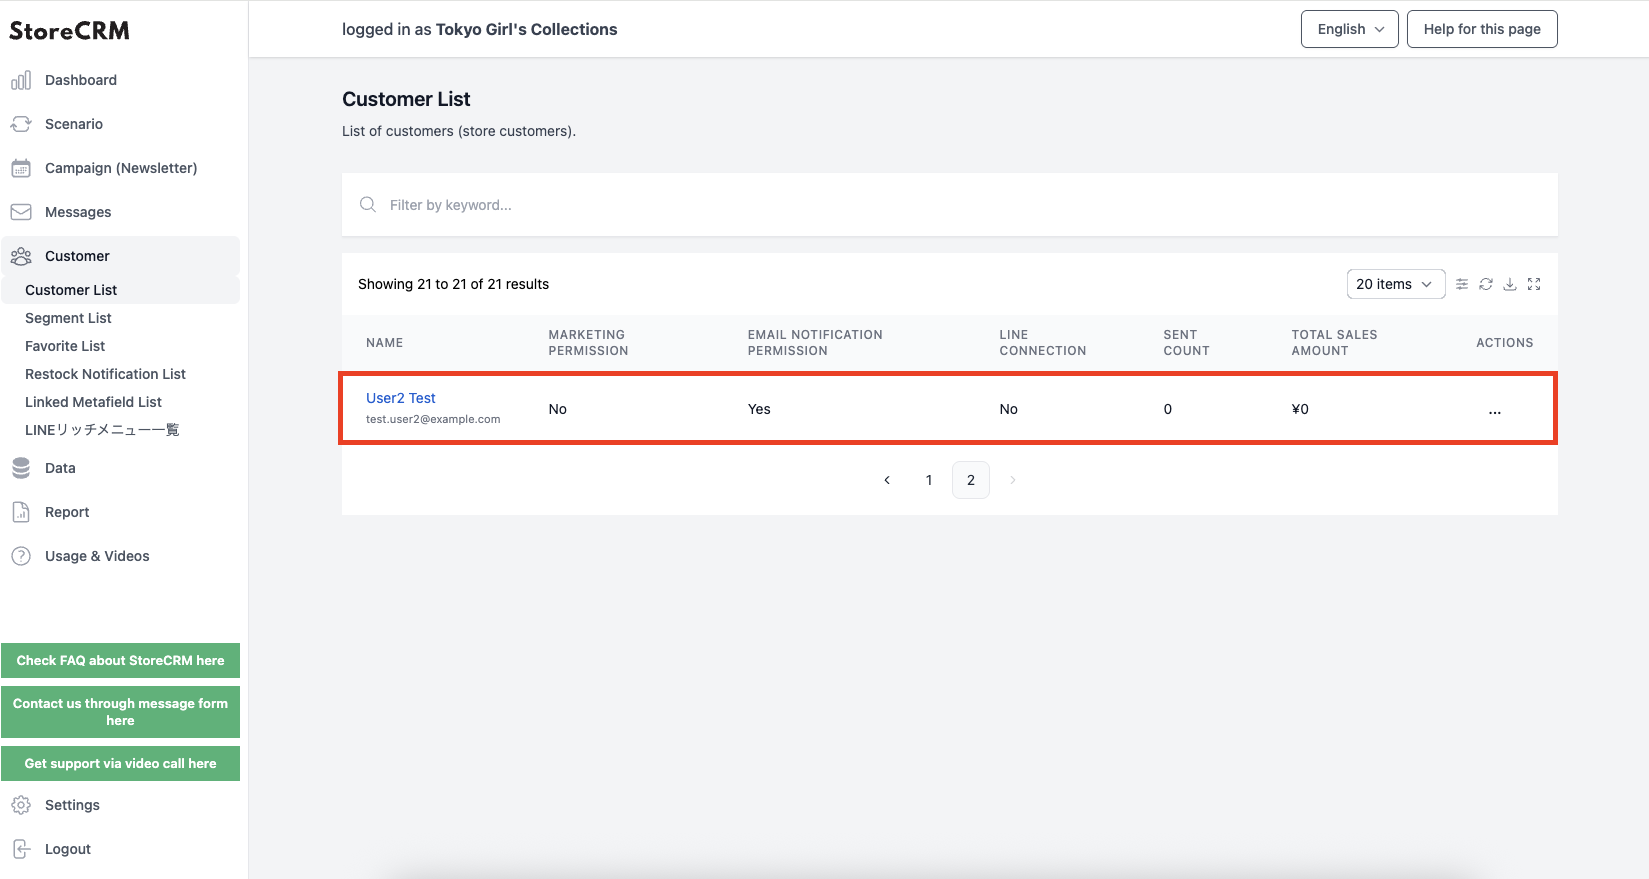
Open the StoreCRM app page and click [Customers] → [Customer List].
At the top of the list, you will see the account you just created — click on the name to view the customer details page.
If the feature doesn’t work as expected, compare the code provided in the [Append Code] section with the code you actually added to ensu
Add birthday registration form to account page
Goal of this Section
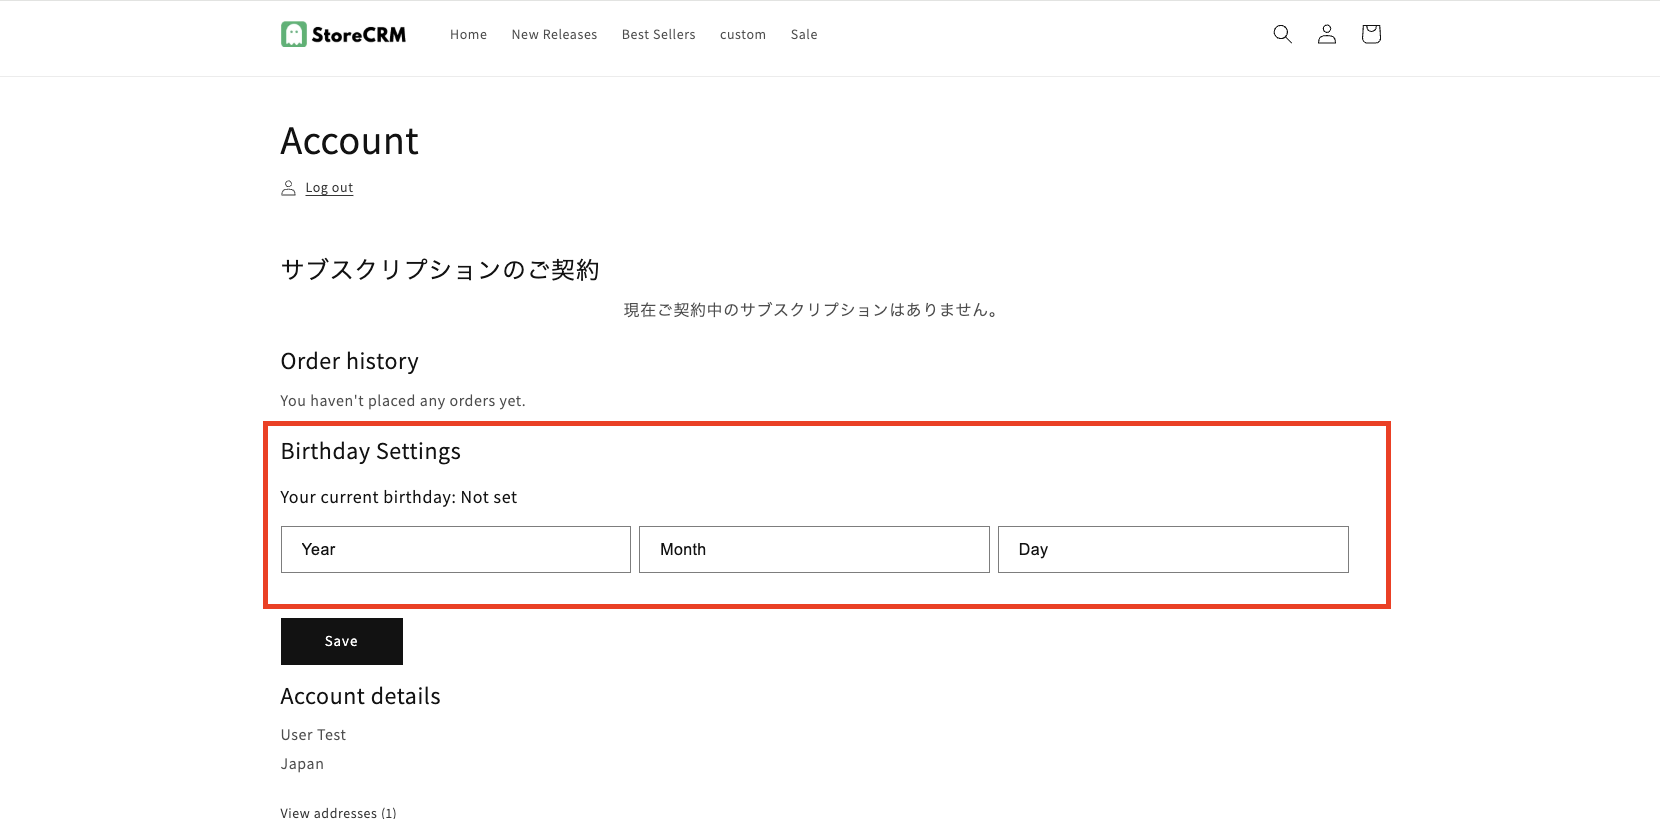

In this implementation, the system will determine whether a birthday has been registered or not, and display different content accordingly.
Implementation goal
From the Shopify admin panel, go to [Sales Channels] > [Online Store] > [Themes] to open the list of themes.
Click on […] and then click [Edit Code].
Since you will be editing the theme code in the following steps, if you feel uncertain, we recommend duplicating the theme and editing the duplicated version.
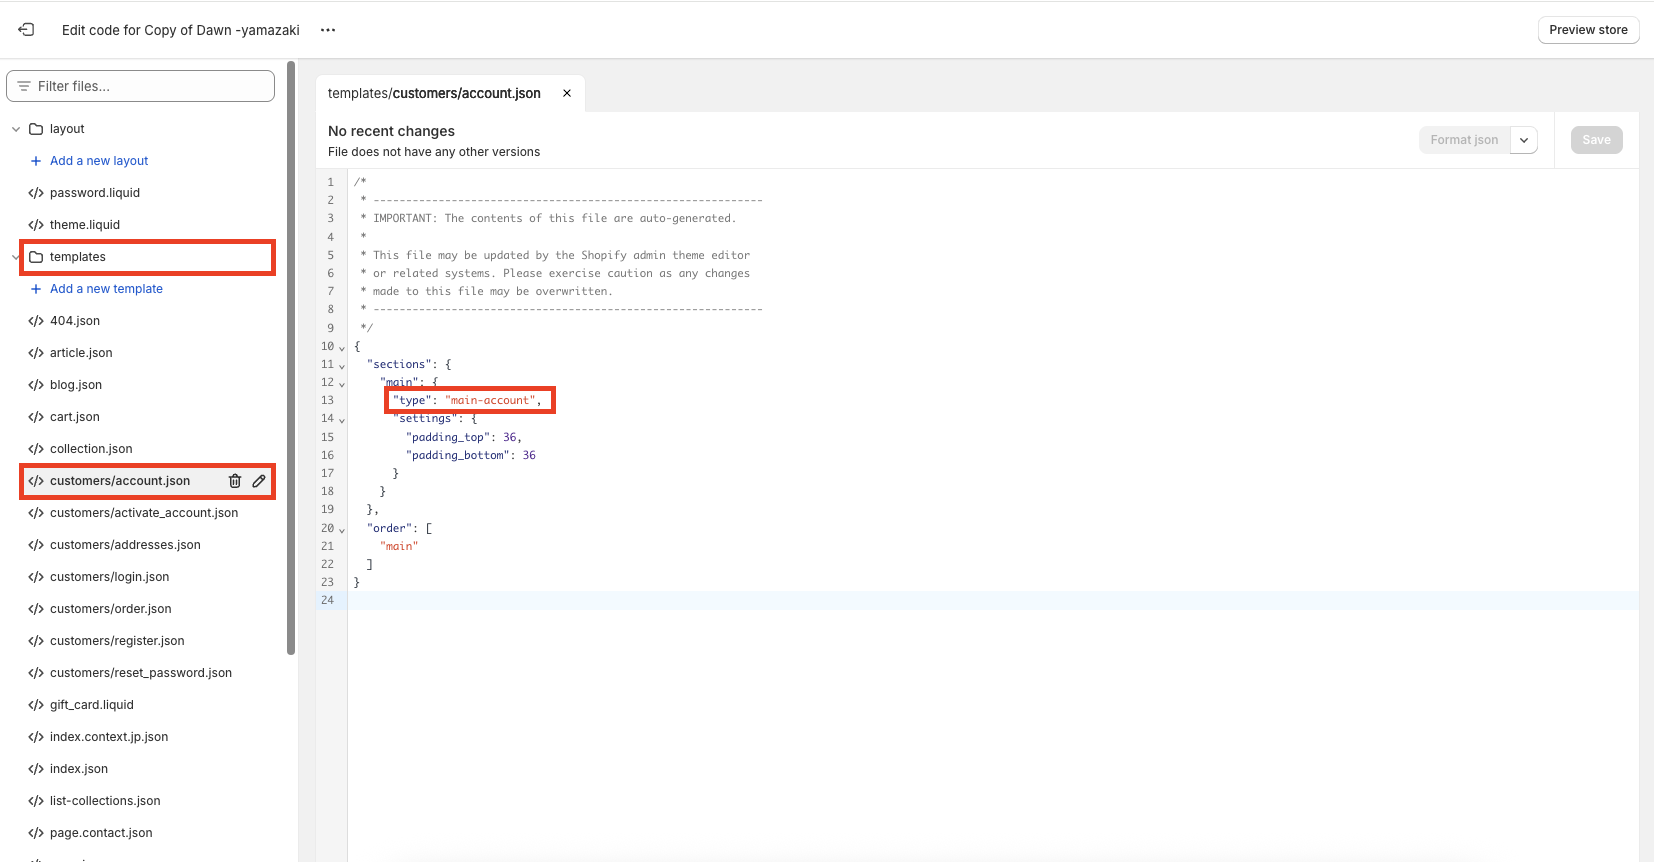
Since we will be editing the account registration page this time, open [Templates] → [customer/account.json].
Once the file is open, check the value written in sections > main > type.
In the case of the Dawn theme, it is labeled as [main-account].
This indicates the location of the code for the account registration page. In this case, it means the relevant code is in [Sections] → [main-account.liquid].
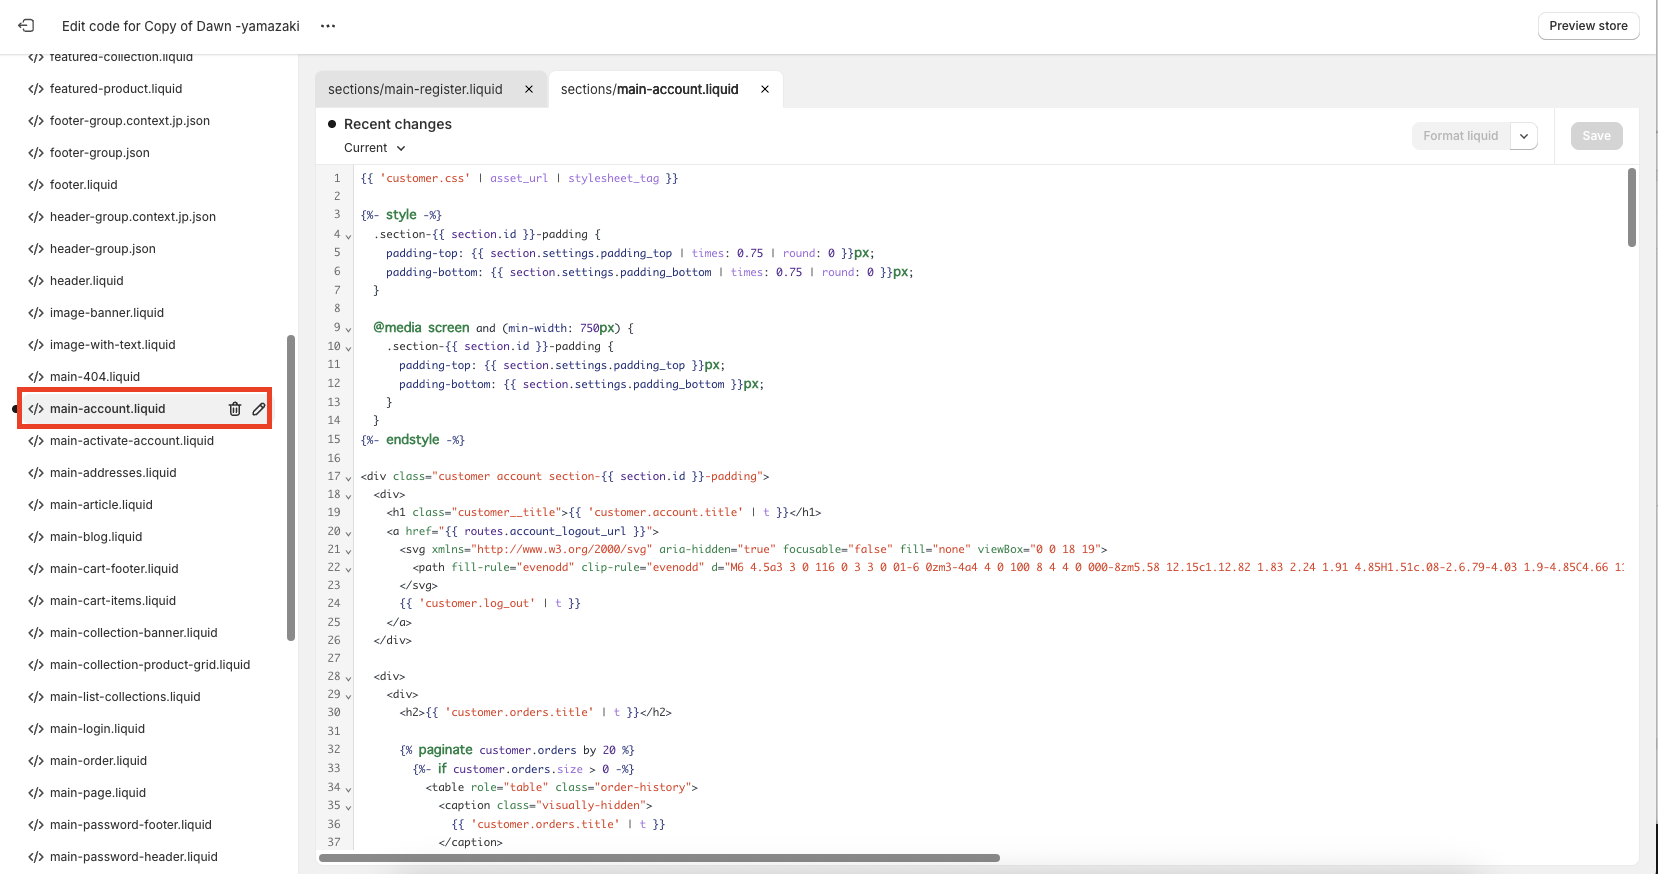
Append code
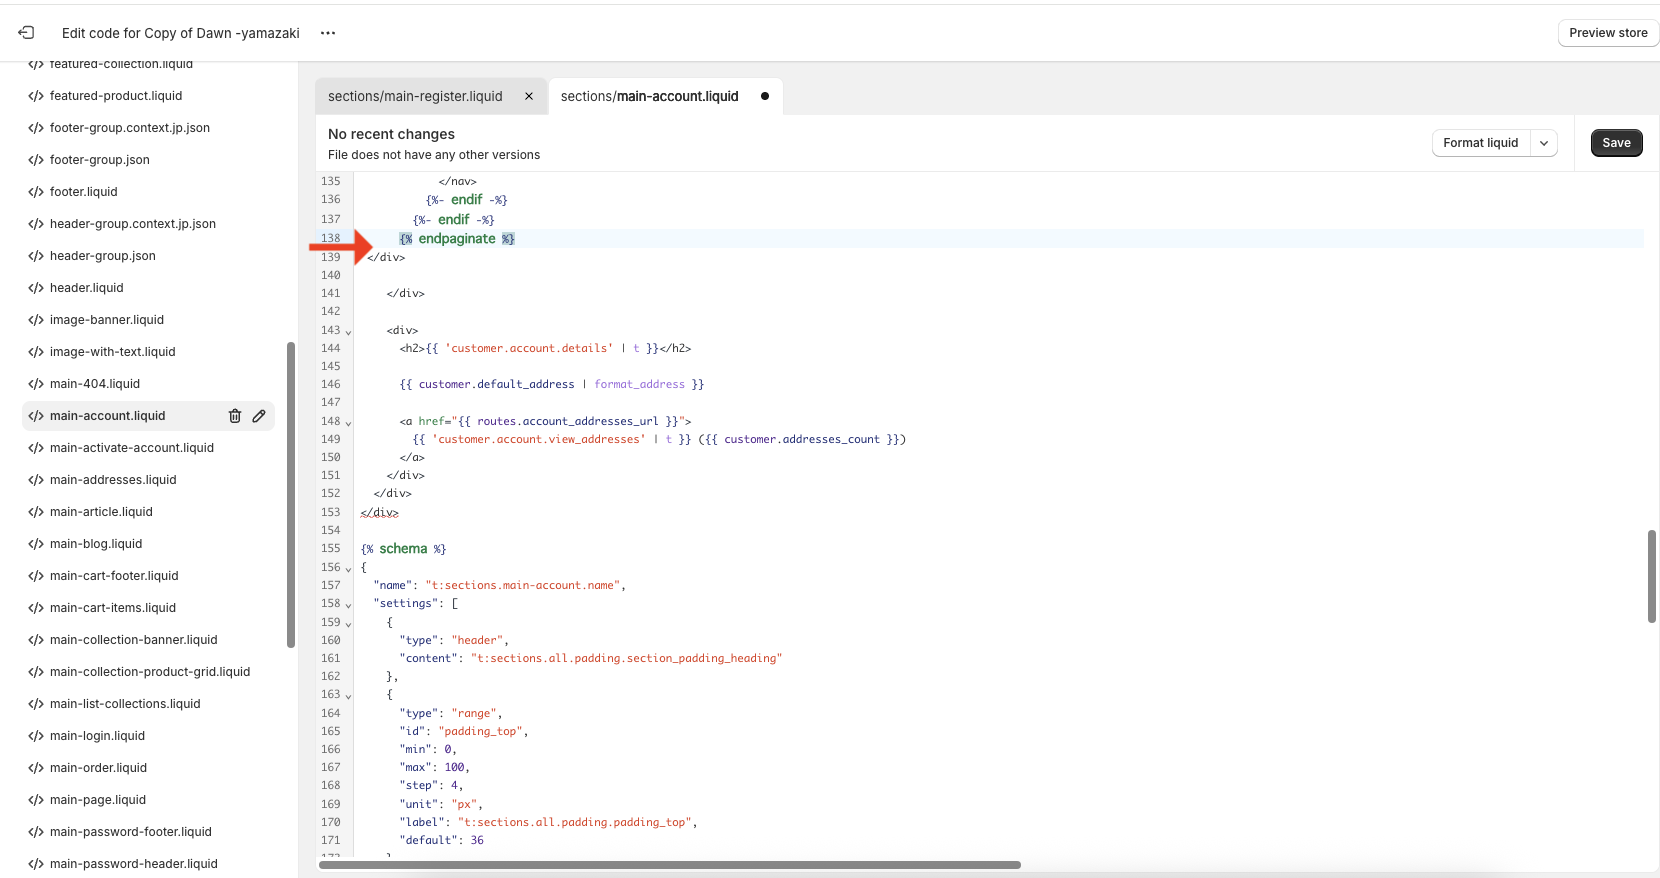
<div id="accountBirthday" class="acountInfoSp sp" style="margin-top:20px;">
  <h2>Birthday Settings</h2>
  <h3 class="setbirthday">
    Currently set birthday:
    {% if customer.metafields.facts.birth_date == null %}
      Not registered
    {% else %}
      {{ customer.metafields.facts.birth_date | date: "%B %d, %Y" }}
    {% endif %}
  </h3>
  {% if customer.metafields.facts.birth_date == null %}
    <!-- Birthday Widget By OBAKE -->
    <div>
      <ul class="grid grid--3-col birthdayinput" style="padding-left: 0;margin-bottom: 5px;">
        <li class="grid__item dayform"><select class="form-control" id="year" name="customer_year" ><option value="0">Year</option></select><span class="daychar">Year</span></li>
        <li class="grid__item dayform"><select class="form-control" id="month" name="customer_month" ><option value="0">Month</option></select><span class="daychar">Month</span></li>
        <li class="grid__item dayform"><select class="form-control" id="day" name="customer_day" ><option value="0">Day</option></select><span class="daychar">Day</span></li>
      </ul>
      <button id="birthdaySave" class="btn btn-primary" onClick="window.obakeStoreBirthday(obakeGetBirthday());">Save</button>
      <div class="saveok">Your birthday has been added</div>
    </div>
  {% else %}
    <p style="font-size:14px;">*Once registered, your birthday cannot be changed. If you accidentally registered an incorrect date, please <a style="text-decoration: underline;" href="#">contact us here</a>.</p>
  {% endif %}
</div>
The CSS is a minimal implementation, so feel free to customize it according to your design preferences if you wish to make changes.
<style>
.dayform {
    display: flex;
    align-items: center;
    position: relative;
    margin-bottom: 0;
}

.birthdayinput {
    display: flex;
    margin-left: 0;
}

.yearselect, .monthselect, .dayselect {
    min-width: 100px;
}

.birthdayyear, .birthdaymonth, .birthdayday {
    padding: 0;
    left: 10px;
    position: absolute;
}

.daychar {
    margin: 0 10px;
}

.form-control {
    box-shadow: 0 0 0 var(--inputs-border-width) rgba(var(--color-foreground), var(--inputs-border-opacity));
}

.saveok {
    color: red;
    font-size: 16px;
    display: none;
    margin-top: 15px;
}

@media (max-width: 500px) {
    .daychar {
        font-size: 14px;
        margin: 0 -20px 0 5px;
    }

    .birthdayinput {
        display: flex;
        justify-content: space-between;
    }

    .customer-birthday {
        padding-right: 25px;
    }

    .dayform {
        max-width: 100px !important;
        min-width: 0 !important;
    }

    #year {
        min-width: 90px;
    }

    #month {
        min-width: 70px;
    }

    #day {
        min-width: 70px;
    }
}
</style>
<script>var obakeCurrentBirthday='{{ customer.metafields.facts.birth_date }}';function addZero(e,t){return('00'+e).slice(-t)}function createOption(e,t,n){var a=document.createElement('option');a.value=e,a.text=t,document.getElementById(n).appendChild(a)}function populateDateFields(e){for(var t=new Date().getFullYear();t>=1900;t--)createOption(t,t,'year');for(var t=1;t<=12;t++)createOption(t,t,'month');for(var t=1;t<=31;t++)createOption(t,t,'day');var n=e.match(/([0-9]+)-([0-9]+)-([0-9]+)/);n&&(t=parseInt(n[1]),n=parseInt(n[2]),a=parseInt(n[3]),document.getElementById('year').value=t,document.getElementById('month').value=n,document.getElementById('day').value=a)}(function(){populateDateFields(obakeCurrentBirthday)})(),window.obakeGetBirthday=function(){var e=document.getElementById('year').value,t=addZero(document.getElementById('month').value,2),n=addZero(document.getElementById('day').value,2);return[].forEach.call(document.querySelectorAll('.saveok'),function(e){e.style.display='block'}),document.getElementById('birthdaySave').disabled=!0,[].forEach.call(document.querySelectorAll('.form-control'),function(e){e.disabled=!0}),e+'-'+t+'-'+n};</script>
<script defer src="/apps/obake/birthdayscript"></script>
Perform operation check
➀ On the account creation page, register as a member without entering a birthday.
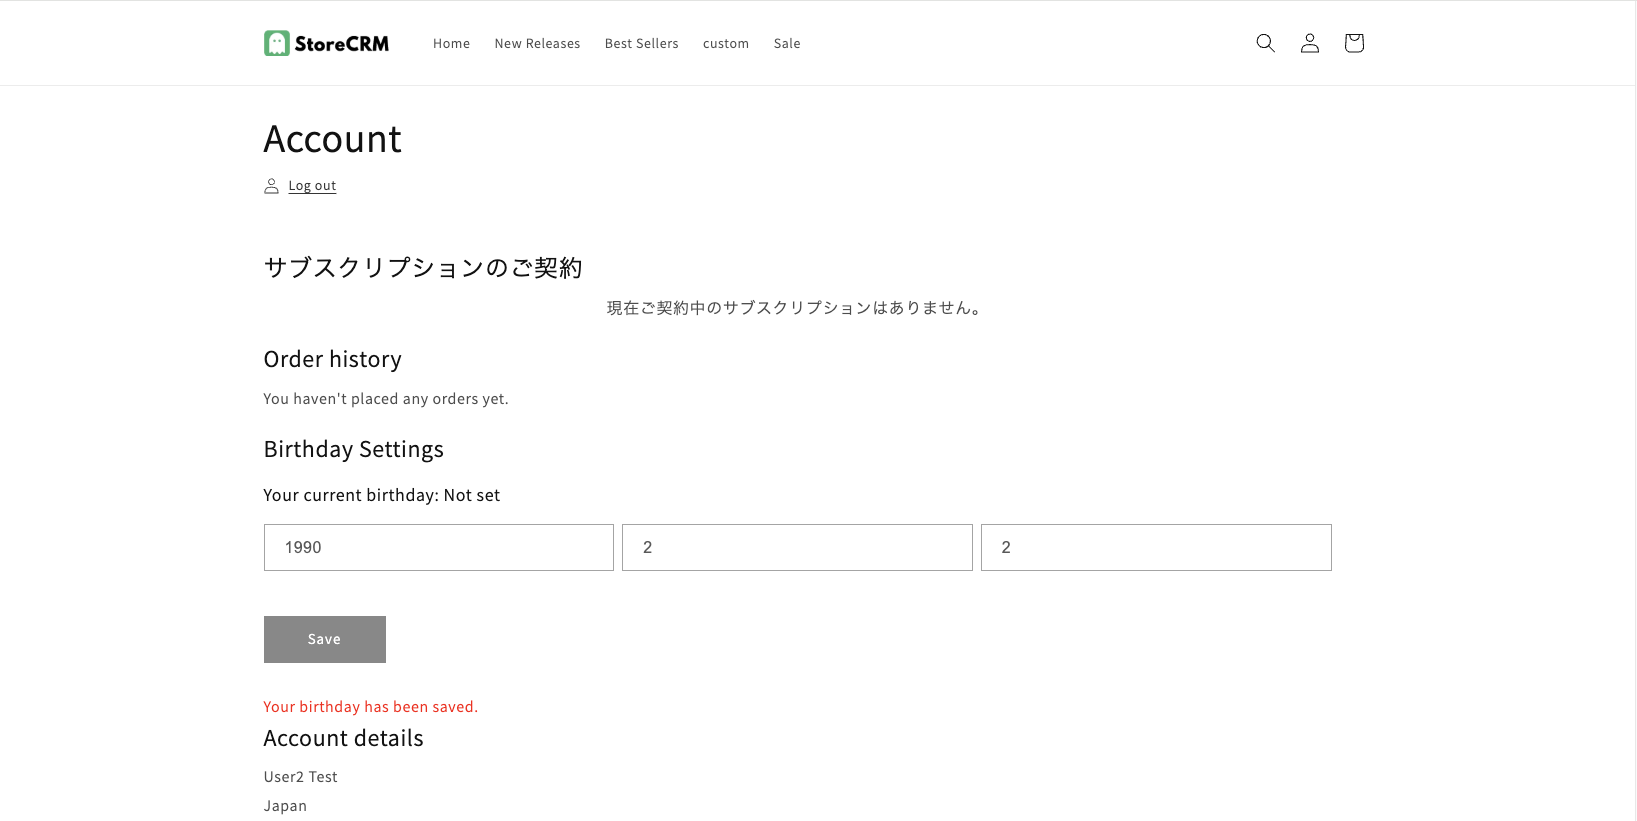

- After saving, the message “Birthday has been added” appears below the [Save] button.
- The birthday selection dropdown and the [Save] button become disabled.
- When reloading the page or accessing My Page again, the display changes and the birthday can no longer be edited.
At the top of the list, you will see the account you just created. Click on the name to view the customer details page.
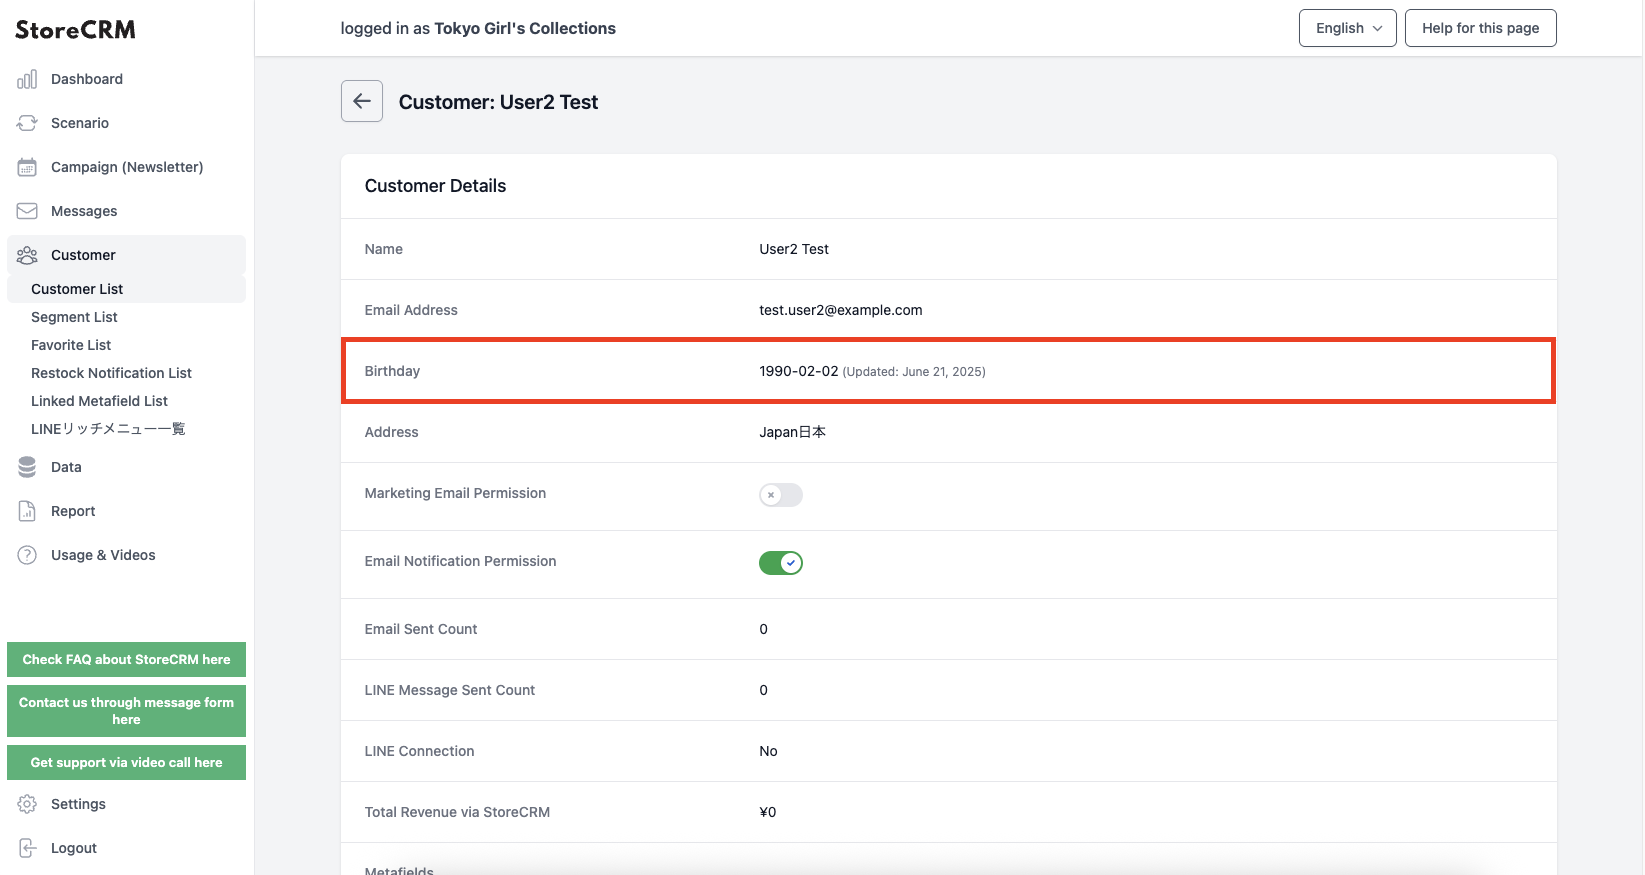
If the feature doesn’t work as expected, compare the code in the [Add Code] section with the code you actually added to ensure there are no differences.
Summary
By utilizing StoreCRM, various strategies that previously required coding, combining Shopify Flow, or configuring multiple Shopify apps can now be realized with this single app — such as the birthday registration feature introduced here.
Click here to install StoreCRM.
Click here to learn how to send birthday emails.
Additionally, StoreCRM offers free support for app-related settings (including setup assistance) and provides proposals to help customers increase sales after implementation.
Please feel free to contact us via the inquiry form.