How to Send Segmented Emails Using Shopify Flow Editor
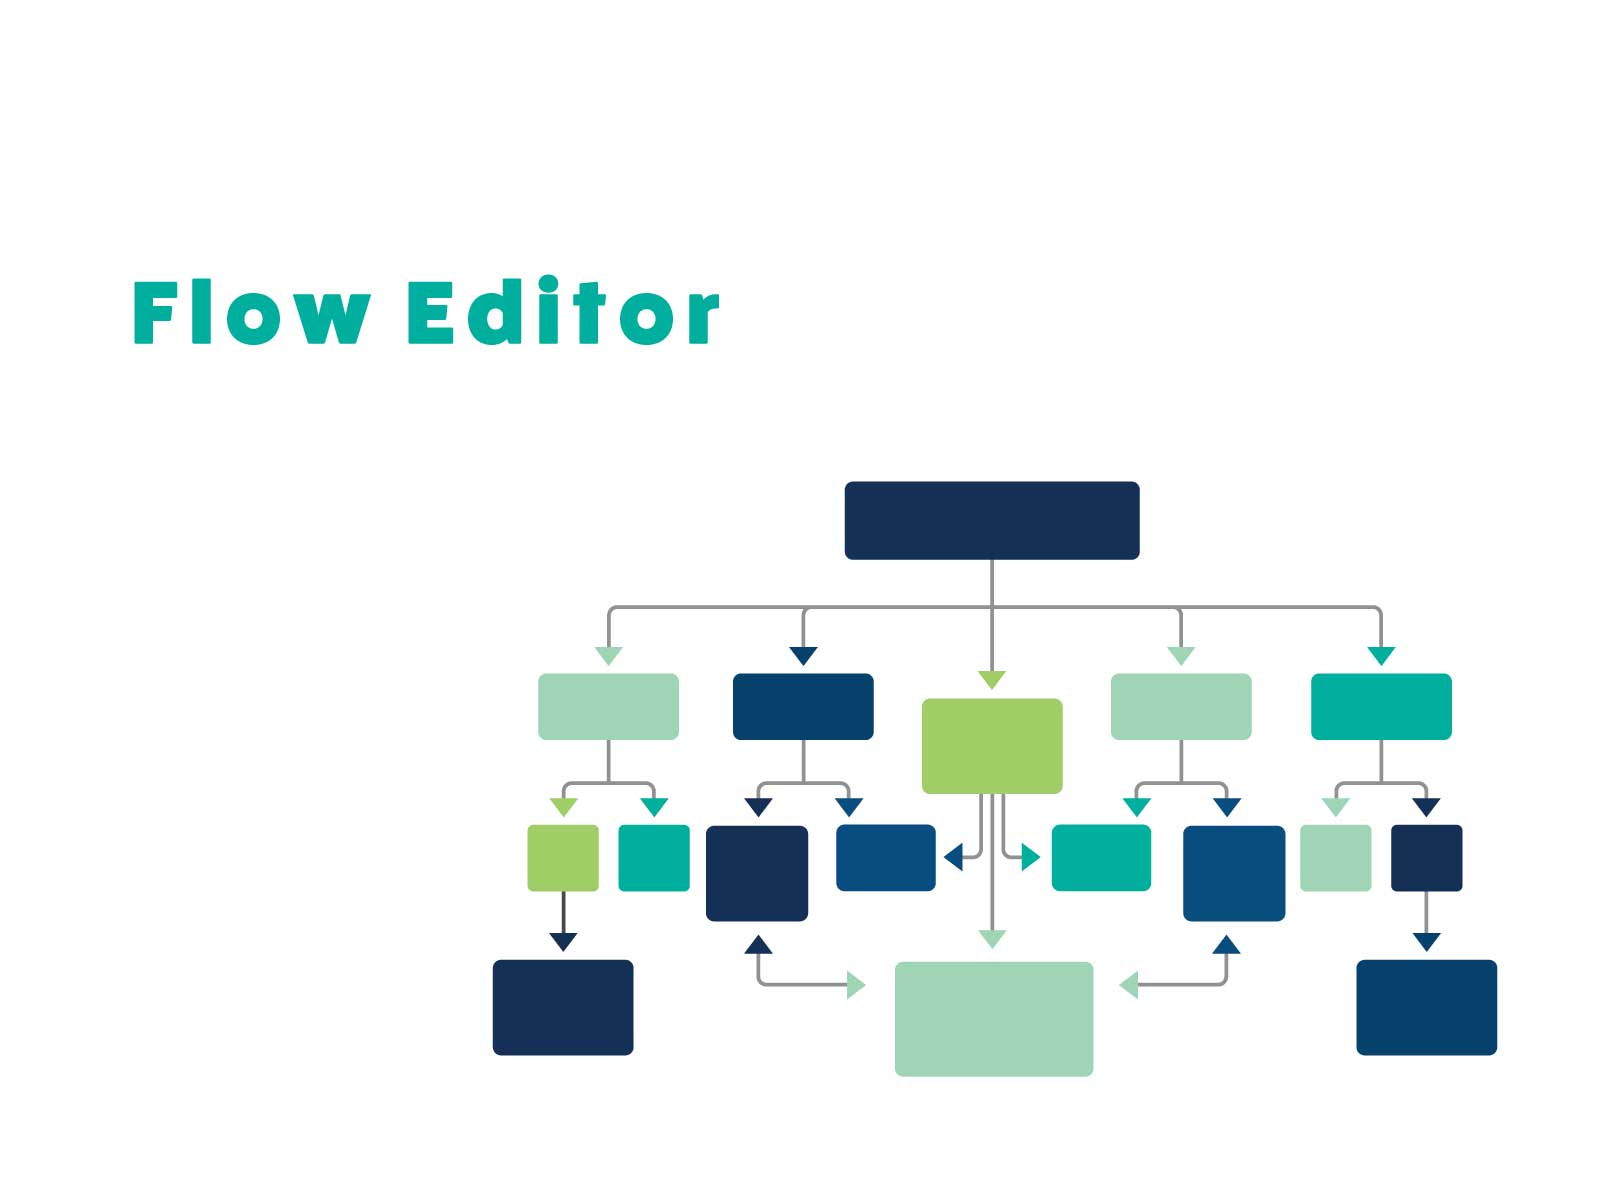
Table of Contents
ToggleIntroduction
This article explains how to use one of StoreCRM’s features, the Flow Editor. StoreCRM allows easy implementation of various strategies such as step emails for checkout abandonment and membership registration. Delivering personalized information tailored to each customer’s interests is a key point in these strategies. StoreCRM enables intuitive settings for detailed conditions such as email segmentation and branching based on customer and order data.
Personalized newsletter distribution using the Flow Editor can improve LTV and reduce unsubscribe rates, so please try it out. *The Flow Editor feature is available with the Plus Plan ($200+/month). See pricing details here.
Explanation of the Flow Editor
How to Open the Flow Editor Screen
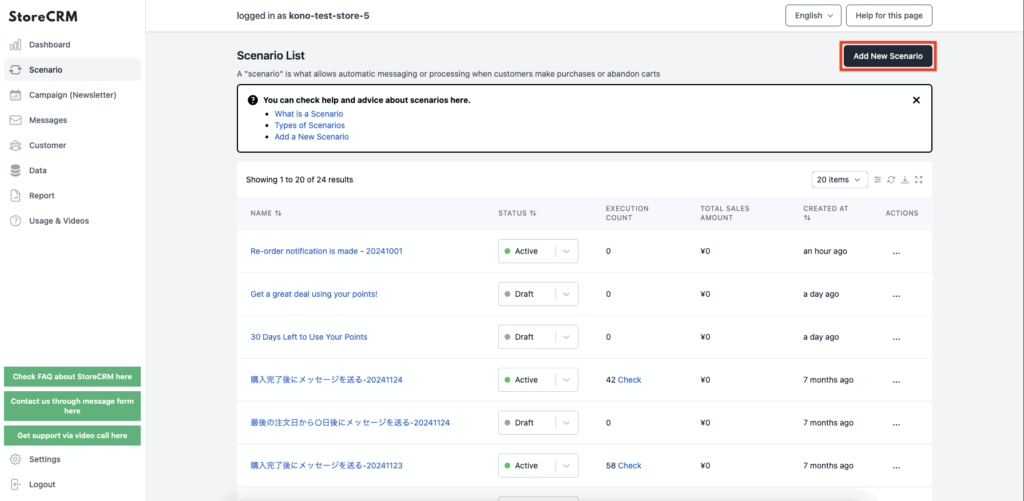
➀Click the scenario you want to create.
Click [Add New Scenario] at the top right of the screen.
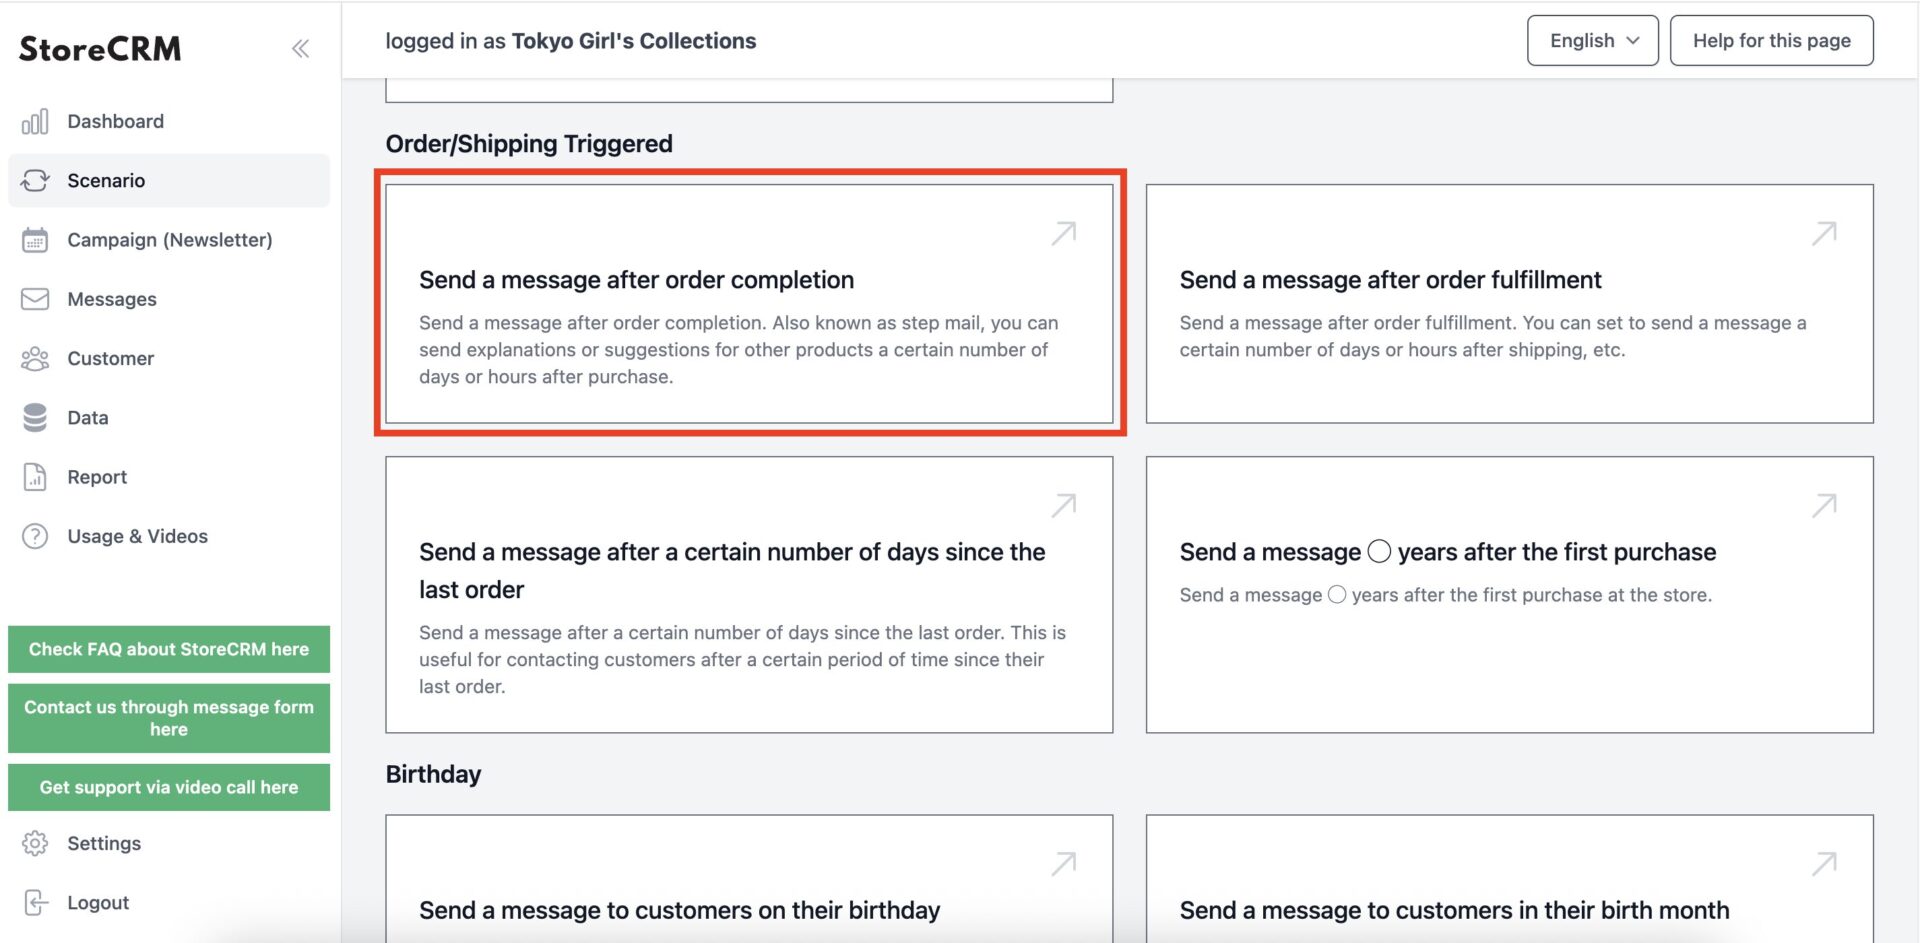
②Click the scenario you want to create.
This time, select [Send Email After Purchase Completion].
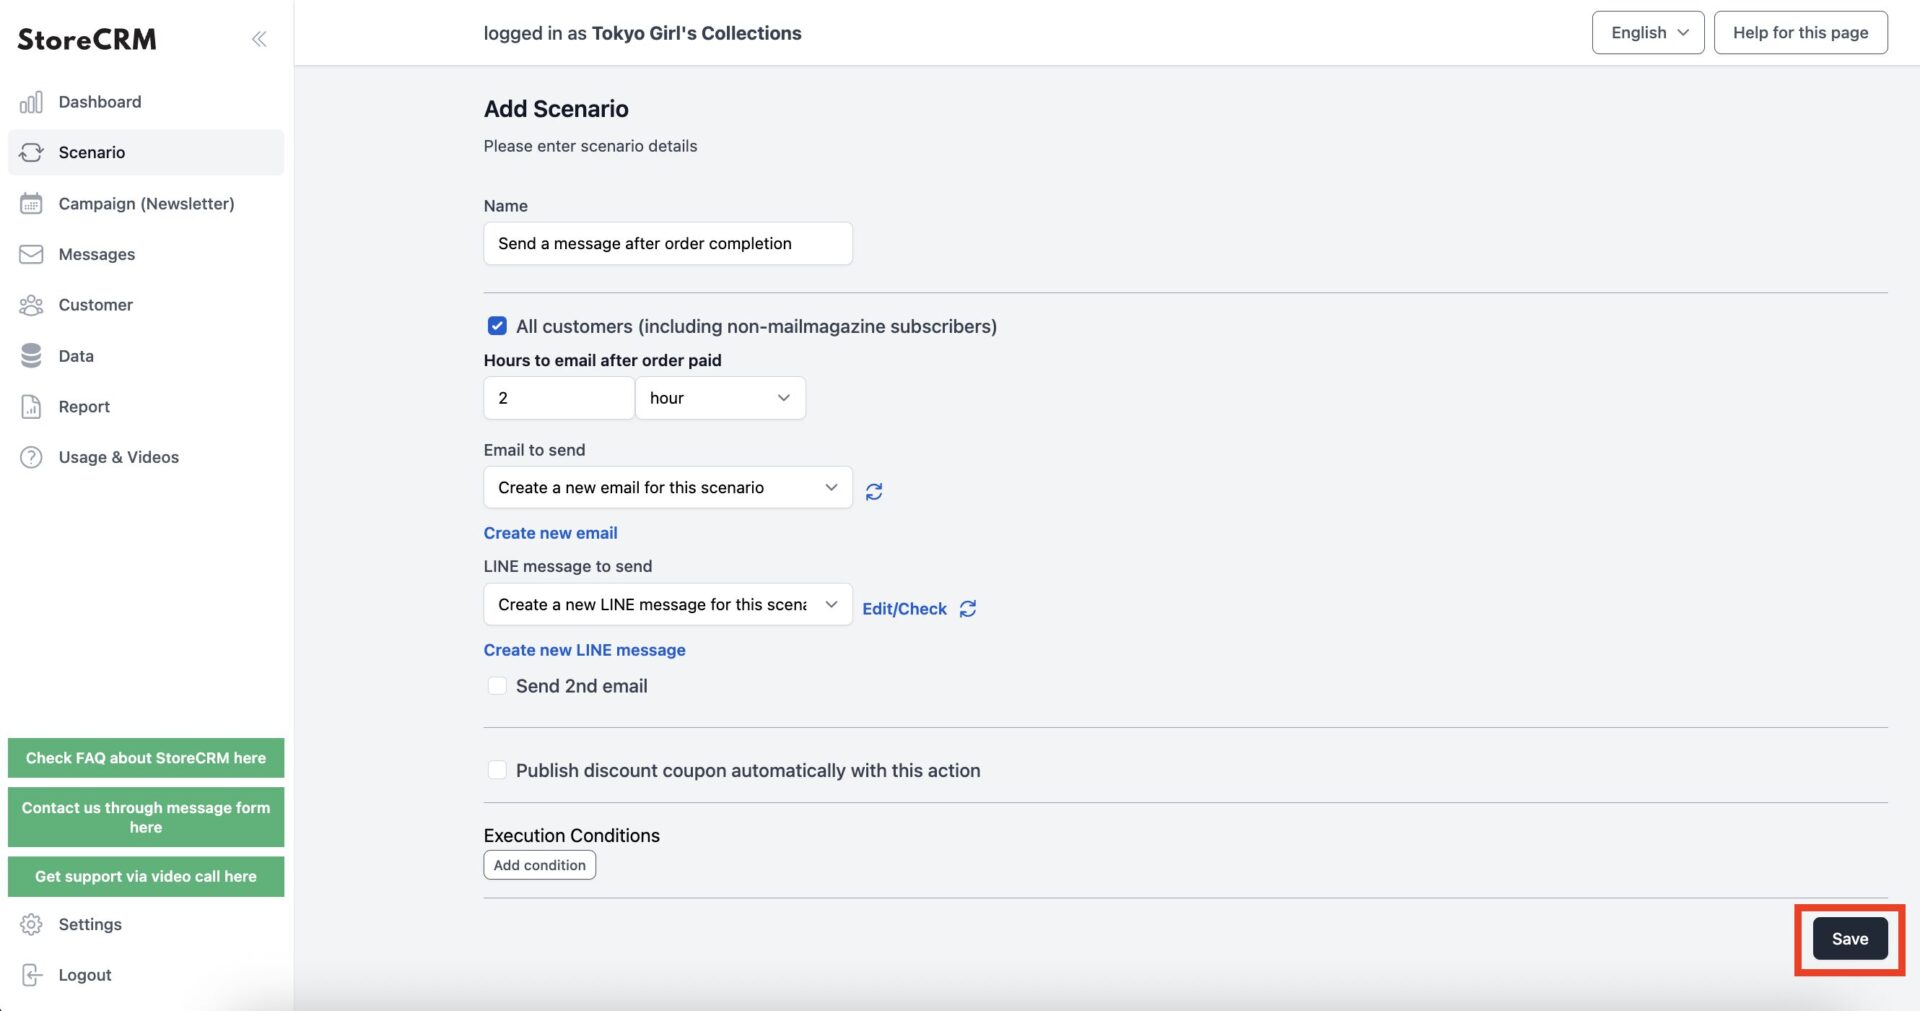
③ The scenario setting screen will open, but since settings will be done in the Flow Editor, just save as is.

The Flow Editor screen opens, completing this step.
You can also open the Flow Editor screen for already created scenarios using the steps from 4.
Explanation of Each Flow Editor Setting Item
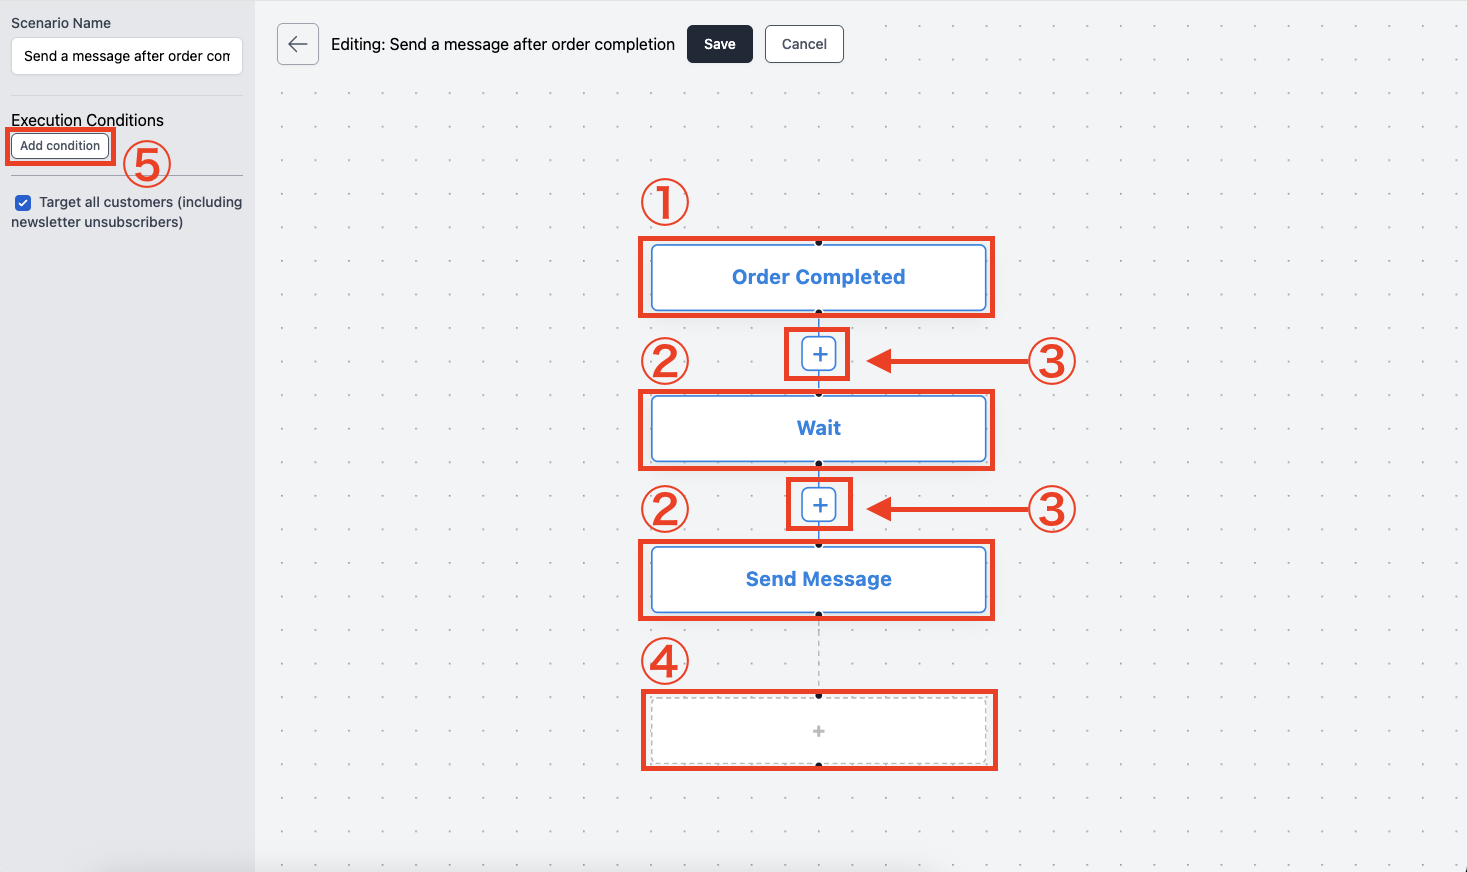
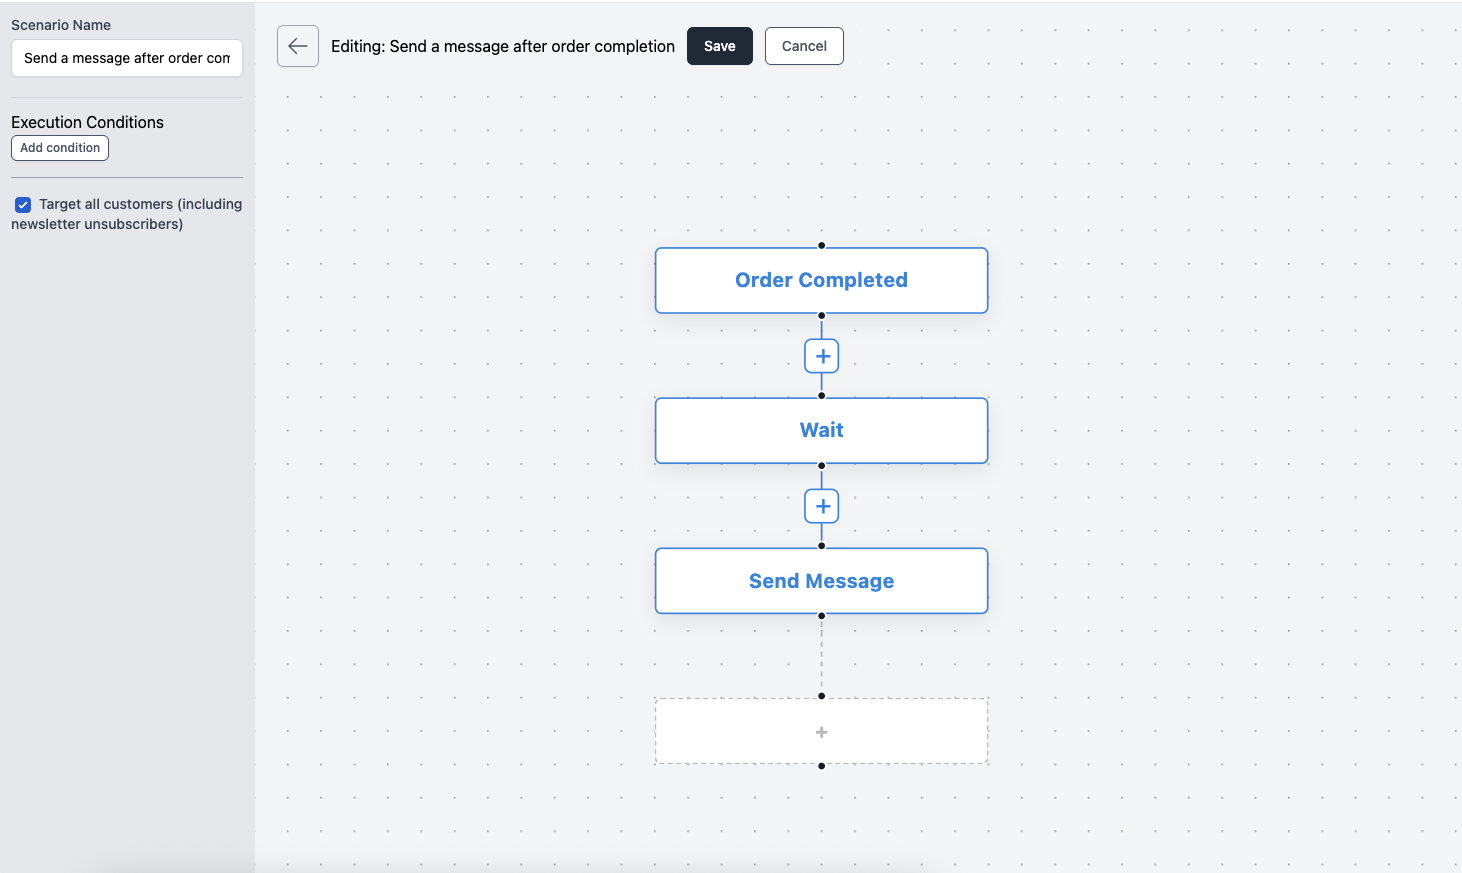
Explanation of each item on the Flow Editor screen. The scenario process starts with ① the execution trigger and then sequentially processes the blocks ② from top to bottom.
① Scenario Execution Trigger
This is the event that triggers the scenario execution. In this case, since the scenario [Send Email After Purchase Completion] was selected, the process starts when a customer completes a purchase. The trigger varies depending on the selected scenario, so choose the scenario according to the event you want to trigger the process. Note that you cannot change or delete the scenario execution trigger.
② Process Block (Node)
These are the actual processes executed triggered by ①, processed from top to bottom. Examples include waiting for a specified number of days or hours, sending specified emails, and branching based on set conditions.
③ Add Process Block Button
Adds a new process block between existing process blocks. There are several types of process blocks available, which will be explained later.
④ Add Process Block Button (Add at End of Current Process)
Adds a new process block at the end of the current process.
⑤ Scenario Execution Conditions
Sets the conditions for whether the scenario actually executes. Conditions can be based on order details or customer information. For example, you can target processing only customers with certain tags or execute processing only for orders exceeding a certain amount. When a process block is selected, its settings will be displayed here.

Clicking the above-mentioned add process block buttons ③ and ④ opens a screen to select the type of process block. Below is an overview and explanation of each process block’s purpose.
① Check if Coupon Has Been Used
Checks whether the generated coupon has already been used; if so, subsequent processing is skipped.
Used when multiple emails are sent within a scenario and you want to stop sending further emails once the coupon has been used.
② Generate Coupon
If you want to send emails with coupons, you need to add this process block before the email sending block.
This block lets you set the coupon’s discount rate, expiration date, and usage conditions.
You can also specify a custom prefix string to manage coupon codes.
③ Send Email
Sends the specified email.
④ Conditional Branching
Refers to order and customer information similarly to scenario execution conditions and branches processing based on whether the conditions are met.
Multiple conditions can be set.
Typically used to send different emails for each branch.
⑤ Filter
Like scenario execution conditions and conditional branching, checks order and customer information and only processes if the set conditions are met.
If conditions are not met, subsequent processing is skipped.
Multiple conditions can be set.
Used when branching is not needed but you want to process only specific customers or orders.
⑥ Wait
Used to insert a delay between the previous and next process.
You can set the wait time in days, hours, or minutes.
⑦ Wait Until Specific Time
Used to delay processing until a specified time.
Can be set as “wait until X o’clock Y days later.”
Advanced Scenario Customization
About Customization Specifications
In this section, we will create an advanced scenario using the Flow Editor.
From this point on, we will explain how to add nodes and the names of nodes using text descriptions, as covered in the previous section. If you feel uncertain, please refer back to the previous section while setting things up.
We will customize the original template used up until the previous section: [Send an email after purchase completion].
The specifications are as follows:
・Send an F2 conversion email tailored to the purchased items for first-time customers.
・Seven days after the purchase is completed, if there are no returns or refunds, send different emails based on the following conditions:
① If the purchased product tag includes [coffee], send a "Recommended Coffee Goods Ranking" email.
② If the purchased product tag includes [Baer], send an introduction email for rental beer servers.
③ If neither ① nor ② applies, send a "Recommended Collections" introduction email.
④ If the order total exceeds ¥10,000, send an email with a 20% OFF coupon.
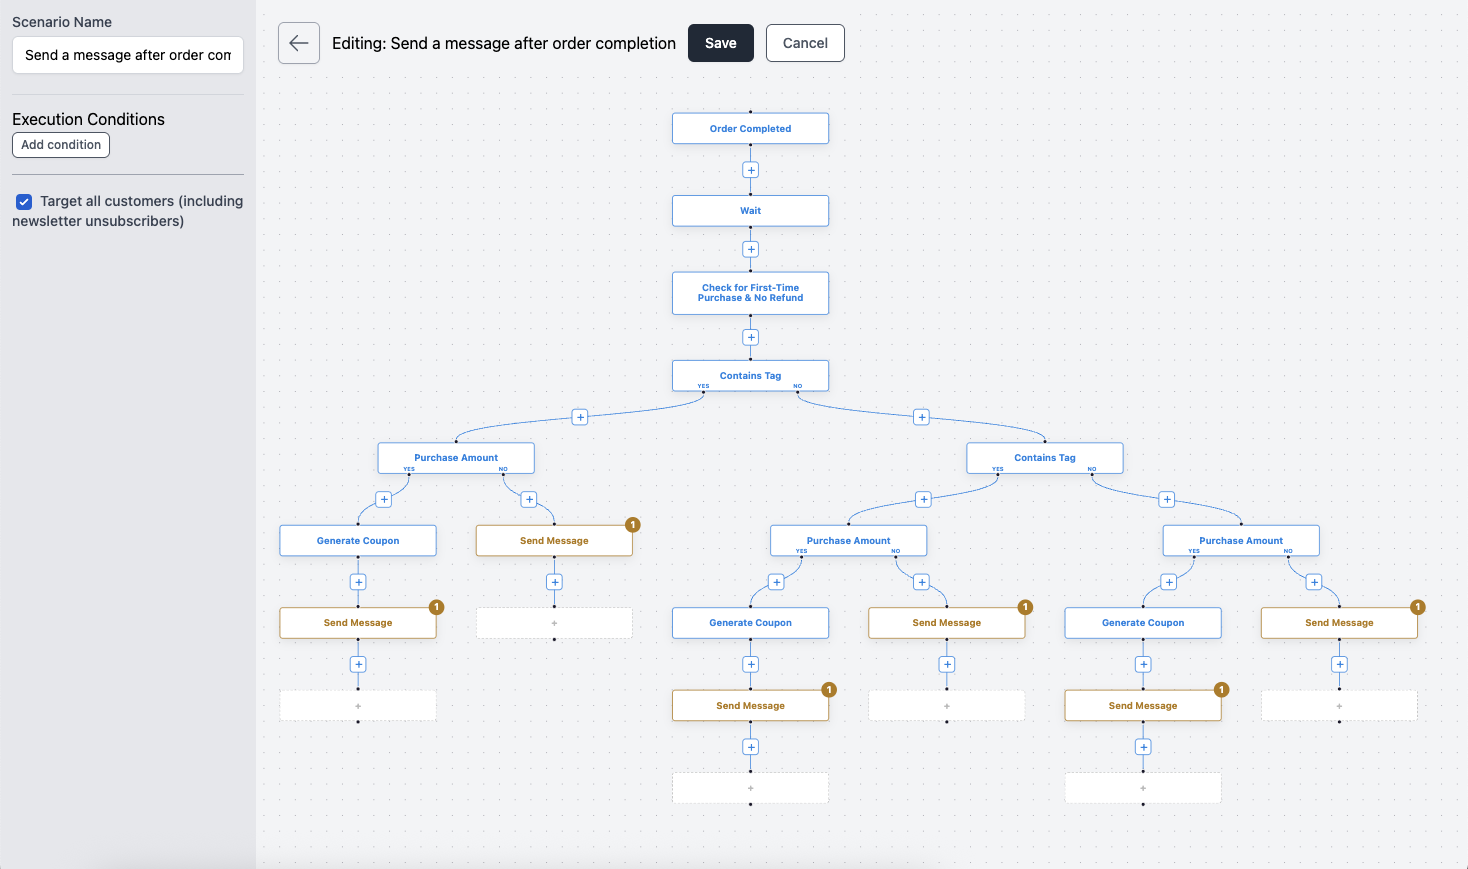
This is the completed Flow Editor scenario. Though it looks complex, it can be set easily by following each step.
Creating Emails
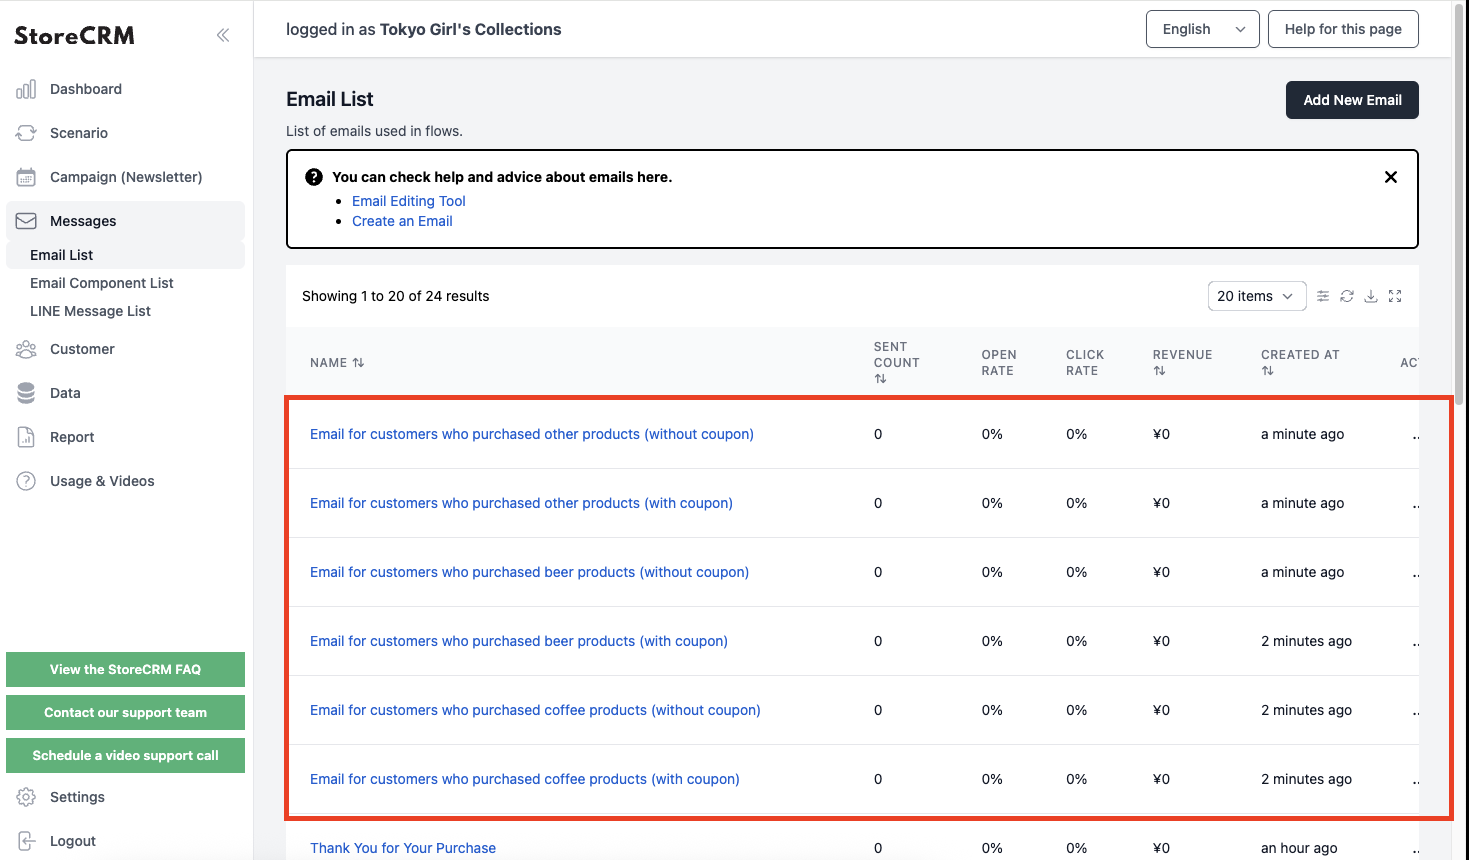
Before editing the Flow Editor, we will first create the emails.
This time, we will be sending six types of emails, so we will create the following:
① Email for customers who purchased coffee products (with coupon)
② Email for customers who purchased coffee products (without coupon)
③ Email for customers who purchased beer products (with coupon)
④ Email for customers who purchased beer products (without coupon)
⑤ Email for customers who purchased other products (with coupon)
⑥ Email for customers who purchased other products (without coupon)
If you don’t know how to create emails, please watch this video.
Customizing the Flow Editor
We will now actually edit the Flow Editor and create the scenario.
If you have already gained a general understanding of the Flow Editor in the previous sections,
feel free to skip the following explanations and try creating the scenario based on the specifications.
Once you save in the Flow Editor, you cannot return to the simple edit mode. If you want to test with a scenario that is currently in use, be sure to duplicate the scenario before customizing it.

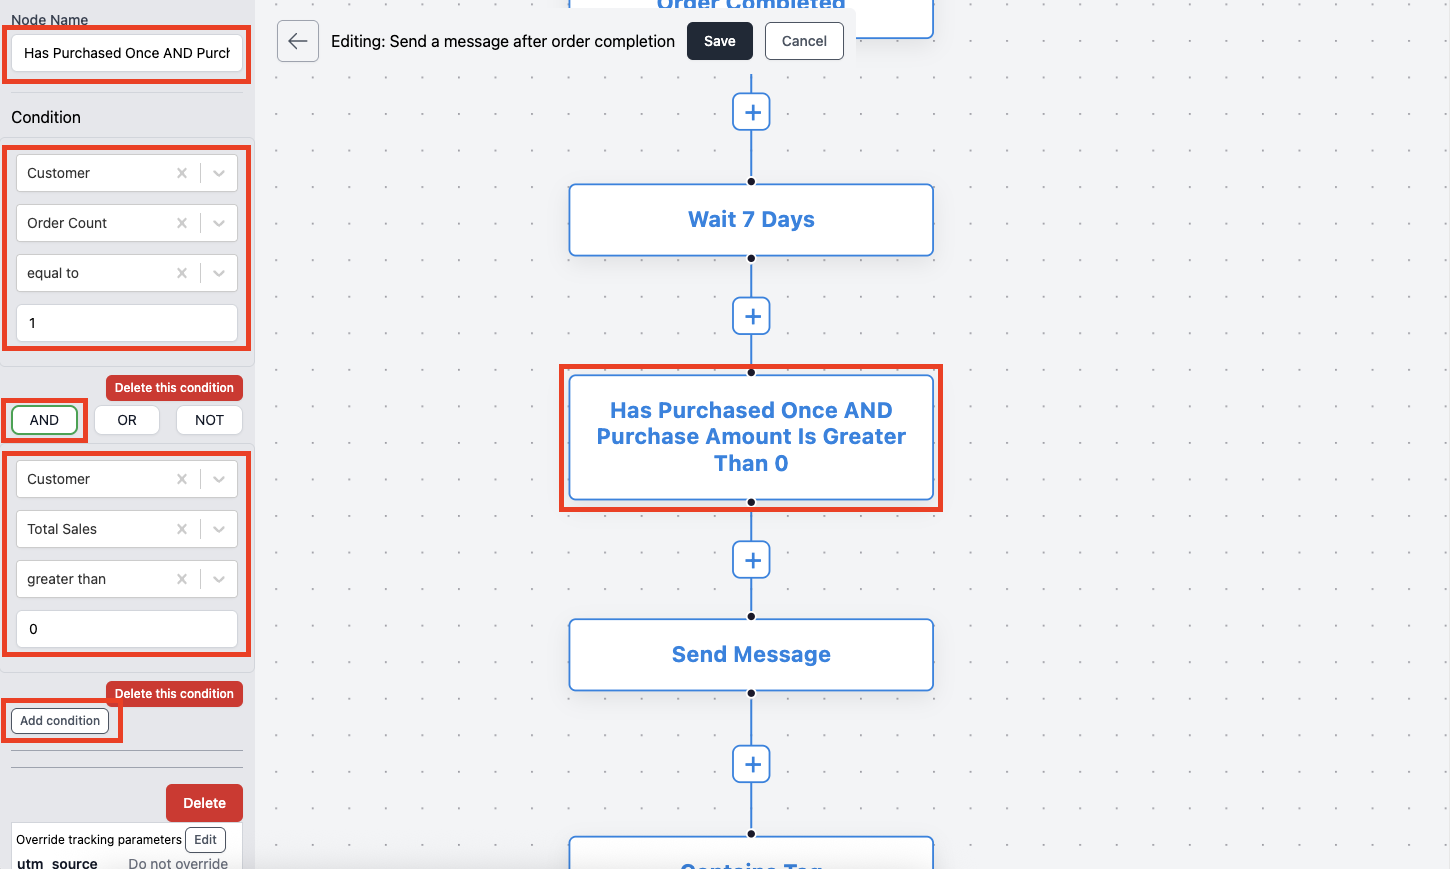
③ Add a [Filter] node between the [Wait] node and the [Email] node.
This time, we want to send emails only to customers who made their first purchase (purchase count is 1) and who have completed the purchase without any returns or refunds. Set these conditions to narrow down the target for the subsequent process.
Note: You can also set multiple conditions by clicking the [Add Condition] button and using [AND], [OR], or [NOT] operators.
④ Add a [Conditional Branch] node between the [Purchase Count is 1 and Purchase Amount is greater than ¥0] node and the [Email] node.
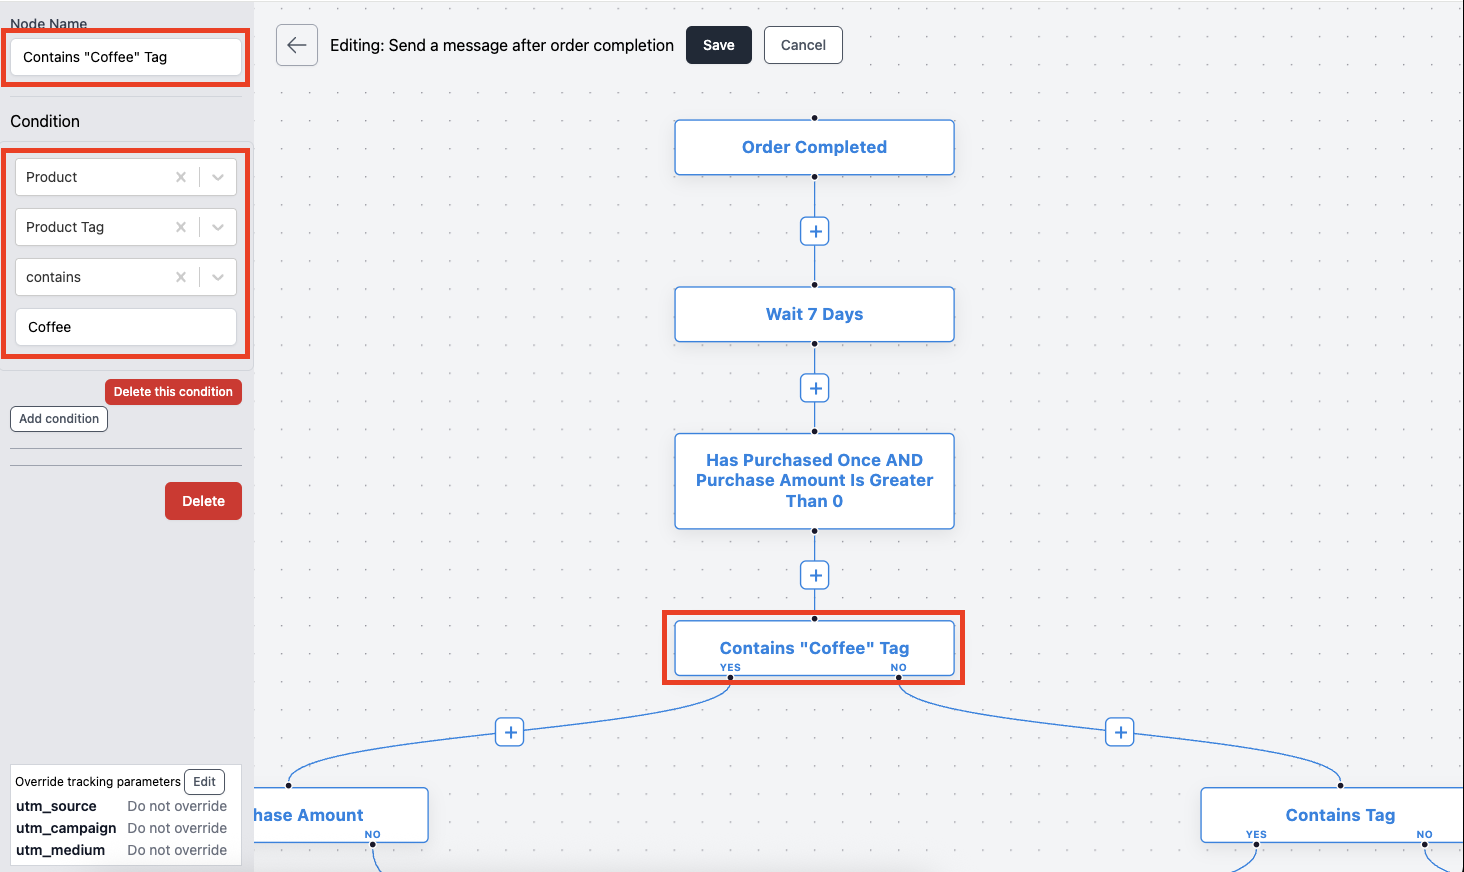
Here, you will check whether the purchased product includes the [coffee] tag.
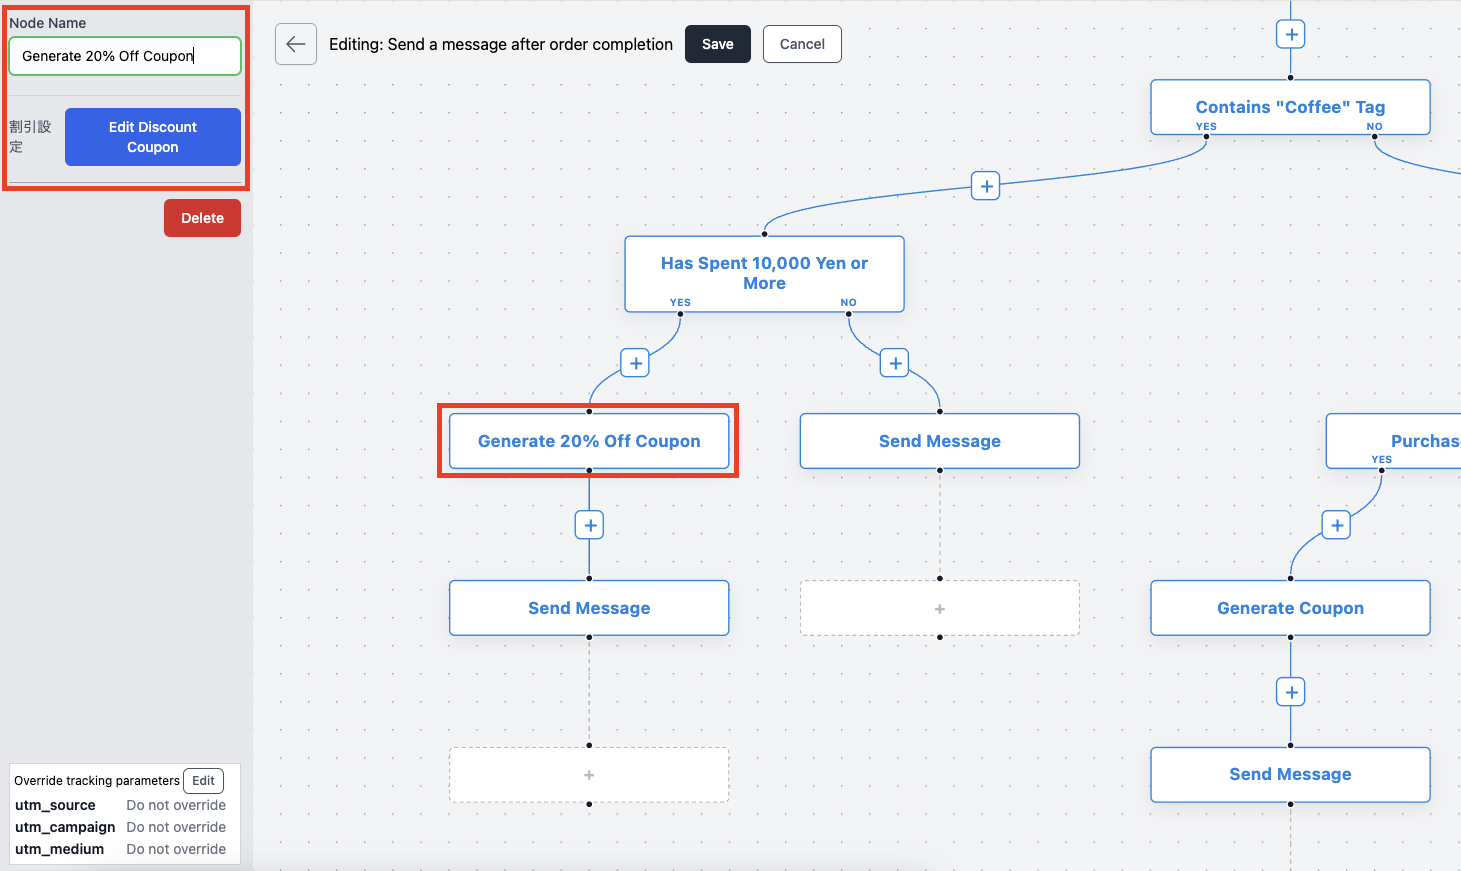
⑥ Add a [Generate Coupon] node between the [Did they purchase over ¥10,000?] node and the [Email] node.
Since we will be sending a coupon to customers who spent over ¥10,000, this node handles the coupon generation process.
Set the discount amount, expiration date, and usage conditions as desired.
As this scenario involves issuing multiple coupons, specify a prefix for the coupon code to easily identify which type of customer it is intended for.
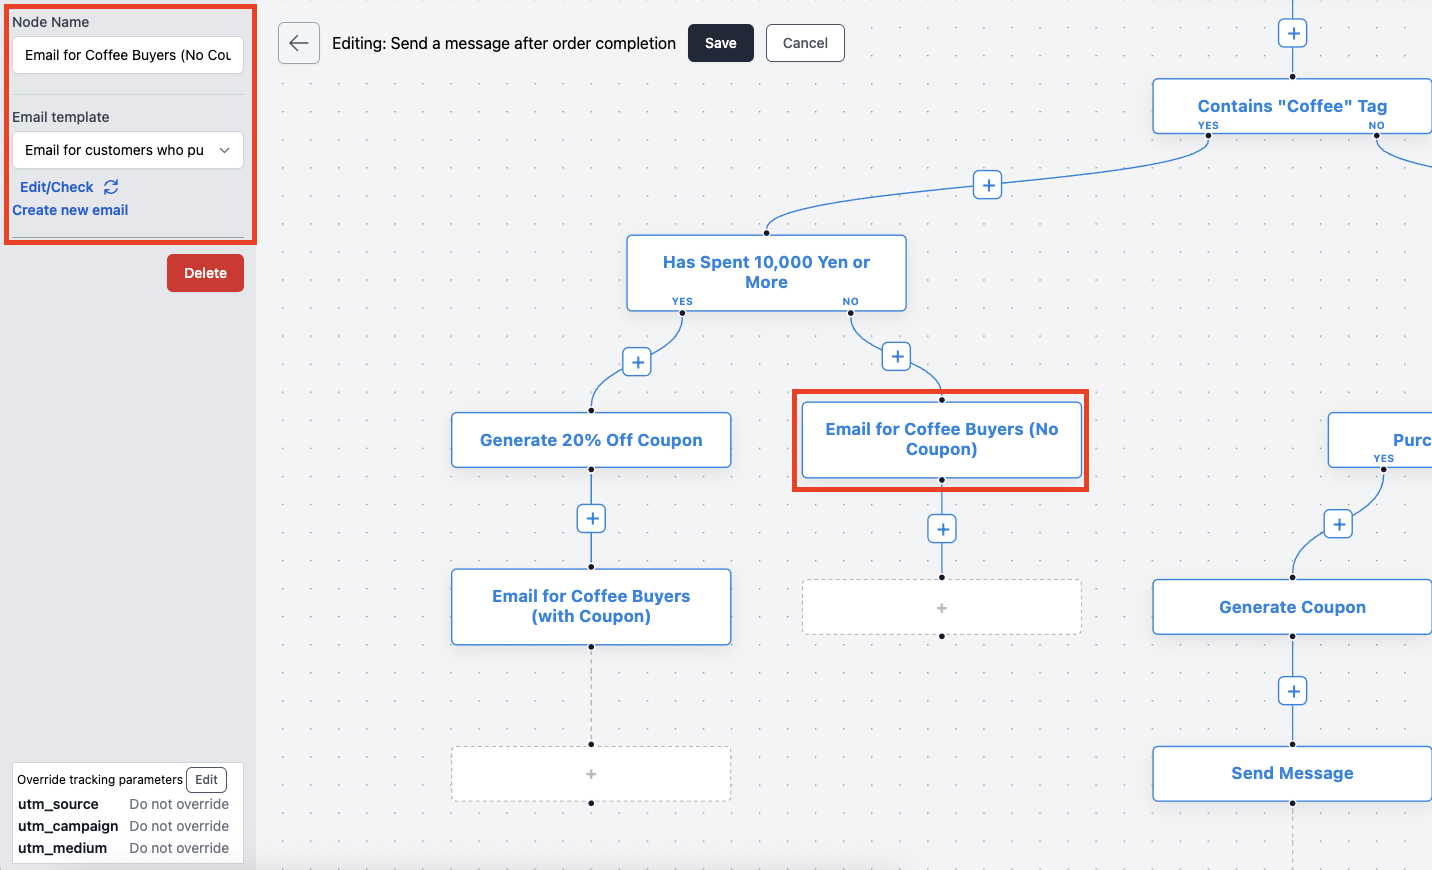
⑧Add a [Send Email] node under the NO branch of the [Did they purchase over ¥10,000?] node.
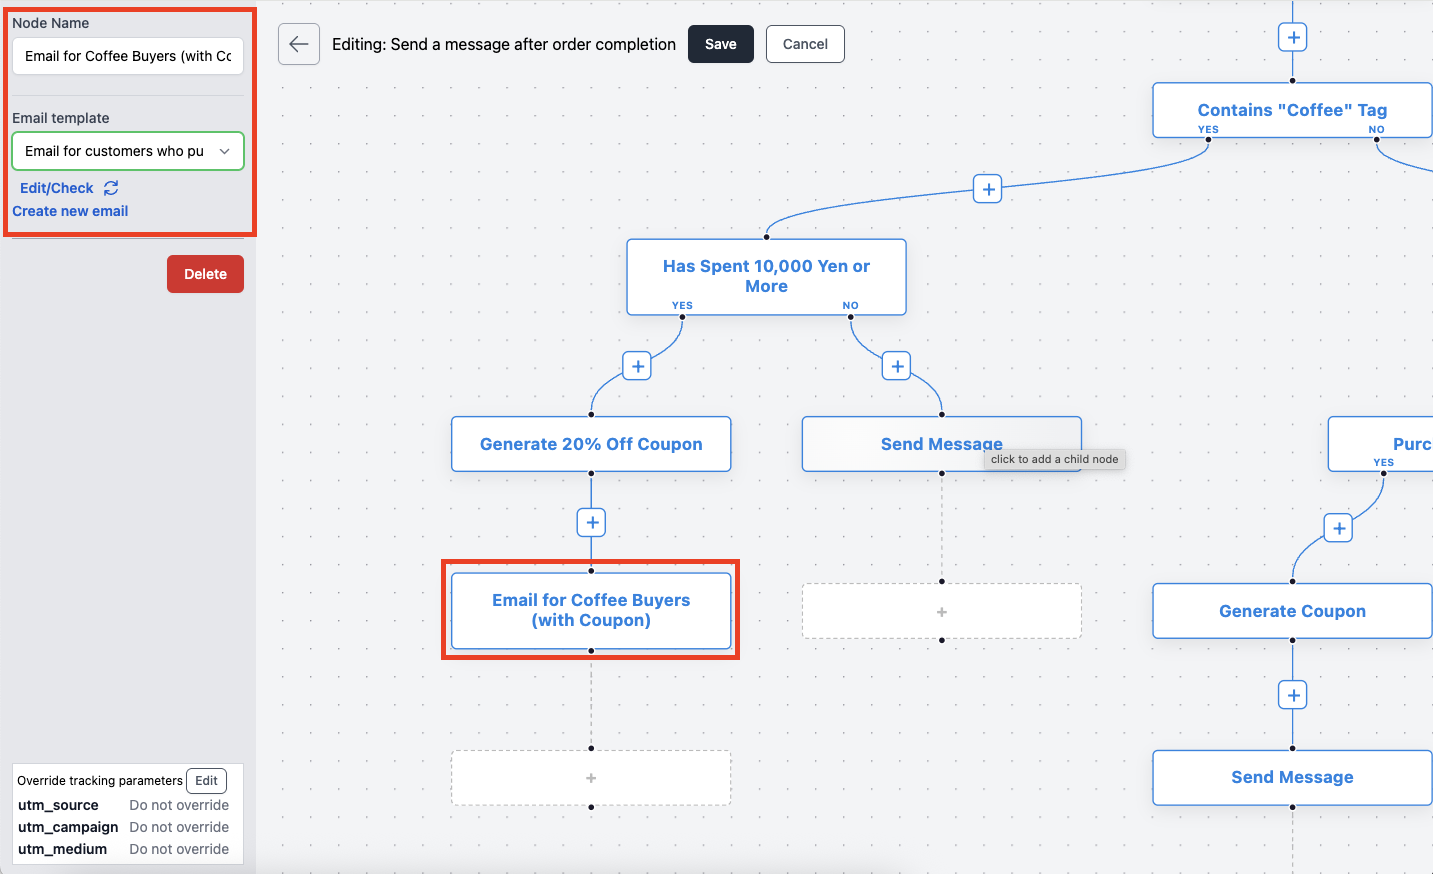
Here, select [Email for coffee product customers (without coupon)]. Be sure to rename the node accordingly.
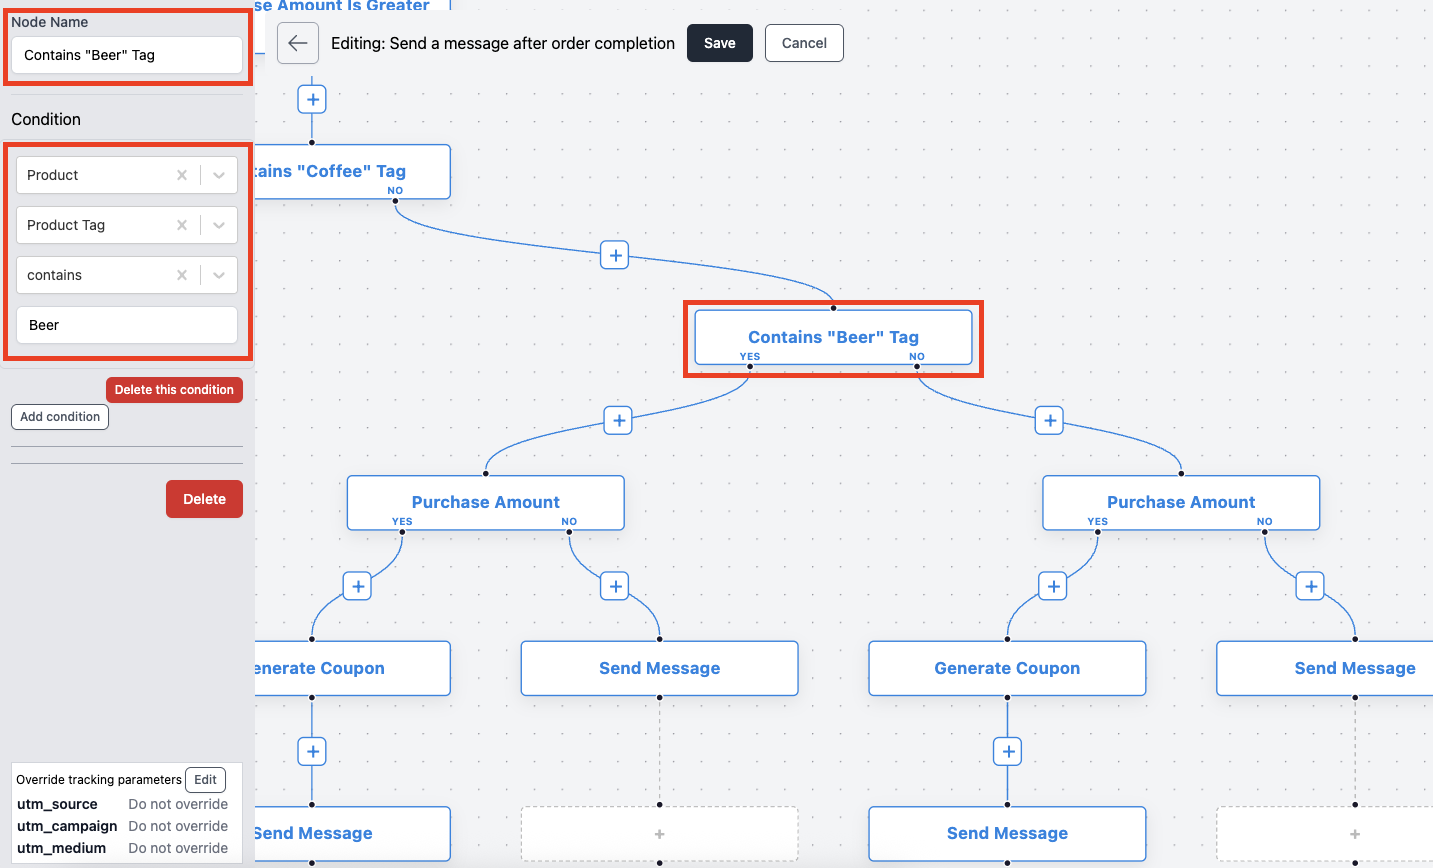
⑨Add a [Conditional Branch] node under the NO branch of the [Does the product include the coffee tag?] node.
Here, you will check whether the purchased product includes the [Beer] tag.
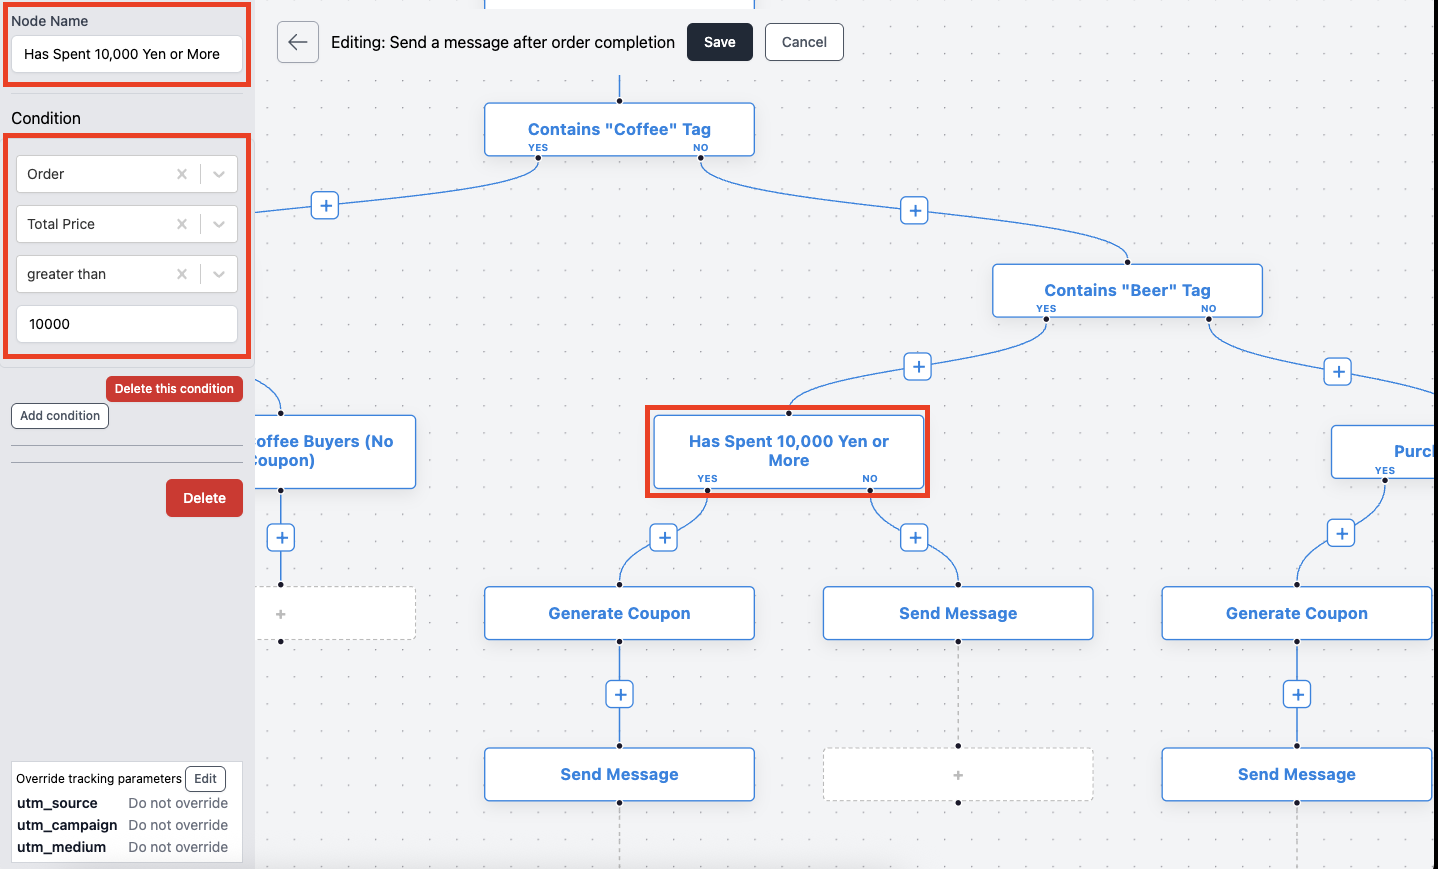
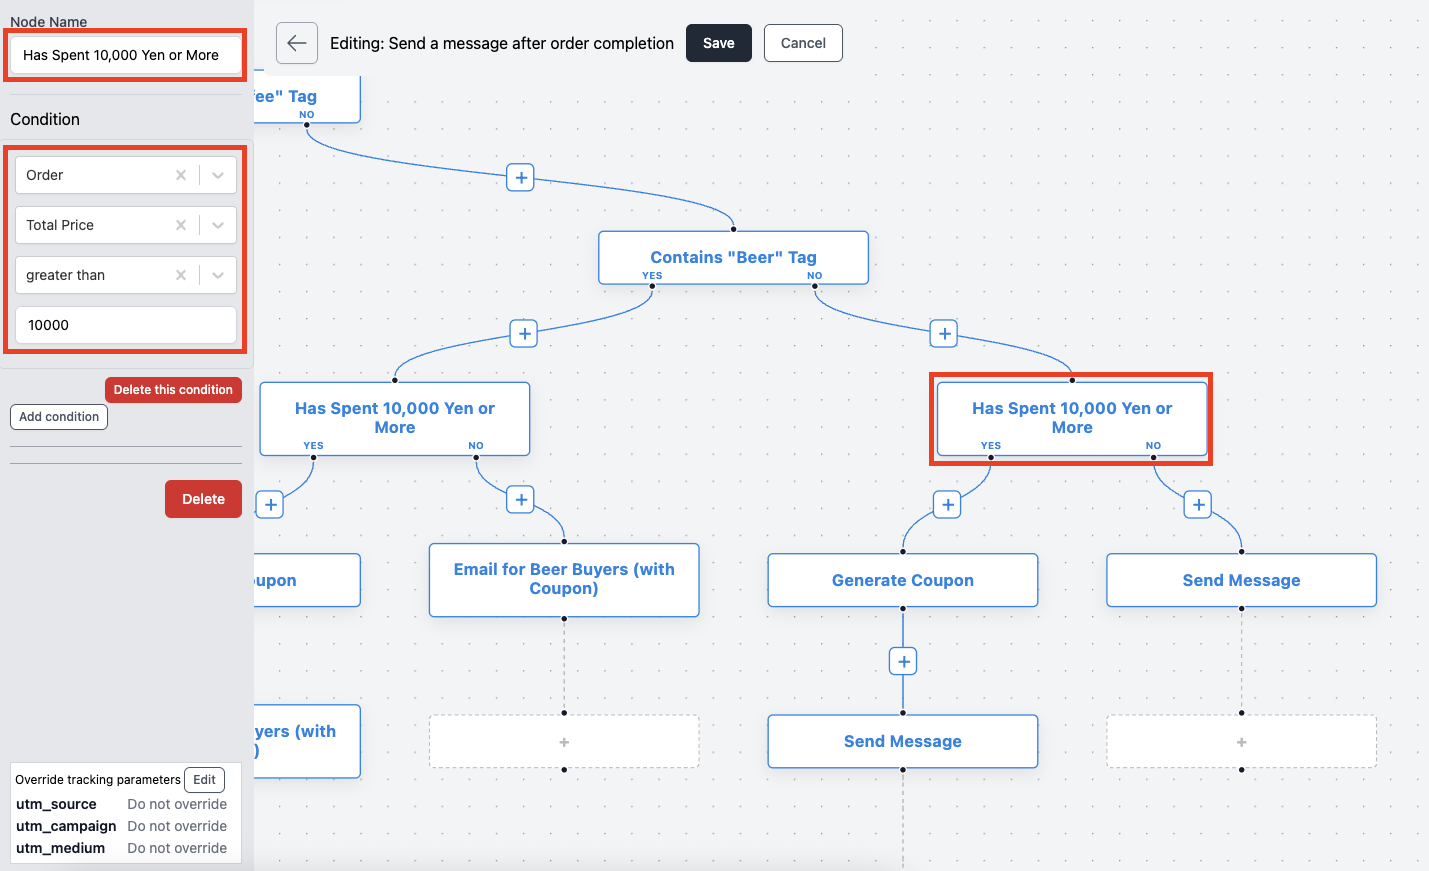
⑩ [Includes Beer Tag] Add a [Condition] node
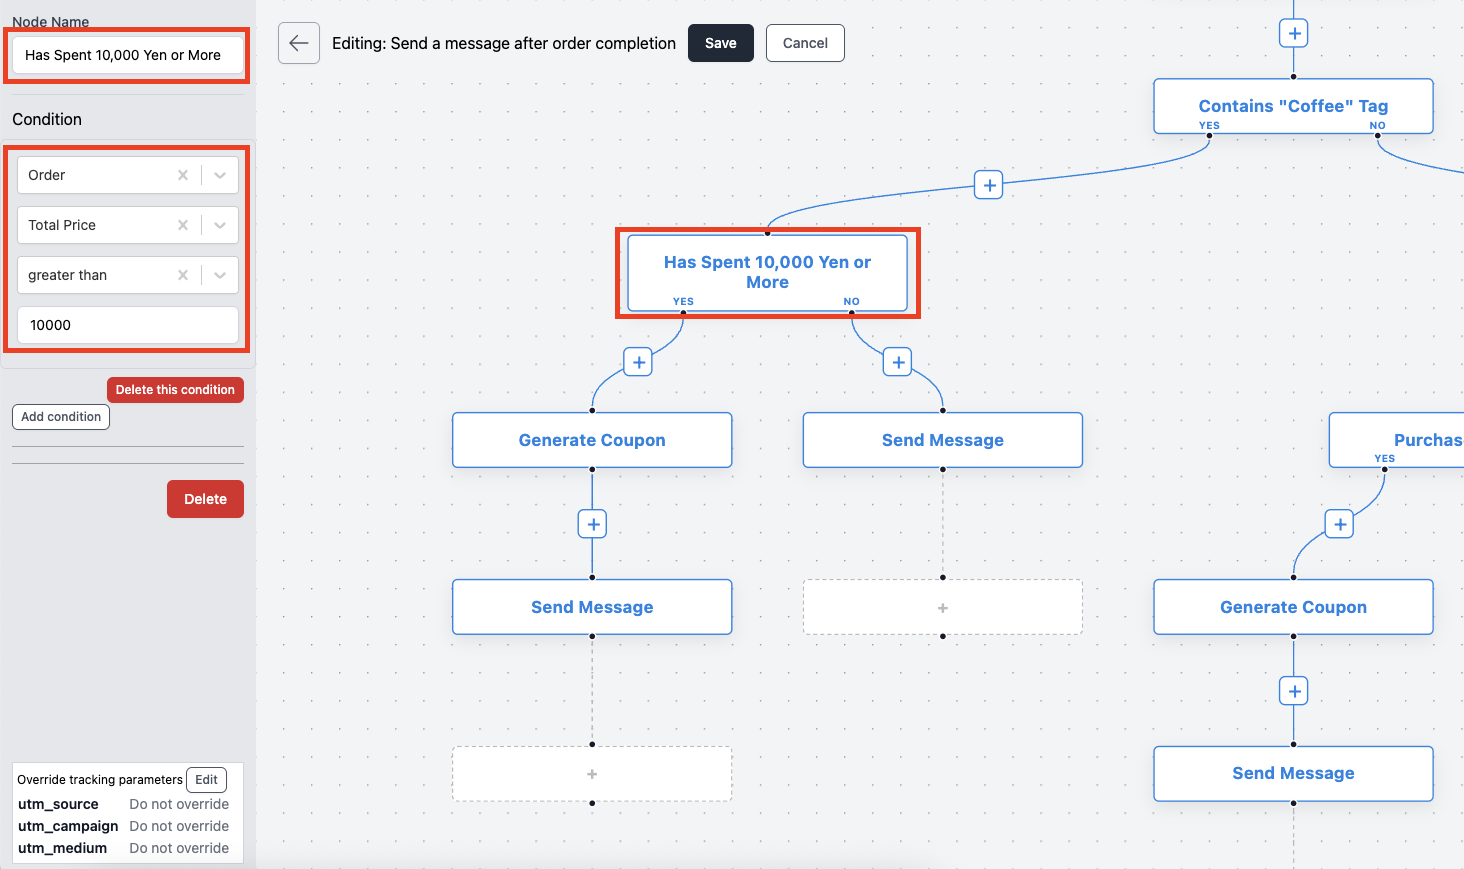
This step checks whether the total order amount is 10,000 yen or more.

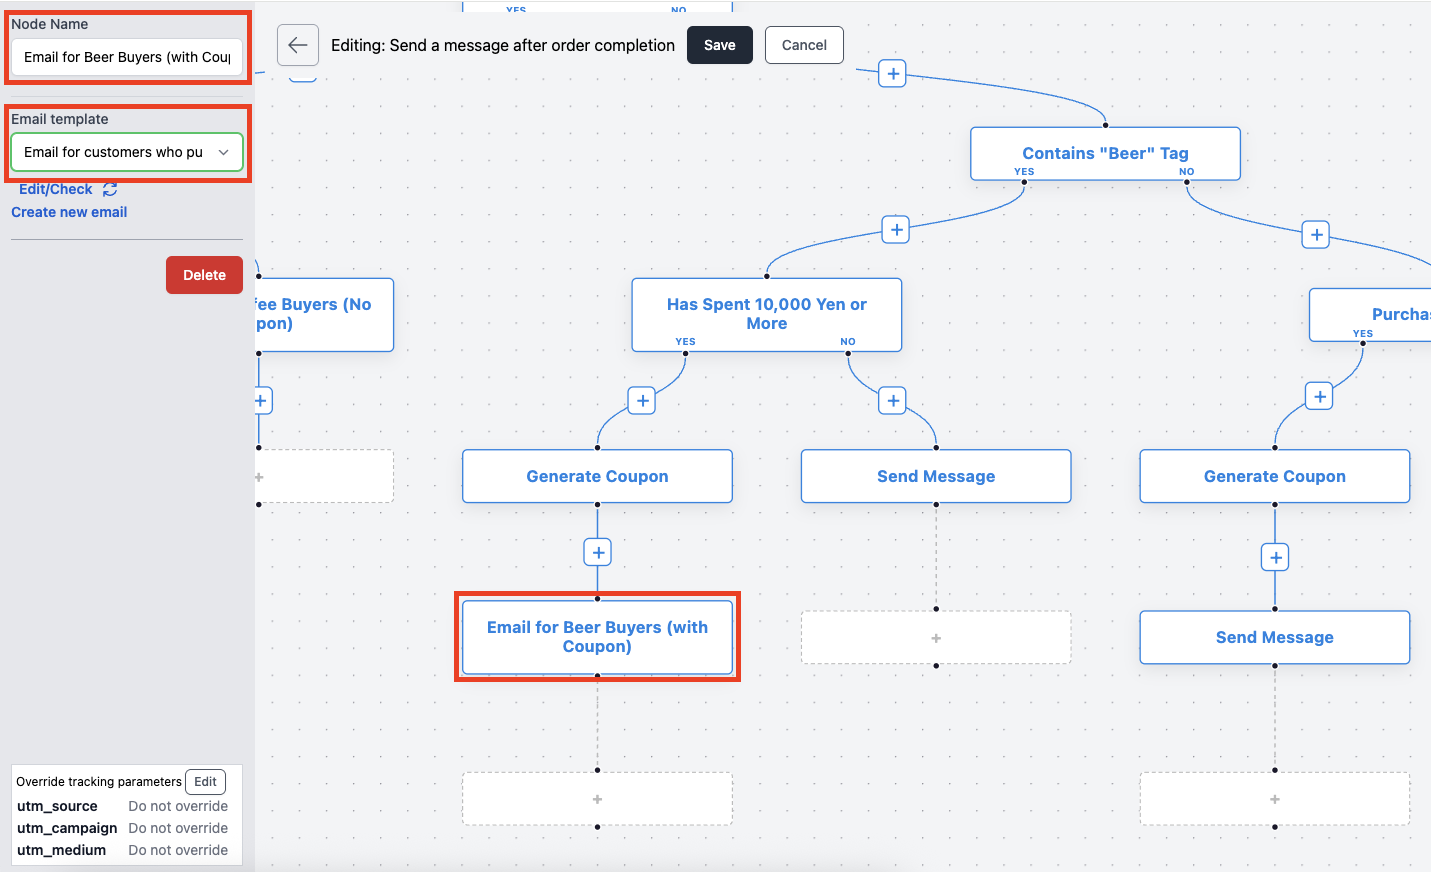
⑫ Add an [Email] node under the [Generate 20% OFF Coupon] node and select an email template.
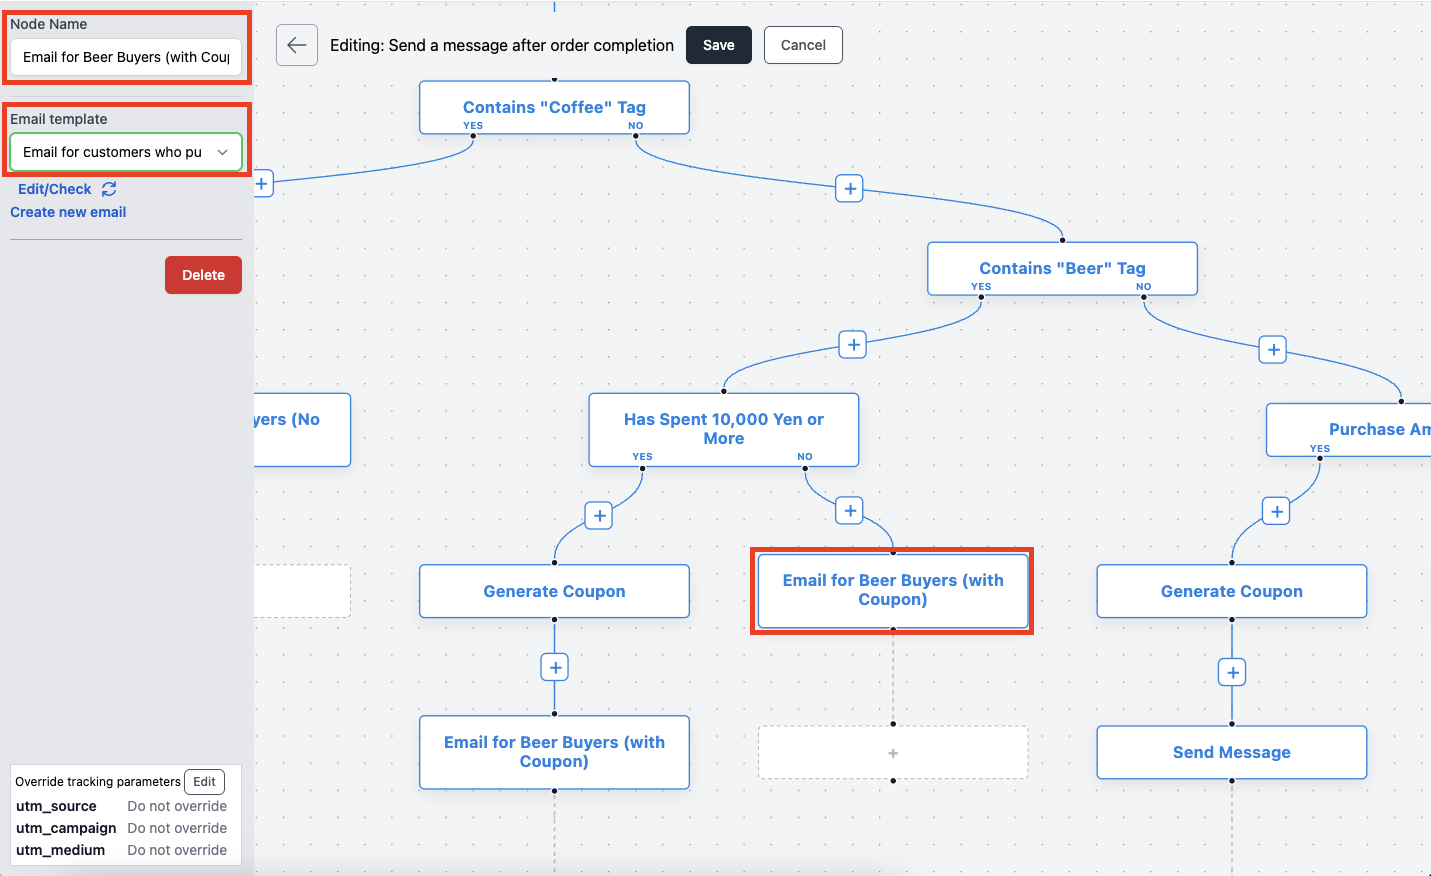
Here, select [Email for Beer Buyers (with Coupon)]. Also, make sure the node name matches accordingly.
*To apply a coupon in the email, include the string [coupon] in the body text. It will be replaced with the generated coupon code when the email is sent.
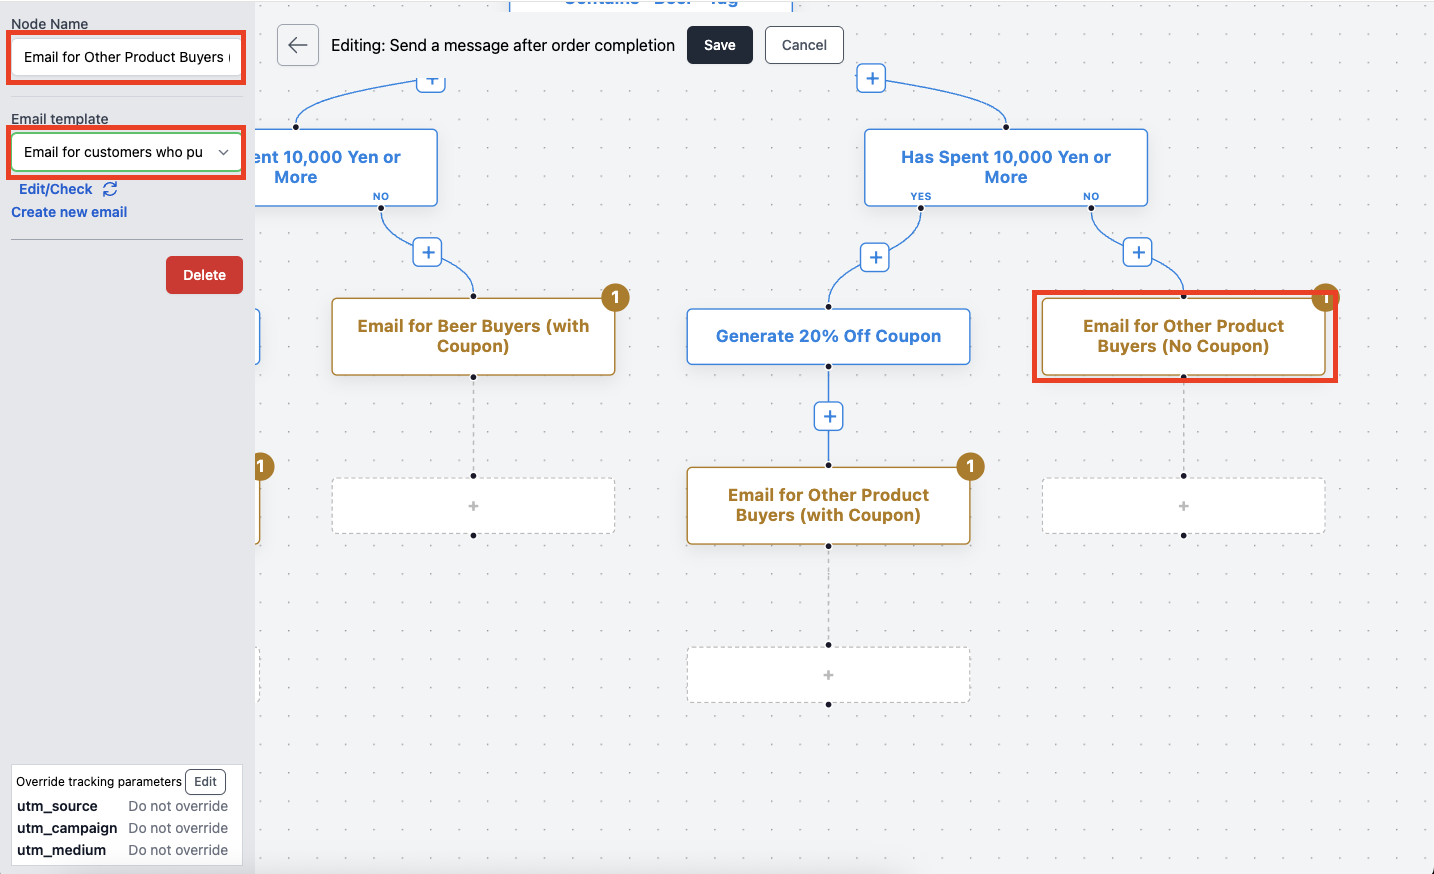
⑬Add a [Send Email] node under the NO path of the [Purchased over 10,000 yen?] node.
Here, select [Email for Beer Buyers (No Coupon)]. Also, make sure the node name is updated accordingly.
⑭ [Includes Beer Tag]Add a [Condition] node under the NO path.
This step checks whether the total order amount is 10,000 yen or more.
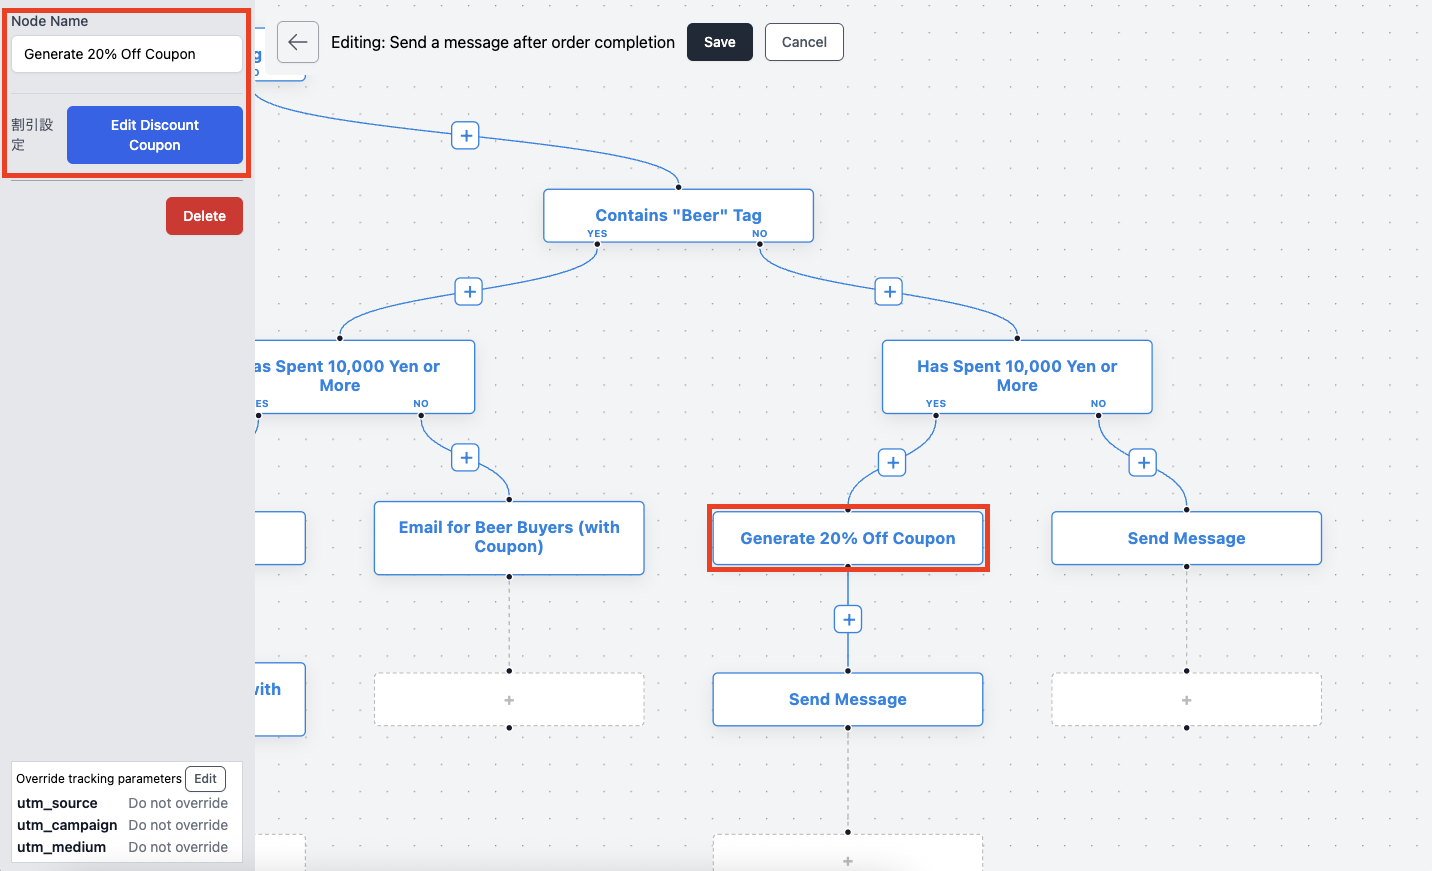
⑮ [Purchased over 10,000 yen?] Add a [Generate Coupon] node under the YES path.
This process generates a coupon to be attached to the email sent to customers who purchased over 10,000 yen.
Set the discount, expiration date, and usage conditions as needed.
Since multiple coupons will be issued in this scenario, specify a prefix to name the coupon so it is clear which customer segment it is intended for.
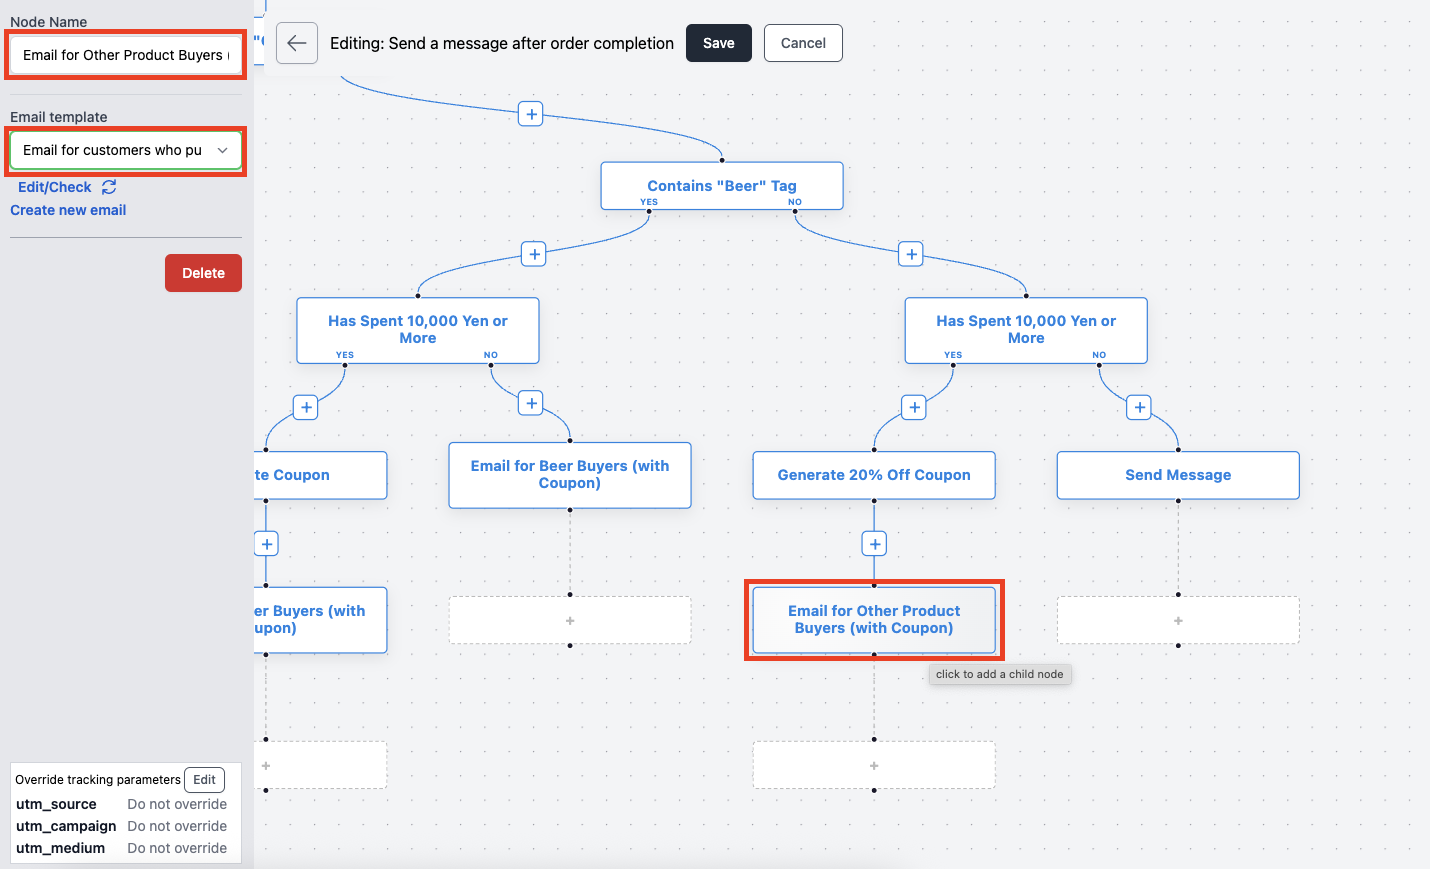
⑯ Add an [Email] node under the [Generate 20% OFF Coupon] node and select an email template.
Here, select [Email for Other Product Buyers (with Coupon)]. Also, update the node name accordingly.
*To include a coupon in the email, insert the string [coupon] in the body text. It will be automatically replaced with the generated coupon code when the email is sent.
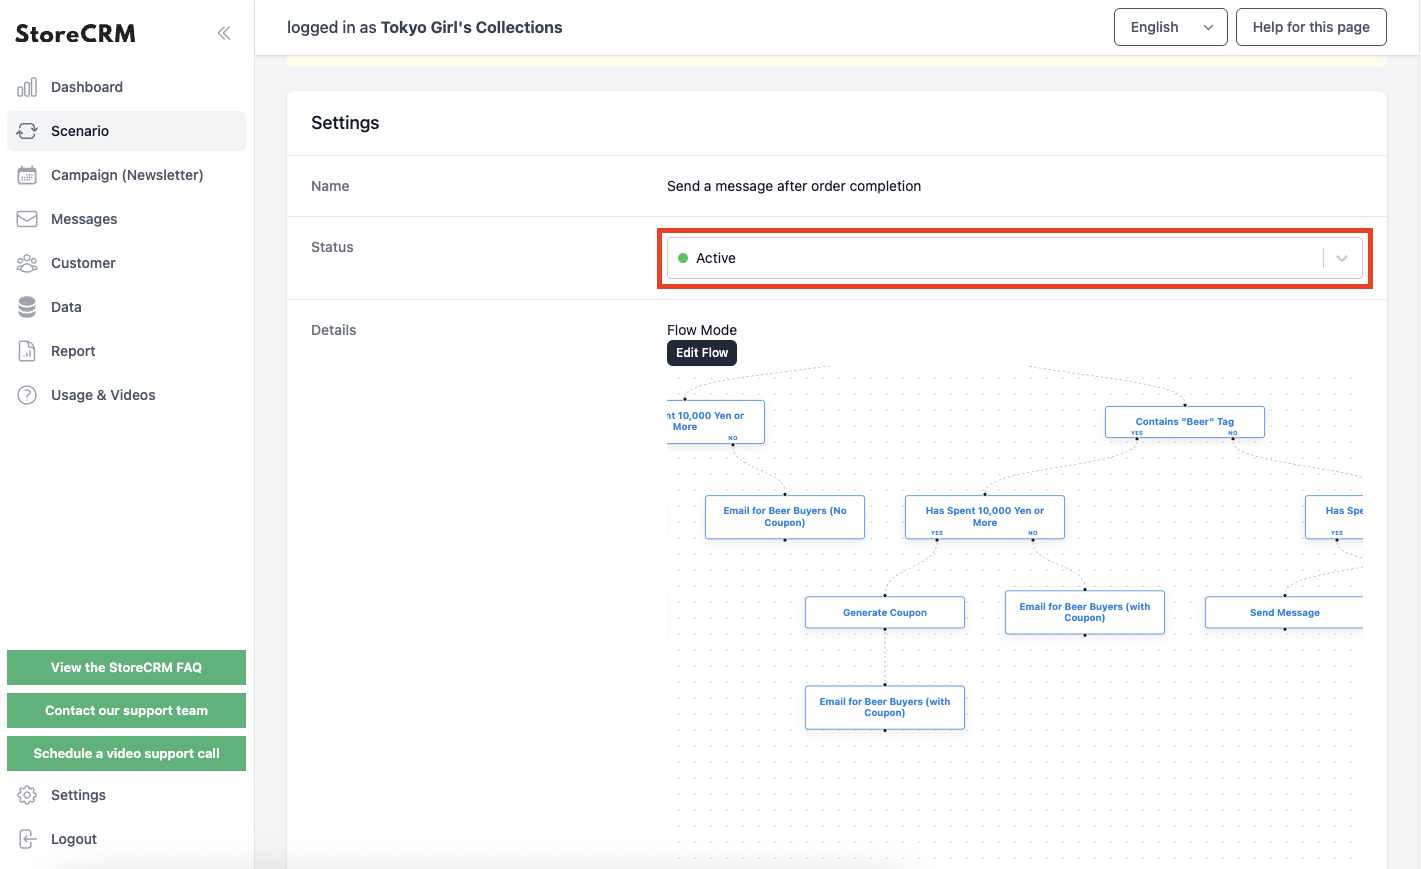
⑱ After saving the Flow Editor, click the [Settings] > [Status] dropdown on the scenario detail screen and select [Active].
This will enable email delivery based on the conditions you’ve set.
Once the scenario is activated, this step is complete.
Before activating the scenario, make sure there are no other scenarios using the same trigger that are already active. If you are using a completely different scenario structure, this will not be an issue. In particular, when activating a duplicated scenario, double-check whether the original scenario should remain active.
Summary
Even without engineering skills, you can implement advanced segmentation just by following this article — so give it a try and put it into practice.
StoreCRM also provides support for app setup and consulting services to help our clients increase their sales.
Please feel free to contact us here with any questions or inquiries.